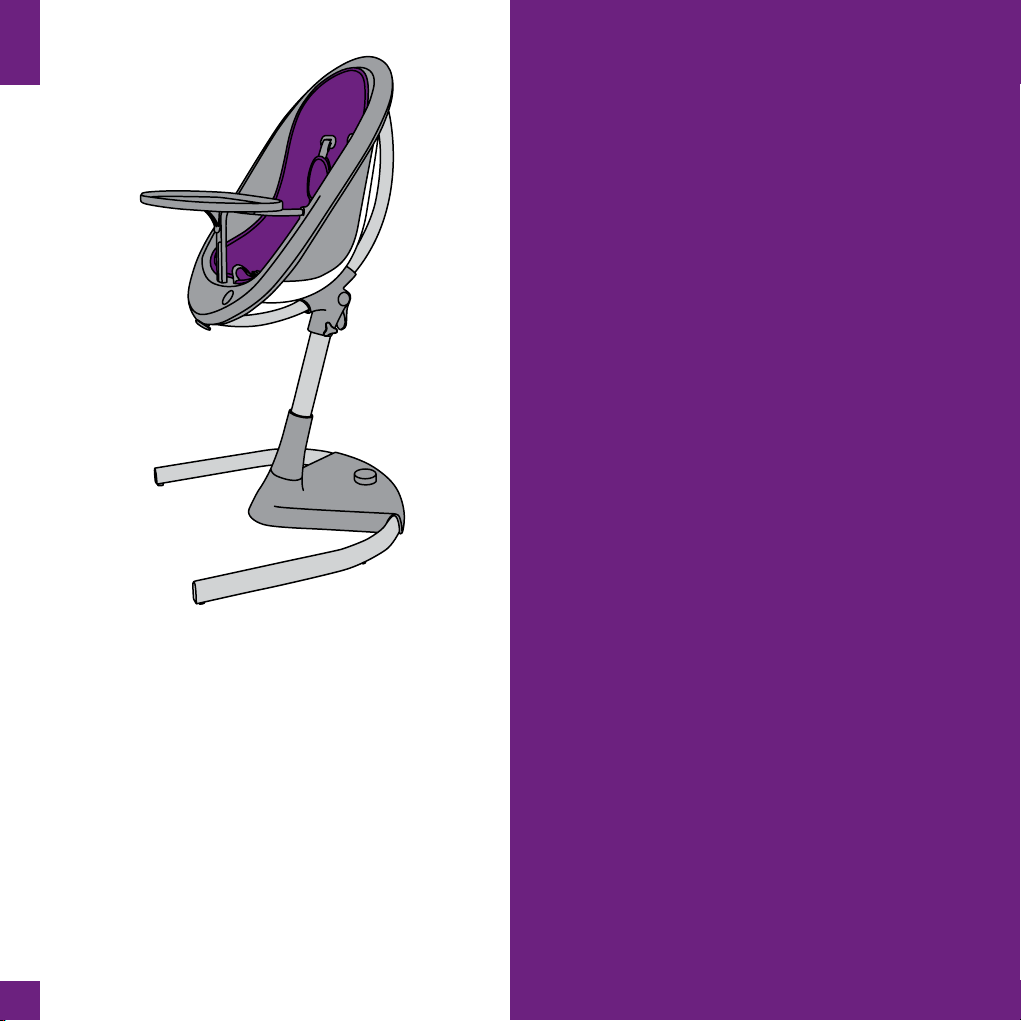
Mima moon Guide

1
®
user manual & warranty
instrucvo del usuario y garana
mode d’emploi et garane
ES
FR

2
Dear parents, grandparents and friends:
Thank you for choosing moon and making it part of your
family!
Our products are designed and developed with great care
for the safety and comfort of your child. We hope you
enjoy moon.
Please read these instrucons carefully before using the
chair for the rst me, this will ensure safe usage of the
product and enable you to nd out about all its handy
features.
mima
INDEX
WHAT YOU GET .................................................................3
PLEASE NOTE......................................................................4
FIRST STEPS........................................................................6
STAGE 1: NEWBORN LOUNGER .........................................8
NEWBORN LOUNGER MODE
SAFETY HARNESS
STAGE 2: HIGH CHAIR ........................................................9
HIGH CHAIR MODE
STAGE 3: JUNIOR CHAIR...................................................10
JUNIOR CHAIR MODE
ACCESSORIES ...................................................................10
CARE AND MAINTENANCE .............................................11
WARRANTY .....................................................................12
EN

3
WHAT YOU GET
Please make sure that you have received all the parts that are listed below. If anything is missing, please contact your
retailer.
1 base
1 pneumac cylinder
1 cylinder cover
1 junior seat
1 high chair seat
1 safety harness and 2 shoulder pads
EN
booster seat
1 safety bar
1 tray
4 screws and Allen key
1 seat cover
1 booster seat
Allen key
safety bar
screws
high chair seat
seat cover
tray
cylinder cover
safety harness
pneumac cylinder
base
junior seat
locking screw

4
PLEASE NOTE
iIMPORTANT!
Keep for future
reference
• Read these instrucons very carefully
before using the product. Failure to
follow these instrucons might put
your child’s safety at risk.
• The newborn lounger is suitable from
0 up to 6 months.
• The high chair is suitable from 6
months up to the age of 3 years. The
maximum weight allowed is 15 kg.
• The junior seat and cushions make
up the junior chair, which is suitable
for children from 3 years of age to a
maximum of 45 kg.
•
• iWARNING!
• Do not use the high chair unl the
child can sit up unaided.
• Your child’s safety is your
responsibility.
• Never leave your child unaended,
even for a short amount of me while
in the chair.
• The child should be secured in the
high chair at all mes, either in the
reclining or upright posion. The
tray is not designed to hold the child
in the chair. It is recommended that
the high chair be used in the upright
posion only by children capable of
sing upright unassisted.
• Make sure that all the users know
how the chair works.
• Do not let your child get in the high
chair on their own to play or leave
them in it unaended, even for a
short amount of me.
• This high chair is not a toy.
• Do not move the high chair around
when your child is in it.
• Do not use the high chair if it is
broken in any way or if any of its parts
are missing.
• Do not use the junior chair for
children younger than 3 years of age.
• The high chair is not designed to
sleep in for long periods of me.
• Do not use accessories or
replacement parts that are not sold
EN

5
EN
by mima.
• Do not use the high chair unless all
components are correctly ed and
adjusted.
• Be aware of the risk of open re and
other sources of strong heat, such as
electric bar res, gas res etc. in the
vicinity of the chair.
• Posion the high chair away from
solid structures and benches to avoid
injuries caused by falls and by access
to dangerous items.
• Only use this high chair on at and
stable surfaces and do not put the
high chair on any high structure or
table.
• To reduce the risk of injury, posion
the high chair away from furniture,
walls, hot surfaces and liquids,
window covering cords, and electrical
cords. Posion the high chair away
from furniture when the chair is not
being used at table with the tray
removed.
• The high chair should only be used
in an upright posion once the child
is capable of reliably and consistenly
sing upright unaided.
• When not in use, store your high chair
in a dry, well venlated area away
from direct sunlight.
• Prevent serious injury or death from
falls or sliding out. Always use the
restraint system.

6
FIRST STEPS
1. Assembling the base
Put the base of the chair on the oor and insert the
pneumac cylinder, making sure that the cut out is facing
forwards. Push the cylinder down to make sure that it ts
into place properly.
2. Assembling the cylinder cover
Place the cylinder cover over the cylinder and turn it
around twice unl it ts.
3a. Assembling the seat
First make sure the locking screw is unscrewed, then
place the seat onto the cylinder facing forward. Once the
seat is xed to the cylinder, apply strong pressure in a
downwards moon to ensure it is aached well.
3b. Locking the screw
Tighten the locking screw by turning clockwise
4. Removing the high chair seat
Press the buon at the boom front of the
seat to release it.
Li it up and out, so that just the junior chair seat
remains.
5. Assembling the safety bar
Install the safety bar on the high chair seat. First x the
screws on the sides and then the screws underneath.
2
11
3a
3b 4
5

7
6. Adjusng the safety harness
• The shoulder straps can be posioned at two dierent
heights. Choose whichever posion is closest to the
upper part of the child’s shoulders.
The harness aachments can be released from the back
of the high chair seat, by pushing the tabs together.
Push the harness aachments back in the desired
posion unl they click in place.
7. Aaching the high chair seat
Reposion the high chair seat, making sure that the pin in
the top part goes into the slot of the junior seat and press
downwards unl it clicks into place.
8. Aaching the tray to the high chair
Slide both locking mechanisms outwards and aach
to the high chair bar. Release the locking mechanisms,
ensuring the tray is stable and locked in place.
9. Seat height adjustment
Press the buon on the base of moon with your foot and
the seat will rise automacally. You may need to press
the chair down slightly to acvate the rising mechanism.
Press the buon on the base of moon with your foot and
at the same me push the seat downwards to lower it.
Lowering the seat is easier if you push down on the upper
middle part of it. Raise your foot when the seat is at the
desired height.
9
8
EN
7
“click”
6

8
STAGE 1: NEWBORN LOUNGER
NEWBORN LOUNGER MODE
• WARNING:When using moon for infants under
6 months, the seat must be used in the completely
reclined posion.
• Use the baby headrest (sold separately) so that your
baby’s head is protected and is held in the right
posion.
10. Seat recline posion adjustment
To adjust the recline posion of the seat, li the lever
located under the seat and adjust it unl the seat is
completely reclined. Once in the desired posion, lower
the lever again to secure the seat.
11. Removing the tray
Simultaneously release both locking mechanisms and li
o the tray.
SAFETY HARNESS
• WARNING:Whenever your child is in the seat, make
sure that the safety harness is nice and snug.
• The shoulder straps can be posioned at two dierent
heights. Choose whichever posion is closest to the
upper part of the child’s shoulders. See g.6.
12. Fastening the harness
Insert the strap buckles into the slots and press unl they
click. Pull the ends of the straps to adjust the harness
around the child so that it is nice and snug.
13. Unfastening the harness
Press the buon in the middle of the buckle to release the
harness.
12 13
10 11

9
STAGE 2: HIGH CHAIR
HIGH CHAIR MODE
• moon can be used from 6 months of age, when babies
can sit up straight without help, up to the age of 3.
• WARNING:Never leave your child unaended
without adult supervision. Your child’s safety is your
responsibility.
• Check that the tray is secure by shaking it.
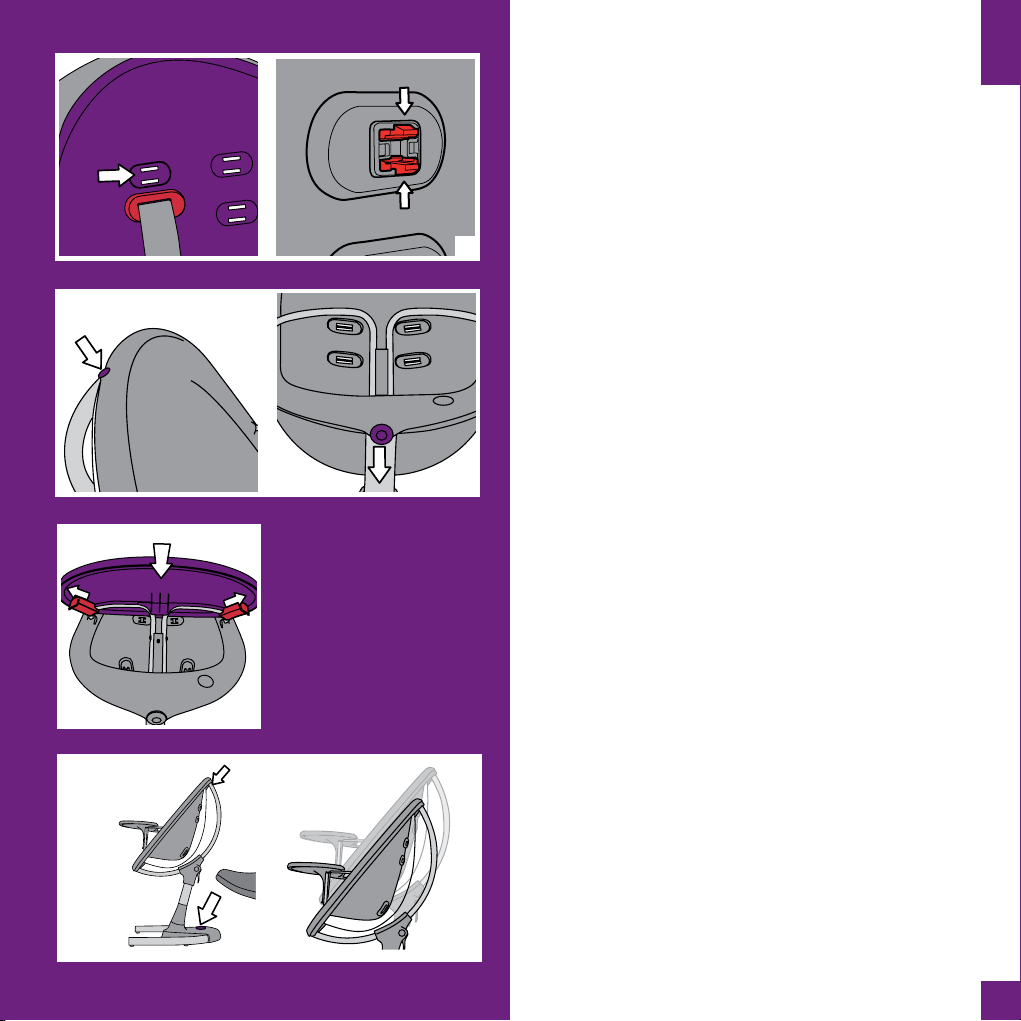
14. Seat recline posion adjustment
To adjust the reclining angle of the seat, li the lever
located under the seat and adjust it unl it is in the sing
posion. Lower the lever downwards again making sure
that it has been adjusted properly.
15. Aaching the tray to the high chair
Slide both locking mechanisms outwards and aach
to the high chair bar. Release the locking mechanisms,
ensuring the tray is stable and locked in place.
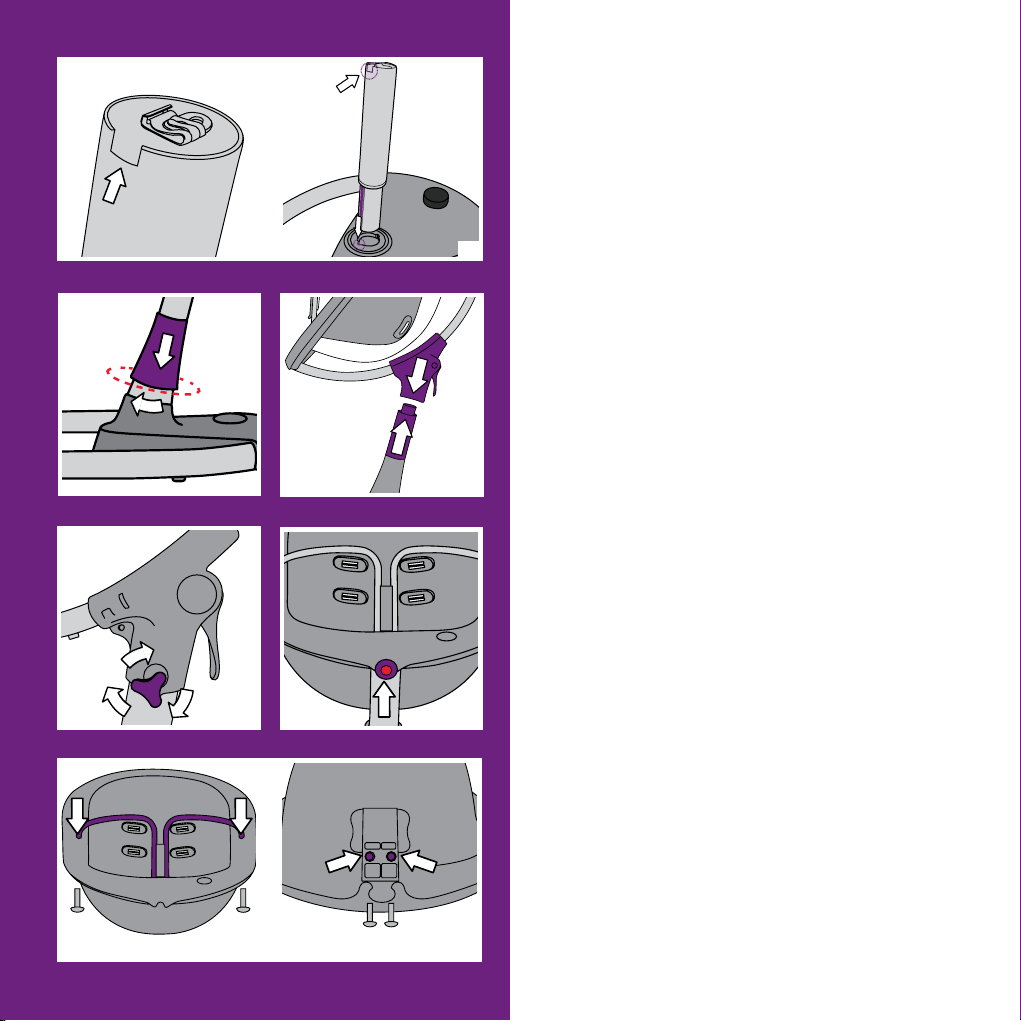
16. Seat height adjustment
Press the buon on the base of moon with your foot and
the seat will rise automacally. You may need to press the
chair down slightly to acvate the rising mechanism. Press
the buon on the base of moon with your foot and at the
same me push the seat downwards to lower it.
Lowering the seat is easier if you push down on the upper
middle part of it. Raise your foot when the seat is at the
desired height.
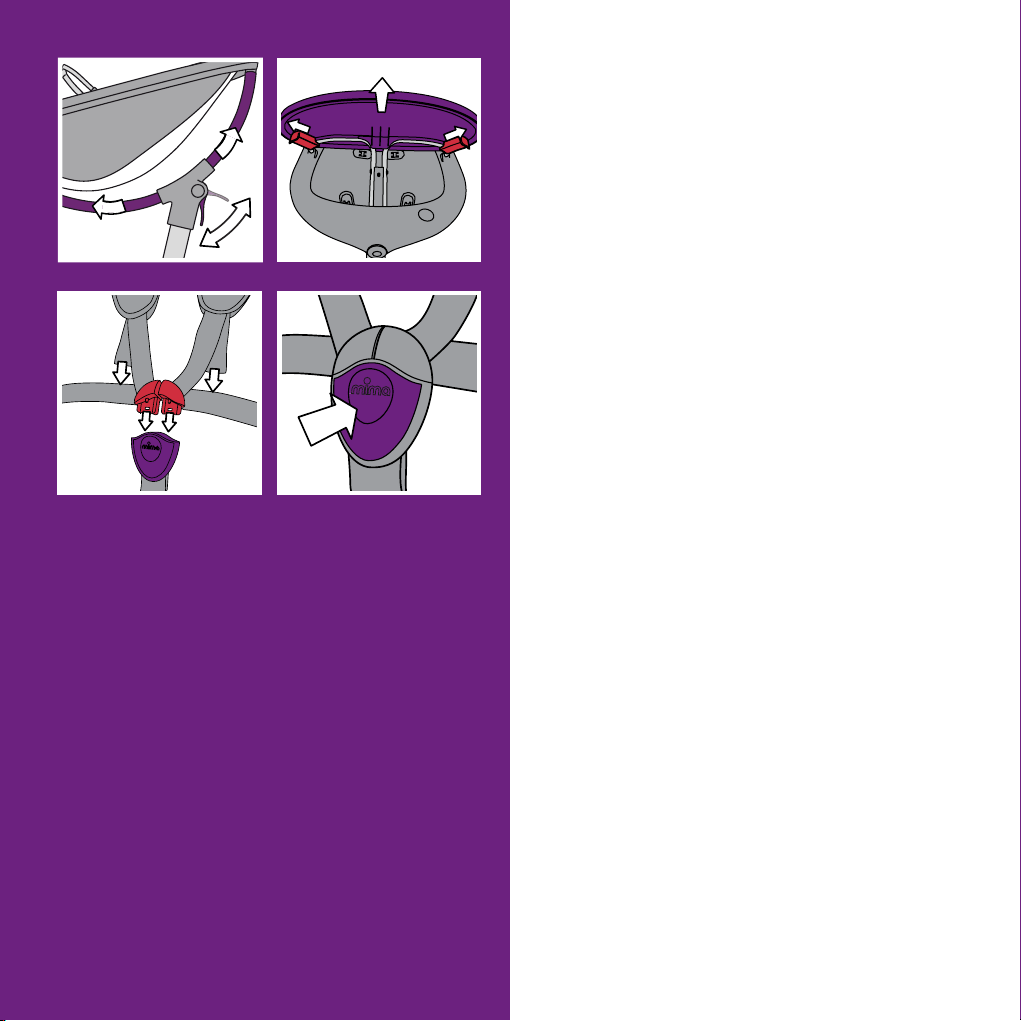
17. Fastening the harness
Insert the buckles of the straps in the slots and press unl
they click. Pull the ends of the straps to adjust the harness
around the child so that it is nice and snug.
18. Removing and reaaching booster seat
Release the harness and unthread the crotch harness
strap from the hole in the booster seat. Li o the
booster seat. To reaach, place the booster seat on the
high chair and thread the crotch harness strap through
the hole on the booster seat to secure.
19. Seat cover replacement
Remove the high chair seat (see g. 4).
Release all harness aachments from the back of the high
chair seat, by pushing the tabs together.
Replace seat cover and reaach the harness and booster
seat.
17
14
16
15
18
EN
19

10
STAGE 3: JUNIOR CHAIR
JUNIOR CHAIR MODE
• WARNING:The junior chair has been designed for
children aged 3 and over.
• The specially designed cushions should be used for the
seat and are sold separately.
• The recommended maximum weight is 45 Kg.
• The chair must be set to the lowest height.
20. Removing the high chair seat
Press the buon at the boom of the seat to release the
high chair seat. Then li and remove it.
21. Seat recline posion adjustment
Adjust the angle of the seat to the almost upright sing
posion. It is more comfortable with the cushions when it
is slightly lted and not totally upright.
22. Adding the junior chair cushions (not included) to
the seat
Place the cushions on the seat.
ACCESSORIES
We frequently develop new accessories for moon. For
more details please visit www.mimakids.com or contact
your retailer.
The following accessories are available to buy:
• Adjustable foot rest
• Junior chair cushions
• Baby headrest
20
2221

11
CARE AND MAINTENANCE
To keep the high chair in perfect condion, please bear in
mind the following:
• The fabrics and plascs used comply with the highest
heat resistance standards. Nevertheless, the plasc
could become yellowish over me. Direct exposure to
sunlight will speed up this natural process; this is not
considered to be a defect.
• To ensure that your chair and accessories last longer,
keep moon clean and do not expose it to direct sunlight
or heat sources.
• Check moon on a regular basis and make sure that the
locking devices and the other parts are kept in good
condion.
• Please contact your retailer if any of the parts need to
be repaired or changed.
• Do not use moon if any of the parts are bent, broken or
worn, unl they have been replaced.
CLEANING THE FRAME AND SEAT
• For a thorough cleaning, remove the seat cover and
safety harness.
• Clean moon and its parts, including the tray with a
damp cloth and a mild cleaning agent. Do not use
abrasive detergents or whitening products.
• The tray can NOT be washed in the dishwasher.
EN
CLEANING THE SEAT COVER
• Clean the cover with a damp cloth and a mild
detergent.
• For big stains, remove the seat cover (see g. 19)
and wash it by hand, put a small amount of neutral
detergent directly on the stain and rub it gently with
a sponge. Rinse well and leave to dry before pung it
back on the seat.
• The harness can be washed by hand. Remember to
take the shoulder pads o and then put them back on
when it has been washed and dried.
Please keep the following in mind:
- clean with a damp cloth
- do not use bleach
- do not dry in clothing dryer
- do not iron
- do not dry clean.

12
WARRANTY
REGISTER YOUR PRODUCT ONLINE AT WWW.MIMAKIDS.COM
This will acvate your warranty and help us to keep you informed about any possible product updates.
Your product complies with current safety requirements and is guaranteed to be free from any manufacturing or material
defects at the me of purchase before rst use.
If this product develops any problems through normal use during the warranty period, please contact your retailer.
WARRANTY CONDITIONS
• The warranty is valid for 24 months from the date of purchase. This warranty period cannot be extended even if the
product has to be repaired.
• For the warranty to be valid you need to:
1. Have registered your product online at www.mimakids.com.
2. Provide your retailer with the original receipt.
3. Provide your retailer with a descripon of the defect.
• The warranty only covers the original owner of the product and cannot be transferred to any subsequent owner.
• The warranty entles the owner to have the product repaired or replaced or a product refund will be granted at mima’s
sole discreon.
The warranty is not valid in the following circumstances:
• The product has been modied or repaired by a third party not authorized by mima.
• Corrosion or rust due to a lack maintenance and care.
• The defect was caused by improper use or maintenance.
• A defect was the result of an accident or damage by an airline/freight company.
• Normal wear and tear should be expected when this product is used daily.
• The fabric may become discolored or become damaged due to damaged due to washing or excessive exposure to direct
sunlight.
EN

13
Esmados padres, abuelos y amigos:
¡Gracias por elegir moon y hacer que forme parte de su
familia!
El diseño y desarrollo de nuestros productos se realizan
con gran cuidado, teniendo en cuenta la comodidad y
seguridad de su hijo. Esperamos que disfrute de moon.
Por favor, lea atentamente estas instrucciones antes
de ulizar la silla por primera vez. De este modo podrá
ulizar el producto de forma segura y conocerá todas sus
práccas caracteríscas.
mima
ÍNDICE
COMPONENTES ..............................................................15
PRESTE ATENCIÓN ..........................................................16
PRIMEROS PASOS ...........................................................17
FASE 1: CUNA ..................................................................19
CONFIGURACIÓN CUNA
ARNÉS DE SEGURIDAD
FASE 2: TRONA ................................................................20
CONFIGURACIÓN TRONA
FASE 3: SILLA JUNIOR ......................................................21
CONFIGURACIÓN SILLA JUNIOR
ACCESORIOS.....................................................................21
CUIDADO Y MANTENIMIENTO .......................................22
GARANTÍA ......................................................................23
ES

14
COMPONENTES
Compruebe si ha recibido todos los componentes indicados a connuación. Si faltase alguno, póngase en contacto con su
proveedor.
1 base
1 cilindro neumáco
1 protector de cilindro
1 asiento junior
1 asiento de trona
1 arnés de seguridad y 2
almohadillas para los hombros
barra de seguridad
cubre asiento
bandeja
protector de cilindro
arnés de seguridad
cilindro neumáco
base
asiento de trona
llave Allen
tornillos
asiento elevador
ES
1 barra de seguridad
1 bandeja
4 tornillos y 1 llave Allen
1 cubre asiento
1 asiento elevador
asiento silla junior
tornillo de cierre

15
PRESTE ATENCIÓN
i¡¡¡¡¡¡IMPORTANTE!
CONSERVE ESTE INSTRUCTIVO PARA
FUTURAS CONSULTAS
• Lea atentamente las instrucciones
antes de ulizar el producto. En caso
de no seguir estas instrucciones,
podría poner en peligro la seguridad
de su hijo.
• La cuna para bebé recién nacido es
adecuada durante los primeros 6
meses de vida.
• La trona es adecuada a parr de los
6 meses y hasta los 3 años de vida. El
peso máximo autorizado es de 15 kg.
• El asiento junior y los cojines
conforman la silla junior, que es
adecuada para niños de más de 3
años, hasta un peso máximo de 45 kg.
i¡¡¡¡¡¡ADVERTENCIAS!
• No ulice la trona hasta que el niño
pueda sentarse sin ayuda.
• La seguridad del niño es su
responsabilidad.
• Nunca deje al niño solo en la silla,
aunque sea por poco empo.
• Asegúrese de que el arnés/sistema
de retención está correctamente
ajustado cuando el niño esté en la
trona, ya sea en posición reclinada
o vercal. Es recomendable que la
trona se uliza en posición vercal
cuando el niño pueda permanecer
sentado de modo able y seguro sin
ayuda.
• Asegúrese de que todos los
usuarios están familiarizados con el
funcionamiento de la trona.
• No deje al niño jugando solo en
la trona ni lo deje en la trona
desatendido, aunque sea por poco
empo.
• La trona no es un juguete.
• No desplace la trona con el niño
dentro.
• No ulice la trona si detecta roturas o
si le falta alguna pieza.
• No ulice la silla junior si el niño es
menor de 3 años.
• La trona no está diseñada para
periodos prolongados de sueño.
ES

16
• No ulice accesorios ni piezas de
repuesto no suministrados por mima.
• No ulice la trona sin que todos los
componentes estén correctamente
instalados y ajustados.
• No ulizar la silla cerca del fuego y
otras fuentes de calor intenso, como
radiadores eléctricos, estufas de gas.
• Coloque la trona lejos de estructuras
sólidas y bancos a n de evitar
lesiones causadas por caídas y por
acceso a elementos peligrosos.
• Ulice la trona en supercies llanas
y estables. No la suba a la mesa o
cualquier otra estructura elevada.
• Para reducir el riesgo de lesiones,
evite colocar la trona junto al
mobiliario, paredes, supercies y
líquidos calientes, correas o cables
de persianas y cornas, o cables
eléctricos. Cuando la trona no se esté
ulizando en la mesa sin la bandeja,
evite colocarla cerca del mobiliario.
• La trona únicamente debe ulizarse
en posición vercal cuando el niño
pueda permanecer sentado de modo
able y seguro sin ayuda.
• Cuando no se esté ulizando, guarde
su trona en un lugar seco y bien
venlado, lejos de la luz solar directa.
• Evitar lesiones graves o muerte por
caídas o resbalones.
• Siempre ulice el arnés de seguridad.
ES

17
PRIMEROS PASOS
1. Montaje de la base
Coloque la base de la silla en el suelo y encaje el cilindro
neumáco, asegurándose de que el punto de encaje está
mirando hacia adelante. Empuje el cilindro hacia abajo
para asegurarse de que está correctamente encajado.
2. Montaje del protector del cilindro
Coloque el protector del cilindro y déle dos vueltas hasta
que esté bien encajado.
3a. Montaje del asiento
Asegúrese primero de que el tornillo de cierre está
abierto, entonces coloque el asiento dentro del cilindro
mirando hacia adelante. Una vez que el asiento está jado
al cilindro, aplique una fuerte presión hacia abajo para
asegurarse de que están unidos correctamente.
3b. Cierre del tornillo
Apriete el tornillo de cierre rmemente girándolo en el
sendo de las agujas del reloj.
4. Rerada del asiento de la trona
Presione el botón situado en la parte inferior delantera
del asiento para liberarlo. Levántelo y extraiga la trona;
quedará sólo la silla junior.
5. Montaje de la barra de seguridad
Coloque la barra de seguridad en el asiento de la trona.
Fije primero los tornillos laterales y luego los de debajo.
ES
3a
2
11
3b 4
5

18
6. Ajustar arnés de seguridad
• Las correas para los hombros pueden posicionarse en
dos alturas diferentes. Elija la posición más próxima a
la parte superior de los hombros del niño.
Las sujeciónes del arnés pueden ser liberados de la parte
posterior del asiento trona, presionando las lengüetas
entre si.
Vuelva a insertar y empuje las sujeciónes del arnés
en la posición deseada hasta que encajen en su lugar
perfectamente.
7. Colocación del asiento trona
Vuelva a colocar el asiento trona asegurándose que el
pasador en la parte superior se inserta en la ranura del
asiento junior y presione hacia abajo hasta que encaje en
su lugar y haga clic.
8. Colocación de la bandeja en la trona
Deslice los mecanismos de bloqueo y asegúrelos a la
barra de la trona. Suelte los mecanismos de bloqueo,
asegurándose de que la bandeja sea estable y esté jada
en su sio.
9. Ajuste de la altura del asiento
Pulse con el pie el botón de la base de moon y el asiento
se elevará automácamente. Es posible que tenga que
presionar ligeramente la silla hacia abajo para acvar el
mecanismo de elevación. Para bajar el asiento, pulse con
el pie el botón de la base de moon y empuje el asiento
hacia abajo. Le resultará más fácil si lo empuja desde el
centro de la parte superior del asiento. Levante el pie
cuando el asiento esté a la altura deseada.
9
8
7
“click”
6

19
FASE 1: CUNA
CONFIGURACIÓN CUNA
• ADVERTENCIA:Cuando ulice moon con niños
menores de 6 meses, el asiento debe ulizarse en una
posición completamente reclinada.
• Ulice el cojin reductor (se vende por separado) para
que la cabeza del niño esté protegida y se sostenga en
la posición adecuada.
10. Ajuste del ángulo de reclinación del asiento
Para ajustar el ángulo de reclinación, levante la palanca
situada bajo el asiento y colóquelo completamente
reclinado. Una vez en la posición deseada, vuelva a bajar
la palanca para asegurar el asiento.
11. Rerada de la bandeja
Simultáneamente, libere ambos mecanismos de bloqueo
y rere la bandeja.
ARNÉS DE SEGURIDAD
• ADVERTENCIA:Siempre que el niño esté en el
asiento, asegúrese de que el arnés de seguridad esté
ajustado correctamente.
• Las correas para los hombros pueden posicionarse en
dos alturas diferentes. Elija la posición más próxima a
la parte superior de los hombros del niño. Consulta la
g. 6.
10. Abrochado del arnés
Introduzca las hebillas de las correas en las ranuras y
presione hasta que oiga un “clic”. Tire de los extremos
de las correas para ajustar el arnés de modo seguro y
cómodo alrededor del niño.
11. Desabrochado del arnés
Presione el botón central de la hebilla para soltar el arnés.
ES
9
10 11
10 11

20
FASE 2: TRONA
CONFIGURACIÓN TRONA
• moon puede ulizarse a parr de los 6 meses, cuando
los niños puedan sentarse sin ayuda, y hasta los 3
años.
• ADVERTENCIA:Nunca deje al niño sin la
supervisión de un adulto. La seguridad del niño es su
responsabilidad.
• Compruebe que la bandeja está correctamente
asegurada, tratando de moverla.
14. Ajuste ángulo reclinación del asiento
Para ajustar el ángulo de reclinación, levante la palanca
situada bajo el asiento y colóquelo en la posición sentada.
Vuelva a bajar la palanca asegurándose de que el asiento
esté correctamente asegurado.
15. Colocación de la bandeja en la trona
Deslice los mecanismos de bloqueo y asegúrelos a la
barra de la trona. Fije los mecanismos de bloqueo,
asegurándose de que la bandeja sea estable y esté jada
en su sio.
16. Ajuste de la altura del asiento
Pulse con el pie el botón de la base de moon y el asiento
se elevará automácamente. Para bajar el asiento, pulse
con el pie el botón de la base de moon y empuje el
asiento hacia abajo. Le resultará más fácil si lo empuja
desde el desde el centro de la parte superior del asiento.
Levante el pie cuando el asiento esté a la altura deseada.
17. Abrochado del arnés
Introduzca las hebillas de las correas en las ranuras y
presione hasta que oiga un “clic”. Tire de los extremos
de las correas para ajustar el arnés de modo seguro y
cómodo alrededor del niño.
18. Rerada y colocación del asiento elevador
Desabroche el arnés y extraiga la correa de la entrepierna
del oricio del asiento elevador para poder rerarlo.
Para volver a colocar el asiento elevador, colóquelo sobre
la trona y, para mayor seguridad, pase la correa de la
entrepierna por el oricio del asiento elevador.
19. Sustución del cubre asiento
Rerar el asiento de la trona (consulta la g. 4).
Suelte las sujeciónes del arnés de la parte posterior del
asiento trona, presionando las lengüetas entre si.
Sustuye el cubre asiento y vuelva a colocar el arnés y el
asiento elevador.
17
14
16
15
18
19
Other manuals for moon
3
Table of contents
Languages:
Other Mima High Chair manuals
Popular High Chair manuals by other brands

VEVOR
VEVOR LPK877-1 user manual

Steelcraft
Steelcraft Ryder instruction manual

Baby Trend
Baby Trend Sit Right 2.0 HC02 A Series instruction manual

Baby Trend
Baby Trend Mylift instruction manual

Baby Trend
Baby Trend muv HC57 Series instruction manual

Duo Collection
Duo Collection PRINCETON I Assembly instructions