Mindfield MindLights User manual

www.mindfield.de
MANUAL
INSTRUCTIONS FOR INSTALLATION AND USE
· SOFTWARE · AUDIO-VISUAL STIMULATION

2 3
Welcome / Introduction
Congratulations on the purchase of your own MindLights®. You now hold a high-qua-
lity, hand-made, »high-end« product for enhancing your wellbeing. Worldwide, there
is no counterpart for this product. We, the Mindfield®Biosystems Ltd. have our roots
in the development of audio-visual devices for stimulation and we can prove our long-
standing experience in this field. The MindLights®implement the current standards
of technology which are linked to many direct demands of our customers, who have
contributed a lot of ideas during the development of this product.
The MindLights®represent a device for audio-visual stimulation, also labeled »Mind
Machine», »AVS«, or »audio-visual Entrainment«. These instruments are a modern and
very effective way to induce relaxation, peace of mind, stress reduction, and an overall
balance for the user. This has a positive outcome for your daily routine and wellbeing. To
an increasing degree these devices are also applied during treatment of health issues.
During the last years we have seen progress in scientific research regarding audio-visual
stimulation. Many positive effects on a broad scale of diseases, such as tinnitus, AD(H)
D, chronic stress, burn-out, depression and migraine have been proven. The chapter
»Research« (p. 46) includes further information on this subject. In addition, you can find
publicly available papers on our website www.mindfield.de
The MindLights®provide you with all the advantages of this technology: The inexperi-
enced user will find it easy to get used to the subject and reach his goals. The sophis-
ticated user will find a maximum of flexibility. The possibilities of individually adjusting
the MindLights®to your demands are greater than for any other product. This provides
you with the maximal benefits so you can achieve results in the shortest amount of time.
This manual elaborates in detail on all functions of the MindLights®and the annexed
software for your PC which controls the device. Scope of delivery includes a poster
which briefly explains the most important parts, so you can start right away.
Have fun with this individual and high-quality product, »Made in Germany«.
1 Huang et. al, 2008: A Comprehensive Review Of The Psychological Effects Of Brainwave Entrainment
2 Thomas Budzynski, Ph. D.: The Clinical Guide to Sound and Light
Please read this manual thoroughly upon utilization of the MindLights®!
Also pay close attention to the safety advices on page 8!
!

4 5
Scope of Delivery
• MindLights®USB-stick incl. software, driver unit & manual (PDF)
• MindLights®LED-mask
• MindLights®headphones
• MindLights®manual
• MindLights®cleaning tissue
• MindLights®suitcase
Areas of Application for the MindLights®
The MindLights®are a product for the benefits of your health and the promotion of
your well-being.
The current state of experience allows for the following range of applications (this state-
ment is not exhaustive).
Mental Fitness and Vitality
• Increase in powers of concentration, comprehension and memory
• Overcoming tiredness and states of exhaustion
Relaxation and Stress Management
• Procuring states of deep relaxation
• Elevation of stress-resistance
Meditation, Mental Training, Trance and Hypnosis
• Procure meditative, trance-like states of consciousness
• Hypnagogic experience of images and imaginary journeys
• Promotion of creativity and brainstorming ability
• Utilization of hypnagogic state for autosuggestion / affirmation
Sleep
• Overcoming problems of falling asleep and insomnia
• Procuring a healthy and recreative sleep
Research on audio-visual stimulation
Extensive scientific studies have been performed to investigate the effects of audio-
visual stimulation.
Studies using electroencephalography (EEG) data have shown changes in the brain’s
electrical activity caused be the auditive and visual stimuli1,2. Furthermore, clinical stu-
dies have shown improvements in the field of stress and anxiety problems, pain re-
duction, and positive effects on concentration disorders and behavioral abnormalities3.
An investigation concerning migraine and tension headache resulted in a reduction of
pain intensity in 49 of 50 patients, and migraine disappeared completely in 36 patients4.
The university of Hamburg has years of experience in the treatment of tinnitus patients
with audiovisual stimulation. The stimulation patterns for tinnitus treatment used in the
MindLights(r) Software are provided by professor Dr. Dipl.-Psych. S. Tönnies.
Further information on studies and publications is available on our website
www.mindfield.de
1 Collura, T.F. (2001). Application of repetitive visual stimulation to EEG neurofeedback protocols. Journal of
Neurotherapy, 6(1), 47-70.
2 Frederick, J.A., Timmerman, D.L., Russell, H.L., & Lubr, J.F. (2004) EEG coherence effects of audio-visual stimula-
tion (AVE) at dominant and twice dominant alpha frequency Journal of Neurotherapy, 8(4), 25-42.
3 Huang, T.L., & Charyton, C. (2008) A comprehensive review of the psychological effects of brainwave entrain-
ment. Alternative Therapies in Health and Medicine, 14(5).
4 Anderson, D. (1989) The treatment of migraine with variable frequency photic stimulation. Headache, 29, 154-
155.
5 S. Tönnies (2006) Entspannung für Tinnitusbetroffene durch Photostimulation. HNO 2006 · 54:481–486.

6 7
Table of Contents
Welcome / Introduction .............................................................................. 3
Research .................................................................................................... 4
Scope of Delivery / Areas of Application...................................................... 5
Table of Contents ....................................................................................... 6/7
1. Safety Instructions ......................................................................................... 8
1.1 Technical Data ...................................................................................... 9
1.2 Maintenance and Reparation ............................................................... 9
1.3 Cleaning ............................................................................................... 9
1.4 Disposal ............................................................................................... 9
2. Installation / Setting-up Operation ................................................................. 10
2.1 Software- and Driver unit Installation of the Mindlights®..................... 11
2.2 Configurating the soundcard of the Mindlights®.................................. 12/13
2.3 Software Updates Mindlights®............................................................. 13
3. Handling the Mindlights®.............................................................................. 14
4. Automatic Generation of a Session ................................................................ 15
Step 1: Choosing a Topic ............................................................................ 15
Step 2: Choosing the Background Music .................................................... 16
Step 3: Choosing the Duration of a Session ................................................ 17
Step 4: Setting Up the Mindlights®............................................................ 17
Step 5: Adjusting Parameters ..................................................................... 18
Step 6: Choosing the Light Stimulation ...................................................... 18
Step 7: Choosing the Color Variation .......................................................... 19
Step 8: Choosing the Frequency Variation .................................................. 20
Step 9: Phase Variation .............................................................................. 21
Step 10: Acoustic Variation ........................................................................ 22
Step 11: Noise ........................................................................................... 23
Step 12: Respiratory Support ...................................................................... 24
Step 13: Checking the Settings ................................................................... 24
Step 14: Final Adjustments of Luminance and Volume ................................ 25
Step 15: Start Playback of the Session ........................................................ 25
5. Manual Generation of a Session .................................................................... 26
5.1.1 Session ............................................................................................. 27
5.1.2 Playback / Information ...................................................................... 28
5.1.3 Music ................................................................................................ 29
5.1.4 Master Control / Other Program Buttons ........................................... 30
5.1.5 Editor function .................................................................................. 31
5.2 Placing / Editing of Frequency Markers ................................................. 32
5.2.1 Time and Frequency .......................................................................... 32
5.2.2 Primary / Secondary Color ................................................................. 32
5.2.3 Deleting Frequency Markers .............................................................. 33
5.2.4 Copying a Color Selection .................................................................. 33
5.2.5 Preview Function ............................................................................... 33
5.3 Editing Transitions ................................................................................ 34
5.3.1 Visual Transition / Copyfunction ......................................................... 34
5.3.2 Function / Waveforms ........................................................................ 35
5.3.3 Symmetry .......................................................................................... 35
5.3.4 Phase ................................................................................................ 35
5.3.5 Acoustic Transition ............................................................................ 36
5.3.6 Background Noise and Breathing Patterns ......................................... 37
5.4 Adjusting and Cloning of Frequency Markers........................................ 38
5.5 Fast Forwarding during a Session ......................................................... 39
5.6 Manipulating a Session during Playback .............................................. 39
5.7 Extended editing mode ........................................................................ 39
6. Information on Wave Frequency Areas ........................................................... 40/41
7. Loading an Existing Session ........................................................................... 42
Details for Advanced Users ........................................................................ 43
8. Brief Description Button-Functions ................................................................. 44/45
Software version changes / Contact ........................................................... 46/47

8 9
1. Safety Instructions for the MindLights®
If you suffer from epilepsy or there are people in your family who do, you should only
use the Mindlights®after having consultated your physician. Disregarding this advice
can cause an epileptic seizure.
As a basic guideline, always abort a session immediately, should any sort of indisposi-
tion occur. Some people react sensitively to quick visual amenities (photosensitivity). If
you fall into this group of people then please use the Mindlights®with special caution.
When you watch TV or play videogames and the rapid change of the images on screen
cause you to experience illness or dizziness, the Mindlights®may also have these effects
on you.
Furthermore, Application of the Mindlights®is contraindicated:
• during treatment with medication such as antipsychotic drugs (e.g. antidepres-
sants, neuroleptic drugs,...) or mind-altering drugs
• in the case of alcohol abuse
• if disorders of the central nervous system can’t be excluded
Please make sure that the USB and earphone cables are not strained or flexed. Also, do
not place any sharp items on the cables.
Do not bend the Mindlights®nor apply pressure on the casing. Please treat the Mind-
lights®with care. Do not expose the Mindlights®to any kind of strong vibration or
shock.
Please make sure that no liquid reaches the inside of the Mindlights®LED-mask or the
PC. Don’t store any liquids (e.g. drinking glass) near the devices.
Never open the casing of the Mindlights®. In case of a problem please contact the
support of Mindfield Biosystems Ltd. The contact data can be found at the end of this
manual.
When you have read all the safety instructions you are ready for your first session with
the Mindlights®.
Please consider the following safety instructions upon operating the
Mindlights®!
!
Women during pregnancy should only use the Mindlights®and other devices for
audio-visual stimulation, after having consultated their physicians.
!
1.1 Technical Data of the Mindfield® Mindlights®
• 4 Multicolor LEDs, 2 for each eye
• Stereo sound over earphone connection
• Continuous and latency free triggering of the LEDs with multichannel soundchip
modulation
• Operating voltage 5 Volt at the USB connection of a PC
• Current drain approx. 150mA
1.2 Maintenance and Reparation
The Mindlights®are basically maintenance-free. The LED-lights have an average du-
rability of many thousand hours. Every unit of the MindLights®is tested thoroughly
before delivery.
Small differences in the features of color and luminance between the LED-lights are
contingent to production and do not need to be repaired. Please contact us immediately
though, should the deviation increase with time, or if individual colors are not properly
displayed.
We do not take any responsibility for improper application.
1.3 Cleaning
We recommend the regular cleaning of the Mindlights®, especially when they are used
by different users. Please use the delivered cleaning cloth or a glasses cloth. Be sure
to clean only the smooth surfaces and do not let and liquid reach the covers or the
splices.
Disconnect the Mindlights®from your PC before cleaning them and also disconnect the
earphones.
1.4 Disposal
The Mindlights®are labeled electronic waste regarding disposal. Therefore they are not
to be disposed of with normal household waste but have to be brought to a recycling
depot. Before you dispose of Mindlights®which have been in direct contact to users,
you have to make sure that the material is not contaminated. When in doubt please
clean and disinfect the material before disposing of it.

10 11
2. Installation / Setting-up Operation
A computer is absolutely necessary for operating the Mindlights®. This can be in the a
stationary personal computer, or as often preferred, a laptop or netbook. The following
system settings are required:
• System Software: Windows XP, Vista or 7, in 32bit and 64bit
or Apple Mac OS X 10.5 (Leopard), 10.6 (Snow Leopard) or 10.7 (Lion)
• Minimally Intel Atom Processor with 1,2 Ghz or comparable
• Minimally 1024MB working memory
• Minimally 500MB free workspace on HD (e.g. for music and sessions)
• A Screen with a resolution of at least 1024x600 pixels
• Two (!) free USB-ports (min. USB-1.1)
For the application with laptops, we recommend using a power supply unit, since the
laptop battery will quickly run low due to the power drain of the Mindlights®over the
USB-port. Furthermore, application via battery may fail to supply 5 Volts on the USB
port constantly, which can cause problems.
2.1 Software- and Driver unit Installation of the Mindlights®
for Microsoft™ Windows™
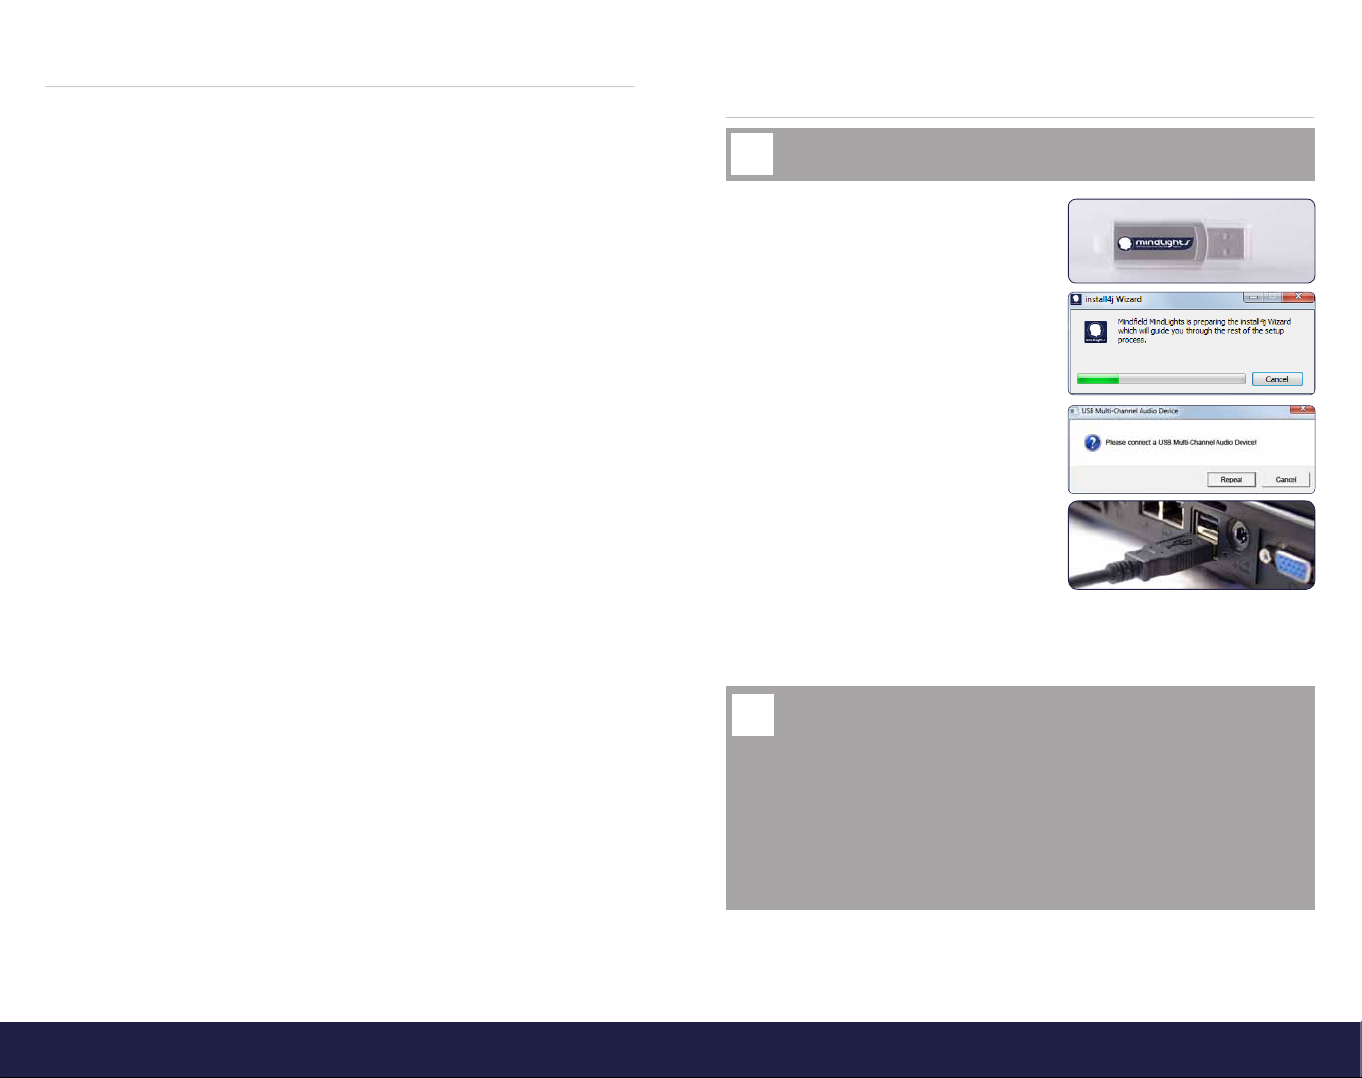
1. Turn on your PC. If you have more than
one user account chose the one that has
administrator status. Connect the Mind-
lights®USB-stick to a free port of your
computer!
2. On the USB stick you will find a file labeled
»Install.exe«. Double click on the file. The
software installation starts and the driver
unit of the Mindlights®is installed too. Be
sure to activate the check mark in the box.
3. The driver unit will now ask you to connect
a »USB Multi Channel Audio Device« to
your PC. These are the Mindlights®. Please
connect the USB-plug of the Mindlights®
to a free USB-port of your PC now. Then
click on »retry«.
4. After the successfull installation of the
driver unit you will have to restart your PC! You should not start the MindLights
Software before this restart.
IMPORTANT before starting the installation: Only connect the Mindlights® to the
USB-port of your PC after the software requests it during installation!
!
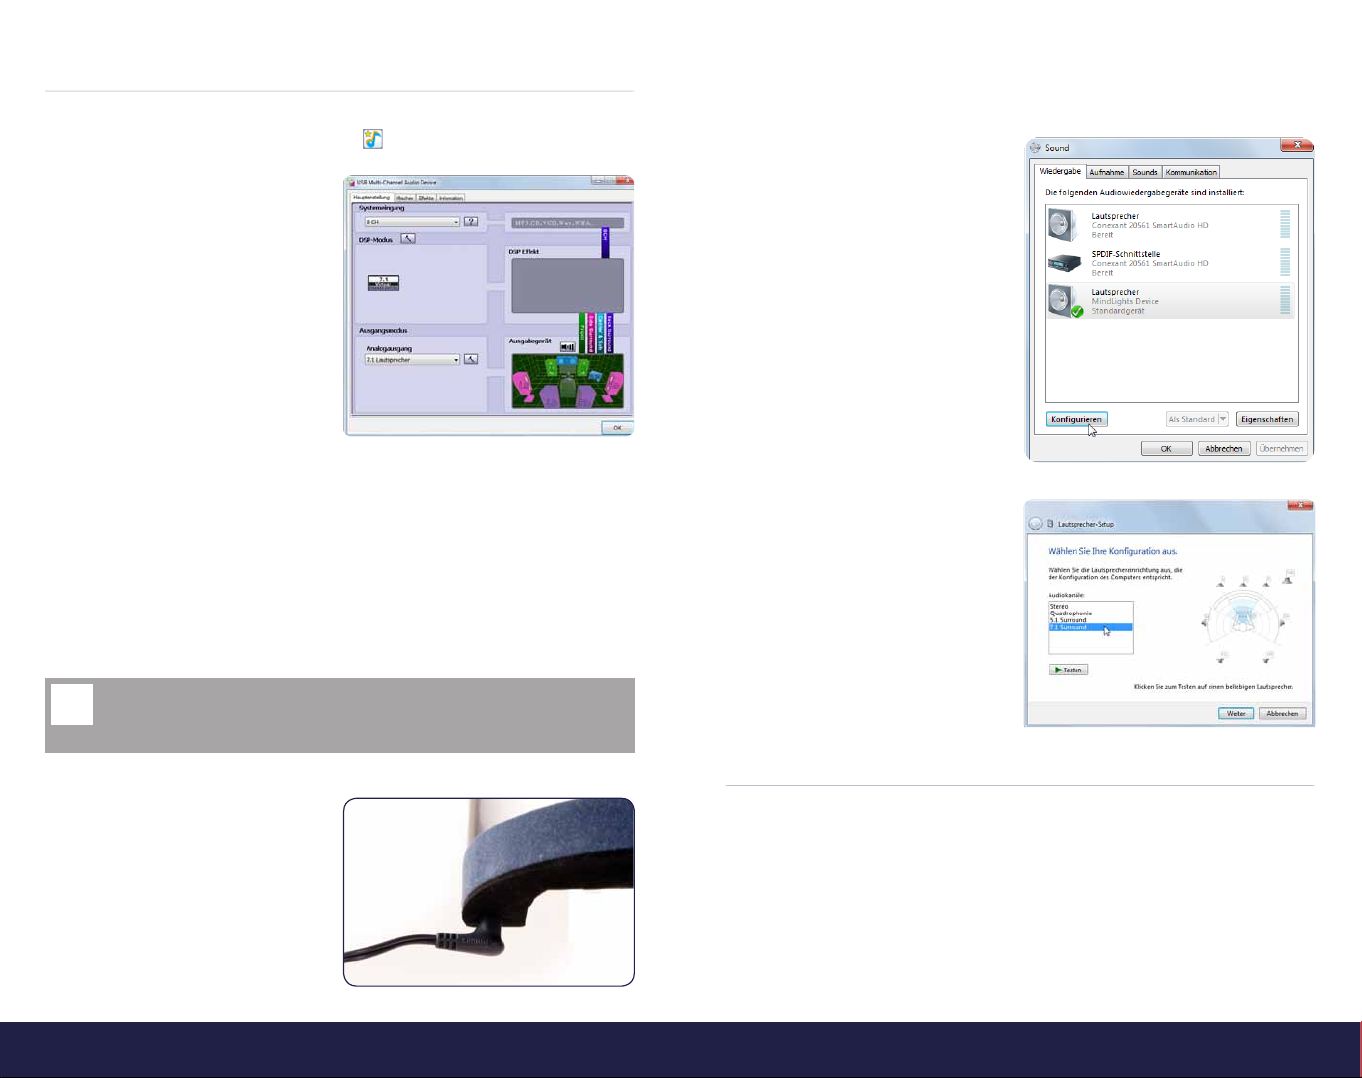
Important notice: The driver unit will only be installed to the current USB-port of your
PC. If you disconnect the Mindlights®from your PC and then reconnect them for
another session on a different USB-port, you will have to install the driver unit again
for this port. We therefore recommend always using the same USB-port! You can also
install the driver unit seperately. To do that you have to execute the file »setup.exe«
which can be found in the subdirectory »driver« on the USB-stick.
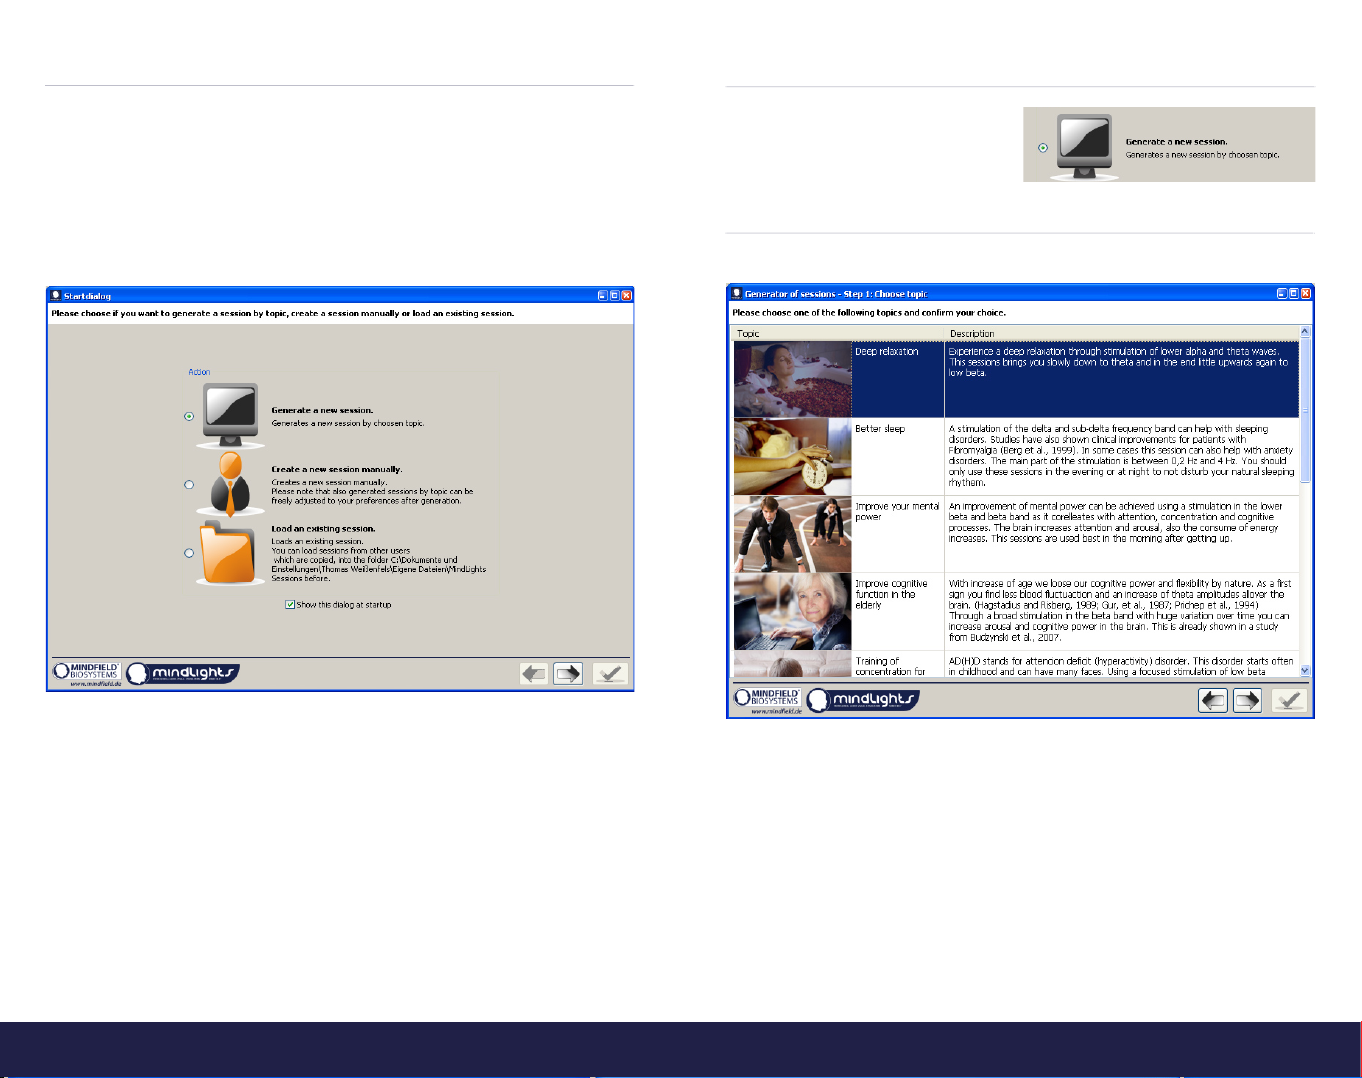
The installation of the software is not necessary. You can operate the software directly
from the USB-stick. In the primary directory there is a file labeled »Start.exe«. Double
click on this file. The software is now loaded directly from the USB-stick and your
sessions will be automatically saved to the folder labeled »sessions« on the USB-stick.
!
The MindLights®software supports Mac OS
X 10.5 (Leopard), 10.6 (Snow Leopard) and
10.7 (Lion).
There is no need for any driver installation
for the MindLights®.
You need at least Java™6 to install or start
the software. Use the apple software up-
date tool.
You can start the MindLights®Software di-
rectly from the USB stick using the »Start.
app« shortcut for the file »Start.app« in the
folder: start/Mac/Start.app
If you start the software directly from the
USB stick the folders »musics« and »sessi-
ons« on the USB stick are the sources for
music files and sessions and your own ses-
sions will be saved there.
If you install the software, which is recom-
mended for best performance, just use the
file »Install.dmg« on the USB stick.
In a local installation your own sessions
are stored in the folder »Home/MindLights
Sessions«.
To de-install the software just drag the soft-
ware icon to the recycle bin (Mac standard).
Advices for Apple™users of the Mindfield®MindLights®

12 13
2.2 Soundcard Configuration (only for Windows™)
After you have successfully installed all of the components and restarted your PC, you
will see the following symbol in your taskbar:
Double-click on the symbol and the con-
figuration window imaged to the right,
will open.
At the top left side of the win-
dow you will find a setting labeled
»Systemeingang(System input)« which is
still preset to 2 CH after the driver unit
installation. Please change this option to
8 CH. From now on, the MindLights®are
triggered correctly.
Confirm your command by clicking on
»OK«.
Explanation: The MindLights®act like an external soundcard of your PC. As soon as the
MindLights®are connected to the PC, they are defined as the standard souncard with
windows. For example, if you listen to music or watch a video during the time when the
MindLights®are still connected, you will hear the sound coming from the headphones
of the MindLights®. If you disconnect the MindLights®from the USB-connection your
normal soundcard will again act as standard soundcard. Music and other audio files will
then playback over the existing soundcard.
Connecting the Headphones
Then you can connect the stereo-jack-
headphone plug to the provided jack-
input of the MindLights®LED-mask.
Hard- and software of the Mindfield
MindLights®are now ready to operate
and you can make yourself familiar with
further content of this manual.
Optional: Alternative Setting of the
MindLights®to 8 Channels
Alternatively you can also change the
MindLights®to 8 channels (8 CH) via the
Windows Settings. To do that go to the
utility of the »USB Multi Channel Audio
Device«.
Navigate through the control panel of
Windows untill you reach the option
»manage audio devices« (in category
hardware and sound). For this example
we have used Windows 7. (Here you can
also see and alternate which soundcard
is set to standard souncard). Click on
configurate if the MindLights®are high-
lighted. (top image)
Change the audio channels to »7.1 Sur-
round« in the configuration window (lo-
wer image) This is equivalent to the 8 CH
in the configuration window of the »USB
Multi Channel Audio Device«.
Confirm the command via »Next« and
leave all further settings as they are.
2.3 Software Updates
As soon as the software starts it automatically searches for updates and newer versions
of the software.
In order for the software to conduct this search, your PC has to have a working internet
connection. Should this be the case you will be provided with the following hint: »A
new version of this software is available, and can be downloaded free of charge on our
website www.mindfield.de . Our website also provides further information regarding
this subject.«
In addition, the software will try to execute this operation automatically, provided
that you have logged in via administrator account. In this case you do not have to
execute the soundcard configuration.
!

14 15
3. Handling the MindLights®
Starting the Program
If you have chosen to create a desktop icon during the installation process, you can
now start the software with a click on this icon! You can find the start option in the
Windows(tm) Start Menu as well. Furthermore there is a shortcut on your desktop to
start a demo session.
After starting the software you will see the following startup menu:
You now have the following 3 options:
1. Automatic Generation of a new Session (p.15)
2. Manual Generation of a Session (p.26)
3. Loading an existing Session (p.42)
By clicking on the following button you
will be guided to the subject selection.
Step 1: Choosing a Topic
The following window opens:
Now you can choose your individual subject via mouse-click. More information on each
subject is available in the respective description.
After you have choose your topic, please confirm your choice by clicking on the arrow
and choose a background music that suits you.
4. Automatic Generation of a New Session

16 17
Step 2: Choosing the Background Music
The following window opens:
Please make sure that you have connected your headphones. Now you can choose a
music track and then play it by clicking on the »Play« button. By clicking on »Stop« you
can terminate the playback of the track.
If you do not wish to integrate a piece of music into your session, simply set a check
mark in the box labeled »No Background Music«.
After you habe chosen and verified your piece of music proceed to the next part of the
menu.
Step 3: Choosing the Duration of a Session
In this part of the menu you can first of all choose the duration of your session. By
sliding the controller the duration can be adjusted to your personal demands. The
standard preference which has proven to be 30 minutes for most people is already
activated.
In order to benefit from the session we do not recommend sessions that last less than
10 minutes.
Step 4: Setting up the MindLights®
During this part you can choose between the options standard settings and parameter
adjustments.
The standard settings are subject related preferences that are optimal for most people.
If you do not wish to make individual adjustments, confirm your selection. This
will guide you to the last window of the session generator (look up p. 24 / step
12: review).
If you do want to make individual adjustments please chose the other option »Paramter
Adjustments«.

18 19
Step 5: Adjusting Parameters
With the following steps you can further individualise your session. They are
not mandatory though. If you do not wish to make any further adjustments
then simply choose the standard settings.
This is the first menu that opens for parameter adjustments:
Step 6: Choosing the Light Stimulation
You can choose between a sinus-shaped, triangle-shaped and rectangle-shaped variati-
on of light intensity. Please use the preview function within the software (»Play« button)
to see the differences between the different variation patterns.
Put on the MindLights®LED-mask which is included in delivery and watch the different
light stimulations. If you wish to experience all of the various light stimulations during
a session, click on the last button labeled »All Light Stimulations«
Step 7: Choosing the Color Variation
In this part of the menu you can choose a set of predefined colors for your session.
• Option »Primary Colors«: Only a few, subject related and predefined colors will be
utilized
• Option »Secondary Colors«: Similar colors will be added to the subject related
primary colors
• Option »All Colors«: All colors which can be generated by the LEDs will be used
(e.g. green or a very bright pink)
The selection of colors for the subjects was influenced by classical of color theory and
by experiments of their effects on the human electroencephalogram3. Principally, colors
like green and yellow have a comforting effect and colors like blue, white, and red (sig-
nal color) have agitating effects. However, this can be perceived differently from person
to person. Therefore you can always change the colors to your preferred colors - even
during automatically generated sessions.
3. Raza et al (2005) A critical analysis of chromo therapy and its scientific evolution

20 21
Step 8: Choosing the Frequency Variation
In the section labeled Frequency Variation you can influence the intervals of audio-
visual stimuli during the session. You have the choice between three frequency variation
levels: low, medium and high level of frequency variation.
Frequency variations
• If you would like to experience a relaxative session we recommend the selection
of a low frequency variation. This means that there will be longer time periods
inbetween the frequency markers, resulting in longer time periods for changes in
stimulation frequency and color.
• For the brain to receive a more diversified and stimulating session, we recommend
a medium level of frequency variation. More markers will be implemented and
there will be more audio-visual shifts.
• For the area of performance improvement, we recommend a high level of frequen-
cy variation. The session will include a lot of shifts in audio-visual stimulation.
Please make sure to consider your personal intentions for the session, before
selecting your subject. Your goal should match the selections you make here!
!
Step 9: Phase Variation
The MindLights®LED mask includes integrated LED diodes. These diodes are aligned
in a horizontal line.
Option »Synchronous«
All LEDs light up at the same time, the right and left eye are visually stimulated syn-
chronously.
Option »Alternating«
The left and right eye will be stimulated reversely.
Option »Both«
The software randomly generates phases of alternating and synchronous stimulation
within the session.

22 23
Step 10: Acoustic Variation
Binaural / Monaural Sounds represent sounds that are created by the brain, due to
slightly different frequencies applied to each ear. When trying to process these sounds,
the brain creates an acoustic »beat« interference sound.
Isochronal Sounds are probably the most effective way of stimulating the brain. An
isochronal sound consists of a series of several beats that sound to a special frequency.
This sound stimulates the brain very effectively because it arises and also fades away
very rapidly.
Pulsed Sounds The option pulsed sounds creates a session that alternates between
muting and elevating the volume of the tone which creates the perception of a pul-
sating sound that gains in volume. In an environment with background noise, pulsed
sounds are easier to perceive.
The different options differ in subjective effectiveness, so we recommend that you ex-
periment with all of them and find the option that best suits you.
White Noise
White noise consists of all the frequencies of the audible range which stretches from
16 Hz to 20 kHz. Within this range all the frequencies have the same sound level. We
experience white noise in the form of a »hissing«, since our ears are more sensitive to
high frequency sounds than to low frequency sounds. White noise is usefull during
treatment of tinnitus or migraine.
Pink Noise
Pink noise, also called 1/f noise is a sort of noise that decreases in intensity as the
frequency rises. It is adapted to the human sense of hearing.
Brownian Noise
Brownian noise is a »dark sounding noise« that reminds of a waterfall or a thunder
strike. It sounds the same for almost all people.
Please use the preview function within the software!
This will help you to make a decision in composing your session.
!
Step 11: Noise

24 25
Step 12: Respiratory Support
Your session can be enhanced through an audio track of a breathing sound. You will
find more information regarding this subject on page 37 of this manual.
Step 13: Checking the Settings
Before the session starts you
can see the most important
settings in an overview. If
you do not wish to make any
further changes, you can now
start your session.
Step 14: Final Adjustments of Luminance and Volumes
You now have a final chance of adjusting
all acoustic and visual settings of the
MindLights®LED-mask and the head-
phones.
Just listen to and look at your preferen-
ces and change them by dragging the
sliders. When you have finished, confirm
your selection with a check mark. Your
session will now begin!
Step 15: Start Playback of the Session
After you have clicked on the check
mark, the MindLights®window opens.
When you click on the play button to
start the session, another small window
opens.
You can now chose a countdown for the
moment you want to start the session.
After you have entered the number of
seconds, click on the start-button below.
You now have enough time to put on your MindLights®LED-mask and the headphones.
The session starts at the time you have set the countdown.
The MindLights®team now whishes you an exciting journey into the world of audio-
visual stimulation!

26 27
5. Manual Generation of a Session
This chapter will provide you with an in depth overview of the MindLights®. The fol-
lowing information will allow you to manipulate the predefined sessions or create your
own.
When you are looking at the main menu, click on »manual generation of a session« and
confirm your selection with a check mark.
The startup window opens. Don’t be startled by an empty, gray surface. You will later
be able to set your own frequency markers. The following options are already included
in this window:
This canvas will open, once you have clicked on »manual generation of a session« (image on page 14)
or on the »New« button.
5.1.1 Session
Generate
Generates a subject-related session. This selection will guide you to the
session generator (page 15).
Load a Session
This will open previously saved sessions. A window opens which allows you
to chose and load a session (page 16).
New
This option creates a new session. An empty, gray canvas shows up, al-
lowing you to set your own frequency markers.
Save / Save as
You can save your current session by clicking on the »save« button or you
can save your sessions under a new name.
Delete History
You can reduce the file size of your session by eliminating the buffer
storage of the current session. This will only save the current version and
the required disk space decreases. Caution: Former versions of the session
can not be restored after deleting the history.

28 29
5.1.2 Playback / Information
Playback / Stop / Pause
These buttons allow you to play, stop and pause the session
(images from left to right).
Information
By clicking on this button
you will open a context
menu, that contains infor-
mation regarding the cur-
rent session. You can change
and / or enhance this infor-
mation with your own data.
If you have composed your
own session, you can create
the corresponding descripti-
on here.
You can also add a file to the information, e.g. a PDF-file containing further
information. You can write down the information in various languages.
| Description and informationen about Sessions
5.1.3 Music
Opening the Music Editor
By clicking on this button you can add your own audio track to the session.
The following button will appear:
Add an Audio Track
The explorer window appears and you can chose an audio file, either from
the MindLights®library or your own library.
After you have selected your track it will appear in the MindLights®.
The surface of the MindLights®now has a slightly grey hue and the title of
your track is displayed. Now simply click on any spot in the canvas and the
following info-window will appear:
The track can be played back at full length or at a
defined length by setting in- and out points.
Alternatively, you can change the duration by
clicking and dragging with the mouse on the
frame.
The »Fading« allows you to adjust the parame-
ters.
The volume of your audio track will then be faded
smoothly, so that there will be a nice transition
from one track to a another.

30 31
5.1.4 Master Control / Other Program Buttons
The following main controller will allow
you to adjust the individual luminance and
volume of all the elements included in the
session.
Before the session starts, you can adjust all of the audio-visual effects here. This allows
for an individual composition of the session. The effects can also be changed throug-
hout the session. Your can save the position of the controllers for a specific session. To
do this, you must have chosen „advanced editing“ in the „options“ menu. When you
load a session now, you can choose in the options menu how the previous controller
positions shall be treated (ask, ignore, use always).
Options
Click on this button to make any global changes, such as language, maxi-
mum frequency, switch start menu on / off, acoustic transitions and fade
in / out durations.
Help
The manual is provided in PDF format.
Quit
Click on this button and the MindLights®software quits. The program will
ask if you wish to save your current session and then close automatically.
5.1.5 Editor Functions
Extend
By clicking this button, you can extend the duration of the session. A session
has a maximum duration of 2 hours.
Zoom Function
Click on the timeline and mark an area of it by dragging the mouse cursor
and releasing it on the desired end position.
The selected area will now be displayed at a larger zoom level and show
a slight color change. You can then navigate through the session with the
scrollbar. Double-click on the timeline to zoom out to normal scale again.

32 33
5.2 Placing / Editing of Frequency Markers
The MindLights®allow you to create your own personal sessions. These consist of many
individual frequency markers.
These frequency markers represent key frames which trigger an audio-visual shift within
the session. You can now determine when and how these shifts will happen in your
session. The following parameters can be adjusted:
5.2.1 Time and Frequency
Click in any area of the canvas to set your first fre-
quency marker. The marker will start to blink. Click
and drag on the marker to move it around anywhere
on the surface.
The following window shows how particular para-
meters, such as time and frequency, dynamically
adjust according to your commands.
The time- and frequency parameters can either be
adjusted by clicking and dragging the markers, or
by manually entering the desired values. More infor-
mation on certain wave frequencies and their effects
can be found on page 40-41.
5.2.2 Primary / Secondary Colors
You can click in the two color fields to open the
color-picking window. Now you can choose which
colors shall be used for stimulation at this point of
the session.
If your primary and secondary colors are the same,
you will only see one color. The »reset« button will
set the colors back to black and white. They can
then be redefined according to your adjustments.
5.2.3 Deleting Frequency Markers
Select an existing frequency marker and then click on the »delete« button in the prefe-
rences window.
5.2.4 Copying a Color Selection
When you have selected your own primary and secondary color you can easily save
your adjustments by clicking in the »copy« field. The parameters will be transferred by
clicking on another frequency marker and then clicking the »paste« button.
5.2.5 Preview Function
After you have made all your desired adjustments for time, frequency and colors, you
can check them again.
Activate the preview function by clicking in the »preview« box. (page 32 image at the
top left).
Put on the MindLights®LED-mask and the headphones and look at your audio-visual
adjustments. In addition, you can adjust every parameter with the main controller in the
canvas. When you are pleased with your preferences you can set your next frequency
marker. This work pattern can be repeated all the time.
By activating the preview function, it will stay on for all following markers. The LED’s
will flash slower though. If you want to see the chosen frequency in the preview, just
click in the field where you can enter the frequency with your mouse, while the preview
is playing.
Frequency markers can also be edited in predefined demo- / or subject related
sessions.
!

34 35
5.3 Editing Transitions
There will always be a transition between two frequency markers. Basically, the
software will try to smoothly interpolate the differences in frequency and color. These
transitions are displayed in the form of lines. Click on this line and the editing mode will
be activated. For your easy orientation, the transition will then be portrayed blinking,
just as with a frequency marker.
After clicking on the line, the following
window will appear. We will now explain
all of the included functions:
5.3.1 Visual Transition
Transitions between frequency markers can be interpolated with all colors and the
primary colors red, green and blue. You can use the preview function to try the different
styles and chose the one that suits you best.
Copying Transitions
You can save your adjustments by clicking on »copy«. The parameters will be pasted to
another transition by clicking on »paste«. All adjustments that you have made will be
copied.
5.3.2 Function / Waveforms
The integrated LED-lights can perform the visual stimulation through three different
waveforms. The following waveforms can be selected in the window »function«:
Sinus
Rectangle
Triangle
5.3.3 Symmetry
The symmetry (weight) of a primary color to its secondary color can be adjusted with a
slider. The emphasis of which color is displayed at what point in time can be changed
for every single transition between frequency markers.
Just move the slider to the desired composition of the color spectrum between frequency
markers.
5.3.4 Phase
This slider can be used to generate time-shifted visual stimulation for the left and the
right side. A phase angle of 0 stands for synchronous stimulation of the left and the
right side, while 180 stands for exactly alternating stimulation. The values in between
are intermediate time-shifts between these two extremes. See also page 21 (phase
variation).

36 37
5.3.5 Acoustic Transition
This tab allows you to create your own acoustic transitions.
By clicking on »function« you can chose monaural, binaural, isochronic or pulsed sound
stimulation patterns.
Each and every sound sound stimulation pattern has three possible adjustments that
can be made.
• Base frequency: Determines the sound frequency between 20Hz and 1000Hz. It
is used for generating a different sound between the tones for the left and the
right ear.
• Modulation depth: Here, modulation describes the preintended transition bet-
ween one key and another. This function is only available for pulsed sounds.
• Phase: This function allows you to incorporate a phase from 0-180 into the
various audio frequencies.
An explanation on the various forms of noise can be found on page 23.
5.3.6 Background Noise and Breathing Patterns
Apart from the visual and acoustic transitions, there is another acoustical function that
helps the user during the session.
First of all, you have the opportunity to incorporate a background noise at specific
markers. There is white, pink and brownian noise available, where the „colors“ denote
certain frequency distributions that sound differently. Of course you also have the
opportunity to switch off this function. Another stimulating but also calming influence
is the individually manageable training of breathing patterns.
Breathing Patterns
According to a lot of clinical studies, slow and smooth breaths has a calming effect
on the autonomous nervous system, but also on the sympathetic and parasympathetic
(parts of the vegetative nervous system) nervous systems. Current studies show that the
right breathing techniques increase heart rate variability (HRV).
At rest and relaxation the HRV turns into heart coherence (optimal synchrony between
rhythm of heart beat, breath and blood pressure). The body can regenerate very effici-
ently. This condition can be trained and faciliated intentionally.
As clinical studies have proven, the heart rate increases while a person inhales, and
decreases as the person exhales.
It has also been proven that long and smooth breath cycles lasting approx. 10 seconds
provide the most benefits. This would result in 6 breath cycles per minute.
You should fully inhale AND exhale during the whole session. The rhythmical breathing
sounds can guide your breath pattern.
Activate the breath training and then adjust the desired rhythm with the slider!
In order to increase your heart rate variability, we recommend you train with a
breath cycle of 10 seconds!
An explanation of the various audio frequencies can be found on page 22.

38 39
5.4 Adjusting and Cloning of Frequency Markers
Adjusting the Frequency Markers
Click and hold down your mouse button, then drag a frame around the markers in the
canvas which you want to copy. Then click on any area inside the frame and move it
to the desired location. With this procedure you can position and edit the markers at
the same time. Click in the canvas again to deselect the frame and proceed with other
adjustments in the same manner.
Cloning of Frequency Markers
If you wish to copy frequency markers, again create a frame around them and chose the
function »copy« from the frequency setting window. After confirming the process, the
markers that you have selected before now appear to the right of the frame.
This procedure can be repeated as often as you like.
Change between frequency markers and transitions
When you have selected a single marker or transition, you can step forward to the next
marker/transition by pressing »Tab« and backwards by »Shift + Tab«.
5.5 Fast Forwarding during a Session
At the point when you have created your own session, you have the opportunity to
rewind or fast forward within it.
You can click, hold and drag the fast forward bar within the composition towards the
start or the end of the session. It is visible the entire time.
5.6 Manipulating a Session during Playback
During playback of a session you have
the possibility of directly manipulating
the various frequency markers. This will
help you to create more professional ses-
sions and will save time. This option has
to be activated at the start of the session
and should only be selected, when you
will actually change the parameters.
This will put higher demand on your
computer’s performance ressources.
5.7 Extended editing mode
You can activate the extended editing
mode in the options menu. It provides
you with the following extras:
a) Background grid for exact positio-
ning of markers
b) Setting a timed starting point for the
session (e. g. to skip certain parts
while testing)
c) Time scale in milliseconds for exact
positioning while playing
Table of contents
Other Mindfield Medical Equipment manuals
Popular Medical Equipment manuals by other brands

SKF
SKF TKES 10 Series Instructions for use

Teeter
Teeter FS-1 1324276 Assembly instructions

Manamed
Manamed PlasmaFlow Patient Start Guide

AMT
AMT Bridle Standard Directions, Indications, & Contraindications For Use

bort medical
bort medical StabiloBasic Sport Instructions for use

Vatech
Vatech EzRay Air Wall user manual