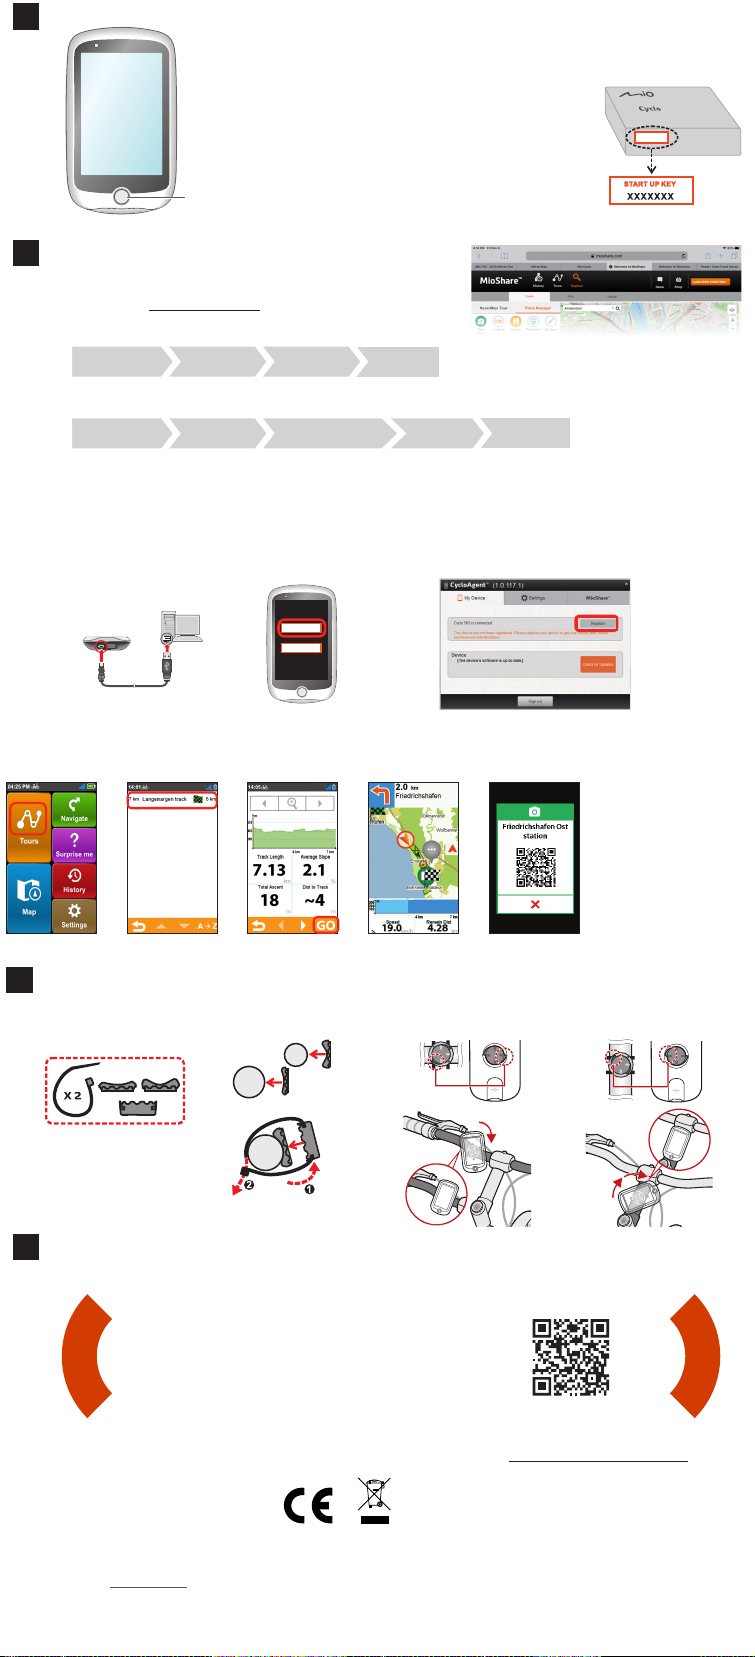
Performing the initial start-up
1. Press and hold the POWER button for 3 seconds to turn on your Cyclo device.
2. Follow the prompts to personalise your Cyclo device.
3. Enter the Startup Key and then tap OK to unlock your
Cyclo device.
You will only have to do this the rst time you use the
Cyclo device.
Zum ersten Mal einschalten
1. Ein/Aus-Taste zum Einschalten des
Cyclo-Gerätes 3 Sekunden lang
gedrückt halten.
2. Befolgen Sie die Anweisungen um Ihr
Cyclo-Gerät zu personalisieren.
3. Startschlüssel (Startup Key) eingeben
und dann zur Freigabe Ihres Cyclo-
Gerätes auf OK drücken.
Dies ist nur bei der ersten
Inbetriebnahme des Cyclo-Gerätes
erforderlich.
Procéder à la conguration
initiale
1. Maintenez le bouton ALIMENTATION
enfoncé pendant 3 secondes pour
allumer votre appareil Cyclo.
2. Suivez les invites pour personnaliser
votre appareil Cyclo.
3. Saisissez la Clé de démarrage (Startup
Key) puis appuyez sur OK pour
déverrouiller votre appareil Cyclo.
Vous ne devez le faire que la première
fois que vous utilisez l’appareil Cyclo.
De eerste keer starten
1. Houd de POWERKNOP 3 seconden
ingedrukt om uw Cyclo-apparaat in te
schakelen.
2. Volg de instructies om uw Cyclo-
apparaat in te stellen.
3. Voer de Opstartcode (Startup Key) in en
tik dan op OK om uw Cyclo-apparaat te
ontgrendelen.
U hoeft dat alleen te doen wanneer u
het Cyclo-apparaat voor de eerste keer
gebruikt.
1
NeverMiss™
Schritt 1. Planen Sie Ihre Tour
Gehen Sie zu MioShare (www.MioShare.
com), um Ihre Tour zu planen, indem Sie:
• Ihre eigene Strecke erstellen; oder
• Eine Streckendatei von einem
Drittanbieter herunterladen.
NeverMiss™
Étape 1. Planication de votre
parcours
Accédez à MioShare (www.MioShare.com)
pour planier votre parcours en :
• Créant votre propre itinéraire ; ou
• Téléchargeant un chier itinéraire
auprès d’une tierce partie.
NeverMiss™
Stap 1. Uw route plannen
Ga naar MioShare (www.MioShare.com)
om uw route te plannen door:
• Uw eigen route te maken; of
• Een routebestand te downloaden van
derden.
NeverMiss™
Step 1. Planning your tour
Go to MioShare (www.MioShare.com) to plan your tour by:
• Creating your own route; or
SaveMioShare Explore Create
• Downloading a route le from the third-party.
Link my
account
RouteYouMioShare Account Synchronisation
settings
2
POWER
Schritt 2. Strecke herunterladen
Gehen Sie zu MioShare, um CycloAgent
herunterzuladen und auf Ihrem Computer
zu installieren.
Schließen Sie Ihr Cyclo-Gerät an den
Computer an und wählen Sie, Mit PC
verbinden.
Öffnen Sie CycloAgent und klicken Sie
auf Mein Gerät > Registrieren Sie sich,
um die Synchronisierung der Daten mit
der MioShare-Website zu starten. Die
Streckendateien werden automatisch auf Ihr
Cyclo-Gerät heruntergeladen. Andernfalls
klicken Sie auf Synchronisieren, um den
Download manuell durchzuführen.
Étape 2. Téléchargement de
l’itinéraire
Accédez à MioShare pour télécharger et
installer CycloAgent sur votre ordinateur.
Connectez votre appareil Cyclo à
l’ordinateur et sélectionnez Connexion au
PC.
Ouvrez CycloAgent et cliquez sur Mon
Appareil > Enregistrer an de commencer
à synchroniser les données avec le site
Web MioShare. Les chiers itinéraires sont
téléchargés automatiquement sur votre
appareil Cyclo ; dans le cas contraire,
cliquez sur Synchroniser pour les
télécharger manuellement.
Stap 2. De route downloaden
Ga naar MioShare voor het downloaden
en installeren van CycloAgent naar uw
computer.
Sluit uw Cyclo-apparaat aan op de
computer en selecteer Verbinden met pc.
Open CycloAgent en klik op Mijn Apparaat
> Registreren om het synchroniseren
van gegevens met de MioShare-website
te starten. De routebestanden worden
automatisch gedownload naar uw Cyclo-
apparaat. Klik anders op Synchroniseren
om handmatig te downloaden.
Step 2. Downloading the route
Go to MioShare to download and install CycloAgent to your computer.
Connect your Cyclo device to the computer and select Connect to PC.
Open CycloAgent and click My Device > Register to start synchronising data with the MioShare website. The route les will
download to your Cyclo device automatically; otherwise, click Sync to download manually.
Connect to PC
Charge only
NeverMiss™: Notications of POI (Point of Interest)
On your Cyclo device, choose the desired route and tap GO to start navigating. The NeverMiss™ function allows you to enjoy your
cycling without missing any POI (Point of Interest) during the trip.
Tip: Scan the QR code (if have)
by using your smartphone and
get the details of the POI.
NeverMiss™: Benachrichtigungen
über POI
Wählen Sie auf Ihrem Cyclo-Gerät die
gewünschte Route aus und tippen Sie auf
GO, um mit der Navigation zu beginnen.
Mit der NeverMiss™-Funktion können Sie
Ihr Radfahren genießen, ohne während der
Fahrt einen POI zu verpassen.
Tipp: Scannen Sie mit Ihrem Smartphone den QR-
Code (falls vorhanden), um die Details des POI
abzurufen.
NeverMiss™ : Notications de
points d’intérêt
Sur votre appareil Cyclo, choisissez
l’itinéraire souhaité et appuyez sur GO
pour commencer la navigation. La fonction
NeverMiss™ vous permet de proter de
votre vélo sans manquer aucun point
d’intérêt (POI) pendant le trajet.
Conseil : Utilisez votre smartphone pour numériser
le code QR (le cas échéant) et obtenir les détails du
POI.
NeverMiss™: Meldingen van
nuttige plaatsen
Kies de gewenste route op uw Cyclo-
apparaat en tik op GO om de navigatie te
starten. Met de functie NeverMiss™ kunt u
genieten van uw etstocht zonder dat u een
nuttige plaats (POI = Point of Interest) mist
tijdens de rit.
Tip: Gebruik uw smartphone om de QR-code te
scannen (als die er is) om details van de POI te
verkrijgen.
3
Gerät am Fahrrad anbringen
Verwenden Sie das mit Ihrem Cyclo-
Gerät mitgelieferte Fahrradmontageset,
um es an einem Fahrrad zu befestigen.
Im Fahrradmontagesatz sind zwei
Gummipolster enthalten, mit denen Sie die
Fahrradhalterung zuverlässig am Fahrrad
xieren können.
Monter l’appareil sur votre vélo
Utilisez le kit de montage spécique pour
vélo fourni avec votre appareil Cyclo an
de le monter sur un vélo. Le kit de montage
pour vélo comprend deux types de tampons
en caoutchouc, ce qui vous permet de xer
le support sur votre vélo en toute sécurité.
Het apparaat op uw ets
monteren
Gebruik de specieke etsmontagekit die
bij uw Cyclo-apparaat is geleverd om deze
op een ets te monteren. De etsbeugelkit
bevat twee soorten rubberen kussens
waarmee u de etsbeugel stevig op de ets
kunt vastzetten.
Mounting the device on your bike
Use the specic bike mount kit that came with your Cyclo device to mount it on a bike. The bike mount kit includes two types
of rubber pads, allowing you to attach the bike mount to your bike securely.
Cyclo™Discover
Quick Start Guide
P/N: 5615N5060004 R01
Guide de mise en route SnelstartgidsSchnellstartanleitung
Revision: R
01
(4/
2020
)
Trademarks
All brand and product names are trademarks or registered trademarks of their respective companies.
Disclaimer
Specications and documents are subject to change without notice. MiTAC does not warrant this document is error-free. MiTAC assumes no liability for damage
incurred directly or indirectly from errors, omissions, or discrepancies between the device and the documents.
Notes
Not all models are available in all regions.
Depending upon the specic model purchased, the colour and look of your device and accessories may not exactly match the graphics shown in this document.
The screenshots and other presentations shown in this document are for reference only. They may differ from the actual screens and presentations generated
by the actual product.
MiTAC Europe Ltd.
Unit 27 Hortonwood 33, Telford, Shropshire, England, United Kingdom
MiTAC Europe Ltd. Sp. Z o. o, Oddzial w Polsce
ul. Puławska 405 A, 02-801 Warszawa, Poland
Regulatory information
For regulatory identication purposes, Mio Cyclo Discover is assigned a model number of N506. Hereby, MiTAC declares that this
N506 is in compliance with the essential requirements and other relevant provisions of Directive 2014/53/EU.
Visit Mio website (www.mio.com) for the full text of the declaration for your Cyclo device.
IPX5
An IPX5 designation means that the unit is protected against water jets but NOT against immersion in water or water-pressure such
as washing the unit with running water. Because of possible user-resealing error, this product is not warranted against waterproof
housing leakage or any resulting damage. Please make sure the waterproof cover is tightly closed before using the product.
IPX5
Sicherheitshinweise (CE)
Zur Richtlinienidentikation: Die Mio Cyclo
Discover ist der Modellnummer N506
zugeordnet. Hiermit erklärt MiTAC, dass dieses
N506 mit den wesentlichen Anforderungen und
anderen relevanten Bestimmungen der Richtlinie
2014/53/EU übereinstimmt. Den vollständigen
Wortlaut der Konformitätserklärung für Ihr Mio
können Sie auf der Website von Mio lesen
(www.mio.com).
IPX5
Die IPX5-Kennzeichnung besagt, dass das
Gerät gegen Strahlwasser, jedoch NICHT gegen
Untertauchen sowie Wasser unter erhöhtem
Druck geschützt ist, wie es beispielsweise
beim Waschen des Gerätes unter ießendem
Wasser auftritt. Da die Dichtigkeit des Gerätes
durch Anwenderfehler leiden kann, erstrecken
sich Garantie und Gewährleistung nicht auf
die Wasserdichtigkeit des Gehäuses sowie auf
jegliche durch Undichtigkeiten entstehende
Schäden. Achten Sie darauf, dass die
wasserfeste Hülle dicht geschlossen ist, bevor
Sie das Gerät benutzen.
Informations règlementaires
À des ns d’identication réglementaire : La
Mio Cyclo Discover porte le numéro de modèle
N506. Par la présente, MiTAC déclare que ce
N506 est conforme aux exigences essentielles
et aux autres dispositions applicables de la
Directive 2014/53/UE. Consultez le site internet
Mio pour connaître le texte intégral de la
déclaration de votre Mio (www.mio.com).
IPX5
Une désignation IPX5 signie que l'appareil
est protégé contre les projections d'eau mais
PAS contre l'immersion dans l'eau ni contre une
pression d'eau telle que le lavage de l'appareil à
l'eau courante. En raison d'erreurs possibles de
refermeture par l'utilisateur, ce produit n'est pas
garanti contre une fuite du boîtier étanche ni
contre tout dommage en résultant. Veuillez vous
assurer que le couvercle étanche est bien fermé
avant d'utiliser le produit.
Informatie over goedkeuringen
Voor regelgevende identicatiedoeleinden: het
modelnummer N506 is toegewezen aan de Mio
Cyclo Discover. MiTAC verklaart hierbij dat deze
N506 voldoet aan de essentiële vereisten en
andere relevante voorwaarden van de Richtlijn
2014/53/EU. Bezoek de Mio-website voor de
volledige tekst van de verklaring voor uw Mio
(www.mio.com).
IPX5
Een IPX5-aanduiding betekent dat het apparaat
beschermd is tegen waterstralen, maar NIET
tegen het onderdompelen in water of waterdruk,
zoals het wassen van het apparaat onder
stromend water. Door mogelijke fouten bij het
opnieuw afdichten door de gebruiker, wordt
geen garantie geboden voor lekkage van de
waterdichte behuizing of enige resulterende
schade. Controleer of de waterdichte afsluiting
stevig gesloten is voordat u het product gebruikt.
For more information
Online tutorial
Online support
For 24/7 help and support with Mio products, visit our Technical Support website at: https://support.mio.com/contacts
4
Scan the QR code to learn more about:
• Starting your rst ride
• Planning your tour and how to connect komoot or RouteYou
• Advanced practice
• Connected services
• Managing your Cyclo device to get update and warranty
• Downloading user manual and watching tutorial videos
Weiterführende Informationen
Online-Anleitung
Für weitere Informationen zu folgenden
Themen QR-Code scannen: Starten Ihrer
ersten Fahrt; Planung Ihrer Strecke und
der Verbindung mit komoot oder RouteYou;
erweiterte Anwendung; verbundene
Dienste; Verwaltung Ihres Cyclo-Gerätes
zur Inanspruchnahme von Aktualisierungen
und Garantie; Herunterladen von
Bedienungsanleitungen und Ansehen von
Anleitungsvideos.
Online-Kundenbetreuung
Bitte besuchen Sie zum 24/7-Service
die Webseite unseres technischen
Kundendienstes unter: https://support.mio.
com/contacts
Pour plus d’informations
Tutoriel en ligne
Numérisez le code QR pour en savoir
plus sur : commencer votre premier trajet
; planier votre itinéraire et comment
connecter komoot ou RouteYou ; pratique
avancée ; services connectés ; gérer votre
appareil Cyclo pour obtenir des mises à jour
et bénécier de la garantie ; télécharger le
manuel d’utilisation et regarder des tutoriels
vidéo.
Assistance en ligne
Pour une aide et un support 24h/24 et 7h/7
concernant les produits Mio,
visitez notre site Internet d’assistance
technique : https://support.mio.com/contacts
Voor meer informatie
Online zelfstudie
Scan de QR-code voor meer informatie
over: uw eerste rit starten; uw tour plannen
en hoe u verbinding maakt met komoot
of RouteYou; geavanceerde praktijken;
verbonden services; uw Cyclo-apparaat
beheren voor een update en garantie; de
gebruikershandleiding downloaden en de
zelfstudievideo’s bekijken.
Online ondersteuning
Voor 24/7 hulp en ondersteuning voor Mio-
producten, kunt u terecht op
de website van onze Technische
ondersteuning op: https://support.mio.com/
contacts


