Mizco International ToughTested TT-PBW-SW24 User manual

TT-PBW-SW24
BIG FOOT SOLAR POWERBANK
BLOC-PILES SOLAIRE
USER MANUAL
GUIDE D’UTILISATION
Mizco International Inc.
Cranford, New Jersey 07016
www.toughtested.com

01
Package contents and features ....................................................................................................................
Charging the powerbank .............................................................................................................................
Checking the power level ............................................................................................................................
Solar charging the powerbank ......................................................................................................................
Charging devices & flashlight functions .......................................................................................................
Specifications ..............................................................................................................................................
Contenu de l’emballage et caractéristiques ................................................................................................
Recharge du chargeur portatif .....................................................................................................................
Vérification du niveau de charge ..................................................................................................................
Recharge solaire du chargeur portatif ..........................................................................................................
Recharge d’appareils et fonctions Lampe torche .........................................................................................
Spécifications ..............................................................................................................................................
02
03
05
06
07
08
10
11
12
14
15
16
TABLE OF CONTENTS / TABLE DES MATIÈRES
Thank you for purchasing this solar powerbank. Please carefully read this manual before operating
your solar charger.
Merci d’avoir choisi ce chargeur solaire portatif. Veuillez lire attentivement le présent guide avant d’utiliser
votre chargeur solaire.

02 03
CHARGING THE POWERBANK
PACKAGE CONTENTS AND FEATURES
Package Includes:
1X 24000mAh Solar Power Bank
1X USB C to USB C Cable
1X Micro USB Cable
Charging the powerbank
• For best results fully charge the powerbank before first use.
• You can use the A to micro or C to C cable that came with the powerbank, depending on what type of
charger you have.
• Using a QC3 or USB-PD wall or car charger will result in the fastest charging times.
Standard charge times from empty to 100%
5watt/1amp USB 28 hours
10watt/2amp USB 15 hours
18watt USB-C PD 8 hours
QC 3.0 8 hours
Features:
1. Flashlight
2. Solar panel
3. Four LED power level indicator
4. Solar charging indicator
5. Power button
6. USB-C PD 18 watt in/out port
7. Micro USB fast charge input port
8. Quick Charge 3.0 output port
9. USB 10 watt output port
2 5 4 3 1 6 87 9

04 05
CHARGING THE POWERBANK
Note:
The powerbank does not allow charging and discharging at the same time i.e. charging external devices and
having its internal battery recharged at the same time.
Solid blue • The LED indicators will turn off after the powebank is fully charged
Solid blue
CHECKING THE POWER LEVEL
How to check the power level of the powerbank
At any time you can check the power level of the powerbank by pressing and releasing the power button.
Note:
The LEDs will automatically turn off after 30 seconds to conserve power.
Charging
status 0% to 25% 25% to 50% 50% to 75% 75% to 99% 100%
LED
Indicator
1st LED
indicator Flashing
Blue
2nd LED
indicator Off Flashing
Blue
3rd LED
indicator Off Off Flashing
Blue
4th LED
indicator Off Off Off Flashing
Blue
Remaining
Capacity 0% to 5% 5% to 25% 25% to 50% 50% to 75% 75%-100%
LED
Indicator
1st LED
indicator Flashing
Blue
2nd LED
indicator Off Off
3rd LED
indicator Off Off Off
4th LED
indicator Off Off Off Off

06 07
Solar charging the powerbank
• The LED closest to the power button will light up green when the solar panel is working.
• Solar charging is designed for emergency charging, 4-5 hours of bright sunlight will provide a 30% charge
for the average Smartphone.
• It is not recommended to use solar charging as the primary charging method.It would take approximately
60 hours of sunlight to charge from 0 – 100% and excessive exposure to heat may damage the battery.
• Never leave a solar charger on a car dashboard or other hot surface to recharge it.
SOLAR CHARGING THE POWERBANK CHARGING DEVICES & FLASHLIGHT FUNCTIONS
Charging your portable devices
• For devices with a USB-C port, connect the USB-C to USB-C between the powerbank and your device.
If your device has Power Delivery built in it will charge at a faster rate.
• For devices with a micro USB port, connect the Micro USB cable between either USB A port and your device.
• If your Smartphone is equipped with Quick Charge use the orange port for fastest charging.
• For iPhone or iPad, use either a standard Lightning cable or the newer C to Lightning cable.
Notes:
1. C to Lightning cables support Power Delivery.
2. The powerbank can rapidly charge multiple devices at the same time.
3. For fastest charging speed it is recommended to charge a maximum of two devices at a time.
Using the flashlight
3 second hold to turn on Quick press for SOS mode Quick press for strobe mode Quick press to power off
You can also press and hold the power button for 3 seconds in any mode to directly turn it off.

08 09
SPECIFICATIONS
Capacity: 24,000mAh (88.9Wh)
Solar Panel: 5V/280mA
Micro USB input: 5V/2A, 9V/2A (18W max)
USB-C Input: 5V/2A, 9V/2A (18W max)
USB-C Output: 5V/3A, 9V/2A, 12V/1.5A (18W max)
USB Output 1 (QC3) 5V/3A, 9V/2A, 12V/1.5A (18W max)
USB Output 2 5V/2A (10W max)
Size: 7.1” x 3.5” x 1.2” (179.5mm x 90mm x 30.5mm)
Weight: 18oz (550g)
Battery Type: Lithium polymer
Battery life: 300 cycles
Operating temperature: 0 – 45C
Flashlight: 1 watt
©Mizco International, Inc. All rights reserved.
All trade names are registered trademarks of the respective manufacturers listed.
Cranford, New Jersey 07016
www.mizco.com

10 11
CONTENU DE L’EMBALLAGE ET CARACTÉRISTIQUES
Contenu de l’emballage :
1X chargeur solaire portatif de
24000 mAh
1X câble USB C à USB C
1X câble micro-USB
Caractéristiques:
1. Lampe torche
2. Panneau solaire
3. Quatre voyants indicateurs de
niveau de charge
4. Voyant indicateur de recharge
solaire
5. Bouton d’alimentation
6.
Port d’entrée/sortie USB-C PD 18 watts
7. Port d’entrée micro-USB de charge
rapide
8. Port de sortie de charge rapide 3.0
9. Port de sortie USB 10 watts
2 5 4 3 1 6 87 9
RECHARGE DU CHARGEUR PORTATIF
Recharge du chargeur portatif
• Pour des résultats optimaux, chargez complètement le chargeur portatif avant la première utilisation.
• Vous pouvez utiliser le câble USB A à micro-USB ou USB C à C fourni avec le chargeur portatif, selon
le type de chargeur que vous avez.
• L’utilisation d’un chargeur mural ou pour voiture QC3 ou USB-PD assurera la recharge la plus rapide.
Temps de charge standard de 0 à 100 %
USB 5 watts/1 amp. 28 heures
USB10 watts/2 amp. 15 heures
USB-C PD18 watts 8 heures
QC 3.0 8 heures

12 13
Remarque:
Le chargeur portatif ne permet pas de charger et de décharger en même temps, c.-à-d. de charger des
périphériques externes tout en rechargeant sa pile interne.
VÉRIFICATION DU NIVEAU DE CHARGE
Lumière bleue solide •
Les voyants DEL s’éteindront une fois que le chargeur portatif sera complètement chargé.
État de
charge 0% to 25% 25% to 50% 50% to 75% 75% to 99% 100%
Indicateurs
LED
1er voyant Bleu
clignotant
2er voyant Éteint Bleu
clignotant
3er voyant Éteint Éteint Bleu
clignotant
4er voyant Éteint Éteint Éteint Bleu
clignotant
VÉRIFICATION DU NIVEAU DE CHARGE
Lumière bleue solide
Vérification du niveau de charge du bloc-pile
Vous pouvez à tout moment vérifier le niveau de charge du bloc-pile en appuyant sur le bouton d’alimentation,
puis en le relâchant.
Remarque:
Les voyants s’éteindront automatiquement après 30 secondes pour conserver l’énergie.
Capacité
restante 0% to 5% 5% to 25% 25% to 50% 50% to 75% 75%-100%
Indicateurs
LED
1er voyant Bleu
clignotant
2er voyant Éteint Éteint
3er voyant Éteint Éteint Éteint
4er voyant Éteint Éteint Éteint Éteint

14 15
Recharge solaire du chargeur portatif
• Le voyant le plus proche du bouton d’alimentation s’allume en vert lorsque le panneau solaire est en fonction.
• La recharge solaire est conçue pour les situations d’urgence; 4 à 5 heures de plein soleil fourniront 30 % de
la charge d’un téléphone intelligent moyen.
• Il n’est pas recommandé d’avoir recours à la recharge solaire comme méthode de charge principale. Il
faudrait environ 60 heures d’ensoleillement pour une recharge de 0 à 100 %, et une exposition excessive à
la chaleur pourrait endommager la pile.
• Ne laissez jamais un chargeur solaire sur le tableau de bord d’une voiture ou sur toute autre surface chaude
pour le recharger.
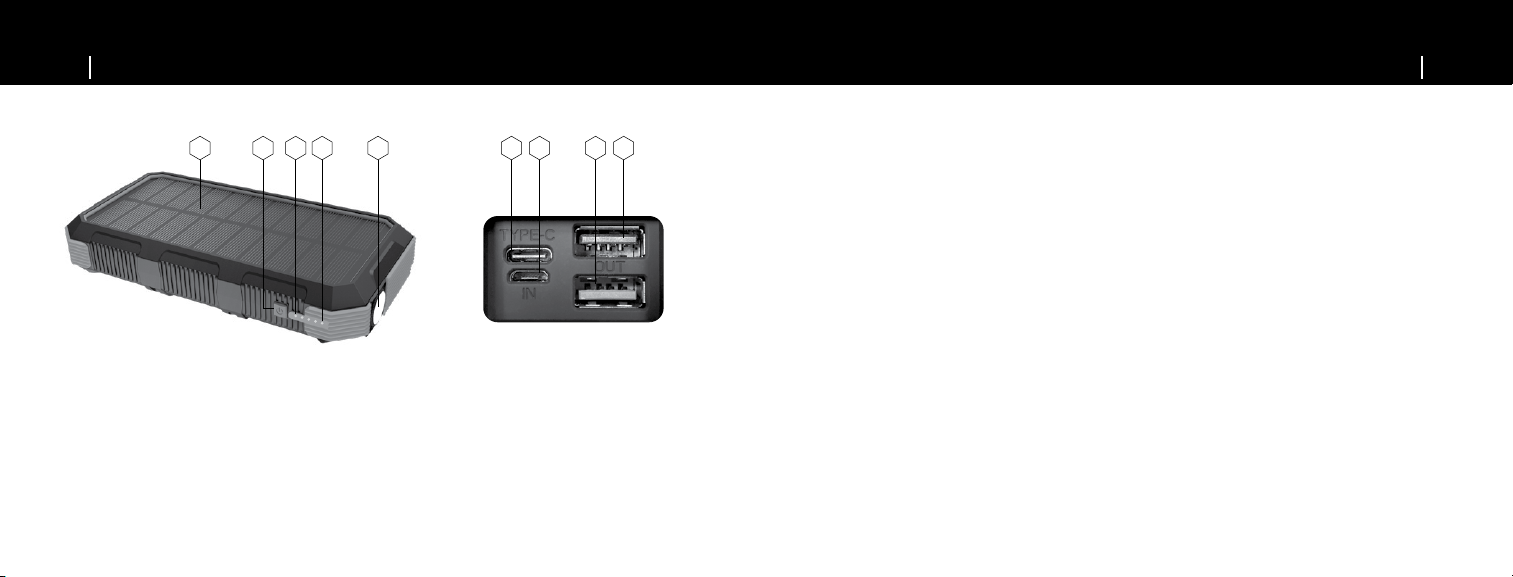
RECHARGE SOLAIRE DU CHARGEUR PORTATIF RECHARGE D’APPAREILS ET FONCTIONS LAMPE TORCHE
Recharge de vos appareils portables
• Pour les appareils avec port USB-C, branchez le câble USB-C à USB-C sur le chargeur portatif et sur votre
appareil. Si votre appareil est doté de la technologie Power Delivery, la recharge sera plus rapide.
• Pour les appareils avec port micro-USB, branchez le câble micro-USB sur l’un ou l’autre port USB A et sur
votre appareil.
• Si votre téléphone intelligent est doté de la technologie Quick Charge, utilisez le port orange pour la
recharge la plus rapide.
• Pour un iPhone ou un iPad, utilisez soit le câble Lightning standard, soit le nouveau câble C à Lightning.
Remarques :
1. Les câbles C à Lightning sont compatibles avec la technologie Power Delivery.
2. Le chargeur portatif peut charger rapidement plusieurs appareils à la fois.
3. Toutefois, pour obtenir la charge la plus rapide, il est recommandé de charger un maximum de deux
appareils à la fois.
Utilisation de la lampe torche
Appuyez 3 secondes pour allumer Appuyez rapidement pour le mode SOS Appuyez rapidement pour le mode
Stroboscope Appuyez rapidement pour éteindre
Vous pouvez également appuyer sur le bouton d’alimentation et le maintenir enfoncé pendant 3 secondes pour
l’éteindre, peu importe le mode.

16 17
SPÉCIFICATIONS
Capacité 24,000mAh (88.9Wh)
Panneau solaire: 5V/280mA
Entrée micro-USB: 5V/2A, 9V/2A (18W max)
Entrée USB-C: 5V/2A, 9V/2A (18W max)
Sortie USB-C: 5V/3A, 9V/2A, 12V/1.5A (18W max)
Sortie USB 1 (QC3) 5V/3A, 9V/2A, 12V/1.5A (18W max)
Sortie USB 2 5V/2A (10W max)
Taille 7.1” x 3.5” x 1.2” (179.5mm x 90mm x 30.5mm)
Poids 18oz (550g)
Type de pile: Li-polymère
Durée de vie de la pile 300 cycles
Température de fonctionnement: 0 – 45C
Lampe torche: 1 watt
©Mizco International, Inc. Tous droits réservés.
Toutes les marques de commerce sont des marques déposées des fabricants
respectifs énumérés.
Cranford, New Jersey 07016
www.mizco.com
Other manuals for ToughTested TT-PBW-SW24
1
Table of contents
Languages:
Popular Accessories manuals by other brands

Brüel & Kjaer Vibro
Brüel & Kjaer Vibro DS821 Series instructions

Viking
Viking PB-1 Technical practice

Panasonic
Panasonic DVCPRO AJ-BS901P operating instructions

PRIMAVERA
PRIMAVERA Ambiente Important information

Invacare
Invacare 6905A Assembly, installation and operating instructions

UNINEX
UNINEX KOOLZONE SAC-3000 quick guide