Mobeye CM4500 User manual

USER MANUAL
Mobeye®Panic Button
CM4500
SW version 1.n

.

2
CONTENTS
1. General description 4
2. Standard behaviour 5
2.1 Mobeye Panic Button with Mobeye SIM and Internet Portal 5
2.2 Mobeye Panic Button with own SIM card 6
3. Getting started 7
3.1 Open the casing and insert the SIM card 7
3.2 Insert the batteries 8
3.3 Connect an external power supply (optionally) 8
3.4 Connect external buttons to the inputs (optionally) 9
3.5 Network connection and program mode 9
4. Programming when using the Mobeye SIM and portal 10
4.1 Sign up in the Mobeye Internet Portal 10
4.2 Register the Mobeye SIM card 10
4.3 Configuration and synchronisation 11
4.4 Basics of the Mobeye Internet Portal 11
4.5 How to activate the Panic Button 13
4.6 System reset 13
5. Possible settings 14
5.1 Alarm phone numbers 14
5.2 Test message 14
5.3 Input type 15
5.4 Alarm delay time 15
5.5 Inactive time 15
5.6 Alarm repeat time 15
5.7 Power failure message 15
5.8 Power failure delay time 16
5.9 Call and/or SMS (own SIM cards) 16
5.10 Priority of the message (own SIM cards) 16
6. Programming when using own SIM card 17
6.1 Program mode 17
6.2 Programming the settings by SMS 17
6.3 Program at least one telephone number 18
7. List of SMS commands for programming with own SIM 19
7.1 List of SMS commands 19
7.2 How to activate the Panic Button 20
7.3 System reset 20
7.4 SMS reports when using own SIM card 21
7.5 Technical messages 22
8. Status feedback 23

3
Attention! Very important
This user manual contains important guidelines for the installation and usage of
the Mobeye® device as described in this manual. Please read these thoroughly
before you start using the Mobeye® device.
In the case of damage caused by disregarding the guidelines and the instructions
for use, no liability is accepted and the warranty becomes void. The user must
regularly check the proper functioning of the Mobeye®device. The manufacturer
cannot be held liable for (direct and indirect) damage as a result of incorrect
operation or incorrect functioning of the device, software, internet or telecom
connection. The manufacturer is in no way liable for the loss of personal
passwords or codes.
Safety guidelines
• The permitted ambient temperature during operation may not be exceeded
(not lower than -10 °C and not higher than 50 °C).
• The device is intended for use in dry and clean places.
• Protect the device from moisture, heat and water splashing. Not intended for
external use.
• The guidelines for the battery usage must be regarded.
• Do not expose the device to strong vibrations.
• Do not let it fall from height.
• Do not use in an environment where any inflammable gases, vapors or dust are
present or could be present.
• Repair of the device may only be carried out by people, trained for Mobeye®
repair.
• If the device must be repaired, only original replacement components may be
used. The use of different parts may lead to damage of the Mobeye®device.
Use in accordance with the regulations
The purpose of this device in accordance with the regulations is sending messages
and making telephone calls after an alarm situation. Other uses are not permitted
and may invalidate the warranty.
Battery recycling
This product contains recyclable components. When disposing of this product,
please take it to a waste collection point for disposal or to your sales point. Bring
empty batteries to a recycling centre or collection point.

4
1. GENERAL DESCRIPTION
The Mobeye Panic Button is a monitoring device with an integrated
communication module used to send alarm notifications after the push
button was pressed for at least a second or after the activation of an input. It
can run battery operated or externally powered. If an external power supply
is used, it can also send a power failure alarm.
In order to activate the device, a few steps are to be followed.
First of all, you need to insert a SIM card. With the Mobeye SIM card, the
Panic Button uses the 4G LTE-M network. This network has a strong network
coverage, deep penetrability in buildings and also works in remote areas. The
Mobeye SIM card is a 'multi-provider' and can be used internationally; it may
choose from several providers per country. In case of a network problem it
will switch to another provider or fall back to 2G. In addition, the Mobeye
SIM card offers access to the Mobeye Internet Portal. This management
environment gives the device essential functions such as online
programming, display of status and history, extensive possibilities for
reporting messages and will also monitor test messages (keep alive).
Optionally, alarm messages are sent as a push message via an app. The
relevant contact person will receive instructions and an installation link on
their phone.
It is also possible to place your own (2G) SIM card. The most important alarm
functions such as calling and/or texting after an alarm also work. The
communication goes entirely through the 2G network. The Mobeye Internet
portal features will not work.
Where the installation steps differ for both modes of use, this is indicated.
The use of the Mobeye Internet Portal with Mobeye SIM card is also referred
to as Mobeye SIM/Portal.

5
2. STANDARD BEHAVIOUR
2.1 MOBEYE PANIC BUTTON WITH MOBEYE SIM AND INTERNET
PORTAL
The Mobeye Panic Button with Mobeye SIM card and registered on the
Mobeye Internet Portal, has the following behaviour as factory settings:
- In case the button is pressed for at least a second, the Mobeye Panic
Button sends an alarm message to the Mobeye Internet Portal. The Portal
forwards the alarm as push notification, call (spoken message), text
message and/or e-mail to the ‘alarm contacts’.
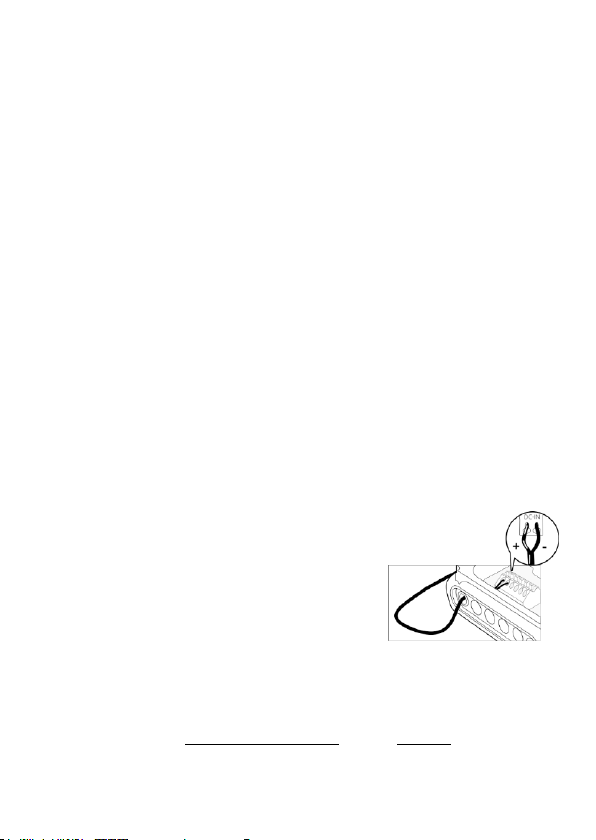
- In case external emergency buttons are connected to the external inputs
and these are activated, a message is sent to the Mobeye Internet Portal,
which forwards the message.
- When an external power supply is used and a power failure occurs, the
Mobeye Panic Button sends a ‘power failure’ message to Mobeye Internet
Portal, to be forwarded to the ‘alarm contacts’. When the power is
restored, the Mobeye Panic Button sends a ‘power restored’ message.
- When the batteries need to be replaced, the Mobeye Panic Button sends
a ‘low battery’ message to the Mobeye Internet Portal. The portal
forwards this to the ‘service’ contacts.
- The unit will send test messages to the portal as communication check
(default: every 7 days). If these are not received in time, the portal sends
an exception message to the ‘service’ contacts.
Chapter 5 describes how to influence the standard behaviour.
Communication between the Mobeye Panic Button and the Mobeye Internet
Portal takes place via data (and SMS as fallback). Messages can be sent as a
push message to the Mobeye Messages app (via the portal). If a contact
confirms the receipt of the message, the subsequent contacts will not receive
it (alternatively a group message is possible). If the message is not confirmed
(or the app is not used), it can still be sent by call (with spoken text). SMS
and email are also possible. A credit system applies to calling and SMS
texting, the other methods are unlimited. At initialisation and contract
renewal, a starting credit is loaded, which is sufficient for most users. In the
event of a low balance, the account holder will receive an email with the
advice to top up online. The credit balance has an unlimited validity period
and applies to all devices under one account.

6
2.2 MOBEYE PANIC BUTTON WITH OWN SIM CARD
The Mobeye Panic Button, equipped with your own SIM card, has the
following standard behavior as factory settings:
- When the button is pressed for at least a second, the Mobeye Panic
Button sends an alarm SMS text message and calls the phone numbers
programmed in by the user.
- When external emergency buttons are connected to the external inputs
and these are activated, the Mobeye Panic Button sends an alarm SMS
text message and calls the phone numbers programmed in by the user.
- When the batteries need to be replaced, the Mobeye Panic Button sends
a ‘low battery’SMS text message to the first telephone number.
- When an external power supply is used and a power failure occurs, the
Mobeye Panic Button sends a ‘power failure’ SMS text message to the
first telephone number. When the power is restored, the Mobeye Panic
Button sends a ‘power restored’ SMS text message.
Chapter 5 describes how to influence the standard behaviour.

7
3. GETTING STARTED
To get started with the Mobeye Panic Button, at least the following steps
need to be taken in the following order:
1. Open the casing and insert the SIM card
2. Insert the batteries
3. Connect an external power supply (optionally)
4. Connect an external button to the input (optionally)
5. Programming when using the Mobeye SIM/Portal
a. Sign up in the Mobeye Internet Portal
b. Activate the SIM card and the device
c. Program the settings and synchronise
d. Use of the portal and app
6. Programming when using your own SIM card
a. Enter the program mode
b. Program the settings
Steps 1 to 4 are described in sections 3.1 up to 3.3.
Step 5 is described in chapter 4. Step 6 can be found in chapter 6.
3.1 OPEN THE CASING AND INSERT THE SIM CARD
Open the casing by pressing the corners of the front panel with both thumbs.
Insert the SIM card into the module.

8
When using the Mobeye SIM card:
The Mobeye SIM card is PIN code secured and will only work in a Mobeye
device. Please do not place it in another device.
When using your own SIM card:
An own SIM card has a “micro” format, is suitable for the 2G network and can
make calls and send text messages. The PIN code is "0000", or the SIM card
is PIN code free.
(A PIN code can be changed or removed by putting the SIM card in to any mobile phone
and entering the 'security' menu.)
Note: make sure that the power supply is removed when inserting or
changing the SIM card. The settings are stored in the device memory.
3.2 INSERT THE BATTERIES
Insert the two batteries (CR123) in the module. Use the +/- indication for the
correct placement. If you replace the batteries the settings will not be
deleted, since they are stored in the device memory.
3.3 CONNECT AN EXTERNAL POWER SUPPLY (OPTIONALLY)
Although the Panic Button is designed to run on batteries, it is possible to
use an external power supply. In this mode the module is always connected
with the mobile network and therefore always in program mode. In this way
the messages are sent sooner. When the power
fails, the batteries take over and a power failure
alarm message is sent. The module continues
operating albeit in the low power mode. This
means the communication module switches off
and only establishes network connection when it
needs to send an alarm notification, test message
or low battery alert.
Connect the power adapter (or any other regulated 12-24VDC power supply)
to the power input of the connector (press on the green pins to connect the
wires).
Mobeye adapter 10027 position
- V+ to “+” black lead with white stripe left
- Ground to “-“black lead 2nd from left

9
3.4 CONNECT EXTERNAL BUTTONS TO THE INPUTS (OPTIONALLY)
It is possible to connect external (potential free) push buttons or output
signals to the inputs. Insert the 2 wires of the sensor through the hole in the
enclosure and insert them in the two connectors of input 1 (press on the
green pins for connecting the wires). It does not matter which wire is
connected to which connector.
As default the input is programmed as Normally Open (NO) contact. This
means the input is triggered if the input is closed for at least 1 second. In
case the contact is Normally Closed (NC), see paragraph 5.3. If the sensor
needs to be activated for a longer period before triggering an alarm, see 5.4.
- A second external sensor can be connected to input 2.
3.5 NETWORK CONNECTION AND PROGRAM MODE
After placing the batteries (and external power) the Mobeye Panic Button will
search for the network. The outside LED flashes green and red. This process
normally takes 10-30 seconds, in a new device this can take some minutes.
When the network has been established the LED will first blink green rapidly
and next stay green (or flashes 1 sec. on/1 sec. off in case the unit has not
been configured yet).
In a battery-operated unit a time-out occurs after 3 minutes,
after which the communication module switches off in order
to save the batteries. In this low power mode the LED flashes
once per 3 seconds. It will search for network connection
once it needs to send notifications. It can also been forced to
establish a network connection by re-inserting the batteries
or pressing the button at the back for 5 seconds.
If the Panic Button is connected to an external power supply, it has
continuous network connection and is permanently in program mode.

10
4. PROGRAMMING WHEN USING THE MOBEYE SIM AND PORTAL
4.1 SIGN UP IN THE MOBEYE INTERNET PORTAL
Go to www.mymobeye.com
and sign up for a new account.
Follow the instructions on the screen.
You will receive an e-mail to confirm the new account. After confirmation
login on the portal.
If you do not receive this e-mail, please check your spam box or ask Mobeye
(info@mobeye.com).
4.2 REGISTER THE MOBEYE SIM CARD
To activate the Mobeye SIM card in the Mobeye
Internet Portal, choose ‘activate SIM card’ on the ‘Add
Device´ screen.
Fill in the SIM card number. This is the number written
on the plastic SIM card below the barcode. You can
take the entire number or only the last 8 digits.
If the SIM card and batteries are already installed, a pop-up will appear,
where you assign a name and location to the device. You can change these
later.
(If you have not installed the SIM card and batteries before, you will first be
asked to select the device type, in your case it will be “CM4500”.)
At the moment you accept the price and terms, you confirm the subscription.
You will be taken to the payment screen. You will receive an invoice for the
mentioned amount. Your new device is now visible on the dashboard.
Before the device is ready for use, first prepare the settings and alarm
forwarding. See next paragraphs to learn how to do this.
Add Device
Activate SIM card

11
4.3 CONFIGURATION AND SYNCHRONISATION
The device settings can be programmed in the Mobeye Internet Portal. In
this way you prepare the settings, to be picked up by the device. Since the
Mobeye device is leading in the communication between the portal and the
device, the data synchronisation is done after:
1) any message to the portal (regular test message, alarm, low batteries).
2) reconnecting power and reinserting batteries.
3) pressing the button (at the backside) for 5 seconds.
4) pressing the SYNC symbol in the portal settings (only visible if external
power is connected), or sending the SMS command 1111 SYNC to the
phone number in the unit (1111 is the security code in factory settings).
During the data exchange with the portal, the LED flashes green. A battery-
operated unit will first blink red-green while connecting to the network.
4.4 BASICS OF THE MOBEYE INTERNET PORTAL
Dashboard
With multiple devices, the dashboard shows all devices, with the (alarm)
messages in the last 24 hours, (missed) test messages and low battery status.
If devices in the dashboard have logging functions, the dashboard changes
when you click on "Diagrams" or "Gauges" in the gray bar.
Select a device to go to the details of a specific device.
Status & History
The status block shows values about the status of the unit.
If the "Synchronised" status is set to "No", there are new settings or alarm
numbers that still need to be transferred to the device.
The network strength value at the last communication session is shown. If
the value is lower than -98 dB, consider another location for the device.
Click on the position icon to see the geographical location during the last
report. Note: this is an indication based on "cell-id".
The history displays all historical events. Click on "all events" to see the list.

12
Device Settings
The device settings can be changed via the Mobeye Internet Portal. To do
this, click on the "edit" icon and type in the security code (factory setting is
"1111"). See chapter 5 for the description per setting.
After saving the new settings, they must be retrieved by the device
(synchronized). See 4.3 for more information about synchronizing.
In the block “device data”the name and location of the device can be
changed. These texts are mentioned in the call, text message and e-mail to
indicate the device. A free text is available as an internal comment field. This
is not included in reports.
Alarm dispatch and the Mobeye app
In the block "Contacts for messages" you link the contact persons who
receive alarm and service messages via push notification, call, text message
and/or e-mail. Service messages can be warnings about missed test
messages and low battery voltage. To add a contact person, first create it as
a contact. This can be done via the +or in the main menu under the blue
Contacts tab. For push notifications, install the Mobeye Messages app
from the Play Store/App Store on the phone.
- Select "App message" for a push notification. A contact will then (once)
receive a code via SMS to register in the app.
- Optionally select "Voice call" as a fallback: If none of the contacts confirm
the app message, a voice call will follow.
- If no app message is set for a contact, but call is set, this call is always made
(regardless of whether other contacts receive push notifications).
- If SMS and/or email is set up for a contact, this is always sent (possibly
alongside the app message).
- An app message can be sent as a group message (to all contacts at once)
or via an escalation plan (where a "confirmation" prevents the app message
from being forwarded to a next contact).
- When selecting "Escalation", adjust the order with the arrows ▲ and ▼.
Hints:
- Always include an email contact for service notifications.
- During testing, we recommend using the app and email (and minimizing
calls and texts) to save on credit.
- If the app asks for a new code or a contact has a new phone, send it from
the contacts tab (change contact).

13
Message texts
The message texts contain the texts that, in addition to the name and
location, are included in the messages. These texts can be adapted to your
own text.
4.5 HOW TO ACTIVATE THE PANIC BUTTON
After the previous steps the Mobeye Panic Button is
ready for use. It is armed automatically.
In order to activate the Mobeye Panic Button, press
the button at the backside for at least 1 second. The
green LED switches off to indicate the disarmed
status.
4.6 SYSTEM RESET
To reset the Panic Button two steps are necessary, in following sequence:
1. Delete the Mobeye Panic Button from the Mobeye Internet Portal
Go to "Device Settings" and click on the delete icon in the "Device" block.
Then confirm your choice.
2. Reset the Mobeye Panic Button to its factory settings
1. Remove the batteries and SIM card (and external power supply).
2. Press the outside button while reinserting the batteries. Keep it pressed
for (about) another 5 seconds.
3. Release the button immediately after the LED starts to flash.
After a successful reset, the status LED will blink green to indicate that the
module is not configured. The security code is back to factory settings as
well.
The SIM card is now disconnected and is visible on the "Add device" screen.
The SIM card can be used again in another (or the same) Mobeye device in
combination with the portal.

14
5. POSSIBLE SETTINGS
The Mobeye Panic Button has many setting options that influence the
behaviour of the module. If connected on the Mobeye Internet Portal, the
settings are prepared in the portal (see chapter 4). If your own SIM card is
used, programming is done via SMS commands (see chapter 6).
5.1 ALARM PHONE NUMBERS
When using Mobeye Internet Portal: an unlimited number of contacts can
receive the alarm messages. These are set in the portal.
When using your own SIM card: the Mobeye Panic Button can inform 5
telephone numbers in the event of an alarm. It is mandatory to set at least
one number (TEL1). The numbers set are used for the telephone calls and/or
SMS messages from the unit.
5.2 TEST MESSAGE
When using the Mobeye Internet Portal: The Mobeye Panic Button can send
regular test messages (keep alive) to the Mobeye Internet Portal, to ensure
the proper functioning of the unit. The test message will also be sent if the
unit is disarmed. The Mobeye Internet Portal expects the test message and
checks the timely receipt. The monitoring of the test messages follows the
‘management by exception’ rule: only if the message was not received, the
‘service’ contacts will receive a notification.
The timing of the test message can be programmed. Since new settings
(options) will be synchronised after the test message, setting a specific time
of the test message may help the process of remote programming. Example:
if you force a daily test message at 17.30 hrs, you can prepare new settings
and be sure they are loaded into the device before the evening.
The interval between the test messages can be set between 0 days (no test
message) and 30 days. The default test interval is set to "7" (weekly).
When using your own SIM card: The Mobeye Panic Button can send regular
test SMS messages (keep alive) to the first phone number (TEL1), to ensure
the proper functioning of the unit. The test message function is only active if
the unit is armed. The timing of the test message is determined by the time
of programming. The test time can also be set. The interval between the test

15
messages can be set between 0 days (no test message) and 30 days. The
default test interval is set to "0" (no test message).
5.3 INPUT TYPE
The input type defines the character of the additional inputs IN1 and IN2.
This can be Normally Open (NO) or Normally Closed (NC). If an input is set
to "NO", the alarm will be triggered as soon as the terminals of the input are
closed. If the input is set to NC, the alarm is triggered when the connection
between the input terminals is broken. The default input type is set to "NO".
5.4 ALARM DELAY TIME
The input delay time defines the time that the input is triggered before an
alarm is initiated. If the input returns to the non-alarm status within the delay
time, no alarm is sent. The time can be set between 0 and 999 seconds. As
default, the input delay time is set to 0 second for input 1 and 1 for input 2.
5.5 INACTIVE TIME
The “inactive time” defines the time an input is not active after an activation.
During the inactive time, no new alarm message will be sent. Only when the
input returned to the non-alarm status, gets activated again and remains
active, an alarm will be sent yet after the inactive time. If the time is set to “0”
(minutes), the input will be active again immediately after returning to the
non-alarm status. The time can be set between 0 and 60 minutes. As default,
the inactive time is set to “0”.
5.6 ALARM REPEAT TIME
In order to emphasize the urgency of the alarm messages, all alarms can be
repeated. As long as the input has not returned to the inactive status, the
textual messages (no phone calls) will be repeated after the ‘alarm repeat
time’. The repeat interval can be set between 0 and 24 hours. As default the
alarm repeat time is set to 0 hours.
5.7 POWER FAILURE MESSAGE
If the Mobeye Panic Button is supplied with external power and the power
fails, it can send alarm messages. If the setting is "OFF", no message is sent.

16
When set to “ALARM”, notifications are sent to the set contacts. When using
your own SIM card, the setting “ALERT” only results in an SMS notification to
TEL1. The default setting is "OFF" for portal use and “ALERT” for own SIM
cards.
5.8 POWER FAILURE DELAY TIME
To avoid false alarms caused by short power failures, a power failure delay
time can be set. This defines the time between the initial power failure and
the alarm notification. If the power is restored within the delay time, no
alarm is sent. The time can be set between 0 and 999 minutes. As default, the
delay time is set to "0".
5.9 CALL AND/OR SMS (OWN SIM CARDS)
When using your own SIM card, by default the Panic Button will call and
send SMS text messages. It is possible to suppress one of these. By turning
off the CALL, the unit will only send SMS text messages. By turning off the
SMS, it will only call. The default both values are set to "ON".
5.10 PRIORITY OF THE MESSAGE (OWN SIM CARDS)
This setting is only relevant once using your own SIM card. In the event of an
alarm, the Mobeye Panic Button will first send an SMS notification and then
call the contacts. The priority can be changed to CALL first. By default, the
priority is MESSAGE (SMS is sent first).

17
6. PROGRAMMING WHEN USING OWN SIM CARD
If your own SIM card is used, programming proceeds via SMS commands.
For this purpose the communication module requires network connection.
6.1 PROGRAM MODE
If the Panic Button is connected to an external power supply, it has
continuous network connection and is permanently in program mode.
A battery-operated Mobeye Panic Button switches to the program mode
after re-inserting the batteries or pressing the button at the back for 5
seconds. While searching for the network connection the outside LED flashes
green and red. This process normally takes 10-30 seconds. When the
network has been established the LED will first blink green rapidly and next
stay green (or flashes 1 sec. on/1 sec. off in case the unit has not been
configured yet).
In this program mode the device is ready to receive commands and settings.
In a battery-operated unit a time-out occurs if no correct command is
received for 3 minutes, after which the communication module switches off
in order to save the batteries. In this low power mode the LED flashes once
per 3 seconds to indicate it is armed.
6.2 PROGRAMMING THE SETTINGS BY SMS
When using your own SIM card, the settings are programmed in by SMS text
messages:
1. Make sure the Panic Button is in program mode (please refer to 6.1).
2. Send an SMS text message with the (security) code and the command.
3. The green LED blinks 3 times to indicate the successful configuration. In
case of an incorrect command, the red LED flashes 5 times.
SMS messages have the following content: CODE COMMAND:OPTION
Example: 1111 TEL1:0044772345678
- CODE stands for the security code, factory setting is 1111.
- Do not forget the space character between (security) code and command.
- The commands are case insensitive.

18
- Several commands may be combined in one SMS message (with a
maximum of 160 characters) by placing a # between the commands.
CODE COMMAND:OPTION#COMMAND:OPTION#COMMAND:OPTION
- All settings are saved and remain saved, even when the unit has no
power or the batteries are removed.
In chapter 5 the options are explained.
In chapter 7.1 all possible SMS commands are listed.
6.3 PROGRAM AT LEAST ONE TELEPHONE NUMBER
The Mobeye Panic Button is able to send messages up to 5 telephone
numbers. The first telephone number (TEL1) is mandatory. This number will
receive, next to alarm message, also system messages such as battery low
and keep-alive message. The telephone number TEL1 is programmed via an
SMS command. This can be done from any telephone, making it possible to
program someone else's number. The TEL1 telephone will receive a
confirmation text message with the security code.
SMS command 1st telephone number: CODE TEL1:
example: 1111 TEL1:07212345678
.... similar for TEL2 ... TEL5
To program international numbers, start with 00 followed by the country
code (for example 0044123456789).
example: 1111 TEL1:0044612345678

19
7. LIST OF SMS COMMANDS FOR PROGRAMMING WITH OWN SIM
7.1 LIST OF SMS COMMANDS
When using your own SIM card, the settings are programmed via SMS
commands. See chapter 6 for the programming method and chapter 5 for an
explanation per setting. The commands are case insensitive.
Setting
SMS command
Options
Default value
Change security code
INSTCODE:
0000 ··· 9999
1111
Set telephone number
for alarm messages
TEL1:
. . .
TEL5:
Empty
Delete telephone
number
DEL1
. . .
DEL5
Identification text
NAME:
20 characters
Mobeye
Interval ‘test SMS’
TEST:
0 ··· 30 (days)
0
Time test message
TESTTIME:
hhmm
Input type input 1
TYPEIN1:
NO, NC
NO
Input type input 2
TYPEIN2:
NO, NC
NO
Delay on input 1
DELAY1:
0 ··· 999 (sec)
0
Delay on input 2
DELAY2:
0 ··· 999 (sec)
1
Inactive time input 1
INACTIVEIN1:
0 ··· 60 (min)
0
Inactive time input 2
INACTIVEIN2:
0 ··· 60 (min)
0
Alarm repeat time
REPEAT:
0 ··· 24 (hrs)
0
Power message
POWERMESSAGE:
OFF,ALERT,ALARM
ALERT
Power failure delay time
DELAYPOW:
0 ··· 999 (min)
0
Actual time
TIME:
hhmm
Empty
Actual date
DATE:
yyyymmdd
Empty
Call on/off
CALL:
ON, OFF
ON
SMS on/off
SMS:
ON, OFF
ON
Priority
PRIO:
CALL, MESSAGE
MESSAGE
Alarm tekst button
TEXT1:
20 characters
Panic alarm
Alarm text input 1
TEXT2:
20 characters
Panic alarm
Alarm text input 2
TEXT3:
20 characters
Panic alarm
Alarm text power failure
TEXT4:
20 characters
Power failure
Alarm text power restore
TEXT5:
20 characters
Power restored
Examples: Set phone number 1: 1111 TEL1:0712345678
Delete phone number 1: 1111 del1
Table of contents
Popular Safety Equipment manuals by other brands

JSP
JSP FAR0804 INSTRUCTIONS ON USE, CARE AND INSPECTION

Ansell
Ansell AlphaTec 4000 APOLLO Instructions for use

Kapriol
Kapriol 27956 Manufacturer's instruction and information

Guardian
Guardian 01608 instruction manual

RITE-HITE
RITE-HITE Dok-Guardian HD Installation/Service/Owner's Manual

Respirex
Respirex WORKMASTER COMPACT DIELECTRIC OVERBOOT User information