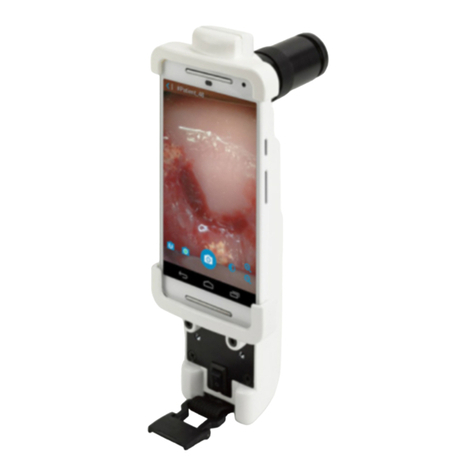
MobileODT EVA System User manual

Enhanced Visual
Assessment System
EVA System – Hardware Guide
Instructions for Use

EVA System: User Guide
2
T ABLE OF CONTENTS
Welcome to the EVA (Enhanced Visual Assessment) System ..................... 3
Get to know the EVA System ...................................................................... 4
Assemble the hardware .................................................................................... 6
How to capture clinically-useful image? ................................................... 10
Stability ........................................................................................................ 10
Positioning ................................................................................................... 11
Light ............................................................................................................. 12
Focus ............................................................................................................ 13
Care and Maintenance .............................................................................. 14
Charging ........................................................................................................... 15
Device Troubleshooting ................................................................................... 16
Lens Troubleshooting ...................................................................................... 17
Replacement Wear Parts and Technical Service ............................................. 18
Technical Product Overview ...................................................................... 19
Illumination ..................................................................................................... 19
Specifications ................................................................................................... 20
Appropriate Use .............................................................................................. 21
Indications for Use ........................................................................................... 21
Contraindications ............................................................................................ 21
Risks and Benefits ............................................................................................ 21
Important Notes on Safety .............................................................................. 21
List of Warnings ............................................................................................... 21
Symbols and Markings ..................................................................................... 22
All specifications for the product are subject to change without notice.
Contents of the User Guide and other written materials provided to the
health service provider with the product may not be reproduced by any
means whatsoever without prior written permission from MobileODT.
All products mentioned in this User Guide and related written materials
are trademarked or copyrighted by their manufacturers.
Doc. 10-GE-002
Rev.01
Printed on 29/06/2016
Mobile ODT, LTD Gershon Shatz 41 2nd Floor Tel-Aviv, Israel.

EVA System: User Guide
3
Welcome to the EVA (Enhanced Visual Assessment) System
Thank you for choosing to use the EVA System. The System has been developed
for use by health providers to enable a more powerful visual examination.
The EVA System is intended to provide magnified views of the vagina, cervix and
external genitalia in order to aid in detecting abnormalities and guiding
treatment.
In the following pages you will learn how to use the EVA System and its different
components. The current version of the EVA System is a result of rigorous
research, testing and ongoing learning from use in the field. We are constantly
looking for new and exciting ways to improve the System and support health
providers. Please do not hesitate to reach out to [email protected] with
any idea, question or thought you may have!
We are proud that The EVA System is currently deployed in over 20 countries
around the world, supporting the work of health providers in hospitals, doctor’s
offices, rural clinics, screening camps and more. Wherever you are using the
System - we are excited to support you in providing the best and most effective
care for your patients.
All the best,
Your friends at MobileODT, Ltd

EVA System: User Guide
4
Get to know the EVA System
Back View
Strap clip

EVA System: User Guide
5
Front View Lens

EVA System: User Guide
6
Assemble the hardware
1. Take out items
2. Top bracket

EVA System: User Guide
7
The bracket is magnetic.
Apply gentle force.
Do not pull up or down.
3. Pull bracket outward
4. Place phone into the device

EVA System: User Guide
8
5. Connect bracket to device
6. Attach the strap to the bottom of the device
The latch on the strap fits into the latch on the device.

EVA System: User Guide
9
7. The device is ready for use
8. After the examination, be sure to store the EVA System in the storage box. To
close the box push downward on the corner of the case and lock the two latches.
9. In order to use the EVA System, it is necessary to install the designated
software on the smartphone. Please refer to the software handbook provided
for further information. If you did not receive such a handbook, please contact
support@mobileodt.com for further assistance.

EVA System: User Guide
10
How to capture clinically-useful image?
Clinically images are critical for remote consultation, documentation and quality
assurance. There are five simple ways that make sure an image is clinically-
useful:
Stability
The EVA System Device should be held in a stable position while capturing an
image. The Device can be stabilized by:
1. Using the neck-strap: when holding the Device by
hand and neck-strap, please confirm that the
neck-strap is completely out-stretched. The
length of the neck-strap can be adjusted for the
user's comfort.
Aside from the neck-strap provided with the System, there are several
other ways to stabilize the device:
2. Using a tri-pod: The EVA System can be attached to any standard camera
tri-pod. The height of the tri-pod should match that of the examination
table (standard medical table height is 80-110 cm).
3. Foot pedal: The EVA System can connect to any standard Bluetooth foot
pedal, which allows the user to perform the examination without
touching the smartphone’s screen, reducing vibration that may lead to
motion blur and compromised image quality.
4. Hand Gestures: Images can be captured without touching the screen,
through the "hand gesture" feature. If this feature is activated when the
user waves in front of the screen while in the visualization screen, the
EVA System will capture an image.
Please note that options 3 and 4 are only available to those users who are using
a tri-pod or stand together with the System.
MobileODT can provide a designated stand on which the device can be mounted,
as well as a foot-pedal that has been tested to work with the EVA System. For
further information, please visit www.mobileodt.com or contact

EVA System: User Guide
11
Positioning
1. Distance: The device should be positioned at a distance of 22.5-42.5 cm / 9-
16.5 inches from the patient’s vaginal canal.
Important: the device should not come into physical contact with the patient.
2. Angle: The entire face of the cervix should be captured in the image,
without the speculum. The lens of the device is aimed directly at the
patient's cervix.
Incorrect: Distance more than 42.5 cm / 16.5 in.
Incorrect: Distance less than 22.5 cm / 9 in.
Correct: Distance in between 22.5-42.5 cm / 9-16.5 in.
22.5-42.5 cm
> 42.5 cm / 16.5
in.
< 22.5 cm / 9
in.

EVA System: User Guide
12
Light
The cervix should be fully illuminated and without glare.
1. The EVA System reduces glare with a filter, however glare from the
speculum is still possible. If this is the case, reposition the EVA System
and/or the speculum until there is less glare.
2. When holding the device, do not block the light-source with your finger.
Correct: Hand is not blocking light-source.
Incorrect: Hand is blocking light source.

EVA System: User Guide
13
The manual focus
Focus
There are two ways to adjust the focus of the EVA System. The first is to adjust
the distance between the device and the patient. Remember that the position of
each cervix is different, so it may be necessary to readjust your position
according to the patient to ensure the EVA System remains in focus.
Once you have achieved adequate focus, as you zoom in and out digitally you
can use the manual focus wheel at the tip of the lens to adjust your focus.
The recommended default setting for the manual focus ring
is having it turned completely to the right. If you find that
working at the distance which normally yields the clearest
images doesn’t work, you can try adjusting the focus
manually by turning the focus wheel at the tip of the lens
to the right and to the left.
After you have captured images, it is important to review
the images captured to verify that they are clinically-useful.

EVA System: User Guide
14
Care and Maintenance
Taking care of the EVA System is simple - no great effort is needed to keep it in a
tidy and functional condition. We recommend that you consistently carry out the
measures described below, in order to ensure long-term and trouble-free
functioning.
Storage: For the protection of the entire System and, in particular, the
optical system, we recommend placing the device in its provided case
when not in use, in order to minimize dust contamination of the device.
Liquids: liquid splashes on the front panel can occur with device usage
and these should be wiped off. If the external optics are soiled, they
should only be cleaned with commercially available lens cleaning papers
or moist spectacle cleaning cloths Do not use towels.
Disinfecting: Lugol’s solution will damage the enamel finish and is very
difficult to remove. Moisten a cloth with diluted alcohol and wipe the
enamel to remove Lugol’s. Standard detergents can also be employed
with the usual dilution.
Please do not use strong detergents or concentrated alcohol under any
circumstances for the cleaning of optics. This would lead to irrevocable damage
to the optically coated lens surfaces.

EVA System: User Guide
15
Charging
Charging the device
The EVA System's light source is powered by a rechargeable battery contained
within the device. The battery possess charge capacity sufficient for
approximately 10 hours of continual or intermittent use.
To charge the EVA System, simply remove the
phone from the device and connect the USB
charger into charging port found on the back of
the EVA System. Connect the cable to the wall
with the proper USB-electrical port adapter.
Please note: such adapters are not provided with
the EVA System, as they vary greatly from country
to country.
A LED indicator light resides above the charging port on the back of the device.
When connected to the charger, the light will turn on and turn green when fully
charged.
WARNING: The device should not be used while it is being charged.
WARNING: If the LED Illumination Light ceases to work, due to battery
drain or bulb burn out, stop using the device and recharge the batteries.
Sometimes a discharged battery will manifest itself by blinking the LED very
rapidly. In this case, recharge the battery to full capacity before continuing use.
Charging the phone
Charging of the phone should be done according to the instructions provided in
the phone's user manual. The phone should be charged whenever the EVA
System is not in use in order to ensure proper functionality during the
examination.

EVA System: User Guide
16
In case the device and/or smartphone have been stolen, please contact
[email protected] immediately.
Device Troubleshooting
LED won't turn on
If the LED won't turn on, make sure the EVA System is fully charged. If,
after charging, the LED does not turn on, the user should contact service.
Low Battery
If low battery or depleted battery is suspected, the user should check
that the Illumination LED is lit. If it is not lit, the user should charge the
battery.
Battery Disconnection
If the battery becomes partially or fully disconnected the user should
contact service. If your EVA System is fully charged but the LED
illumination is not turning on, or turning on and off, this may indicate
battery disconnection.
Warning: This device contains lithium batteries. A battery replacement
by inadequately trained personnel could result in a hazard (such as
excessive temperatures, fire or explosion).
Illumination LED Lights
If the user suspects that the Illumination LED is burned causing artifacts
in the image or a low-resolution image, the user should check that the
Illumination LED is lit. If it is not lit and the battery is charged, the user
should contact service to replace the device.
LED Indicator Lights
The user should check that the LED indicator light is lit during battery
charge. If it is not lit, it may indicate that the light has burnt out and the
user should contact service to replace the device.

EVA System: User Guide
17
Brackets
If the device brackets are broken and the smartphone is not sitting
properly in the cradle causing artifacts in the image or a low-resolution
image, the user should contact service to replace the device.
Device Casing
If the device casing is cracked or not intact leading to artifacts in the
image or low-resolution image, the user should contact service to
replace the device.
On/Off Switch
If the on/off switch is stuck in either the on or off position, the user
should contact service to replace the device.
USB Connector
If the USB connector (input) is broken, the user should contact service to
replace the device.
Lens Troubleshooting
Lens Cracks or Misalignment
If there are artifacts or low-resolution images because of a cracked or
misaligned lens, the app’s software should check for distortions in the
image or the user should do a calibration check daily. If either of these
checks fail, the user should contact service to replace the lens.
Dirt on Lens
If there are artifacts or low-resolution images due to dirt on the lens, the
app’s software should check for distortions in the image or the user
should do a calibration check daily. The user should also clean the lens. If
these checks fail, the user should contact service to replace the lens.
Focus Adjustment
Focus is maintained with the colposcope by adjusting the separation of
the objective lens, positioned at the far-end of the lens tube opposite
the smartphone’s camera, from the rest of the lens system. This can be
done by screwing the end piece in or out. The two extreme positions
correspond to working distances of 22.5 and 42.5cm.

EVA System: User Guide
18
Replacement Wear Parts and Technical Service
When contacting MobileODT’s Service and Repair department for servicing the
EVA System, you will need to provide the following information: Details on the
defect that has occurred and corresponding serial number of the device. These
can be read off from the label located on the back of your device, where the
phone is to be inserted.
For questions concerning service, please contact us at support@mobileodt.com
The following is the contact information for MobileODT, the manufacturer of the
EVA System:
MobileODT, LTD. Gershon Shatz 41
Tel Aviv, Israel
Website: www.mobileodt.com
The following is the contact information for the Authorized Representative used
for this device:
MedNet GmbH Borkstrasse 10
48163 Muenster, Germany www.medneteurope.com

EVA System: User Guide
19
Technical Product Overview
Before initial set up of the EVA System, check for damage on the outside of the
transport packaging, the device, and any accessories. Please check all
components received against the parts list of components section to verify a
complete set. If parts are missing, please notify MobileODT. The EVA System
always includes the following items:
1. The colposcope body
2. The lens
3. The upper and lower phone brackets*
4. The neck strap: provided to aid with the usability of the device, for ease of
carrying and for use as a supplementary fulcrum. It can support the weight of
the colposcope while the user uses his or her hands for other aspects of
providing care and it can be used as a support to help stabilize the camera
while it is being held by the user’s hands.
5. The mobile application
6. The web portal
7. User guide
*The device does not include the Smartphone. Phones that are compatible with
this device include the Moto G2, Moto G3 and Samsung J5.
Illumination
Illumination of the EVA System is provided through a LED light-source found on
the body of the device. It has been designed to transmit no heat or electricity,
and to be comfortable for touch during a normal, 10-minute session. It includes:
Three 16850 LiOn 2600Mh batteries + protection circuit.
Two 350 mA LED drivers (700 mA)
ON/OFF switch
Micro USB charging circuit 5V input (1.5A - 2A Max)
The 3W LED is operated at 2.5W providing ~230 Lux of luminous flux at a beam
angle of 15 degrees.

EVA System: User Guide
20
Specifications
Item
Specification
Technical Data
Power Requirements
Charger Input Voltage
Frequency
Output
As rated by MicroUSB Charger
5V DC
Dimensions
Colposcope (HxWxD)
Lens
20.8cm x 7.8cm x 11cm (w/lens)
20.8cm x 7.8cm x 6cm (w/o lens)
93.1mm long x 30mm diameter
Weight
Colposcope
Lens
400g
108g
EVA System
Specifications
(For Samsung J5)
Working Distance
Magnification
Field of View
Depth of Field
225mm – 425mm
4.0X optical/17X with digital zoom
(at 250mm)
3.8X optical/16X with digital zoom
(at 450mm)
54mm (at 250mm) - 106mm
(at 450mm)
17mm (at 250mm) - 34mm
(at 450mm)
Operating
Environment
Ambient Temperature
Relative Humidity
Atmospheric Pressure
50°F (10°C) to 105°F (40°C)
95% max
70kPa to 110kPa
Illumination
Lamp type
Lamp voltage
6500K 3W LED
3.6V
Other manuals for EVA System
2
Table of contents
Other MobileODT Medical Equipment manuals
Popular Medical Equipment manuals by other brands

Flight Medical Innovations
Flight Medical Innovations Flight 60 Ventilator Operator's manual

SAESHIN
SAESHIN medi Power quick start guide

Blatchford
Blatchford Esprit ESP22L1S Instructions for use

burmeier
burmeier Vertica-Homecare instruction manual

Otto Bock
Otto Bock 3R90 Instructions for use

Organ recovery systems
Organ recovery systems Lifeport Kidney Transporter Cover Instructions for use