Mobridge m1000-m-da series Instruction Manual

MOBRIDGE M1000-M-DA SERIES | INSTALL NOTES
PAGE | 1
Installation & User manual for the mObrid e M1000-M-DA series of Pre-Amplifiers
MOBRIDGE M1000-M-DA MERCEDES INSTALLATION V1.0

MOBRIDGE M1000-M-DA SERIES | INSTALL NOTES
PAGE | 2
WELCOME! ............................................................................................................................................................................. 4
DISCLAIMER ........................................................................................................................................................................... 5
MERCEDES SUPPORTED RADIOS ............................................................................................................................................ 6
KIT CONTENTS ........................................................................................................................................................................ 7
M1000-M-DA1C
ONTENTS
............................................................................................................................................................ 7
M1000-M-DA2
&
M1000-M-DA3
C
ONTENTS
................................................................................................................................ 7
COMMON INSTALL NOTES ...................................................................................................................................................... 7
POWER WIRING HARNESS & MOST CABLE ............................................................................................................................. 9
GRAPHICAL INTERFACE OPERATION ....................................................................................................................................... 9
C
ONNECTING AND
C
HANNEL
M
APPING
............................................................................................................................................. 10
C
ROSSOVER
(F
ILTER
)
S
ET UP
........................................................................................................................................................... 10
I
NDIVIDUAL
C
HANNEL
E
QUALI ATION
............................................................................................................................................... 11
I
NDIVIDUAL
S
PEAKER
T
IME
A
LIGNMENT
............................................................................................................................................ 12
M
ASTER
E
QUALI ATION
................................................................................................................................................................. 13
S
AVING
S
ETUPS
&
P
RESETS
............................................................................................................................................................ 14
VEHICLE CODING .................................................................................................................................................................. 15
NTG1.0
W220
S
C
LASS
............................................................................................................................................................... 15
NTG2.0/A
UDIO
20/A
UDIO
50 ........................................................................................................................................................ 15
NTG2.5 ..................................................................................................................................................................................... 15
NTG4.0/4.5/4.7 ........................................................................................................................................................................ 15
MOBRIDGE SOFTWARE UPDATE ........................................................................................................................................... 17
U
PDATING VIA THE
W
I ARD
............................................................................................................................................................ 17
U
PDATING VIA THE
DSP
G
RAPHICAL
I
NTERFACE
.................................................................................................................................. 20
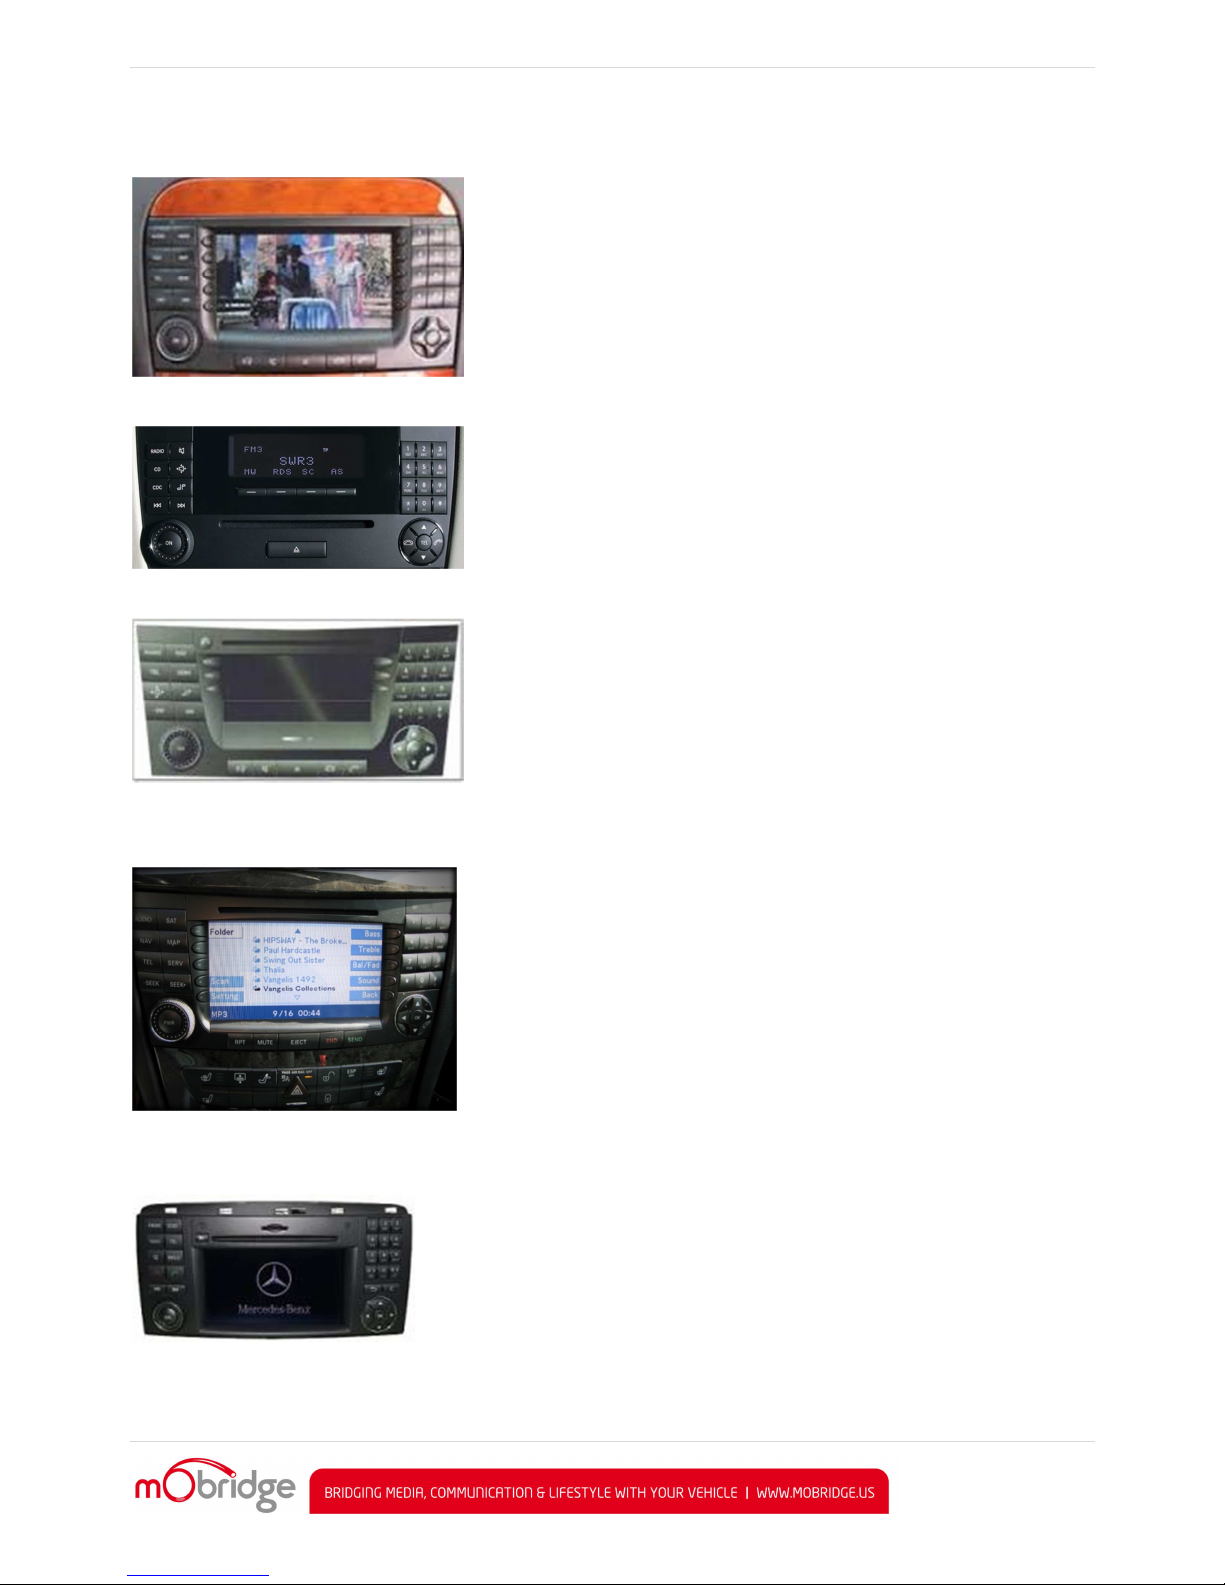
Figure 1 W220 S Class COMAND NTG1.0........................................................................................................................................ 6
Figure 2 Audio20 ............................................................................................................................................................................ 6
Figure 3 Audio50 ............................................................................................................................................................................ 6
Figure 4 COMAND NTG2.0 .............................................................................................................................................................. 6
Figure 5 COMAND NTG2.5 .............................................................................................................................................................. 6
Figure 6 NTG 4.0/4.5/4.7 ................................................................................................................................................................ 7
Figure 7 DA1 Kit Contents ............................................................................................................................................................... 9
Figure 8 DA2/DA3 Kit Contents ...................................................................................................................................................... 9
Figure 9 M1000-M-DA3 Connected .............................................................................................................................................. 10
Figure 10 M1000-M-DA3 Crossovers ............................................................................................................................................ 11
Figure 11 Channel Equalizer ......................................................................................................................................................... 12
Figure 12 Channel Equalizer with mater mark ............................................................................................................................. 12
Figure 13 Time Alignment Cross Hairs .......................................................................................................................................... 13
Figure 14 Master Equalization ...................................................................................................................................................... 14
Figure 15 Saving Tuned Settings ................................................................................................................................................... 14
Figure 16 NTG2.5 Surround Modes to change DA3 presets ......................................................................................................... 15
Figure 17 NTG2.0 Surround Modes to change DA3 presets ......................................................................................................... 15
Figure 18 Engineering mode......................................................................................................................................................... 16
Figure 19 Select the TGW Parameter ........................................................................................................................................... 16
Figure 20 Select Audio Source ...................................................................................................................................................... 17
Figure 21 Select ‘External Amp’ .................................................................................................................................................... 17
Figure 23 Wizard interface selection ............................................................................................................................................ 18
Figure 24 Select USB port ............................................................................................................................................................. 18
Figure 25 DA software versions .................................................................................................................................................... 19
Figure 26 Select update file .......................................................................................................................................................... 19
Figure 27 Software Update Complete .......................................................................................................................................... 20
Figure 28 DA is connected to the DSP GUI and we can click on 'Connected' ............................................................................... 20

MOBRIDGE M1000-M-DA SERIES | INSTALL NOTES
PAGE | 3
Figure 29 Click on 'Manual Update' and select the file ................................................................................................................ 21
Figure 30 DA3 update in progress ................................................................................................................................................ 21

MOBRIDGE M1000-M-DA SERIES | INSTALL NOTES
PAGE | 4
Welcome!
Dear Buyer,
Con ratulations on your purchase of a mObrid e M1000-M-DA Pre-Amplifier. mObrid e prides itself on strivin to
develop and manufacture products to the hi hest en ineerin quality standards and seamlessly inte ratin these
products with factory audio visual systems.
The mObrid e M1000-M-DA series are some of the most advanced DSP aftermarket audio inte ration interfaces
available for the MOST Bus based vehicles, and comes with an easy to use PC & Mac Graphical Interface for set
up and tunin for the DA2 (limited interface) & DA3 systems. This can be downloaded free from our
www.mobrid e.us
website.
Features, dependin on DA model, include TOSLINK output, Channel Mappin to 8 RCA output channels, 1000
Point Parametric Graphic Equalizer for each channel, as well as a ‘Master EQ’, Crossover Type and crossover
points for each speaker, crossover slope, individual speaker time ali nment, phase adjustment, Q factor (Both left
and ri ht), and summin for subwoofer or centre channel set up.
As with all mObrid e products, we have included a USB port for USB up rades of the software allowin for new
features to be added as they become available. The M1000-M-DA series can be updated by simply loadin the
latest software from our website and throu h the use of either the Wizard or the DSP user interface.
The M1000-M-DA series may also have system function up rades available for purchase and download from time
to time. These will also be available on our website.
We hope you enjoy your new enhanced listenin experience!
Kind re ards,
mObrid e

MOBRIDGE M1000-M-DA SERIES | INSTALL NOTES
PAGE | 5
Disclaimer
mObrid e makes every effort to try and keep the support and installation documentation up to date.
We do not reimburse or bear costs arisin from installations should installation issues occur. mObrid e can be
contacted via email and also via its world wide distribution network. We always recommend contactin the local
distributor first, and althou h we endeavor to answer emails we receive in a timely manner, due to time zone
differences we may not be able to respond immediately.
mObrid e always recommends professional installation of these products as they are technically complex,
involvin optical fiber across multiple vehicle confi urations and software versions within these vehicles.
In some cases vehicles may require codin by specialist workshops and dia nostic equipment. mObrid e always
recommends allocatin a number of hours to any installation, just in case any issues should arise.

MOBRIDGE M1000-M-DA SERIES | INSTALL NOTES
PAGE | 6
Mercedes Supported Radios
F gure 1 W220 S Class COMAND NTG1.0
F gure 2 Aud o20
F gure 3 Aud o50
F gure 4 COMAND NTG2.0
F gure 5 COMAND NTG2.5

MOBRIDGE M1000-M-DA SERIES | INSTALL NOTES
PAGE | 7
F gure 6 NTG 4.0/4.5/4.7
The Mercedes W211 (E Class 2003-2008) and the R171 (SLK 2005-2008) use the Aud o50 and COMAND NTG rad os w th a
separate Aud o Gateway known as the AGW. The DA ser es of products s not compat ble w th these veh cles!
The W220 (S class 2004-2007) also use the AGW system but the S emens based COMAND rad o n th s veh cle s compat ble
w th the DA ser es.
Kit Co te ts
M1000-M-DA1Contents
The M1000-M-DA series product comes complete and ready to install into the MOST Bus systems within the
compatible vehicles.
The mObrid e M1000-M-DA1 kit contains the followin items:
•M1000-M-DA1 main unit
•Power, Ground & Remote wirin harness
•MOST extension cable
•MOST connectors
•Free software download from
http://www.mobrid e.us/wizard
(this is not provided in the packa e
contents)
M1000-M-DA2 & M1000-M-DA3 Contents
•M1000-M-DA2 main unit
•Power, Ground & Remote wirin harness
•8x RCA output cable
•MOST extension cable
•MOST connectors
•Free software download from
http://www.mobrid e.us/wizard
and also the DSP user interface
http://www.mobrid e.us/node/15213 (this is not provided in the packa e contents)
Commo I stall Notes

MOBRIDGE M1000-M-DA SERIES | INSTALL NOTES
PAGE | 8
1.
Prior to comme ci g a y i stallatio ! Some vehicles may eed to be coded for the M1000-M-DA
for correct operatio . Please refer to the Codi g otes chapter i this i structio ma ual.
2.
I itially, please set the gai co trols o your a alogue amplifiers to mi imum. This will reduce
oise sig ifica tly a d allow your amplifiers to ru smother for lo ger. NB: We recomme d that
you use the M1000-M-DA gai co trol as your master set up gai .

MOBRIDGE M1000-M-DA SERIES | INSTALL NOTES
PAGE | 9
Power Wiri g Har ess & MOST cable
The M1000-M-DA kits come with a universal power, ground & remote turn on harness as pictured below. We
recommend these products be installed by a professional Installation Technician.
F gure 7 DA1 K t Contents
F gure 8 DA2/DA3 K t Contents
We hi hly recommend the MOST connection be made as soon after the Head unit as possible. The DA units come
with a MOST fiber extension to be able to extend the factory amplifier wirin to the unit. The units also come with a
ran e of other MOST connector shells just in the case the car does not have an existin amplifier. In these cases
the installer can chan e the MOST connector shells and form a ‘T’ piece from the MOST cablin .
NB: The DA u it eeds to be co ected to the car before the PC software will work as the DA will ot power
up u til it has MOST light.
NB: If the MOST Bus is ot co ected properly, this ca affect ma y fu ctio s of the vehicles operati g
system i cludi g the ability to start the vehicle.
Graphical I terface Operatio
Red = 12v Positive
Black = Ground
Blue = Remote Turn On

MOBRIDGE M1000-M-DA SERIES | INSTALL NOTES
PAGE | 10
The Graphical Interface can be downloaded from our website, and can be used both online and offline mode.
However, in order to ‘Map the Channels’ you will need to be connected to the DA2/DA3 with power connected too.
Offline mode allows you to configure Graphic EQ settings and store them for later fine-tuning in the car if desired.
We recommend all tuning be done with a ‘Live’ System, because this way you can hear all changes being made in
real time. Graphic EQ, Crossover settings and Time Alignment changes, can all be heard as you make the
changes when ‘Live’.
Connecting and Channel Mapping
Once downloaded, we recommend you open the application and connect to your DA unit via a USB cable (not
provided). If power is connected to the DA and turned on, you will see the below screen.
F gure 9 M1000-M-DA3 Connected
The first thin you will need to do is to select the vehicle the DA is bein fitted to and then confi ure the channels
for the correct mappin of your particular system.
First select a speaker from the ima e of the vehicle then from the drop down menu in the middle of the screen,
select the channel output you have connected for that particular speaker. Repeat this for each speaker and its
correspondin output channel.
When runnin a component speaker system with a passive crossover, only select one of the speakers in the
cluster. It is not important which speaker is chosen, as this is only the mappin sta e. Crossover settin s will allow
for correct settin s for this type of speaker system!
When connectin a Mono Subwoofer, simply select the speaker ima e and click the ‘Left’ & ‘Ri ht’ buttons for the
input mappin in order for the M1000-M-DA3 to know that this is a ‘summed’ channel output, providin information
from both the left and ri ht hand sides.
Crossover (Filter) Set up
After channel mappin , you will need to set the crossover for each of the speakers connected. To do this, first click
on the ‘Channel EQ’ TAB at the top left corner of the screen. This will open the Full EQ pa e for the individual
speaker selected.

MOBRIDGE M1000-M-DA SERIES | INSTALL NOTES
PAGE | 11
You will also note a ‘XOVER L/R LINK’ radio button. This allows you to set up both left and ri ht crossovers
simultaneously. It is very unusual to have separate crossover settin s for the same type of speaker on opposite
sides of the vehicle.
In the middle of the screen you will see the ‘Filter type’ drop down menu. Select your desired crossover.
•Low Pass for Subwoofers
•Band Pass for Mid-Bass or Midran e Speaker
•Hi h Pass for Tweeters
•
If you are running a passive crossover on your component speakers, then select High Pass filter and simply lower
the crossover point.
To adjust the crossover point, there are two methods:
1. Simply type a number into the Lo-P Hz or Hi-P Hz boxes provided
2. Dra the 3db down point (shown as a rey or blue dot on the Graphic Screen) to the desired frequency.
As you make the adjustments, you will hear the difference your chan es make if you are connected and powered
on!
F gure 10 M1000-M-DA3 Crossovers
You can also adjust the slope of the crossover. The adjustment options for slope are 6dB, 12dB, 18dB and 24dB.
In the above figure we have selected a tweeter and applied a hi-pass filter to it with a 24dB slope.
Individual Channel Equalization
Each speaker can be equalizer or tuned to your own taste. NB: If the ‘XOVER L/R LINK’ radio button is selected, the linked
speakers of left and right will be equalized together. We recommend this for initial tuning. You can always uncheck this radio
button to fine tune individually later.
Go back to the ‘Configuration’ TAB at the top left corner. Here you will see a flat yellow line across the Parametric Equalizer
towards the bottom of the screen. Take make adjustments, you just select a point with your mouse, click and hold, and then
drag it to your desired setting. You can do this up to 1000 points!
As you move the point on the screen, you will hear the sound adjust. For each point in the Eq curve you can adjust the left
and right Q-factor or you can link the Q-factor together.

MOBRIDGE M1000-M-DA SERIES | INSTALL NOTES
PAGE | 12
There is also a checkbox for watermarking the related speakers so that the user can see exactly where the cross-over points
are.
F gure 11 Channel Equal zer
We can see in figure 5 that we have placed two points in the Eq curve and that we have adjust one point at 6136Hz down a
little and adjusted the left Q factor down to 0.01 and the right Q-factor is at 3.00. There is also a slider bar for channel gain
control.
F gure 12 Channel Equal zer w th mater mark
In figure 6 we can see that we have enabled a 3-way system and checked the box for the watermark. We have also bumped
up the gain a little on the tweeter and we can now see on the graph that the Eq point we dropped in at 4 KHz has now started
to clip.
Individual Speaker Time Alignment
Time Alignment helps to make sure the sound from each speaker arrives at the desired listening position, all at the same
time. Normally a measuring tape is required for this task, which you can do with our system BUT for ease and speed of setup,
we have devised a very simple ‘drag & drop’ cross hair time alignment system.

MOBRIDGE M1000-M-DA SERIES | INSTALL NOTES
PAGE | 13
Choose the speaker you want to align, and then drag the green cross hair (pictured in the vehicle image) to the desired
listening position.
For example, if you are setting up for the driver’s position as optimal performance, and then drag all speakers to roughly
where the driver’s head will be. If you are setting up for a well-centered sound for all to enjoy, then drag your cross hairs to a
centered position just at the edge of the dashboard (Individuals like a different sound position so this is only a
recommendation).
F gure 13 T me Al gnment Cross Ha rs
In figure 7 you can see that we have dragged the left tweeter crosshairs over and in the time alignment section on the right
hand side we can see the actual offset in time and distance. The graphical interface uses both metric and imperial for the
distance and will gather the regional zone of the computer you are using and do this automatically.
Master Equalization
The DA3 has a master eq. This gets overlaid over all of the channel cross/Eq curves. It is exactly the same operation as the
individual channel equalization setup with multiple points, left and right Q –factors and overall master gain control.

MOBRIDGE M1000-M-DA SERIES | INSTALL NOTES
PAGE | 14
F gure 14 Master Equal zat on
Figure 8 show us a master Eq setup with a number of points added to the adjustment. More points can be added simply by
clicking on the graph.
Saving Setups & Presets
The DA will automatically save setups upon a shutdown of the MOST system. This needs to happen ‘gracefully’ as the user
cannot just pull power from the unit as this will not work.
The DA3 has four different presets and these can individually tuned. The channel mapping will remain across all four presets
and will also apply default filter setups to the speakers to avoid speaker damage.
You can save a backup of all of your Presets by simply clicking the ‘File Button’ on the top menu and then ‘Save As’. This will
save a backup of your setup across all four presets and this file can be used to load in saved settings.
F gure 15 Sav ng Tuned Sett ngs

MOBRIDGE M1000-M-DA SERIES | INSTALL NOTES
PAGE | 15
In figure 7 we can see the user has selected to save the file by selecting the ‘File’ menu at which point the user can save the
tuning session as a *.rax file.
You can also see in the figure that the user was currently tuning preset 1.
It is also possible to pull these presets up using the surround sound modes in the Mercedes vehicles.
F gure 16 NTG2.5 Surround Modes to change DA3 presets
F gure 17 NTG2.0 Surround Modes to change DA3 presets
Vehicle Codi g
NTG1.0 W220 S Class
No coding required
NTG2.0/Audio20/Audio50
No coding required
NTG2.5
Unless the car came with an external Lo ic7 Harmon Karndon option then the vehicle will require codin with the
Mercedes Stardia nose or equivalent
NTG4.0/4.5/4.7
Thankfully in these later model radios there is an en ineerin menu that can quickly enable the external amplifier.
To enter en ineerin mode the user needs to hold down the phone han up button and ‘1’ and ‘#’ for 10 seconds
to ether. The NTG system will then enter en ineerin mode as can be seen in the next fi ure.

MOBRIDGE M1000-M-DA SERIES | INSTALL NOTES
PAGE | 16
F gure 18 Eng neer ng mode
To navigate this engineering mode use the following controls:
•‘2’ is up
•‘8’ is down
•‘5’ is OK
The user needs to navigate down to option 7 which is the ‘HW setting’. After selecting this the NTG radfio will display another
menu and we want to select ‘TGW Parameter’ as can be seen in the figure below.
F gure 19 Select the TGW Parameter
Once in the TGW menu the user can select the ‘Audio Source’ as can be seen in the next figure.

MOBRIDGE M1000-M-DA SERIES | INSTALL NOTES
PAGE | 17
F gure 20 Select Aud o Source
Then finally it is a simple matter of selecting the ‘External Amp’ option as can be seen in the next figure.
F gure 21 Select ‘External Amp’
mObridge Software Update
Updating via the Wizard
All mObrid e products can be software updated in the field via USB. This is necessary as sometime vehicle
manufacturers do update the software in the vehicle which requires interfaces to be updated also to remain
compatible. mObrid e also re ularly adds features into the software for better user experiences as well as
software bu fixes. The mObrid e DA products MOST unit can be software updated via its USB connection and
use of the mObrid e Wizard software interface that runs on Windows PC’s.
The Wizard can be downloaded here http://www.mobrid e.us/wizard
Once the Wizard has been downloaded, the latest DA software can be applied. The latest software can be found
here http://mobrid e.us/node/15145

MOBRIDGE M1000-M-DA SERIES | INSTALL NOTES
PAGE | 18
The mObrid e DA unit will need to be connected in the car and powered up for the unit to be updated. Once it is
connected to the Wizard the user will be presented with the followin screen. The user needs to select the USB
cable option for the connection as seen below.
F gure 22 W zard nterface select on
When the ‘Next’ button is clicked the user will then be presented with the USB serial port to connect to the DA unit.
This will be called ‘FT232R USB UART’ and will appear automatically or when the ‘scan’ button is clicked. It may
take a few minutes for Windows to install the driver for the DA unit. Windows will install this automatically. Once
the user has selected this USB port they can click next.
F gure 23 Select USB port
Upon selection of this USB port the unit will upload its software version to the Wizard and will be in a connected
state. The fi ure below shows us the software versions of the DA unit and presents the user with a software
update button.

MOBRIDGE M1000-M-DA SERIES | INSTALL NOTES
PAGE | 19
F gure 24 DA software vers ons
To perform the software update, simply click on the ‘Update’ button, which will brin the user to the followin
screen. The user can browse their computer to the location that they have downloaded the update file to. Once
selected the user can simply select ‘Next’ and the unit will update.
F gure 25 Select update f le
The Wizard will download the file and then flash the memory of the DA unit. It is important not to remove power
durin this process! Once this has successfully flashed, then the user can simply click on the ‘Next’ button and the
unit has been updated.

MOBRIDGE M1000-M-DA SERIES | INSTALL NOTES
PAGE | 20
F gure 26 Software Update Complete
Updating via the DSP Graphical Interface
The mObrid e DA products MOST unit can be software updated via its USB connection and use of the mObrid e
DSP software interface that runs on Windows and Mac PC’s.
The DSP GUI can be downloaded here http://mobrid e.us/node/15213
Once the GUI has been downloaded, the latest DA software can be applied. The latest software can be found here
http://mobrid e.us/products/da3-dsp-professional and here http://mobrid e.us/products/most-analo -pre-amp
The mObrid e DA unit will need to be connected in the car and powered up for the unit to be updated. Once it is
connected to the DSP GUI the user will be presented with the followin screen.
F gure 27 DA s connected to the DSP GUI and we can cl ck on 'Connected'
Other manuals for m1000-m-da series
1
This manual suits for next models
1
Table of contents
Other Mobridge Amplifier manuals