Mobridge MOST25 DA Series User manual

BRIDGING MEDIA, COMMUNICATION & LIFESTYLE WITH YOUR VEHICLE
MOBRIDGE.US
MOST25 DA SERIES
INSTALLATION AND USER GUIDE
CONTACT US
PHONE +61 3 9465 5997
/
INQUIRIES [email protected]

CONTENTS
DISCLAIMER 4
WELCOME 5
OVERVIEW 6
Vehicle Compatibility 6
Kit Contents 6
DA1 Digital Pre-Amp MOST25 6
DA-G2.Standard MOST25 & DA-G2.Pro MOST25 Kits 6
Technical Specifications 7
HARDWARE INSTALLATION 8
System Layout 8
DA1 Digital Pre-Amp 8
DA-G2.Standard & DA-G2.Professional 9
Installation Guide 10
Wiring Harness 10
Remote Wakeup 10
DIP Switches 11
LED Status 13
GRAPHICAL INTERFACE OPERATION 13
Software Update 13
Speaker Mapping 16
Mono Inputs 17
Saving Setups & Presets 19
MOST25 DA SERIES
//
GUIDE PAGE 3

DISCLAIMER
mObridge makes every effort to try and keep the support
and installation documentation up to date.
We do not reimburse or bear costs arising from installations
should installation issues occur. mObridge can be contacted
via email and also via its worldwide distribution network.
We always recommend contacting the local distributor
first, and although we endeavour to answer emails we
receive in a timely manner, due to time zone differences
we may not be able to respond immediately.
mObridge always recommends professional installation
of these products as they are technically complex, involving
optical fiber across multiple vehicle configurations and
software versions within these vehicles.
In some cases, vehicles may require coding by specialist
workshops and diagnostic equipment. mObridge always
recommends allocating a number of hours to any installation,
just in case any issues should arise.
WELCOME
Congratulations on your purchase of a mObridge MOST25 DA series preamp.
mObridge prides itself on striving to develop and manufacture products to
the highest engineering quality standards and seamlessly integrating these
products with factory audiovisual systems.
The mObridge MOST25 DA series are some of the most advanced DSP
aftermarket audio integration interfaces available for MOST25 based
vehicles and come with an easy to use PC & Mac Graphical Interface for
setting up and tuning the MOST25 DA systems. This can be downloaded
free from our www.mobridge.us website.
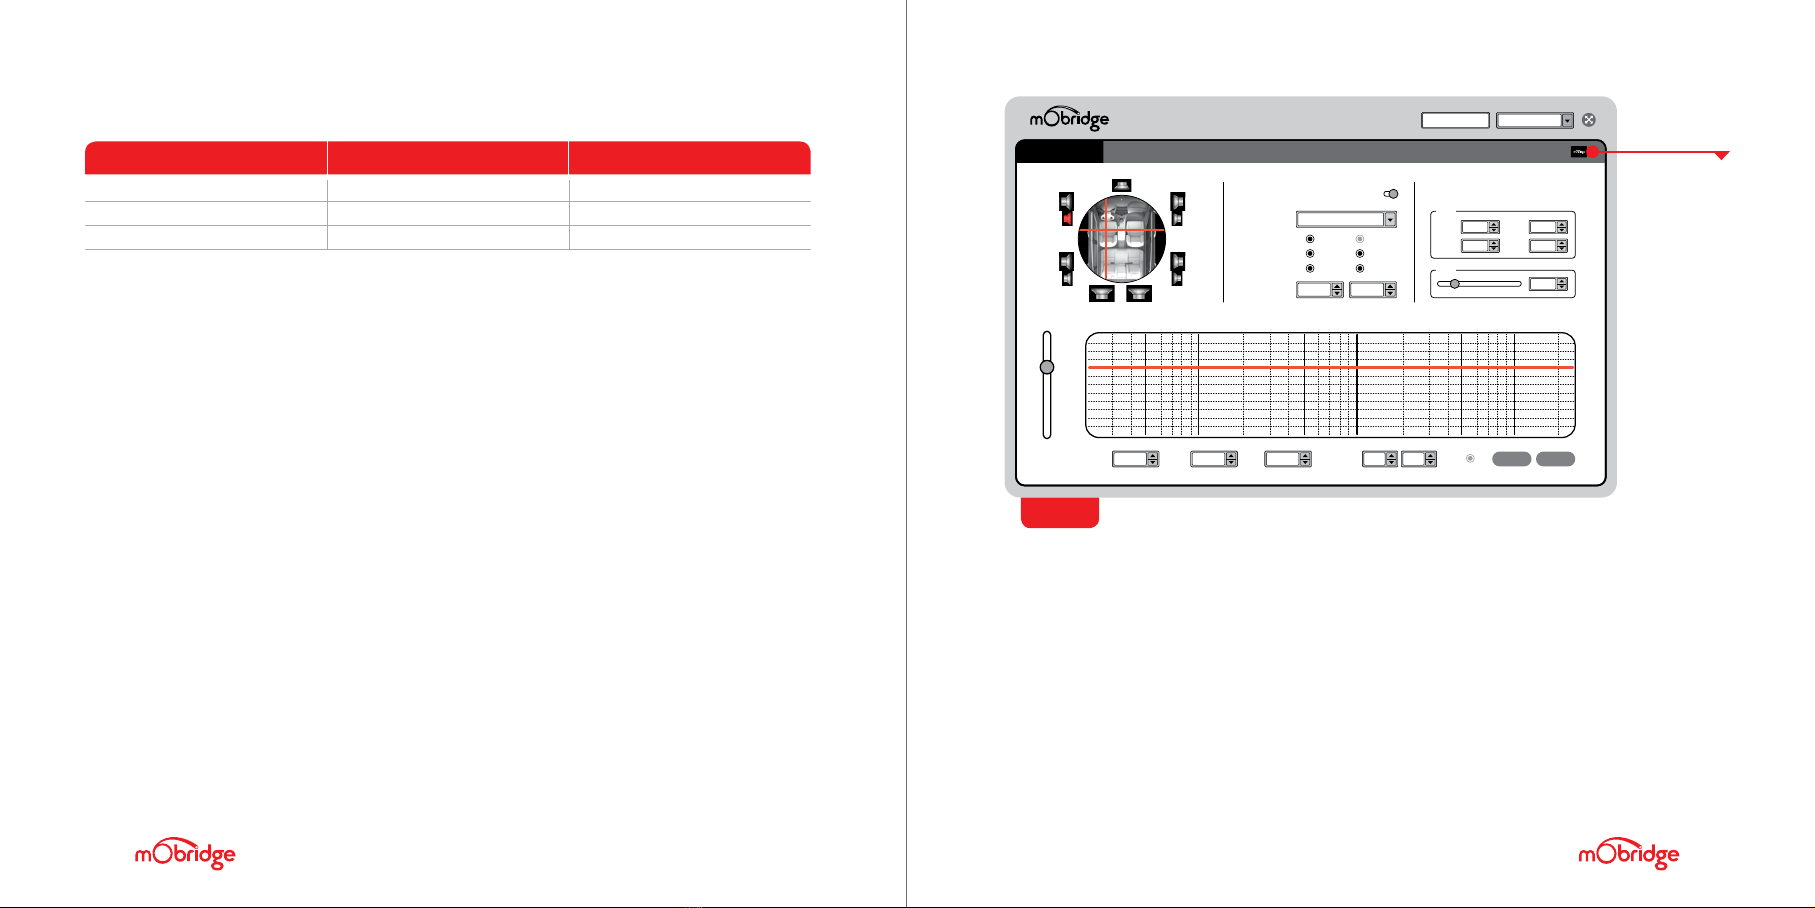
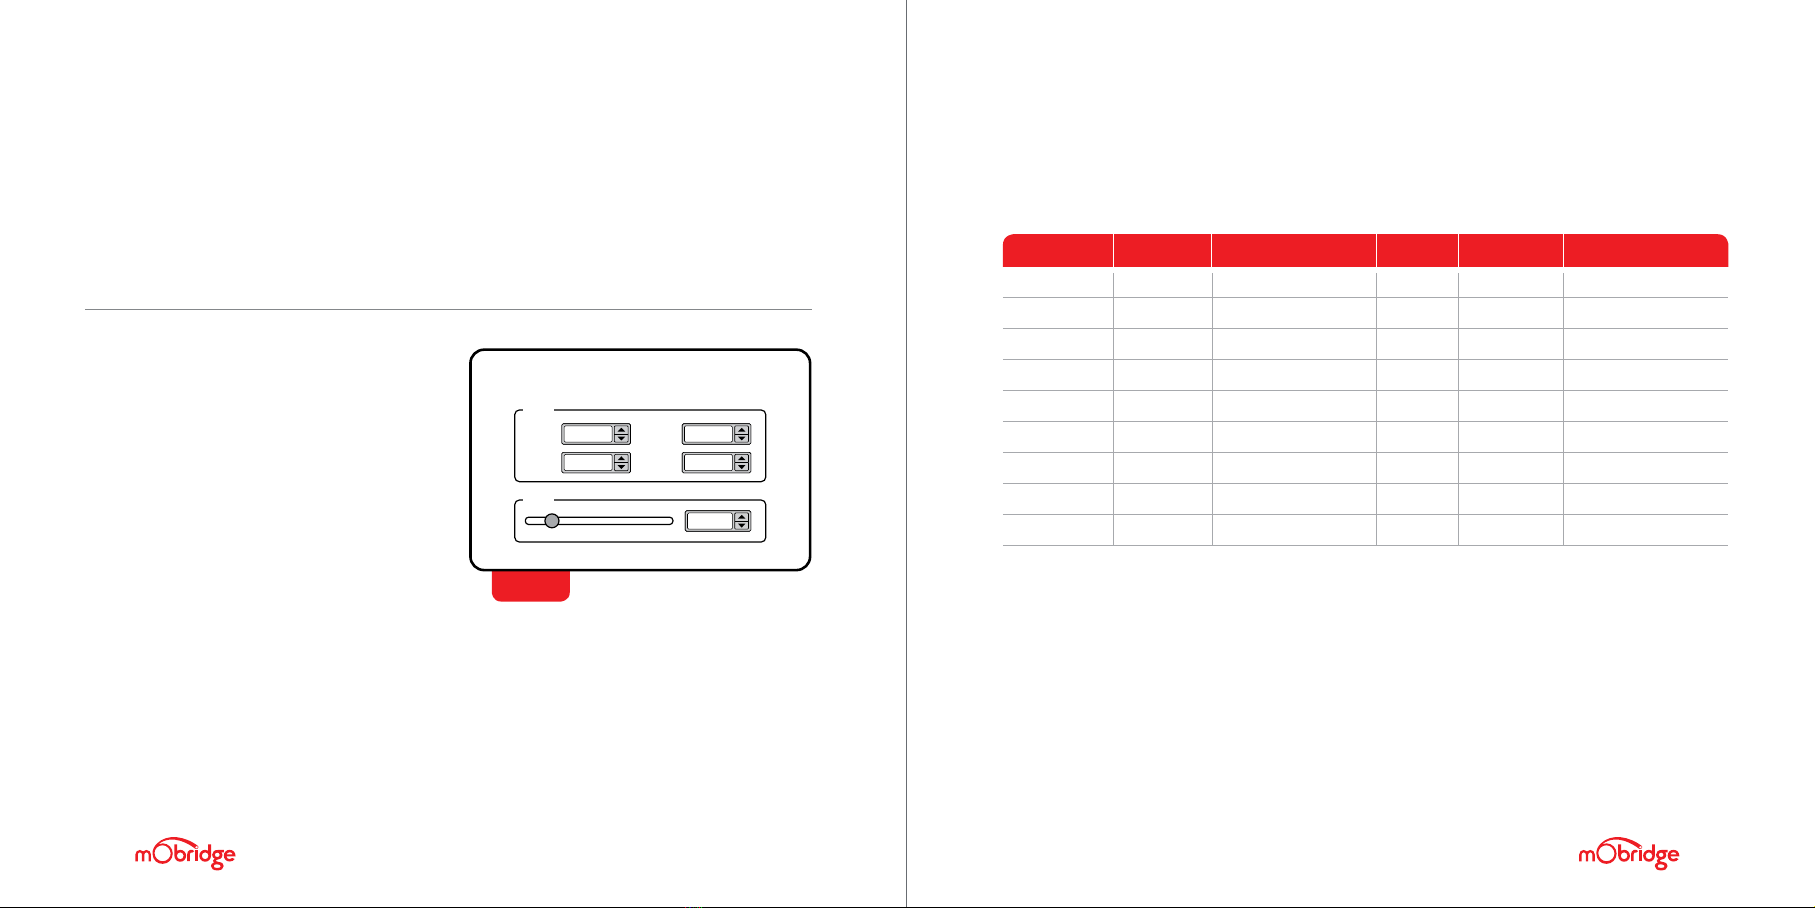
Features, depending on the MOST25 DA model, include TOSLINK output,
Channel Mapping to 10 RCA output channels, 1024 Point Parametric Graphic
Equalizer for each channel, as well as a ‘Master EQ’, Crossover Type and
crossover points for each speaker, crossover slope, individual speaker time
alignment, phase adjustment, Q factor (Both left and right), summing for
subwoofers and centre channel upmixing. The user can also use the radio
controls to change preset settings in the MOST25 DA for different tuning profiles.
As with all mObridge products, we have included a USB port for USB
upgrades of the software allowing for new features to be added as they
become available. The MOST25 DA series can be updated by simply
loading the latest software from our website and through the use of the
DSP user interface.
The MOST25 DA series may also have system function upgrades available
for purchase and download from time to time. These will also be available
on our website.
We hope you enjoy your new enhanced listening experience!
2020 FIBERDYNE SYSTEMS PTY LTD PAGE 5
DA-G2 MOST150
//
GUIDE

KIT CONTENTS
DA1 Digital Pre-Amp MOST25
The mObridge DA1 Digital Pre-Amp MOST25 kit
contains the following items:
/
DA-G2 MOST25 unit
/
Power Loom
/
MOST Optical Cable Connection
/
Free software download from mObridge DSP PC
Application on our website www.mobridge.us
(This is not provided in the package contents)
DA-G2.Standard MOST25 & DA-G2.Pro MOST25 Kits
The mObridge DA-G2.Standard and DA-G2.Pro
MOST25 kits contain the following items:
/
DA-G2 MOST25 unit
/
Power, Ground & Remote wiring harness
/
MOST ‘T’ piece harness
/
Female 2+0 MOST connector for harness extension
/
Male 2+0 shell for harness extension
/
Free software download from mObridge DSP PC
Application on our website www.mobridge.us
(This is not provided in the package contents)
OVERVIEW
VEHICLE COMPATIBILITY
The mObridge MOST25 DA series is compatible with specific BMW, Mercedes, Audi, Porsche, Mini, Jaguar,
Landrover, Toyota and Aston Martin vehicles. Please refer to the website to see the complete
compatibility list, www.mobridge.us/support
MOST
CABLE
POWER
LOOM
RCA CONNECTION
8 Channel RCA
connection
FEMALE 2+0 MOST
CONNECTOR
MOBRIDGE
UNIT
MALE 2+0
MOST SHELL
MOST25 DA SERIES
//
GUIDE
PAGE 6 MOST25 DA SERIES
//
GUIDE PAGE 7

HARDWARE INSTALLATION
SYSTEM LAYOUT | DA1 DIGITAL PRE-AMP
12v (+)
Ground (-)
Amplifier turn-on
From other MOST
Components (if applicable)
FOR DA1 INSTALLATIONS,
THE FACTORY AMPLIFIER MUST BE
DISCONNECTED (IF EQUIPPED)
Aftermarket
Amplifier
Fiber Optic
TOSLINK
Analog RCA
From OEM radio MOST
or amplifier (removed)
EQ | Processor
TECHNICAL SPECIFICATIONS
INPUT
Digital Input MOST25 Optical
OUTPUT
Digital Outputs TOSLINK (24bit 48kHz)
Frequency Response (Digital) 20Hz - 24KHz
Analog Outputs 12 Channels (RCA)
Output Voltage (Peak) 10.2
Output Voltage (RMS) 3.6V
Analog Output Type Single-Ended
Signal-to-noise Ratio (Analog) 112dB
Frequency Response (Analog) 20Hz - 24KHz
THD+N @ -1dBFS -107dbFS
Digital-Analog Converter 32bit 48kHz
Digital Signal Processor 32bit Blackfin Processor
POWER SUPPLY
Current Consumption (Stand-by)
<
3mA
Current Consumption (Operational) 300mA
Operational Voltage 8-22 Volts
Remote Turn on Output Automatic
Remote Turn on Voltage 12V
Remote Turn on Current 500mA
OTHER
Dimension 110mm x 80mm x 30mm
Weight 250g
Country of Origin Australia
MOST25 DA SERIES
//
GUIDE
PAGE 8 MOST25 DA SERIES
//
GUIDE PAGE 9

SYSTEM LAYOUT | DA-G2.STANDARD & DA-G2.PROFESSIONAL
Channel 1
From other MOST
Components (if applicable)
12v (+)
Ground (-)
Amplifier turn-on
Channel 2
Channel 3
Channel 5
Channel 7
Channel 8
Channel 9
Channel 10
Channel 6
Channel 4
Aftermarket
Amplifier
Fiber Optic
Analog RCA
From OEM radio MOST
or amplifier (removed)
FOR DA-G2 INSTALLATIONS,THE FACTORY AMPLIFIER
MUST BE DISCONNECTED (IF EQUIPPED)
WIRING HARNESS
01 For MOST25 DA installations, the installation
process changes depending on whether the
vehicle has an amplifier, and also if it has
MOST fiber optic presently installed.
a For vehicles with a fiber amplifier, the factory
amplifier must be removed and the MOST25
DA unit can be installed in its place. Connect
the OEM fiber previously connected to the
amp, directly into the MOST25 DA unit.
b For vehicles without an OEM amplifier or
MOST fiber, use the supplied optic extension
and connect from the fiber port behind the radio
to the MOST fiber port on the MOST25 DA.
c For vehicles without an OEM amplifier but still
equipped with MOST fiber, disconnect the fiber
from the radio and connect it to the supplied
‘T’ piece harness. Connect one side of the ‘T’
piece harness to the MOST25 DA and then
connect the remaining plug back to the radio
unit to add the MOST25 DA to the MOST loop.
* NOTE: with options (b) and (c), you must
reprogram the system to use the external
amplifier for the MOST25 DA to operate
properly. Use the mObridge MOST25 OBD
programmer to reprogram the system.
02 Connect the wiring harness to the POWER
socket on the MOST25 DA.
03 Connect the desired audio output(s) to the
MOST25 DA: (Note: both Analog and Digital
outputs can be used simultaneously).
a If using analog RCAs for the signal to the
amplifier, connect the provided RCA output
harness to the ANALOG OUT port on the
MOST25 DA.
b If using the digital TOSLINK for the signal to
the amplifier, connect a TOSLINK cable to the
TOSLINK OUT port on the MOST25 DA.
REMOTE WAKEUP
The MOST25 DA kits come with remote wake-up
functionality. The remote wake-up wire (Blue) is
used to power on the preamp with the vehicle’s
accessory power at the same time as the rest of
the audio system. We recommend this be installed
by a professional installation technician.
INSTALLATION GUIDE
MOST25 DA SERIES
//
GUIDE
PAGE 10 MOST25 DA SERIES
//
GUIDE PAGE 11

DIP SWITCHES
There are 6 dip switches on the MOST25 DA unit. These switches are used to set which head unit
configuration is in your vehicle to provide seamless integration with your MOST25 DA unit.
SWITCH SETTINGS VEHICLE RADIO NOTES
Porsche PCM 2.0/2.1
(2003-2009)
Porsche PCM3.x mObridge will not be held
(2009-2014) responsible for any echo issues
experienced in the PCM3.x systems.
These radios have a very ‘brittle’
window of echo cancellation in
its Bluetooth processing. Many
factors can contribute to the echo
issues in these vehicles such as
speaker placement and
crossover selection.
Audi MMI 2G
Audi MMI 3G The MMI3G system must be
coded for the external amplifier.
Mercedes Any 2003 - 2008 The W211 E Class from 2003-2008
and the SLK 171 from 2005-2008
with the NTG2.0 system are not
compatible.
SWITCH SETTINGS VEHICLE RADIO NOTES
Mercedes NTG
2.5/4.0.4.5/4.7
BMW, Mini & All The BMW E65 with the ASK
Toyota (Except BMW E65) system is not compatible.
Landrover 6CD
(2005 - 2010)
Landrover Touchscreen
(2010 - 2017)
Jaguar Touchscreen The vehicle must be coded by
(2010 - 2017) the dealership if it does not contain
the factory MOST25 amplifier.
Aston Martin G1
Aston Martin G2
MOST25 DA SERIES
//
GUIDE
PAGE 12 MOST25 DA SERIES
//
GUIDE PAGE 13

LED STATUS
LED LED STATUS INDICATION
A (Leftmost) Flashing Audio Processing
B Solid MOST25 Link
C (Rightmost) Solid Master Sync
GRAPHICAL INTERFACE OPERATION
The mObridge DSP Graphical Interface can be downloaded from www.mobridge.us and can be used in
both online and offline mode. However, in order to ‘Map the channels,’ you will need to be connected to
the MOST25 DA with power connected too. Offline mode allows you to configure Graphic EQ settings and
store them for later fine-tuning in the car if desired. We recommend all tuning be done with a ‘Live’
system because this way you can hear all changes being made in real-time.
SOFTWARE UPDATE
The mObridge MOST25 DA series can be software
updated via its USB connection and use of the
mObridge DSP software interface that runs on
Windows and Mac PC’s. The mObridge DSP GUI
can be downloaded from support on our website
www.mobridge.us/support
Once the GUI has been installed, the latest MOST25
DA software can be applied. The GUI can perform
software updates either using the online updater,
or you can download the latest software for an
offline update at www.mobridge.us/support
The mObridge MOST25 DA unit will need to be
connected in the car and powered up for the unit
to be updated. Once it has connected to the DSP GUI
the user will be presented with the following screen
(figure 01). Please note that certain features are
only available in the DA-G2.Pro MOST25 model, if
you have a DA1 Digital Pre-Amp MOST 25 or a
DA-G2.Standard MOST25 these features may not
be available.
CHANNEL EQ CONNECTED
0.00Hz
Default Preset 01
DELETE CLEAR
FREQ 0.00Hz
0.00Hz MAG 0.00Hz
0.00dB
GAIN 0.00Hz
0dB Q-FACTOR 0.00H
0.01
0.00Hz
0.01 Q-L/R
CONFIGURATION
12dB
50Hz 100Hz 500Hz 1KHz 10KHz5KHz 20KHz
6dB
0dB
-6dB
-12dB
-18dB
-24dB
1
3
5
11
7
910
2
4
5
12
8
0.00Hz
Output Channel 3
Output Mapping
Time Mapping
Input Mapping
Left Right
Sink 1 Sink 2
Sink 3 Sink 4
0.00ms 0.00ms
Sink 1 Sink 2
0.00Hz
0 dB
0.00Hz
0 dB
Sink 3 Sink 4
0.00Hz
0 dB
0.00Hz
0 dB
Gains
0.00Hz
1.4 ms
Delay
MONO INPUTS
MUTE
FRONT LEFT TWEETER
FIG 01 MOST25 DA is connected to the DSP GUI
CLICK ON
‘CONNECTED’
Once the MOST25 DA is connected via the GUI we can just click on the ‘Connected” in the to right-hand
corner and this will bring us to the update page as seen on the following page (figure 02).
MOST25 DA SERIES
//
GUIDE
PAGE 14 MOST25 DA SERIES
//
GUIDE PAGE 15

CHANNEL EQ CONNECTED
0.00Hz
Default Preset 01
DELETE CLEAR
FREQ
0.00Hz
0.00Hz
MAG
0.00Hz
0.00dB
GAIN
0.00Hz
0dB
Q-FACTOR
0.00H
0.01
0.00Hz
0.01
Q-L/R
CONFIGURATION
12dB
50Hz 100Hz 500Hz 1KHz 10KHz5KHz 20KHz
6dB
0dB
-6dB
-12dB
-18dB
-24dB
0.00Hz
Output Channel 3
Output Mapping
Time Mapping
Input Mapping
Left Right
Sink 1 Sink 2
Sink 3 Sink 4
FRONT LEFT TWEETER
0.00ms 0.00ms
MONO INPUTS
Sink 1 Sink 2
0.00Hz
0 dB
0.00Hz
0 dB
Sink 3 Sink 4
0.00Hz
0 dB
0.00Hz
0 dB
Gains
1
3
5
11
7
910
2
4
5
12
8
0.00Hz
1.4 ms
Delay
CHANNEL EQ
0.00Hz
Default Preset 01
CONFIGURATION
FIRMWARE UPDATE
12 Channel Professional DSP
DA-G2.PRO MOST25
Serial Number: N/A
Firmware Version: 02.01.00
Vehicle Type: AUDI MM13G/MM13G+
Download Online Updates Automatically
Firmware Update Options
Check Online for Updates
Manual Updates Only
Check for Updates Automatically
FACTORY RESET
RESTART
RESTORE
CONNECTED
Install Guide
Device Support
DA-G2.PRO MOST25
User Guide
FIG 02 Update Page
UPDATE
ONLINE
UPDATES
If performing an online update, make sure the
‘Check Online for Updates’ option is ticked and
then press the ‘Firmware Update’ button. This
will automatically check for the latest software
update for the connected device and begin the
upgrade process.
If performing an offline update, make sure the
‘Check Online for Updates’ option is unticked and
then press the ‘Firmware Update’ button. This will
open a window where you can select the new MOST25
DA firmware file to update to and the update
procedure will begin.
Once the update has completed, the MOST25 DA unit
will reboot and start the system again. Sometimes it
is a good idea to let the car sleep after the firmware
upgrade as some MOST systems do not like ECU’s
resetting on the MOST bus.
This configuration screen will allow you to configure
the channels for the correct mapping of your
particular system.
First select a speaker from the image of the vehicle
in the top left corner, then select an output mapping
from the drop-down menu in the middle of the
screen to select the channel output you have
connected for that particular speaker. Repeat this for
each speaker and its corresponding output channel.
SPEAKER MAPPING
Once the MOST25 DA unit is connected to the mObridge DSP application, you will see the below screen (figure 03).
CHANNEL EQ CONNECTED
0.00Hz
Default Preset 01
DELETE CLEAR
FREQ
0.00Hz
0.00Hz
MAG
0.00Hz
0.00dB
GAIN
0.00Hz
0dB
Q-FACTOR
0.00H
0.01
0.00Hz
0.01
Q-L/R
CONFIGURATION
12dB
50Hz 100Hz 500Hz 1KHz 10KHz5KHz 20KHz
6dB
0dB
-6dB
-12dB
-18dB
-24dB
0.00Hz
Output Channel 1
Output Mapping
Time Mapping
Input Mapping
Left Right
Sink 1 Sink 2
Sink 3 Sink 4
0.00ms 0.00ms
MONO INPUTS
Sink 1 Sink 2
0.00Hz
0 dB
0.00Hz
0 dB
Sink 3 Sink 4
0.00Hz
0 dB
0.00Hz
0 dB
Gains
1
3
5
11
7
910
2
4
5
12
8
0.00Hz
1.4 ms
Delay
MUTE
FRONT LEFT TWEETER
FIG 03 Configuration Page
CONFIGURATION
SETTINGS
SELECTED
SPEAKER
MOST25 DA SERIES
//
GUIDE
PAGE 16 MOST25 DA SERIES
//
GUIDE PAGE 17

FIG 04 Mono Input adjustments
When running a component speaker system with
a passive crossover, only select one of the
speakers in the cluster. It is not important which
speaker is chosen, as this is only the mapping
stage. Crossover settings will allow for correct
settings for this type of speaker system.
Next, you will need to allocate the appropriate
input mappings to each speaker. For each speaker,
simply select the speaker image in the top left
corner, and then click the appropriate ‘Input Mapping’
options for each speaker. If multiple input
mappings are selected, these sources will be
combined and summed.
MONO INPUTS
After mapping your speakers, you can then adjust
the mono input gains and delay using the “Mono
Inputs” panel which will be displayed on the
right-hand side of the configuration tab (figure 04).
MONO INPUTS
Sink 1 Sink 2
0.00Hz
0 dB
0.00Hz
0 dB
Sink 3 Sink 4
0.00Hz
0 dB
0.00Hz
0 dB
Gains
0.00Hz
1.4 ms
Delay
PHONE, NAV, PDC AND CHIME GAIN ADJUSTMENTS
This can be used to independently adjust the gains of the input sinks such as phone, navigation, PDC, and
chimes. Each manufacturer has different configurations for their mono inputs so please reference the
table below when adjusting your phone, nav, pdc or chime gains.
DELAY
The delay slider can be used to fine-tune the mono input processing delays in your mObridge device. This
can help alleviate echo issues in certain vehicles while using your mObridge device to play audio on phone
calls. The delay will be active on all mono inputs.
VEHICLE PHONE NAV PDC CHIMES VOICE
BMW Sink 1 Sink 2 Sink 4 Sink 3 Sink 2 (same as Nav)
Audi Sink 1 Sink 2 NA NA Sink 3
Porsche Sink 1 Sink 2 NA NA Sink 3
Mercedes Sink 1 Sink 2 NA NA Sink 3
Landrover Sink 2 Sink 2 (same as Tel) Sink 3 Sink 4 Sink 2 (same as Tel)
Jaguar Sink 2 Sink 2 (same as Tel) Sink 3 Sink 4 Sink 2 (same as Tel)
Aston Martin Sink 1 Sink 2 Sink 3 Sink 4 Sink 2 (same as Nav)
Toyota Sink 1 Sink 2 Sink 4 Sink 3 Sink 2 (same as Nav)
Mini Sink 1 Sink 2 Sink 3 Sink 4 Sink 2 (same as Nav)
MOST25 DA SERIES
//
GUIDE
PAGE 18 MOST25 DA SERIES
//
GUIDE PAGE 19

SAVING SETUPS & PRESETS
The MOST25 DA will automatically save setups
upon shutdown of the MOST system. This needs
to happen ‘gracefully’ as the user cannot just pull
power from the unit as this will not work.
The MOST25 DA has four different presets and
these can be tuned individually. The channel
mapping will remain across all four presets and
will also apply default filter setups to the speakers
to avoid speaker damage. These can be selected
with the drop-down menu in the top right corner
as shown below (figure 05).
CHANNEL EQ CONNECTED
0.00Hz
Default Preset 01
DELETE CLEAR
FREQ 0.00Hz
0.00Hz
MAG 0.00Hz
0.00dB
GAIN 0.00Hz
0dB
Q-FACTOR 0.00H
0.01
0.00Hz
0.01
Q-L/R
CONFIGURATION
12dB
50Hz 100Hz 500Hz 1KHz 10KHz5KHz 20KHz
6dB
0dB
-6dB
-12dB
-18dB
-24dB
1
3
5
11
7
910
2
4
5
12
8
New
Save
Save As
Open
Fullscreen On
Exit
File Options Tools Help
0.00Hz
Output Channel 1
Output Mapping
Time Mapping
Input Mapping
Left Right
Sink 1 Sink 2
Sink 3 Sink 4
0.00ms 0.00ms
MONO INPUTS
Sink 1 Sink 2
0.00Hz
0 dB
0.00Hz
0 dB
Sink 3 Sink 4
0.00Hz
0 dB
0.00Hz
0 dB
Gains
0.00Hz
1.4 ms
Delay
MUTE
FRONT LEFT TWEETER
FIG 05 Saving tuned settings
PRESET
NUMBER
SAVE
SETTINGS
FIG 06 Using L7 Surround Mode to change presets
FIG 07 Using Professional Radio Surround Modes to change presets
If there are no vehicle-specific instructions for your vehicle make, the preset can generally be changed
using the Logic7 Surround controls as shown in the images below (figure 06 & 07).
You can save a backup of all of your presets by
simply clicking the ‘File Button’ on the top menu
bar and then ‘Save As’ as shown in the above screen.
This will save a backup of your setup across all
four presets and this file can be used to load in
saved settings.
It is also possible to pull these presets up using
specific commands in the headunit of your vehicle.
This varies depending on your vehicle make and
head unit system. Please check the support
documentation on the mObridge website to find
the vehicle-specific instructions.
TrebleCD/DVD
11:22am 10ToneCD/Multimedia
BassMusic colle
AUX (fro
TV
Tone
Balance
Fader F R
L R
Equaliser
Volume settings
L7 Surround
m
AUDIO MENU
GONG
0 2
S-VOL CINEMA
MUSIC
BMW PROFESSIONAL
CHANGING
PRESETS
CHANGING
PRESETS
MOST25 DA SERIES
//
GUIDE
PAGE 20 MOST25 DA SERIES
//
GUIDE PAGE 21

NOTES
MOST25 DA SERIES
//
GUIDE
PAGE 22
This manual suits for next models
3
Table of contents
Other Mobridge Automobile Accessories manuals