DoubleTake SeatBack Plates User manual

CAT-3: Universal Seat Back Plates / December 18, 2014 / Manufactured By Custom Golf Car Supply, Inc. www.DoubleTakeGolfCar.com
Cushion
Seat Back
Plastic
(A) (A)
SEAT BACK PLATES INSTALLATION
IMPORTANT: Do not fully tighten hardware until instructed.
Read through all instructions before beginning installation.
PREPARE CAR FOR INSTALLATION:
TABLE OF CONTENTS:
• 2P: Remove Factory Cushions
•4P: Remove Top, Rear Frames and Seat Back Support/Sweater Basket
Assembly. Install DoubleTake®Rear Seat Kit.
NOTE: Save original Hardware for later use.
Section 1 - 2-Passenger Plate Installation (For Star see pg 4)
Section 2 - 4-Passenger Plate Installation (For Star see pg 4)
Section 3 - Seat Back Cushion Installation
Attach the Seat Back Plates to the Seat Back
Supports using a 1/4" x 1-3/4" FHP Bolt, a 1/4" Flat
Washer (back), and a 1/4" Nyloc Nut (2x both sides
– through holes marked CC-DS).
NOTE: Fully tighten Bolts.
2-PASSENGER PLATE INSTALLATION
SECTION 1
UNIV SPL-2 KIT
Club Car Precedent (PD)
EZGO RXV (RX)
NOTE: For Star
mounting, see pg 4.
UNIV SPL-1 KIT
Club Car DS 2000+ (C2)
EZGO TXT (TX)
Yamaha Drive
Club Car DS 2000+: 2-Passenger Factory Supports
Club Car DS
Club Car Precedent: 2-Passenger Factory Supports
NOTE: The Seat Back Plates DO NOT
WORK with Precedent Factory Seat
Back Supports.
Precedent Mounting Clips
PROVIDES HEIGHT ADJUSTMENT FOR SEAT BACK CUSHIONS
PROCEED TO SECTION 3
DoubleTake®Seat Back Cushion Install
(Factory Seat Back Supports)
Install Mounting Clips to the cushion back
where indicated (A). Mount Seat Back Cushion
to factory seat back supports the same way
the factory cushion mounts.
NOTE: Fully tighten Bolts.
For 4-Passenger installation,
skip to Section 2

Seat Back Plates - Section 1 / pg 2
Yamaha Drive: 2-Passenger Factory Supports
Attach the Seat Back Plates to the Seat Back
Supports using 1/4" x 2-1/4" FHP Bolt, Black
Spacer (A), 1/4" Flat Washer (back), and 1/4"
Nyloc Nut (2x both sides – through holes marked
Drive).
NOTE: Fully tighten Bolts.
EZGO RXV: 2-Passenger Factory Supports
Temporarily remove the Bag Holder/
Sweater Basket Assembly from the
Seat Back Supports by removing the
6 Bolts (3 Bolts each side) as shown
below (A).
NOTE: Keep Hardware for reinstall.
EZGO RXV
Yamaha Drive
Attach the Seat Back Plates to the Seat Back
Supports using 1/4" x 1-3/4" FHP Bolt, 1/4" Flat
Washer (back), and 1/4" Nyloc Nut (2x both sides –
through holes marked TXT).
NOTE: Fully tighten Bolts.
EZGO TXT: 2-Passenger Factory Supports
EZGO TXT
(A)
Spacers
Edge of
Seat Back
Plate
Mount
to these
holes
Attach the Universal Seat Back Plates to the Seat Back Supports using 1/4" x
1-3/4" FHP Bolt, 1/4” Flat Washer (back), and 1/4" Nyloc Nut (2x both sides –
through top and bottom holes marked RXV).
NOTE: Fully tighten Hardware.
Install Seat Back Cushion (A) to Seat Plates (see Section 3 for example).
Then, complete your installation by reinstalling the Bag Holder/Sweater
Basket Assembly using the factory hardware (B).
NOTE: Fully tighten allBolts.
(A)
(A)
PROCEED TO SECTION 3
PROCEED TO SECTION 3 INSTALLATION IS COMPLETE
(A)
(B) (B)

Tabs
Car
Front
Car
Rear
Car
Front
Car
Rear
(A)
Black Spacer Washer
(Between Support and Plate
in the top holes only)
Top View
Car
Front
Car
Rear
Car
Front
Car
Rear
Car
Front
Car
Rear
Seat Back Plates - Section 2 / pg 3
4-PASSENGER PLATE INSTALLATION
SECTION 2
Attach the Seat Back Plates to the Seat Back
Supports (front and back) using 1/4" x 1-1/4" FHP
Bolt, 1/4" Flat Washer (back), and 1/4" Nyloc Nut
(2x both sides – through holes marked CC-DS).
NOTE: Repeat for Seat Back Plates on opposite
side of supports. Fully tighten Bolts.
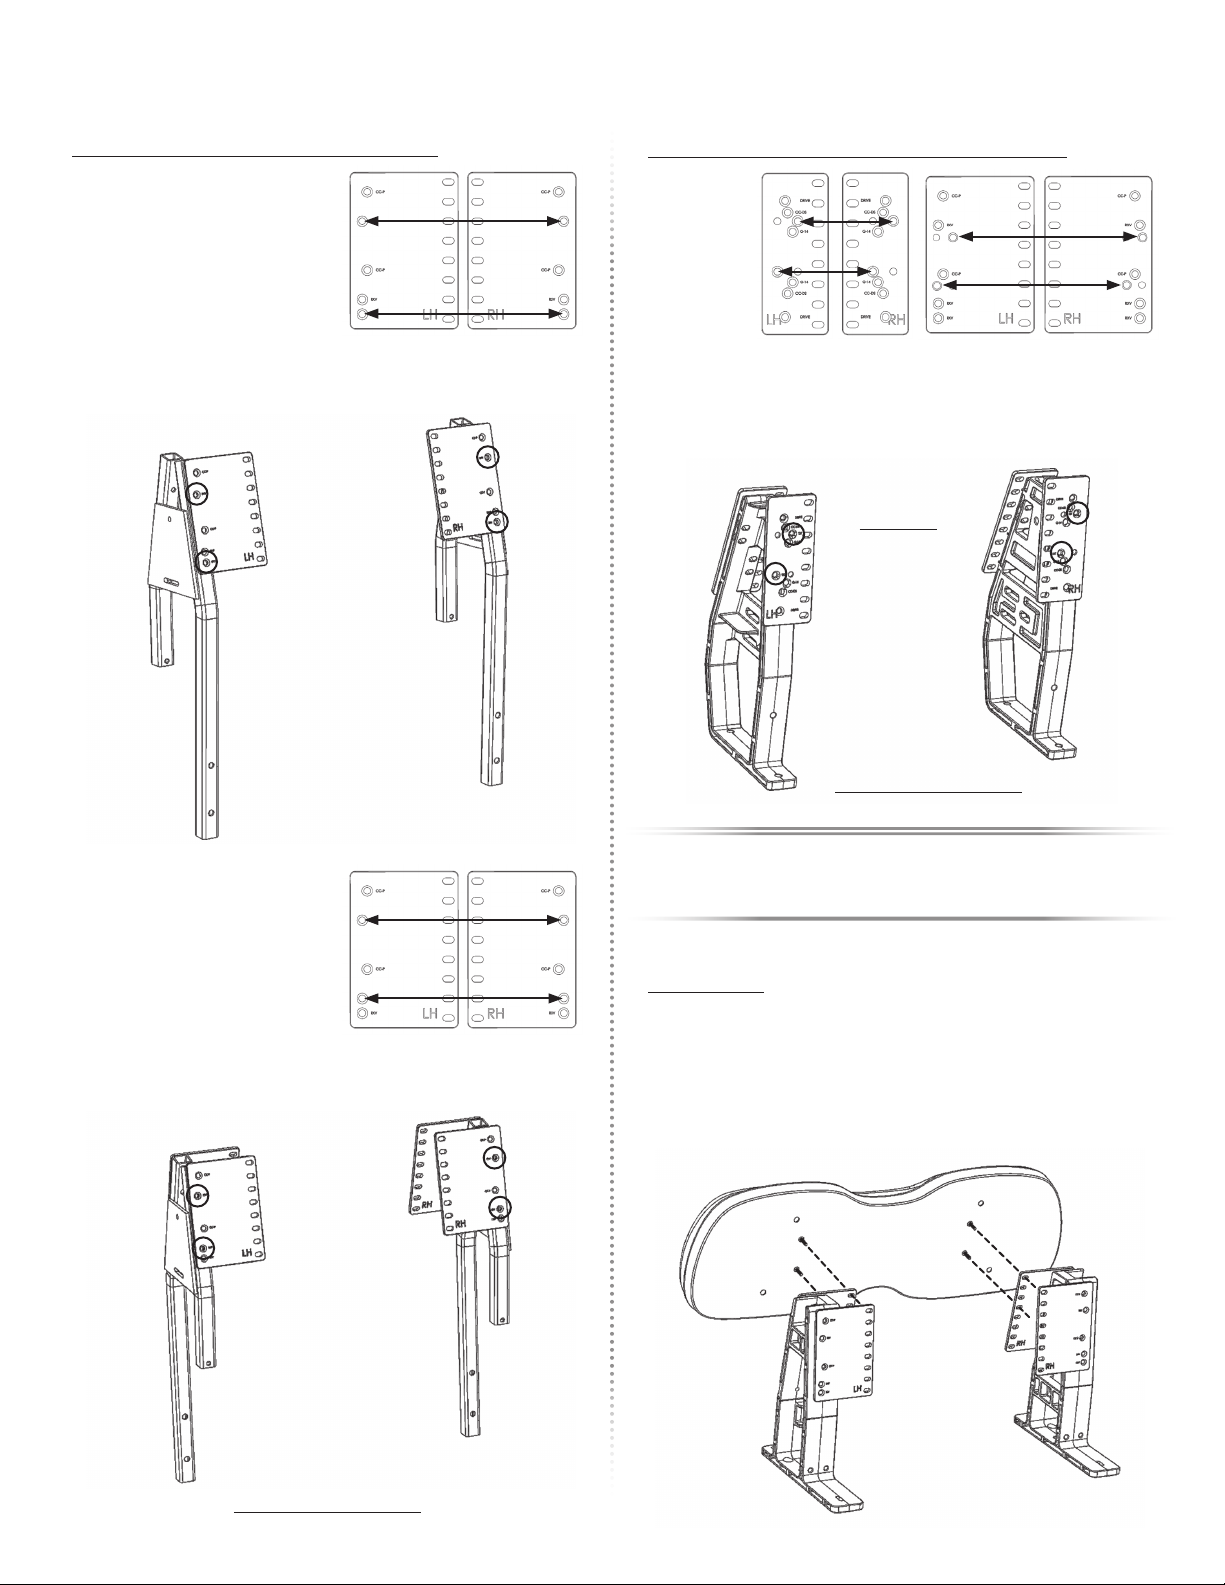
Club Car DS 2000+: 4-Passenger DoubleTake Supports
Club Car DS
Club Car Precedent: 4-Passenger DoubleTake Supports
Rear Seat Back Plate Install
(No Spacer Washer Required)
PROCEED TO SECTION 3
Yamaha Drive: 4-Passenger DoubleTake Supports
Attach the Seat Back Plates to the Seat Back
Supports using 1/4" x 2-1/4" FHP Bolt, 1/4" Flat
Washer (back), and 1/4" Nyloc Nut (2x both sides –
through holes marked Drive).
NOTE: Black Spacers (4) are for installing on
Factory Seat Back Supports only (2-passenger).
Fully tighten Bolts.
Yamaha Drive
Front & Rear
PROCEED TO SECTION 3
Attach the Seat Back Plates to the front
of the Seat Back Supports through top
holes marked CC-P using 1/4" x 1-1/4"
FHP Bolt, Black Spacer Washer (A), 1/4"
Flat Washer (back), and 1/4" Nyloc Nut.
Repeat for other side.
For the bottom holes marked CC-P use
1/4” x 1-1/4” FHP Bolt, 1/4” Flat Washer
(back), and 1/4” Nyloc Nut. Club Car Precedent
DoubleTake®Seat Back Cushion Install
(Use Seat Back Plates with spacer washers)
Factory Seat Back Cushion Install
(Use Precedent Tab Set - Seat Back Plates not required)
Attach the Seat Back Plates to the rear Seat Back Supports using 1/4” x
1-1/4” FHP Bolt, 1/4” Flat Washer (back), and 1/4” Nyloc Nut (2x both sides
through holes marked CC-P).

Car
Front
Car
Rear
Car
Front
Car
Rear Car
Front
Car
Rear
TXT Pictured
(A)
(A)
(B)
Car
Front
Car
Rear
Seat Back Plates - Section 2 & 3 / pg 4
EZGO RXV: 4-Passenger DoubleTake Supports
Attach the front Seat Back Plates to
the Seat Back Supports using a 1/4"
x 1-3/4" FHP Bolt, a 1/4" Flat Washer
(back), and a 1/4" Nyloc Nut (2x both
sides – through top and bottom holes
marked RXV).
NOTE: Fully tighten Bolts.
EZGO RXV Front
Attach the
Front Seat
Back Plates to
the Seat Back
Supports using
a 1/4" x 1-3/4"
FHP Bolt, a 1/4"
Flat Washer
(back), and a
1/4" Nyloc Nut
(2x both sides – through holes marked TXT).
NOTE: Repeat for Seat Back Plates on opposite side of supports.
Fully tighten Bolts.
EZGO TXT / Star: 4-Passenger DoubleTake Supports
EZGO TXT
Front & Rear
Attach the Rear Seat Back Plates to
the Seat Back Supports using a 1/4"
x 1-3/4" FHP Bolt, a 1/4" Flat Washer
(back), and a 1/4" Nyloc Nut (2x both
sides – through the upper set of holes
marked RXV).
NOTE: Fully tighten Bolts.
EZGO RXV Rear
SEAT BACK CUSHION INSTALLATION
SECTION 3
Mount the Seat Back Cushions to the Seat Back Plates (Club Car Precedent
shown as example). Install the Threaded Studs (4) into the Seat Back Cushion
where indicated (A). Determine the Seat Back Cushion height preferred and
mount Cushion to Seat Back Plates thru corresponding slotted holes (B).
Secure the Cushion using a 1/4" Flat Washer and a 1/4" Nyloc Nut (2x both
sides). Repeat for opposite Seat Back Cushion.
NOTE: Fully tighten allBolts.
All Car Models
Front Seat Back Plate Install
Rear Seat Back Plate Install
PROCEED TO SECTION 3
Star Front & Rear
(Holes are not labeled)
Other DoubleTake Automobile Accessories manuals
Popular Automobile Accessories manuals by other brands

INDRA
INDRA Smart Series installation guide

ACV
ACV Inbay 240000-02 quick start guide

Safe Fleet
Safe Fleet Bustin Slide & Go Platform Use and maintenance guide

Atoc
Atoc DraftMaster CAA Series Assembly and operation

Bunker Indust
Bunker Indust RECOVERY-KIT002A user manual

Whispbar
Whispbar K782W Fitting instructions