Modena BC Series User manual

BC Series
BUKU PETUNJUK PENGGUNAAN
KOMPOR LISTRIK
DAN KARTU GARANSI
01/14
VITROCERAMIC COOKER MANUAL
AND
WARRANTY CARD


Bahasa Indonesia 1
Dengan cara pemakaian yang benar, Anda akan mendapatkan manfaat yang maksimal
selama bertahun-tahun.
Bacalah buku petunjuk pengoperasian ini dengan seksama, agar seluruh manf aat dan
kelebihan yang dimiliki kompor listrik MODENA bisa Anda peroleh. Simpanlah buku petunjuk
pengoperasian ini dekat dengan kompor listrik Anda, agar sewaktu -waktu jika diperlukan
mudah untuk mendapatkannya.
Sertakan buku petunjuk pengoperasian ini jika kompor listrik Anda dialihkan kepada pihak
lain. Karena dengan demikian pemakai yang baru dapat segera memahami cara
penggunaan kompor listrik.
Terima kasih atas kepercayaan Anda untuk memilih produk MODENA.
SELAMAT ATAS P ILIHAN ANDA MENGGUNAKAN KOMPOR LISTRIK MODENA

Bahasa Indonesia 2
DAFTAR ISI HLM.
- Kata Pengantar 1
- Bagian 1 : Nama-nama Bagian 3
- Bagian 2 : Langkah Awal Sebelum Instalasi 3
- Bagian 3 : Instalasi 4
- Bagian 4 : Cara Penggunaan 5
- Bagian 5 : Pemeliharaan 6
- Bagian 6 : Tindakan Pencegahan 7
- Bagian 7 : Masalah & Solusinya 7
- Bagian 8 : Spesifikasi 8

* Gambar adalah gambaran secara umum dan belum tentu sama dengan produk yang anda terima.
* Fitur dan kelengkapan tergantung pada tipe produk
Bahasa Indonesia 3
K
Ke
et
te
er
ra
an
ng
ga
an
n
s
si
im
mb
bo
ol
l
p
pa
ad
da
a
k
ko
on
nt
tr
ro
ol
l
p
pa
an
ne
el
l
:
:
Simbol untuk power ON /
OFF
Simbol untuk memperbesar
tingkat panas atau
menambahkan timer
(waktu)
Simbol untuk memperkecil
tingkat panas atau
mengurangi timer (waktu)
Double cooking zone / Area
memasak ganda
Single cooking zone / Area
memasak tunggal
Timer/waktu
Lock/pengunci sistem
Indikator tingkat
pemanasan pada area
memasak/cooking zone
1. Bila Anda tidak mengerti mengenai prosedur pemasangan/instalasi kompor listrik , sebaiknya
Anda menghubungi MODENA Service Center untuk melakukan pemasangan/instalasi.
2. Siapkan perlengkapan penunjang yang dibutuhkan untuk pemasangan/instalasi seperti :
- Obeng
- Tang, dll
3. Siapkan stop kontak/jaringan listrik yang mudah terjangkau oleh kabel power kompor listrik Anda.
Bagian 2: Langkah Awal Sebelum Instalasi
3
2
1
Bagian 1: Nama-nama Bagian
1 = Double cooking zone / Area
memasak ganda
2 = Single cooking zone /Area memasak
tunggal
3 = Panel control/Kontrol Panel

Bahasa Indonesia 4
Bukalah kardus pembungkus kompor listrik, lalu keluarkan kompor listrik tersebut dan letakkan pada
permukaan yang rata.
Perhatian !!!
1. Sumber listrik harus diletakkan di tempat yang mudah terjangkau oleh kabel power.
2. Kompor listr ik ini membutuhkan tegangan listrik 220~230 V/ 50 Hz, 30 A Fuse, dengan kabel
power minimal 3 core x 2.5 mm2.
M
ME
EN
NY
YE
ES
SU
UA
AI
IK
KA
AN
N
K
KO
OM
MP
PO
OR
R
L
LI
IS
ST
TR
RI
IK
K
P
PA
AD
DA
A
M
ME
EJ
JA
A
D
DA
AP
PU
UR
R
- Kompor listrik dapat dipasang pada meja dapur selama meja tersebut tahan terhadap panas
sekitar 85°C. Periksalah apakah ukuran lubang pada meja dapur sudah sesuai untuk diletakkan
kompor listrik.
- Ukuran lubang untuk memasang kompor listrik pada meja dapur adalah sebagai berikut :
MODEL A B C D E
BC 1320 300 510 270 490 55
BC 1640 580 510 560 490 55
Perhatian !!!
- Jika kompor dipasang dengan oven di bawahnya, panel
pemisah harus diletakkan di antara bagian bawah kompor
dan kerangka di bawa hnya dengan jarak minimum 10 cm,
ikuti juga instruksi pemasangan oven.
- Jika kompor dipasang tanpa oven di bawahnya, panel
pemisah harus diletakkan di antara bagian bawah kompor
dan kerangka di bawahnya dengan jarak minimum 15 cm.
- Untuk menghindari arus pendek, kabel listrik untuk kedua
perlatan tersebut harus terpisah.
Bagian 3: Instalasi

Bahasa Indonesia 5
M
ME
EM
MA
AS
SA
AN
NG
G
K
KO
OM
MP
PO
OR
R
L
LI
IS
ST
TR
RI
IK
K
P
PA
AD
DA
A
L
LU
UB
BA
AN
NG
G
M
ME
EJ
JA
A
D
DA
AP
PU
UR
R
Untuk memasang kompor listrik pada lubang meja dapur Anda, lakukanlah hal di bawah ini :
Siapkan stop kontak untuk kompor listrik . Selain BC 1320 kabel
power langsung disambung pada jaringan listrik yang melalui
MCB.
Perhatian :
Sebaiknya stop kontak tidak dicabangkan/dipararel dengan
pengunaan yang lain
Lekatkan Seal Adhesive (perekat) di sepanjang tepi kompor
bagian bawah. Hal ini diperlukan untuk menjaga kelembaban
pada bagian bawah kompor listrik.
Letakkan kompor listrik pada lubang meja dapur , lalu untuk
mengencangkan gunakan penjepit (clamp) yang telah tersedia
pada kemasan perlengkapan kompor listrik.
Pastikan semua telah terpasang dengan benar kemudian pasan g kable power kompor listrik pada
stop kontak.
Perhatian:
Untuk selain BC 1320 tidak dilengkapi steker, jadi kabel power harus disambung langsung
dengan jaringan listrik yang melalu MCB.
M
ME
EN
NY
YA
AL
LA
AK
KA
AN
N
A
AR
RE
EA
A
M
ME
EM
MA
AS
SA
AK
K
(
(Z
ZO
ON
NE
E
C
CO
OO
OK
KI
IN
NG
G)
)
Untuk menyalakan area memasak (zone cooking) dengan mudah, nyalakanlah kompor listrik sebelum
meletakkan peralatan masak tepat berada di tengah-tengah lingkaran area memasak (zone cooking).
Sentuh symbol power ON/OFF selama 3 detik untuk menghidupkan
area memasak (zone cooking) , hal ini ditandai de ngan bunyi suara
“beep” dan lampu indikator akan menyala bersamaan
Pilihlah area memasak (zone cooking) dengan cara menyentuh
simbol posisi area memasak ( zone cooking) yang akan dinyalakan
pada kontrol panel.
Bagian 4: Cara Penggunaan

Bahasa Indonesia 6
Untuk memperbesar/memperkecil pemanasan pada area
memasak (zone cooking) yang sedang menyala :
Sentuh dan tahan simbol plus (+) untuk memperbesar pemanasan
atau s imbol minus ( -) untuk memperkecil pemanasan . Hal ini
ditandai dengan nilai angka pada kontrol panel (1 sampai 9)
Untuk mematikan area memasak (zone cooking) :
Sentuh simbol minus (–) hingga LED pada k ontrol panel mati atau
sentuh simbol power ON/OFF
atau
Untuk mengkunci sistem operasi :
Sentuh simbol pengunci (hingga ter dengar suara “beep”) untuk
mengunci semua simbol yang ada pada kontrol panel sehingga
tidak berfungsi. Untuk mengaktifkan kembali tekan simbol
pengunci (hingga terdengar suara “beep”).
CATATAN :
- Jika selama 10 detik tidak dilakukan pemilihan area memasak (zone cooking) untuk
memasak maka secara otomatis unit akan berada dalam kondisi off (mati ).
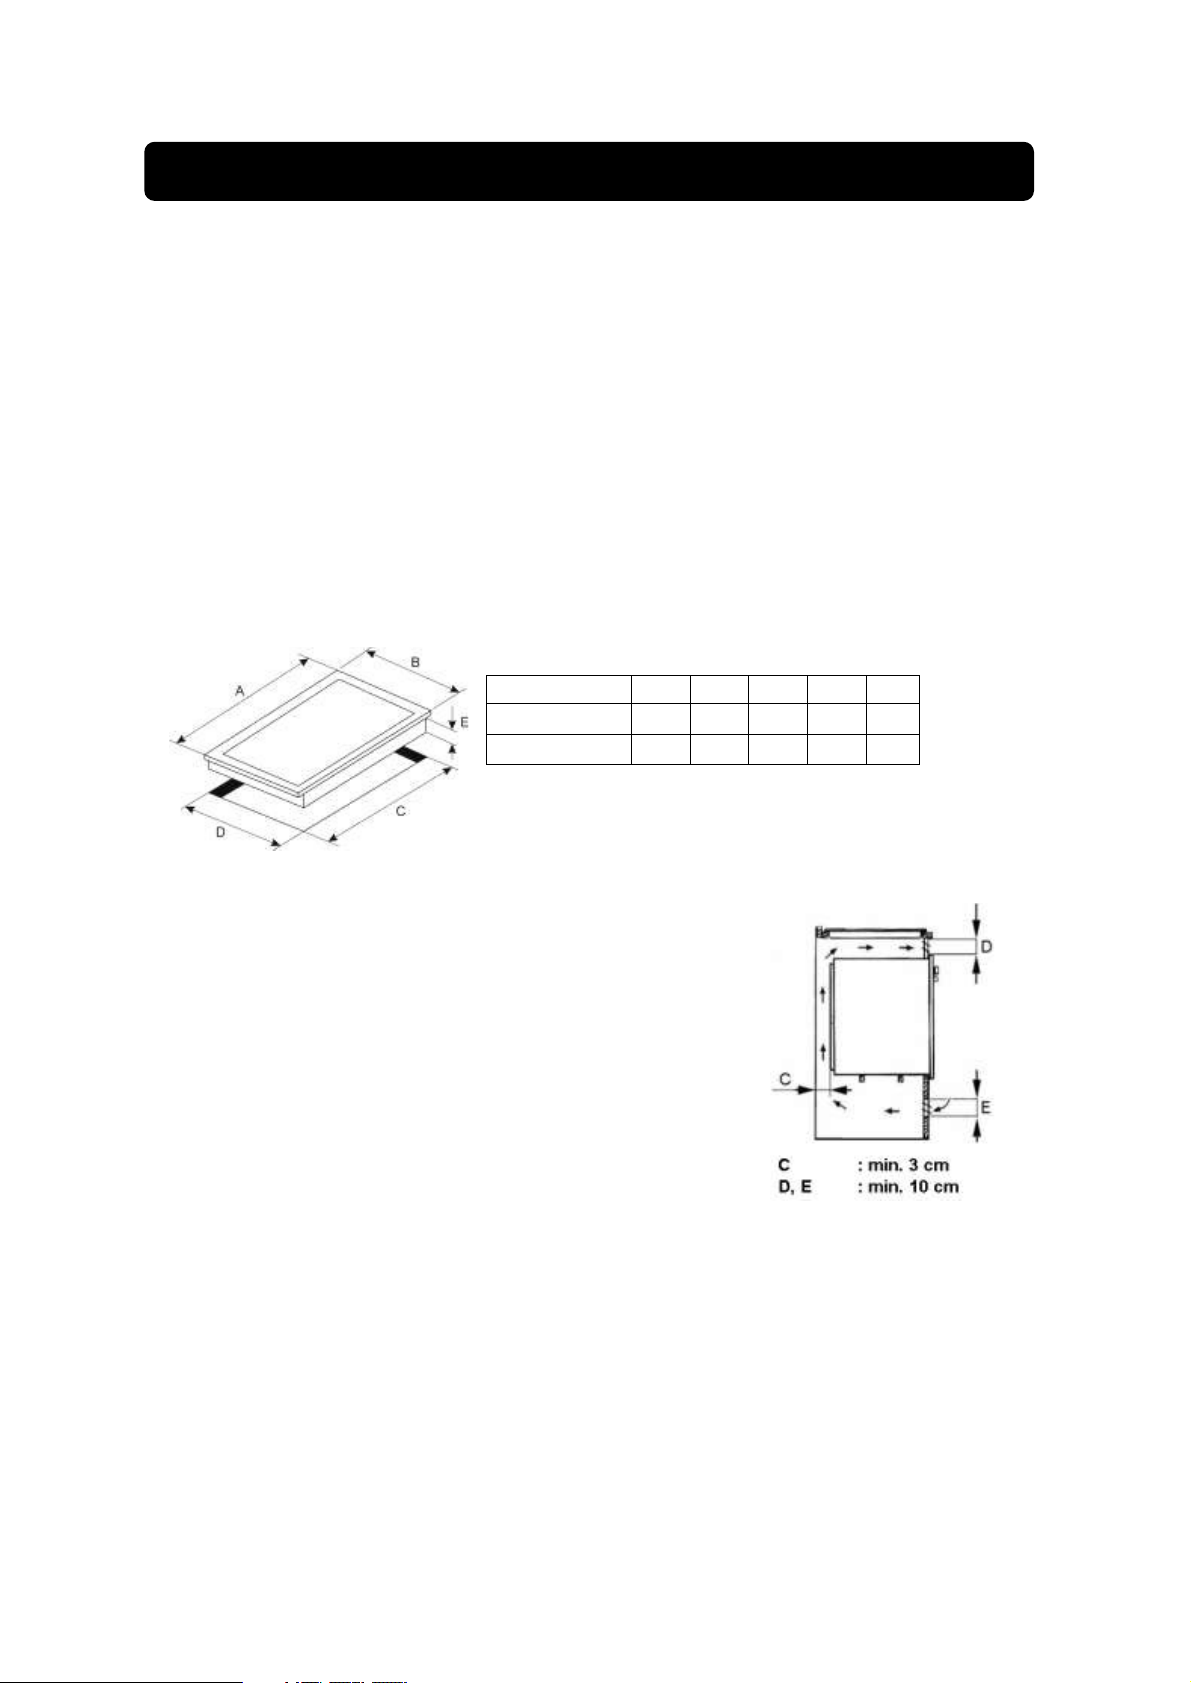
- Gunakan peralatan memasak dengan permukaan dasar yang rata serta diameter yang
sesuai dengan area memasak (zone cooking) yang digunakan.
- Berat beban peralatan memasak dan bahan masakan maksimal 10 kg.
Kompor listrik MODENA dirancang secara khusus untuk pemakaian jangka waktu panjang sehingga
tidak memerlukan perawatan yang rumit. Namun, ada beberapa hal yang dianjurkan untuk merawat
kompor listrik Anda agar kualitas kompor tetap terjaga.
Permukaan KACA/ KERAMIK
Bersihkan bagian kaca/keramik yang kotor dengan menggunaka n lap basah atau pembersih khusus
untuk bahan kaca/keramik, kemudian keringkan dengan menggunakan lap yang berbahan halus.
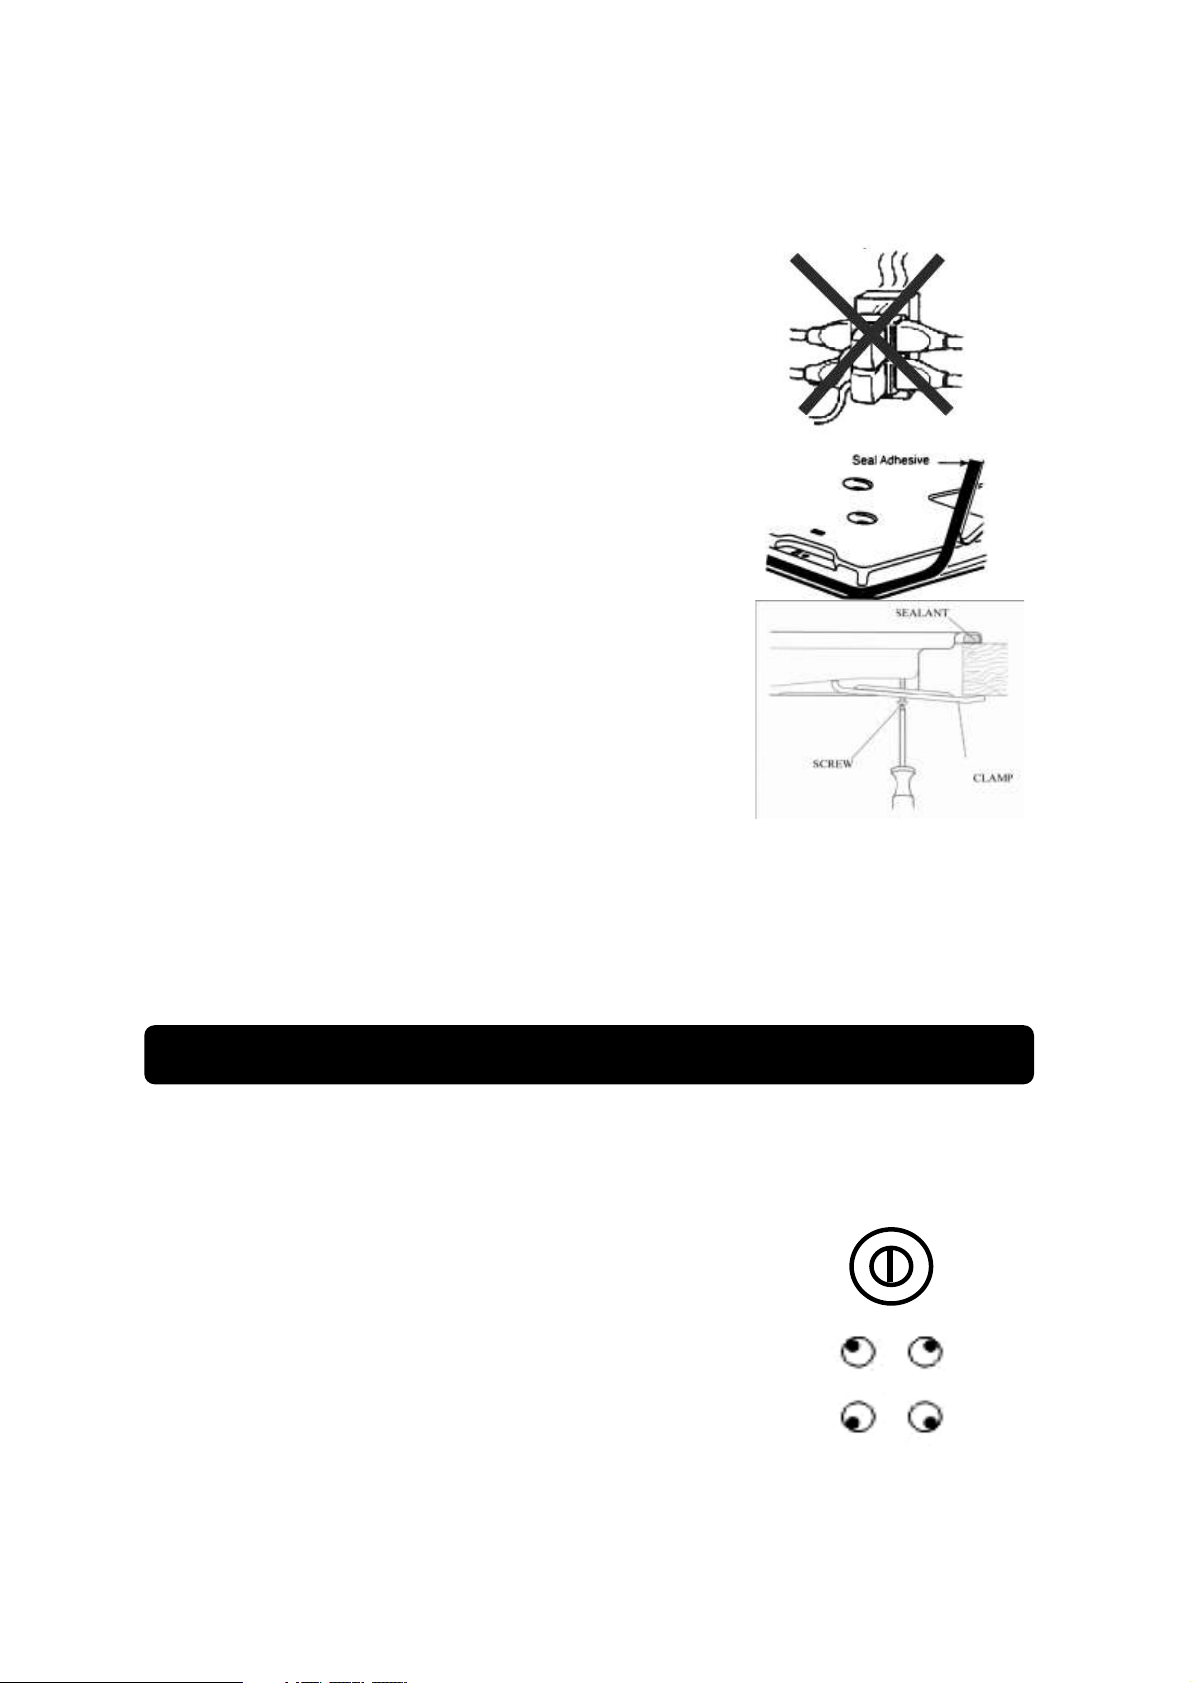
PERHATIAN :
- Pembersihan pada kaca/Keramik dilakukan pada saat kaca/keramik tida k dalam keadaan panas.
Kecuali : jika kaca/keramik terkena gula atau cairan yang mengandung kadar gula tinggi, segera
bersihkan kaca/keramik, (hati - hati dalam melakukan hal ini, karena dapat menyebabkan luka
bakar)
- Selalu matikan area memasak (zone cooki ng) dan cabut kabel power dari stop kontak jika
diperlukan sebelum membersihkan kompor listrik Anda.
- Jangan gunakan cairan pembersih yang dapat merusak kaca/ keramik
- Gunakan kain/lap yang halus dan tidak menimbulkan gores pada kaca/keramik kompor listrik
Anda
Bagian 5: Pemeliharaan

Bahasa Indonesia 7
- Selalu kecilkan panas pada area memasak (zone cooking) atau matikan area memasak (zone
cooking) sebelum mengangkat peralatan masak Anda .
- Selama proses memasak, lemak atau minyak harus diperlakukan secara hati -hati karena bahan
ini dapat menimbulkan kebakaran jika mencapai suhu tertentu.
- Setelah kompor listrik selesai digunakan lampu indaktor (H) akan tetap menyala hingga seluruh
suhu area memasak (zone cooking)) telah dingin, jangan menyentuh area memasak (zoen
cooking) jika lampu indikator masih dalam keadaan menyala
- Hindari penyambungan listrik dengan menggunakan sambungan kabel.
- Jika terjadi sesuatu hal yang tidak normal pada kompor listrik Anda, matikan unit dan lepaskan
kabel power dari stop kontak kemudian segera hubungi MODENA Service Center.
- Sebaiknya matikan kompor dan cabut kabel power dari stop kontak setiap selesai memasak atau
jika kompor listrik tidak digunakan dalam waktu lama. untuk BC 1640 dan BC 1940 matikan aliran
listrik melalui MCB.
- Lakukan service secara rutin pada kompor Anda setiap 3 (tiga) bulan sekali, karena jika terdapat
kelainan pada kompor gas Anda, dapat segera diketahui dan diperbaiki
Lakukan pengecekan terhadap hal-hal di bawah ini sebelum menghubungi Service Center kami, bila
terjadi gangguan pada kompor listrik Anda :
Kompor tidak bekerja
1. Apakah steker kabel power tersebut sudah terpasang atau
tersambung dengan benar ?
2. Apakah terdapat tegangan listrik pada stop kontak ?
3. Apakah kabel pada unit terputus ?
Area memasak (zone
cooking) tidak
berfungsi
1. Apakah steker atau kabel power tersebut sudah terpasang atau
tersambung dengan benar?
2. Pastikan simbol posisi area memasak ( zone cooking) sudah
dipilih dan panasnya diatur sesuai keinginan.
Hubungi Service Center kami untuk dilakukan perbaikan, jika ganguan – ganguan di atas masih
belum teratasi.
Bagian 6: Tindakan Pencegahan
Bagian 7: Masalah & Solusinya

Bahasa Indonesia 8
MODEL Vetro – BC 1640 Vetro – BC 1320
Fitur Utama
Jenis Vitroceramic Hob Vitroceramic Hob
Jumlah Tungku 4 2
Komposisi tungku
Double ring Ø 140 – 210 mm -
Double ring Ø 120 – 180 mm Quick Ring Ø 180 mm
2@ Quick ring Ø 140 mm Quick Ring Ø 140 mm
Security Blocking System Ya Ya
Warna Diamond Black Diamond Black
Top plate Glass + Stainless frame Glass + Stainless frame
Panel Kontrol Touch Control Touch Control
Jumlah Level Pemanasan 9 9
Timer Digital Digital
Residual Heat Indicator Ya Ya
Lock System Ya Ya
Kaki Tidak Tidak
Fitur Teknis
Power
Double ring Ø 140 – 210 mm 1000 – 2000 Watt -
Double ring Ø 120 – 180 mm 700 – 1700 Watt -
Single ring Ø 180 mm - 1800 Watt
Single ring Ø 140 mm 2 @ 1200 Watt 1200 Watt
Dimensi Produk
Panjang (mm) 580 300
Lebar (mm) 510 510
Tinggi (mm) 55 55
Berat (Kg) 8.8 4.5
Dimensi Lubang Meja
Panjang (mm) 560 270
Width (mm) 490 490
Untuk meningkatan kualitas produk, desain dan spesifikasi diatas dapat berubah setiap saat tanpa pemberitahuan.
Gambar pada buku ini bersifat skematis dan bisa saja tidak tepat sama dengan produk aktual. Nilai yang tercantum pada label
atau dalam dokumentasi yang menyertainya diperoleh di laboratorium sesuai dengan standar yang relevan . Nilai-nilai dapat
bervariasi tergantung pada kondisi operasional dan lingkungan dari unit.
Bagian 8: Spesifikasi


English 9
Thank you for your trust and decision to buy MODENA product and make it a part of your modern
family's needs and lifestyle. The stylish and advanced design in each product is an elegant
combination for your daily household activities.
This book contains various matters regarding Vitroceramic Hob, from its method of usage,
maintenance, various professional features of the product down to its trouble -shooting. As a
manufacturer of user friendly home appliances, we thrive to sim plify the description in this manual to
facilitate the users.
In order for this Vitroceramic Hob to perform normally for an extended period of time, we highly
recommend not only the buyer to hold onto this manual, but also those who wish to operate the
product optimally to maintain its service period and quality. This manual is recommended for use by
anyone who operates this unit.
Enjoy your daily activities, we hope that our products may provide the best services to your family.
INSTRUCTION AND GUIDE TO USING VITROCERAMIC HOB

English 10
CONTENTS PAGE
- Introduction 9
- Part 1 : Name of Parts 11
- Part 2 : Pre-Step befor Installation 11
- Part 3 : Installation 12
- Part 4 : How to Use 13
- Part 5 : Maintenance 14
- Part 6 : Precaution Action 15
- Part 7 : Problem & Solving 15
- Part 8 : Specification 16

* The image is a general overview and is not necessarily the same as the product you receive.
* Features and completeness depends on the type of products
English 11
T
Th
he
e
S
Sy
ym
mb
bo
ol
l
o
on
n
t
th
he
e
C
Co
on
nt
tr
ro
ol
l
P
Pa
an
ne
el
l
m
me
ea
an
n
t
th
he
e
f
fo
ol
ll
lo
ow
wi
in
ng
g
:
:
ON / OFF
Increasing Heat Level
Decreasing Heat Level
Double cooking zone /
Double ring
Single cooking zone/
Quick ring
Timer
Lock system
Heat Indicator level for
cooking zone area
1. If you do not understand about installation procedure of the vitroceramic hob , please contact
MODENA service center to install your product.
2. Prepared the Installation’s supporting equipment, such as :
- Screwdriver
- Pliers, etc
3. Prepare the electrical contact that’s reachable electric plug of your vitroceramic hob
Part 2: Pre-step before Installation
Part 1: Name of Parts
3
2
1
1 = Double cooking zone / Double ring
2 = Single cooking zone / Quick ring
3 = Control Panel

English 12
Open the box of vitroceramic hob, then take out the vitroceramic hob and put on a flat surface
Caution !!!
1. Use the powercord with 3 core x 2.5 mm2 , or use more high specification.
2
2.
.
Plug in the power cord into 220~230 V/50 Hz, with minimal fuse 30 A .
A
AD
DJ
JU
US
ST
TI
IN
NG
G
V
VI
IT
TR
RO
OC
CE
ER
RA
AM
MI
IC
C
H
HO
OB
B
O
ON
N
K
KI
IT
TC
CH
HE
EN
N
T
TA
AB
BL
LE
E
- Vitroceramic hob can be installed on the kitchen table a s long as the table hold up until 85°C
Check whether the hole size of the table on the kitchen set is correct.
- Size of hole for installing the vitroceramic hob on the kitchen set are as below :
MODEL A B C D E
BC 1320 300 510 270 490 55
BC 1640 580 510 560 490 55
Attention:
- If the vitroceramic hob is installed with oven on the bottom,
separator panel must be placed between bottom vitroceramic
hob and framework, with minimum distance 10 cm and follow the
instruction for oven installation.
- If the vitroceramic hob is installed without oven on the bottom,
the minimum distances to put the separator panel is 15 cm
- Electrical cable from both equipments must be installed
separately to avoid short circuit.
Part 3: Installation

English 13
I
IN
NS
ST
TA
AL
LL
LI
IN
NG
G
T
TH
HE
E
V
VI
IT
TR
RO
OC
CE
ER
RA
AM
MI
IC
C
H
HO
OB
B
O
ON
N
K
KI
IT
TC
CH
HE
EN
N
S
SE
ET
T
T
TA
AB
BL
LE
E
To install Vitroceramic hob on your kitchen set table, follow the instructions below:
Prepare the electrical contact for your Vitroceramic hob . For model
without electrical plugs (BI 1640), conne ct the power cords directly to
electricity pass the MCB.
Attention:
For better usage, do not parallize the electrical contact with another
use
Stick the Seal Adhesive (glue) on the edge of the vitroceramic hob on
the bottom side. This is to preser ve the moist on the vitroceramic
hob’s bottom.
Put the vitroceramic hob on the kitchen set holes, then to tighten, you
can use the hook that is available on vitroceramic hob equipment
box.
Make sure whether all the items is pr operly installed and then connect the stecker cable into electric
power.
Caution:
For products that are not equipped with plug, power cord must be connecting directly to the
power lines through the MCB.
L
LI
IG
GH
HT
TI
IN
NG
G
T
TH
HE
E
C
CO
OO
OK
KI
IN
NG
G
Z
ZO
ON
NE
E
To acquire the cooking zone easily, light the cooking zone before placing the cooking utensil on the
center of the zone burner circle.
Touch the ON/OFF Symbol for 3 seconds to lighting the zone burner, it
signs by “beep” sound and the neon light is on for the same time.
Choose which cooking zone you want to use by touching the cooking
zone symbol on the control panel.
Part 4: How to Use

English 14
To decrease / Increase the heat level when cooking zone is turned
on :
Touch an d hold the plus symbol (+) to in crease the cooking zone heat
or minus symbol (-) to decrease the c ooking zone heat. It shown by the
number on the control panel ( 1 to 9 ).
To turn off the cooking zone :
Touch the minus symbol ( -) until the LED light is turn off or you can
easily touch the ON/OFF symbol.
or
To lock off the cooking zone system :
Touch and hold the lock symbol (until you hear the “b eep” sound) to
disable the entire symbol on the control panel from its function. Touch
and hold the lock symbol to activate it again. (Until you hear the “beep”
sound).
NOTE :
- Within 10 seconds if there is no cooking zone to use, it is automatically turn into off condition.
- The pan (and lid) must be stainless steel or enamel. The diameter of the pan must match
the cooking zone, and be flat-bottomed or slightly concave.
- The weight of the pan and food, which is put on the cooking zone, cannot be over 10 kg.
MODENA vitroceramic hob is especially designed for the long-term usage so it did not need
complicated treatment. But, there is a few suggested maintenance procedure to maintain your
vitroceramic hob
GLASS CERAMIC Surface
Clean the glass ceramic part with a wet towel or special detergent. After that dry it with a smooth
leather sheet towel
ATTENTION :
- The appliance should be cleaned after each use. Let it cool down to room temperature befor e
cleaning. Should any sugar, plastic or aluminium foil spill or fall onto a hot cooking zone while it is
in use, first switch off the appliance. Then carefully scrape off all the sugar, plastic or aluminium
residues from the hob whilst they are still hot, using a shielded scraper blade. Take care not to
burn yourself. Allow the appliance to cool down, and then clean.
- Always turn off the cooking zone and if needed unplug the cord before cleaning the unit.
- Do not use any cleaner that can disable the glass ceramic function.
- Use smooth towel which is not make the glass ceramic scratch.
Part 5: Maitenance

English 15
- Always decreasing the cooking zone heat level or turn off the cooking zone before take out the pan
from the burner
- During cooking proces s, fat or oil must be carefully treated because this material can burn if its
reach certain temperature.
- After, the Vitroceramic hob has already used; the indicator lamp (H) will be on until the
cooking zone has already cool; do not touch the cooking zone!
- Avoid electrical connected using cable joint
- In the case of fault and/or malfunction, pull the plug out of the socket and inform MODENA
Service Center to carry out the repair with original spare parts.
- Always unplug the cord from the electric socket or turn off the electricity from the MCB (for BC
1640 and BC 1940) after finished the cooking process or if do not use the vitroceramic hob in
long-term condition.
- Do the routine service on your vitroceramic hob every 3 (three) month, to immediately detect
and repair the fault and/or malfuction.
Make some preventive checking before you Call Service Center if you have any operational problem
as below:
The unit is not
functioning
1. Check whether the cable power is already connected properly?
2. Is there any electrical power in the socket?
3. Cable was not installed?
Cooking zone is not
functioning
1. Check whether the cable power is already connected properly?
2. Make sure that the cooking zone symbol is already pressed and
adjusted for the certain condition.
If the problem still unsolved, please contact our Service Center for repairs.
Part 6: Precaution Action
Part 7: Problem & Solving

English 16
MODEL Vetro – BC 1640 Vetro – BC 1320
Main features
Hob type Vitroceramic Hob Vitroceramic Hob
Numbers of cooking zone 4 2
Burners Composition
Double ring Ø 140 – 210 mm -
Double ring Ø 120 – 180 mm Quick Ring Ø 180 mm
2@ Quick ring Ø 140 mm Quick Ring Ø 140 mm
Security Blocking System Yes Yes
Color Diamond Black Diamond Black
Top plate Glass + Stainless frame Glass + Stainless frame
Control Panel Touch control Touch control
Cooking level 9 9
Timer Digital Digital
Residual Heat Indicator Yes Yes
Lock System Yes Yes
Feet No No
Technical features
Power
Double ring Ø 140 – 210 mm 1000 – 2000 Watt -
Double ring Ø 120 – 180 mm 700 – 1700 Watt -
Single ring Ø 180 mm - 1800 Watt
Single ring Ø 140 mm 2 @ 1200 Watt 1200 Watt
Product Dimension
Length (mm) 580 300
Width (mm) 510 510
Hight (mm) 55 55
Weight (Kg) 8.8 4.5
Cut-out Dimension
Length (mm) 560 270
Width (mm) 490 490
Specifications of this appliance may change without notice to improve the quality of the product. Figures in this manual are
schematic and may not match your product exactly. Values s tated on the machine labels or in the documentation
accompanying it are obtained in laboratory in accordance with the relevant standards. Depending on operational and
environmental conditions of the appliance, values may vary.
Part 8 : Specification

NOTE :
This manual suits for next models
2
Table of contents
Languages:
Other Modena Kitchen Appliance manuals