Moller Vibrasat Pro User manual

en Vibrasat®Pro
The new premium system for liposuction and infiltration
INSTRUCTIONS FOR USE

IMPORTANT
READ CAREFULLY BEFORE USE
KEEP FOR FUTURE CONSULATION
© Möller Medical GmbH
All rights reserved.
No part of this documentation may be reproduced or translated in any way whatsoever without prior written
approval from Möller Medical GmbH. The status of the information, specifications and figures in these
instructions for use is indicated by the version number on the last page. Möller Medical GmbH reserves the
right to make changes in terms of technology, functions, specifications, design and information at any time
and without prior notification.
Möller Medical GmbH, Wasserkuppenstraße 29-31, 36043 Fulda, Germany

Vibrasat® Pro
Contents
Page 3 of 34
Contents
1General safety information........................................................................... 5
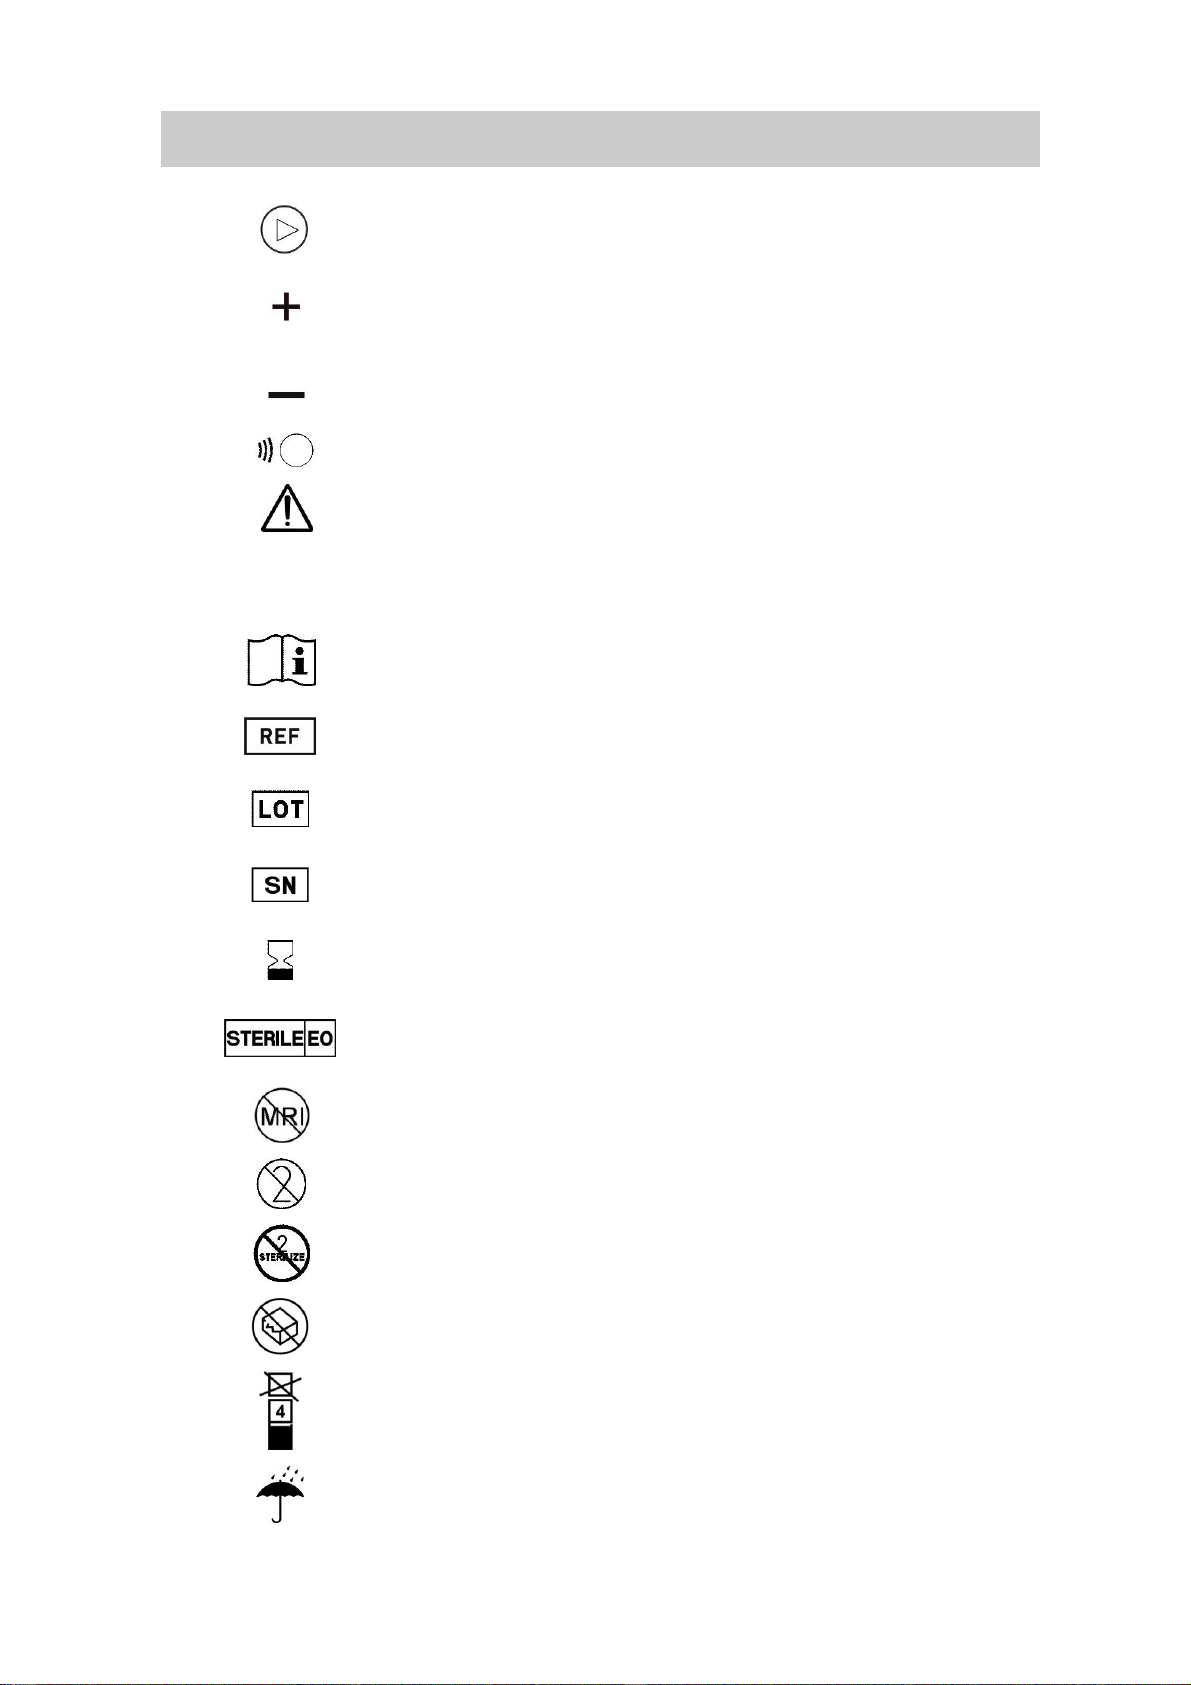
1.1 Explanation of the safety symbols used .......................................................... 5
1.1.1 Symbols used in the instructions for use:............................................ 5
1.1.2 Symbols appearing on the device:...................................................... 5
1.1.3 Symbols appearing on the packaging: ................................................ 6
1.2 Explanation of the format conventions used.................................................... 7
1.3 Manufacturer's responsibility........................................................................... 8
1.4 Operator's obligation to exercise diligence...................................................... 8
1.5 Warning notices.............................................................................................. 9
1.6 Non-product-related additional equipment....................................................... 9
1.7 Single use....................................................................................................... 9
1.8 Precautionary measures............................................................................... 10
1.9 Target group (user)....................................................................................... 10
2Intended use................................................................................................ 11
2.1 Proper use –intended use Vibrasat® Pro ...................................................... 11
2.2 Contraindications.......................................................................................... 11
2.3 Complications ............................................................................................... 11
2.4 Essential performance features..................................................................... 11
2.5 Combination with other products................................................................... 11
3Product description.................................................................................... 12
3.1 Vibrasat® Pro Wand (handle)......................................................................... 12
3.2 Vibrasat® Pro Console................................................................................... 13
3.3 Foot switch.................................................................................................... 13
3.4 Cannulas....................................................................................................... 13
4Setup and commissioning.......................................................................... 14
4.1 Unpacking the device and checking the scope of supply............................... 14
4.2 Suitable operating environments Vibrasat® Pro............................................. 14

Vibrasat® Pro
Contents
Page 4 of 34
4.3 Setup and commissioning............................................................................. 15
4.4 Disassembly ................................................................................................. 17
5Application and operation.......................................................................... 18
5.1Vibrasat® Pro Console description of the operating elements........................ 18
5.1.1 Display.............................................................................................. 19
5.2 Operation...................................................................................................... 19
5.2.1 Setting the vibration speed Vibrasat® Pro Wand................................ 19
5.2.1.1 Boost function............................................................................ 19
5.2.2 Vibration control................................................................................ 20
5.2.3 Warning notices................................................................................ 20
6Cleaning and care....................................................................................... 21
6.1 Vibrasat® Pro Wand....................................................................................... 21
6.2 Vibrasat® Pro Console................................................................................... 21
7Help in the event of a fault.......................................................................... 22
8Service......................................................................................................... 23
8.1 Software update............................................................................................ 23
9Periodic safety checks ............................................................................... 26
10 Disposal....................................................................................................... 27
11 Appendix ..................................................................................................... 28
11.1 Key technical data......................................................................................... 28
11.2 General data................................................................................................. 29
11.3 Electromagnetic emissions ........................................................................... 30
11.4 Electromagnetic immunity............................................................................. 31
11.5 Recommended safety distances................................................................... 33
11.6 Accessories .................................................................................................. 33

Vibrasat® Pro
General safety information
Page 5 of 34
1 General safety information
1.1 Explanation of the safety symbols used
In these instructionsfor use, important informationis indicated visually. These references are
prerequisites for preventing hazards to patients, operating personnel and third parties, as
well as for avoiding damages or malfunctioning of the device.
1.1.1 Symbols used in the instructions for use:
Caution! Hazard for patients, operating personnel and third
parties.
Information or help
1.1.2 Symbols appearing on the device:
Applied part Type B
Serial number (the first 4 digits indicate the year and month of
manufacture in YYMM format)
Conformity in accordance with the Medical Device Directive
93/42 EEC
Observe instruction manual
Manufacturer
Complies with ANSI/AAMI ES 60601-1
CAN/CSA 22.2 No. 60601-1-08
Alternating current
Return and disposal as per the WEEE Directive
O
Device switched off
I
Device switched on
Device selector switch on / standby
Foot switch

Vibrasat® Pro
General safety information
Page 6 of 34
Start/stop button
Up button to increase the stroke rate
Down button to lower the stroke rate
Device connected to superordinate control unit
Control device warning message
1.1.3 Symbols appearing on the packaging:
Consult instructions for use
Catalogue number
Batch code
Serial number (the first 4 digits indicate the year and month of
manufacture in YYMM format)
Use by
YYYY-MM-DD
Sterilised using ethylene oxide
Not suitable for use with MRI
Single use
Do not resterilise
Do not use if package is damaged
Stacking limit, do not store more than 4 packs high
Keep dry

Vibrasat® Pro
General safety information
Page 7 of 34
Restriction on relative storage humidity
Storage temperature limitation
Manufacturer
Conformity in accordance with the Medical Device Directive 93/42
EEC
Consult instructions for use
Applied part Type B
Keep in a place protected against sunlight
Caution! Observe transport and storage conditions.
Attention:
Under US federal law, this device may be only sold to a physician
or ordered by a physician.
1.2 Explanation of the format conventions used
In these instructions for use, different fonts are used to improve orientation.
Font
Use
Bold and italics
Buttons in instructions.
Small capitals
Dialogue fields and submenus in running text.
Italics
Device options, buttons and references to chapter
and sections in the running text.
The use of the Vibrasat® Pro is subject to thorough knowledge and observance of these
instructions for use, which are delivered as part of the product. Store the instructions for use
for the Vibrasat® Pro carefully. The device must be used only by persons who have the
required training or knowledge and experience.

Vibrasat® Pro
General safety information
Page 8 of 34
1.3 Manufacturer's responsibility
The manufacturer may only be regarded as responsible for the safety,
reliability and suitability for use of the devices if:
•Assembly, expansions, resetting, changes or repairs are performed by
individuals authorised by the manufacturer.
•The electrical installation in the room in question complies with the
relevant requirements and regulations (e.g. VDE 0100, VDE 0107 or IEC
specifications).
•The devices are used in accordance with the instructions for use and the
country-specific regulations and national deviations are observed.
•The conditions stated in the technical data are observed.
Any other use exept those described in the operating instruction is not intended and will result
in an exclusion of warranty and liability
The manufacturer undertakes to accept old devices as per the German Electrical and
Electronic Device Act (ElektroG).
1.4 Operator's obligation to exercise diligence
The operator is responsible for the proper operation of the medical device. In line with the
German Medical Device Operator Ordinance (MPBetreibV), the user must perform a wide
range of duties and also assume responsibility when handling medical devices within the
framework of his activities. Only qualified personnel may operate the Vibrasat® Pro .
Whenever the Vibrasat® Pro is handled and used, precise knowledge and compliance with
these instructions for use is necessary. The devices may only be operated by persons with
the necessary training or knowledge and experience.
The devices are subject to special precautionary measures with respect to
electromagnetic compatibility (EMC) and must be installed and operated in
accordance with the EMC guidelines.
If one of the devices no longer works properly due to a malfunction, the
device must not be used any further and must be inspected by the technical
service.
Performance and safety may be impaired if Original Equipment Manufacturer device parts
are not used.
All work that requires tools must be performed by the manufacturer's technical service or
parties authorised by the latter.

Vibrasat® Pro
General safety information
Page 9 of 34
1.5 Warning notices
•The devices must not be modified.
•No liquids must be allowed to penetrate the current-carrying parts of
the device.
•When cleaning, ensure that no cleaning agent runs into the connector
sockets.
•Disconnect the power cable before cleaning.
•The housing of the Vibrasat® Pro Console is only connected as
functional earth with the earth contact of the power supply.
•Replace connecting cables of all kinds even if they are only slightly
damaged; make sure not to roll over cables.
•Keep the cables away from heat sources. This prevents the insulation
from melting which could cause a fire or an electric shock.
•Do not use force to push plugs into sockets.
•When removing plugs, do not pull on the cables. To remove, release
the plug lock if necessary.
•Do not subject the devices to strong heat or fire.
•Do not subject the devices to hard impacts.
•If heat, fumes or smoke appear, disconnect the devices from the mains
immediately.
•When reprocessing the devices, observe the reprocessing instructions
in order to avoid damaging the products.
1.6 Non-product-related additional equipment
Additional equipment which does not belong to the device’s scope of supply and which are
connected to the device’s analogue and digital interfaces must be shown to satisfy the
relevant EN specifications (e.g. EN 60601 for electromedical devices). Anyone who connects
additional devices becomes the system configurator and is thus responsible for ensuring that
the valid version of the system requirements as per the standard IEC 60601-1 is observed.
If components are used that do not correspond to the original parts, the
performance, safety and EMC behaviour may be impaired.
1.7 Single use
Reuse of single-use devices creates a potential risk of patient or user infections.
Contamination of the device may lead to injury, illness or death of the patient. Cleaning,
disinfection and sterilisation may compromise essential material properties and product
parameters leading to device failure.

Vibrasat® Pro
General safety information
Page 10 of 34
Dispose of the used single-use product according to your hygiene
requirements.
1.8 Precautionary measures
The application results vary depending on the patient’s age, site of intervention and the
surgeon’s experience. The application results may or may not be permanent.
Sterilise all reusable components of the Vibrasat® Pro as per the reprocessing instructions
and replace all the disposable components before using the Vibrasat® Pro on another
patient.
1.9 Target group (user)
The Vibrasat® Pro is reserved for use by doctors who can demonstrate that they have the
necessary expertise through the relevant specialist training or approved, specialist further
training.

Vibrasat® Pro
Intended use
Page 11 of 34
2 Intended use
2.1 Proper use –intended use Vibrasat® Pro
The Vibrasat® Pro, consisting of the control unit and a handle with a connecting cable has
the intended use to vibrate cannulas n particular to support the hand movement of the user.
2.2 Contraindications
•Clotting disorders or intake of anticoagulant medication
•Massive hernias
•Serious heart diseases
•Serious lung diseases
•Serious liver damage
•Serious kidney damage
•Risk of thrombosis (thrombophilia)
•Diabetes
2.3 Complications
•Vascular injuries
•Nerve injuries
•Tissue injuries
•Organ injuries
•Death
2.4 Essential performance features
The Vibrasat® Pro does not have any essential performance features.
2.5 Combination with other products
Only accessories that have been specified and approved by the device manufacturer should
be used. Please contact the device manufacturer if you are unsure.

Vibrasat® Pro
Product description
Page 12 of 34
3 Product description
Figure 1
1
Vibrasat® Pro Wand handle
9
Foot switch cable
2
Vibrasat® Pro Wand connecting cable
10
On / Off switch
3
Vibrasat® Pro Console control device
11
Connection socket for Vibrasat® Pro Wand
4
Mains cable
12
Connection sockets for foot switch
5
Mains plug
13
Mains input socket
6
Foot switch cable
14
USB socket, service interface
7
Foot switch
15
USB socket
8
Foot switch
16
Vibrasat® QuickLock cannula holder
3.1 Vibrasat® Pro Wand (handle)
The Vibrasat® Pro Wand handle (Figure 1, Point 1) transfers very rapid vibrations in an axial
direction to a cannula connected to the handle and thus supports the user’s hand movements.

Vibrasat® Pro
Product description
Page 13 of 34
3.2 Vibrasat® Pro Console
The Vibrasat® Pro Console (Figure 1, Point 3) is the control unit for the Vibrasat® Pro.There
is an On / Off switch on the rear of the device for the device standby mode and for the device
interfaces for the foot switch (2 foot switches can be operated simultaneously)
Vibrasat® Pro Wand and mains plug. All the application parameters are controlled using the
capacitive buttons on the front of the Vibrasat® Pro Console .
The Vibrasat® Pro Console software can be updated using the USB interface on the rear
(Figure 1, Point 14). It must be noted that this is a service interface. The procedure is
described in Chapter 8.
3.3 Foot switch
Down button
On/Off button
Up button
The foot switches (optionally available as accessories) can be set in the same way as the
buttons on the Vibrasat® Pro Console.
Both foot switches behave identically.
Both connection sockets on the rear are equal.
3.4 Cannulas
Only the designated Möller Medical GmbH cannulas may be attached to
the Vibrasat® Pro Wand handle. An up-to-date list of the available
cannulas can be found in our Brochure or on our website www.moeller-
medical.com.
On / Off

Vibrasat® Pro
Setup and commissioning
Page 14 of 34
4 Setup and commissioning
4.1 Unpacking the device and checking the scope of supply
Delivery of the Vibrasat® Pro comprises at least 2 packaging units, depending on the scope
of the delivery. Make sure that no parts remain in the packaging when unpacking the
Vibrasat® Pro .
Packaging unit Vibrasat® Pro Console:
•1 Vibrasat® Pro Console
•1 mains cable
•1 USB service interface release key
•1 instructions for use
Packaging unit Vibrasat® Pro Wand
•1 Vibrasat® Pro Wand
•1 cannula holder
•10 O-rings (not sterile)
•1 reprocessing instructions
It is advisable not to dispose of the packaging and to use it again for any
service required.
Only send the devices in their original packaging to prevent damage during
transportation.
4.2 Suitable operating environments Vibrasat® Pro
The Vibrasat® Pro is suitable for environments in the following areas:
•Professional healthcare facilities with specific requirements
Clinics (rooms in A+E, hospital rooms, intensive care, operating theatres, except
for in the proximity of active facilities of RF surgery devices or outside of the RF-
shielded room for magnetic resonance imaging, first aid facilities).
Make sure that the box is not damaged on delivery to you. The forwarder
must be notified immediately of any transport damage. Check all products
for damage. Damaged products must not be used. Please contact your
supplier immediately.

Vibrasat® Pro
Setup and commissioning
Page 15 of 34
•Home healthcare
Practices, lodgings (places of residence, nursing homes), hotels, guest houses
and stationary vehicles, provided that the devices are not connected to the
vehicle's DC power supply.
TheVibrasat® Pro isnot approved for use in aircrafts ormilitary applications. The appropriate
EMC requirements for these environments have not been tested.
4.3 Setup and commissioning
Before commissioning, the Vibrasat® Pro Console must be processed as
per the hygiene guidelines (see Chapter 6).
The Vibrasat® Pro Wand and the cannula holder must be processed as
per the reprocessing instructions provided by the manufacturer.
If the devices Vibrasat® Pro Console and Vibrasat® Pro Wand had been
exposed to temperature or humidity fluctuations during transport or other
change of place, they need to rest for at least 2 hours in the operating
environment before restart.
•Place the Vibrasat® Pro Console on a suitable, stable surface or, if available, use the
Vibrasat® Pro fastening kit. Fasten the fastening kit to a standard rail. Put the
Vibrasat® Pro Console on the plate and secure it to the fastening kit using the screw
supplied.
•Connect the foot switch (optional) to the Vibrasat® Pro Console using the connecting
cable.
•Insert the mains cable in the designated connector on the Vibrasat® Pro Console and in
a socket with a connected earth wire. Observe the voltage indicated on the identification
plate.
•Press the On / Off switch on the rear of the Vibrasat® Pro Console to switch it to standby
mode.
•Remove the sterile Vibrasat® Pro Wand from its packaging under sterile working
conditions and connect it to the Vibrasat® Pro Console.
•Connect the cannula holder to the handle Vibrasat® Pro Wand.

Vibrasat® Pro
Setup and commissioning
Page 16 of 34
Figure 2
1. Push the cannula holder (Figure 2, Point 1) onto the fork-shaped pin on the handle
(Figure 2, Point 4). The tube connection can be aligned upwards or downwards as
required. The alignment of the tube connection can be rotated by 180° if necessary.
The O-rings (Figure 2, Point 2 and 5) must be in perfect condition.
2. Attach the cannula holder by tightening the lock nut (Figure 2, Point 3) against the O-
ring by hand.
The cannula holder must be locked into place!
The O-ring prevents the nut from becoming loose during use. Do not use tools. The
use of tools damages the device.
Figure 3
•Attach a suitable suction tube (available as an accessory) on the cannula holder.
1. Push the tubethrough the tube holder onthe rearend of the handle (Figure 3, Point 1).
2. Attach the suction tube to the tube connection of the cannula holder (Figure 3, Point 2).

Vibrasat® Pro
Setup and commissioning
Page 17 of 34
Figure 4
Figure 5
•Connect a suitable cannula for the application to the cannula holder. For this, hold the
lock (Figure 4, Point 1) pressed down whilst attaching until the square of the cannula hold
locks into place. Then push the cannula at the attachment further, beyond the marked
line (Figure 5), until it audibly clicks into place.
The Vibrasat® Pro is now ready for use.
4.4 Disassembly
•Press the unlocking button on the cannula attachment and pull the cannula out of the
cannula holder.
•Firstly pull the suction tube out of the cannula holder and then out of the tube holder.
•Turn the lock nut of the cannula holder anticlockwise vis-à-vis the handle
Vibrasat® Pro Wand and push the released nut up to the handle housing.
•Pull the cannula holder off the handle.
•Pull the connecting cable of the Vibrasat® Pro Wand off the Vibrasat® Pro Console.
After each use, the Vibrasat® Pro Console must be processed as per the
hygiene guidelines (see Chapter 6) and the Vibrasat® Pro Wand must be
processed as per the reprocessing instructions provided by the
manufacturer.

Vibrasat® Pro
Application and operation
Page 18 of 34
5 Application and operation
Always note:
•The handle may only be loaded in an axial direction.
•The device switches off for safety reasons if subjected to excessive
radial force.
•Large radial forces will damage the handle.
•If the cannula holder (connection for suction tube and suction
cannula) is subjected to excessive forces, the handle will be
damaged.
•All handling of the device requires precise knowledge and
compliance with these instructions for use.
•The device may only be used by specialist staff.
5.1 Vibrasat® Pro Console description of the operating elements
After switching on the device using the On / Off switch on the rear, a brief display test is
performed. After starting, the display shows the last set value when the device was switched
off (stroke rate per minute = vibration speed).
The stroke rate can be set between 3000 strokes per minute and 5000 strokes
per minute. The stroke rate can be set in standbymode and in vibration mode
in increments of 100. The Vibrasat® Pro features a boost function. A
description of this can be found in Chapter 5.2.1.1.

Vibrasat® Pro
Application and operation
Page 19 of 34
5.1.1 Display
3
6
5
2
1
4
1. Segment display shows the set stroke rate per minute
2. Start / Stop –vibration button ON/OFF
3. Signal display –connected to the superordinate control unit
4. Minus - button to lower the stroke rate
5. Plus - button to increase the stroke rate
6. Warning –in the event of malfunctions (e.g. handle is not connected)
5.2 Operation
To make work as simple and convenient as possible, the Vibrasat® Pro provides various
operating options.
5.2.1 Setting the vibration speed Vibrasat® Pro Wand
Setting the desired vibration speed in strokes per minute. The setting can be made at any
time with one of the following actions:
•Press the Plus / Minus buttons on the Vibrasat® Pro Console
•Press the Up / Down buttons on the foot switch
Pressing once increases or reduces the vibration speed by 100 strokes/minute. Pressing for
longer increases/lowers the speed automatically.
5.2.1.1 Boost function
The boost function can only be activated on the Vibrasat® Pro Wand .
Press the button on the Vibrasat® Pro Wand for longer than 2 seconds to start the boost with
6000 strokes per minute for max. 1 minute. The button must remain pressed during this time.
The device then switches automatically to the last set vibration speed.

Vibrasat® Pro
Application and operation
Page 20 of 34
6000 is shown briefly on the Vibrasat® Pro Console. 60 s is then decremented on the
display. If during the boost, the foot switch or play button on the Vibrasat® Pro Console is
pressed, the vibration is switched off and the 60 s timer is reset. The timer is also reset if the
button on the Vibrasat® Pro Wand is released within 60 seconds.
Repeat activation of the boost function can cause the temperature of the handle to rise.
5.2.2 Vibration control
Switching the cannula vibration on and off:
•Press the Start / Stop button on the Vibrasat® Pro Console
•Press the button on the Vibrasat® Pro Wand
•Press the On / Off button on the foot switch
If the Vibrasat® Pro Wand is switched on, the ring on the Start / Stop display lights up.
5.2.3 Warning notices
If prohibited operating states occur during vibration, the Vibrasat® Pro Wand is switched off
and a corresponding warning ID is shown on the display. In addition, the warning symbol is
displayed.
The error must be acknowledged with the Start / Stop button and the vibration switched on
before the Vibrasat® Pro Console switches on the Vibrasat® Pro Wand again.
Alternatively switch the Vibrasat® Pro Console off and on again.
•If the prohibited operating states occur repeatedly, contact the Möller
Medical GmbH service centre.
Warning displays
Warning ID
Error description
Solution
100
Motor speed does not
correspond to set value
Reduce the load and check that the
Vibrasat® Pro Wand is running smoothly.
106 - 108
Device initialisation failed
Contact the service centre.
Table of contents
Other Moller Medical Equipment manuals
Popular Medical Equipment manuals by other brands

Bodypoint
Bodypoint BB101M-1 Installation and user instructions

PCS
PCS Nasco Simulaids Alex Getting started

Atrium
Atrium Express Mini 500 user manual

SurgiTel
SurgiTel Fixed Headband Light w/ Iris Operation and service manual

agiliti
agiliti Immerse user manual

Welch Allyn
Welch Allyn KleenSpec 78900 quick start guide