Montana SIRIO User manual

SIRIO
USER MANUAL


USER MANUAL
3
INDEX
1.0 General warning 4
1.1 Important safety information 4
2.0 OLI Sport system main features 6
2.1 How to switch on/off the OLI Sport system 6
3.0 Battery 6
3.1 Battery charge percentage 7
3.2 Battery installation and removal 7
3.3 Battery key 8
3.4 Battery cleaning 8
3.5 How to charge the battery 8
4.0 High Vision Display 9
4.1 Display control panel 9
4.2 Main screens 10
4.3 Assistance levels 12
4.4 Walk mode 12
4.5 Settings 13
4.6 Error codes 15
4.7 Technical assistance 16
4.8 Cleaning and maintenance 16
4.9 Disposal 17
Thank you for choosing an e-bike equipped with OLI motor.
Always wear protective clothing before using the e-bike.

USER MANUAL
4
1.0 GENERAL WARNING
Please read all the WARNING and information in this User Manual carefully before using the e-bike.
• Please contact the retailer for any information concerning the installation or adjustment of the e-bike
that is not provided in this manual.
• This product must be disassembled or adjusted only by qualified personnel.
• This product must be used in compliance with the local laws and regulations.
!! WARNING – The use of batteries, battery chargers or other aftermarket accessories not approved by
MONTANA S.R.L may compromise the normal functioning of the system and may cause damage. Moreover, it
voids the warranty.
1.1 IMPORTANT SAFETY INFORMATION
!! DANGER – How to handle the battery:
• Do not deform, modify or disassemble the battery. Do not weld anything directly on the battery.
It may cause leaks, overheating, explosions or battery fire.
• Do not leave the battery next to heat sources such as heaters.
Do not warm up the battery and do not throw it into the fire. This may cause explosions or battery fire.
• Do not immerse the battery into liquids such as water and do not wet the connectors.
This may cause overheating, explosions or battery fire.
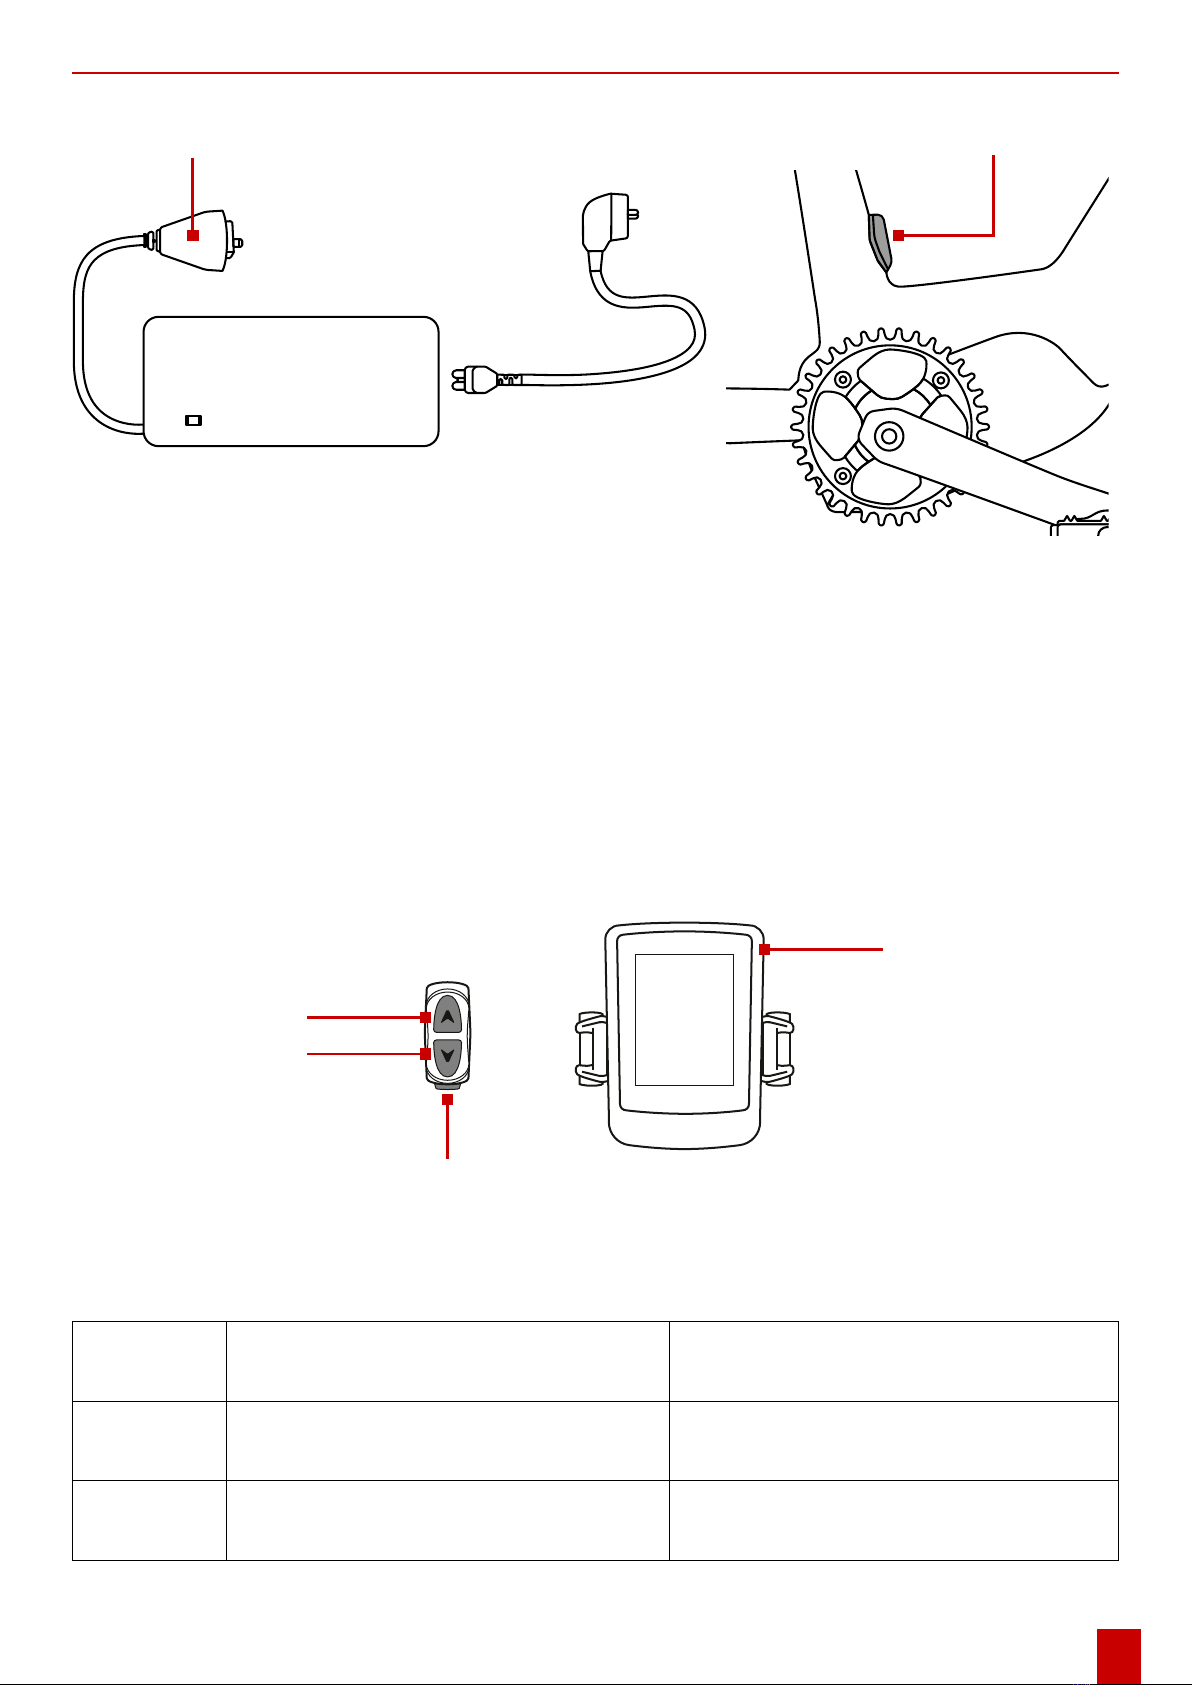
• Use only MONTANA S.R.L. approved battery charger to charge the battery and respect the requirements
indicated for battery charging. Not following these requirements may cause overheating,
explosions or battery fire.
• Should any liquid leak from the battery and come into contact with your eyes, rinse the eyes
with water without rubbing them and call your doctor. This may cause eye injury.
• Do not charge the battery in highly humid places or outdoors. This may cause electric shocks.
• Do not insert or remove the charging plug if it is wet. This may cause electric shocks.
If there are traces of water on the charging plug, remove them before inserting it.
• If the battery is not fully charged after 6 hours, remove the plug from the socket and contact the retailer.
Not following these requirements may cause overheating, explosions or battery fire.
• If there are scratches or visible damage on the battery, do not use it.
This may cause explosions, overheating and other problems.
• Do not use the battery when the temperature exceeds the range displayed below.
This may cause battery fire, injuries or malfunction.
1. Using the e-bike: -20 °C / +60 °C;
2. During the battery charge: 0 °C / +45 °C.
General rule for a safety ride
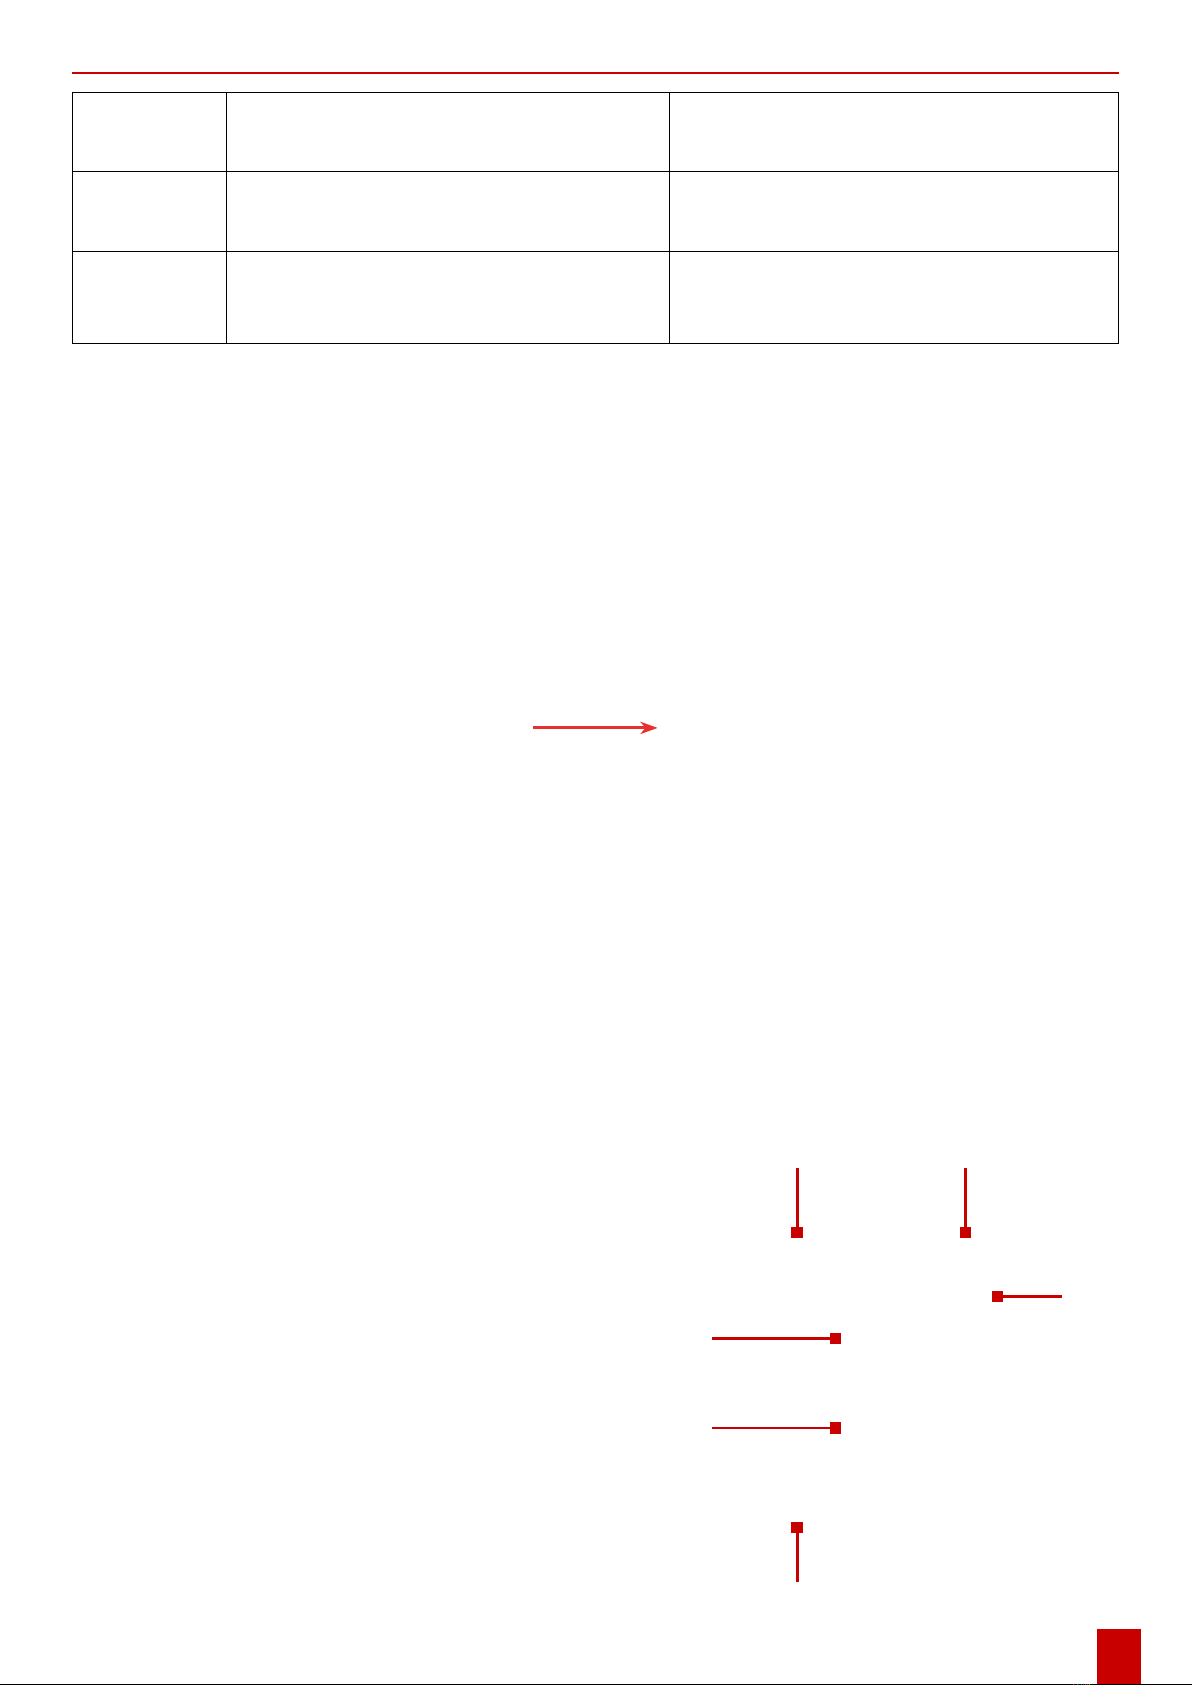
To avoid accidents, do not pay excessive attention to the display when you are riding your e-bike.
General rule for a safety use of the product:
Always remove the battery before wiring or connecting components to the e-bike. If not, it may cause electric
shocks.
WARNING: Follow the rules contained in this User Manual for a safe and correct use of the e-bike.
Safe use of the product:
• Regularly check the condition of the battery charger, in particular the wire, the plug and the case.
If the battery charger or the adapter are broken, do not use the battery until they are fixed up.
• People (kids included) with reduced physical, mental or sensorial capabilities must not use the e-bike
unless they have been instructed on how to use it by someone responsible for their safety and supervision.

USER MANUAL
5
• Kids must not play too close to the e-bike.
• Contact the retailer for the installation and adjustment of the e-bike.
• Do not put the e-bike upside down. This may cause damage to the display or to the shift lever.
• Use the e-bike with care without exposing it to excessive stress.
WARNING: Do not use high-pressured water or steam jests to clean the motor, the display or the battery as
they may cause damages or malfunctioning. Do not use high-pressured air jet to dry the e-bike.
How to handle the battery
• Do not leave the battery under the direct sunlight or inside of a vehicle if the temperature is high.
This may cause leaks.
• Should the liquids leaked form the battery come into contact with your clothes or skin wash them
immediately with water. The liquids may cause skin injuries.
• Store the battery in a safe place, away from the reach of children or pets.
• In case of malfunctioning or problems, contact your retailer.
• Do not modify the system, as this may cause malfunctioning.
• If the battery is removed from the e-bike, the vehicle works as a regular bike. Anyway, if the lights are
connected to the battery, they can’t be switched on.
• Pay attention to the following points if you charge the e-bike battery with the battery assembled
on the frame:
- Make sure that there are no traces of water on the socket or plug.
- Before charging the battery, make sure that the battery is correctly assembled and blocked.
- Do not remove the battery during the charging.
- Do not use the battery while it is connected to the battery charger.
- Close the frame charging socket with its cover after every battery charge.
• Remove the battery from the e-bike before loading it into your car.
• Before connecting the battery to the e-bike, make sure that there are no traces of water or dirt
on the connectors.
• Keep away from the reach of children.
• Always remove the battery before cleaning the e-bike.

USER MANUAL
6
2.0 OLI SPORT SYSTEM MAIN FEATURES
To use the OLI Sport propulsion system, make sure that the following requirements are met:
• The battery must be sufficiently charged.
• The speed sensor must be correctly connected and the magnet correctly positioned.
The motor automatically deactivates when the e-bike reaches the speed of 25 km/h.
The motor automatically reactivates when the user restarts to pedal and the speed is less than 25 km/h.
As the user stops pedaling, the motor automatically deactivates. The motor reactivates as the user restarts
pedaling. The motor cooperates and harmonizes with the user’s effort.
2.1. HOW TO SWITCH ON/OFF THE OLI SPORT SYSTEM
SWITCHING THE SYSTEM ON:
Press and hold the POWER button until the initial screen with the OLI logo is displayed.
After a few seconds the first Home section is displayed.
SWITCHING THE SYSTEM OFF:
Press and hold the POWER button until the shutdown screen is visualized.
Wait a few seconds for the whole system shutdown.
PLEASE NOTE: If the E-bike is not used for a certain amount of time, depending on the type of battery,
the system will switch off automatically.
3.0 BATTERY
!! DANGER:Use only the specific battery charger and follow the charging requirements indicated in this User
Manual. If not, it may cause overheating, explosion or battery fire.
WARNING:
• Do not unplug the battery charger from the socket by pulling the cable, but gently unplug the plug.
• If the battery charger is connected to the frame socket for battery charging, pay attention not to stumble
in the battery charger cable. This may cause injuries or the bicycle to drop with consequent damages to
the components.
• If the e-bike is stored for a prolonged period of time after the purchase, it will be necessary to charge the
battery again before using the e-bike.
• The warranty does not cover the battery for wearing and deterioration determined by the regular and
normal use of the e-bike.
display
su/up
giù/down
power

USER MANUAL
7
3.1 BATTERY CHARGE PERCENTAGE
The battery charge percentage is displayed in every Home screen.
3.2 BATTERY INSTALLATION AND REMOVAL
WARNING: Always remember to switch off the battery before the battery installation or removal.
!! DANGER: Do not use the e-bike with the key on. This may cause the battery to drop or the key to be lost.
WARNING:
• Before using the e-bike make sure that the battery is locked and that the charging socket cover is closed.
• Remove and store the battery in a dry place before transporting the e-bike; cover and protect the electric
connectors from weather elements.
BATTERY REMOVAL
1. Insert the key into the lock and turn it clockwise to
unlock the battery.
2. Grab the upper part of the battery and remove it
from the support.
BATTERY INSTALLATION
1. Insert the lower part of the battery into the down
tube opening paying attention to avoid ruining the
rubber gaskets, and then connect the upper part to
the electric connectors.
2. The “click” sound indicates that the battery is
correctly locked. There is no need to insert the key
to assemble the battery.
3. During this operation make sure to handle and
assemble the battery with care to avoid damages to
the electric components and connectors.
4. Remove the key from the lock and store it in a
safe place.
battery
charge indicator
1
2
1
2

USER MANUAL
8
3.3 BATTERY KEY
In case of key loss, contact your retailer. He will replace the whole padlock.
3.4 BATTERY CLEANING
• Do not use diluents or solvents to clean the e-bike parts. Such products may damage the components.
• Use a damp cloth to clean the battery and plastic parts.
• The battery is designed to be completely waterproof and, when assembled, it can be used also in case of rain.
Anyway, when it is not assembled on the e-bike, the battery must not enter into contact with water as in this
case the connectors are not protected.
• Do not clean the battery with high-pressured jets. This may cause malfunctioning.
• Remove the battery before cleaning the e-bike.
3.5 HOW TO CHARGE THE BATTERY
• At the moment of the purchase the battery is not completely charged. Before using the e-bike it is necessary
to charge the battery completely. If the battery runs out of charge, it will be necessary to charge it as soon
as possible. If not, the battery lifetime will tend to reduce considerably.
• At the moment of storing the e-bike for a prolonged period of time, the battery charge must be around the
70% of its total capacity. Moreover, it is recommended to charge the battery for around 2 hours each
3 months to avoid the complete battery discharge.
HOW TO CHARGE THE BATTERY WHEN DISASSEMBLED
1. Insert the battery charger plug into the socket.
2. Insert the battery charger adapter into the battery socket. Leave the battery on a flat surface during the
charging.
HOW TO CHARGE THE BATTERY INSTALLED ON THE FRAME
1. Switch off the system.
2. Secure the e-bike to avoid any fall during the battery charge.
3. Insert the battery charger power plug into the socket.
4. Insert the battery charger adapter into the frame socket.
charging socKet
charging plug

USER MANUAL
9
FraMe charging socKei
charging plug
WARNING:
• If the battery (17.5 Ah) is completely discharged, it will take 10 hours to complete the charge.
• If the battery (14.5 Ah) is completely discharged, it will take 7/8 hours to complete the charge.
• Follow the safety rules contained in this manual during the battery charge.
• Check and remove any trace of dirt from the battery charge connectors and sockets.
• Apossibleinterruptionduringthebatterychargewon’tcausedamagestothebattery.
• If the battery is charged when the battery is assembled on the e-bike, close the frame charging
socket cover after each charge.
4.0 HIGH VISION DISPLAY
WARNING: Using the display during the ride may distract the user and cause accidents.
Always follow the traffic regulations.
4.1 DISPLAY CONTROL PANEL
The display is provided with 3 buttons that allow the user to navigate within the software. They can be used
either with a short pressing or a prolonged pressing (more than 2 seconds).
display
su/up
giù/down
power
BUTTON SHORT PRESSING (<1 SEC) LONG PRESSING (>2 SEC)
POWER Allows you to: Allows you to:
UP scroll on the Home screen from one main
screen to another; turn the display on or off;

USER MANUAL
10
BUTTON SHORT PRESSING (<1 SEC) LONG PRESSING (>2 SEC)
DOWN Allows you to scroll through the menu items,
going down
From any main screen allows you to activate
Walk mode
DOWN + UP -
From the main screens, pressing the two
keys simultaneously allows access to the
Menu
4.3 MAIN SCREENS
HOME
After powering on, the first Distance screen of the Home section is displayed.
The Home section consists of 6 screens.
To scroll through the screens you need to press the POWER button.
From any screen in the Home section, you can:
• Adjust the assistance level by pressing the UP and DOWN buttons.
• Enter Walk mode by holding down the DOWN button.
• Adjust the brightness of the e-bike lights by holding down the UP button for 2”.
• Enter the Menu section by holding down the UP and DOWN buttons at the same time for 2”.
GENERAL SCREEN LAYOUT
The screens in the Home section differ from each
other in the type of information displayed.
From screens 1, 2, 3 and 4 it is always possible to
visualize the following information:
1. Battery charge percentage;
2. E-bike light adjustment;
3. Assistance level;
4. Current e-bike speed (in km/h);
5. Power graph display (upper bar: motor power;
lower bar: cyclist power);
6. Navigation bar.
1
6
2
3
4
5

USER MANUAL
11
SCREEN 1 – TRIP
Indicates the distance travelled in kilometers (km) since the last reset.
SCREEN 2 – TIME
Indicates the time elapsed in motion since the last reset. The value is expressed in
hours:minutes:seconds.
SCREEN 3 – PACE
Indicates the instantaneous speed of rotation of the rotating pedals per minute (rpm).
SCREEN 4 – ENERGY
Indicates the energy consumed by the cyclist in kilocalories (kcal) since the last reset.
SCREEN 5 – RACE
It is the fifth screen of the Home section.
In this screen, the values in watts (w) of the motor power and cyclist power are expressed in full.
1. Indicates the instantaneous power delivered by the moto in watts (w).
2. Indicates the instantaneous power expressed by the cyclist in watts (w).
3. Power graph display (upper bar: motor power; lower bar: cyclist power).
4. Indicates the average energy consumption in watt-hours per kilometer (Wh / km), calculated since the
last reset.
This data allows you to adjust the level and, therefore, the consumption of the e-bike according to the need.
1
2
3
4

USER MANUAL
12
SCREEN 6 – SUMMARY
It is the sixth screen of the Home section. This screen summarizes the variable parameters of the previous
screens.
4.3 ASSISTANCE LEVEL
From any screen in the Home section is possible to change the assistance level by pressing the UP button
to increase it and the DOWN button to decrease it.
Below you can find the multiplication factor for each level of assistance:
• LEVEL 0: 0% (motor inactive);
• LEVEL 1: 50%;
• LEVEL 2: 100%;
• LEVEL 3: 200%;
• LEVEL 4: 300%;
•LEVEL 5: 400%.
4.4. WALK MODE
The system is equipped with a walk assistance function, which allows you to activate the motor up to a
maximum speed of 6 km/h.
To activate the walk assistance function, press and hold the DOWN button.
The motor will start in Walk mode and the corresponding icon will appear on the display.
To deactivate Walk mode, release the DOWN button.
The motor will shut down in the following cases:
• Release of the DOWN button;
• Speed exceeding 6 km/h;
• Locking the e-bike wheel.
WARNING: If assistance level (0) is set, the motor is disabled and the walk assistance function
cannot be used.
Indicates the distance travelled in kilometers (km) since
the last reset.
Indicates the time elapsed in motion since the last reset.
The value is expressed in hours:minutes:seconds.
Indicates the average speed in kilometers per hour (km/h)
measured since last reset.
Indicates the average energy consumption in watt-hours
per kilometers (Wh/km) calculated since the last reset.
Indicates the energy consumed by the cyclist in kilocalo-
ries (kcal) since the last reset.
Indicates the total distance travelled by the e-bike in kilo-
meters (km). Non-resettable value.

USER MANUAL
13
4.5 MENU
From the Home section, hold down the UP + DOWN buttons at the same time for 2” to enter the Menu section.
ADVANCED:
From the Menu section it is possible to access the Advanced section by selecting
the relevant item.
From the Advanced page:
• Use the UP and DOWN buttons to scroll through the items, the selected item is
highlighted in the center in the white line;
• Press the POWER button to confirm and open the page of the selected item,
the Back item takes you back to Menu page.
RESET TRIP
The Reset trip item allows you to reset all the recorded lap data by returning the coun-
ters to zero.
By pressing the POWER button it starts immediately upon reset.
The message “Trip reset…” appears on the display for a few seconds, when the reset
is complete, the Menu page is displayed again.
SYSTEM INFO
In this screen you can view the firmware versions:
• Of the installed HMI;
• Of the associated motor.
Press the POWER button to return to the Menu.
From the Menu page:
• Use the UP and DOWN buttons to scroll through
the items present, the selected item is highlighted in
the center in the white line;
• Press the POWER button to confirm and open the
page of the selected item; the Back item takes you to
the first screen of the Home section.
From any screen, by holding down the POWER
buttons for 2”, you can return to the last viewed
HOME screen.
SCREEN BRIGHTNESS
From this screen, you can adjust the brightness of the screen.
Use the UP and DOWN buttons to scroll through the values from 1 to 10. The selected
value is highlighted in the center in the white line.
Press the POWER button to confirm and return to the Advanced page.
Select the Back item and press the POWER button to return to the Advanced page
without setting any value.

USER MANUAL
14
MEASURE UNIT
From this screen it is possible to select the unit of measure with which the following are
calculated:
• Instantaneous speed;
• Average speed;
• Average consumption;
• Lap distance;
• Total distance.
Use the UP and DOWN buttons to scroll through the available items. The selected
value is highlighted in the center in the white line.
Press the POWER button to confirm and return to the Advanced page.
Select the Back item and press the POWER button to return to the Advanced page
without changing the unit of measure.
WEIGHT
From this screen you can set your body weight by choosing a value between 50 and
150 kg.
WARNING: Setting this datum is not necessary for the e-bike to function correctly. The
value has the sole purpose of making the calculation of the calories consumed reliable.
Use the UP and DOWN buttons to scroll through the available items. The selected
value is highlighted in the center in the white line.
Press the POWER button to confirm and return to the Advanced page.
Select the Back item (located after item 150) and press the POWER button to return to
the Advanced page without changing the weight.
GENDER:
From this screen you can set your gender.
WARNING: Setting this datum is not necessary for the e-bike to function correctly. The
value has the sole purpose of making the calculation of the calories consumed reliable.
Use the UP and DOWN buttons to scroll through the available items. The selected
value is highlighted in the center in the white line.
Press the POWER button to confirm and return to the Advanced page.
Select the Back item and press the POWER button to return to the Advanced page
without changing the gender.
LANGUAGE
From this screen you can choose the language of the unit’s text.
Use the UP and DOWN buttons to scroll through the available items. The selected
value is highlighted in the center in the white line.
Press the POWER button to confirm and return to the Advanced page.
Select the Back item and press the POWER button to return to the Advanced page
without changing the language.

USER MANUAL
15
NIGHT MODE:
From this screen you can choose the configuration for night mode:
• Automatic, the night mode is set automatically by means of the twilight sensor inside
the display, which detects the ambient brightness.
• Active, night mode always active.
• Deactivated, night mode always deactivated.
Use the UP and DOWN buttons to scroll through the available items. The selected
value is highlighted in the center in the white line.
Press the POWER button to confirm and return to the Advanced page
Select the Back item and press the POWER to return to the Advanced page without
changing the configuration.
4.6 ERROR CODES
In the event of a fault, the system signals the problem to the user by displaying a danger icon combined
with 4-character code, which allows the user to trace the type of error.
WARNING:
• Depending on the type of fault, the system may prevent the motor from starting or run at reduced power.
• Where “request assistance” is indicated, the intervention of an OLI E-bike Systems technician is required.
The following table lists the possible faults and the 4-character codes displayed in the error messages.
ERROR PROBLEM SOLUTION
0001 Battery communication problem. Battery
status data may be displayed incorrectly.
Check that the battery cables and contacts
are intact and connected correctly.
0101 Communication problem between power
unit and HMI.
0104 Speed sensor not detected. Check that the wiring is intact and
connected correctly.
0105
Non-compliant torque meter signal. The
torque meter signal has a fault. Reduced
power operation.
Check that the speed sensor is installed and
connected correctly.
0106 Non-compliant torque meter offset. The
torque meter signal has a fault. Request assistance.
0801 Motor rotation sensors fault Request assistance.
0802 Pedal rotation sensors fault Request assistance.
0804 Excessive drive temperature. Request assistance.
0805
Excessive motor temperature. The motor
has reached a temperature above the
danger threshold.
Shut down the system temporarily to allow
the components to cool.
0806 Non-compliant peripheral bus voltage If it occurs frequently, ask for assistance.

USER MANUAL
1616
4.7 TECHNICAL ASSISTANCE
Ordinary and extraordinary maintenance must be carried out in accordance with the instructions contained
in this manual.
WARNING: The manufacturer declines all responsibility for damage to person or property, as well as for the
faulty operation of the unit, in the event of:
• Improper use of the unit;
• Errors in use or inexperience, imprudence or negligence with respect to the indications and instructions
container in this manual;
• Use of non-original spare parts.
REQUEST FOR ASSISTANCE
In case of error codes that require assistance, problems that could not be solved with the suggested indica-
tions, problems not indicated and for any kind of assistance, it is recommended to contact the manufacturer
directly.
Data to be reported in the request for assistance:
• Model (see identification plate);
• Serial number (see identification plate);
• Year of construction (see identification plate);
• HMI version;
• Motor version.
Correct reference of the data when requesting for assistance guarantees quick and accurate answers.
4.8 CLEANING AND MAINTENANCE
None of the components must be immersed in water or cleaned with a high-pressure jet.
To clean the HMI unit, use a cloth moistened with water.
WARNING: Never use aggressive products or abrasive powders or basic or acid chemical detergents.
The manufacturer declines all responsibility for damage caused by incorrect cleaning or resulting from the
use of unsuitable products.
0808
Locked rotor. The motor failed to start due
to a mechanical lock or a problem with the
internal wiring of the power unit
Request assistance
0809 The battery voltage is higher than the
maximum allowed Request assistance
0810 Non-compliant current sensor signal Possible battery defect, try alternative or
new battery.
0811 The drive has detected an overcurrent Request assistance.
1101
Communication problem between power
unit and HMI. Check that the wiring is intact
and connected correctly.
Check the cable connections by removing
the motor.
1102 A button on the keypad is stuck in a pushed
position
Try moving the buttons on the keypad. If this
does not resolve, please request assistance.

USER MANUAL
17
4.9 DISPOSAL
HMI unit, display, keypad, various accessories and packaging must be disposed of in compliance with the
environmental regulations in force.
When the unit is put out of service and dismantled, it is necessary to separate the plastic parts and the
electrical components, which must be sent to the separate collection centres in compliance with the
regulations in force. The metal parts must be separated for correct recycling. Electric and electronic
components, marked with a special symbol, must be disposed of in authorized collection centres.
Illegal disposal of “Waste Electrical Electronic Equipment” (WEEE) is punished with sanctions regulated by
the laws in force on the matter.
WARNING: The disposal must be carried out by qualified personnel.


MONTANA S.R.L.
Via Domenico Rossi 70, 12060 Magliano Alpi (CN) - Italy
Tel. +39 017466828 - Fax +39 017466651
montana@montanabike.com - www.montanabike.com
Table of contents
Other Montana Bicycle manuals