manuals.online logo
Brands
  1. Home
  2. •
  3. Brands
  4. •
  5. Morphy Richards
  6. •
  7. Coffee Maker
  8. •
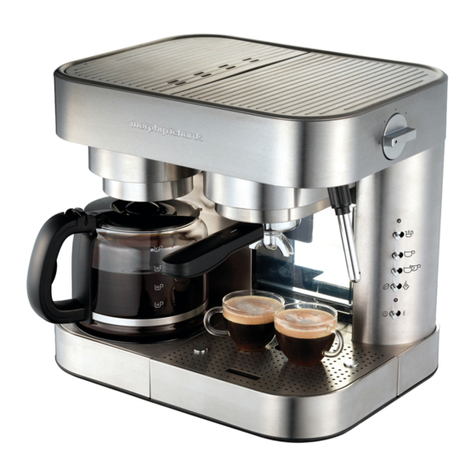
  9. Morphy Richards IB47490 User manual

Morphy Richards IB47490 User manual

5
start to flow from the filter holder spout after
about 2 minutes. Wait until all the water from
the water tank has flowed into your glass
carafe.
9Set the on/off switch to ‘OFF’.
10 When the filtering process is complete
remove the glass carafe from your coffee
maker and pour the coffee into your cups.
11 Before removing the water container lid or the
filter-holder you must release any steam which
may be present in the water tank. The
container lid cannot be removed if any steam
pressure is present in the water tank. To release
the steam pressure in the water tank, turn the
steam control knob slowly anti-clockwise so
that any steam remaining is released through
the steam tube Â. Do not remove the filter
holder until all the steam has been released,
ensuring parts are cool enough to touch.
12 To remove the used coffee grounds, remove
the filter holder (allow to cool first) by turning
the handle to the left until you find that the
filter holder drops down. Slide the filter
retaining clip Áalong the handle as far as it
will go so that it retains the filter. Either turn
the filter holder upside down and knock out
the grounds or alternatively hold the filter
holder and the filter underneath a running tap
for a few moments then allow it to drain. Slide
the retaining clip back along the handle before
the next use.
13 Ensure the flow regulator is set between light
and strong, ready for your next use.
HHoowwttoopprreeppaarreeccaappppuucccciinnooccooffffeeee::
1Make sure that you have a heat-resistant jug
handy to hold your milk for frothing. The best
results will be achieved if you use fresh milk
which should be at refrigerator temperature.
2Unscrew the water container lid ‹by turning
it anti-clockwise. Lift and turn again to remove
the lid.
3Use your glass carafe for measuring the
correct volume of water needed. For 2 cups
add extra water up to the steam symbol on
your glass carafe and for 4 cups add extra
water up to the bottom of the metal band, or
up to the higher steam symbol, on your carafe.
(Dependent on model).
4Refer to and follow steps 3-7 ‘How to make a
perfect espresso coffee’
5Place your glass carafe with lid on the drip
tray „directly under the spout of the filter
holder. Press the on/off switch to ‘ON’ ‰
and the pilot light will glow. The coffee will
start to flow from the filter holder spout after
about 2 minutes. When your coffee starts to
flow move the flow regulator lever to
‘cappuccino’ and hold your jug of milk under
the steam nozzle Êand open the valve by
turning the steam control knob ‚anti-
clockwise. Move the jug up and down under
the steam nozzle ensuring that the nozzle
opening is just under the surface of the milk -
this will give maximum froth.
6When the milk is frothy, close the steam
control knob by turning it clockwise and move
the flow regulator knob ‘slowly’ to the
preferred strength of coffee. Coffee will flow
into the glass carafe.
7Wait until all of the coffee has been filtered
and then turn the on/off switch to ‘OFF’
8Pour the coffee into the cups. Gently pour, or
spoon the frothy milk onto the coffee, then
sprinkle on a little chocolate powder for
perfect cappuccino coffee.
9To clean and prepare for re-use, clear the
steam tube of milk immediately after use, as
dried milk can be difficult to remove by
turning the steam control knob ‚anti-
clockwise to the ‘OPEN’ position.
10 Taking care as the steam tube may be hot,
remove the steam nozzle Êfrom the steam
tube by turning it anti-clockwise (café select
series 4751X) or pulling off (model no 47480).
Wash the cone in hot water and frequently
use a pin to clean the steam tube. Wipe the
steam tube and replace the steam nozzle.
11 Should you need more coffee, switch off your
coffee maker and allow 3 minutes for it to
cool before refilling with cold water.
UUssiinnggsstteeaammttoohheeaattlliiqquuiiddss
1Unscrew the water container lid by turning it
anti-clockwise. Lift it upwards and turn again
to remove.
2Fill your glass carafe up to the level marked ‘2’
and pour the water into the water tank.
3Replace the water container lid and set the
flow regulator lever ·to ‘cappuccino’. Check
that the steam control knob is closed.
4Press the on/off switch to ‘ON’.
5Pour the liquid to be heated into a large heat
resistant vessel and place it underneath the
steam tube and steam nozzle.
6Wait for approx 11/2 mins, then turn the steam
control knob anti-clockwise into the open
position to allow the steam to heat your
liquid. If no steam appears close the steam
control knob clockwise, and wait for a further
7896 Espresso/Cafe Select Rev6 07/01/2002 9:54 AM Page 1
Morphy Richards Limited, Mexborough,
South Yorkshire, England S64 8AJ 447/8000/01 Rev 6
November 2001
Morphy Richards products are intended for household use only.
Morphy Richards has a policy of continuous improvement in product quality and design.
The Company, therefore, reserves the right to change the specification of its models at any time.
short period for steam to form.
7When the liquid you are heating has reached
the temperature you require, switch the
coffee maker off and allow all steam pressure
to subside. You may now close the steam
control knob by turning it clockwise.
8Before removing the water container lid, turn
the steam control knob to the open position
in order to check that there is no residual
steam pressure in the water tank.
9Clean the steam nozzle and steam tube as
above.
10 Empty the water tank of any remaining water
by removing water container lid and inverting
the machine. WARNING: The water may be
very hot.
CClleeaanniinnggaannddccaarree
IInnggeenneerraall
Before cleaning any domestic electrical
appliance, always make sure that the plug has
been removed from the mains supply socket.
MMaacchhiinneeccaassiinngg
Never immerse the machine in water or
liquid. Wipe the body of your coffee machine
with a clean damp cloth and do not use harsh
abrasive cleaners.
SStteeaammnnoozzzzllee,,ddrriippttrraayyaannddaacccceessssoorriieess
Remove the nozzle from the steam tube and
drip tray from the machine and clean them and
the glass jug, lid, filter and filter holder by hand, in
warm soapy water (not in a dishwasher).
DDeessccaalliinngg
Your coffee machine should be regularly
descaled using a good quality proprietary descaler
recommended for espresso machines. We
suggest the following intervals.
normal water: every 6 months
hard water: every 3 months
very hard water: every 6 to 8 weeks
Remove the filter from its holder and position
the filter holder beneath the water outlet.
Pour fresh cold water together with 2 or 3
teaspoonfuls of descaler into the water container
of your machine and close its lid.
Place the empty glass jug back onto the drip
tray ensuring that the steam valve is closed by
turning the steam control knob clockwise, and
setting the flow regulator lever to the ‘light’
position.
Switch on your machine to descale, repeating
the process if necessary.
To clean the steam tube, carefully open the
steam control knob, at the end of the cleaning
process, by turning the knob anti-clockwise.
Beware of hot escaping steam.
After descaling, flush your machine through by
operating 2 or 3 times using fresh cold water.
Clean all detachable parts and please remember
that you can help prevent build up of deposits,
especially in hard water areas by leaving your
machine empty between use.
It is important you use a descaler suitable for
cappuccino/espresso machines carefully following
any special instructions given by its manufacturer.
Do not use the descaling solution twice and
dispose of used descaler carefully as it may
damage your sink.
Any damage caused by non-compliance with
the descaling instructions will not be covered by
guarantee. No liability will be undertaken for
possible damage in the event of the appliance
being misused or operated in any manner other
than described in these instructions.
7896 Espresso/Cafe Select Rev6 07/01/2002 9:54 AM Page 2
The After Sales Division, Morphy Richards Ltd, Mexborough, South Yorkshire, England, S64 8AJ
Helpline (office hours): UK (local rate) 08450 777700, Republic of Ireland 1800 409119
CCaappppuucccciinnoo//EEsspprreessssooccooffffeeeemmaakkeerrss
DDeeaarrCCuussttoommeerr,,
Thank you for buying your Morphy Richards Cappuccino/Espresso Coffee Maker.
Before using your Cappuccino/Espresso Coffee Maker for the first time we would ask you to carefully read
the instructions, in particular if you are going to use the machine to make cappuccino coffee. We have found
that there is a ‘technique’ to making good cappuccino coffee and therefore we’d like to pass on to you some
tips to help you get the best from your machine.
MMaakkiinnggccaappppuucccciinnoo
Follow the instructions to assemble the machine and make espresso coffee.
Always use espresso (fine ground) coffee and lightly tamp down the coffee into the filter.
When the coffee starts to flow move the flow regulator lever to ‘cappuccino’ and hold your jug of milk
under the steam nozzle. Open the valve by turning the steam control anti clockwise.
Move the jug up and down so that the nozzle opening is just under the surface of the milk - this will give
maximum foaming. Once you’ve got enough foam, close the valve by turning the steam control knob clockwise.
Move the flow regulator lever SLOWLY to the preferred strength. The remaining steam and water will pass
through the coffee filter, into the coffee pot.
Pour the coffee out into a cup.
It is best to spoon out the foamed milk on top of the coffee in the cup. Sprinkle on a little chocolate
powder and you have a cup of cappuccino.
Practice makes perfect and we’re sure you’ll be satisfied with the results if you experiment a couple of
times. Always make sure you use fresh milk, straight from the fridge.
If you have any problems please call us on the helpline number and we will be pleased to give you any help
you require.
Enjoy your coffee.
7896 Espresso/Cafe Select Rev6 07/01/2002 9:54 AM Page 3
2
IIMMPPOORRTTAANNTT
SSAAFFEEGGUUAARRDDSS
When using electrical appliances, basic
safety precautions should always be
followed, including the following:
1Read all instructions.
2Do not touch hot surfaces. Use
handles or knobs.
3To protect against fire, electric shock
and personal injury do not immerse
cord, plugs, or appliance in water or
other liquid.
4Ensure that this appliance is situated
out of the reach of children. Children
should never be allowed to operate
this appliance.
5Unplug from outlet when not in use
and before cleaning. Allow to cool
before putting on or taking off parts,
and before cleaning the appliance.
6Do not operate any appliance with a
damaged cord or plug or after the
appliance malfunctions, or has been
damaged in any manner. Contact the
Morphy Richards helpline for advice on
examination, repair or electrical or
mechanical adjustment.
7The use of accessory attachments not
recommended by the appliance
manufacturer may result in fire, electric
shock or personal injury.
8Do not use outdoors.
9Do not let cord hang over edge of
table or counter, or touch hot
surfaces.
10Do not place on or near a hot gas or
electric burner, or in a heated oven.
11When unplugging, turn any control to
‘off’, then remove plug from wall
outlet.
12Do not use appliance for other than
intended use.
13Scalding may occur if the lid is
removed during the brewing cycles,
therefore never open or remove
the water container lid whilst the
machine is switched on. Before you
open the water container lid, make
sure the container is not under
pressure by opening the steam control
knob and allowing excess steam to
escape. This must be done even
when the machine has been
switched off.
14The glass jug, the filter holder and the
steam pipe get hot while the machine
is in use. Always use with care.
15Make sure that the mains lead does
not touch the hot parts of the
machine.
16Do not wind the mains lead around
the hot appliance or store the
appliance until it has fully cooled down.
17Do take care to pour hot coffee slowly
and carefully without tipping the glass
jug too fast.
18Do be careful to avoid scalding when
using the steam jet.
19Do not remove the filter holder
when the appliance is producing
steam, hot water or coffee.
SAVE THESE
INSTRUCTIONS
7896 Espresso/Cafe Select Rev6 07/01/2002 9:54 AM Page 4
3
EElleeccttrriiccaallrreeqquuiirreemmeennttss
Place all electrical appliances out of the reach
of children. Never allow the mains lead to
overhang the work surface.
Check that the voltage on the rating plate of
your appliance corresponds with your house
electricity supply which must be A.C. (Alternating
Current).
If the socket outlets in your home are not
suitable for the plug supplied with this appliance,
the plug should be removed and the appropriate
one fitted.
WARNING: The plug removed from the
mains lead, if severed, must be destroyed as a
plug with bared flexible cord is hazardous if
engaged into a live socket outlet.
WARNING: THIS APPLIANCE MUST
BE EARTHED.
Should the fuse in the 13 amp plug require
changing, a 13 amp BS1362 fuse must be fitted.
All repairs of electrical appliances should be
carried out by skilled personnel as improper
repairs can be dangerous to the user.
TTwwooyyeeaarrgguuaarraanntteeee
THIS GUARANTEE IS VALID IN THE UK AND
IRELAND ONLY. It is in your interest to retain the
retailers receipt as proof of purchase. Please quote
the following information if the product develops a
fault.
These numbers can be found on the base of the
product.
Model No. Serial No.
All Morphy Richards Products are individually
tested before leaving the factory. In the unlikely
event of any appliance proving to be faulty within 28
days of purchase it should be returned to the place
of purchase for it to be replaced.
If the fault develops after 28 days and within 24
months of original purchase, you should contact the
helpline number quoting Model number and Serial
number on the product, or write to the address
below. You will be asked to return the product (in
secure, adequate packaging) to the address below
along with a copy of proof of purchase. Subject to
the exclusions set out below (see ‘Exclusions’) the
faulty appliance will then be repaired or replaced
and dispatched usually within 7 working days of
receipt.
If for any reason this item is replaced during the
2 year guarantee period, the guarantee on the new
item will be calculated from original purchase date.
Therefore it is vital to retain your original till receipt
or invoice to indicate the date of initial purchase.
To qualify for the 2 year guarantee the appliance
must have been used according to the
manufacturers instructions. For example kettles
should have been regularly descaled or an iron cord
should have been stored as recommended by the
instructions.
EXCLUSIONS
Morphy Richards shall not be liable to replace or
repair the goods under the terms of the Guarantee
where:
1The fault has been caused or is attributable to
accidental use, mis-use, negligent use or used
contrary to the manufacturers recommendations
or where the fault has been caused by power
surges or damage caused in transit.
2The appliance has been used on a voltage supply
other than that stamped on the products.
3Repairs have been attempted by persons other
than our service staff (or authorised dealer).
4Where the appliance has been used for hire
purposes or non-domestic use.
5Morphy Richards are not liable to carry out any
type of servicing work, under the guarantee.
6Plastic filters for all Morphy Richards kettles and
coffee makers are not covered by the guarantee.
This guarantee does not confer any rights other
than those expressly set out above and does not
cover any claims for consequential loss or damage.
This guarantee is offered as an additional benefit and
does not affect your statutory rights as a consumer.
7896 Espresso/Cafe Select Rev6 07/01/2002 9:54 AM Page 5
UUssiinnggyyoouurrccooffffeeeemmaakkeerrffoorrtthheeffiirrssttttiimmee
Take your coffee maker out of the box.
Remove the packaging and store it in a safe place
away from children and retain for future use.
Before using the coffee maker for the first
time, clean thoroughly by operating two or three
times with the maximum volume of fresh water
but without using ground coffee.
Wash the detachable parts of the machine in
warm soapy water (not in a dishwasher).
HHoowwttoommaakkeeaappeerrffeecctteesspprreessssooccooffffeeee
1Unscrew the water tank lid ‹by turning it
anti-clockwise. Lift and turn again to remove
the lid.
2To fill the water tank ¤use your glass carafe
›to measure the volume of water required.
The carafe is marked with the water levels for
2 cups (minimum) and 4 cups (maximum).
Always switch the machine off and remove the
plug from the socket before filling the water
tank. Do not overfill the water tank. Care
should be taken to ensure that the correct
quantity of water is replaced in the tank, as
the machine always uses all the water.
3Close the water container lid tightly by
turning it clockwise.
4Place the washable metal filter fiinto the
filter holder fland add the desired quantity
of coffee to the filter using the handy scoop
provided. Spread the coffee evenly and lightly
press it down. Special marks on the inside of
the filter show the correct levels for 2 and 4
cups of coffee. Remove excess coffee from the
edge of the filter.
5Position the filter holder underneath the
water outlet ‡, push it upwards and turn it
to the right into the locked position to fix it
onto the coffee machine. Push firmly to the right
to lock in position.
6Your machine is fitted with a flow regulator
·which allows you to make LIGHT,
MEDIUM or STRONG coffee. Set this to the
desired position. On the 47480 model,
Medium is halfway between light and strong
indicator. Do not set it at ‘Cappuccino’ position.
7Check that the steam control knob ‚is
turned fully clockwise, i.e closed.
8Place your glass carafe with lid on the drip
tray „directly under the spout of the filter
holder. Press the on/off switch to ‘ON’ ‰
and the pilot light will glow. The coffee will
⁄
¤
‹
›
fi
fl
‡
·
‚
„
‰
Â
Ê
Á
Ë
IInnssttrruuccttiioonnssffoorruussee
4
⁄
¤
‹
›
fi
fl
‡· ‚
„
‰
Â
Á
Ê
Ë
DDeessccrriippttiioonn
⁄Rating plate
¤Water tank
‹Water tank lid
›Glass carafe and lid
fiFilter
flFilter holder
‡Water outlet
·Flow regulator lever
‚Steam control knob
„Drip tray
‰On/off switch with
neon light
ÂSteam tube
ÊSteam nozzle
ÁFilter retaining clip
ËRubber seal
7896 Espresso/Cafe Select Rev6 07/01/2002 9:54 AM Page 6

Other Morphy Richards Coffee Maker manuals

Morphy Richards ELIPTA 47160 User manual

Morphy Richards

Morphy Richards ELIPTA 47160 User manual

Morphy Richards MRCM90BK User manual

Morphy Richards

Morphy Richards MRCM90BK User manual

Morphy Richards VERVE User manual

Morphy Richards

Morphy Richards VERVE User manual

Morphy Richards 10 12 CUP FILTER COFFE MAKER User manual

Morphy Richards

Morphy Richards 10 12 CUP FILTER COFFE MAKER User manual

Morphy Richards Series 2000 User manual

Morphy Richards

Morphy Richards Series 2000 User manual

Morphy Richards MRCM35BK User manual

Morphy Richards

Morphy Richards MRCM35BK User manual

Morphy Richards espresso User manual

Morphy Richards

Morphy Richards espresso User manual

Morphy Richards Cafe Rico Espresso coffee maker User manual

Morphy Richards

Morphy Richards Cafe Rico Espresso coffee maker User manual

Morphy Richards Pump action espresso User manual

Morphy Richards

Morphy Richards Pump action espresso User manual

Morphy Richards 172251 User manual

Morphy Richards

Morphy Richards 172251 User manual

Morphy Richards VECTOR User manual

Morphy Richards

Morphy Richards VECTOR User manual

Morphy Richards IB47071 User manual

Morphy Richards

Morphy Richards IB47071 User manual

Morphy Richards 47490 COMBINATION COFFEE MAKER User manual

Morphy Richards

Morphy Richards 47490 COMBINATION COFFEE MAKER User manual

Morphy Richards IB47009 User manual

Morphy Richards

Morphy Richards IB47009 User manual

Morphy Richards MENO ONE CUP User manual

Morphy Richards

Morphy Richards MENO ONE CUP User manual

Morphy Richards IB47001 User manual

Morphy Richards

Morphy Richards IB47001 User manual

Morphy Richards Accents U:Pod User manual

Morphy Richards

Morphy Richards Accents U:Pod User manual

Morphy Richards nesta User manual

Morphy Richards

Morphy Richards nesta User manual

Morphy Richards meno Espresso User manual

Morphy Richards

Morphy Richards meno Espresso User manual

Morphy Richards Accents Espresso MR47580 User manual

Morphy Richards

Morphy Richards Accents Espresso MR47580 User manual

Morphy Richards 172002 User manual

Morphy Richards

Morphy Richards 172002 User manual

Morphy Richards IB47004 User manual

Morphy Richards

Morphy Richards IB47004 User manual

Morphy Richards 47060 User manual

Morphy Richards

Morphy Richards 47060 User manual

Morphy Richards Accents Espresso User manual

Morphy Richards

Morphy Richards Accents Espresso User manual

Popular Coffee Maker manuals by other brands

Siemens TE506 Series instruction manual

Siemens

Siemens TE506 Series instruction manual

Kalorik USK CM 20903 operating instructions

Kalorik

Kalorik USK CM 20903 operating instructions

LAVAZZA Blue LB800 instruction manual

LAVAZZA

LAVAZZA Blue LB800 instruction manual

Kalorik CM 38933 operating instructions

Kalorik

Kalorik CM 38933 operating instructions

Russell Hobbs 21701-56 manual

Russell Hobbs

Russell Hobbs 21701-56 manual

Homa HCM-7517 instruction manual

Homa

Homa HCM-7517 instruction manual

La San Marco PLUS 10 Series Installation and use manual

La San Marco

La San Marco PLUS 10 Series Installation and use manual

Nespresso Maestria TX300 TURMIX manual

Nespresso

Nespresso Maestria TX300 TURMIX manual

B.F.C. PERFETTA Instructions for use

B.F.C.

B.F.C. PERFETTA Instructions for use

Caffeo #66 Operating	 instruction

Caffeo

Caffeo #66 Operating instruction

DeLonghi NESCAFE dolce gusto user manual

DeLonghi

DeLonghi NESCAFE dolce gusto user manual

LAVAZZA BLUE LB 951 instructions

LAVAZZA

LAVAZZA BLUE LB 951 instructions

Cremesso SMART UNA AUTOMATIC user manual

Cremesso

Cremesso SMART UNA AUTOMATIC user manual

Newco Moo-Cafe user guide

Newco

Newco Moo-Cafe user guide

Electrolux EKF4 Series Instruction book

Electrolux

Electrolux EKF4 Series Instruction book

Slayer Professional Series user manual

Slayer

Slayer Professional Series user manual

Breville wake cup vcf042 user manual

Breville

Breville wake cup vcf042 user manual

Jura IMPRESSA J9.3 One Touch TFT Instructions for use

Jura

Jura IMPRESSA J9.3 One Touch TFT Instructions for use

manuals.online logo
manuals.online logoBrands
  • About & Mission
  • Contact us
  • Privacy Policy
  • Terms and Conditions

Copyright 2025 Manuals.Online. All Rights Reserved.