Mothers choice glide User manual

glide
unharnessed booster seat
Illustrations and designs may vary.
IMPORTANT: KEEP THIS BOOKLET IN THE
PLACE PROVIDED ON THE CHILD RESTRAINT.
motherschoice.com.au Service
INSTRUCTION
MANUAL
motherschoice.com.au
Slim
Seat Design
Slim
Seat Design
6 Position
Headrest
2 Swing Out
Cup Holders
Machine
Washable Covers
Warranty Warranty
Service

2
Mother’s Choice | glide unharnessed booster seat
QUICK START GUIDE
PUSH
LOOSEN TETHER
CLICK
For detailed step by step installation instructions, please refer to page 29.
CORRECT INCORRECT
BOOSTER MODE:
APPROXIMATELY 4 YEARS TO APPROXIMATELY 6-8 YEARS

3
Mother’s Choice | glide unharnessed booster seat
Tighten till slack is removed
QUICK START GUIDE
ATTACH TOP TETHER

4
Mother’s Choice | glide unharnessed booster seat
contents
Quick Start Guide 2 - 3
Contents 4
Introduction 5
Warnings 6 - 7
PREPARING VEHICLE FOR YOUR SEAT
The Next Seat for your Child 8
Shoulder Height Markers 9
Components List 10 - 11
Location of Top Tether Anchorage Point 12
Correctly Connecting the Top Tether 13
Anchorage Fitting Installation 14 - 15
OPERATION AND ADJUSTMENTS
Correct Vehicle Position 16
Securing and Adjusting Top Tether Strap 17
Positioning Booster in the Vehicle 18
Functional Adjustment 19
Securing Your Child in the Vehicle 20
CARE AND MAINTENANCE
Caring for the Seat Fabrics 21
Cleaning the Plastic Shell 22
Guarantee 23
Notes 24 - 26
Registration 27

5
Mother’s Choice | glide unharnessed booster seat
Thank you for purchasing this child seat. This product is suitable
for children approximately 4 years old, to approximately 6 to 8
years old. We welcome you as a valued customer, and trust that
your child will enjoy many years of comfort and safety.
No child restraint can guarantee absolute protection from a crash.
However proper use of this restraint may reduce the risk of injury
or death!
Before you start:
Call our Customer Service Team: 1300 809 526
Monday to Friday (8:30am - 5:00pm AEST)
www.motherschoice.com.au mother’s choice
Need assistance?

6
Mother’s Choice | glide unharnessed booster seat
WARNINGS
IMPORTANT: RETAIN FOR FUTURE REFERENCE
THESE INSTRUCTIONS DETAIL THE SAFE USE, FITMENT AND
MAINTENANCE OF THE SEAT.
PLEASE READ THESE INSTRUCTIONS CAREFULLY AND ENSURE THAT
THEY ARE FOLLOWED AT ALL TIMES.
NO SAFETY SEAT CAN GUARANTEE PROTECTION FROM INJURY
HOWEVER, PROPER USE OF THIS SEAT REDUCES THE RISK OF SERIOUS
INJURY OR DEATH TO YOUR CHILD.
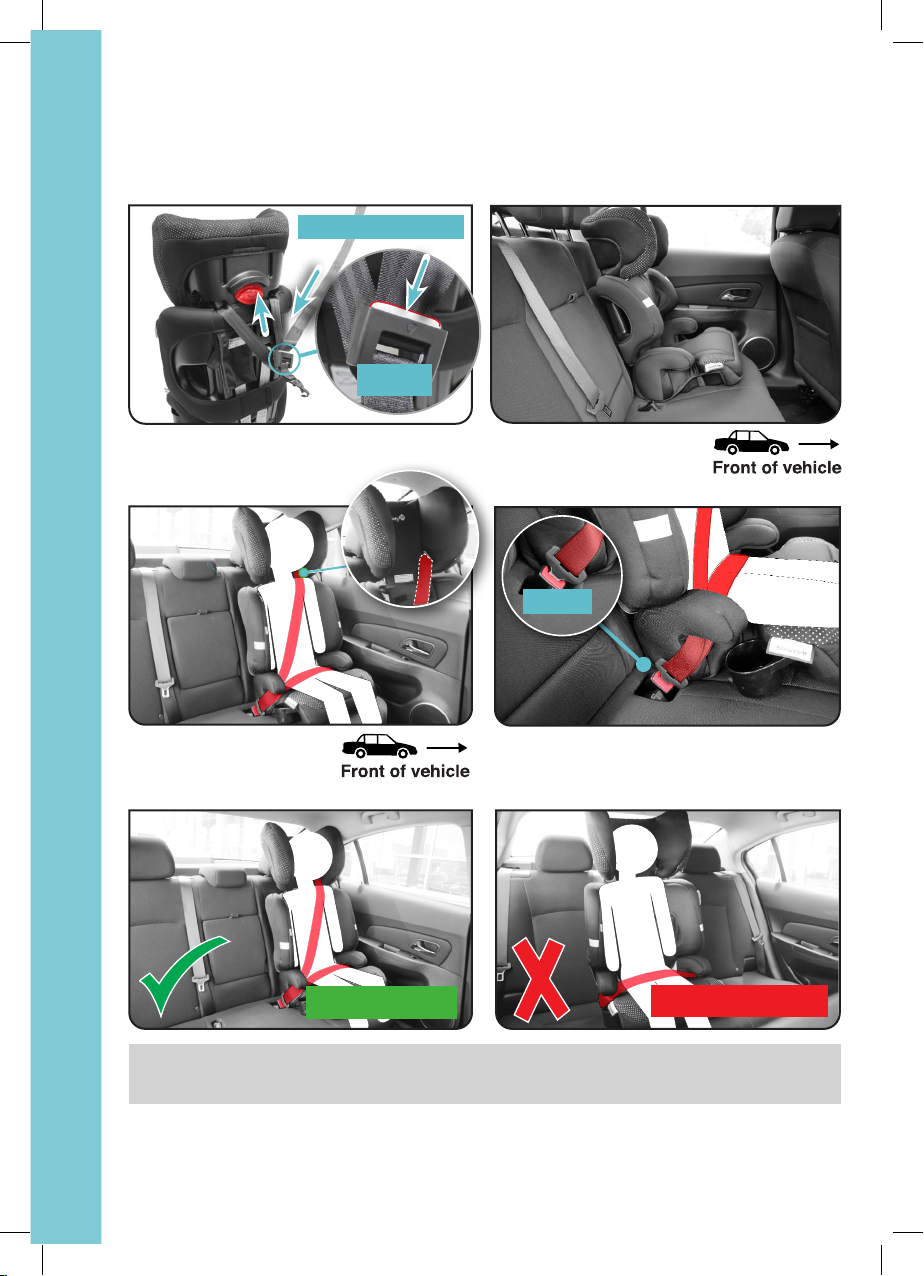
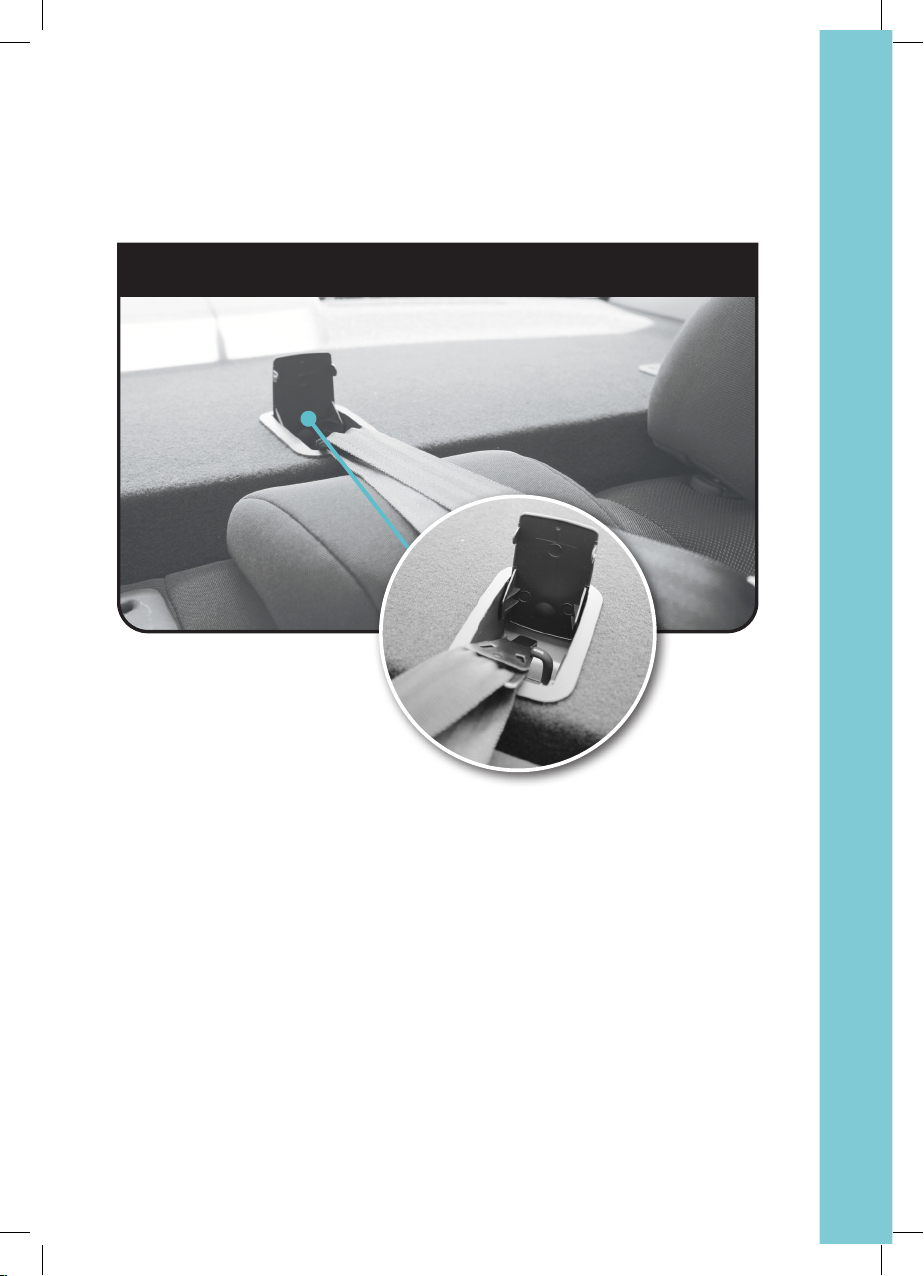
THIS RESTRAINT MUST BE ATTACHED TO A CHILD RESTRAINT UPPER
ANCHORAGE POINT IN THE CAR. REFER TO CAR OWNER’S HANDBOOK
FOR LOCATION OF UPPER ANCHORAGE POINTS. REFER TO A CHILD
RESTRAINT FITTING STATION IF NO UPPER ANCHORAGE POINTS ARE IN
THE MOTOR CAR.
Follow the manufacturer’s instructions at all times.
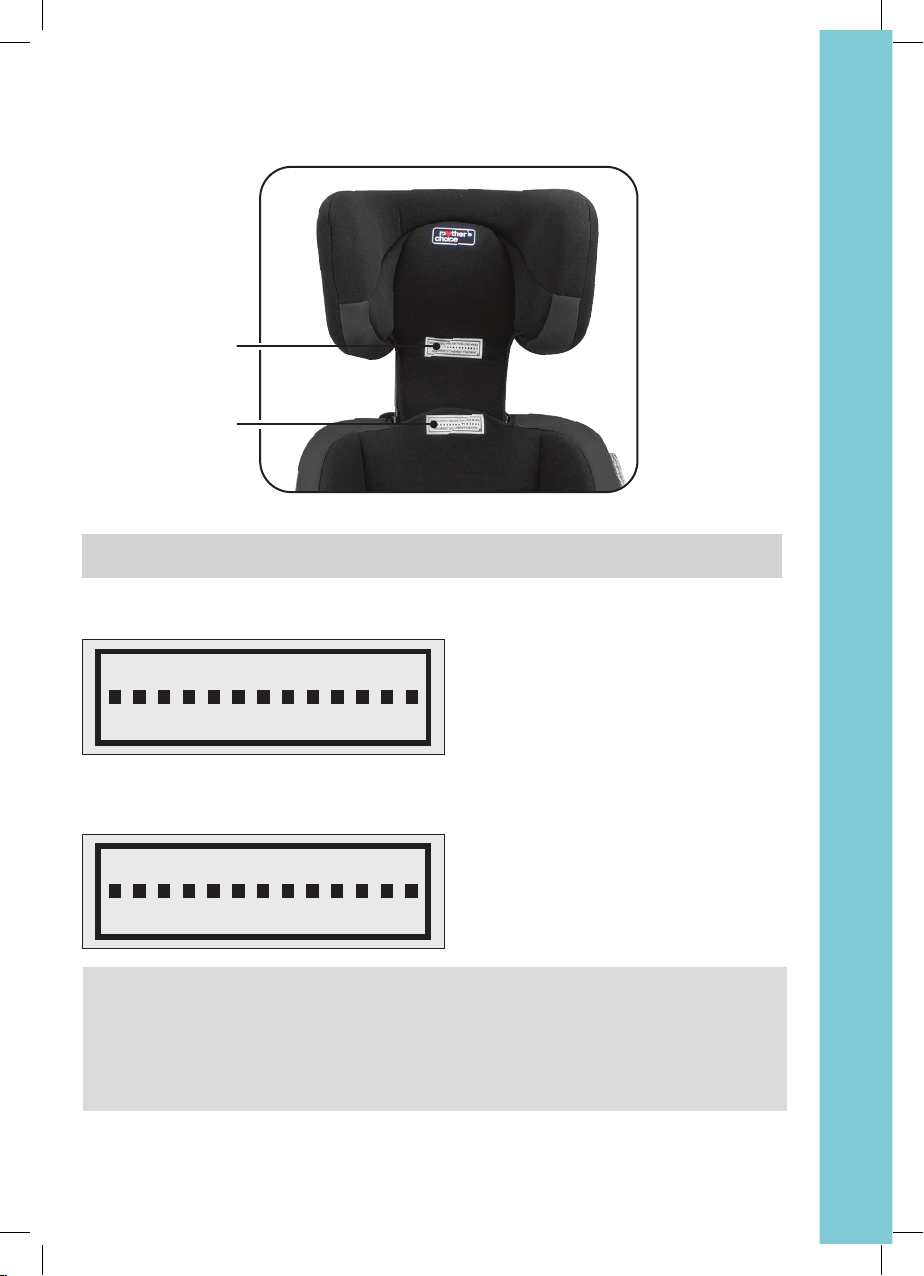
To be used with a lap-sash seatbelt by a child whose shoulders are above
the lower shoulder height marker with head restraint in lowest position
(approximately 4 years of age) until the child’s shoulders reach the upper
shoulder height marker with head restraint in highest position (approximately
6 to 8 years of age). Continue to use this booster seat until the child reaches
this limit. Children are safest in a booster seat until their shoulders reach the
upper shoulder height marker of the booster seat. Do not use this restraint
until child’s shoulders are above the lower shoulder height marker with the
head restraint in the lowest position. If knees do not bend in front of the
vehicle seat cushion, continue to use a booster seat. Just using a seatbelt
is not recommended for children that have outgrown this seat. Use a larger
booster seat.
Please read and follow all of the instructions outlined in this manual for maximum
protection.
If you have any questions regarding the installation or use of this child restraint
in Australia or New Zealand, please contact our customer service numbers
provided. An alternative option is to also contact any registered child tting
station authorised by your local transport authority.
No child restraint can guarantee absolute protection from a crash. However
proper use of this restraint may reduce the risk of injury or death.
WARNINGS

7
Mother’s Choice | glide unharnessed booster seat
WARNINGS
• Use the restraint exactly as shown in the instructions.
• Supervision of children is needed because they may be able to undo the
buckles.
• DO NOT LEAVE CHILDREN UNATTENDED IN THE CAR.
• Do not alter or modify this restraint.
• Repairs must only be done by the manufacturers or agent.
• Do not allow the restraint to come into contact with polishes, oils, bleach and
other chemicals.
• Destroy the restraint if it has been in a severe crash, even if no damage is
visible.
• DO NOT USE THIS RESTRAINT WITHOUT THE COVER.
• DO NOT USE WITH JUST A LAP BELT. You must use with a lap-sash
seatbelt.
• The lap part of the seatbelt must be rmly across the thighs and the sash
belt tted diagonally across the chest and on the shoulder.
• Always secure the loose end of the top tether strap. Do not use the child
restraint where this strap may fall into a split in the seat back or off the side
of the seat.
• ALWAYS ATTACH HOOK AND REMOVE SLACK.
• Seat belt extenders should not be used if the seatbelt is not long enough to
secure the child restraint. If seatbelt is not long enough to secure the child
restraint, advice should be sought from a child restraint tter.
• THIS RESTRAINT IS NOT SUITABLE FOR USE WHERE THE TOP
TETHER STRAP MAY FALL INTO A SPLIT IN THE SEAT BACK OR OFF
THE SIDE OF THE SEAT.
• THIS RESTRAINT MUST BE USED IN CARS WITH FORWARD FACING
SEATS WITH A LAP-SASH SEATBELT. THIS BOOSTER SEAT IS NOT
SUITABLE FOR USE WITH A CHILD HARNESS.
• This child restraint is not approved for use with any connectors that connect
to the car’s ISOFIX low anchorages.
• The use of child restraints in the front seat may be restricted for children of
specic ages by local legislation. Please check with your local legislation
regarding any restriction for child restraint.
WARNINGS

8
Mother’s Choice | glide unharnessed booster seat
PREPARING VEHICLE FOR YOUR SEAT
If your child is transitioning out of a booster, try this
simple three point test. You may nd that your child
is not yet ready to use an adult seatbelt without the
booster.
When your child has outgrown the seat, you can either use:
A booster seat suitable for children up to 4-10 years of age until
their shoulders reach the upper height marker of the booster
seat. NOTE: This illustration is representative only.
Or, follow the steps below to see if your child is ready to use
a vehicle seat belt.
3 POINT TEST
1. Does the sash part of the seatbelt sit on the middle of the shoulder
and not touch the neck or face?
2. Does the lap part of the seatbelt sit low down on the hips and not
on the abdomen?
3. When you sit the child on the seat with their bottom all the way back,
are their thighs long enough for their knees to bend allowing the legs
to hang over the front of the seat?
INCORRECT
1
2
3
1
2
3
Sash part
across neck
and face and
not shoulder
Lap belt
across
stomach and
not low on
hips
Legs are not long
enough so child is
slumping in seat
CORRECT
1
2
3
1
2
3
Sash on shoulder
and not on neck
or face
Lap belt low
across hips and
not stomach
Legs long enough
to bend at knees
- no slumping
If you answered “no” to any of these questions, your child needs to be in a booster
seat to make both the sash and the lap part of the seatbelt t right to ensure
maximum crash protection.
THE NEXT SEAT FOR YOUR CHILD

9
Mother’s Choice | glide unharnessed booster seat
PREPARING VEHICLE FOR YOUR SEAT
IMPORTANT: FOLLOW THIS ADVICE
SHOULDER HEIGHT MARKERS
The booster seat is unsuitable for the occupant when the shoulders are
below the lower marker (Marker B) or above the upper marker (Marker A).
The child needs to be moved into the next form of restraint when they reach
the top shoulder height marker.
The child’s shoulders must be in-line
or above this marker. If the child’s
shoulders are below then the child
should remain in their previous child
restraint.
When the child’s shoulders reach
this upper marker, or the child no
longer ts in the child restraint
(approximately 6 to 8 years of age),
then try the 3 point test (see page 8).
MARKER B: YOUNG TODDLER
MARKER A: OLDER CHILD
Lower Shoulder Height Marker
Upper Shoulder Height Marker
SHOULDERS BELOW THIS LINE WHEN
HEADREST AT HIGHEST POSITION
SHOULDERS ABOVE THIS LINE WHEN
HEADREST AT LOWEST POSITION
Marker A
Marker B

10
Mother’s Choice | glide unharnessed booster seat
PREPARING VEHICLE FOR YOUR SEAT
COMPONENTS LIST
1
3
7
7
4
2
6
5
BOOSTER SEAT BELT PATH
Adjustable Headrest
Sash Guide (both sides)
Shoulder Height Markers
Seat Back
Cup holders (both sides)
1
2
3
4
5
6
7
Seat Base
Booster Seat Belt Paths
(both sides, under arm rests)
BOOSTER
SEATBELT
PATH

11
Mother’s Choice | glide unharnessed booster seat
COMPONENTS LIST
PREPARING VEHICLE FOR YOUR SEAT
8
9
10
12
11
13
8
BOOSTER SEAT BELT PATH
BOOSTER SEATBELT PATH
8
9
10
13
Booster Seat Belt Paths
(both sides, under arm rests)
Top Tether adjuster
Top Tether / Instruction Manual
Pocket
11
12
Top Tether Strap
Top Tether Hook
Anchor Fitting
2

12
Mother’s Choice | glide unharnessed booster seat
PREPARING VEHICLE FOR YOUR SEAT
LOCATION OF TOP TETHER ANCHORAGE POINT
Extension straps 300mm
ref no. 015057
Extension straps 600mm
ref no. 015058
Belt converter ref no. 015059
NOTE:
• The anchor point can be found in dierent locations in dierent car. The
illustration above shows possible locations of anchor points. Sometimes it is
on the parcel shelf in sedans, and on the oor area in station wagons, vans
and hatchbacks. Make sure that you do not confuse the luggage hook in the
back of a station wagon with anchor points. Refer to your owner’s manual.
• An extension strap may be needed for vehicles without a xed parcel
shelf. Extension straps and extra ttings are available from various stores.
• Use of aftermarket accessories (i.e. items not provided in the box with the
child restraint) can reduce the safety provided by child restraint and may
cause injury or death.

13
Mother’s Choice | glide unharnessed booster seat
PREPARING VEHICLE FOR YOUR SEAT
LOCATION OF TOP TETHER ANCHORAGE POINT
CORRECTLY CONNECTING THE TOP TETHER
Child restraints must be used correctly to provide proper protection for your child.
The anchorage system on child restraint must be used in the correct way.
CORRECT
Make sure there is no slack in the top strap and the attachment clip is upright in
the anchorage tting.
INCORRECT
The clip must not lie at on the anchorage tting.
INSTALLATION CORRECT
Make sure there is no
slack in the top strap
and the attachment
clip is upright in the
anchorage tting.
The clip must not
lie at on the
anchorage tting.
Anchorages in
vertical panel at
rear of vehicle
Floor mounted
anchorages
INCORRECT
FIGURE 1
FIGURE 2
16 IEuro Plus IConvertible Car Seat IMaxi-Cosi
Child restraints must be used correctly to provide proper protection for your child. The
anchorage system on child restraints must be used in the correct way.
CORRECT
Make sure there is no slack in the top strap and the attachment clip is upright in the
anchorage fitting.
INCORRECT
The clip must not lie flat on the anchorage fitting.
Vehicle information
Anchorage fitment check
INCOR-
INSTALLATION CORRECT
Make sure there is no
slack in the top strap
and the attachment clip
is upright in the anchor-
age fitting.
The clip must not
lie flat on the
anchorage fitting.
Anchorages in
vertical panel at
rear of vehicle
Floor mounted
anchorages
INCORRECT
FIGURE 1
FIGURE 2
x
x
Extension straps 300mm
ref no. 015057
Extension straps 600mm
ref no. 015058
Belt converter ref no. 015059

14
Mother’s Choice | glide unharnessed booster seat
PREPARING VEHICLE FOR YOUR SEAT
Vehicle metal
structure
Spacer(s)
(if required)
Attachment bolt
Anchor fitting
Vehicle trim
Centre line of
seating position
200mm
min.
FOR SEDANS ONLY:
FOR SEDANS ONLY:
Vehicle metal
structure
Spacer(s)
(if required)
Attachment bolt
Anchor fitting
Vehicle trim
Lock washer
Nut
Reinforcing
washer
For cars tted with a child restraint
upper anchorage point:
Locate the upper anchorage point behind the
rear seating position (consult the car owner’s
handbook for the location of the upper anchorage
point). Remove the thread plug from the parcel
shelf/oor/roof and install the attachment bolt as
shown in Figure 1.
CAUTION: DO NOT OVERTIGHTEN THE
ATTACHMENT BOLT. OVERTIGHTENING
MAY FRACTURE OR BREAK BOLT.
MAXIMUM TORQUE IS 20 Nm.
For cars not tted with a child
restraint upper anchorage point:
For sedans only:
Drill a 9mm diameter hole in the parcel shelf on
the centre-line of the seating position as shown
in Figure 2. Install the anchor bolt as shown in
Figure 3. It is recommended that this installation
be carried out by a child restraint tting station or
licenced motor mechanic.
1
2
3
ANCHORAGE FITTING INSTALLATION
For vehicles other than sedans:
In Australia, consult your nearest child restraint
tting station or trafc authority for vehicle
inspection to nd the best, correct position for
the placement of the upper anchorage point, and
for the correct attachment bolt length and use of
spacers. In New Zealand, consult the agent for
the vehicle.

15
Mother’s Choice | glide unharnessed booster seat
PREPARING VEHICLE FOR YOUR SEAT
ANCHORAGE FITTING INSTALLATION
WARNINGS
CHILD RESTRAINTS MUST NOT BE ATTACHED TO UNSOUND METAL OR
TO WOOD OR SYNTHETIC STRUCTURES. WHEN DRILLING THE 9mm HOLE
DO NOT DRILL THROUGH FUEL LINES, FUEL TANKS, ELECTRICAL WIRING,
OR RADIO SPEAKERS. WEBBING STRAPS MUST BE PROTECTED FROM
SHARP CORNERS AND EDGES.
THE ANCHOR FITTING MUST BE USED ONLY AS DESCRIBED ABOVE. IT
MUST NOT BE HOOKED ONTO ANY OTHER OBJECT.
IMPROPER PLACEMENT OF THE SAFETY SEAT INCREASES THE RISK OF
SERIOUS INJURY OR DEATH.
Some seating positions in your vehicle may NOT be safe for this safety seat. Some
vehicles do not have any seating positions that can be used safely with the seat.
If you are not sure where to place the booster seat in your vehicle, consult your
vehicle’s owner’s handbook.

16
Mother’s Choice | glide unharnessed booster seat
PREPARING VEHICLE FOR YOUR SEAT
• IMPROPER PLACEMENT OF THE SAFETY SEAT
INCREASES THE RISK OF SERIOUS INJURY OR DEATH.
WARNING
CORRECT VEHICLE POSITION
CORRECT
USE
CORRECT
USE
INCORRECT
USE

17
Mother’s Choice | glide unharnessed booster seat
OPERATION AND ADJUSTMENTS
SECURING AND ADJUSTING TOP TETHER STRAP
1. Press on the adjuster button and
pull strap to loosen.
2. Attach top tether strap to vehicle
anchor point.
3. Place one knee on child restraint,
push down rmly and tighten top
anchorage strap by pulling free
end of strap.
Always secure the loose end of the top tether strap to prevent it hanging out
of the car or being accessible by the child. Please store excess webbing in
the rear pocket at the rear of the restraint.
CAUTION: CHILDREN CAN BE INJURED OR RESTRAINTS AND TOP
TETHER STRAP DAMAGED BY UNSECURED CARGO IN A COLLISION.
SECURE OR REMOVE HAZARDOUS CARGO BEFORE USING THIS CHILD
RESTRAINT.
THIS RESTRAINT IS NOT SUITABLE FOR USE WHERE THE TOP TETHER
STRAP MAY FALL INTO A SPLIT IN THE SEAT BACK OR OFF THE SIDE OF
THE SEAT.
NOTE: Ensure the base of the
seat is not lifted from
the car seat.
PUSH
PULL TO
TIGHTEN

18
Mother’s Choice | glide unharnessed booster seat
OPERATION AND ADJUSTMENTS
POSITIONING BOOSTER IN THE VEHICLE
NOTE: If the vehicle seat belt lays across the child’s neck or face, then read
just the headrest height.
CAUTION: In the event of a crash, a seat belt across the child’s throat could
cause a strangulation hazard.
WARNING: A SASH BELT UNDER THE ARM OR
BEHIND THE BACK IS DANGEROUS.
INCORRECT
INCORRECT
CORRECT
Correct Shoulder Position
To ensure the correct head support is
obtained, the bottom of the headrest
MUST be even or slightly higher with the
top of child’s shoulders.
Incorrect Positioning
NEVER use a vehicle’s lap-only belt
across front of the child and booster
seat. It WILL NOT restrain your child’s
shoulders in the event of an accident
and could result in serious injury.
INCORRECT
Correct and Safe Positioning
Use only the vehicle’s lap-sash seat belt
when restraining the child in the booster
seat.
CORRECT

19
Mother’s Choice | glide unharnessed booster seat
OPERATION AND ADJUSTMENTS
FUNCTIONAL ADJUSTMENTS
The booster seat is tted with 6 height
positions.
Lift up to raise headrest to the desired
position.
NOTE: You may need to lift and
push with force to adjust
height.
PUSH DOWN
PUSH DOWN
TO LOWER
TO LOWER
LIFT UP
LIFT UP
TO RAISE
TO RAISE
To use cup holders, simply swing
outwards on either side. Push back
when not in use.
SWING
SWING
Using Cup Holders
Position the lap belt across the child’s
lap. Place the shoulder belt over the
child’s chest and into the seat sash
guide, located in the headrest (as shown).
Fasten the seatbelt buckle. Remove
slack.
Adjusting Lap-Sash Belt
ALWAYS USE THE SASH GUIDE.
Adjusting Headrest
To lower, hold the backrest in position
with one hand whilst pushing down on
the headrest with the other.

20
Mother’s Choice | glide unharnessed booster seat
OPERATION AND ADJUSTMENTS
Have your child sit in the booster seat with
their back at against its back.
Position the sash belt through the sash
guide in the headrest. The lap belt portion
MUST be positioned low on the hips.
Fasten buckle and pull up on the shoulder
belt to tighten.
Place the booster seat rmly against the
back of a forward facing vehicle seat
equipped with a lap and shoulder belt only.
SECURING YOUR CHILD IN THE VEHICLE
DO NOT place the booster seat in
a vehicle without the tether strap
attached to the vehicle’s anchor
tting. Refer to page 18.
DO NOT LEAVE CHILDREN UNATTENDED IN THE CAR.
WARNING
ALWAYS USE THE SASH GUIDE.
SASH
GUIDE
NOTE: The vehicle’s seatbelt MUST
NOT be twisted.
CLICK
CAUTION: In the event of a crash, a seat belt across the child’s throat could
cause a strangulation hazard.
Table of contents
Other Mothers choice Car Seat manuals

Mothers choice
Mothers choice journey User manual

Mothers choice
Mothers choice adore AP User manual

Mothers choice
Mothers choice Star-Gold User manual

Mothers choice
Mothers choice serenity 017340 User manual

Mothers choice
Mothers choice kin AP User manual

Mothers choice
Mothers choice nest II User manual

Mothers choice
Mothers choice Infinity User manual