Motive VARIO-S User manual

Operation and maintenance manual VARIO rev.01 mar16 page 1 of 17
керівництво з експлуатації та обслуговування
operation and maintenance manual
motive
power transmission
VARIO
варіаторний редуктор
mechanical speed variators

Operation and maintenance manual VARIO rev.01 mar16 page 2 of 17
ІНДЕКС –INDEX
Зміст
Title
Передогляд - pre-view
Перелік деталей
Components list
Принцип роботи
Operating principles
Продуктивність
Performance
Розміри
Dimensions
Зберігання
Монтаж
Періодичні перевірки
Обслуговування
Інші застереження
Storage
Installation
Routine checks
Maintenance
Further warnings
Змащування
Монтажні положення
Lubrication
mounting positions
Заміна сальників
Seals replacement
Проблеми та вирішення
Trouble shooting
ДОДАТОК ATEX
ATEX ADDENDUM
Декларація відповідності ATEX
ATEX conformity declaration

Operation and maintenance manual VARIO rev.01 mar16 page 3 of 17
ПЕРЕЛІК ДЕТАЛЕЙ –COMPONENTS LIST
N°
арт. - code
N°
арт. - code
1
VARHOU
13
VAROUT
2
VARFEE
14
VARFLA
3
VARFRI
15
VARCAP
4
VARORG
16
VARKNO
5
VARBRG
17
VARBPL
6
VARMRG
18
BOXLPL
7
VARSTL
19
BOXFPL
8
VARPLC
20
VARKSH
9
VARFRG
21
VARBEA
10
VARINP
22
VAROSO
11
VARIRG
23
VAROSI
12
VARBLV
24
VARKNC
N°
VARIO-S
VARIO-M
VARIO-L
21
16002
6004
6205
22
TC15*32*7
TC28*47*7
TC25*52*8
23
TC18*30*7
TC20*42*7
TC32*52*8
10
7
11
12
6
9
4
5
8
3
1
2
13
14
15
16
17
20
19
18
21
21
22
23
24

Operation and maintenance manual VARIO rev.01 mar16 page 4 of 17
ПРИНЦИП РОБОТИ
В основі VARIO лежить епіциклічна передача зі змінним
передавальним числом.
Обертове сонячне кільце 10 ( насаджене на вал
електродвигуна) і нерухоме кільце 11, притиснуте
шайбами Бельвіля 12, передають обертання конусним
дискам-сателітам 7. Ці сателіти контактують із зовнішнім
нерухомим зовнішнім кільцем 9 і зовнішнім рухомим
кільцем 6, і передають обертання планетотримачу 8
(цілісному з вихідним валом), з яким вони з'єднані через
фрикційний підшипник-планетарний диск 3. Обертаючи
ручку управління, рухоме кільце 6 повертається і
здійснює осьове зміщення; цей рух викликається дією
кулькових кілець 5 на протилежні орбіти кілець (4 і 6); це
зміщення діє на конічні сторони планет, які
переміщуються в радіальному напрямку всередині
сонячних кілець 10 і 11, долаючи реакцію пружин 12.
Таким чином, зміна положення контакту бічних сторін
планет визначає зміну частоти обертання планетних
опор, і, як наслідок, частоти обертання вихідного валу.
OPERATING PRINCIPLES
VARIO is based on an epicyclic transmission at variable
ratios.
The rotating solar ring 10 (spliced on the motor shaft) and the
fixed ring 11, pressed by the belleville washers 12, transmit
the rotation to the satellite cone disks 7.
These satellites are in contact with the outer fixed external
ring 9 and the external mobile ring 6, and impart rotation to
the planet carrier 8 (integral with the output shaft) to which
they are connected through the friction bearing-planet disk 3.
Rotating the control knob, the mobile ring 6 rotates and
operates an axial shifting; this movement is caused by the
action of the ball rings 5 on the opposite orbits rings (4 and
6); this shifting movement operates on the conic sides of the
planets which move radially inside the 10 and 11 solar rings,
overcoming the springs 12 reaction. In this way, the variation
of the contact position on the planets sides determines the
planet supports speed variation, and as a consequence that
of the output shaft speed too.
min
rpm
max
rpm

Operation and maintenance manual VARIO rev.01 mar16 page 5 of 17
10
12
11
7
9
5
8
6
4

Operation and maintenance manual VARIO rev.01 mar16 page 6 of 17
ПРОДУКТИВНІСТЬ
PERFORMANCE
VARIO
MOTOR
P1[kW]
M1[Nm]
n1 [rpm]
i:
n2 [rpm]
M2[Nm]
VARIO-S
63A-4
0,13
0,84
1400
1,55-7.36
900-190
1,1 - 2,2
63B-4
0,18
1,26
1400
1,55-7,36
900-190
1,5 - 3,0
VARIO-M
71A-4
0,25
1,73
1400
1,4-7,0
1000 - 200
2 - 4
71B-4
0,37
2,54
1400
1,4-7,0
1000 - 200
3 - 6
VARIO-L
80A-4
0,55
3,78
1400
1,4-7,0
1000 - 200
5 - 10
80B-4
0,75
5,15
1400
1,4-7,0
1000 - 200
6 - 12
РОЗМІРИ
DIMENSIONS
габарит двигуна
tipo - type
kW, 4 poles
B
D1
G
G3
H
T
K
VC
R
VL
VR
VR1
VS
A
AB
VARIO S
63
0,13 - 0,18
50
M5
111,5
64
70
3,5
44,5
68
111
78
100
100
71
60
77
VARIO M
71
0,25 - 0,37
40
M8
110
74
77
3,5
52,5
68
106
92
100
100
71
76
90
VARIO L
80
0,55 - 0,75
58
M8
139
84
92,5
3,5
57
79
140
107
125
125
85
83
100
вихідні дані - output
PAM
M
N
P
S
E
D (j6)
b
t
f
Kg
VARIO S
63B5
115
95
140
9
23
11
4
12,5
-
4,2
VARIO M
71B5
134
110
160
9
30
14
5
16
M6
4,8
VARIO L
80B5
165
130
200
11
40
19
6
21,5
M6
8,5
опис:
P1[kW]
вхідна потужність
input power
n1 [rpm]
вхідна швидкість
Input speed
n2 [rpm]
вихідна швидкість
output speed
M2[Nm]
вихідний момент
output torque
10
M2 [Nm]
n2[rpm]
200 300 400 500 600 700 800 900 1000
9
8
7
6
5
4
3
2
1
0,18 kW
0,25 kW
0,37 kW
0,75 kW
0,55 kW
0,13 kW
12
n1<1500rpm

Operation and maintenance manual VARIO rev.01 mar16 page 7 of 17

Operation and maintenance manual VARIO rev.01 mar16 page 8 of 17
ЗБЕРЕГАННЯ
Не зберігати на відкритому повітрі, в місцях,
що піддаються впливу атмосферних явищ або
при підвищеній вологості.
При зберіганні понад 60 днів всі оброблені
поверхні, такі як фланці і вали, повинні бути
захищені відповідним антиокислювальним
засобом.
VARIO повинен бути встановлений з сапуном
зверху і повністю заповнений маслом.
Сальники повинні торкатися оливи. В іншому
випадку, при зберіганні більше 6 місяців,
рекомендуємо замінити сальники, оскільки гума
могла приклеїтися до валу або втратити
властивість еластичності, необхідну для
правильної роботи.
- Перед введенням їх в експлуатацію
відновити правильну кількість і тип масла.
Слід дотримуватися вказівок
"ALTO", розміщених на упаковці. Поки
двигун не буде підключений до
VARIO, вхідний порожнистий вал
VARIO не буде закріплений. Під дією сили
тяжіння він може зміститися з центральної осі
VARIO, і відбудеться витік масла.
STORAGE
Do not store outdoors, in areas exposed to
weather or with excessive humidity.
For storage periods longer than 60 days, all
machined surfaces such as flanges and shafts must
be protected with a suitable anti-oxidation product
VARIO should be placed with the breather plug
high up and filled completely with oil.
Oil seals must be touched by the oil. If not, for
storage periods longer than 6 months, we suggest
to replace the oil seals because the rubber could be
glued onto the shaft or it could have lost the
elasticity property that is necessary for the correct
working
Before putting them into operation restore the
correct quantity and type of oil.
Respect the “ALTO” indication put
on the packing. Until the motor will not
be connected into VARIO, VARIO input
hollow shaft will not be sustained.
Gravity can make it move out of VARIO center axis,
and oil leakage will occur
МОНТАЖ
Переконайтеся, що VARIO належним чином
закріплений, щоб уникнути вібрацій.
Якщо очікуються удари або перевантаження,
встановіть гідравлічні муфти, муфти зчеплення,
електронні обмежувачі крутного моменту, блоки
управління тощо.
Для задовільної роботи редуктора необхідно
правильно співставити двигун і привідну машину
на одну вісь.
По можливості ми рекомендуємо
використовувати гнучкі муфти.
Точно вирівняйте майбутній підвісний
підшипник, оскільки будь-яка неспіввісність може
призвести до високих перевантажень з
подальшим розривом підшипника або вала.
Перед нанесенням лакофарбового покриття
захистіть отвір сапуна, оброблені поверхні і
зовнішню поверхню сальників, щоб запобігти
висиханню гуми і порушенню функції сальника.
Перед запуском машини переконайтеся, що
рівень масла відповідає монтажному положенню,
перевіривши його за допомогою контрольного
INSTALLATION
Make sure that the BOX unit is correctly secured to
avoid vibrations.
If shocks or overloads are expected, install hydraulic
couplings, clutches, electronic torque limiters,
control units, etc.
For a satisfactory performance, it is essential to
align correctly the motor and the driven machine.
Whenever possible, we suggest to interpose flexible
couplings
Align with precision the eventual outboard bearing,
because any misalignment would cause high
overloads, with a consequent rupture of a bearing or
the shaft
Before being paint coated, protect the breather plug
hole, the machined surfaces and the outer face of
the oil seals to prevent paint drying out the rubber
and jeopardizing the oil-seal function
Before starting up the machine, make sure that the
oil level is conform to the mounting position by
checking the level plug

Operation and maintenance manual VARIO rev.01 mar16 page 9 of 17
отвору.
При установці на відкритому повітрі передбачте
відповідні навіси для захисту приводу від
атмосферних опадів, а також від прямого
сонячного випромінювання.
Перед монтажем очистити і змастити всі
поверхні, що сполучаються (вал і фланець)
При наявності зовнішніх навантажень
рекомендується використовувати штифти і
позитивні упори
На болтах і з'єднувальних поверхнях рами
машини слід використовувати самоблокувальні
клеї, щоб запобігти розхитуванню редуктора і
приводної машини
Рекомендується уникати встановлення
консольних шестерень. Якщо це неможливо,
мінімізуйте відстань між шестернею і вихідним
валом, щоб уникнути надмірних радіальних
навантажень
Попереднє навантаження ременів і ланцюгів
повинно бути мінімальним
Ніколи не використовуйте молоток для
монтажу/демонтажу шарнірних деталей, а
використовуйте різьбові отвори, передбачені на
головках валів і знімачів
Для плавної і безшумної роботи
рекомендується використовувати мотор-двигуни
Перевірте правильність напрямку обертання
вихідного валу перед монтажем агрегату на
верстаті
Варіатор не слід використовувати в умовах, де
можливі несподівані перевантаження або
блокування.
Не рекомендується використовувати двигун з
гальмом.
Не рекомендується використання двигунів, що
мають частоту обертання більше 2000 об / хв
Для роботи з великою кількістю пусків під
навантаженням рекомендується використання
термозахисту всередині двигуна
2 гвинтових штифта під маховиком регулювання
швидкості відкалібровані на заводі, будь ласка,
не регулюйте їх.
For outdoors installation provide adequate guards in
order to protect the drive from rainfalls as well as
direct sun radiation.
Before mounting, clean and lubricate all mating
surfaces (shaft and flange)
Whenever there are outer loads, it is recommended
to use pins and positive stops
Self-locking adhesives should be used on the bolts
and joining surfaces of the machine frame to
prevent gearbox and driven machine to get loose
It is recommended to avoid to fit cantilever pinions.
If this is not possible, minimize the distance between
pinion and output shaft to avoid excessive radial
loads
The pre-loading of belts and chains must be at the
minimum
Never use the hammer for mounting/dismantling of
the jeyed parts, but use the tapped holes provided
on the head of the shafts and strippers
For a smooth and silent working, it is recommended
the use of Motive motors
Verify the correct rotation sense of the output shaft
before assembling the unit on the machine
The variator should not be used in applications
where unexpected overloads or locks may occur.
The use of the brake motor is not recommended.
The use of motors having a speed greater than
2000rpm is not recommended
For work with many starts under load it is
recommended the use of thermal protectors inside
the motor
The 2 screw pins under the speed-setting hand-
wheel are calibrated in the factory, please do not
adjust them.

Operation and maintenance manual VARIO rev.01 mar16 page 10 of 17
ПОЧАТОК РОБОТИ
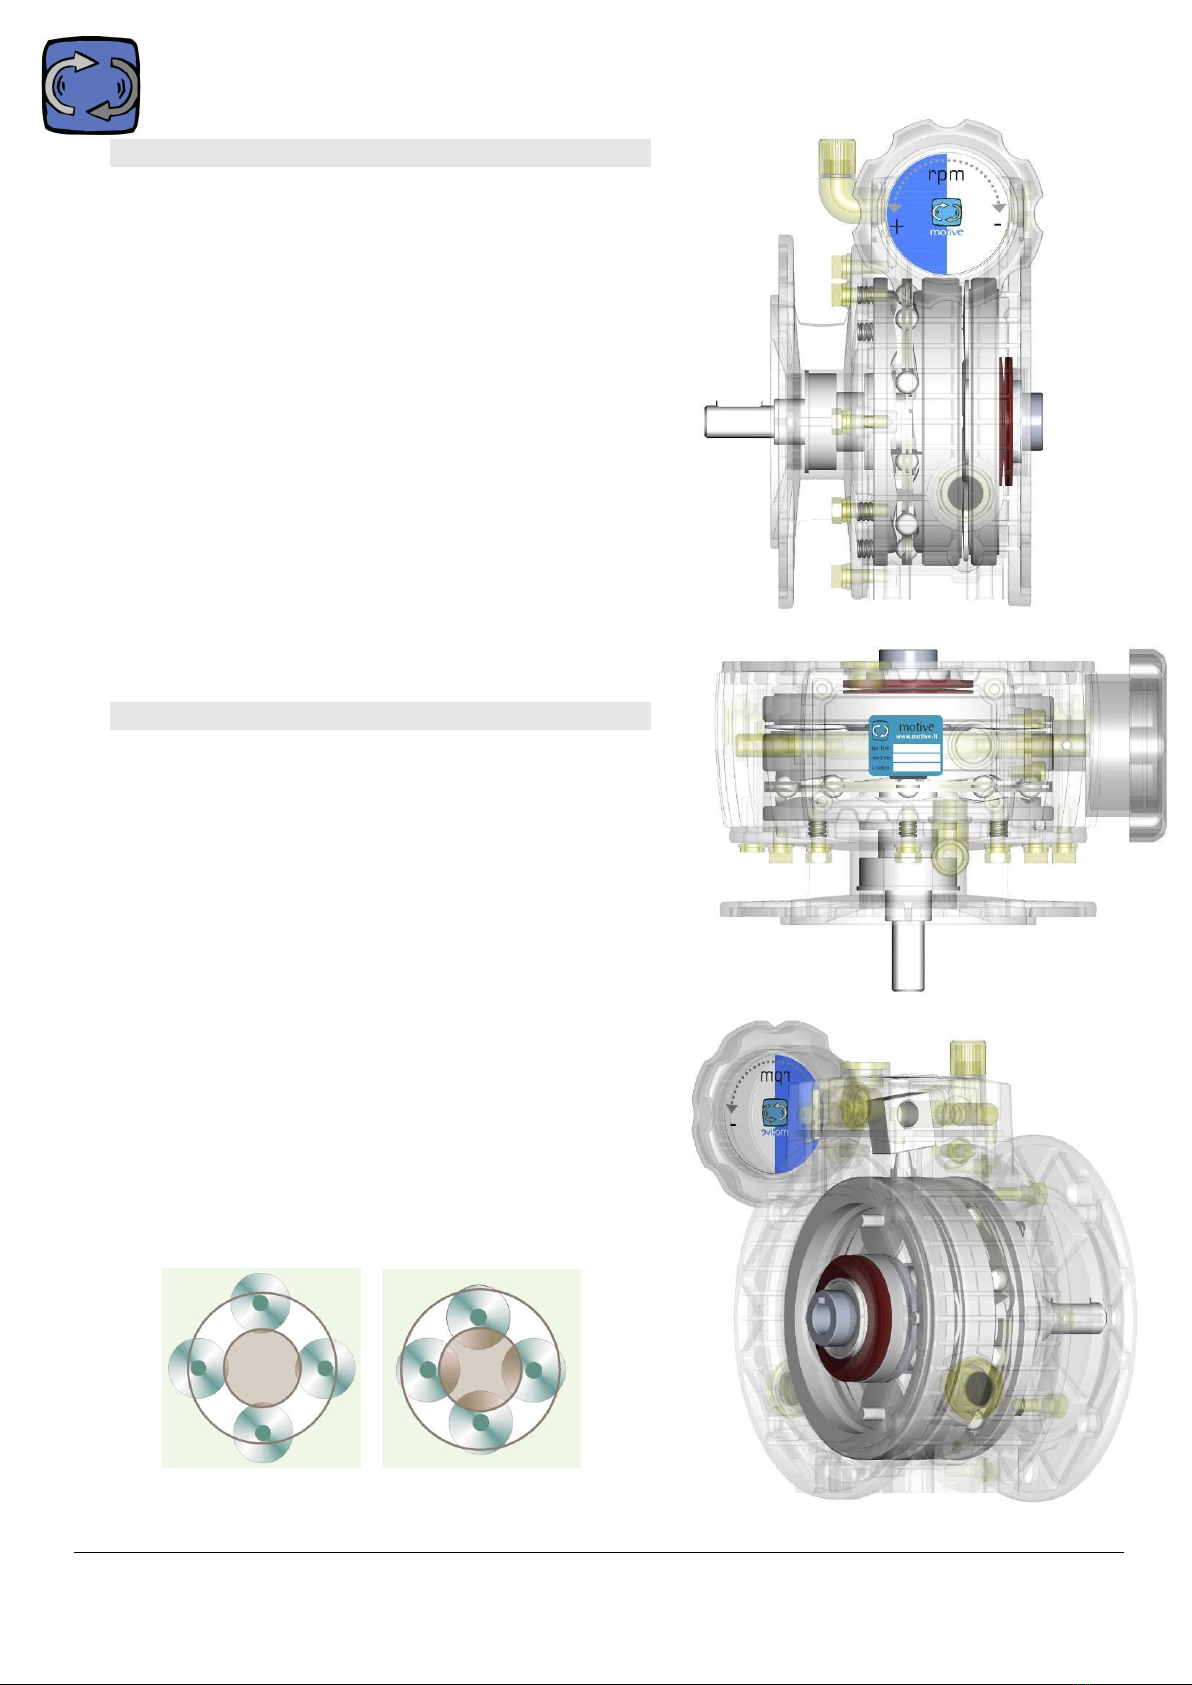
Регулювання швидкості повинно
виконуватися під час роботи
VARIO.
Не регулюйте маховик при
вимкненому двигуні.
Перед запуском необхідно
відкрутити сапун
Запуск повинен бути поступовим. Слід уникати
негайного застосування повного навантаження, що
вимагається застосуванням, з метою перевірки та
усунення можливих проблем, викликаних
неправильним монтажем або застосуванням.
Обкатка необхідна для очищення внутрішніх
механічних частин і забезпечення хороших
експлуатаційних характеристик, оскільки принцип
роботи VARIO заснований на терті.
STARTING
The speed regulation must be done
whilst VARIO is working.
Do not adjust the handwheel when
motor is off.
Breather plug must be loosened
before starting
The starting must be gradual. It must be
avoided the immediate application of the full load
requested by the application, in order to verify and
correct eventual problems caused by a wrong
installation or application
The running-in is essential for the cleaning of the
inner mechanical parts and the good performance,
because of VARIO working principles that are based
on the friction
ПЕРІОДИЧНІ ПЕРЕВІРКИ
Технічне обслуговування в основному обмежуєть-
ся вимогами, зазначеними в розділі "Змащення", а
також ретельним зовнішнім очищенням, яке зазви-
чай виконується м'якими розчинниками, щоб не
пошкодити фарбу.
Періодично перевіряйте чистоту зовнішніх
поверхонь агрегату VARIO і каналів для
проходження охолоджуючого повітря.
Переконайтеся, що отвір сапуна чистий.
Регулярно перевіряйте відсутність витоків
мастила.
Періодично перевіряйте за допомогою контро-
льного віконця правильну кількість мастила
ROUTINE CHECKS
Maintenance is essentially limited to the requests
reported in the charter “lubrication” and to an accurate
external cleaning, usually carried out with bland
solvents in order to not to damage the paint
Periodically check that the outer surfaces of the
VARIO unit and the cooling air passages are clean.
Verify that the breather plug hole is clean.
Regularly make sure that there are no lubricant
leaks.
Using the level plug window, verify periodically the
correct quantity of lubricant
РОБОЧА ТЕМПЕРАТУРА
Робоча температура залежить від ряду факторів,
таких як тип трансмісії, тип і кількість мастила,
характеристики і конструкція варіатора, частота
обертання і застосовувана потужність, а також
середовище, в якому експлуатується варіатор
Для планетарних конусно-дискових варіаторів
допустимий діапазон робочих температур може
бути на 50-55°C вище температури навколишнього
середовища, при максимальній температурі
навколишнього середовища 40°C
Максимально допустима температура всередині
варіатора - 90°C. Більш високі температури можуть
пошкодити сальники з NBR-гуми.
У разі контролю важливо перевірити, щоб робоча
температура при роботі редуктора на нормальній
швидкості була постійною; це свідчить про те, що
варіатор працює безвідмовно
OPERATING TEMPERATURE
The operating temperature depends on a number of
factors such as the type of power transmission, the
type and quantity of lubricant, the characteristics and
structure of the variator, the speed and power applied
and the environment in which the variator is operating
With planetary cone-disk variators, the acceptable
operating temperature range can be up to 50-55°C
more than the ambient temperature, under a max
ambient temperature of 40°C
The maximum allowable inside temperature is 90°C.
Higher temperatures could damage the oil seals in
NBR rubber.
In case of control, it is important to check that the
operating temperature when the gearbox runs at
normal speed is constant; this indicates that the
variator is running in a trouble-free manner

Operation and maintenance manual VARIO rev.01 mar16 page 11 of 17
ЗВІТ про ВТРУЧЕННЯ та ПЕРЕВІРКИ
INTERVENTIONS and CONTROLS REPORT
Втручання/перевірки –Intervention/control
Дата - Date
Підпис - Signature

Operation and maintenance manual VARIO rev.01 mar16 page 12 of 17
ЗМАЩУВАННЯ –LUBRICATION
VARIO S
b
VARIO M
b
VARIO L
b
Синтетична олія – synthetic oil
ISO VG…
ISO VG220
T°C
-5°C ÷ 35°C*
обслуговування
maintenance
олія, л. –oil litres
B3-B5
0,06
0,16
0,30
необхідно замінити мастило
після першого періоду обкатки
(200 годин) і надалі через
кожні 4000 годин (2000 годин
при використанні мінеральної
оливи). Рівень мастила
повинен бути на рівні 2/3
пробки оглядового віконця.
Періодично перевіряйте цей
рівень і при необхідності
доливайте мастило.
it is necessary to replace
lubricant after first run in period
(200 hours) and hereinafter
each 4000 hours (2000 if with
mineral oil). The oil level must
be at 2/3 of the sight glass plug.
Check periodically this level and
top up as required.
B8
0,20
0,60
1,10
V1
0,13
0,40
0,95
V3
0,15
0,25
0,50
B6-B7
0,10
0,20
0,40
*per temperature diverse/залежно від температури різний:
мінеральна олива - mineral oil
синтетична олива - synthetic oil
ISO VG
460
320
220
460
320
220
150
температура навк.сер.
ambient temperature
10°C ÷ 45°C
0°C ÷ 35°C
-5°C ÷ 25°C
10°C ÷ 60°C
0°C ÷ 50°C
-5°C ÷ 35°C
-10°C ÷ 25°C
produttore manufacturer
FUCHS
Renolin
PG 460
Renolin
PG 320
Renolin
PG 220
Renolin
PG 460
Renolin
PG 320
Renolin
PG 220
Renolin
PG 150
SHELL
Omala
Oil 460
Omala
Oil 320
Omala
Oil 220
OMALA S4
460
OMALA S4
320
OMALA S4
220
OMALA S4
150
MOBIL
Mobilgear
634
Mobilgear
632
Mobilgear
630
Glygoyle 460
Glygoyle 320
Glygoyle 220
Glygoyle 150
CASTROL
Alpha
SP 460
Alpha
SP 320
Alpha
SP 220
Alphasyn
PG460
Alphasyn
PG320
Alphasyn
PG220
Alphasyn
PG150
AGIP
Blasia
Oil 460
Blasia
Oil 320
Blasia
Oil 220
Telium
VSF460
Telium
VSF320
Telium
VSF220
Telium
VSF150
VARIO поставляються з синтетичним мастилом ISO VG 220, з
кількістю мастила для позицій B3-B5
(така олива є обов'язковою у виконанні ATEX (VARIO-Ex))
Внаслідок принципу дії, заснованого на терті сателітів, відповідне
мастило є важливим для правильної тривалості та ефективності
роботи VARIO.
Крім того, суворо рекомендується уникати змішування двох різних
типів мастил. Якщо ви змінюєте тип мастила, переконайтеся, що
ви очистили виріб відповідним хімічним розчинником.
VARIO are supplied with ISO VG 220 synthetic lubricant, with the
quantity of oil for positions B3-B5
(such oil is compulsory in ATEX version (VARIO-Ex))
As a consequence of its operating principles, based on the satellites
friction, the appropriate lubrication is essential for the correct duration
and efficiency of VARIO.
It is strictly recommended, in addition, to avoid mixing two different oil
types. If you change type of oil, make sure you clean the product with
appropriate chemical thinner.

Operation and maintenance manual VARIO rev.01 mar16 page 13 of 17
монтажні положення
mounting positions
Всі агрегати поставляються з пробками для заливки, зливу і
перевірки рівня масла. Крім того, до них додається сапун.
Перед введенням в експлуатацію рекомендується замінити
пробку заливної горловини у верхній частині агрегату на
пробку сапуна.
All units are supplied with plugs for loading, discharging and
checking the level of the oil. Furthermore, they are
accompanied by a breather plug. Before start-up, we suggest
to re-place the filler plug in the upper side of the unit with the
breather plug.
сапун – breather plug
пробка рівня – level plug
пробка для заливу – filler plug
B6
B8
B5
V1
B7
V3
B3
Перед початком роботи
послабити
Loosen before starting

Operation and maintenance manual VARIO rev.01 mar16 page 14 of 17
ЗАМІНА САЛЬНИКІВ
Якщо ущільнення валу не працює належним чином, його
необхідно швидко замінити, щоб уникнути подальшого
витоку масла і пошкодження інших компонентів.
При установці нового ущільнення необхідно
дотримуватися наступних запобіжних заходів:
дотримуватися особливої обережності при поводженні з
пломбою та переконатися, що пломба знаходиться в
належних умовах, особливо якщо тривале зберігання
могло призвести до її передчасного псування, особливо
за наявності надмірної вологості;
завжди перевіряйте, щоб гніздо ущільнення вала було в
хорошому стані, без поверхневих дефектів. Якщо
ділянка, де кільцеве ущільнення контактує з валом,
зношена більш ніж на 0,2-0,3 мм, не встановлюйте нове
ущільнення
слідкуйте за тим, щоб нова кромка
ущільнення не працювала точно по
тому ж сліду, який залишив
попередній
встановлюйте ущільнення вала
перпендикулярно до осі, з повністю
вільними кромками, не
закрученими під нього і не
затиснутими
встановіть кільцеве ущільнення
так, щоб кромка була звернена в
бік масла, яке необхідно
утримувати, або в бік, з якого
здійснюється тиск
для кільцевих ущільнень без
пилонепроникної кромки покрийте
зовнішню сторону кромки мастилом
для кільцевих ущільнень, забезпечених
пилонепроникною кромкою, заповнити зазор між
кромкою ущільнення і пилонепроникною кромкою
мастилом
змастити посадочне місце ущільнення на валу
не використовуйте герметики, оскільки при попаданні на
кромку ущільнення або поверхню вала вони можуть
викликати швидкий знос
при установці ущільнення притискайте якомога ближче
до зовнішнього краю
не блокуйте кільцеве ущільнення в осьовому напрямку і
не прикладайте занадто велике навантаження
завжди використовуйте відповідні інструменти, щоб
уникнути пошкодження кромки ущільнення різьбленням,
канавками, гострими краями або шпонковими пазами
при перефарбовуванні редуктора завжди закривайте
кромку ущільнення і посадочне місце на валу
використовуйте сальники типу, зазначеного Motive
провести остаточний контроль герметичності за
допомогою тиску повітря (зверніться за інструкцією до
компанії Motive)
SEALS REPLACEMENT
When a shaft seal doesn’t work properly, it must be replaced
rapidly, in order to avoid that the oil leakage goes further on,
and that the damage extends to some other components.
When fitting a new seal, the following precautions are required:
take particular care in handling, and make sure that the
seal is in good conditions, particularly if long times of
stocking could have caused a premature ware, especially in
presence of excessive humidity
always check that the shaft seal seat is in good conditions,
free of surface defects. If the area where the ring seal
comes into contact with the shaft has worn down by more
than 0,2-0,3mm, do not install a new seal
care to prevent the new seal lip from working exactly on the
same trace left by the previous one
fit the shaft seal perpendicularly to the
axis, with the lips wholly free, not
curled under or pinched
install the ring seal so that the lip
faces the oil that must be kept in or
the side from where the pressure is
exerted
for ring seals without a dust-tight lip,
coat the outside of the lip with grease
for ring seals provided with a dust-
tight lip, fill the gap between the seal
lip and dust-tight lip with grease
lubricate the seal seat on the shaft
do not use sealants because if they
get on the seal lip or shaft surface they can cause rapid
wear
when installing the seal, press down as near as possible
the outside edge
do not block the ring seal axially or apply too much load
always use suitable tools to avoid damaging the seal lip
with threads, grooves, sharp edges or keyways
always cover the seal lip and the seat on the shaft when
repainting the gearbox
use oil seals of the type indicated by Motive
run a leakage final control by using air pressure (ask
instructions to Motive)

Operation and maintenance manual VARIO rev.01 mar16 page 15 of 17
ПРОБЛЕМА, ПРИЧИНА, ВИРІШЕННЯ
ПРОБЛЕМА
МОЖЛИВА ПРИЧИНА
ЗАСІБ ВИПРАВЛЕННЯ (1)
ЗАСІБ ВИПРАВЛЕННЯ (2)
струм споживання
електродвигуна занадто
високий
а) неправильний розмір двигуна.
б) несправність двигуна.
перевірте установку /
застосування
заміна двигуна, а з часом і
редуктора
занадто висока температура
корпусу двигуна
а) неправильний розмір двигуна.
б) несправність двигуна.
перевірте установку /
застосування
заміна двигуна, а з часом і
редуктора
температура корпусу редуктора
занадто висока
a) Неправильний розмір
редуктора
б) Неправильне монтажне
положення
в) Недостатньо мастила
перевірте установку /
застосування
скоригуйте монтажне
положення або рівень
мастила
обороти вихідного валу
редуктора відрізняються від
зазначених
а) Неправильне передавальне
число.
б) неправильна полярність
двигуна.
a) перевірте передавальне
число редуктора.
б) перевірте полярність
двигуна
заміна редуктора та / або
електродвигуна
підтікання масла з валів
а) дефектні ущільнення.
б) посадочні місця ущільнень на
валах
в) вхідний порожнистий вал
зміщений від центру
a) замініть ущільнення.
б) замініть ущільнення і
встановіть їх трохи віншому
положенні або замініть вали
в) Рухатися до центру
делікатними ударами по
порожнистому валу,
дотримуючись правильного
положення "АЛЬТО"
відправити пристрій в Motive
підтікання масла з ущільнень
a) фланці не затягнуті належним
чином.
б) несправні пломби або
пошкоджені під час
транспортування
а) затягнути фланці.
б) замініть ущільнення,
перевіривши, щоб гнізда
ущільнень були ідеально
оброблені.
відправити пристрій в Motive
вихідний вал обертається в
неправильному напрямку
неправильне підключення
електродвигуна
інвертувати положення 2-х
фаз живлення
електродвигуна
циклічний шум в редукторі
пошкоджені шестерні
немає практичної проблеми,
якщо шум не є важливим в
конкретному застосуванні.
відправити пристрій в Motive,
якщо шум має важливе
значення в конкретному
застосуванні
не циклічний шум всередині
редуктора
забруднення всередині редуктора
немає практичної проблеми,
якщо шум не є важливим в
конкретному застосуванні,
або якщо він зникає після 3
робочих годин
відправити пристрій в Motive,
якщо шум має важливе
значення в конкретному
застосуванні
з редуктора доноситься
свистячий звук
а) несправні підшипники або
неправильно зібрані.
б) несправні шестерні.
в) недостатньо мастила
а) перебрати або замінити
підшипники
б) замінити шестерні
в) додати правильну кількість
мастила
відправити пристрій в Motive
вібрації електродвигуна
геометричні похибки муфтових
з'єднань
a) перевірити геометричні
допуски фланця
електродвигуна. У разі
необхідності замініть
б) перевірити геометрію та
допуски шпонки валу
електродвигуна. При
необхідності замініть
в) перевірте вібрацію
електродвигуна
замініть двигун на двигун
Motive.

Operation and maintenance manual VARIO rev.01 mar16 page 16 of 17
TROUBLE SHOOTING
PROBLEM
POSSIBLE CAUSES
REMEDY (1)
REMEDY (2)
the current absorption of the
electric motor is too high
a) wrong motor size.
b) motor faulty.
check the
installation/application
replace the motor and
eventually also the gearbox
the temperature of the motor
frame is too high
a)wrong motor size.
b)motor faulty.
check the
installation/application
replace the motor and
eventually also the gearbox
the temperature of the gearbox
housing is too high
a)Wrong gearbox size.
b)Wrong mounting position.
c) Not enough lubricant
check the
installation/application
correct the mounting position or
the lubricant level
output speed is different from
expected
a)wrong reduction ratio.
b)wrong motor polarity.
a)verify the reduction ratio.
b)verify the motor polarity
replace the gearbox and/or the
electric motor
oil leaks from the shafts
a)defective seals.
b)seal seats on the shafts
c) input hollow shaft moved out
from the center
a)replace the seals.
b)replace the seals and install
them in a very slightly
different position or replace
the shafts.
c) Move to the center with
delicate hits the hollow shaft,
and respect the correct
“ALTO” position
send the unit to Motive
oil leaks from the seals
a)flanges are not tightened
properly.
b)defective seals or damaged
during the transport
a)tighten the flanges.
b)replace the seals, verifying
that the seals seats are
perfectly worked.
send the unit to Motive
The output shaft turns in the
wrong sense
wrong electric motor wiring
invert the position of the 2
phases of the electrical motor
power supply
cyclical noise in the gearbox
damaged gears
no practical problem if the
noise is not important in the
specific application.
send the unit to Motive if the
noise is important in the
specific application
not cyclical noise inside the
gearbox
dirty inside the gearbox
no practical problem if the
noise is not important in the
specific application, or if it
disappears after 3 working
hours
send the unit to Motive if the
noise is important in the
specific application
a whistiling noise is coming from
the gearbox
a)defective bearings or not
correctly assembled.
b)defective gears.
c) not enough lubricant
a) reassemble or replace the
bearings
b) replace the gears
c) put the correct quantity of
lubricant
send the unit to Motive
vibrations of the electric motor
coupling geometrical errors
a)check the geometrical
tolerances of the electric
motor flange. Eventually
replace
b)check geometry and
tolerances of the electric
motor shaft key. Eventually
replace
c) Check the motor vibration
replace the motor with a Motive
one.

Operation and maintenance manual VARIO rev.01 mar16 page 17 of 17
На сайті www.motive.it, використовуючи серійний
номер на заводській табличці редуктора, можна
завантажити фінальний протокол випробувань
кожного агрегату.
On www.motive.it, using the serial number on the
nameplate of the gearbox, it is possible to download
the Final Test Report of each unit.
"Мотив" розглядає претензії покупця в рамках
гарантійних зобов'язань (див. каталог "Мотив")
тільки при дотриманні всіх встановлених умов
зберігання, підготовки, введення в експлуатацію та
використання. Можливі рекламації повинні
супроводжуватися інформацією про серійний
номер виробу, а також будь-якою необхідною
інформацією та доказами.
Motive takes into consideration customer’s
reclamation claims in the frame of the term of
guarantee obligations (see Motive catalogue), only
if all prescribed conditions for storage, preparation,
putting into operation and use are observed.
Eventual complaints shall be accompanied by the
information of the product serial number and any
relevant information and evidence.
power transmission
This manual suits for next models
2
Table of contents
Other Motive Engine manuals
Popular Engine manuals by other brands

Takegawa
Takegawa KSR110 instruction manual

Siyang
Siyang N485J Operation manual

GEIGER
GEIGER GB45R Series Original assembly and operating instructions

SCHUNK
SCHUNK STM 48V Assembly and operating manual

Denison Hydraulics
Denison Hydraulics Goldcup Series Installation & Overhaul Instructions

Bombardier-Rotax
Bombardier-Rotax FR 125 Mini MAX Installation and operator's manual