motogadget mo.hub User manual

Instruction Manual
mo.hub
EN
V1.2

Thank you very much for purchasing a high quality motogadget product - Made in Germany.
Please read the following information and recommendations thoroughly and follow these in-
structions during installation and use of the instrument. No liability shall be assumed by mo-
togadget for damage or defects resulting from negligence or failure to follow the operating and
contact:
motogadget GmbH
Wollenberger Str. 4 i/j
D - 13053 Berlin
Tel. +49 (0)30-6900410-0
www.motogadget.de
Copyright © 2009-2023 by motogadget GmbH, Berlin
motogadget and mo.hub are registered trademarks of
motogadget GmbH, Berlin, Germany.

1 Review of Delivery
All products from motogadget are thoroughly checked to ensure they are completely fault-free
when dispatched. Please check the received goods immediately for possible transport dam-
age. If you find any damage or other deficiencies, please contact us immediately.
In this regard, we refer to our General Terms of Business and Delivery, which are published
at www.motogadget.com. Should a return of the received delivery be agreed, please note that
we only take back goods in their original packaging. The mo.unit and its accessories must be
returned within the legal period of time and without any traces of use. We shall not assume any
liability for returns which are insufficiently insured or packed.
2 Exclusion of Liability
THE DEVICE AND ITS ACCESSORIES MUST BE INSTALLED BY A CERTIFIED MOTOR-
CYCLE TECHNICAN AND IN AN AUTHORIZED SERVICE CENTER. REVERSE POLARITY
OR VOLTAGE ABOVE 25V MAY RESULT IN DAMAGE TO THE MO.HUB. THE DEVICE
THEN HAS TO BE REPLACED AND ALL CLAIMS OF WARRANTY ARE DELETED.
MOTOGADGET ACCEPTS NO LIABILITY FOR DIRECT OR INDIRECT DAMAGE OR
SUBSEQUENT DAMAGE OF ANY KIND RESULTING FROM THE USE, INSTALLA-
TION OR CONNECTION OF THE DEVICE OR OTHER DELIVERED EQUIPMENT. THIS
EXCLUSION OF LIABILITY PARTICULARLY INCLUDES DAMAGE TO PERSONS,
MATERIAL LOSSES AND FINANCIAL DAMAGES. THE USE IN AREAS OF PUBLIC TRAF-
FIC ENSUES AT THE USER’S OWN RISK.

DEVICE HOUSINGS AND ALL OTHER DELIVERED PARTS MUST NOT BE OPENED
OR DISMANTLED. IN CASE OF NON-COMPLIANCE, ALL WARRANTY CLAIMS
BECOMES INVALID. THE USE OF THE DELIVERED DEVICE AND ITS ACCESSO-
RIES FOR RACING OR OTHER COMPETITIONS AS WELL AS FOR ANY USE NOT
CORRESPONDING TO THE RECOMMENDED APPLICATION ALL WARRANTY CLAIMS
SHALL BE INVALID.
3 Safety Instructions
• THE VEHICLE BATTERY MUST BE COMPLETELY DISCONNECTED PRIOR TO ANY
WORK ON THE VEHICLE’S ELECTRICAL SYSTEM. FIRST, DISCONNECT THE NEGA-
TIVE TERMINAL AND THEN THE POSITIVE TERMINAL. FOR RECONNECTION
PROCEED IN THE REVERSE ORDER.
• USING THE MO.HUB WITH PLUS POLE CONNECTED TO VEHICLE FRAME (OLDER
ENGLISH MOTORCYCLES) IS NOT POSSIBLE.
• INSTALLATION AND ELECTRICAL CONNECTION OF THE MO.HUB MAY ONLY BE
CARRIED OUT BY A CERTIFIED MOTORCYCLE TECHNICIAN.
• ALL CABLE DIAMETERS MUST BE DIMENSIONED ACCORDING TO THE CURRENT
FLOW (REFER TO CHAPTER 8.5).

4 Intended use
The mo.hub is a universal data interface between motorcycle and smartphone (and motogad-
get instrument). It connects the vehicle and the Smartphone via Bluetooth and enables the
use of our „mo.ride“ app, with extensive vehicle management such as trip logs, maintenance
activities, season progress, last trip data, etc.
The Bluetooth coupling process between smartphone and mo.hub and its configuration in the
app also take place. Further information at www.mo-ride.com
4.1 Areas of application
4.1.1 Smartphone and vehicle via OBD (On Board Diagnostics) interface
For compatible vehicles, we provide suitable OBD plugs, which cables are need to be
connected to the mo.hub terminals. The instructions for this are given in the coupling process
within the „mo.ride“ app.
4.1.2 motogadget instrument and smartphone via the vehicle‘s instrument connector
For compatible vehicles, we provide suitable instrument plugs, which cables are need to be
connected to the mo.hub terminals. The instructions for this are given in the coupling process
within the „mo.ride“ app.
4.1.3 motogadget instrument and smartphone via direct tap on the vehicle wiring harness
For all vehicles without a BUS system, the signals are picked up directly on the vehicle wiring
harness. The instructions for this are given in the coupling process within the „mo.ride“ app.

4.2 Device cold and warm start
During a cold start, the battery plus is connected to mo.hub Terminal 1 in addition to the vehic-
le earth (mo.hub Terminal 3). The device is initializing during a cold start. This process takes
approx. 3s, which is indicated by a briefly lit status LED.
During a warm start, vehicle earth and battery plus are connected. The device is in standby
mode. The wakeup is done by ignition plus, switched by the ignition lock, at mo.hub Terminal 2.
4.3 Status LED
The following operating states are represented by the status LED:
- LED off: no Bluetooth connection or device off
- LED on: Bluetooth pairing active
- LED flashes once in 3s: Bluetooth connection established
4.4 Bluetooth pairing
Install the app mo.ride (from Android 8.0 / iOS13, availability according to smartphone manu-
facturer and model may be restricted).
Create and open a new vehicle in the garage. Now continue with button "pair hardware" and
follow the further instructions.

Two methods to initialize the pairing process on the mo.hub:
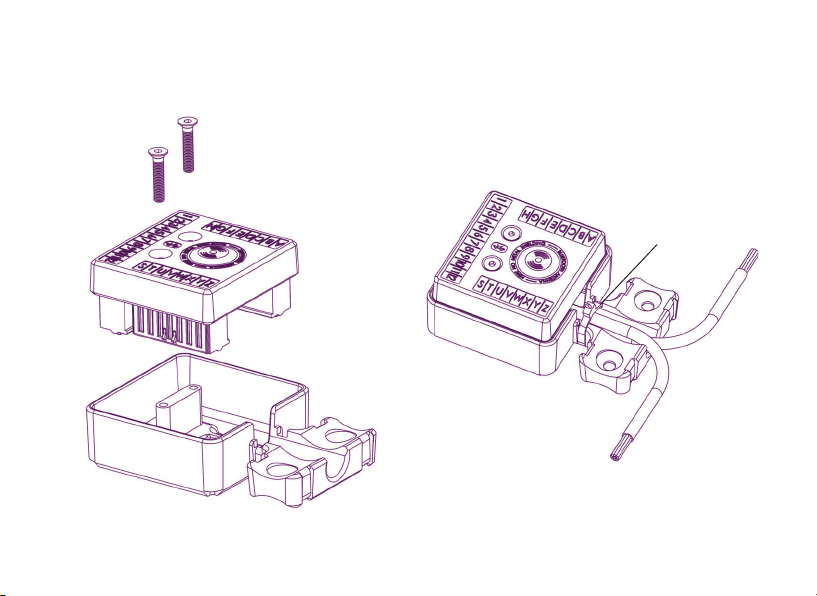
A) Performing a cold start by connecting vehicle earth to mo.hub terminal 3 and battery plus to
terminal 1. If allready connected, just unplug the large terminal strip from the mo.hub by pul-
ling on it and then replug it. Tap the housing twice in quick succession with your index finger.
The action was successful if then the LED is continously lit. The pairing process can now be
continued in the app.
OR
B) Switch the ignition on and off10 times in quick succession. The action was successful when
the LED is continously lit. The pairing process can then be continued in the app.
For this method, the following is required: connection vehicle earth to mo.hub termnial 3, bat-
tery plus to terminal 1 and ignition plus to termnial 2.
Note
When new or after a reset, the mo.hub is ready for pairing and can be coupled immediately
after a cold start (LED lit).
The time window for the pairing process (LED lit) is 30s. After the time has elapsed, the LED
will switch offand pairing process must be initialized again.
If a mo.unit blue and a mo.hub are used in a vehicle at the same time, the Bluetooth connection
is only possible with one device. All other devices are connected to each other by cable via the
motogadget LIN bus. Please follow the instructions in the pairing process.
When reselling an already paired mo.hub, we recommend performing a reset to factory condi-
tion. This function is available after pairing; in the mo.hub settings of the mo.ride app.

5 Overview
plug-in / relase connecting cabel by phusing
orange inserts with a screw driver blade
serial no.
(important for support requests)
area of Bluetooth Antenna-
do not cover with metal
mouning holes for
cable cover
terminal
marking
Status LED

6 Mounting the cable cover & cable guide
M3x16 countersunk
cable ties

7 Mounting options
cable ties M4 screws

8. Connecting motogadget instruments to the mo.hub
8.1 motoscope mini and combi-frame or handle bar clamp
mo.hub motoscope mini combi-frame HD handlebar clamp
terminal no. wire color wire color wire color
3
black orange | yellow | purple orange | blue
H
red white red
S
yellow
T
white
U
green
V
black yellow
W
brown green
X
red purple
Y
blue black
Z
green white

8.2 motoscope tiny und motoscope classic
mo.hub motoscope tiny motoscope classic
terminal no. wire color wire color
1
red
3
black black and white-green
H
brown red
S
purple yellow
T
orange white
U
green green
V
white grey
W
yellow white-orange
X
blue blue
Y
white-yellow

9 Connecting the vehicle with the mo.hub
9.1 vehicles without data BUS
mo.hub
terminal no.
1
battery +12V (via 5A cable fuse)
2
ignition lock switched +12V
3
vehicle ground (GND)
6
instrument menu push button (switching to GND)
7
high beam (+12V)
8
Error / MIL (GND)
9
turn left (+12V)
10
turn right (+12V)
11
neutral switch (switching to GND)
12
ABS indicator light (+12V)
A
oil temperature sensor (motogadget article 9001005 / 9001007 / 9001002)
B
oil pressure switch (switching to GND)
C
air temperature sensor (motogadget article 1005090)
D
water temperature sensor (motogadget article 9001005 / 9001007 / 9001002)
E
fuel sensor or switch (0-500 Ohm to GND)
S
tacho signal (ignition coil low tension primary switched input)
T
speed signal (all types)
vehicle

9.2.2 Connecting the vehicle-specific plug and the battery cable to the mo.hub
BMW models from 2015 with a 6 pin instrument plug with dimensions of
approx. 9x10x22mm, are equipped with a LIN bus for communication between control unit and
instrument.
9.2 BMW modells with LIN Bus
9.2.1 Vehicletype identification
mo.hub
terminal no.
1 motogadget battery cable (4005102) from battery plus terminal
3 motogadget plug (4005100) black wire
4 motogadget plug (4005100) red wire
motogadget BMW LIN vehicle plug
9.2.3 Installation
1) Jack up vehicle, remove seat and tank, disconnect battery (first minus, then plus)
2) Unscrew OEM instrument, unplug connector, unscrew OEM instrument carrier.
3) attach the motogadget instrument to the vehicle-specific motogadget retaining plate and
connect the tail cable of the motogadget instrument to mo.hub
4) Connect motogadget vehicle-specific plug and battery cable to mo.hub
5) Screw the motogadget retaining plate with instrument to the fork bridge with the OEM screws.
6) Attach mo.hub to the upper frame tube with cable ties, avoiding collision
pay attention to mo.hub housing and tank.
7) motogadget battery connection cable, OEM instruments connector plug and motogadget
Instuments Lay the cable free of kinking and abrasion to the mo.hub and cable with cable ties
attach to the frame. Allow enough play for steering movements.

BMW models from 2010 - 2014 a 6 pin instrument plug with the dimensions of
approx. 14.5x23.5x40mm, are equipped with a CAN bus for communication between control unit
and instrument.
9.3.1 Vehicletype identification
9.3 BMW Modells with CAN Bus
8) Insert the plug of the OEM speedometer (not tachometer!) In the with motogadget
Insert vehicle plug. The second OEM instrument plug (if available) with
Protect heat shrink tubing from splash water.
9) The eyelet of the motogadget battery connection cable with the battery-plus connection terminal
connect
10) Connect the battery (first plus, then minus)
11) Install the tank and seat
9.3.2 Connection of the vehicle-specific plug to the mo.hub
1red
2brown
3black
F
blue
G purple
motogadget BMW CAN
vehicle plug (4005101)
mo.hub
terminal no.

10 settings for motogadget instruments
1) Jack up the vehicle, remove seat and tank
2) Unscrew OEM instrument, unplug connector, unscrew OEM instrument carrier.
3) attach the motogadget instrument to the vehicle-specific motogadget retaining plate and
connect the tail cable of the motogadget instrument to mo.hub
4) Connect motogadget vehicle-specific plug and battery cable to mo.hub
5) Screw the motogadget retaining plate with instrument to the fork bridge with the OEM screws.
6) Attach mo.hub to the upper frame tube with cable ties, avoiding collision
pay attention to mo.hub housing and tank.
7) OEM instrument connector and motogadget instrument cable kink and scuff-free
Lay to the mo.hub and secure the cables to the frame with cable ties. Sufficient
Allow game for steering movements.
8) Insert the plug of the OEM speedometer into the vehicle with motogadget plug.
9) Install the tank and seat
9.3.3 Installation
motoscope mini
Circ=2000 / ImpW=1 / ImpE=1
motoscope tiny, speedster, vintage
Circ=2000 / Pulse=1
motoscope classic, classic speedo, Chronoclassic, Chronoclassic speedo
Circ=200 / ImpW=4 / ImpE=1

12.3 Return and complaints
Before returning your mo.hub for technical inspection, contact our technical support.
Therefore, visit our website and follow the instructions in area “support”. Please provide the
following informations completely: mo.hub serial no. (serial label on top of mo.hub).
For returning an item follow the instruction in chapter “service” on our website.
Declaration of Conformity
Hereby, motogadget GmbH declares that the radio equipment type
mo.hub is in compliance with Directive 2014/53/EU.
The full text of the EU Declaration of Conformity is available at the
following internet address:
https://manuals.motogadget.com/mo-hub/en/
WEEE directive
The wheelie bin symbol on the product or its packaging indicates that this product shall not
be treated as household waste. In line with EU Directive 2002/96/EC for waste electrical and
electronic equipment (WEEE), this electrical product must not be disposed of as unsorted mu-
nicipal waste. Please dispose of this product by returning it to the point of sale or to your local
municipal collection point for recycling. By doing this you will help conserve the environment.

Regulations
PRODUCT INFORMATION:
Manufacturer: motogadget GmbH
Model: mo.hub
FCC ID: 2AIF8-4005000
IC: 21495-4005000
FCC COMPLIANCE STATEMENT:
This device complies with part 15 of the FCC Rules. Operation is subject to the following two
conditions:
(1)This device may not cause harmful interference, and (2) this device must accept any
interference received, including interference that may cause undesired operation.
INFORMATION TO USER:
This equipment has been tested and found to comply with the limits for a Class B digital device,
pursuant to Part 15 of FCC Rules. These limits are designed to provide reasonable protection
against harmful interference in a residential installation. This equipment generates, uses, and
can radiate radio frequency energy.

If not installed and used in accordance with the instructions, it may cause harmful interference
to radio communications. However, there is no guarantee that interference will not occur in a
particular installation.
If this equipment does cause harmful interference to radio or television reception, which can
be determined by turning the equipment offand on, the user is encouraged to try and correct
the interference by one or more of the following measures:
• Reorient or relocate the receiving antenna
• Increase the distance between the equipment and the receiver
• Connect the equipment to outlet on a circuit different from that to which the receiver is
connected
• Consult the dealer or an experienced radio/TV technician for help.
Canada – Industry Canada (IC)
This device complies with Industry Canada license-exempt RSS Standard(s). Operation is
subject to the following two conditions:
(1) This device may not cause interference, and (2) this device must accept any interference,
including interference that may cause undesired operation of the device.
Cet appareil est conforme avec Industrie Canada exempts de licence standard RSS (s). Son
fonctionnement est soumis aux deux conditions suivantes:
(1) Cet appareil ne doit pas provoquer d’interférences et (2) cet appareil doit accepter toute
interference, y compris celles pouvant causer un mauvais fonctionnement de l’appereil.
Other manuals for mo.hub
1
Table of contents
Other motogadget Motorcycle Accessories manuals

motogadget
motogadget motoscope pro User manual

motogadget
motogadget m-Unit V.2 User manual

motogadget
motogadget Motoscope Tiny User manual

motogadget
motogadget mo.relay+ User manual

motogadget
motogadget mo.switch pro User manual

motogadget
motogadget motoscope Classic User manual

motogadget
motogadget mo.stop User manual

motogadget
motogadget motoscope mini rally User manual

motogadget
motogadget Chronoclassic 2 User manual

motogadget
motogadget mo.switch basic User manual