8A 8B
ENEN
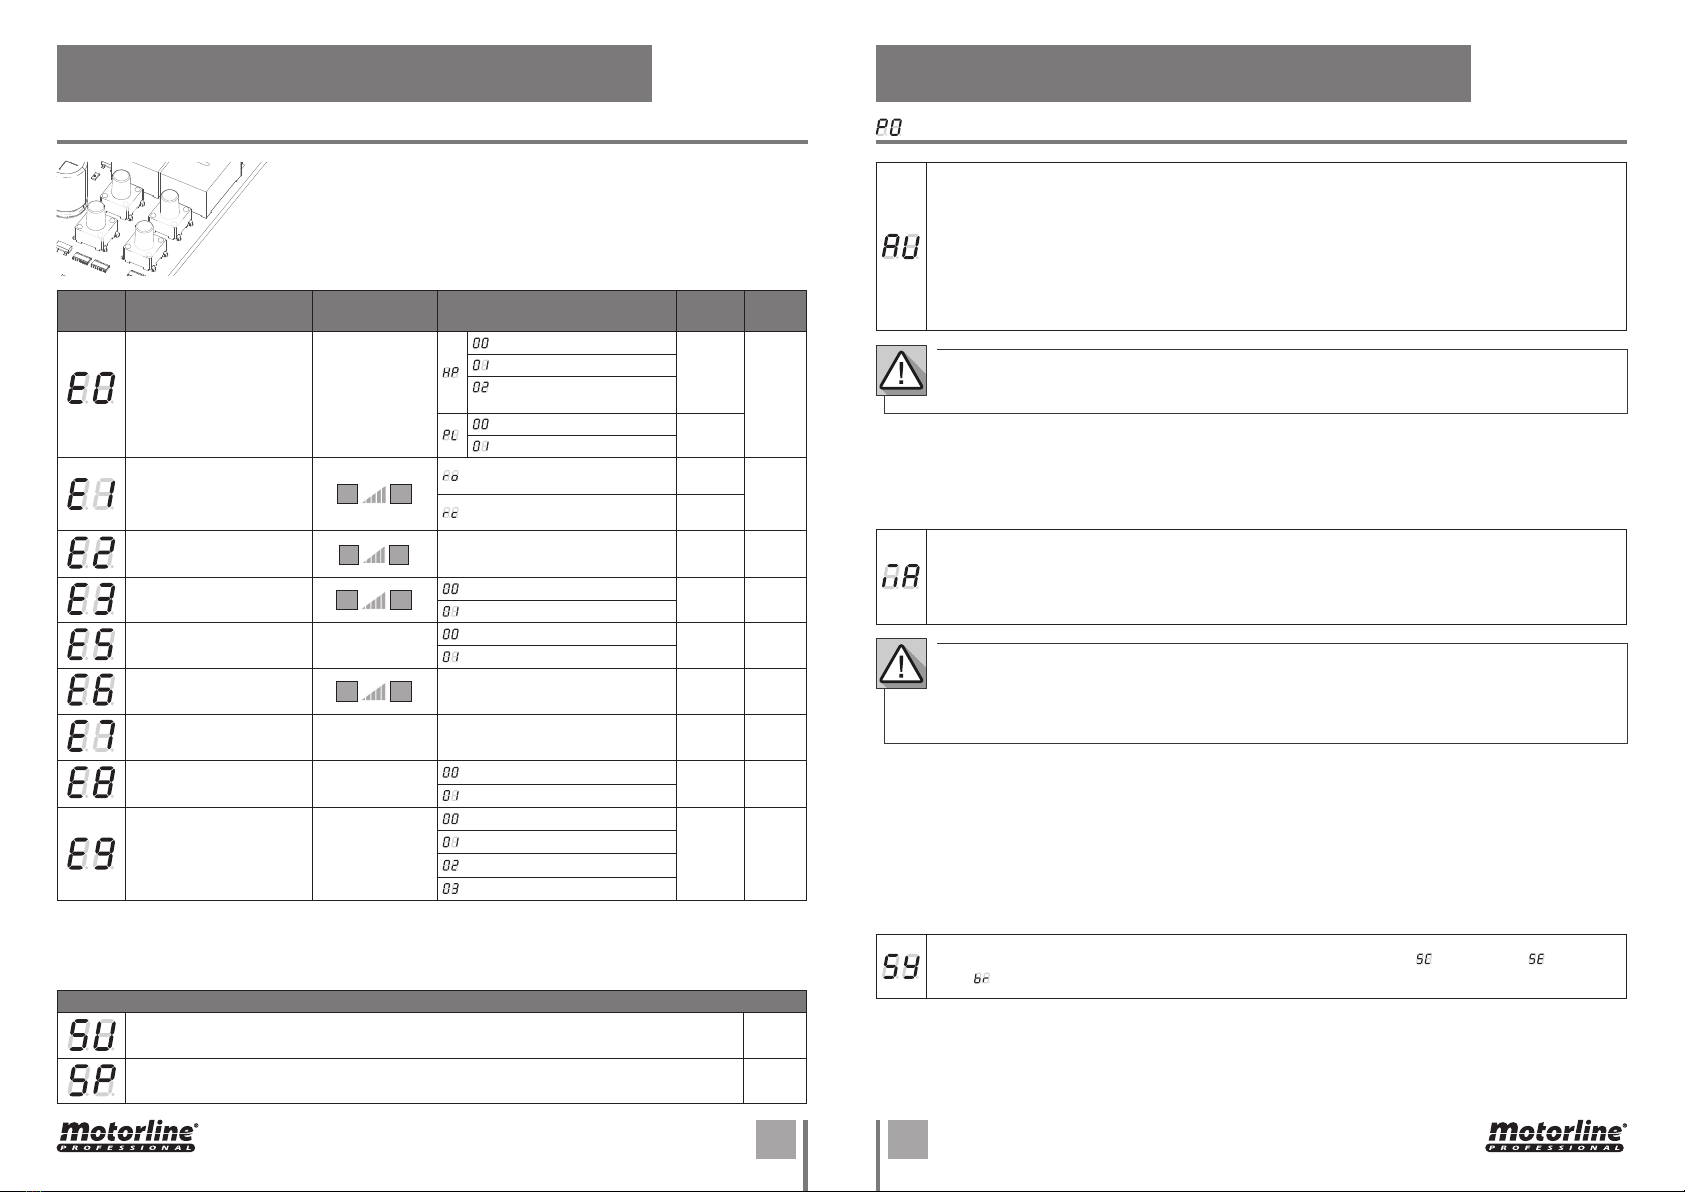
03. PROGRAMMING "P" 03. PROGRAMMING "P"
SETTING STRENGTH AND SENSITIVITY
01 • Press MENU for 3 seconds.
02 • P0 appears. Press ↓ 1 once.
03 • P1 appears. Press MENU for 1 second.
04 • tP appears. Press MENU for 1 second.
05 • dA appears. Press MENU for 1 second.
06 • Appears the time defined from factory. If you want, change the time from 1 to 45 sec. using ↓↑.
07 • Press MENU for 1 second, to save the defined time. dF appears. Press MENU for 1 second.
08 • Appears the time defined from factory. If you want, change the time from 1 to 45 sec. using ↓↑.
09 • Press MENU to save the chosen time. P2 appears. To program P2, continue in step 3 from P2
menu (page 8). To exit the programming press ↓↑ simultaneously.
If you set the sensitivity (FS) to a value over 1, the force (FO) is automatically set to 9 without the
possibility to change it.
Note: If the control board has very high sensitivity values, will show the error LI.
After four attempts, the LI error will turn ER.
You will have to wait 10 seconds to return to program the automatism.
01 • Press MENU for 3 seconds.
02 • P0 appears. Press ↓ twice.
03 • P2 appears. Press MENU for 1 second.
04 • F0 appears. Press MENU for 1 second.
05 • Appears the value defined from factory. If you want, change the value from 1 to 9 using ↓↑.
06 • Press MENU for 1 second, to save the defined value.
07 • FS appears. Press MENU for 1 second.
08 • Appears the value defined from factory. If you want, change the value from 1 to 9 using ↓↑.
09 • Press MENU for 1 second, to save the defined value.
10 • Fd appears. Press MENU for 1 second.
11 • Appears the value defined from factory. If you want, change the value from 1 to 9 using ↓↑.
12 • Press MENU for 1 second, to save the defined value.
13 • P3 appears. To program P3, continue in step 3 from P3 menu (page 9A).
To exit the programming press ↓↑ simultaneously.
01 • Press MENU for 3 seconds.
02 • P0 appears. Press ↓ three times.
03 • P3 appears. Press MENU for 1 seconds.
04 • Appears the time set from factory. If you want, change time between 1 and 99 sec., using ↓↑.
05 • Press MENU to save the defined time.
06 • P4 appears. To program P4, continue in step 3 from P4 menu (page 9B).
To exit the programming press ↓↑ simultaneously.
With this menu you can change the direction of the motor's movement, without change the
connection of the motor wires and limit switches.
• To change the motor's movement direction
• To restore standard motor movement
It allows to define the slowdown time in the opening phase. Factory values
SC: 03; BR: 04; SE: 02
It allows defining the slowdown time in the closing phase. Factory values
SC: 03; BR: 06; SE: 04
When the deceleration is not used, you should adjust the limit switches to be activated
slightly before the intended location. This will ensure that the gate does
not exceed the stopping point due to movement inertia, which could cause it to get stuck.
It allows you to adjust the motor sensitivity
in detecting obstacles. The higher the
sensitivity the less effort is needed to detect
any obstacle and reverse the direction.
If you activate this function,
the force is automatically set
to 9.
To activate the function,
you must make a new
programming of the course.
This will allow the control
board to assume new settings.
Factory values
SC, BR: 00
SE: 04
It allows you to adjust the sensitivity during
the deceleration. Factory values
SC, BR, SE: 00
It allows to regulate the motor's operation force when opening and closing. Factory values
SC, BR, SE: 09
PEDESTRIAN COURSE TIME
It allows the gate to be opened for people to pass through, without it being
fully opened, you can program the time you want the gate to open.
Factory values
SC: 10
BR, SE: 00
For pedestrian mode work, the minimum working time must be 1 second, where 0 disables
the pedestrian mode.
AUTOMATIC AND SEMI-AUTOMATIC COURSE PROGRAMMING
SETTING THE DECELERATION TIME
SETTING STRENGTH AND SENSITIVITY