Motorola solutions VCM-5 User manual


1
Important Safety Instructions
This document contains important safety and operating
instructions and should be read in conjunction with the product
safety information supplied with the mobile or portable radios,
used with the accessories. Read these instructions carefully and
save them for future reference. Installation of communications
equipment should be performed by qualified personnel only.
Before using the accessory, read all the instructions and
cautionary markings on all other items. Seek guidance from
vehicle manufacturer on mounting equipment in vehicles.
Operational Caution
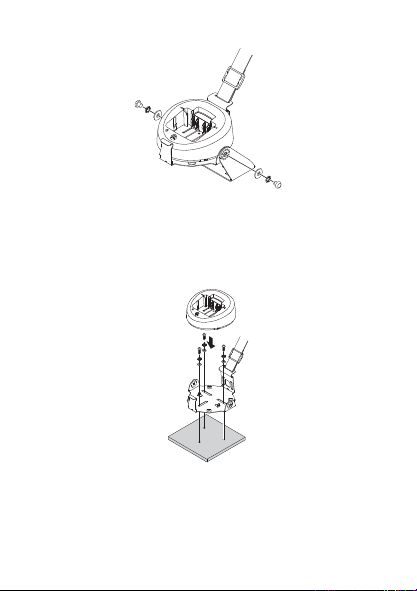
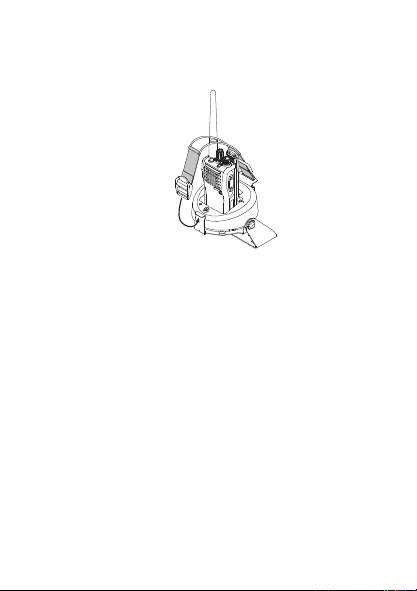
1. To reduce risk of injury, use only Motorola Solutions
approved items with the Vehicle Charger Mounting
Adapter.
2. It is essential to mount the equipment in locations
where it will not cause any injury in the event of a
collision.
3. A vehicle air bag inflates with great force. Do not place
objects, including communications equipment, in the area
over the vehicle air bag or in the air bag deployment area. If
the communication equipment is improperly installed and the
vehicle air bag inflates, this could cause serious injury. If
necessary, contact the vehicle manufacturer for air bag
information specific to the vehicle.
4. Verify that none of the vehicle systems are affected by use of
the portable radio such as cruise control, Anti-lock Braking
System (ABS) braking, traction control, engine management,
direction indicators, lights, and others.
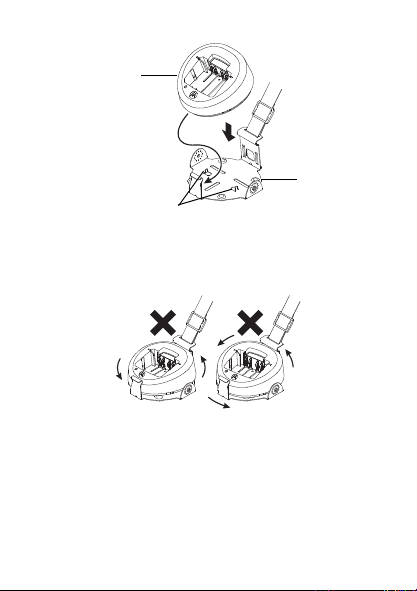
5. Use existing openings through the bulkhead to avoid drilling.
If drilling is necessary, ensure that no damage is incurred to
the vehicle Electronic Control Modules (ECM), fuel pipes,
brake pipes, and/or cable looms.

2
6. Do not transport or store flammable gas, flammable liquids or
explosives in the compartment of your vehicle that contains
your equipment.
7. To avoid possible interference with blasting operations, turn
your radio OFF before entering an area where you may be
close to electrical blasting caps, in a “blasting area” or in
areas posted as “Turn OFF two-way radios”. Obey all signs
and instructions.
Safety and General Information
A properly installed Vehicle Charger Mounting Adapter minimizes
service calls. When mounting the components of the Vehicle
Charger Mounting Adapter, consider the following factors:
• The mounting surface must have sufficient strength to support
the item being mounted to prevent it from becoming loose over
time.
• Do not attach components to any part of the vehicle that is
subject to excessive vibration.
• The proposed location of the item being mounted, wires, or
cables attached, must not interfere with driver or passenger
seating or leg space.
• Use the supplied mounting hardware.
• Ensure that the cables are not stretched, and not subject to
heat from the engine, transmission housing, or heating ducts.
• Crimp or tie together all the wires using a cable tie to keep tidy.
• Ensure that screws are securely fastened on all connectors.
• Do not run cables over sharp edges that may cause excessive
wear or chaffing of the cable insulation.
• Do not install components in locations where they may cause
interference to the operation of the vehicle's controls.
• Always remove the antenna before charging the radio. The
radio may not charge properly if the antenna is attached to the
radio.
• The E-DC-32 Cigarette Lighter Adapter is designed for
charging only when the radio is not in operation. Always turn
the radio off when charging the battery.

3
On some vehicles, it is necessary to penetrate the bulkhead to
reach the battery. Ensure that there is cable clearance on the
opposite side of the bulkhead and that the vehicle ECM are not
installed on the opposite side of the bulkhead before drilling
commences. Protect the cable where it passes through the
bulkhead by using a grommet or similar protective measures.
Introduction
The VCM-5 Vehicle Charger Mounting Adapter is a Mobile
Mounting Bracket designed to match the CD-58 Desktop
Charger. The VCM-5 includes the E-DC-32 Cigarette Lighter
Adapter.
Supplied Items
Before installing the Mounting Adapter, confirm all parts are
present.
• VCM-5 bracket to install CD-58 Desktop Charger: 1 piece
• Bracket “A” for mounting in the vehicle: 1 piece
• Cloth Band Assembly to fix the radio (including Adjusters): 1
piece
• Screw Kit to mount VCM-5 bracket to Bracket “A” (screws,
toothed washers, and plain washers): 2 pieces for each
• Hexagon Wrench: 1 piece
• Cigarette Lighter Adapter E-DC-32: 1 piece
Installation
1. Place Bracket “A” at a suitable position for mounting. Ensure
that there is sufficient clearance for the VCM-5 bracket. Drill
holes compatible with the mounting hardware you have
selected. For best results, Motorola Solutions recommend
hardware of #8 (M4) screw.
Note: As each mounting situation is different, mounting hardware
is not supplied with this kit.
2. Secure Bracket “A” with your selected screws and washers.

4
Figure 1: Installing Bracket “A”
3. Install the Cloth Band and flat-shaped Adjuster to the VCM-5
bracket.
Figure 2: Installing Cloth Band and Flat-Shaped Adjuster
4. Insert the front section of the CD-58 Desktop Charger into the
VCM-5 bracket until it locks in place with a click. Ensure that
the small protrusions of the VCM-5 bracket is fixed correctly
into the holes which are located at the bottom of the CD-58
Desktop Charger.
Bracket “A”
Cloth Band
Flat-Shaped
Adjuster
VCM-5
Bracket

5
Figure 3: Inserting CD-58 Desktop Charger into VCM-5 Bracket
Note: The CD-58 Desktop Charger must not be inclined and/or
rotated.
Figure 4: CD-58 Inclined and Rotated
5. Use the Hexagon Wrench to mount the VCM-5 bracket to
Bracket “A” with the screws and washers.
CD-58 Desktop
Charger
VCM-5
Bracket
Protrusions
Inclined Rotated

6
Figure 5: Mounting VCM-5 Bracket to Bracket “A”
Note: Adjust the angle of the Charger Stand to a convenient and
accessible position.
You can also secure the Charger Stand with Bracket “A”
directly to the vehicle.
Figure 6: Securing Charger Stand with Bracket “A” to Vehicle

7
6. Insert the DC plug from the E-DC-32 Cigarette Lighter
Adapter into the DC jack at the rear panel of the CD-58
Desktop Charger. Route and secure the E-DC-32 Cigarette
Lighter Adapter cable in the vehicle, then plug the E-DC-32
Cigarette Lighter Adapter into the cigarette lighter jack of the
vehicle. Insert the radio into the CD-58 Desktop Charger.
Figure 7: Connecting E-DC-32 Cigarette Lighter Adapter to CD-
58 Desktop Charger
7. Install the Adjuster to the Cloth Band.
Figure 8: Installing Adjuster to Cloth Band
E-DC-32 Cigarette
Lighter Adapter
Adjuster
Cloth Band

8
8. Hook the Adjuster to the hook of the VCM-5 bracket. Ensure
that the ring section of the Cloth Band goes over the Channel
knob of the radio.
Figure 9: Hooking Adjuster to VCM-5 Bracket
9. Adjust the Cloth Band so that the ring section is on top and at
the center of the radio. Secure the radio by tightening the end
of the Cloth Band with the Adjuster while pulling the Cloth
Band downward, so that the radio does not become loose
from vibration.
Note: Do not secure the Cloth Band too tightly, as it can damage
the radio.
Hook

9
Figure 10: Securing Cloth Band Over the Radio
Adjust
Adjust

10
Notes

11
Notes

12
© 2017 and 2021 Motorola Solutions, Inc. All rights reserved.
MOTOROLA, MOTO, MOTOROLA SOLUTIONS and the Stylized M
logo are trademarks or registered trademarks of Motorola Trademark
Holdings, LLC and are used under license. All other trademarks are
the property of their respective owners.

1
Важливі правила техніки безпеки
Цей документ містить важливі інструкції щодо техніки безпеки
й експлуатації. Його слід читати разом із відомостями щодо
безпеки, які надаються з мобільними й портативними
радіостанціями, що використовуються з приладдям. Уважно
прочитайте ці інструкції та збережіть їх для подальшого
використання. Установлювати обладнання для радіозв’язку
дозволено тільки персоналу з належною кваліфікацією.
Перед використанням приладдя ознайомтеся з усіма
інструкціями й попереджувальним маркуванням на всіх інших
виробах. Ознайомтеся зі вказівками виробника
транспортного засобу щодо встановлення обладнання.
Застереження щодо експлуатації
1. Задля зменшення ризику травмування
використовуйте з монтажним адаптером
автомобільного зарядного пристрою тільки
вироби, схвалені компанією Motorola Solutions.
2. Обладнання необхідно встановлювати таким чином,
щоб у разі зіткнення воно не завдало травм.
3. Подушка безпеки транспортного засобу виштовхується з
дуже великою силою. Не розміщуйте предмети, зокрема
обладнання для радіозв’язку, у зоні над подушкою безпеки
або в зоні її розкриття. Якщо обладнання для радіозв’язку
встановлено неправильно, воно може завдати серйозних
травм під час розкриття подушки безпеки транспортного
засобу. За потреби інформацію щодо подушки безпеки можна
дізнатися у виробника відповідного транспортного засобу.
4. Упевніться, що використання переносної радіостанції не
перешкоджає роботі систем транспортного засобу на
кшталт круїз-контролю, антиблокувальної гальмівної
системи, антибуксувальної системи, системи керування
двигуном, індикаторів повороту, ліхтарів тощо.
5. Використовуйте існуючі отвори в перегородці, щоб уникнути
свердління нових отворів. Якщо необхідно просвердлити
новий отвір, упевніться, що це не призведе до пошкодження
електронних модулів керування, бензопроводів, гальмівних
трубок чи оболонки кабелів транспортного засобу.
Увага!

2
6. Не перевозьте й не зберігайте легкозаймисті рідини, гази
чи вибухонебезпечні речовини та обладнання в одному
відсіку транспортного засобу.
7. Щоб не утворити перешкод під час виконання вибухових
робіт, ВИМИКАЙТЕ радіостанцію, перш ніж наближатися
до електродетонаторів, місць проведення вибухових робіт
або місць з оголошеннями про необхідність вимкнення
пристроїв двостороннього радіозв’язку. Дотримуйтеся
всіх прямих інструкцій і вказівок на графічних знаках.
Інформація щодо техніки безпеки й загальні відомості
Належне встановлення монтажного адаптера автомобільного
зарядного пристрою дає змогу уникнути зайвого обслуговування. Під
час установлення компонентів монтажного адаптера автомобільного
зарядного пристрою зважайте на вказані нижче аспекти.
• Монтажна поверхня має бути достатньо міцною, щоб
утримати виріб і запобігти його розхитуванню внаслідок зносу.
• Не прикріплюйте компоненти до будь-яких деталей
автомобіля, що піддаються надмірній вібрації.
• Місце встановлення виробу, його проводи й кабелі не повинні
перетинатись із сидінням чи нішею для ніг водія або пасажира.
• Використовуйте кріпильні елементи, які входять до комплектації.
• Упевніться, що кабелі не розтягнуті, а також що вони не
нагріватимуться від двигуна, картера коробки передач чи
каналів системи кондиціонування.
• Скріпіть усі проводи за допомогою хомута, щоб зберегти
порядок їх розташування.
• Упевніться, що всі гвинти в з’єднаннях надійно затягнуті.
• Не прокладайте кабелі через гострі краї, оскільки це може
призвести до надмірного зносу чи пошкодження ізоляції кабелю.
• Не встановлюйте компоненти в місцях, де вони можуть
перешкоджати використанню елементів керування
транспортним засобом.
• Перед заряджанням радіостанції обов’язково знімайте
антену. Радіостанція не заряджатиметься належним
чином, якщо до неї прикріплено антену.
• Конструкція адаптера прикурювача E-DC-32 передбачає
заряджання лише вимкненої радіостанції. Перш ніж
заряджати акумулятор, обов’язково вимкніть радіостанцію.

3
У деяких транспортних засобів для отримання доступу до
акумулятора необхідно зробити отвір у перегородці. Перш ніж
просвердлювати отвори, упевніться, що з протилежного боку
перегородки достатньо місця для кабелю та що там не
встановлено електронні блоки керування транспортного
засобу. Захистіть частину кабелю, яка перетинається з
перегородкою, за допомогою люверса або схожого засобу.
Вступ
Монтажний адаптер автомобільного зарядного пристрою VCM-5 —
це мобільний монтажний кронштейн, розроблений для використання
з настільним зарядним пристроєм CD-58. До комплектації VCM-5
також входить адаптер прикурювача E-DC-32.
Комплектація
Перед установленням монтажного адаптера впевніться в
наявності всіх наведених нижче деталей.
• Кронштейн VCM-5 для встановлення настільного
зарядного пристрою CD-58: 1 шт.
• Кронштейн A для встановлення в автомобілі: 1 шт.
• Тканинний ремінець для кріплення радіостанції
(з регуляторами): 1 шт.
• Комплект гвинтів для встановлення кронштейна VCM-5 на
кронштейн A (гвинти, зубчасті шайби, пласкі шайби): по 2 шт.
• Шестигранний ключ: 1 шт.
• Адаптер прикурювача E-DC-32: 1 шт.
Установлення
1. Розмістіть кронштейн A у місці, що підходить для
встановлення. Упевніться, що для встановлення
кронштейна VCM-5 є достатньо вільного простору.
Просвердліть отвори відповідно до характеристик
вибраних кріпильних елементів. Для найкращого
результату компанія Motorola Solutions рекомендує
використовувати гвинт № 8 (M4).
Примітка. Оскільки умови встановлення різняться, кріпильні
елементи не входять до комплектації.

4
2. Закріпіть кронштейн A вибраними гвинтами із шайбами.
Рис. 1: Установлення кронштейна A
3. Установіть тканинний ремінець і плаский регулятор на
кронштейн VCM-5.
Рис. 2: Установлення тканинного ремінця та плаского
регулятора
4. Вставляйте передню секцію настільного зарядного
пристрою CD-58 в кронштейн VCM-5, доки не почуєте
клацання, що свідчить про успішну фіксацію. Упевніться,
що невеликі виступи кронштейна VCM-5 належним чином
закріплені в отворах у нижній частині настільного
зарядного пристрою CD-58.
Кронштейн A
Тканинний
ремінець
Плаский
регулятор
Кронштейн
VCM-5

5
Рис. 3: Установлення настільного зарядного пристрою CD-58
у кронштейн VCM-5
Примітка. Настільний зарядний пристрій CD-58 необхідно
встановлювати прямо, без нахилу чи повороту.
Рис. 4: CD-58 нахилено або повернуто
5. Використовуйте шестигранний ключ, щоб закріпити
кронштейн VCM-5 на кронштейні A за допомогою гвинтів і
шайб.
Настільний
зарядний
пристрій CD-58
Кронштейн
VCM-5
Виступи
Нахил Поворот

6
Рис. 5: Установлення кронштейна VCM-5 на кронштейні A
Примітка. Відрегулюйте нахил підставки зарядного пристрою
для забезпечення надійного кріплення й зручного
використання.
Зауважте, що підставку зарядного пристрою можна
закріпити безпосередньо на транспортному засобі
за допомогою кронштейна A.
Рис. 6: Закріплення підставки зарядного пристрою на
транспортному засобі за допомогою кронштейна A
Table of contents
Languages:
Other Motorola solutions Automobile Accessories manuals