MotoSAT Nomad 2 User manual

Rev. 08.29.07

2
Personal Information Page
Installing Dealer Name _______________________________________
Date of Installation _______ _______ _______
Day Month Year
Type of System Executive ___ MD 00 ___ MD1000.2 ___
MHDTV ___ MD Slim ___ MSD60 ___
Freedom (not recommended)______
Serial Number of Controller ______________________
Comments:
___________________________________________________________________________
_________________________________________________________________________________
_________________________________________________________________________________
_________________________________________________________________________________
_________________________________________________________________________________
_________________________________________________________________________________
_________________________________________________________________________________
_________________________________________________________________________________
_________________________________________________________________________________

3
Table of Content: Page
Nomad 2 Controller Bill of Materials ...........................................................4
Nomad 2 Specifications ................................................................................4
Using the Nomad 2 Universal Controller
First Time Installation ..................................................................................
Test Dish Functions ......................................................................................
Explanation Display Options
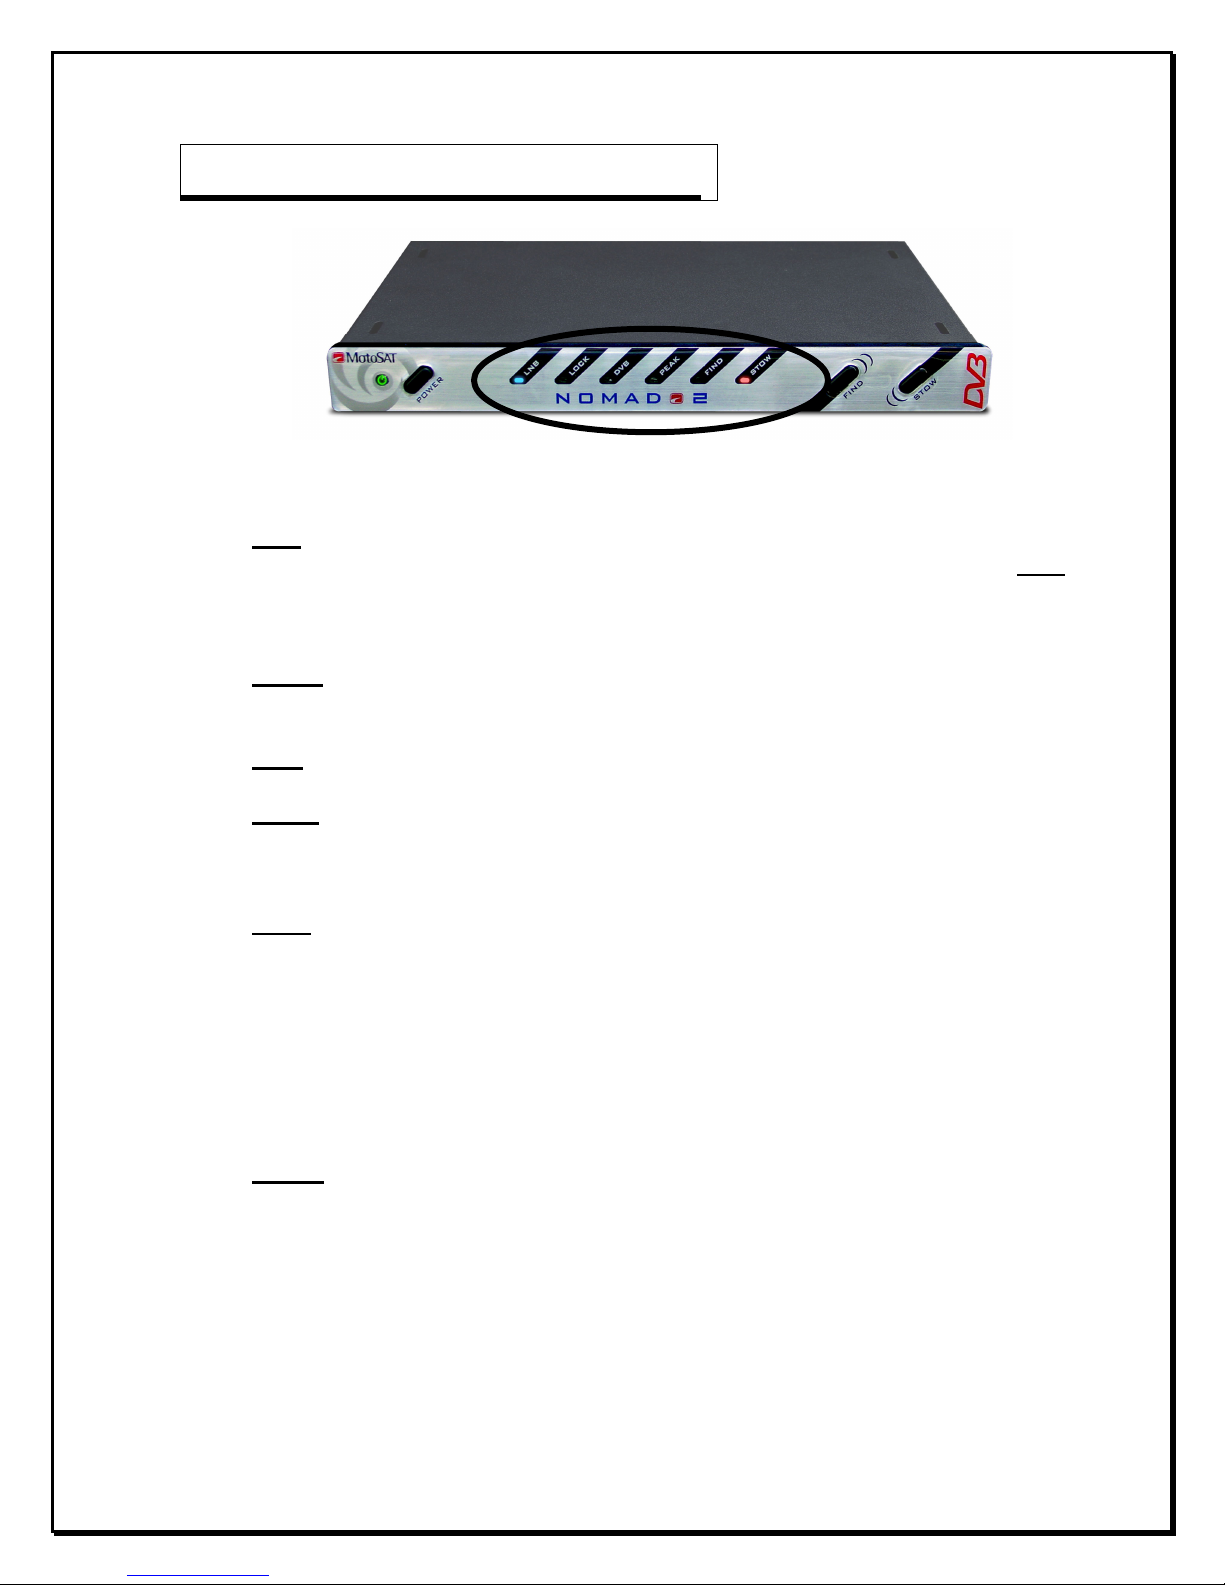
Front Panel ...................................................................................................6
Dish Services and their Assigned Satellites ..................................................6
Front Panel LED’s ........................................................................................7
Explanation Nomad 2 Hardware
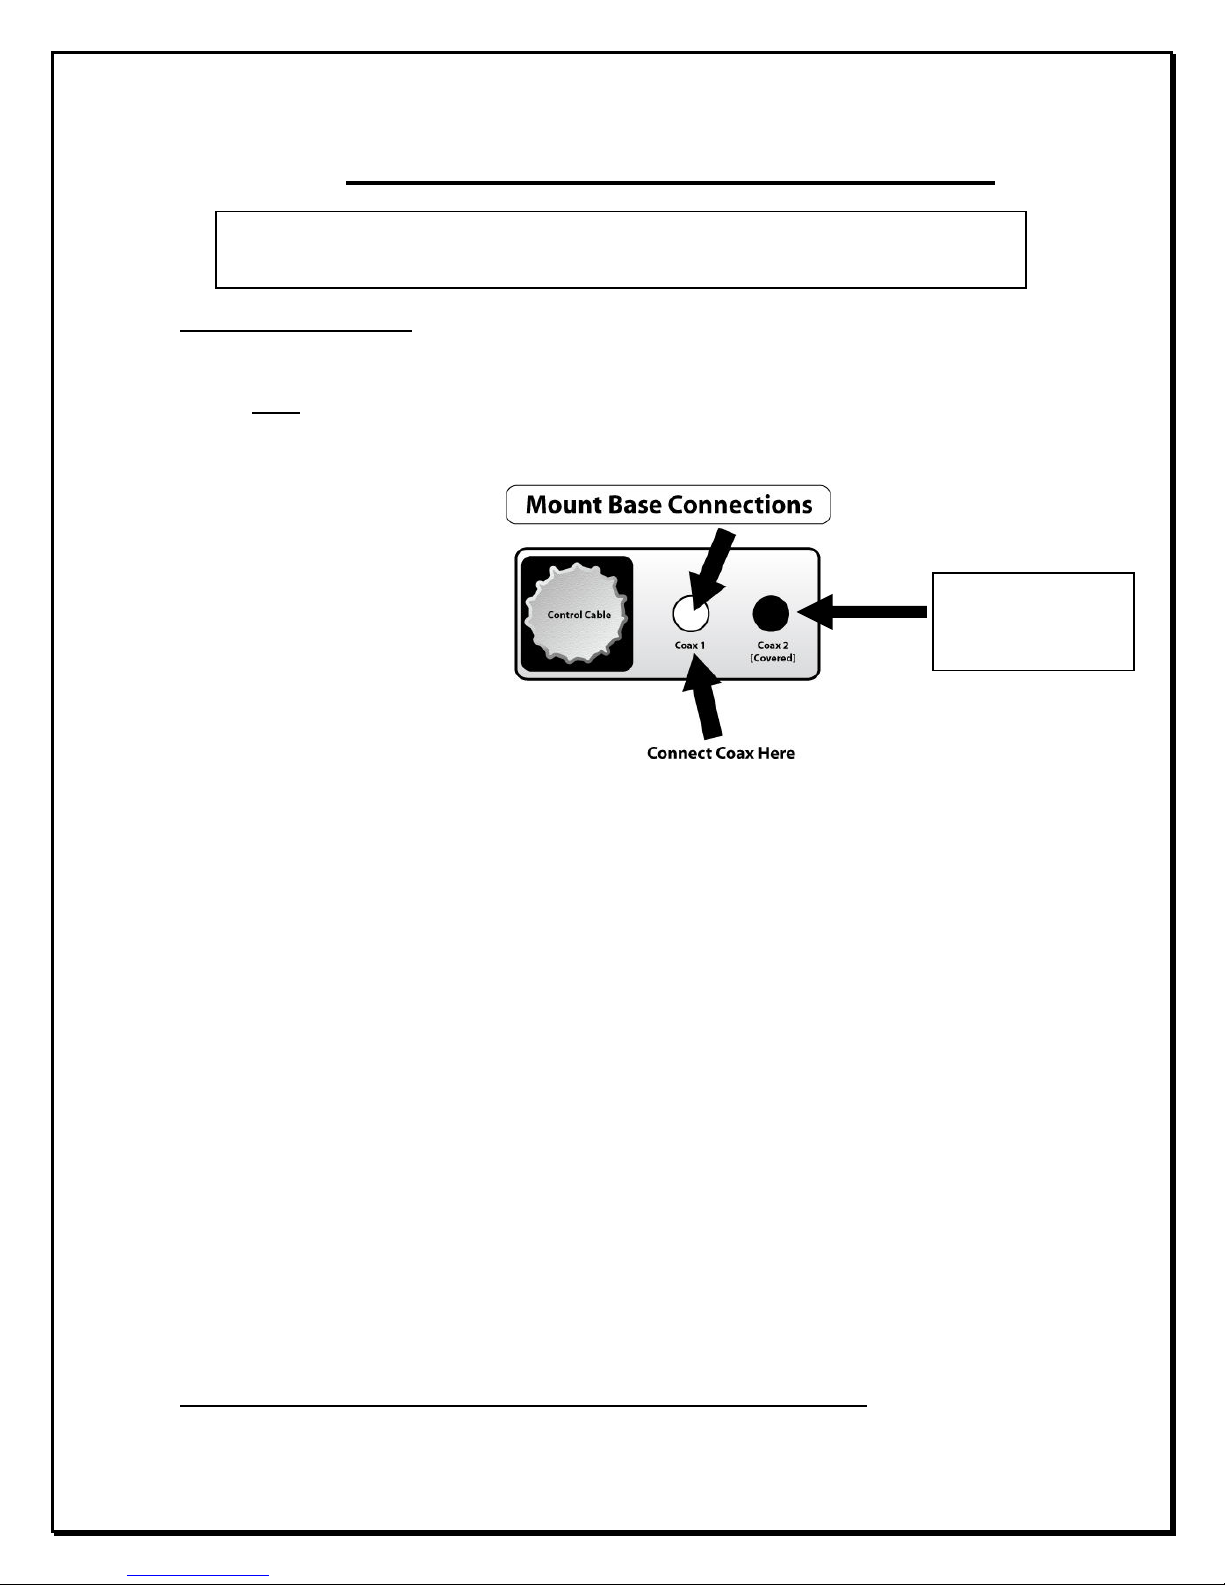
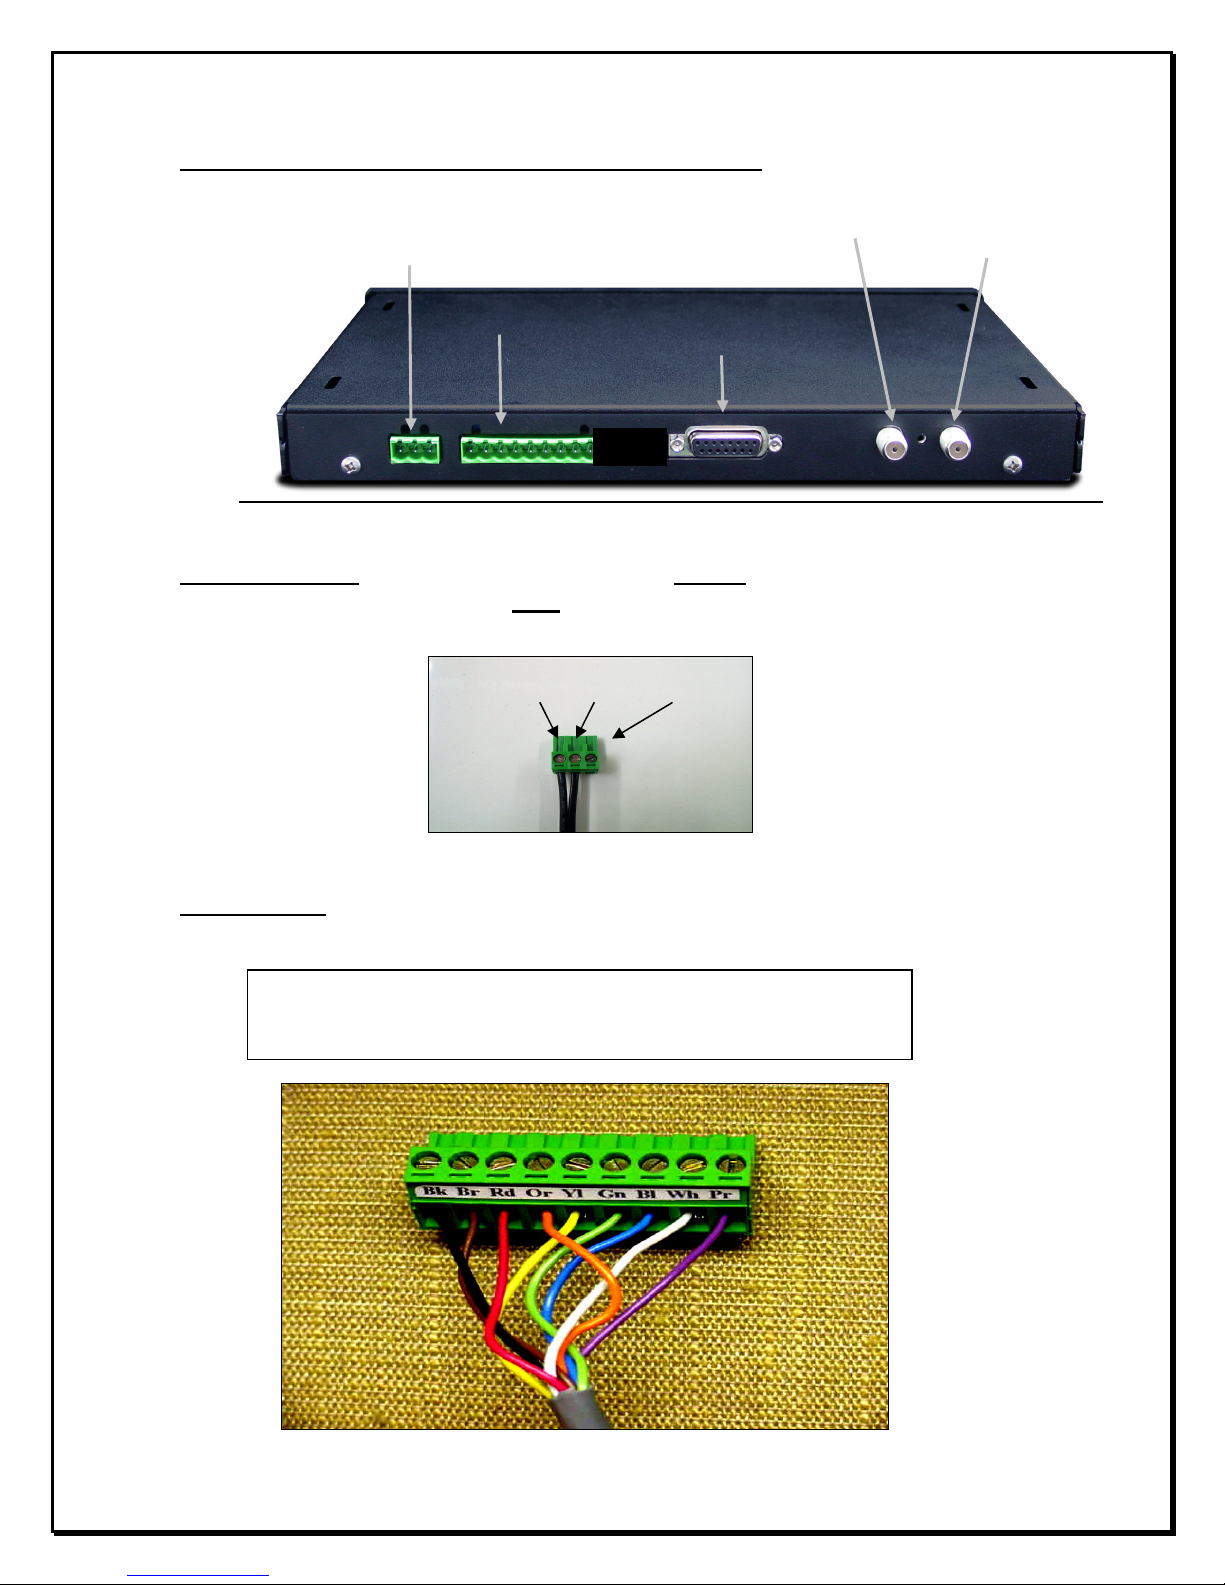
Rear Panel ....................................................................................................8
Control Cable Wiring Diagram ...................................................................8
Operation Procedures ..................................................................................10
Nomad 2 Visual Setup Diagram ..................................................................11
Products Used with the Nomad 2 ................................................................12
Wiring Configuration ................................................................................. 13
Programming, Service, and Satellite Selection ...........................................1
MD1000.2 Limited Coverage ……………………………………………..16
Clearance Diagram ......................................................................................17
Nomad 2 Quick Guide .................................................................................18
Trouble Shooting and Error Codes ..............................................................19
Technical Support Information ....................................................................19
.
Special Notes
Sto ing Your Dish ......................................................................................20
Dish Net ork Receivers ..............................................................................20
Software Upgrade Procedures……………………………………………..21
Warranty.......................................................................................................Insert

4
NOMAD 2 Universal Controller Bill of Materials:
The NOMAD 2 Universal Controller Systems (when shipped with a mount of choice) is shipped with
the following components:
Components shipped with NOMAD 2 Controller:
- NOMAD 2 Universal Controller
- 12 VDC 4 AMP Power Supply
- NOMAD 2 Universal Controller User Manual
Components shipped with your MOUNT of choice:
- 30’ Control Cable
- 30’ Coax Cable
NOMAD 2 Universal Controller S ecifications:
- 11” Wide
- 7. ” Deep
- 1.2 0” Height
- 2.7 lbs. Weight
- Voltage Requirements: 12VDC 4 AMP power supply (supplied)

Using the NOMAD 2 Universal Controller
First Time Installation:
1- Plug in all necessary cable connections to the back of the NOMAD 2 (see diagram on pg. 8).
Note: Plugging the receiver and NOMAD 2 controller into an independent power strip is
recommended.
2- Connect coax from NOMAD 2 to Mount.
(Labeled “To Nomad 2)
2- Set the Nomad 2 to the proper satellite mode (the programming service that you are using) by
using the Quick Guide for DirecTV, Dish Network, Etc. You will also need to know whether
or not your unit is a non-skewable unit [Executive18” or 24”], or a skewable unit [MD 00,
MHDTV].
3- To get into the “Program Mode”…..
a. Turn the Nomad power “OFF”
b. Hold both the ‘Find’ and ‘Stow’ buttons down and hit the Power Button “ON”
c. Continue to hold ‘Find’ and ‘Stow’ button down for an additional seconds after
releasing the Power button
d. Release the ‘Find’ and ‘Stow’ buttons. At this point and the front display lights will
show the current satellite mode of the unit (Note: No Lights indicate “Dish Network
Non-Skewable mode.”
e. Use the ‘Find’ and ‘Stow’ buttons to cycle through the light patterns until the desired
configuration is shown.
f. Turn the ‘Power’ off to store the programmed settings [See age 14 Satellite Mode
Guide and age 17 Quick Guide for configurations and more detailed
instructions]
4- To run the “MANDATORY” Test Dish function, hit the power button, wait 10 seconds for
the Nomad to finish the startup sequence then, press the ‘Find’ and ‘Stow’ buttons simultaneously.
This procedure must be performed follo ing any configuration change.
●
Dish Pro
Series R
eceiver
(s)
(300,500,800)
are
a
required
com onent
when using the Model MD500.
IMPORTANT!!
Second Satellite
Receiver
connection

6
BUTTONS:
NOMAD 2 UNIVERSAL CONTROLLER “FRONT” PANEL
POWER: (Provides ower to the Nomad 2 Controller)
FIND
: (Find Satellite)
Pressing the Find button will begin the dish “search” to locate and lock onto the
“main” satellite.
For non-skewable single LNB dishes pressing the Find button, while on satellite
enables you to switch between multiple satellites. Pressing the find button, while
locked onto a satellite, will go to the next satellite in order such as:
• DIRECTV will toggle between 101 and 119.
• Dish Network will toggle between satellites 110 and 119.
• Dish Network International East will toggle between satellites 61. , 110, and
119.
• Dish Network International West will toggle between satellites 110, 119 and
148
• Dish Network High Definition will toggle between satellites 110, 119 and 129
(Note: You must have a High Definition receiver to receive the High
Definition signals)
• Bell ExpressVu will toggle between satellites 82 and 91.
STOW:
(Stowing the Dish)
Pressing this button returns the dish to its stowed or travel position.
Programming Services and their Assigned Satellites
1. Dish Network – Can use satellite(s) 110 & 119 [also 61. and 148]
2. DIRECTV – Can use satellite(s) 101, 110 and 119 (110 takes a
special LNB which is included with the Skewable MHDTV
System)
3. Bell ExpressVu – Can use satellite(s) 82 & 91

7
FRONT PANEL LED’S:
LNB: When lit, this LED indicates the coax cable from the receiver has been correctly
connected to the NOMAD 2 Universal Controller, and the receiver has power. (Note: The
LNB LED is illuminated once the coax cable of the receiver
has been connected, but does NOT indicate the Controller has power).
LOCK: When lit, this LED indicates the “strongest” or “highest” signal strength of the
satellite has been achieved and is locked onto the desired satellite.
DVB: When lit, indicates that the DVB is powered up and ready to identify satellites.
PEAK: When lit, this LED indicates the dish has found a signal and is adjusting for the
“strongest” or “highest” signal strength of the satellite. It will turn off after satellite lock has
been achieved.
FIND: When the “Find” button has been pressed, the Find LED will blink (indicating that the
dish is moving) until a satellite has been found and identified and can establish a connection.
Once the satellite has been identified, the Find LED will remain solid. (The Stow LED also
blinks indicating motor movement.) If the Nomad 2 is locked onto a satellite with a skewable
dish, pressing the “Find” button again will activate a re-peak routine which will verify the
dish alignment to the satellite for optimum signal level for the skewable dishes, the MD 00
(for Dish Network) and the MHDTV (for DirecTV). Pressing the Find button on non-
skewable dishes (Executive 18” and 24”) allows you to toggle between satellites.
STOW: When the “Stow” button is pressed, the Stow LED will blink indicating motor
movement as the dish is being stowed. Once the dish has been stowed, the Stow LED will
remain solid for a short period of time and then the power will automatically turn off.

8
NOMAD 2 UNIVERSAL CONTROLLER REAR VIEW
Power Connector: Is used to connect the 12 VDC 4 AMP power supply to provide power to the
NOMAD 2 Universal Controller. (Note: Only use the power supply provided by MotoSAT.)
Control Cable: Connects the mount by way of a 9 pin conductor cable to the NOMAD 2 Universal
Controller. The cable is color coordinated for exact connection configuration. (See Figure Below)
Wiring to 9 Pin Control Connector
Black-Brown-Red-Orange-Yellow-Green-Blue-White-Purple
(Purple is only used on Skewable Mounts, and not required on Non-Skewable Mounts)
Power Connector
Control Cable
Maintenance Port
To Satellite Receiver
Satellite In
From Dish
P1 P2 P3
+12V -GND Unused

9
Maintenance Port: Used to provide software upgrades.
Satellite in (on Receiver): Coax connection used to connect the NOMAD 2 Universal Controller to
the satellite/LNB connection on the satellite receiver.
From Dish: Coax connection from the dish to the NOMAD 2 Universal Controller.

10
OPERATION PROCEDURES
TO FIND A SATELLITE
If the Mount Ty e is
SKEWABLE
(Models MD500, MHDTV and Star Choice)
1. Turn ON power.
2. After -10 seconds (after Nomad power up sequencing) press the FIND button.
The dish will search out and lock onto the ro er rogrammed satellite.
3. To initiate a REPEAK – kewable Mounts ONLY - Pressing the Find button, when the
signal strength shows weakness, will re-peak the dish for a higher signal quality when
using the twin LNB skewable dish model(s) MD 00 or triple LNB MDHDTV ONLY.
(Note: Single LNB, non-skewable dishes “re-peak” during satellite transition or
acquisition.)
If the Mount Ty e is
NON-SKEWABLE
(Executive (One LNB))
1. Turn ON power.
2. After -10 seconds (after Nomad power up sequencing) press the FIND button.
The dish will search out and lock onto the ro er rogrammed satellite.
3. Pressing the FIND button while on satellite will initiate a ‘FIND NEXT SATELLITE’
routine.
TO STOW THE DISH
1. Press the STOW button and the dish will stow, or return, to the proper travel position.
After the dish has been ro erly stowed, the ower will
automatically turn OFF.

11
NOMAD 2 VISUAL SETUP DIAGRAM
Satellite Mode Guide: Configuration
TROUBLESHOOTING
All “O en Face” Stowable Systems

12

13
WIRING TABLE
O en Face TV Mounts
The Control Cable, 9 conductors, colored coded, 22Awg stranded that connects to the mount with a
twist lock connector is configured in the following manner:
Color Code Pin Designation Mount
Destination
Counts
er Degree
Black 1
Motor, Azimuth Positive
*Brown 2
Motor, Azimuth/Skew
Negative
*Red 3
Motor, Elevation/Skew
Positive
Orange 4
Motor, Elevation
Negative
Yellow
Sensor, Count Azimuth
3.408
Green 6
Sensor, Ground
Azimuth/Elevation
Blue 7
Sensor Count Elevation
.034
White 8
Power, Mount LED
**Purple 9 Sensor, Count Skew 8. 00
* The Brown and Red wire perform a dual function when used on a Skewable
(MD 00/MD1000/MHDTV/Star Choice) mounts. These wires control the Skew motors when
directed by the Nomad 2 Controller. Applying 12 volt power directly to these wires will skew the
dish.
**The Purple cable is for use on skewable dishes but it WILL NOT effect the operations of a non-
skewable dish when it is connected (or not connected).
The Mount is coil wrapped inside with the following cables and wire:
2 ea RG179 Teflon coated coax cables (can do four (4) if required)
1 ea Control Cable, 9 conductor cable, colored coded, 22Awg stranded. This cable is molded
with a twist lock connector on one end and manually terminated at the Nomad 2 end
with a 9 pin connector.
2 or 4 ea RG179 coax cables terminate at the LNB will provide additional cabling for multiple
receivers.
1 ea Black and White 22Awg stranded wires carry the positive (white) voltage and ground
(black) to the LED which is used to illuminate the dish face.
For any questions or comments please contact our
Technical Su ort De artment at 1-800-247-7486 Ext 338.

14
To get into the “Program Mode”…..
1. Turn the Nomad power “OFF”
2. Hold both the ‘Find’ and ‘Stow’ buttons down and hit the Power
Button “ON”
3. Continue to hold ‘Find’ and ‘Stow’ button down for an additional
seconds after releasing the Power button
4. Release the ‘Find’ and ‘Stow’ buttons at this point and the front
display lights will show the current satellite mode of the unit (Note:
No Lights indicate “Dish Network Non-Skewable mode.”
. Use the ‘Find’ and ‘Stow’ buttons to cycle through the light (LED)
patterns until the desired configuration is shown.
6. Turn the ‘Power’ off to store the programmed settings.
7. When you turn “Power” back on, you can do a Test Dish or “Find”
satellite.
Programming Modes

1
NOMAD 2 PROGRAMMING MODES
By Service
For software version V25 or hi her
MODEL NUMBER Skewable Orbital Position
Multi
Sat Nomad 2 LED(s)
DIRECTV
Executive 18"/24" NO 101° Only NO FIND
Executive 18"/24" NO 101° or 119° NO PEAK / FIND
HDTV YES 101° / 110° / 119° YES FIND / STOW
DISH NETWORK
Executive 18"/24" NO 119° or 110° NO NO LIGHTS
Executive 18"/24" NO 119° or 110° or 61.5° NO DVB / PEAK/ FIND
Executive 18"/24" NO 119° or 110° or 129° NO LOCK / FIND
Executive 18"/24" NO 119° or 110° or 148° NO LOCK
D500 YES 119° / 110° YES STOW
D1000.2 YES 119° / 110° / 129° YES LOCK / STOW
BELL EXPRESSVU
Executive 18"/24" NO 82° or 91° NO PEAK
D500 YES 82° / 91° YES PEAK / STOW
STAR CHOICE
SC60 YES 107.3° / 111.1° YES PEAK / FIND / STOW
SHOW MODE (for display purposes)
SKEWABLE YES Continuous otion N/A DVB / FIND / STOW
NON-SKEWABLE NO Continuous otion N/A DVB / PEAK
Note: The FREEDO (fixed dome) will function with the Nomad 2. It is not recommended.
It may be programmed as a NON-SKEWABLE system for any of the above
NON-SKEWABLE configurations. At the push of the SATELLITE Button it will
toggle sequentially though the satellites for which it is programmed.
Nomad 2 Program LED’s.

16
NOTE: The MD1000.2 has 2 limitations that can affect its o eration.
1. The MD1000.2 has the same limitations that exist with the Dish Network
D1000.2 home coverage. Coverage is limited due to the footprint of the satellite signal
on the 129◦ High Definition Satellite. You will be able to receive programming on the
other two (2) satellites (110◦ and 119◦) when in the shaded areas but may have limited
or no coverage of the 129◦ satellite. This limited coverage may extend past the shaded
areas but is known to be a problem within the shaded areas. Please call Dish Network
(888-248-7116) for any additional information.
2. The size of the dish makes wind loading a factor. While under most
circumstances you will not be affected but when winds reach an excess of 2 MPH
(depending upon the direction of the wind) you could experience the mount being
moved off the satellite. If this should happen, simply press the “FIND” button and the
system will re-peak for signal strength or re-find as required.

17
CLEARANCE DIAGRAMS

18
First Time Setu
We have introduced an exciting new product, the Nomad 2. It has incorporated all the features that you
(the dealer and consumer) have asked for. We are excited about it and know that you will be also. To help you
become familiar with the programming, and to assist you in the first turn on, we are offering this Quick Guide
to programming.
After all connections are made please take the time to read through this guide once and then
follow each step as outlined:
TO PROGRAM
Step 1:
Make sure your Nomad 2 is turned OFF:
Note: The Nomad 2 is OFF when the green light next to the power button is not lit.
Step 2:
Locate the FIND, STOW and POWER buttons on the Nomad 2:
Read the follo ing steps carefully before beginning –
• With your right hand Press and hold down together the FIND and STOW
buttons, while continuing to hold…..
• Use your left hand to Press the POWER button once and release
• Your right hand will continue holding down the FIND and STOW buttons for
an additional -7 seconds.
This will put the Nomad 2 into a Program Mode.
Step 3:
Refer to the diagram on page 1 in the Nomad 2 Manual to determine what Program Mode
settings you will need for the type of MotoSAT system you have:
Use the FIND or STOW button to navigate through the different settings on the front
LED panel of the Nomad 2.
When the light configuration on the Nomad 2 matches the selected diagram on the
page 14, press the POWER button once to turn off the Nomad 2.
This will store the configuration that you have set.
Step 4:
Turn on the Nomad 2 by pressing the POWER button. Wait -7 seconds for the Nomad 2 to
perform startup sequences.
TO TEST DISH
Step :
Complete a “Test Dish” by:
Push both the FIND and STOW buttons at the same time.
You will see the STOW light blink. It is indicating that the dish is moving.
When the Test Dish is completed, the STOW light will stop blinking and go solid.
TO LOCATE SATELLITE
Step 6:
Press the FIND button.
This will locate your satellite(s) based upon the configuration settings that have been
programmed.
Thanks for buying a MotoSAT product.

19
TROUBLESHOOTING
ERROR CODES ARE FLASHING LED LIGHTS AT 1 SECOND INTERVALS
Stow Flashing: This is not an error but indicates the motors are moving.
Find Flashing: Invalid Mode selected, Skewable vs. Non-Skewable.
Find and Stow Flashing: Invalid Mode.
Peak Flashing: Motor Time Out. No counts in Elevation.
Peak and Stow Flashing: Motor Time Out. No counts in Azimuth.
Peak and Find Flashing: Motor Time Out. No counts in Skew.
Peak, Find and Stow Flashing: Limit Error in Elevation movement.
DVB Flashing: Limit Error in Azimuth movement.
DVB and Stow Flashing: Limit Error in Skew movement.
DVB and Peak Flashing: Only Main satellite found.
DVB, Peak and Stow Flashing: Main satellite not found but Secondary satellite was.
DVB, Peak, Find and Stow Flashing: Signal lost, NO LNB Power
Lock Flashing: No satellite found.
Lock and Stow Flashing: Over Temperature on Satellite Receiver.
Lock and Find Flashing: Dish did not raise high enough.
Lock, Find and Stow Flashing: Coax cables on reversed on back of Nomad.
Lock, Peak, Find and Stow Flashing: Could not find main satellite after Skew.
Lock and DVB flashing: EEPROM failure.
Lock, DVB and Stow flashing: AGC Control Failure.
NOTE: Before calling Technical Su ort lease erform a
“Test Dish” and ress “Find” one more time before you call.
MotoSAT Customer/Technical Service – (1-800-247-7486 Ext. 338) - Available
Mon-Fri 8:00 a.m. to :00 p.m. Mountain Standard Time.
● Please have your MotoSAT Model # and Satellite Receiver Brand
prior to calling Customer/Technical Support.

20
S ecial Notes
Stowing the dish when all else fails.
If you are able to go onto the roof -
1. Unplug the “Green” 9 pin connector from the back of the NOMAD 2. This will
release “dynamic braking” that holds the mount in position. The mount may now
be rotated manually.
2. Go to the roof where you can apply a slight amount of force to move the dish into
an acceptable position for traveling. . In Azimuth, rotate the mount in a counter
clock wise direction to move to the proper stowed position.
3. Plug the “Green” 9 pin connector back into the Nomad 2.
4. Call Tech Support when you can perform additional trouble shooting.
If you are unable to go onto the roof –
The dish can be manipulated by applying 12 volt DC power to specific wires in the
control cable located in the back of the NOMAD 2. The 12 Volts going to your NOMAD 2
controller (3 pin “green” connector) can be used as the 12 volt DC power source (see page 8.)
1. ELEVATION - Orange and Red wires (reversing polarity will change direction.)
2. AZIMUTH - Black and Brown (reversing polarity will change direction.)
3. SKEW - Brown and Red wires (reversing polarity will change direction.)
If a chain or motor/gearbox assembly is broken, the dish will have to be stowed by hand.
Dish Network receivers
NON- KEWABLE
O en Faced mounts.
If your satellite receiver is a Dish 00 or Dish Pro and you remove it from your home
to your RV, you will need to perform a “Check Switch” while the non-skewable dish
is in the TOWED PO ITION. Your screen upon completion of the “Check Switch”
should have 8 X’s in the check boxes meaning that the “Check Switch” failed.
This
procedure must be accomplished before you “FIND” satellite.
Failure to do so
will result in im ro er o eration of the receiver.
Other manuals for Nomad 2
2
Table of contents
Other MotoSAT Satellite TV System manuals

MotoSAT
MotoSAT Nomad SD2 User manual

MotoSAT
MotoSAT Nomad 2 User manual

MotoSAT
MotoSAT AutoMotion Dome T2 User manual

MotoSAT
MotoSAT WM 1431 User manual

MotoSAT
MotoSAT Freedom SD2 User manual

MotoSAT
MotoSAT MD500 User manual

MotoSAT
MotoSAT Nomad 2 User manual

MotoSAT
MotoSAT Executive User manual

MotoSAT
MotoSAT MSC60 User manual

MotoSAT
MotoSAT Nomad SD User manual