11162020 / MFG-13220
Our Service Department will gladly answer any questions you have.
www.moultriefeeders.com/support
Battery Information:
- Do Not Mix Old and New Batteries
- Do Not Mix Alkaline, Standard, or Rechargeable Batteries
FCC COMPLIANCE
This device complies with part 15 of the FCC Rules. Operation is subject to the following two conditions: (1) This device may not cause harmful interference, and (2) this device must accept any interference received, including interference that may cause undesired operation.
For devices approved under Part 15, the user’s manual or instruction manual for an intentional or unintentional radiator shall caution the user about changes or modications to the device (Section 15.21).
NOTE: This equipment has been tested and found to comply with the limits for a Class B digital device, pursuant to part 15 of the FCC Rules. These limits are designed to provide reasonable protection against harmful interference in a residential installation. This equipment generates, uses and
can radiate radio frequency energy and, if not installed and used in accordance with the instructions, may cause harmful interference to radio communications. However, there is no guarantee that interference will not occur in a particular installation. If this equipment does cause harmful
interference to radio or television reception, which can be determined by turning the equipment o and on, the user is encouraged to try to correct the interference by one or more of the following measures:
– Reorient or relocate the receiving antenna.
– Increase the separation between the equipment and receiver.
– Connect the equipment into an outlet on a circuit dierent from that to which the receiver is connected.
– Consult the dealer or an experienced radio/TV technician for help.
NOTE: DO NOT LOAD FEEDER until it is standing up and in place (see Section B-5).
122106R4 / MFH-ATK & AT5
CONFIGURING AND TESTING FEEDER
SET TIME OF DAY: Press the UP or DOWN button until the correct
time of day appears. Press and release button to single-step through the
minutes or hold down to advance quickly. The feeder will not run while
buttons are being pressed and waits 10 seconds from the last button press
before it is activated.
SET FEED TIMES: Press the MODE button until the correct Timer
Number appears in the lower right hand corner as shown. Press the UP or
DOWN button to set the Feed Time.
TEST FEEDER: PRESS AND HOLD the MODE button while the
RUN-TIME SECONDS are displayed. Release the button and get away
from the feeder when the message “TESTING GET AWAY” appears on
the display.
Your Feeder will feed up to four times per day and has been factory set to feed at 7:00am and 6:00pm
for six seconds. To change factory settings or add additional feed times, follow the instructions below.
RUN TIME (sec.)
Approx. feed dispensed (lbs.)
4 6 8 10 12 14 16 18
0.8 1.0 1.3 1.6 1.9 2.2 2.4 2.7
SET RUN DURATION: Press the MODE button again to set the
RUN-TIME SECONDS which can range from zero to twenty seconds.
Adjust RUN-TIME SECONDS using the chart below. Set the RUN-TIME
SECONDS to zero to disable the specific timer.
INSTALLING BATTERIES
To install the batteries or adjust the feed
settings, remove the bottom of the feeder by
rotating it counter clockwise as shown. Install
four (4) AA Alkaline or Moultrie rechargeable
batteries with the negative side of the battery
going to the battery holder spring clip.
Replace bottom by rotating clockwise until
secure.
20
3.0
Our Service Department will gladly answer any questions you have. Call
205-664-6700 or 800-653-3334, Monday - Friday, 8:00 AM to 5:00 PM CST.
www.moultriefeeders.com
NOTE: This equipment has been tested and found to comply with the limits of Part 15 of the FCC Rules. These limits are designed to provide reasonable protection against
harmful interference in a residential installation. This equipment generates, uses and can radiate radio frequency energy and, if not installed and used in accordance with the
instructions, may cause harmful interference to radio communications. However, there is no guarantee that interference will not occur in a particular installation. If this
equipment does cause harmful interference to radio or television reception, which can be determined by turning the equipment off and on, the user is encouraged to try to
correct the interference by one or more of the following measures:
• Reorient or relocate the receiving antenna.
• Increase the separation between the equipment and receiver.
• Connect the equipment into an outlet on a circuit different from that to which the receiver is connected.
• Consult the dealer or an experienced radio/TV technician for help.
POSITION TIMER: The Timer may be
rotated outward for easier viewing. Gently
pull down on the button-side of the Timer
as shown.
MODE UP DOWN
7:00AM
SET TIMER 1
MODE UP DOWN
:06AM
SET TIMER 1
RUN-TIME
MODE UP DOWN
:05
GET AWAY
CAUTION:WEAR EYE PROTECTION
01302012 / MFH-ATK & AT5
CONFIGURING AND TESTING FEEDER
SET TIME OF DAY:Press the UP or DOWN button until the correct
time of day appears. Press and release button to single-step through the
minutes or hold down to advance quickly. The feeder will not run while
buttons are being pressed and waits 10 seconds from the last button press
before it is activated.
SET FEED TIMES: Press the MODE button until the correct Timer
Number appears in the lower right hand corner as shown. Press the UP or
DOWN button to set the Feed Time.
TEST FEEDER: PRESS AND HOLD the MODE button while the
RUN-TIME SECONDS are displayed. Release the button and get away
from the feeder when the message “TESTING GET AWAY” appears on
the display.
Your Feeder will feed up to four times per day and has been factory set to feed at 7:00am and 6:00pm
for six seconds. To change factory settings or add additional feed times, follow the instructions below.
RUN TIME (sec.)
Approx. feed dispensed (lbs.)
4 6 8 10 12 14 16 18
0.8 1.0 1.3 1.6 1.9 2.2 2.4 2.7
SET RUN DURATION: Press the MODE button again to set the
RUN-TIME SECONDS which can range from zero to twenty seconds.
Adjust RUN-TIME SECONDS using the chart below. Set the RUN-TIME
SECONDS to zero to disable the specific timer.
INSTALLING BATTERIES
To install the batteries or adjust the feed
settings, remove the bottom of the feeder by
rotating it counter clockwise as shown. Install
four (4) AA Alkaline or rechargeable batteries*
with the negative side of the battery going
to the battery holder spring clip. Replace
bottom by rotating clockwise until secure.
20
3.0
caution:wear eye protection
Our Service Department will gladly answer any questions you have. Call
205-664-6700 or 800-653-3334, Monday - Friday, 8:00 AM to 5:00 PM CST.
www.moultriefeeders.com
Rotate Counter
Clockwise to Open
NOTE: This equipment has been tested and found to comply with the limits of Part 15 of the FCC Rules. These limits are designed to provide reasonable protection against
harmful interference in a residential installation. This equipment generates, uses and can radiate radio frequency energy and, if not installed and used in accordance with the
instructions, may cause harmful interference to radio communications. However, there is no guarantee that interference will not occur in a particular installation. If this
equipment does cause harmful interference to radio or television reception, which can be determined by turning the equipment off and on, the user is encouraged to try to
correct the interference by one or more of the following measures:
• Reorient or relocate the receiving antenna.
• Increase the separation between the equipment and receiver.
• Connect the equipment into an outlet on a circuit different from that to which the receiver is connected.
• Consult the dealer or an experienced radio/TV technician for help.
POSITION TIMER: The Timer may be
rotated outward for easier viewing. Gently
pull down on the button-side of the Timer
as shown.
MODE UP DOWN
7:00
AM
SET TIMER 1
MODE UP DOWN
:06
AM
SET TIMER 1
RUN-TIME
MODE UP DOWN
:05
GET AWAY
*Note: Rechargeable batteries MUST be used
when using a Feeder PowerPanel.
122106R4 / MFH-ATK & AT5
CONFIGURING AND TESTING FEEDER
SET TIME OF DAY: Press the UP or DOWN button until the correct
time of day appears. Press and release button to single-step through the
minutes or hold down to advance quickly. The feeder will not run while
buttons are being pressed and waits 10 seconds from the last button press
before it is activated.
SET FEED TIMES: Press the MODE button until the correct Timer
Number appears in the lower right hand corner as shown. Press the UP or
DOWN button to set the Feed Time.
TEST FEEDER: PRESS AND HOLD the MODE button while the
RUN-TIME SECONDS are displayed. Release the button and get away
from the feeder when the message “TESTING GET AWAY” appears on
the display.
Your Feeder will feed up to four times per day and has been factory set to feed at 7:00am and 6:00pm
for six seconds. To change factory settings or add additional feed times, follow the instructions below.
RUN TIME (sec.)
Approx. feed dispensed (lbs.)
4 6 8 10 12 14 16 18
0.8 1.0 1.3 1.6 1.9 2.2 2.4 2.7
SET RUN DURATION: Press the MODE button again to set the
RUN-TIME SECONDS which can range from zero to twenty seconds.
Adjust RUN-TIME SECONDS using the chart below. Set the RUN-TIME
SECONDS to zero to disable the specific timer.
INSTALLING BATTERIES
To install the batteries or adjust the feed
settings, remove the bottom of the feeder by
rotating it counter clockwise as shown. Install
four (4) AA Alkaline or Moultrie rechargeable
batteries with the negative side of the battery
going to the battery holder spring clip.
Replace bottom by rotating clockwise until
secure.
20
3.0
Our Service Department will gladly answer any questions you have. Call
205-664-6700 or 800-653-3334, Monday - Friday, 8:00 AM to 5:00 PM CST.
www.moultriefeeders.com
NOTE: This equipment has been tested and found to comply with the limits of Part 15 of the FCC Rules. These limits are designed to provide reasonable protection against
harmful interference in a residential installation. This equipment generates, uses and can radiate radio frequency energy and, if not installed and used in accordance with the
instructions, may cause harmful interference to radio communications. However, there is no guarantee that interference will not occur in a particular installation. If this
equipment does cause harmful interference to radio or television reception, which can be determined by turning the equipment off and on, the user is encouraged to try to
correct the interference by one or more of the following measures:
• Reorient or relocate the receiving antenna.
• Increase the separation between the equipment and receiver.
• Connect the equipment into an outlet on a circuit different from that to which the receiver is connected.
• Consult the dealer or an experienced radio/TV technician for help.
POSITION TIMER: The Timer may be
rotated outward for easier viewing. Gently
pull down on the button-side of the Timer
as shown.
MODE UP DOWN
7:00AM
SET TIMER 1
MODE UP DOWN
:06AM
SET TIMER 1
RUN-TIME
MODE UP DOWN
:05
GET AWAY
CAUTION:WEAR EYE PROTECTION
CONFIGURING AND TESTING FEEDER
C
Your feeder will feed up to four times per day and has been factory set to feed at 7:00am and 6:00pm for 6 seconds.
To change factory settings or add additional feed times, follow the instructions below.
SET TIME OF DAY: Press the UP or DOWN button until the correct time of day appears.
Press and release button to single-step through the minutes or hold down to advance quickly.
SET FEED TIMES: Press the SET button until the correct timer number appears as shown.
Press the UP or DOWN button to set the Feed Time.
Note: Factory settings are 7am and 6pm.
SET RUN DURATION: Press the SET button again to set the RUN-TIME SECONDS which can
range from zero to twenty seconds. Adjust RUN-TIME SECONDS using the chart below. Set the
RUN-TIME SECONDS to zero to disable the specic feed time. Note: Factory setting is 6 seconds.
TEST FEEDER: PRESS AND HOLD the SET button while the RUN-TIME SECONDS are displayed. Release the button and get away from the
feeder when the message “TESTING GET AWAY” appears on the display.
POSITION TIMER: The timer may be rotated outward for easier viewing.
Gently pull down on the button-side of the timer as shown.
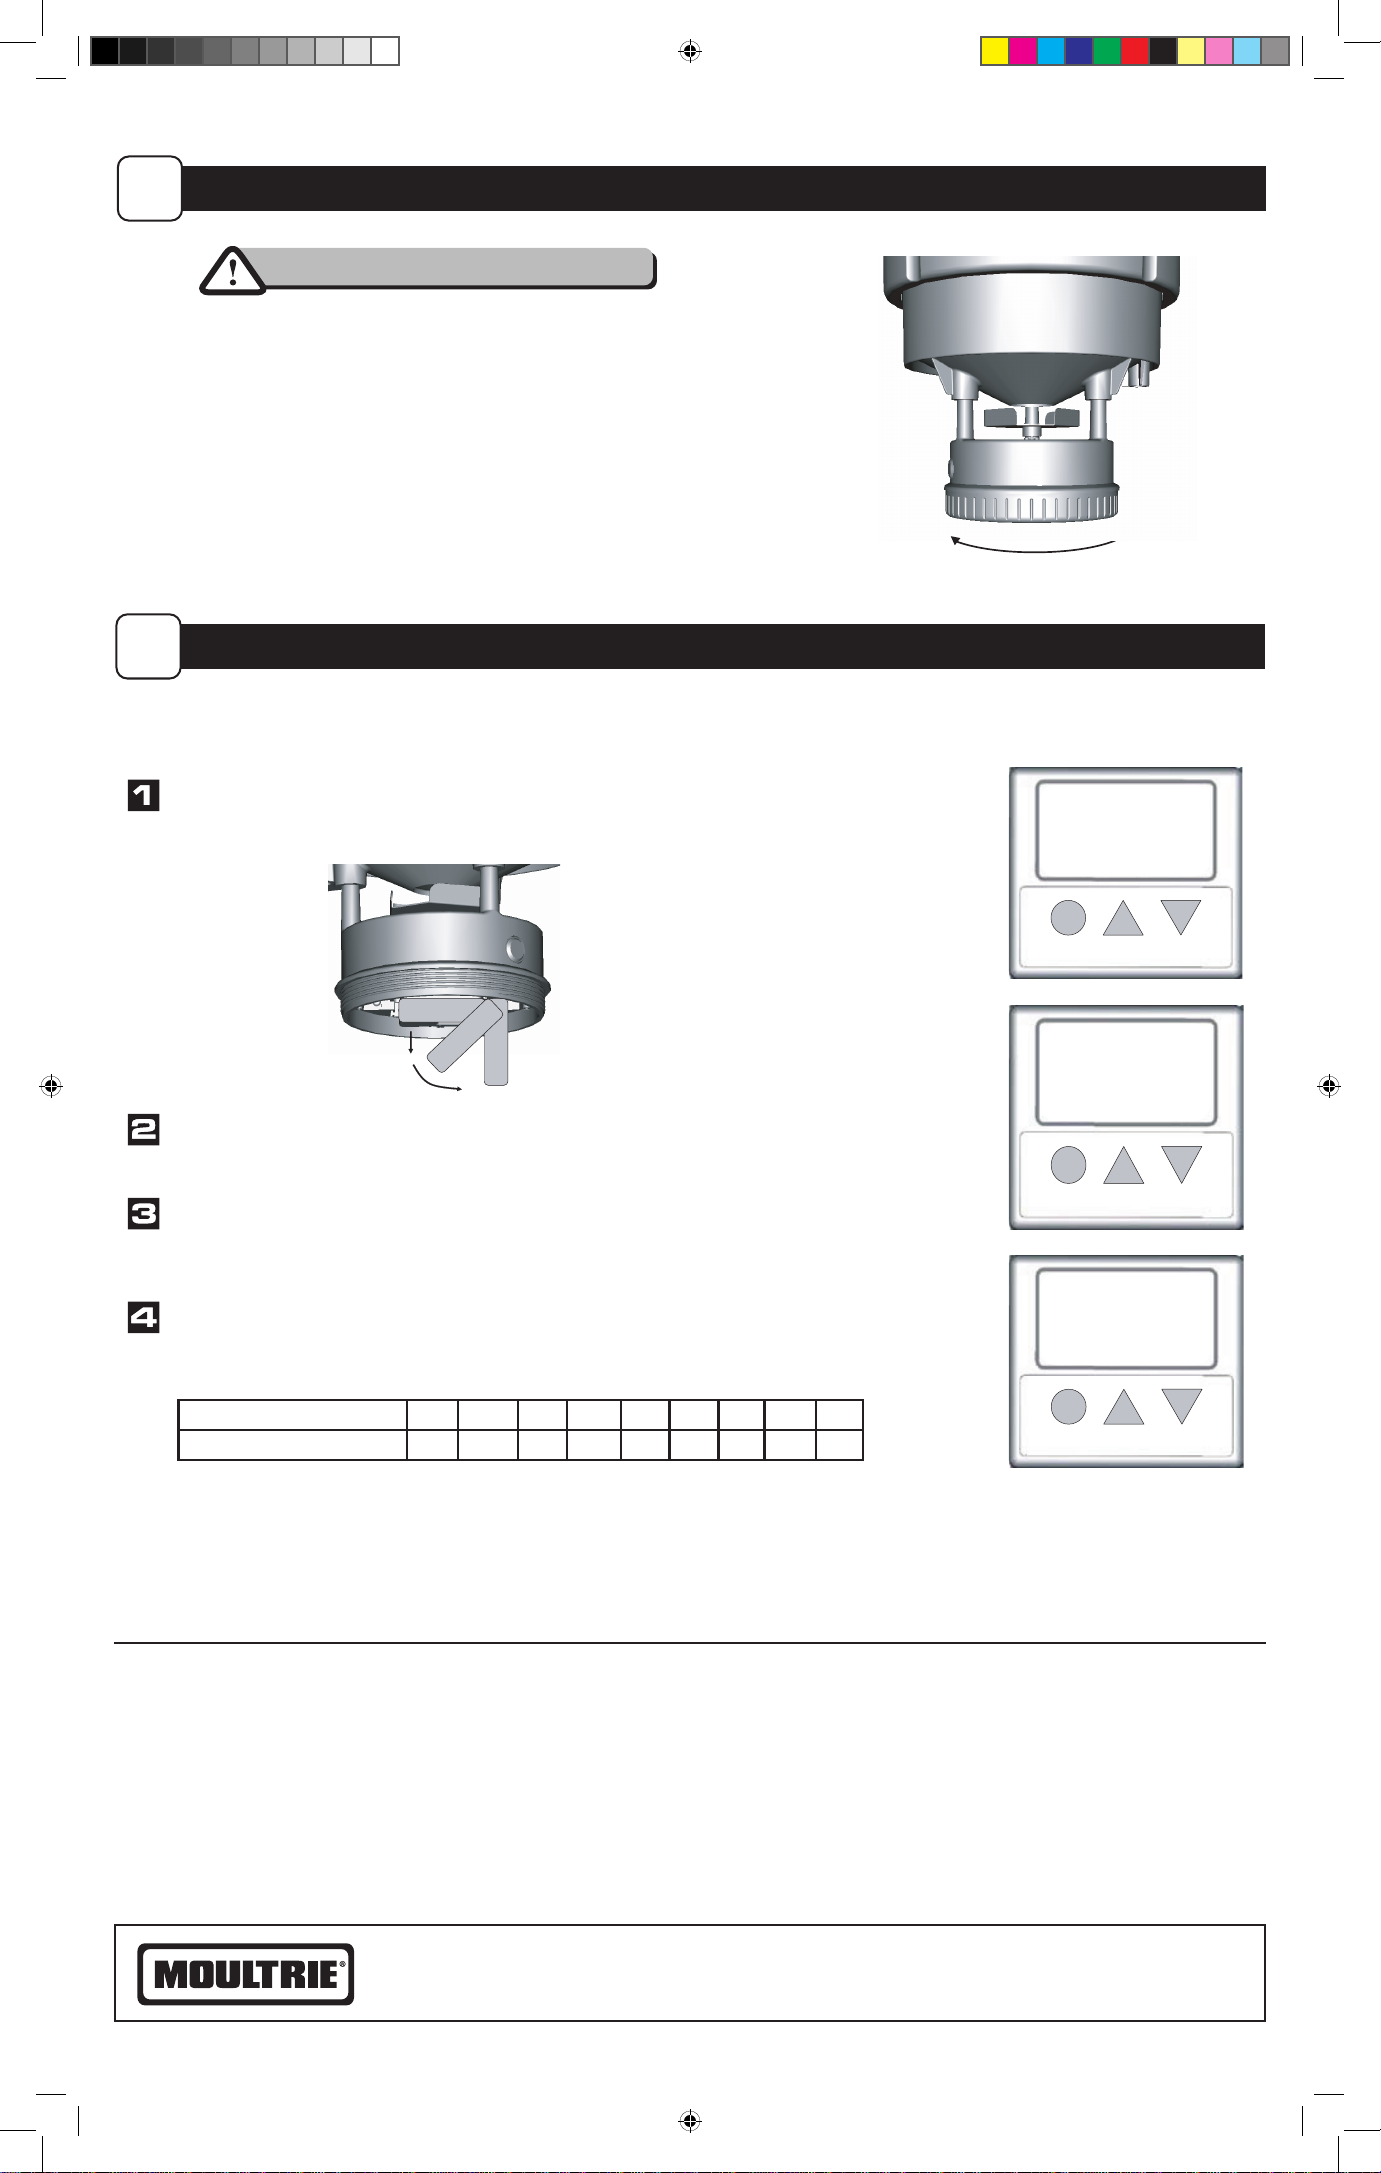
INSTALL BATTERIES
B
To install the batteries or adjust the feed settings, remove the bottom
of the feeder by rotating it counter clockwise as shown. Install four (4)
AA alkaline or lithium batteries with the negative side of the battery
going to the battery holder spring clip. Replace bottom by rotating
clockwise until secure.
NOTE:
Do not mix old and new batteries.
Always replace ALL the batteries at the same time.
Do not mix battery types.
If using solar panel, insert rechargeable batteries.
Rotate
counter-clockwise
to open
RUN TIME (sec.) 4 6 8 10 12 14 16 18 20
Approx. Feed Dispensed (lbs.) .8 1.0 1.3 1.6 1.9 2.2 2.4 2.7 3.0
MFG-13220_Standard Feeder QL_Manual-ENGLISH_11-16-20.indd 2MFG-13220_Standard Feeder QL_Manual-ENGLISH_11-16-20.indd 2 11/17/20 1:48 PM11/17/20 1:48 PM