Mounting Systems Theta User manual

In-roof system Theta
Installation manual
December 2009

Table of contents
ENGLISH
Theta Installation manual 3
12.2009 Theta-MA-ENG-0912
Table of contents
1Introduction 4
1.1 Overview 4
1.2 Intended use 4
1.3 Standards and technical directives 4
1.4 About this manual 4
2Safety 5
2.1 Basic safety instructions 5
2.2 Working on roofs 5
2.3 Warnings 5
2.4 Responsibilities of the operator 6
3Technical description 7
3.1 System overview 7
3.2 Scope of delivery 7
3.3 Technical specifications 7
4Planning the module field 8
4.1 Operating conditions 8
4.2 Landscape installation 9
4.3 Portrait installation 10
5Important installation information 11
5.1 Preparation work 11
5.2 Installation aids and required tools 11
5.3 Additionally required material 11
6Installation 12
6.1 Roof preparation 12
6.2 Installing the substructure 13
Laying the sealing strip 13
Installing the lower profile filler 14
Option A: Foam profile filler with
short lower adapter and narrow sealing strip 14
Option B: Comb profile filler with
intermediate adapter and wide sealing strip 14
Laying the corrugated metal sheets 15
6.3 Installing the adapter (landsacpe installation) 16
Installing of the short or intermediate
landscape adapters 16
Using the steps (for landscape installation) 17
Installing the short or long lateral adapters 17
6.4 Installing the adapter (portrait installation) 18
6.5 Installing the lateral flashings 18
6.6 Installing the top flashing 19
6.7 Installing the PV modules 20
Attaching the PV modules to the outer edge of
the module field (portrait and landscape
installation) 20
Inserting the Quickstone 20
Attaching the PV modules within the module
field (portrait and landscape installation) 20
6.8 Retiling the roof 21

1 Introduction
Theta Installation manual 4
ENGLISH
1Introduction
1.1 Overview
Theta is an in-roof system for PV modules. It enables
direct integration of PV modules (framed or unframed)
into the roof cladding independently of the type of roof
covering. All components are pre-assembled on the
basis of your order and replace the previous roof cove-
ring. Theta is mounted on the existing or on new battens
of the roof construction. The roof can thus be completely
or partially covered with PV modules.
1.2 Intended use
The Theta in-roof system is to be used only for the roof
installation of PV modules. Any other use is considered
improper. The observance of the information in these
assembly instructions is a part of proper use. Mounting
Systems GmbH is not liable for damage that results from
the non-observance of assembly instructions, in particu-
lar the safety information, or from the improper use of
the product.
1.3 Standards and technical directives
When planned correctly, Theta fulfils the following norms
and technical directives:
| Eurocode 1: Actions on structures – Part 1-3:
General actions, snow loads; German version EN
1991-1-3: 2003
| Eurocode 1: Actions on structures – Part 1-4:
General actions, wind actions; German version EN
1991-1-4: 2005
| Eurocode 9 – DIN V ENV 1999-1-1:
Design of aluminium structures
| DIN 1055 Actions on structures, section 100:
Basis of design, safety concept and design rules
| DIN 1055 Actions on structures, Part 4:
Wind actions
| DIN 1055 Actions on structures, Part 5:
Snow and ice loads
1.4 About this manual
Subject
These instructions describe the installation of the Theta
in-roof system.
The drawings in this manual illustrate the mounting of PV
modules on a tile roof (Frankfurter Pfanne, roofing tile).
Please note the specifications for mounting on other roof
types.
User group
This manual is intended for qualified personnel with
a basic knowledge of mechanics, hand tools and
mechanical skills.
Orientation aids
The following aids will improve orientation when using
these instructions:
Position numbers
The illustrations show the individual components with
position numbers referred to in the text. The position
numbers are shown as (1) and (2).
Headers
The headers give the current chapter overview.
Footers
The footers display the product name, the document title
and the page number.
2 Safety
Theta Installation manual 5
ENGLISH
2Safety
2.1 Basic safety instructions
The following basic safety information and warnings are
an essential part of these instructions and have funda-
mental importance for handling of this product:
| Ensure that the product corresponds to the static
requirements on-site prior to every assembly and
installation.
| Observe occupational health and safety regulations
of the employer's liability insurance association.
| Wear a hard hat, protective gloves and safety shoes.
| Wear sunglasses in the event of glare from the sun
during the installation.
| A second person must be present during the entire
installation process to assist in the event of an acci-
dent.
| A copy of this installation manual must be kept in the
direct vicinity of the unit.
2.2 Working on roofs
When working on roofs, note the following instructions:
|Pay attention to accident prevention regulations for
working on roofs. If appropriate, use a barrier to
protect against falling parts.
|In line with accident prevention regulations, work on
roofs should be carried out using safety harnesses
for individuals or safety scaffolding.
|Observe the relevant local safety regulations.
|Before stepping on to the roof, check the load-
bearing capability of all parts which are under stress.
|Use fall protection.
|Use protective equipment to guard against falling
even when carrying out short jobs.
| Do not carry materials on to the roof via ladders,
but rather use suitable lifting gear.
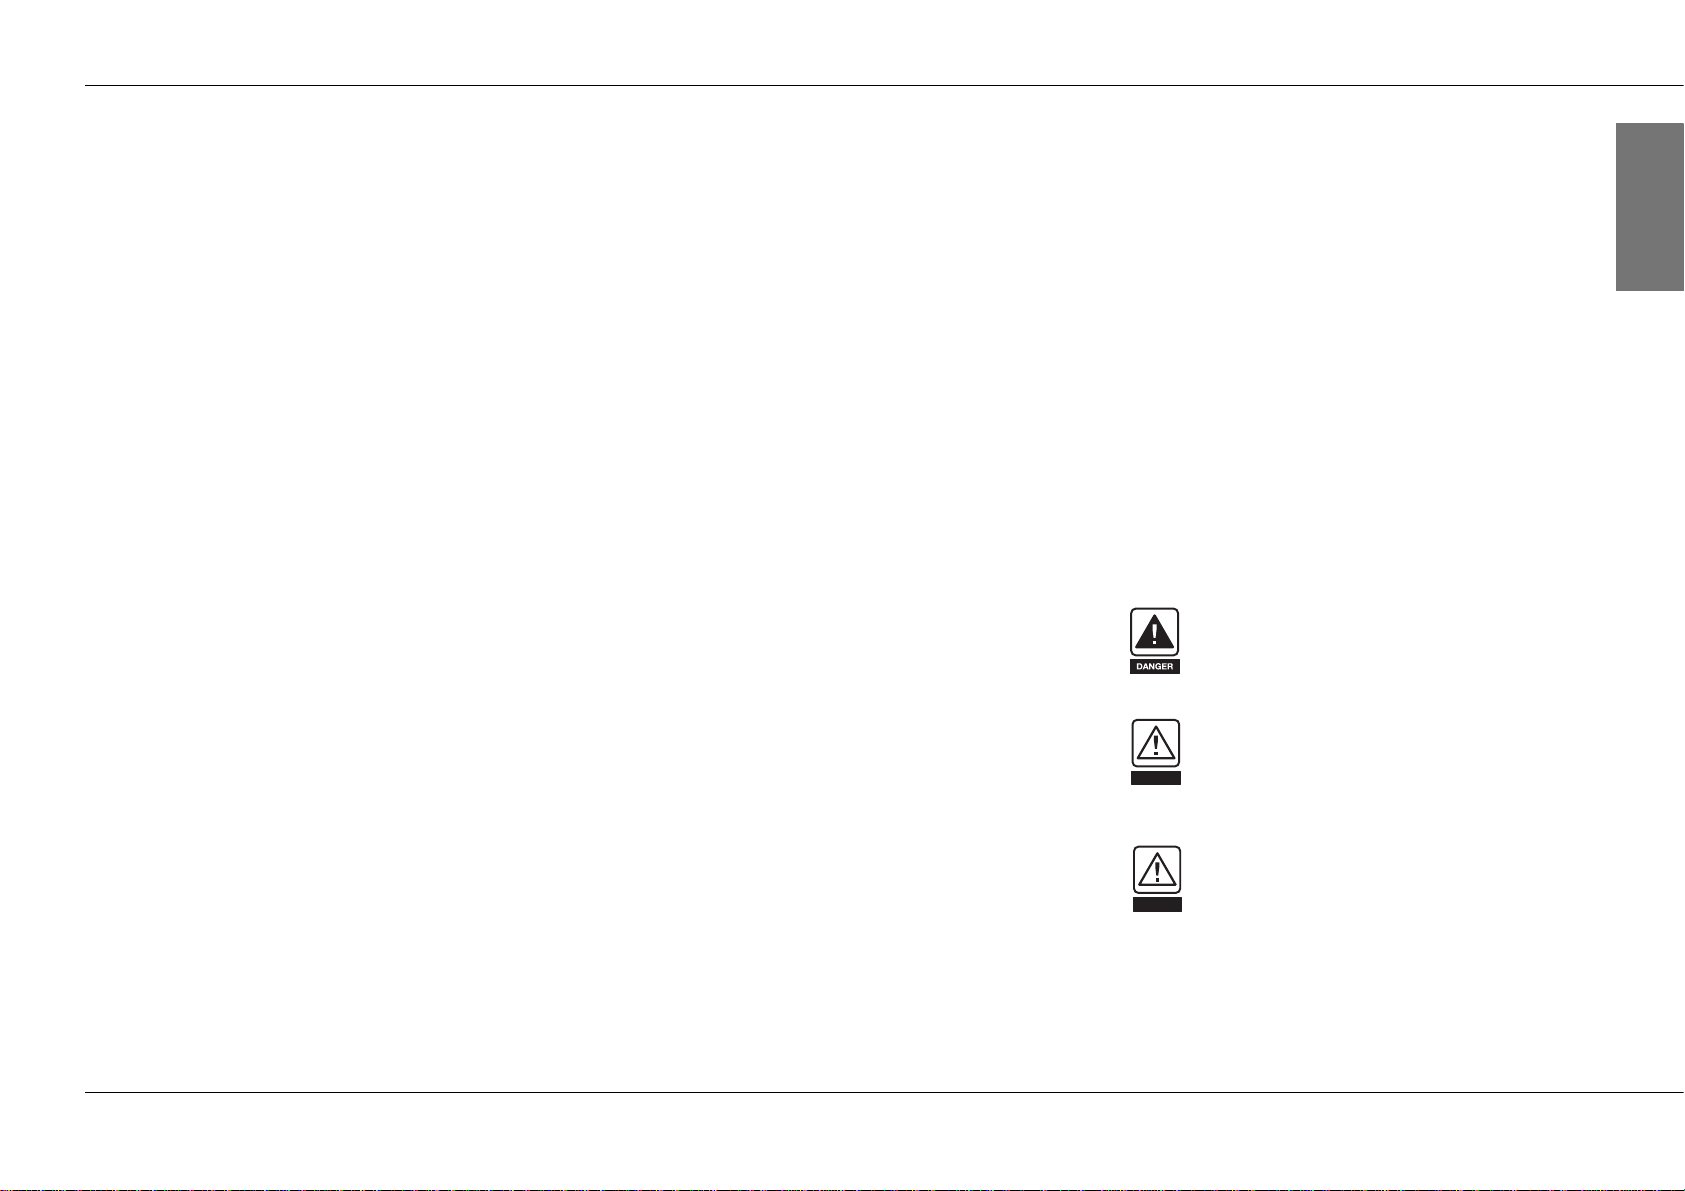
2.3 Warnings
The warning notes used in this manual identify safety
related information.They consist of:
|Warning symbol (pictograph)
|Indicator word to denote the danger level
|Information about type and source of the danger
|Information about possible consequences if the
danger is not observed
|Measures for avoiding the danger and for preventing
injuries or property damages
The heading of the warning notes identifies one of the
following danger levels:
Denotes a major risk, failure to observe which
could lead to serious injury or death.
Denotes a potentially dangerous situation
which may lead to moderate to serious physical
injury and property damage.
Denotes a potential risk which may lead to
physical injury and property damage.
DANGER
WARNING
WARNING
CAUTION
CAUTION

2 Safety
Theta Installation manual 6
ENGLISH
2.4 Responsibilities of the operator
The system operator has the following safety relevant
responsibilities:
| Ensure that the installation of the system is only
performed by persons with manual skills and basic
knowledge of mechanics.
| Ensure that the commissioned installation personnel
can evaluate the work assigned to them and can
recognize possible dangers.
| Ensure that the persons commissioned are familiar
with the system components.
| Ensure that the installation manual is accessible
during the assembly. The mounting instructions are
an integral part of this product.
| Ensure that the installation manual and in particular
the warnings have been read and understood by the
autorized installation personnel prior to assembly.
| Ensure that the permissible operating conditions
(see chapter 4.1, page 6) have been upheld. Moun-
ting Systems GmbH will not be held liable for
damage which results from a violation of these con-
ditions.
| Ensure that the roof construction has the required
load-bearing capacity, in particular in the vicinity
of the force transmission points.
| Ensure that the durability of the mounted connec-
tions and roof attachments are guaranteed.
| Ensure that the appropriate lifting equipment is used
for the mounting process.
| Ensure that the water tightness of the mounted roof
installation is guaranteed.
| Ensure that only Mounting Systems components are
used, also in case of replacement.
Otherwise the warranty claim is void.

3 Technical description
Theta Installation manual 7
ENGLISH
3 Technical description
3.1 System overview
(1) Lateral flashing
(2) Top flashing
(3) Corrugated metal sheet
(4) PV module
(5) Long adapter with module clamp (option A)
(6) Short adapter with module end clamp (option A)
(7) Short adapter with module clamp (option B)
(8) Intermediate adapter with module end clamp (option B)
(9) Sealing strip
Note:
This illustration shows the landscape mounting position
of the PV module. Other adapters must be used for por-
trait installation. The required calottes necessary for
attaching the corrugated sheets to the roof are not
shown here.
3.2 Scope of delivery
Theta includes all system components and accessory
components which are necessary for installation.The
delivery content corresponds to the configuration of
the PV unit. Additional roof battens and their respective
fixing materials are not included in delivery.
3.3 Technical specifications
(2)
(1)
(3)
(4)
(5)
(6)
(9)
(7)
(8)
Support profiles,
module (end) clamps Extruded aluminium EN AW
6060 T6/6063 T66
Small parts Stainless steel (V2A)
Flashings Aluminium, EN AW 5005
Corrugated metal sheet Aluminium, EN AW 3005

4 Planning the module field
Theta Installation manual 8
ENGLISH
4 Planning the module field
4.1 Operating conditions
Application range Pitched roof
Roof covering Any
Roof pitch Depending on the regular roof pitch
of the remaining roof covering, min.
of 10°; max 45°
PV module Any size
Roof construction The roof construction must have ade-
quate load-bearing capacity. The roof
structure must comply with national
requirements and standards (for
example, rear ventilation).
Building height Max. 12 m
Snow load Max. 1.44 kN/m²*
Wind load Max. 39 m/s*
Roof batten spacing Max. 320 mm**
Roof batten
thickness Min. 35 mm
Roof batten width Min. 35 mm
* The maximum values may vary, depending on module size, building and
location.
**Applies to installation on existing battens. For installation on new bat-
tens: Position the battens at the quarter points of the modules.
Module field planning is based on:
| Module size (L x W x H)
| Module positioning (portrait, landscape)
| Number of modules
| Roof batten spacing
Additional roof battens
If the existing roof battens do not correspond to the
required points in the module field, additional roof bat-
tens will be necessary at the following points:
| Fixation of upper adapters
| Fixation of the sealing strip
| Fixation of the top flashing.
Additional roof battens and their respective fixing mate-
rials are not included in delivery.
Planning information
The following must be observed for planning the module
field:
| The standard Theta components are designed for
mounting the module field into a tiled roof. Mounting
on other types of roof coverings must always be
done by a professional roofing company.
| There must be a distance of at least three rows of
tiles between the top edge of the module field and
the roof ridge. If this is not the case, the top edge
completion must be performed by a roofing com-
pany to guarantee the water tightness and durability
of Theta. Should the ridge tiles not be fixed, then
there must be a distance of at least one row of tiles
between the top edge of the module field and the
roof ridge.
| Direct connections of the module field to the roof
ridge, roof verge or the eaves must be performed by
a professional roofing company in all cases.

4 Planning the module field 4.2 Landscape installation
Theta Installation manual 9
ENGLISH
4.2 Landscape installation
The modules can be fixed along the entire length of the
adapters.
(1)
(2)
(3)
(4)
(6)
(7)
(3)
(6)
(7)
(5)
(1) Height of the module field:
Module width x number of modules vertically + ((number of
modules vertically – 1) x 19 mm) + 50 mm
(2) Width of the module field:
Module length x number of modules horizontally + ((num-
ber of modules horizontally – 1) x 19 mm)
(3) Additional roof battens for attaching the sealing strip and
the lower adapter: Distance between new batten (center)
and edge of the below tiles: 120 mm (for the short adapter)
or 220 mm (for the intermediate adapter).
(4) Additional roof battens for fixing the top adapter:
Height of module field – 30 mm (center of batten)
(5) Additional roof battens for fixing the top flashing:
Height of module field + 280 mm (center of batten).
(6) Horizontal distance between adapters:
Approx. at quarter points of the module = ½ module length
(observe the information provided by the module manufac-
turer)
(7) Vertical distance between adapters:
Can be calculated from the module dimensions. Place the
adapter correctly in the inner part of the module field so
that its centre point is located in the 19 mm clearance
space between the modules. A minimum distance of 25
mm between the adapter edge and module field edge must
be kept for the outer top and bottom adapters.
Choosing between short and long adapters
for landscape installation
Should the existing battens be replaced or supplemented
during the course of precise module arrangement planning,
then the short adapters may be used in the inner surface
area. The long adapters facilitate more flexibility in the verti-
cal fixation of the PV modules, so that in some cases, when
installing the mounting system, no further roof battens need
to be added to the roof truss.
For the lower edge of the PV field, short or intermediate
adapters may be used. The intermediate adapters enable (in
connection with a correspondingly wide sealing strip) a lar-
ger overlapping in the sealing strip area. This may be neces-
sary, depending on the national standards.

4 Planning the module field 4.3 Portrait installation
Theta Installation manual 10
ENGLISH
4.3 Portrait installation
(1) (7)
(6)
(2)
(3)
(5)
(4)
(1) Width of the module field:
Module width x number of modules horizontally +
((number of modules horizontally – 1) x 19 mm) + 50 mm
(2) Heigth of the module field:
Module length x number of modules vertically +
((number of modules vertically – 1) x 19 mm)
(3) Additional roof battens for fixing the sealing strip: Distance
between new batten (center) and edge of the below tiles:
120 mm or 220 mm, depending on the chosen sealing strip.
(4) Additional roof battens for fixing the upper edge of the PV
field: Height of the module field - 30 mm (center of batten).
(5) Additional roof battens for fixing the top flashing:
Height of the module field + 280 mm (center of batten).
(6) Vertical distance between adapters:
Approx. at quarter points of the module = ½ module length
(observe the information provided by the module manufac-
turer). Spacing is based on the roof batten raster. In the
case of a particularly unfortunate batten raster, additional
battens may have to be installed).
(7) Horizontal distance between adapters:
Can be calculated from the module dimensions. Position
the adapter in the inner part of the module field so that its
centre point is located in the 19 mm clearance space
between the modules. A minimum distance of 25 mm must
separate the adapter edge of the adapters on the right and
left edge and the module field edge.

5 Important installation information
Theta Installation manual 11
ENGLISH
5 Important installation information
5.1 Preparation work
Mounting Systems recommends that you inform yourself
about the local conditions prior to ordering Theta.
In particular, be familiar with:
| The roof construction
| The roof batten thickness
| The roof batten quality
| The roof batten spacing
5.2 Installation aids and required tools
The following tools will be needed for the installation of
Theta:
| Roof ladder
|Foldingrule
| Chalk line to align the adapters
| Aluminium level (to check the flatness of the battens
and the module field)
| Cut-off grinder with a stone disc (to fit the tiles)
| Metal cutters (for cutting the metal sheets, sealing
strip, etc.)
| Roofing tinsmith tools, i.e. crimping or clinching
pliers (for possible work on the flashings)
| Rubber hammer
| 6 mm Allen key
| Cordless drill with an 8 mm hex headbit (for adapter
screws) and torx bit (for calottes and roofing screws)
5.3 Additionally required material
Depending on the system plan, the following additional
materials may be necessary:
| Double-sided adhesive tape
| Roof battens
| Appropriate wood screws for fixing roof battens
| Appropriate material for sealing and additional fixing
of the surrounding tiles, as needed.

6 Installation
Theta Installation manual 12
ENGLISH
6Installation
6.1 Roof preparation
When working on the roof, components may
fall down, or persons may fall off.
| Protect yourself against falling
(use scaffolding or barriers if necessary).
| Mark the danger zone on the ground
(concerning falling components) and bar
access to unauthorised persons.
| Do not remain in the danger zone.
| Wear a hard hat.
| Take note of the possible effect of wind
gusts when transporting modules and
sheets.
| After the assembly is complete, ensure
secure fixing of the mounting system, the
PV modules and the tiles.
(2)
(1)
Removing the roof covering
Installation:
| Remove roof covering for the surface area of the
modules. On the lateral and top edges remove an
additional row of tiles beyond what is necessary for
the actual module field.
| In the case of an uneven roof truss, it may be neces-
sary to adjust the height of the roof battens.
| If necessary, lay a roofing membrane under the
intended module field. Should the insulation be in
direct contact with the roofing membrane, the
vapour permeability of the roofing membrane must
be ensured.
If the additional roof battens are not sufficiently
fixed, they will not resist increased wind loads.
| Ensure that the roof battens are sufficiently
attached to the rafters.
Installing additional roof battens
Installation:
| Attach the additional roof battens at the appropriate
places in a professional manner (see point 4,
"Planning the module field").
Potentially mortal danger from falls and
falling objects
(1) Roof covering (for example tiles)
(2) Roof substructure (for example wooden battens)
CAUTION
Material damage from faulty installation

6 Installation
Theta Installation manual 13
ENGLISH
6.2 Installing the substructure
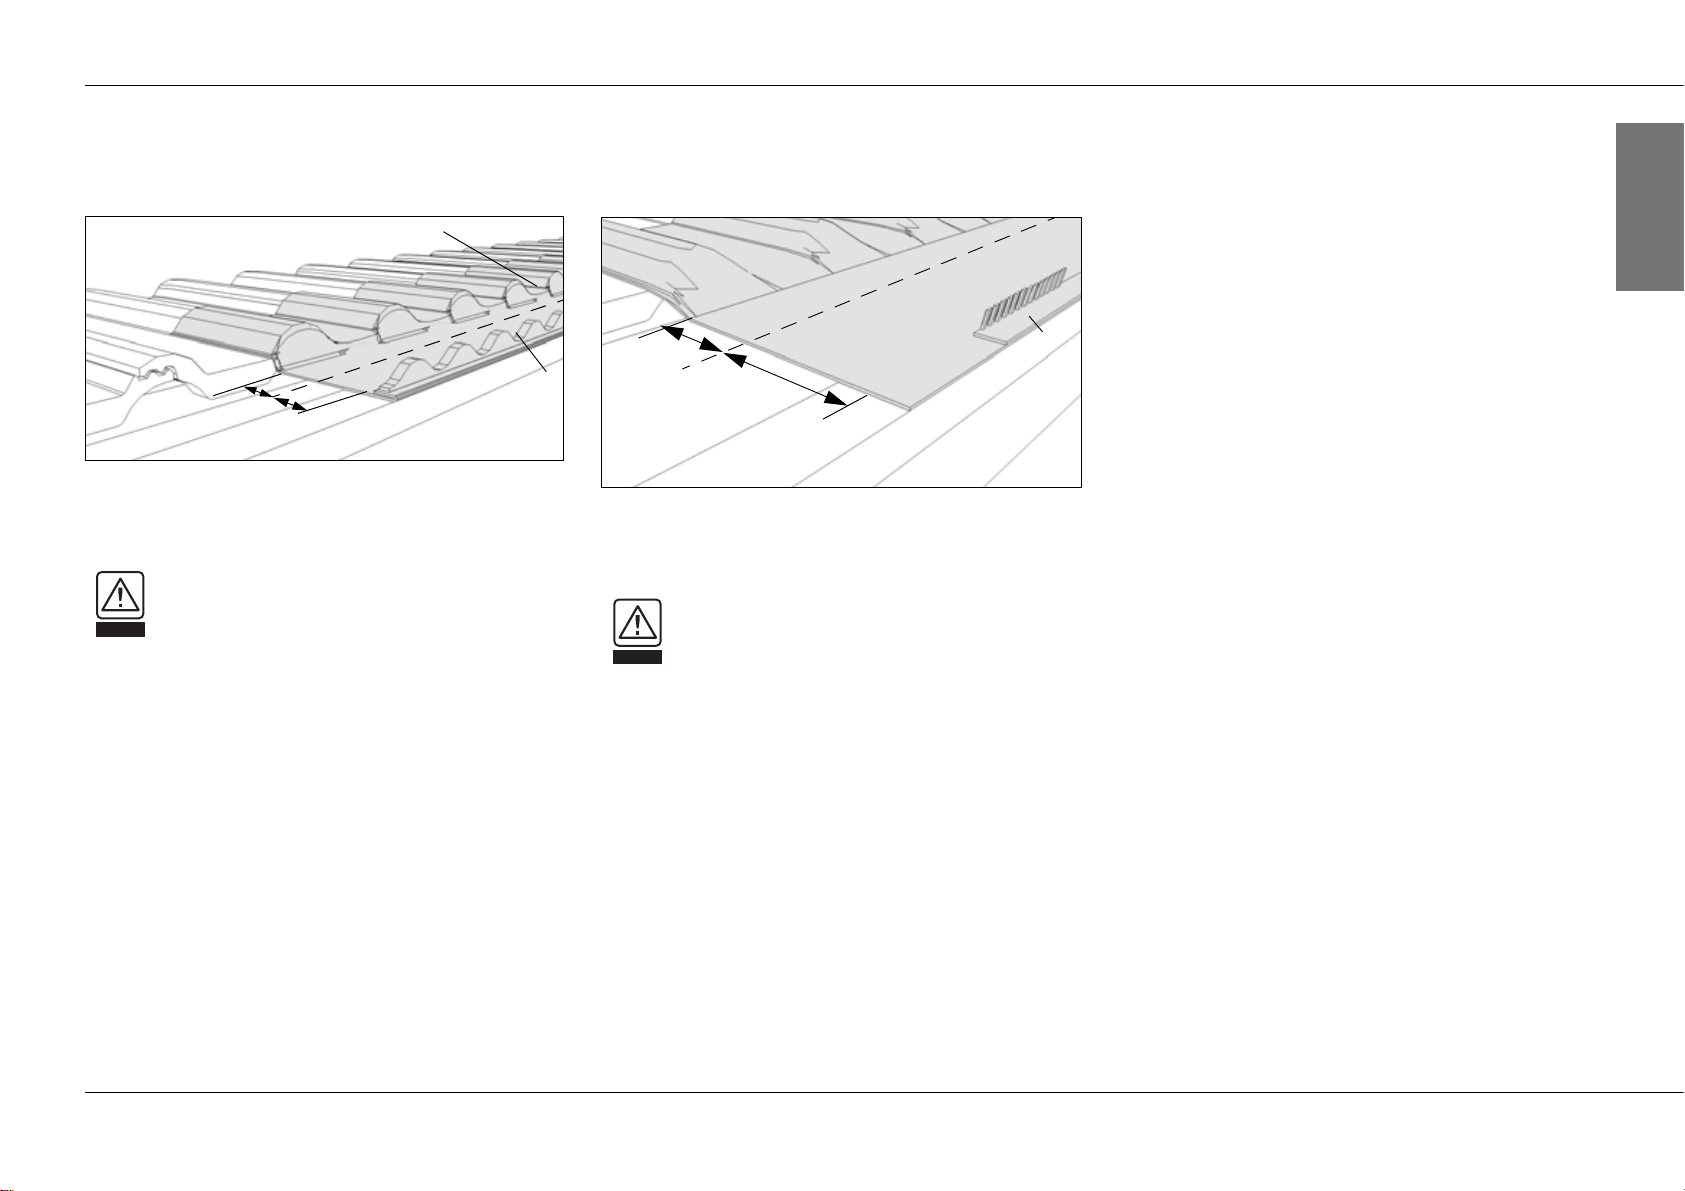
Laying the sealing strip
CAUTION
Leaky construction
If the sealing strip does not sufficiently overlap
the roof tiles, the roof may become subject to
leaks.
| The sealing strip must vertically overlap the
tiles at least as much as the tiles overlap
themselves. In case of very curved roof
tiles, it may be advisable to flatten the
upper edge of the tile underneath the sea-
ling strip prior to laying. In that way, sharp
edges and water accumulation can be
avoided.
(2)
(1)
(1) Sealing strip
(2) Additionally installed battens for sealing strip fixation
Installation:
| Unroll the sealing strip along the lower edge of the
uncovered roof surface.
| Cut the sealing strip for the length of the surface area
+ one extra tile width on the left and right.
| Allow for adequate spacing (5 cm) between the
upper edge of the roof tile and the lower edge of the
corrugated metal sheet to avoid an edge that is too
sharp. Also allow for adequate overlapping by the
corrugated sheets (depending on the type of sealing
strip, see pg. 14).
| After fixing the sealing strip (see pg. 14), adapt the
shape of the strip to the shape of the tiles, taking
care to avoid the formation of sharp edges.
6 Installation
Theta Installation manual 14
ENGLISH
Installing the lower profile filler:
Option A: Foam profile filler with short lower
adapter and narrow sealing strip
(in this case: MetallRoll)
Option B: Comb profile filler with intermediate
lower adapters and wide sealing strip (in this
case: Perform)
70 mm
(2)
(1)
50 mm (3)
(1) Foam profile filler
(2) Sealing strip (in this case: MetallRoll)
(3) Lower edge of the corrugated metal sheet
Installation:
CAUTION
Leaky construction
If the sealing strip is not sufficiently overlapped
by the corrugated metal sheets, the roof cove-
ring may become subject to leaks.
| The sealing strip must begin no less than
100 mm above the planned lower edge of
the corrugated metal sheet. An allowance
of a further 5 cm up to the roof tile edge
has to be made.
Installation:
| Guide the comb profile filler up to the lateral
flashings of the module field.
| Attach the profile filler to the roof batten directly
underneath using roofing screws.
CAUTION
Leaky construction
If the sealing strip is not sufficiently overlapped
by the corrugated sheet, the roof covering may
become subject to leaks.
| The sealing strip must begin no less than
200 mm above the planned lower edge of
the corrugated metal sheet, and an allo-
wance of a further 5 cm up to the roof tile
edge has to be made.
170 mm
(3)
50 mm (2) (1)
(1) Comb profile filler
(2) Sealing strip (in this case: Perform)
(3) Lower edge of the corrugated sheet
| Guide the foam profile filler up to the lateral flashings
of the module field.
| Fix the profile filler on the sealing strip with double-
sided adhesive tape in such a way that later (by
means of adapters or calottes), it can be screwed
onto the roof batten directly underneath it.
| Should MetalRoll be used as the sealing strip, the
top 2 cm of the adhesive surface can be completely
turned over, so that the adhesive surface is facing
upwards, and the profile filler can be attached
without additional adhesive tape.
(view from above)
(view from above)
6 Installation
Theta Installation manual 15
ENGLISH
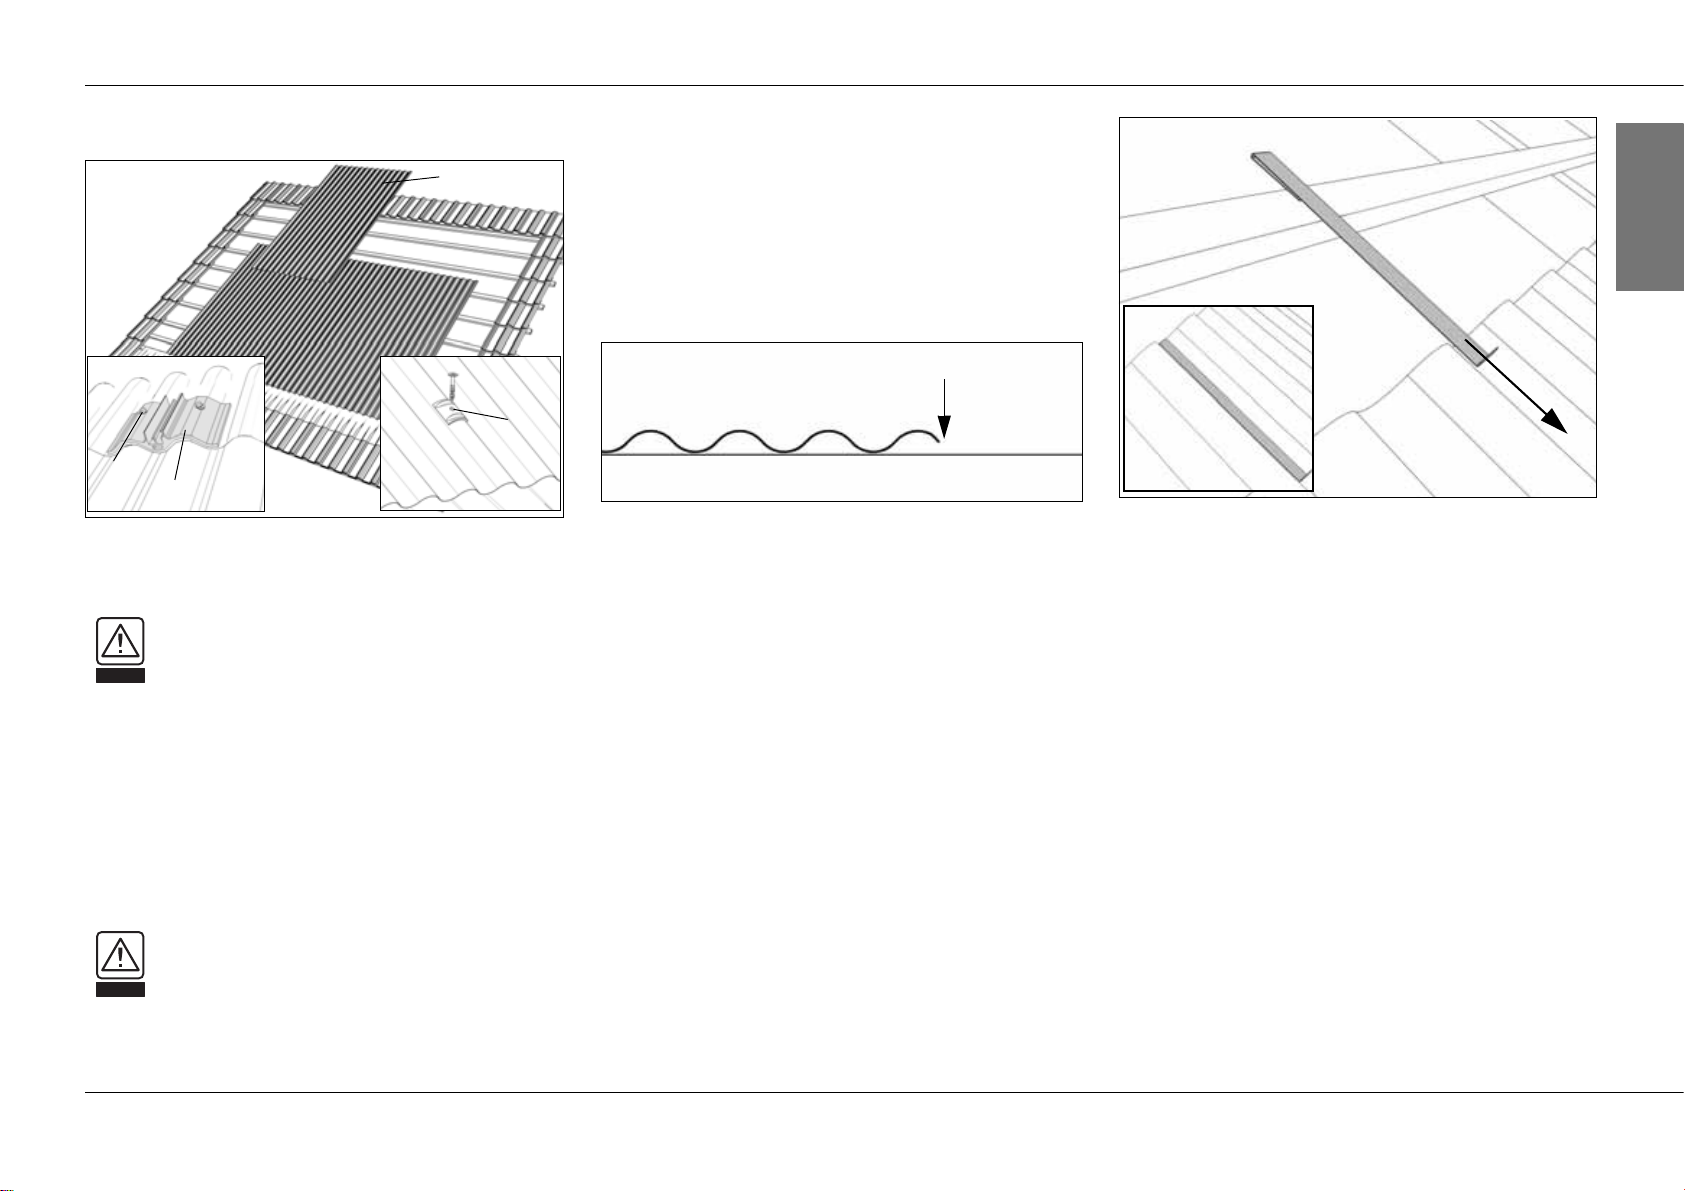
Laying the corrugated metal sheets
(3) (4)
(1)
(2)
(1) Corrugated metal sheet
(2) Roofing screw 4.5 x 45mm with calotte
(3) Sheet metal screw 6.5 x 65 mm (self drilling)
(4) Adapter (in this case: short adapter for landscape installation)
CAUTION
Leaky construction
If the corrugated metal sheets do not suffi-
ciently overlap, the roof may become subject to
leaks.
| Sheets must overlap above each other by
at least 200 mm vertically and by at least
80 mm = 2 high points of the corrugation
horizontally.
| Lay the corrugated sheets in sequence
starting from the bottom and working
upwards, and plan the side overlap in
accordance with the main wind direction.
CAUTION
Material damage
Walking on the corrugated sheets can cause
dents or tears.
| Do not walk or stand on the corrugated
sheets.
| Use of a roofer's ladder is recommended.
Installation:
| Place the lower edge of the corrugated sheet onto
the sealing strip with adequate overlapping: 100 mm
for the foam profile filler and 150 mm for the comb
profile filler (see "Installing the lower profile filler").
| Position the corrugated sheets so that the sides end
with corrugation pointing downward to the roof truss. (1)
(1) Mounting aid
Installation:
| To expedite the installation process, the mounting
aid can be used starting at the second row of sheets.
The mounting aid cannot be used on the last / top
row, as the height of the corrugated sheet must be
adjusted to the intended module field height, and the
mounting aid's prescribed overlap of 200 mm must
therefore be exceeded there.
| For normal rectangular roofs, lay the lower edge of
the bottom row of corrugated metal sheets parallel to
the eaves.
| Attach the corrugated metal sheets (see point 6.3/
6.4 "Installing the adapters") to the roof with
6.5 x 65 mm sheet metal screws together with the
adapters, the profile filler and the lateral flashings.
If necessary, use additional 4.5 x 45 mm roofing
screws and calottes, so that at least 6 fixing points
per m² are provided.
| Position the corrugated sheets so that they corres-
pond to the entire module field. If necessary, use
additional roofing screws and calottes to attach the
overlapping points.
| After laying the lateral and top flashings, attach the
outer edges of the corrugated sheet surface area
every 50 cm with roofing screws and calottes.

6 Installation
Theta Installation manual 16
ENGLISH
6.3 Installing the adapters
(landscape installation)
Walking on the corrugated sheets can cause
dents or tears.
| Do not walk or stand on the corrugated
sheets.
| Use of a roofer's ladder is recommended.
Screws that are not attached in the centre of
the roof batten may rip out.
| Position all screws in the centre of the
battens.
Fix the adapters from the bottom, moving upwards. After
installing the bottom row, you may use the provided
steps. The steps can be inserted into every adapter, as
needed.
While installing the adapters, repeatedly check that the
surface is flat, for example with an aluminium level.
(1) (2)
(3)
(4)
(1)
Installing of the short or intermediate lands-
cape adapters (on the lower edge of the module
field)
Installation:
| Lay out the first row of corrugated sheets above the
sealing strip, and make the side points of overlap
correspond to the final surface width.
| Position the short or intermediate landscape adap-
ters on the lower corrugated sheet edge according
to the plan (see chapter 4, "Planning the module
field"). The holes of the adapter should face
upwards, the round tip in the adapter's Quickstone
channel should be facing left (see detailed illustra-
tion).
| If one of the profile filler fixation points lines up
exactly with one of the adapters, remove this screw
from the profile filler.
| Position the corrugated metal sheets to the prescri-
bed overlap onto the sealing strip and profile filler,
and align the sheets.
| Screw the adapters with two 6.5 x 65 mm sheet
metal screws each (see chapter 4, "Planning the
module field") onto the roof batten lying directly
underneath at the designated points. At the same
time, attach the corrugated sheet, sealing strip and
profile filler.
CAUTION
Material damage
CAUTION
Material damage
(1) Sheet metal screws, 6.5 x 65 mm (self-drilling)
(2) Short landscape adapter
(3) Corrugated metal sheet
(4) Intermediate adapter

6 Installation
Theta Installation manual 17
ENGLISH
Using the steps (for landscape installation) Installing the short or long lateral adapters (in
the centre and upper range of the module field)
(3)
(4)
(1)
(2)
(1) Step
(2) Landscape adapter
(3) Quickstone fixation
(4) Quickstone channel
Mortal danger due to incorrectly mounted
steps
Incorrectly mounted steps or adapters can
result in falls.
| Protect yourself against falling.
| The step is not a safety-related element.
| Check the stability of the steps set in the
adapters.
| Ensure that the screw connections are
tight.
Installation:
| Slide the step into the Quickstone channel of the
adapter from above as far as it will go.
The long landscape adapter is used when no new
battens are to be installed in the inner surface area.
Otherwise, short adapters can be used. The top adapter
row must be fitted with short adapters.
(1) Sheet metal screw, 6.5 x 65 mm (self-drilling)
(2) Long landscape adapter
(3) Corrugated metal sheet
(2)
(3)
(1)
Attention:
| For landscape installation, the top flashing must be
fixed before the installation of the top adapter row
(see chapter 6.6 "Installing the top flashing").
| Ensure professional potential equalisation of the
metal surface without damaging the leak tightness.
Installation:
| For orientation: Mark the position of the roof battens
on the corrugated sheet by using a chalk line.
| If using the steps, ensure the correct positioning of
the Quickstone channel of the adapter (rounded tip
in the Quickstone channel facing left, see detailed
illustration).
| In accordance with the plan, screw long or short
adapters on the designated points (see page 6,
"Planning the module field") with 6.5 x 65 mm sheet
metal screws onto the roof batten lying directly
underneath. Use the corresponding holes in the
adapters – 2 each for the short, or 4 for the long
adapters.

6 Installation
Theta Installation manual 18
ENGLISH
6.4 Installing the adapter
(portrait installation)
Walking on the corrugated sheets can cause
dents or tears.
| Do not walk or stand on the corrugated
sheets.
| We recommend the use of a roofer's
ladder.
6.5 Installing the lateral flashings
CAUTION
Material damage
(1)
(2)
(1) Sheet metal screws, 6.5 x 65 mm (self-drilling)
(2) Portrait adapter (two-part)
Installation:
| For orientation: Mark the position of the roof battens
on the corrugated metal sheet by using a chalk line.
| Screw the portrait adapters at the points specified in
the planning (see page 6, "Planning the module field")
with two 6.5 x 65 mm sheet metal screws each onto
the roof batten lying directly underneath. Use the
corresponding drill holes in the adapter.
| Install the two parts of the portrait adapters in the
module field precisely aligned above each other.
| For mounting on the lateral edges, the perforated rail
can be slid sideways up to 50 mm beyond the basis
to ensure a clean transition between roof and module
field.
CAUTION
Material damage
Screws that are not attached in the centre of
the roof batten may rip out.
| Position all screws in the centre of the
battens.
Attention:
| For portrait installation, the lateral flashings must be
installed before fixing the outer adapters (see point
6.5 "Installing the lateral flashings").
| Ensure professional potential equalisation of the
metal surface without damaging the leak tightness.
(1)
(1)
200 mm
(2)
(1) Lateral flashing
(2) Fixation clip for 4.5x45 mm roofing screws
Installation:
| Position the lateral flashings so that 2 waves of the
flashing overlap the corrugated metal sheet on the
right and left side of the module field.
| Align the sheets on the lower edge of the corrugated
metal sheet area.
| If using several lateral flashings, overlap them by at
least 200 mm vertically – if necessary, shorten the
topmost lateral flashing corresponding to the size of
the corrugated metal sheet area.
| Ensure a professional overlapping of the sheets by
using roofing tinsmith tools such as clinching pliers.
| By using the fixation clips and roofing screws, fix the
flashing on the outer edge at least every
50 cm.
| Fix the flashing on the inside by using roofing screws
and calottes or adapters (only for portrait installation)
at least every 500 mm.

6 Installation
Theta Installation manual 19
ENGLISH
6.6 Installing the top flashing
(1) Top flashing, a strip of 150 mm flattened on the edges (area
marked in grey)
(2) Lateral flashing
(3) Corner flashing
(4) Top flashing
Installation:
| Install additional roof battens 30 mm below and
280 mm above the upper end of the corrugated
metal sheet area (measured from the centre of the
battens).
| Position the left-hand and right-hand corner
flashings with the respective two outer
corrugations and the flat part overlapping the
lateral flashings, and push them downwards as far
as they will go. (Alternatively, by use of a rubber
hammer, about 150 mm of the top flashing can be
flattened on the left-hand and right-hand top
flashings respectively (see area marked in grey
above). The flattened sheets can then be used in
place of the corner flashings).
| Continue positioning the top flashings, taking care
to align them properly and to have them overlap
each other by at least 80 mm (= two high points of
the corrugation). Fix each overlap with an adapter
and 2 screws 6.5 x 65 mm (if in the right position) or
with a calotte and screw 4.5 x 45 mm.
| Work the upstand of the flashings with tinsmith tools
to ensure a clean overlap.
| Fix the upstand to the underlying batten at least
every 500 mm, using fixing clips and screws
4.5 x 45 mm.
| Complete the fixation of the top flashings by fixing
the corrugated part at least every 500 mm, using
adapters and/or calottes and the according screws.
(1)
(2)
(2)
(3)
(4)

6 Installation
Theta Installation manual 20
ENGLISH
6.7 Installing the PV modules
Attaching the PV modules on the outer edge of
the module field (portrait and landscape
installation)
Inserting the Quickstone
Attaching the PV modules within the module
field (portrait and landscape installation)
(1) PV module
(2) Module end clamp
(3) Quickstone channel of the adapter
Installation:
| Place the Quickstone in the track channel of the
adapter.
| When positioning, the bolt at the bottom side of the
Quickstone may not protrude. The form of the
Quickstone fits precisely into the channel.
| Place the module on top and align it.
| Slide the end clamp completely onto the module and
tighten it (tightening torque 8 Nm), so that there is a
minimum of 25 mm between the inner side of the end
clamp (on the module frame) and the outer adapter
edge.
Attention:
| The track channel of the adapter in which the end
clamp is slid, is identical for both, portrait and lands-
cape installation. It is merely turned by 90° and
positioned transversely to the overlying module
frame.
| In order to ensure secure positioning, the Quicks-
tone must sit completely inside the adapter (at least
5 mm distance from the adapter edge).
(1) End clamp
(2) Allen bolt
(3) Quickstone
(4) Adapter
(1)
(1)
(2)
(3)
(4)
.
(1)
(2)
(3)
CAUTION
Material damage through incorrect
installation
Incorrectly installed Quickstones may rip out.
| All Quickstone connections must be instal-
led according to instructions.
(1)
(2)
(1)
(2)
Installation:
| Place the Quickstone in the channel of the adapter.
| When positioning, the bolt at the bottom side of the
Quickstone may not protrude. The form of the
Quickstone fits precisely into the channel.
| Align the module clamp on the first module and then
slide the next module up against the module clamp.
| Tighten the module clamp (tightening torque 8 Nm),
so that both modules are securely fixed.
(1) Module clamp with Quickstone
(2) PV module

6 Installation
Theta Installation manual 21
ENGLISH
6.8 Retiling the roof
(1) Roof tile
(2) Module field (left side)
CAUTION
Leaky construction
If the roof tiles do not sufficiently overlap the
flashings, the roof may become subject to
leaks.
| Lay the roof tiles over the flashings up to
the edge of the module field.
Installation:
| Replace the roof tiles around the module field.
| Depending on the module field and the type of tiles,
it may be necessary to cut the adjoining roof tiles
down to size.
| Should it be necessary to shorten the mounting on
the underside of the roof tiles, additional professio-
nal fixation must be ensured.
| Depending on the type of roof covering, it may be
impossible to avoid a gap between the tile and the
flashing (top or lateral). Should this be the case, the
gap must be sealed against snow accumulation and
insects.
(1)
(2)
(1)
(2)
(1) Roof tile
(2) Module field (top edge)
Table of contents
Other Mounting Systems Construction Equipment manuals

Popular Construction Equipment manuals by other brands


Toro
Toro 68038 Operator's manual

Auto Crane
Auto Crane EHC-4 NEXSTAR owner's manual

Faithfull
Faithfull HIGH WALKERS quick start guide

Marshalltown
Marshalltown SHOCKWAVE 2.0 POWER SCREED manual

Generac Power Systems
Generac Power Systems MAGNUM MLT6SKDS owner's manual

Pittsburgh Automotive
Pittsburgh Automotive 69514 Owner's manual & safety instructions


