MP-Man MP-M700 User manual


NOTICE TO USERS
WARNING
TO REDUCE THE RISK OF FIRE OR ELECTRIC SHOCK,
DO NOT EXPOSE THIS APPLIANCE TO RAIN OR MOISTURE.
Copyright Notices
Under the copyright laws, neither the documentation nor the software for this product
may be copied, photocopied, reproduced, translated, or reduced to any electronic
medium or machine-readable form, in whole or in part, without the prior written
consent of MPMan.com, Inc.
Copyright©2001 MPMan.com, Inc. All rights reserved.
•Microsoft, Windows, Windows Media and the Windows Logo are trademarks or
registered trademarks of Microsoft Corporation.
• Intel and Pentium are registered trademarks of Intel Corporation.
• MultiMediaCard is a trademark of Infineon Technologies AG.
•The names of systems and products appearing in this
manual may be registered trademarks or trademarks of their
respective companies or organizations. In this manual, the
TM or ®mark is not always explicitly described.
Disclaimer
MPMan.com, Inc. will not be responsible for any loss or damage of music files due to
their transfer to the MP-M700 player.
About the supplied software
•For using the supplied Audio Manager software, follow the terms of License
Agreement that you can view during the installation of the software.
•
You need software upgrades in order to support emerging new compression methods
other than WMA and MP3. Some software upgrades may not be free of charge.
•For FAQs and downloading the new software for the MP-M700 player, refer to
http://www.mpman.com
Warning
You must be aware that distributing copies of WMA- or MP3-format music files to any
other person without permission is against the copyright laws. You can use the software
in the supplied installation CD-ROM for personal use only.
COPYRIGHT
Please check the laws on copyright relating to recordings from discs, radio or external
tape for country in which the machine is being used.
PRECAUTIONS
The following are precautions that you should always keep in mind. Any violation of
one or more of the following precautions may cause damage and will void the
warranty.
To maintain good performance
• Avoid exposure to heat, moisture and static electricity.
• Do not use the player in places that are extremely hot, cold, dusty, or humid.
•In particular, do not keep the player in a high humidity area such as a bathroom,
near a heater or in an area exposed to direct sunlight *e.g., inside a parked car).
•When you carry the battery in your pocket, do not have other metal objects such as
coins or keys in the same pocket.
Friction caused by the metal and the battery rubbing together may cause a fire.
• Make sure that pins or other foreign objects do not get inside the player.
Caution of impact
Do not drop the player or allow any sharp impact. This may cause serious damage to
the player.
Note on listening with the headphones
•Listening to the player at full poser for extended periods of time can result in
hearing damage.
•Do not wear the headphones while driving or cycling. This may create a traffic
hazard.
•You should use extreme caution or temporarily discontinue use in potentially
hazardous situations, such as walking, jogging, etc.
• Wear them properly; L is left and R is right.
• The in-ear type headphones should be worn with the longer cord behind your neck.
To clean the cabinet
Do not use chemicals to clean the cabinet. This may change the color of the player or
damage the surface. Use a soft towel to clean the surface of the player.
*mp-man MP-M700øµ 01.12.14 1:24 PM ∆‰¿Ã¡ˆ1

Introduction
1. Main features .................................................................................6
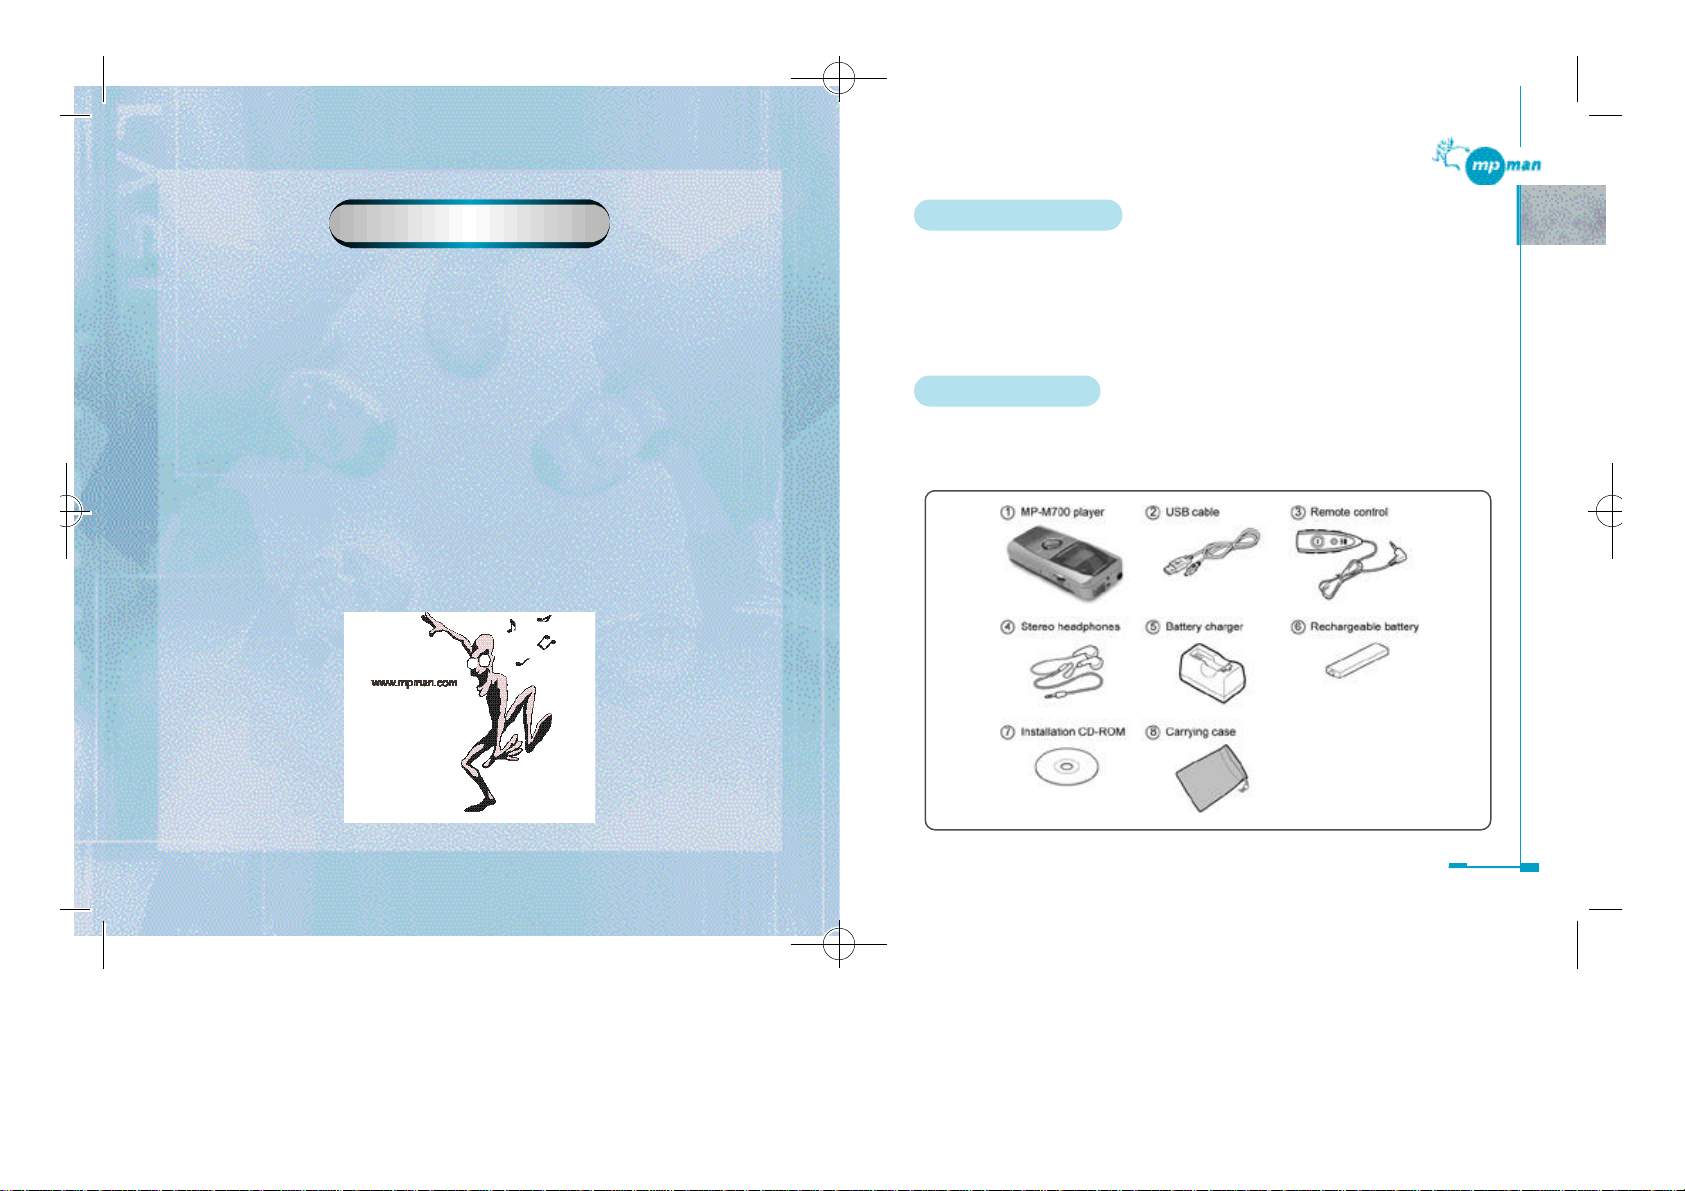
2. Accessories .....................................................................................6
3. System requirements .....................................................................7
4. About this manual .........................................................................8
5. Viewing Help .................................................................................8
6.
Restrictions on transferring music files and using MultimediaCards
......9
Preparation
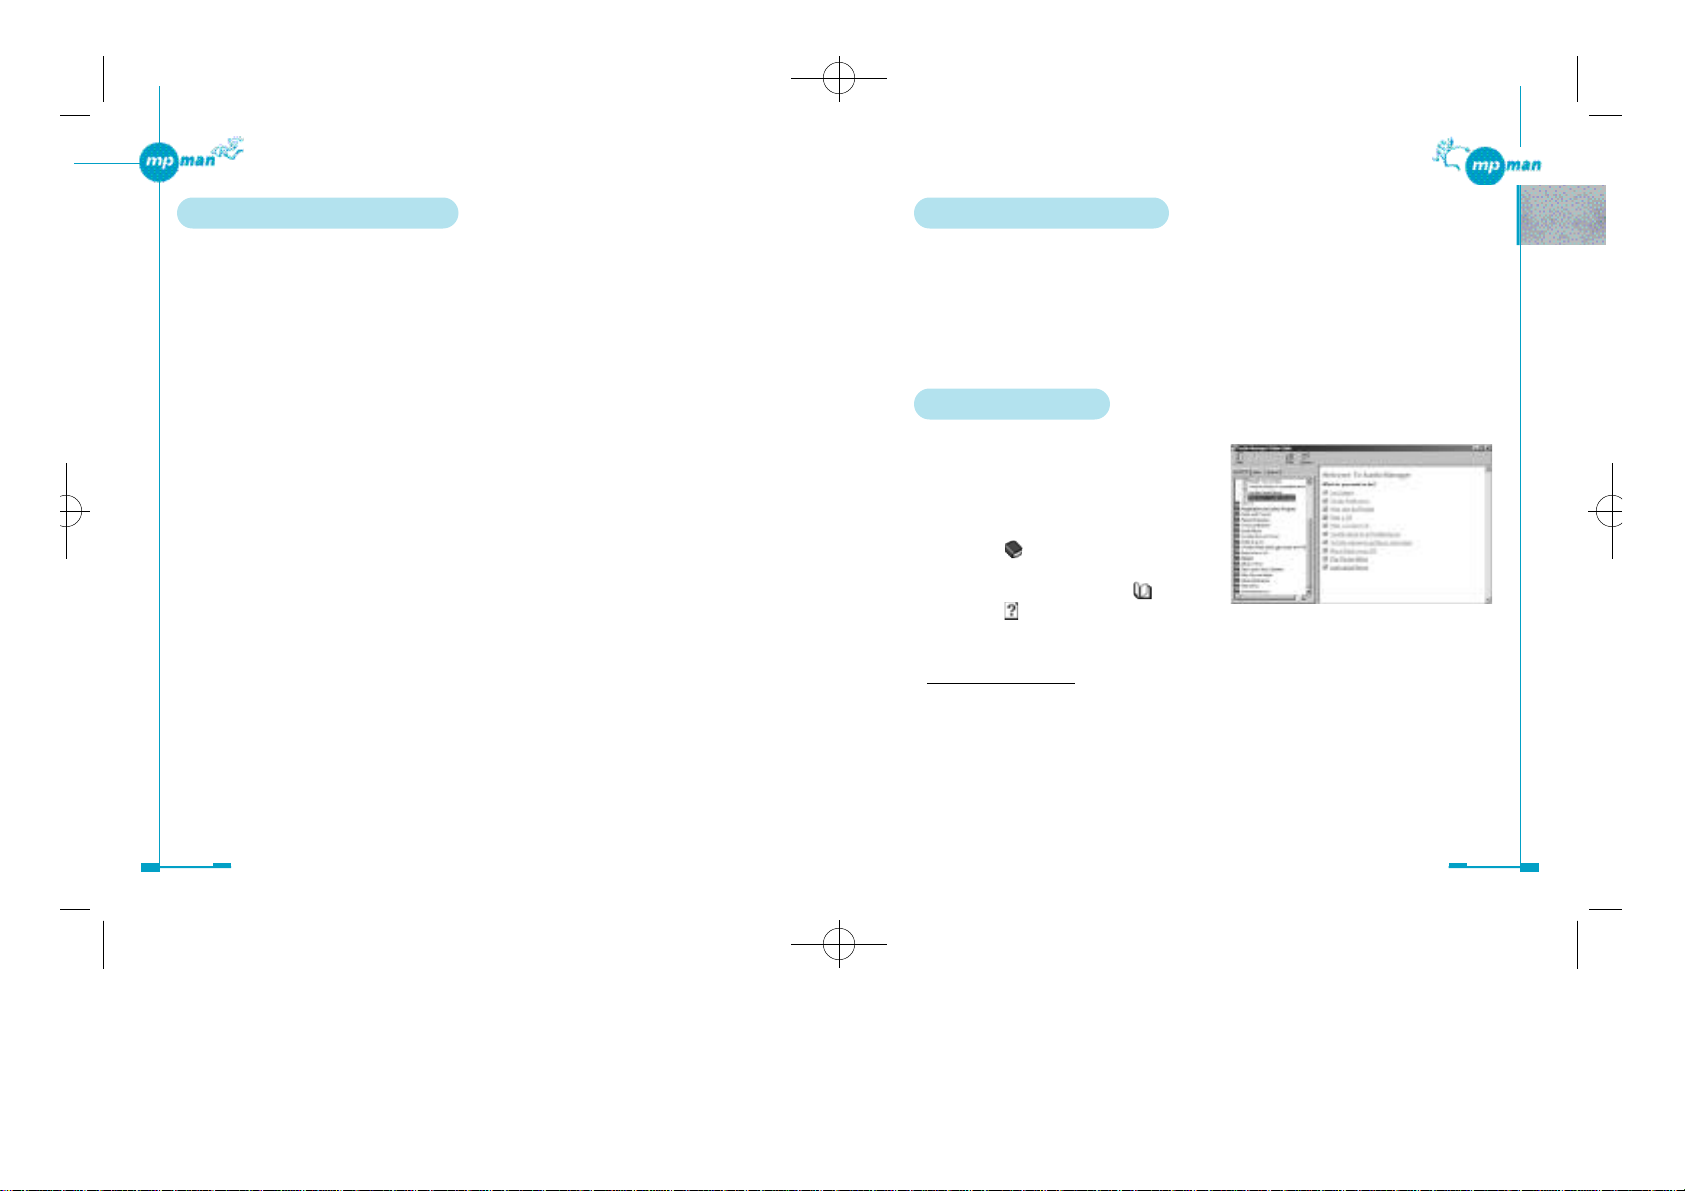
1. Installing the Audio Manager and driver software .................11
Uninstalling the Audio Manager and driver software ...................14
2. Preparing the MP-M700 player .................................................15
Charging the battery ......................................................................15
Inserting the battery .......................................................................15
Battery indicator ............................................................................16
Installing a MultiMediaCard .........................................................16
Formatting a MultiMediaCard ......................................................17
3. Connecting the MP-M700 player to your computer ................18
Disconnecting the MP-M700 player .............................................19
Installing the USB driver ..............................................................20
Using Audio Manager
1. Starting Audio Manager..............................................................23
Switching between the Audio Manager window and small player
....24
To exit Audio Manager .................................................................24
Changing the appearance of the Audio Manager window ............24
2. Identification of Audio Manager controls .................................25
Audio Manager window ................................................................25
3. Recording tracks from a music CD ...........................................27
Read a CD window .......................................................................27
Recording tracks ............................................................................29
Obtaining track information about a music CD automatically .....33
4. Obtaining music files via the Internet .......................................34
5. Organizing tracks using play list ...............................................36
Play List window ..........................................................................36
Creating a play list ........................................................................39
Creating a play list so that it contains music files already on your computer
........41
TABLE OF CONTENTS
Chapter 4
Chapter 3
Chapter 2
Chapter 1
Chapter 5
Adding tracks to the previously created play list ..........................42
Deleting tracks from the previously created play list ....................43
Deleting tracks and play lists from your database ........................44
Editing track information ..............................................................46
Playing the tracks in the play list ..................................................46
Playing the tracks on the music CD ..............................................47
Shortcut menus ..............................................................................47
6. Transferring tracks to the MP-M700 player .......................48
Copy to Devices window .........................................................48
Transferring tracks to the MP-M700 player ............................51
Viewing current memory usage status of the memory media
...........54
Deleting tracks from the memory media .................................55
Increasing the number of files that can be transferred to the MP-M700 player
.....55
Formatting the internal Flash Memory and MultiMediaCard
...........56
Using the MP-M700 player
1. Player overview ...........................................................................58
Main unit .......................................................................................58
Remote control ..............................................................................60
Display window ............................................................................61
2. Using the player ...........................................................................62
Playing back tracks .......................................................................62
Selecting a play mode ...................................................................63
Playing a desired portion of a track repeatedly (A-B Repeat Playback)
.........63
Selecting equalizer settings to suit tracks ......................................64
Selecting the AREA setting before you use the player .................64
Listening to a radio program (Manual Tuning) .............................65
Presetting stations automatically (Auto Preset) ............................66
Presetting stations manually (Manual Preset) ...............................66
Listening to a preset station ...........................................................67
Appendix
1. Specifications ...............................................................................69
2. Frequently asked questions ........................................................70
General questions ..........................................................................70
Questions about the MP-M700 player ..........................................71
3. Troubleshooting ..........................................................................73
*mp-man MP-M700øµ 01.12.14 1:24 PM ∆‰¿Ã¡ˆ3

6
1. Main features
•Boosts the capability of portable audio equipment by incorporating the FM
radio feature in addition to the high-performance memory audio player.
• Having no drive mechanism results in skip-free sound.
• The USB computer interface provides high-speed transfer of music files.
•
Plays back highly compressed CD-quality WMA- and MP3-format music files that
have been t
ransferred from your computer using the supplied Audio Manager software.
2. Accessories
The following accessories are supplied with the MP-M700 player. Make sure all of the
items are in the package.
If anything is missing, please contact the store where you purchased the MP-M700 player.
Introduction
1. Main features
2. Accessories
3. System requirements
4. About this manual
5. Viewing Help
6. Restrictions on transferring music files and using
MultimediaCards
Chapter 1
*mp-man MP-M700øµ 01.12.14 1:24 PM ∆‰¿Ã¡ˆ5

7 8
3. System requirements
The following hardware and software are required for using the supplied Audio Manager
software.
Hardware requirements
• Intel Pentium 233 MMX or faster
• 64MB RAM or more
• Free hard-disk space
- 32MB or more for software installation
- 64MB or more for music-file storage
• CD-ROM drive that supports digital audio extraction
• 1 available USB port
• Sound card
• 256-color display (16-bit color display is recommended) and 16-bit color video card
• 28.8-kbps modem or faster required for Internet access
(ISDN or LAN connection recommended)
Software requirements
• Microsoft Windows 98 or Windows 98 Second Edition*
* You can use the Audio Manager software only on computers on which Microsoft
Windows 98 or Windows 98 Second Edition has been preinstalled by the
manufacturer.
The MP-M700 player does not support Macintosh computers.
• Microsoft Internet Explorer (Version 4.01 Service Pack 2 or later)
Note
Sound skip may occur, depending on the configuration of the computer system and the
applications running on it.
4. About this manual
This manual includes basic instructions for using the MP-M700 player and the supplied
Audio Manager software. For detailed information on how to use the versatile functions
provided by Audio Manager, refer to the Help menu that can be accessed from the Audio
Manager window.
You are also recommended to read the Readme file included on the installation CD-ROM,
which contains helpful supplemental information.
5. Viewing Help
To view Help, click “Help” in the Audio
Manager window, and then click “Help
Topics”.
The “Audio Manager Online Help” window
appears.
•Click on to open any book and display
the topics it contains.
To close a book, double-click .
• Click on to open a topic page.
• Click an underlined term in the topic to jump to another related topic.
Searching by Keyword
1. Click the “Index” tab in the Online Help window.
A list of keywords appears.
2. Enter the word that you wish to search for or scroll the list of keywords.
3. Select a keyword from the list and click “Display”.
The related topic appears.
When two or more topics are related to a selected keyword, a “Topics Found” dialog
box appears. Select the desired topic from the list and click “Display”.
*mp-man MP-M700øµ 01.12.14 1:24 PM ∆‰¿Ã¡ˆ7

Preparation
1. Installing the Audio Manager and driver software
2. Preparing the MP-M700 player
3. Connecting the MP-M700 player to your computer
Chapter 2
9
6. Restrictions on transferring music files
and using MultiMediaCards
For the purpose of copyright protection for music files, the MP-M700 player and the
supplied Audio Manager software have some restrictions on transferring music files and
using MultiMediaCards on portable players.
• MP3 files recorded from music CDs can be transferred to up to 3 MP-M700 players.
•WMA files recorded from music CDs can MP-M700 players. However, future changes
in the file format due to changes in specifications or because of copyright protection
measures may lead to some restrictions on transferring and therefore on playing back
WMA files on the MP-M700 player. For detailed information, refer to
http://www.mpman.com.
•For a music file that is obtained from a content provider via the Internet, the number of
MP-M700 players to which you can transfer the music file depends on the information
written in the file by the content provider.
• A music file transferred to the player cannot be restored to your computer.
Tip
For specific restrictions on transferring music files to the MP-M700 player, click on the
“Advanced” button, which you can find in the Copy to Devices window.
*mp-man MP-M700øµ 01.12.14 1:24 PM ∆‰¿Ã¡ˆ9

12
1. Installing the Audio Manager and driver software
Before using the MP-M700 player, you must install the Audio Manager and driver software
on your computer.
Before starting the installation
• Do NOT connect the MP-M700 player to your computer.
• Quit any active applications.
•If you have already installed a different version of Audio Manager, delete it by
following the procedure described in “Uninstalling the Audio Manager and driver
software” (Chapter 2).
• If you install the Audio Manager software
under Windows 98 (but not Windows
SE), the installation program will not
change the program to be associated with
a WAVE (.wav) file by Audio Manager.
If your system is running Windows 98,
click on “Fix Problem” when the dialog
box noticing you for it appears during
installation.
You can also change the setting after installation is finished. Click on the box to the left of
“Wave Audio Files” under the “File Types” tag that can be accessed by clicking on
“Options” of the “View” menu.
1. Insert the installation CD-ROM into the CD-ROM drive of your computer.
2. Double-click on the My Computer icon on the desktop.
3. Double-click on the icon to access the CD-ROM.
4. Double-click on the icon to start the installation program.
The “Welcome!” dialog box appears.
5. Click on “Next”.
The “Choose Setup Language” dialog box
appears.
6. Select the desired language from the drop-down menu opened by clicking on the
button, then click on “OK”.
The “License Agreement” dialog box appears.
7. Click on “Yes” if you accept the terms of the Agreement.
8. Click on “Yes” in the next “Privacy Statement” dialog box if you accept the terms
of the agreement.
9. Click on “Next” if you accept the default installation location or click on “Browse”
to select your desired location from the “Choose Folder” dialog box.
Tip
If you wish to change the configuration, you can click on “Back” to redo any step of the
installation process.
11
*mp-man MP-M700øµ 01.12.14 1:24 PM ∆‰¿Ã¡ˆ11

10.Click on “Next” if you accept the
default location for storing created
music files or click on “Browse” to
select your desired location from the
“Choose Folder” dialog box.
A dialog box appears and asks if you
want to register Audio Manager as a
default player.
11.Click on “Yes” if you want to use Audio Manager as a default player.
Otherwise, click on “No” in the dialog box.
Copying of the driver software to the computer starts.
12.Click on “Finish” in the “Installation
Complete” dialog box.
13.Click on “OK” in the dialog box that
prompts you to restart your computer.
When your computer finishes rebooting, installation of the Audio Manager and driver
software is completed.
Uninstalling the Audio Manager and driver software
1. Click on the “Start” button, point to
“Programs” and “Audio Manager”,
then click on “Uninstall Audio
Manager”.
A dialog box appears and asks if you
really want to uninstall the software.
2. Click on “Yes” in the dialog box.
3. Click on “OK” in the Uninstallation
completion dialog box.
Successively uninstall the driver
software.
4. Click on the “Start” button, point to “Programs” and “Audio Manager”, then click
on “Uninstall driver”.
You are finished uninstalling when you return to the desktop.
1413
*mp-man MP-M700øµ 01.12.14 1:24 PM ∆‰¿Ã¡ˆ13

16
Battery indicator
The battery indicator shows the power
remaining.
When lights, recharge the battery. If you
continue to use the MP-M700 player after
lights, the “LOW BATT” indicator
appears, operation stops, and the MP-M700
player beeps.
Note on the rechargeable battery
• Use only the supplied battery charger to recharge the battery.
•Do NOT carry the battery in a pocket or handbag together with metal objects such as
pendants or key holders.
• Do NOT short-circuit the terminals by placing a metal object across them.
• Do NOT try to disassemble the battery, heat it, or put it in water.
• The supplied rechargeable battery can be recharged approximately 300 times.
Installing a MultiMediaCard
Before you purchase an additional contact your nearest MPMan service personnel to find
out which kind that works best with your MP-M700 player.
Before installing or removing a MultiMediaCard, be sure to turn off the MP-M700 player
and disconnect the USB cable from it.
1. Remove the battery compartment cover.
2. Insert the MultiMediaCard into the slot in the
correct direction, holding it with the beveled
corner to the right.
The mark printed on the player over the slot
indicates the correct orientation of the card.
3. Replace the battery compartment cover.
To remove the MultiMediaCard
First push the MultiMediaCard in slightly to release it.
15
2. Preparing the MP-M700 player
Charging the battery
Before using the rechargeable battery for the first time, charge it for about 3 hours.
1. Insert the rechargeable battery into the
supplied battery charger.
2. Plug the battery charger into a wall outlet.
Note
The LED will be turned on while charging the battery.
When charging is completed, the LED will be turned off.
Recharging a completely drained battery takes about 3 hours.
When the battery has finished charging, remove it from the battery charger and disconnect
the battery charger from the wall outlet.
Inserting the battery
1. Remove the battery compartment cover.
2. Install the rechargeable battery with the and
poles correctly aligned.
3. Replace the battery compartment cover.
*mp-man MP-M700øµ 01.12.14 1:24 PM ∆‰¿Ã¡ˆ15

17
Formatting a MultiMediaCard
In order to use a MultiMediaCard with an MP-M700 player, you must initialize it to MP-
M700 format using the format function of the supplied Audio Manager.
For details on formatting a MultiMediaCard, see “Formatting the internal Flash Memory
and MultiMediaCard” (Chapter 3).
Note on the MultiMediaCard
• Insert the MultiMediaCard completely into the slot to ensure that it is recognized
by Audio Manager.
•NEVER remove the MultiMediaCard from the MP-M700 player while Audio Manager
is formatting it or transferring music files to the MP-M700 player.
Doing so may cause not only the computer to freeze up but also the memory media to be
damaged.
• Music files on the MultiMediaCard cannot be played back with another player.
18
3. Connecting the MP-M700 player to your computer
Use the supplied USB cable to connect the MP-M700 player to your computer, as shown
below.
1. Connect the series A connector (the larger one) to the computer’s USB port.
2. Connect the series B connector (the smaller one) to the USB port connector of the
MP-M700 player.
3. Turn on the player by holding the button pressed until “CONNECT USB”
appears on the display of the MP-M700 player.
If you connect the USB cable to the MP-M700 player while it is in Playback mode, the
player will stop playback and display “CONNECT USB”.
*mp-man MP-M700øµ 01.12.14 1:24 PM ∆‰¿Ã¡ˆ17

2019
Installing the USB driver
Installation of the USB driver is automatically
performed when you turn on the MP-M700 player
for the first time after connecting it to the
computer (chapter 2).
If any problem occurs during installation of the
Audio Manager software, the “Add New
Hardware Wizard” appears when you connect the
MP-M700 player and turn it on. If this happens,
install the USB driver by following the steps
below.
1. Click on “Next” in the “Add New Hardware Wizard” window.
2. Select “Display a list of all the drivers in a specific location, so you can select the
driver you want”, the click on “Next”.
3. Select “Universal Serial bus controllers” from the list, then click on “Next”.
4. Click on the “Have disk” button.
5. Insert the supplied installation CD-ROM
into the CD-ROM drive of your computer,
then click on the “Browse” button.
The “Open” dialog box appears.
Note
If the “Add New Hardware Wizard” appears after you turn on the MP-M700 player in step
3, install the USB driver, following the procedure described in “Installing the USB driver”
(chapter 2).
•Before connecting the MP-M700 player to your computer with the supplied USB cable,
be sure to fully charge the battery.
If “LOW BATT” or “NO BATT” appears on the display of the MP-M700 player when
it is connected to the computer, disconnect the MP-M700 player from the computer,
then reconnect it after fully charging the battery.
•The following actions are strictly prohibited while transferring music files or formatting
the memory media. Doing so may cause not only the computer to freeze up but also the
memory media to be damaged.
- Disconnecting the USB cable from the MP-M700 player or the computer
- Removing the battery from the MP-M700 player
- Removing the MultiMediaCard from the MP-M700 player
•Do NOT turn on or off the computer while the MP-M700 player is connected to the
computer. This may cause damage to the MP-M700 player or the music files stored on
it.
Disconnecting the MP-M700 player
You can disconnect the MP-M700 player from your computer whenever you like except
during the process of transferring music files or formatting the memory media.
When you disconnect the USB cable from the MP-M700 player, it will automatically shut
off, leaving the message “GOOD-BYE”
*mp-man MP-M700øµ 01.12.14 1:24 PM ∆‰¿Ã¡ˆ19

21
Using Audio Manager
1. Starting Audio Manager
2. Identification of Audio Manager controls
3. Recording tracks from a music CD
4. Obtaining music files via the Internet
5. Organizing tracks using play list
6. Transferring tracks to the MP-M700 player
Chapter 3
6. Select an appropriate drive from the “Drives” drop-down menu, then click on
“OK”.
7. Click on “Next” after confirming that “MP Man MP-M700” is listed in the
“Models” list box.
A window appears telling you that Windows is ready to install the driver.
8. Click on “Next”.
The wizard begins copying the necessary files to your computer. A subsequent window
appears when copying of files is completed.
9. Click on “Finish”.
Confirming Installation of the USB driver
You can confirm if the USB driver is successfully installed by the following procedure:
1. Check that the MP-M700 player is
connected to your computer and
turned on.
2. Point to “Settings” of the “Start”
menu, then click “control Panel”.
3. Double-click on the “System” icon to
open the “System Properties” dialog
box.
4. Click on the “Device Manager” tab.
5. Click on the mark of the “Universal
Serial Bus controllers” item.
6. If “MP-M700” is listed, the USB driver
is successfully installed.
*mp-man MP-M700øµ 01.12.14 1:24 PM ∆‰¿Ã¡ˆ21

2423
Switching between the Audio Manager window and small player
To switch to the small player, click on the (Small Player) icon to the right of the
navigation buttons bar in the Audio Manager window.
You can also click on “Small Player” of the “View” menu.
To switch to the Audio Manager window (big player), right-click on the area within the
small player, then select “Big Player” from the shortcut menu.
Tip
Each time you press the F8 key, Audio Manager switches between the big player and small
player.
To exit Audio Manager
Click on the upper-right corner of the Audio Manager window and small player.
You can also click on “Exit” from the “File” menu in the Audio Manager window or the
shortcut menu of the small player that appears when you right-click.
Changing the appearance of the Audio Manager window
In Audio Manager, several skins of different design are available, which allow you to
change the appearance of your Audio Manager window (also of the small player) to suit
your preference.
Click on “Link to more skins” of the “Skins” menu in the Audio Manager window to
connect to the Web site, where you can find and download skins of your preference.
When you are displaying the small player, click on “Skins” from menu of the small player
that appears when you right-click.
1. Starting Audio Manager
To start Audio Manager, double-click on the (Audio Manager) icon on the desktop.
You can also click on the “Start” button, point to “Programs” and “Audio Manager”, then
click on “Audio Manager”.
Note
When you start Audio Manager for the first
time after installation, the following dialog
box appears.
If you have ever installed and upgraded
Audio Manager, enter our e-mail address and
click on “Connect”. If not, click on “Skip”,
and “OK” in the next dialog box.
*mp-man MP-M700øµ 01.12.14 1:24 PM ∆‰¿Ã¡ˆ23

2625
Copy to devices button
Click on this button to open the Copy to Devices window, which allows you to transfer
tracks from your computer to your MP-M700 player (chapter 3-6).
The Copy to Devices window also allows you to view a list of tracks and delete tracks
stored on the memory media.
Write audio cd button
Click on this button to open the Write CD window, which allows you to record tracks from
your computer on a CD-R.
Note
MP-M700 does not support the functions available in the Write CD window. For detailed
information about the Write CD window, refer to the “Write to a CD” book in the Online
Help window.
Read a cd button
Click on this button to open the Read a CD window, which allows you to record tracks from
a music CD to your computer (chapter 3-3).
Go to web button
Click on this button to connect to the WindowsMedia.com Web site (chapter 3-4).
Small Player icon
Click on this icon to transform Audio Manager
into a Small Player.
For a description of each control, see “Player
controls” (chapter 3-5-5).
When you start playing back tracks on Small
Player, the WhiteCap window appears giving
representations with 3-D curve graphics.
Note
Minimizing Small Player causes the WhiteCap window to disappear. To restore the
WhiteCap window, quit audio Manager and restart it.
Tip
You can display each window using the “Navigation” command of the “View” menu
instead of using above buttons.
2. Identification of Audio Manager controls
Audio Manager window
To make full use of the MP-M700 player, you need to learn how to use the basic functions
of the Audio Manager.
Menu bar
Clicking on an item opens a drop-down menu
from which you can select commands. The
following is the “View” menu opened by
clicking on the “View” item on the menu bar.
To learn how each menu command functions,
refer to the “Quick Reference” book in the
Online Help window.
Audio Manager navigation buttons
Make a playlist button
Click on this button to open the Play List window, which allows you to listen to tracks and
organize tracks into play lists as you like, such as by artist, genre, etc. (chapter 3-5).
(Audio Manager with the Play List Window opened)
*mp-man MP-M700øµ 01.12.14 1:24 PM ∆‰¿Ã¡ˆ25

2827
Read a CD Track list
Displays information about the loaded music CD, such as an album title, and the title,
artist, and length of each track on the music CD.
Select the tracks you want to record by clicking on the box to the left of each track.
Read a CD Track list button bar
button
Click on this button to reload information on the music CD.
button
Click on this button to select all the tracks on the list for recording. All the boxes to the
left of the tracks are checked at once.
button
Click on this button to clear the check marks for all the tracks on the list at once.
Track Details box
Displays information about the selected track, such as the title, artist, playing time,
album title, category, and lyrics. You can view more detailed information and edit it by
clicking on the “Edit Track Info” button.
Status box
Displays the current progress of the recording process. The upper status bar displays the
recording progress of the track currently being processed, and the lower status bar shows
the overall recording progress for all the tracks selected for recording.
3. Recording tracks from a music CD
Read a CD window
The Read a CD window allows you to record selected tracks from a music CD or record an
entire music CD at once. The recorded tracks can be transferred to your MP-M700 player
for playback.
Read a CD button bar
button
Click on this button to obtain information about the inserted music CD from the CDDB
server on the Internet (chapter 3-3).
The CDDB service may require a charge in the future. If you want to keep using the
CDDB service at this time, a license will be provided by the CDDB service.
button
Click on this button to open the “Preview Play List” window, which allows you to edit
the CD or track information manually.
button
Click on this button to start recording tracks from a music CD.
button
Click on this button to stop recording.
*mp-man MP-M700øµ 01.12.14 1:25 PM ∆‰¿Ã¡ˆ27

30
Under the “CDDB” tab, check the “Always get title from CDDB when CD is inserted”
option by clicking on it if you want information about a music CD to be obtained
automatically.
If you check this option, you can obtain general information about a music CD, such as
album title, track titles, artist name, and playing time from the CDDB* server on the
Internet.
Otherwise, leave this option unchecked.
You must have Internet access to use CDDB.
* The disc-recognition service provided via the Internet by CDDB, Inc.
1. Double-click on the icon on the desktop to start Audio Manager.
2. Insert the music CD from which you wish to record tracks into the CD-ROM drive
of your computer.
If the Play List window is open and any
tracks remain on the list, the “New CD
Detected” dialog box appears, asking you
to select “Play this CD”, “Append to Play
List”, or “Cancel”. If this dialog box
appears, click on “Cancel” in the dialog
box.
3. Click on the “ read a cd” button to open the Read a CD window.
The Read a CD window appears with all
the tracks on the music CD checked for
recording.
If you did not check the “Always get title
from CDDB when CD is inserted” option
mentioned above, the dialog box appears
and prompts you to obtain information
about the inserted music CD automatically.
Now, click on “No” so you can edit
information manually.
If you want to record the entire music CD into your computer, skip steps 4 and 5, and go
to step 6.
Recording tracks
Before starting
Before starting you may confirm and change the settings to use when recording tracks from
a music CD by following the steps below.
To learn more about setting preferences, refer to the “Set Preferences” book in the Online
Help window.
Click on “Options” of the “View” menu to open the “Options” dialog box.
Under the “Read CD” tab, confirm the following settings and change them if necessary.
Drive:
Choose the CD-ROM drive to use when recording tracks from a music CD. If you have
multiple CD-ROM drives in your computer, you can change the current CD-ROM drive by
clicking on to the right of the “Drive:” field.
Record File As:
Choose the file format to use when recording tracks from a music CD by clicking on to
the right of the “Record File As:” field. You can choose between “Mpeg (.mp3)” and
“Microsoft Windows Media Audio (.wma)”.
Bit Rate:
Select the bit rate to be used to encode tracks recorded from a music CD. Click on to the
right of the “Bit Rate:” field, then select one of items. Higher bit rates create files with
better sound quality, but larger file sizes result in less total recording time that can be stored
on the memory media.
Note
•The MP-M700 player supports WMA and MP3 files encoded with a following bit rate.
Files encoded with other bit rates may cause inaccuracy of elapsed playing time
indicated on the display and sound skip.
-
WMA files encoded with a bit rate of 64, 80, 96, 128, or 160 kbps
-
MP3 files encoded with a bit rate of 64, 80, 96, 128, 160, 192, 256, or 320 kbps.
•Be sure not to check the “Protect files for use on this machine only” option in the “Bit
Rate:” field, if you want to play back the encoded files on another computer or transfer
them to the MP-M700 player using another computer.
29
*mp-man MP-M700øµ 01.12.14 1:25 PM ∆‰¿Ã¡ˆ29

3231
Click on “Next” once or more times to go to the next track to edit. When you have no
more tracks to edit, click on “Close”.
Click on “Close” to close the “Preview Playlist” window. To learn more about how
to use the “Edit CD Track Information” dialog box, refer to the “Edit Track
Information” under the “Play List” book in the Online Help window.
7. Click on the “Start Reading” button.
The recording process for the selected tracks starts. The Status box displays the progress
of the track currently being recorded and the total recording progress of all the tracks
selected for recording.
To stop recording, click on the “Stop
Reading” button.
When the entire track is successfully
recorded, the dialog box stating that
recording is completed successfully
appears.
If you are going to record tracks from a
CD for the first time, the “Testing CD
drive...” dialog box appears stating that
your system and CD-ROM drive is being
tested. Through this process, your system
and CD-ROM drive will be automatically
configured and optimized for recording.
Note
As to MP3 format, the number of times allowed for encoding is limited to 50. If you try to
record tracks from a music CD past that limit, a message notifying you of that will appear
once you click on the “Start Reading” button. If this happens, you can use WMA file
format, which has no such limitation.
8. Click on “OK.”
The recorded tracks are added to your database.
Now you are ready to go to “Creating a play list” (chapter 3-5).
4. Click on the “Untag All” button to clear the check marks for all the tracks on the
“Read a CD Track” list.
5. Select the tracks that you want to record into your computer by clicking on the box
to the left of each track.
To cancel a selection, click on the box 5again.
Tip
If you are not sure that the track you selected is correct, right-click on the track, then select
“Play” from the drop-down menu to hear it.
6. Edit track information.
Click on the “Edit Track Info” button.
The “Preview Playlist” window appears.
Select the track that you want to edit,
then click on the “Review/Edit” button.
The “Edit CD Track Information” dialog
box appears.
Enter information about the track such as the title, artist, album title, genre, and
lyrics.
In some fields, you can select the desired item from the drop-down list by clicking on
to the right of the field.
*mp-man MP-M700øµ 01.12.14 1:25 PM ∆‰¿Ã¡ˆ31

3433
4. Obtaining music files via the Internet
Audio Manager provides easy and convenient means to stream music, download music
clips, and purchase music via the Internet. Clicking on a single button automatically
connects you to the WindowsMedia.com Web site, where you can find vast amounts of
music downloads covering almost all popular artists in the world and genres, a variety of
entertainment contents such as movies and radio, and information about hardware and
software. This site also provides many links to other entertainment Web sites.
Note
You must have Internet access to download music via the Internet.
1. Click on the “ go to web” button on the Audio Manager window.
The WindowsMedia.com Web site appears.
2. Search for desired music through links of your preference, or enter a different Web
site address in the address field if you know it.
3. When you find your desired music file,
start downloading it by clicking on the
“Download” button or other such
button that may be displayed in a
particular case.
The “File Download” dialog box appears.
Note
With most contents provider on the Internet, you may be required to fill in information on
an enrollment form for membership before you can download music files.
Obtaining track information about a music CD automatically
If you have access to the Internet, you can obtain information about the music CD, such as
the album title, track title, and artist name, automatically from the CDDB on the Internet.
The CDDB is a database accessible via the Internet, which stores track information
regarding a vast amount of music CDs from all over the world. If your music CD is
recorded in the database, the track information about the CD will be added to your list. If
not, no change will be made to the list. In such a case, you are left with entering the
information manually.
To get track information about your music CD, perform the following.
1. Confirm that you are connected to the Internet.
2. Insert the music CD into the CD-ROM drive of your computer.
A dialog box appears asking you if you
want to get information about the CD
from the Internet.
3. Click on “Yes” in the dialog box.
The connection to the CDDB is automatically established, and downloading starts.
4. When downloading is finished, information about your music CD will be displayed
on the list.
Tip
You can get information at any time you like, but before you start recording, by clicking on
the “Get Track Titles” button, even if you clicked “No” in step 3 in “Recording tracks”
(chapter 3-3). If you click on the “Refresh” button the above dialog box will appear.
*mp-man MP-M700øµ 01.12.14 1:25 PM ∆‰¿Ã¡ˆ33

35
5. Organizing tracks using play list
Play List window
You can use the Play List window to view all the tracks stored on your computer, as well as
to create play lists and add selected tracks to them. The Play List window also allows you to
play back the tracks you added from your database* to the Play List.
If you save the tracks displayed on the Play List as a play list, you can easily prepare a
number of tracks for transfer to your MP-M700 player.
* Music files recorded or downloaded to your computer using Audio Manager are
automatically added to your database. Music files already on your computer can be also
added to your database. To learn more about the database, refer to the “Tracks
Database” and “Play List Database” books in the Online Help window.
Add Tracks to the Play List button bar
button
Click on this button to select desired tracks from your database and add them to the Play
List.
button
Click on this button to select desired play lists from your database and add the tracks
contained in them to the Play List at once.
button
Click on this button to add the tracks from the music CD in the CD-ROM drive of your
computer to the Play List.
4. Check the “Save this file to disk” option and click on “OK”.
The “Save As” dialog box appears.
5. Check that “My Music” is entered in the “Save in” field, enter a filename
if necessary, then click on “Save”.
Downloading starts. When downloading is finished, the “Download complete”
dialog box appears.
6. Click on “OK” in the dialog box.
Now you are ready to play the downloaded music file on the Audio Manager
and your MP-M700 player.
For detailed information about obtaining downloadable music files, refer to the
“Visit the Internet to get audio and video” and “Play Secure Media” books in
the Online Help window.
Note
Most downloadable music files are delivered in a secure files that have encrypted
information for copyright protection written in them. Therefore, you may be
restricted as to playing back and transferring downloaded music files.
36
*mp-man MP-M700øµ 01.12.14 1:25 PM ∆‰¿Ã¡ˆ35

3837
Player controls
Provide basic functions for playing back
tracks with Audio Manager.
Elapsed playing time indicator
Input level indicator
Balance control slider
Drag the slider to adjust the balance between the left and right speakers.
Volume control slider
Drag the slider to the right or left to adjust the volume.
Repeat play button
Plays the current track repeatedly.
Shuffle play button
Plays all tracks in random order.
Track Position slider
Drag the slider to start playback at a different position within the track.
(Backward) button
Plays the previous track.
(Play) button
Starts playback of the selected track.
(Pause) button
Pauses playback. To resume playback, click on again or click on .
(Stop) button
Stops playback.
(Forward) button
Plays the next track.
Play List
Displays the list of the tracks you have added from your database or the music CD in the
CD-ROM drive of your computer. Each track has information such as the track title,
artist name, original album title and playing time, and also an icon that represents its file
type.
A track in MP3 file format
A track in WMA file format (Windows media Audio) file format An icon preceding
the track in the Play List indicates the play status of the track (stopped, in play, or play
paused.) this icon changes among , and depending on the play status of the track.
Organize the Play List button bar
button
Click on this button to clear all the tracks from the Play List.
button
Click on this button to save the tracks displayed on the Play List as a play list, which gives
you an easy way to access these grouped tracks for playback and transfer to your MP-
M700 player.
button
Click on the trash can to delete the selected track from the Play List.
button
Click on this button to move a selected track up in the Play List order.
button
Click on this button to move a selected track down in the Play List order.
Track Details box
Displays detailed information about the selected track, such as the track title, artist
name, original album title, ratings, artwork, and lyrics.
You can edit these details by right-clicking on the track and selecting the “Edit Track”
menu command.
*mp-man MP-M700øµ 01.12.14 1:25 PM ∆‰¿Ã¡ˆ37
Table of contents
Other MP-Man MP3 Player manuals

MP-Man
MP-Man MP-F70 Manual

MP-Man
MP-Man MP-FOL10 Manual

MP-Man
MP-Man MP-F1000 User manual

MP-Man
MP-Man MP-CL1 User manual

MP-Man
MP-Man TK262 Series User manual

MP-Man
MP-Man MP- F59 User manual

MP-Man
MP-Man MP-E2004 User manual

MP-Man
MP-Man MP-AV20 User manual

MP-Man
MP-Man MP-F60 User manual

MP-Man
MP-Man Sporty 5 User manual

MP-Man
MP-Man SPORTY 2 User manual

MP-Man
MP-Man MP-FUB27 User manual

MP-Man
MP-Man MP-FUB27 User manual

MP-Man
MP-Man BT 22 User manual

MP-Man
MP-Man MP-F75 Manual

MP-Man
MP-Man MP-FOL6 Manual

MP-Man
MP-Man MP-F72 User manual

MP-Man
MP-Man MP-FOL6 User manual

MP-Man
MP-Man MIRROR2 User manual

MP-Man
MP-Man TS200 Series User manual