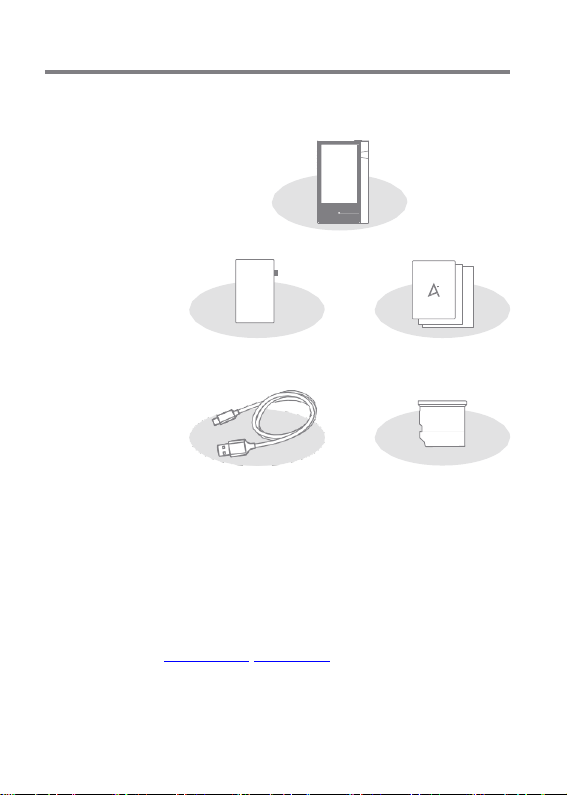
IRiver Astell&Kern PPM12 User manual

PPM12
INSTRUCTIONBOOK
UserGuide

Package Contents
PPM12 at a Glance
Power Management
Charging Connecti
ons Firmware Upgr
ade
02
03
04
05
06
11
Getting Started _01
Basic Operations
Home Screen N
otification Bar S
tore
AK Connect Listenin
g to Music Playlist M
anagement USB DA
CInstallation
How to Use USB Audio
CD Ripping
Using Bluetooth
Settings
Connecting to a Wireless Network
Equalizer Setup
12
14
15
18
19
25
31
34
35
36
38
40
45
46
Using the Device _02
Safety Precautions Tro
ubleshooting Copyrigh
t Certifications Specifi
cations Registered Tra
demarks Disclaimers
49
50
52
52
54
55
55
Miscellaneous _03
CONTENTS

UserGuide
PPM12
microSD Card Slot Cover
Micro-USBCable
Protective Film: Protect the device and its screen. Mic
ro-USB Cable: Connect the device to a computer or ch
arge the device.
Quick Start Guide: Basic overview of device functionality.
Warranty Card: The warranty card is required for customer
and technical support. Do not misplace the card.
User Guide: The User Guide canbe downloaded from the
Astell&Kern website.
[http://www.astellnkern.com/ > Support > Download]. Mic
roSD Card Slot Cover: The cover is used to protect the mi
croSD card slot when not in use. It is installed on the prod
uct by default.
Contents may be changed without prior notice to improve the
performance or quality of the product.
Package
Contents
Protective Film Quick Start Guide
& Warranty Card
Getting Started 2

Earphones: - Earphone symbol.
Output sound to connected earphones.
Power: - Power symbol.
Turn the screen on and off.
Long press - Turn the device on and off.
Balanced Out: - Balanced Out symbol
Output sound to earphones or headphones that support
balanced audio connections. Connect to an external audi
o device by using both the earphone port (ground) and b
alanced audio port (LR) in conjunction.
Micro-USB Port: - DC power symbol
Connect to a computer or recharge the device. You can enjo
y USB audio by connecting with a portable USB DAC (refer to
p. 35).
Previous/Rewind: Play the previous song or restart the song.
Long press - Rewind.
Play/Pause: Play or Pause a song.
Long press - Show the playback screen.
UserGuide
The appearance of the product as well as the printed and
engraved information may vary depending on the model.
PPM12 at
a Glance
microSD
CardSlot Home Button
LCD
Touchscreen
Volume
Previous/
Rewind
Play/Pause
Next/
Fast-Forward
EarphoneJack
Micro-USB Port
Balanced
AudioPort
Power
BalancedAudio
PinMap
R- R+L+ L-
Getting Started 3

This device has an automatic shutdown feature to reduce battery c
onsumption. The device will turn off after a defined period if there i
s no user input. [ - Power Saving - Automatic Shutdown] (See p. 4
3)
This device has an automatic timeout feature to reduce battery con
sumption. The screen will turn off after a defined period of time if t
here is no user input. [ - Power Saving - Screen Timeout] (See p.
43)
Turn the Screen On/Off
1. While the screen is on, press the [ ] button to turn off t
hescreen.
2. Press the [ ] button again to turn off the screen.
TurnOn/Off
1. Long-press the [ ] button to turn on the device.
2. While the device is on, long-press the [ ] button to displ
ay a shutdown confirmation message.
3. Press [Confirm] to turn off the device.
Power
Manage-
ment
UserGuide
Next/Fast-Forward: Skip to thenext song.
Long press: Fast-forward.
LCD Touchscreen: Display with touch control.
Volume: Control the volume by turning the wheel.
microSD Card Slot: - microSD card slot symbol
Insert a microSD card and access its files.
Home Button: Show the home screen.
Getting Started 4

1. Connect the device to the PC using the supplied Micro USB
cable. Charging starts.
UserGuide
Reset Function
1. In cases of unexpected device failure or freeze, press the
[ ] button for 12 seconds to force a shutdown. The devic
e can be restarted after a shutdown.
The device can be restarted after a shutdown.
Resetting the device will not affect the stored data or time setting.
Do not use the reset function while the product is in use. Doing so
may corrupt the data on the device.
Charging time: up to 8 hours (fully discharge, power OFF)
You may have to turn on a computer to start charging depending on
computerspecifications.
When charging via PC connection, the charging time may vary dep
ending on whether the device is turned on or off.
If a computer goes into standby/sleep mode, the device may not be
chargeddepending on computer specifications.
The built-inbatterywill gradually lose capacityover time according
to the numberof charges/discharges.
Do not use any micro-USB cable other than the one supplied with
the device. Doing so may cause a malfunction.
Charging time: up to 4 hours (fully discharge, power OFF)
When using a high-speed charger that is supported with various v
oltages such as 5V/9V/12V, the charging may not proceed normally
and it may cause the product to malfunction.
Getting Started 5
Charging using PC
Charging using the adapter
1. Charging is possible by using the 5V 2A output adapter
(sold separately).
Charging

UserGuide
Connec-
tions
Earphones/Headphones
1. Connect earphones or headphones to the earphones port.
OR
Balanced Earphones/Headphones
1. Connect supported earphones or headphones to the
balanced port.
OR
Balanced Audio Device
1. Connect to an external audio device by using the Earphones
port and Balanced port in conjunction.
Earphones Port BalancedPort (LR)
(Ground)
Astell & Kern balanced cable (PEF12, PEF21) is not supported.
Getting Started 6

UserGuide
Connecting to a Computer
1. Turn on the device and your PC.
2. Connect the device to your PC as a standard USB device
by using a micro-USB cable. [ - Connect USB]
Media Device (USB Drive): Transfer files from a PC to
the device.
DAC input: Listen to music located on a PC through the
device. (See p. 34)
Mac users need to download and install the MTP program from the
Astell&Kern website. [http://www.astellnkern.com Support > Dow
nload]
For an optimal connection, quit any unnecessary programs before
connecting the device to the computer.
Only use the micro-USB cable supplied with the device. Doing so
may causea malfunction.
Windows XP users require Service Pack 2 and Windows Media Pla
yer 10 to be installed for the computer to recognize the USB devic
e.
Download necessary Service Packs and Windows Media Player from
the Microsoft website.http://www.microsoft.com
Disconnecting from theComputer
1. Verify that all operations are completed before attempting
to disconnect the device from the computer.
Disconnecting the device from the computer during an operation (
e.g. file transfer) may corrupt data on the device.
Getting Started 7

UserGuide
Copy Files/Folders to the Device
1. To copy files/folders from your computer, select the desired
files/folders and drag & drop them into the USB device.
Make sure that the micro-USB cable is securely connected.
Note that removing the micro-USB cable or turning off the device or
computer during a file transfer may corrupt data on the device.
File transfer speeds may be affected depending on the computer
and/or OSenvironment.
Getting Started 8

Insert/Remove a microSD Card
1. Refer to the diagram and
gently insert a microSD
card into the microSD c
ard slot.
2. To safely remove a microSD
card, select [Safely remove S
D card] from the Notification
Bar or select [Unmount SD card]
from [ - SystemInformation].
3. Gently press the microSD card
to release it from the slot.
UserGuide
Delete Files/Folderson the Device
1. Right-click the desired file/folder, and then select [Delete].
2. Select [Yes] in the [Confirm File/Folder Deletion] window
to delete the selected file/folder.
Getting Started 9

Maximum supported microSD card capacity: 128GB
Notes on inserting 128GB microSD card.
Do not force the microSD card into the slot. Doing so may cause
damage to the device and/or microSD card.
Do not repeatedly insert/removethe microSD card.
If the microSDcardis improperlyinserted,it may become immovable
or cause damage to the device.
Notes on removing a microSD card
Be sure to safely unmount and remove the microSD card from the
device. Not following the proper procedure may corrupt data and
cause serious damage to the system.
Do not remove the microSD card while it is in use. Doing so may
cause data corruption/deletion, malfunction, and damage to the
microSD card.
Miscellaneous
If the device is unable to recognize the microSD card and/or malf
unctions, format the memory card before use. We recommend usi
ngthe FAT32format.
Using microSD cards other than the recommended brands may
causedevice malfunction.
A microSD card is not included with this device. Please purchase
separately.
UserGuide
Recommended microSDCards
Brand : SanDisk, Transcend
Getting Started 10

Refer to page 45 of the manual for more information on connecting
to a wireless network.
The firmware upgrade may not initialize if the battery level is too l
ow. (A minimum battery level of 50% is required.)
Moving to another screen during a file download will cancel the do
wnload.
Do not disconnect from the wireless network while downloading a f
irmware upgrade. Doing so may cause data corruption and/or dam
age to thesystem.
If an error occurs or the notice in the Notification Bar disappears d
uring an upgrade, download the firmware update again through
[ - Update - System Update].
User Guide
Wi-Fi Update / OTA (Over-the-Air)
1. Connect to a wireless network.
2. When a new firmware version is available, the screen will
display a Firmware Update Guide window.
3. Select [Update] and choose the items for update.
4. Follow the on-screen instructions and proceed with the
firmware upgrade.
Firmware
Upgrade
Getting Started 11

Toprevent damage, do not use a sharp object or use excessive force
when touching the screen.
Basic LCDTouchscreen
Operations 1. This device features an LCD touchscreen that allows you
to perform operations by touch.
Interact with the device by touching the screen to access
various features.
UserGuide
HomeScreen
Using the Device 12
Return to the Home Screen
1. Press the [Home] button at any time to return to the
Home Screen.

UserGuide
Moving a list in the home screen
1. You can move the list by dragging
the home screen [up] / [down].
Navigating Up/Down in a List
1. Scroll through the list by dragging
the list screen [up] and [down].
Using the Device 13

UserGuide
Launches AKConnect.
Currently playing song information.
View the list of songs by different
search options.
1 AK CONNECT
2 CurrentSong
3 Search Options
1
2
3
Home
Screen
The search options can be long-pressed and dragged to change the
irlocations.
Using the Device 14

UserGuide
9
10
11
12
13
14
15
16
8
3
4
5
6
7
Notification 1
Bar
2
Using the Device 15

UserGuide
Expand or collapse the notifi
cation bar by dragging the bar
down or up, respectively.
Press [ ] to turn Wi-Fi on
or off.
Press [ ] to turn Bluetooth
on or off.
Press [ ] to turn the EQ o
n or off. The most recent EQ
settings are applied by default.
Notification Bar
Wi-Fi
Bluetooth
EQ
1
2
3
4
5
Gapless Press [ ] to turnGapless
Playback Playback on or off.
6
Line Out Turn Line Out on or off.
7
Wi-Fi Speakers Turn Wi-Fi speakers on or off
.
(Must be on the same network.
)
(The icon will become
enabled
when AK Connect is turned on.)
8
Notification
s Display
Notification contentsare
displayed in this area.
9
FileSearch Enter keywords to display a
list of items containing the
search terms.
10
Settings Displays a list of settings.
Using the Device 16

Long-press [ / / / / ] to move to the corresponding
screen.
UserGuide
Mode
ScreenLock
Play Mode
RepeatMode
USB Audio
RipperPower
Screen Br
ightness
11
12
13
14
15
16
PC Connection Select the appropriate mode
Press [ ] to turn the screen lock
on or off. The volume wheel is disabled
whenthe screenlock icon is activated.
Press [ ] to cycle through
different playmodes.
:Sequential playback.
:Shuffle playback.
Press [ ] to cycle through
different Repeatmodes.
:Repeat the entire playlist.
:Repeat the current song.
:Disable repeat.
Please turn on or off USB audio
output after connecting the device
with the portable USB DAC (ref
er to p. 35).
Turn the CD Ripper on or off.
(Enabled when connected to
the AK CD Ripper.)
Use the adjustment bar to co
ntrol the display brightness.
when connected to a computer.
DISK :USB drive mode for tra
nsferring media files.
:Listen to music located on
a PC through the device.
Using the Device 17

Refer to page 45 of the manual for more information on connecting
to a wireless network.
UserGuide
Purchasing Music
1. Connect to a wireless network.
2. Select [Store] from the home screen.
3. Select the desired store.
4. Check the user guide or help menu within each store for
detailed information.
Using the Device 18
connected to a wireless network.
Purchasing Conveniently purchase music from the Store when
Music from
a Store

System Requirements
PCMinimum System Requirements
OS : Windows XP, Windows 7/8/10 (32 & 64-bit)
Mac Minimum System Requirements
OS X 10.7 (Lion) or later
UserGuide
MQS Streaming Server Installation
1. Visit the Astell&Kern website and download the server
installer that corresponds to your operating system. [h
ttp://www.astellnkern.com > Support > Download].
2. Run the downloaded installer and follow the on-screen
instructions.
3. Check the User Guide within the program for detailed
information on using the MQS Streaming Server.
The PPM12 can access and play back music files stored on
a computer on the same network as well as output sound
through Astell&Kern speakers.
AK CON
NECT
Connecting to the AK Connect Server
1. Turn on the server and connect to
the same network as the PPM12.
Run the MQS Streaming Server
on your computer.
2. Turn on [AK Connect] from the
device settings.
3. Pr ess [AK Connect] from the home
screen.
Using the Device 19
Table of contents
Other IRiver MP3 Player manuals

IRiver
IRiver N11 User manual

IRiver
IRiver iFP-190T How to use

IRiver
IRiver iFP-1090 Mounting instructions

IRiver
IRiver iFP-990 User manual

IRiver
IRiver iHP-100 Series User manual

IRiver
IRiver T10 1GB User manual

IRiver
IRiver T8 User manual

IRiver
IRiver Simple S7 User manual

IRiver
IRiver iHP-140 User manual

IRiver
IRiver B30 User manual

IRiver
IRiver X20 User manual

IRiver
IRiver H10 User manual

IRiver
IRiver iFP-799 User manual

IRiver
IRiver IFP-800 Series Assembly Instructions

IRiver
IRiver S100 Soft Silhouette User manual

IRiver
IRiver iFP-300 Series User manual

IRiver
IRiver S10 1GB User manual

IRiver
IRiver T10 User manual

IRiver
IRiver T5 User manual

IRiver
IRiver T8 User manual