MP-Man MP-FOL7 User manual

MP-FOL7
USER’S MANUAL
www.mpmaneurope.com
Function Overview
.
●Support various audio formats
S u c h a s M P 3 , W M A , W M V, A S F, WAV.
●FM Stereo Radio
Strong auto searching or manual searching function, 40 local channels with different frequency
may be saved (20 channels for one system), to enable you to enjoy the programs comfortably.
●Text Browser
To read books at the same time when listening to the music.
●USB function, no driver needed
This device is automatically recognized by your PC when using WIN2000 or above.
When using WIN98, a software (CDROM) installation is still needed.
●REC
Record your voice with the microphone and save it in .WAV or .ACT formats.
●Seven tones equalizer
Normal, Rock, Pop, Classic, Soft, Jazz and DBB
●Multiple Play Modes
Normal, Repeat One, Folder, Folder Repeat, Repeat All, Shuffle and Introduce
●Auto Power Off
There are two modes including Sleep Mode and Energy-Saving Mode
●Animated Menu
With visual animated menu and related letters, operate it at your pleasure!

Statement
○Firstly, thank you for using mpman©MP3 digital player!
To enable you to operate the player correctly and skillfully, please read this manual carefully
before using.
○The contents in this manual might be changed for improvement.
And these contents with respect to performance and function shall be subject to change
without any further notice.
In case the actual setup or operating method is inconsistent to the provision in this manual,
you are advised to visit our website for the related information of the latest product.
www.mpmaneurope.com
Inside the Box
(1) MP3 player one
(2) Stereo earphone one pair
(3) Installation disk for WIN98 users one
(4) User’s manual one
(5)USBcable one
System requirements
(1) Pentium 166 MHz or faster
(2) Windows 98/2000/ ME/XP
(3) USB port
(4) 4 X CD- ROM driver or higher
(5) 20MB of free space on hard disk
(6) 64 MB system memory
2

Contents
Functions Overview····································································1
Statement····················································································2
Description ·················································································4
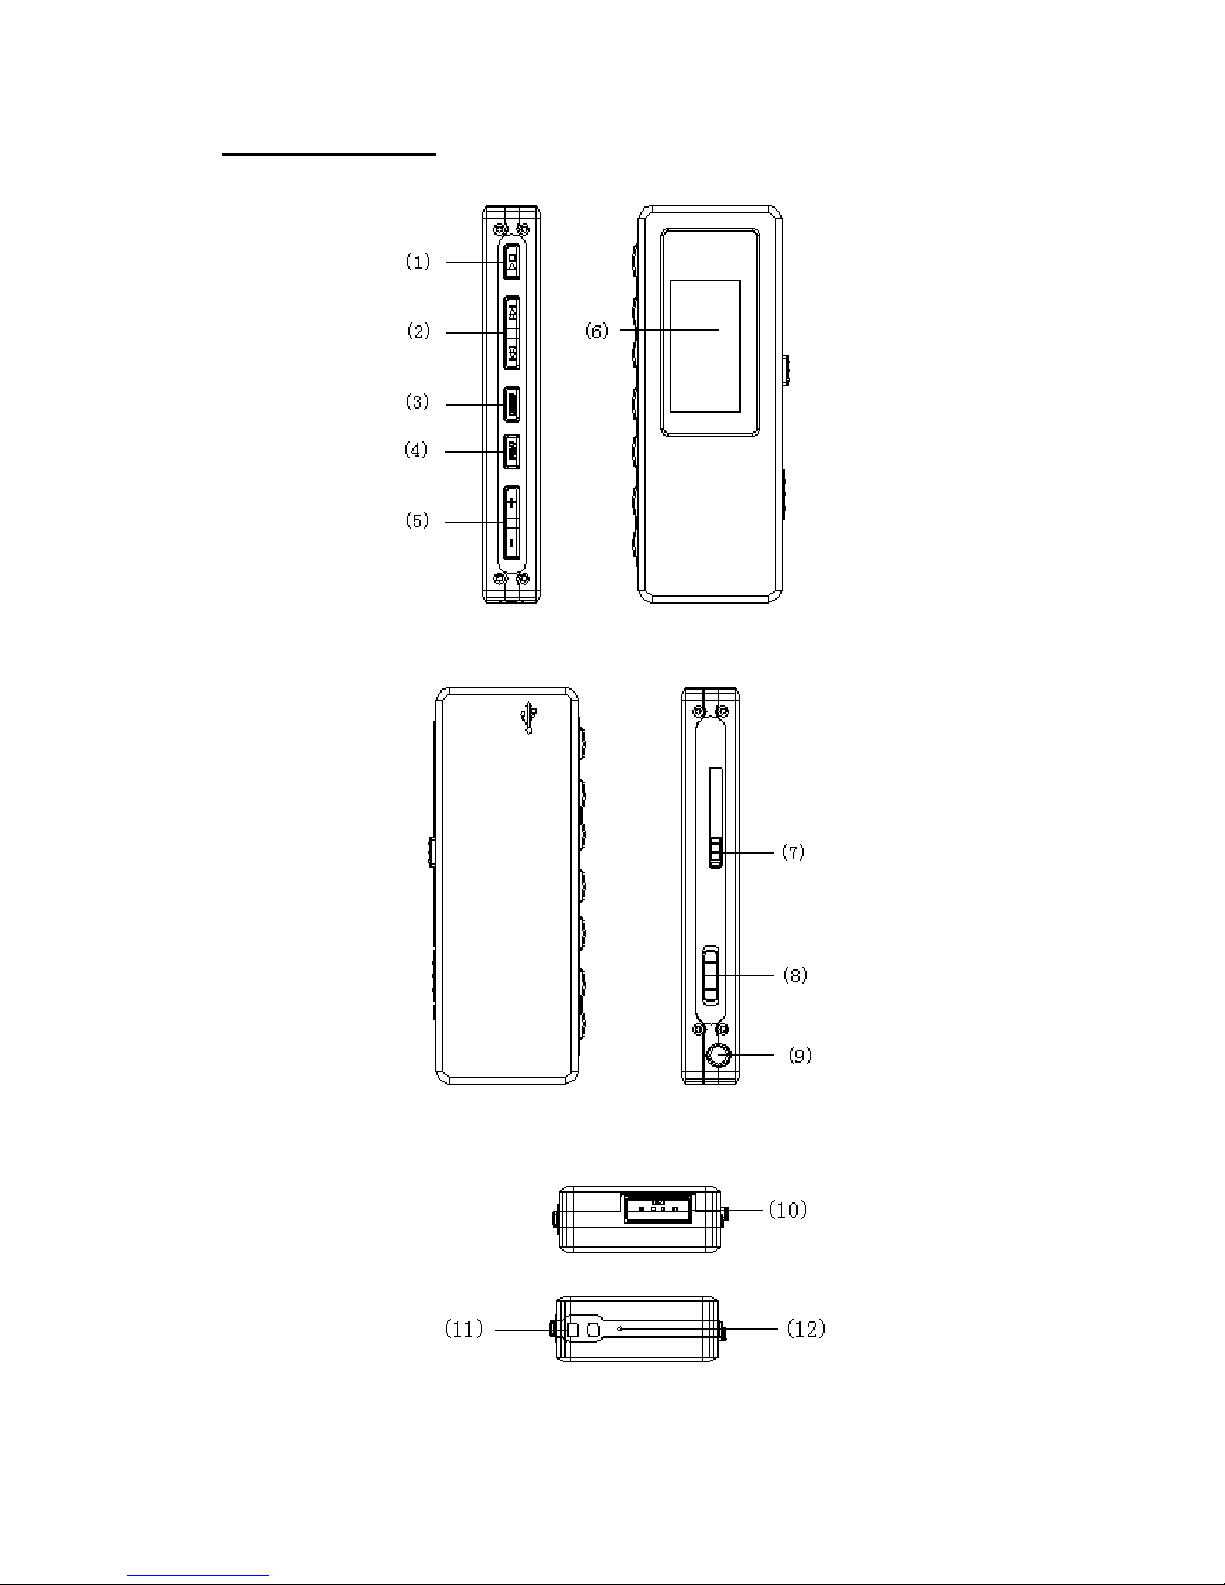
Figure and keys·······························································5
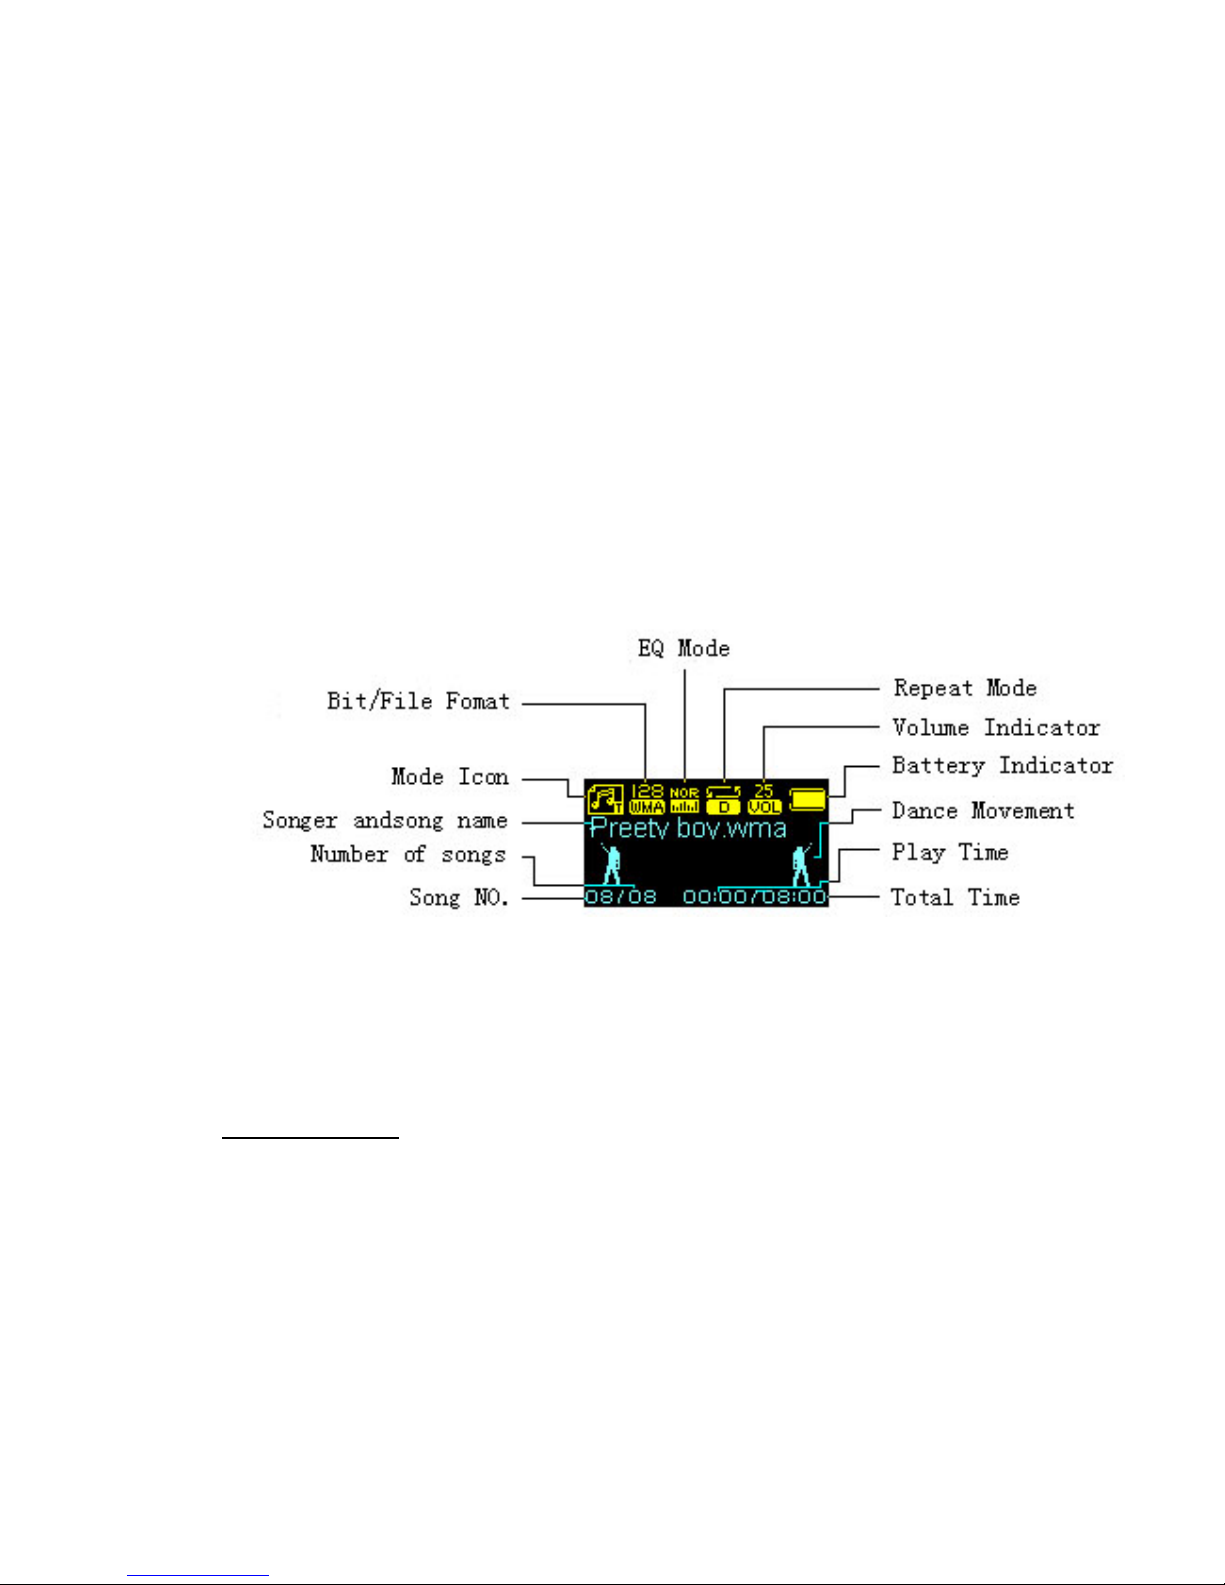
Display ···········································································5
Battery ············································································5
Basic functions ···········································································5
Enter menu ·····································································5
Browse operation····························································5
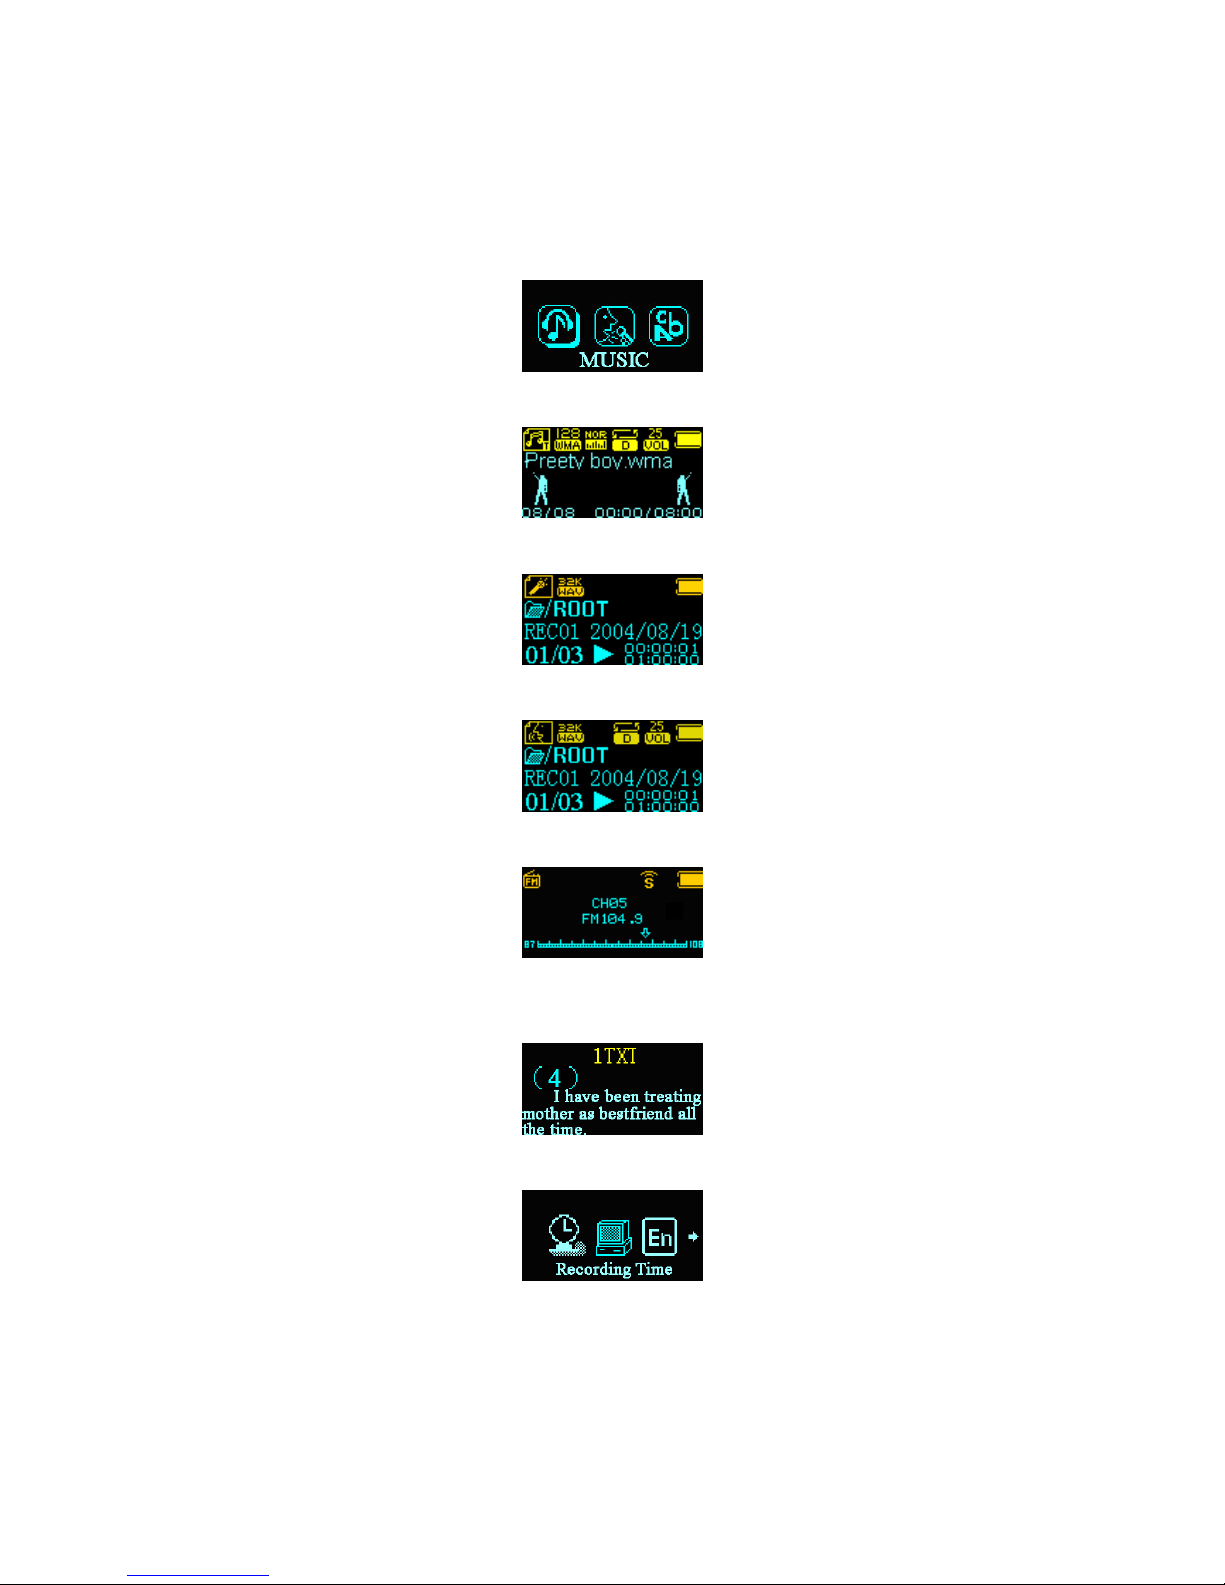
Enter function modes ······················································6
Keys Operation···········································································7
Music mode and Play mode ············································7
REC mode ······································································7
FM mode ······································································8
Play music ··················································································9
Simple Operation····························································9
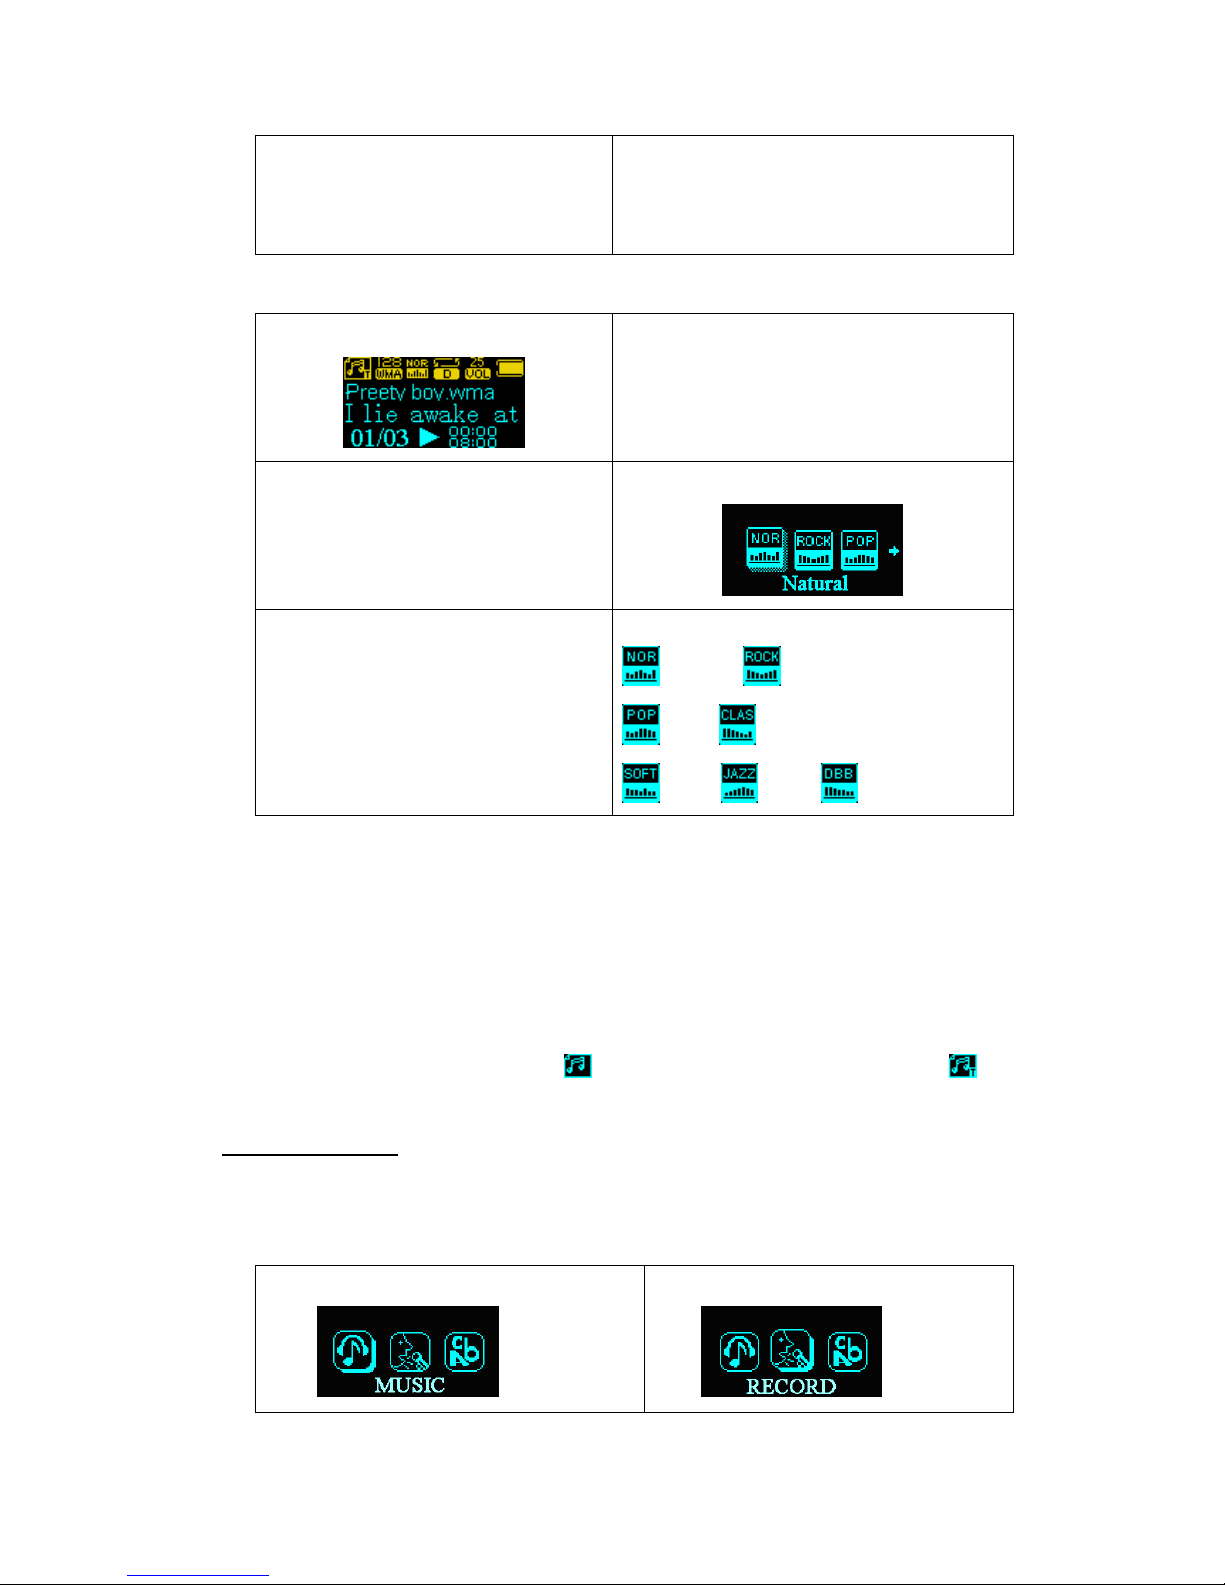
EQ mode ········································································9
Lyric synchronous display (karaoke function) ··············10
Voice Recording ······································································· 10
Recording in REC mode··············································· 10
Select REC style ··························································· 10
Playback voice recordings ························································ 11
Convert the ACT recording files into WAV format ··················· 11
Use FM radio············································································ 12
Text reader················································································ 13
System setting ·········································································· 14
How to enter?····························································· 14
The parameters ····························································· 14
Detailed instructions ····················································· 14
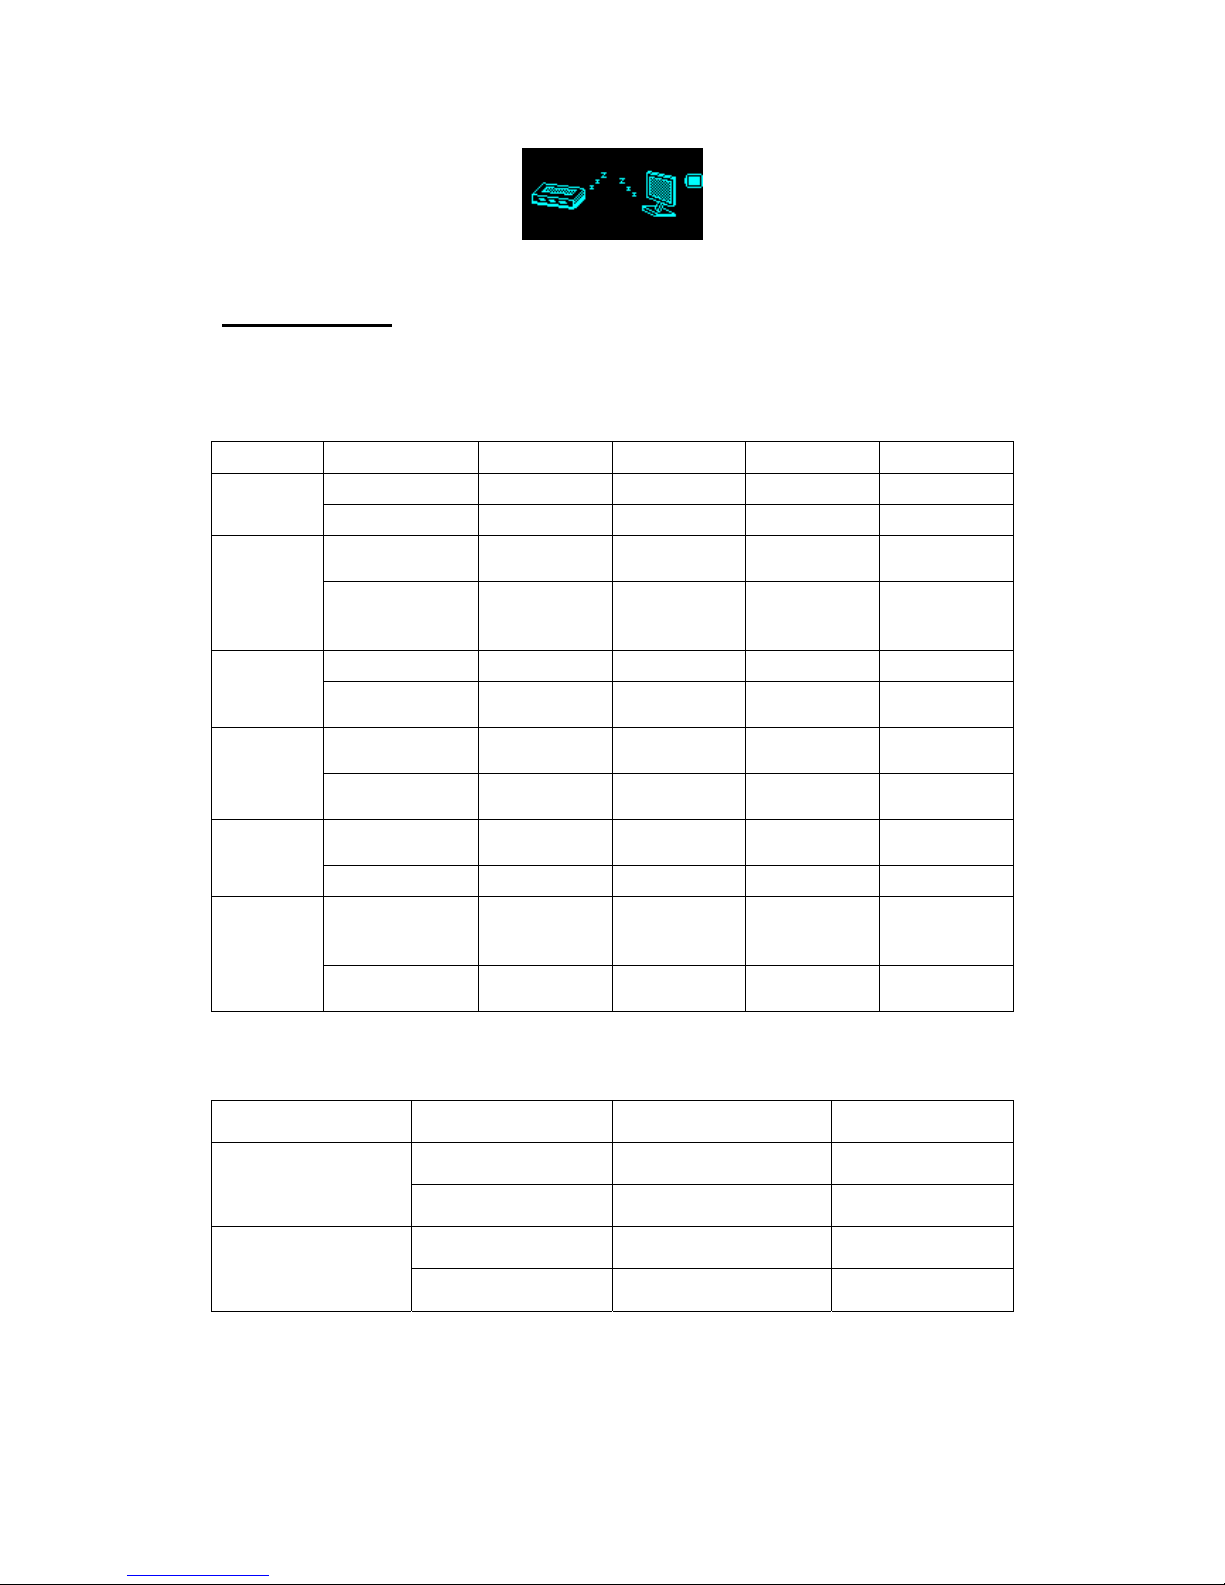
USB disk ·················································································· 16
Create a folder (or directory) ···················································· 16
Other settings ··········································································· 16
Select different directories (stop the submenu) ················· 16
Delete files (stop the submenu)········································· 17
Play mode (play the submenu)·········································· 17
Play speed (play the submenu)·········································· 18
3

Repeat mode (play the submenu) ······································ 18
Repeat time (play the submenu)········································ 19
Repeat intervals (play the submenu) ································· 19
Install driver for Win98 users ·················································19
Special recommendations ·······················································20
Safe removal····································································· 20
Reset················································································· 21
Troubleshooting········································································21
Technical specifications····························································22
4

Description of keys
5

Figure & Keys
1) Play/Pause
2) F.FWD/F.REV, Previous/Next,
3) Menu,
4) REC,
5) Vol+/-,
6) OLED,
7) Push button of USB Port,
8) Power ON/OFF
9) Earphone,
10) USB Port,
11) Cord Hole,
12) Mic
Display
Battery
The screen shows a battery indicator with nine levels.
The battery indicator is full when the battery voltage 1.5V.
The battery indicator will be empty when the battery is used up. At that time, the player
should be charged with an external charger(optional) or with the USB connection on your PC.
Basic Functions
Enter Menu
Press Menu button to enter the menu:
Main menu (long press to enter during Stop mode),
Submenu during playback mode (short press to enter)
Submenu in Stop mode (short press to enter).
Browse Operation
Select the song to be introduced and enter menu option.
Press PREV key to select forward and NEXT key to select backward.
Skip backwards or forward when playing music.
Press PREV key to fast reverse and NEXT key to fast forward.
6

Enter function modes
Select different submenus in the main menu.
Short press Menu button to enter
Main menu :
Music mode :
Record mode :
Voice mode :
FM mode:
Text reader:
System function:
Enter USB mode via the PC connection:
7

Key operations
Music Mode and Voice Mode
Press-keys Action Stop mode Play mode Play submenu Stop submenu
Long press Power off Power off Power off Power offPlay
Short press Play Stop Exit menu Exit menu
Long press Enter main
menu
Enter main
menu
Enter main
menu
Enter main
menu
Menu
Short press Enter Stop
submenu
Enter Play
submenu
Confirm the
option or enter
submenu
Confirm the
option or enter
submenu
Push Next Next and play Move submenu Move submenuNext
Press and hold Go forward
successively
F.FWD Go forward
successively
Go forward
successively
Push Previous Previous and
play
Move submenu Move submenuPrev
Press and hold Go backward
successively t
F.REV Go backward
successively
Go backward
successively
Short press Increase volume
step by step
Increase volume
step by step
× ×Vo l +
Press and hold Increase volume Increase volume × ×
Short press Decrease
volume step by
step
Decrease
volume step by
step
× ×
Vo l -
Press and hold Decrease
volume
Decrease
volume
× ×
REC mode
Press-keys Action Stop state REC state
Long press Power off Stop recordingPlay
REC Short press Start recording Pause recording
Long press Enter the main menu ×Menu
Short press Enter the REC submenu ×
FM mode
8

Press-keys Action In Tuning state FM submenu
Long press Power off Power offPlay
Short press If there is channel
saved: next channel;
If there is no
channel saved: ×
Exit the menu
Long press Enter main menu Enter main menuMode
Short press Enter the submenu Confirm the option
or enter further level
Push Increase 100KHz by
one step, or stop to
search
Move the submenu
Next
Press and hold Increase 100KHz
successively to
search
Go forward
successively
Push Decrease 100KHz
by one step, or stop
to search
Move the submenu
Prev
Press and hold Decrease 100KHz
successively to
search
Go backward
successively
Short press Increase volume
step by step
×Vo l +
Press and hold Increase volume
successively
×
Short press Decrease volume
step by step
×Vo l -
Press and hold Decrease volume
successively
×
Play Music
Simple operation
1.Connect earphone
Insert the earphone plug into the earphone
jack
2. Switch the ON/OFF button (8) to the right. Select
Music mode. Press menu button to enter.
3. Select music
Prev button (2): select the previous song
Next button (2): select the next song
4. Volume adjustment
VOL+ (5): increases volume
VOL-(5): decreases volume
Note:
9

The player will power off automatically at the
specified time by “System setting/power off
setting/Save mode” except during playback or
recording.
EQ mode
1. During playback
2.Push Menu button to enter the Play submenu.
3.Push Next button to select “EQ mode” option.
4.Push Menu button to enter “EQ mode” menu.
5.Push Next button to select and push Menu
button to confirm.
6.EQ modes:
(Natural) (Rock)
(Pop) (Classical)
(Soft) (Jazz) (DBB)
Lyric Synchronous Display (Karaoke Function)
The player supports “*.LRC” lyric files, to achieve the synchronous play of lyric and sound.
How to use the lyric file?
The name of lyric file should be consistent with the name of the song file.
For example:
The song file name is: A-Do—Night.mp3
The lyric file name must be: A-Do—Night.lrc
How to know whether the song has a lyric file?
If the current song has a lyric file, the icon “ ” at the top left corner of Music Mode will become “ ”
Voice recording
The player can store up to 99 REC files in each directory!
Recording in REC Mode
1.Enter Main Menu
Music mode
2 . Push Next button to select REC mode
REC mode
10

3.Push Menu button to enter REC mode.
4.Push REC button to start recording.
5.Push Play button to pause/continue recording.
The recorded voice is saved in the current directory that is set in “REC Stop Submenu/main directory.
If the screen displays “Space Full”, it means that there is no space available to record new files. Delete
other files to release space.
If the screen displays “Directory Full”, it means that there are 99 recording files in the directory. Select
another directory.
Select REC style
1.Select record mode. No recording
2.Push Menu button to enter the REC submenu.
Local Folder
3.Push Next button to select “REC Style”
submenu:
REC style
4.Push Menu button to enter the submenu:
SP REC
5.Push Next button to select the desired REC
style.
6.Push Mode button to confirm the selected style
7.Push Play button to start recording. 8.REC style:
SP recording, wav format and good quality
LP recording, act format and average quality
SP voice-control, wav format (voice-control REC:
recording is paused if there is no sound)
:LP voice-control and act format
Playback voice recordings
1.Enter Main Menu
Music mode
2. Push Next button to select “Voice mode” REC mode:
Voice mode
11

3.Push Mode button to enter Voice mode
4.Select REC file:
Prev key: select previous REC file
Next key: select next REC file
5.Press Play button again to start to play 6.Volume adjustment:
VOL+ : increase volume
VOL-: decrease volume
Convert the ACT voice recordings into Wav format
When you want to listen to your voice recordings on your computer you need first to convert
it into Wav format.
The converter is inside the CDROM supplied with your player.
Put it in your PC and open the “act to wav CONVERTOR” folder. Double click on the
application to install it.
Go to Programs and choose “USB Flash disk Utilities” and then “Sound Convert” (see image
below)
This will launch the converter that will allow you to convert voice recordings into wav or
mp3 files.
Use FM Radio
1.Enter Main Menu.
2.Push Next button to select “FM mode”.
FM mode
3.Push Menu button to enter “FM
mode”.
4.Auto search
Push and hold Pre/Next button for two seconds.
The device will select automatically the next
available station.
5.Manual search:
Push Pre/Next to search channels
manually
6.Store selected radio station:
Push Menu button to enter the FM submenu.
12

save stations
Push Menu button to store the selected channel.
7.Stored channels can be selected by
pushing shortly on the Play button
8.Volume adjustment:
VOL+: volume increase
VOL-: volume decrease
9.Recording from the radio
Select the desired radio station. Push
Menu button to enter FM submenu and
select the REC mode (Fine or Long).
Note:
If the current channel is a stereo broadcast,
the screen will display “ ”.
Text reader
Text stored on the player in .txt or .lrc format, can be read in this mode
1.Enter Main Menu
Music mode
2.Press Next button to select “Text browser”.
Text reader
3.Push Menu button to enter Text mode
Push Play button to turn pages backward.
Push PREV button to turn pages forward.
Push NEXT button to turn pages
backward.
4. Text selection
Push Menu button to enter submenu.
Select the directory by pushing Menu button
again. Push Menu button to select the desired
text
Text select
Note: Text reader only supports .txt and .lrc format.
System Settings
13

How to enter?
1.Enter Main Menu.
Music mode
2.Press Next button to select “System
settings”.
System settings
3.Push Mode button to enter “System
settings”
REC time
The parameters
REC time Setting of the date and time for recordings
Screensaver time Select the time (s) before the display enters into Screensaver mode
Screensaver picture Select picture
Dancing pictures Select picture during playback
Language Setting Select different languages
Power off setting Select a time (min). After this time period the player automatically
switches off
Replay mode Auto/manual replay
Contrast Adjustment Set contrast of display
Online Mode “Special space” function
Memory Info Available and total memory size
Firmware Version Displays the firmware version of the player
Exit Exit the interface
Detailed instructions
○Setting of “REC time”
1.Select REC time in System settings
REC time
2.Push Menu button to Enter the interface of
REC time.
REC time
3.Push VOL+ button to select YEAR
The YEAR number will flash:
4.Push Next/Prev button to increase/decrease
14

REC time REC time
5.Push VOL+ button to select
MONTH……..
6.Push Menu button to confirm and exit.
○“Screensaver Time”setting
1.Select “Screensaver Time”
2.Push Next/PREV button to adjust the time.
3.Press Menu button to exit when the
adjustment is done
○“Screensaver picture” setting
Similartothesettingof“EQmode”.
○“Dancing picture” setting
Similartothesettingof“EQmode”.
○“Language selection”
Similar to the setting of “EQ mode”.
○“Power off” setting
Similar to the setting of “Screensaver time”
: “Power-saving mode”: Device will switch off after preset time if no
button is pushed ( not during playback and recording)
“Sleeping mode”: ”: Device will switch off after preset time
Note: Sleeping mode is has to be reset every time you want to use this
function.
○Repeat setting
Similar to the setting of “EQ Mode”.
○Contrast adjustment
Similar to the setting of “Screensaver time”
○Setting of the Online Mode
Similar to the setting of “EQ mode”.
Some operating systems (versions before Windows 2K SP4) can’t support the USB with two
disk icons.
○“Memory info”
The number here indicates the total capacity of the disk and the percentage indicates the used part.
○“Firmware version”
The current version of the firmware used for the player can be checked.
15

USB disk
This player has the standard functions of a USB disk, supports the systems above Windows98
(WIN98 needs driver).
The player supports USB power supply so that it can be played without battery.
How to connect with PC? Power on the player and insert into USB port.
When connected with PC, the player has three modes
1. Standby state
2.Downloading state 3. Uploading state
Create a folder (or directory)
You can put up to 99 songs per folder (or directory).
If you want to copy more than 99 songs into your MP3 player, you have to create a new folder (or
directory).
Just go to “my computer” and open the external hard drive that represents your MP3 player.
To create a new folder (or directory) just right-click any blank area and select New, Folder from
the resulting menu.
You can create up to 10 folders (including root folder) and up to 99 songs per folder
Other Settings
Select different directories (stop sub-menu)
Users can put different files into different directories.
1.Stop interface (The example is in Music
mode. The directories can be selected in
recording and playing mode)
2.Press Menu button to enter the Stop
Submenu.
Main disk directory
3.Press the Menu button again to Enter
A-Do
Richard Ren
4 Push Next or PREV button to select the
directory
5. Press Mode key to confirm the selected
directory.
16

Deleting files (Stop sub-menu)
In the Music mode and Voice mode , the corresponding files and can be deleted.
1.stop mode
2. Push Mode button to Enter the
submenu
Main disk
directory
3.Push Next button or Pre button
to select “Delete files” or “Delete
all files”
Delete file?
4.Push Menu button to Enter
Delete file?
Night A-Do 9skymusic
5, Push Next button to change
“NO” into “YES”.
deleting…
Night A-Do 9SKY MUSIC
6, Push Menu button to confirm
deleting…
Night A-Do 9SKY MUSIC
The function of “Delete all files” will delete all the files of the current mode in the current
directory (for example, deleting all files in the Music mode is just deleting all the music files and
the recording files will not be deleted)
Play mode
When reproducing music or recorded files, the user may select different play modes (repeat,
shuffle)
○REPEAT
(Normal)
After the songs in the current directory have been
played, the player will play the music in the next
directory untill all files are played and then it will stop.
(Repeat One)Repeats playing a single song.
17

(Folder)Plays all the music in the selected folder.
(Repeat Folder)Repeatedly plays all the music in the folder.
(Repeat All)Repeatedly plays all the music.
○SHUFFLE
(Random)Plays the music at random in the current folder.
○INTRO
(Intro)Plays the first 10s of each song in the current folder.
Play speed (play submenu)
When playing the music (only applicable for MP3 files), the user can select different play speeds
(either fast or slow), but the sound will not be changed.
1.During the playing of music
2.Push Menu button to Enter the play submenu
3.Push Next button to select the item of
“Play speed”.
4.Push Menu button to Enter “Play speed”
Play speed
5.Push Next/prev button to change speed
Repeat mode (play the submenu)
○A-B repeat
1.Music play or record play.
2.Push Menu button to Enter the play
submenu.
3. Push Next button to select the “Repeat
mode” in the menu.
4. Push Menu button to Enter “Repeat mode”.
Letter “A” in repeat icon will flash to wait
for confirming the first point A.
18

5. Push NEXT button to confirm the
second point B.
Letter “B” in repeat icon will flash
6. Push NEXT button to confirm point B.
Repeat icon is fixed. The player
repeats between A and B untill it reaches the set
times and exit from the repeat mode. During
this mode, the user can push PRE button to
reset point A.
○Follow function (the playback mode doesn’t have this function)
1.The section of A-B is being repeated.
2.Push Next button to enter Follow mode.
3.The repeat icon“ ”is changed into
the follow icon “ ” The player will
record the voice of the user. The time
length is the same as the A-B repeat.
4.The player will play the original voice and
the icon will be changed into“ ”, Then the
user can press Next button to enter the contrast
function.
In this state, press PRE button to return to the state of “A-B repeat”.
○Contrast function (playback mode doesn’t have this function)
1.After entering the contrast function, the
repeat icon will be changed to“ ”, the
player starts playing the original voice.
2.After the original voice has been
reproduced, the icon will be
changed to“ ”,
In this state, short pr to return to the state of “Follow function”.
In above three states, push Menu to exit from the repeat mode.
Repeating time (play submenu)
Similar to the setting of “Screensaver time”.
The repeat time will determine how many times A-B section is repeated.
Repeat intervals (play submenu)
Similar to the setting of “Screensaver time”.
The repeat interval determines the time length to be paused between two sections
Install driver for Win98 users
Please note that you don’t need any driver if you use Win Me / Win2000 / Win XP!
But, if you use Win98, you need to install a driver before using your MP3 player.
The driver is inside the CDROM which is in the box.
19

1/ Unplug the MP3 player
2/ Put the CDROM in the PC and open the “DRIVER FOR WIN98 USERS” folder.
3/ Launch the installation by clicking on “WIN98 DRIVER.EXE”
4/ When the installation is complete, restart the computer
5/ After restart, you can now plug your MP3 player, it will be recognized automatically by
the PC.
Special recommendations
Safe removal hardware procedure
Always follow this procedure to avoid trouble with your player!
Never unplug your player without using this procedure!
Before unplugging your device
1/ Double click “the Safe Remove Hardware” icon on the task bar (see image 1) :
Image 1
2/ From the “Safely Remove Hardware” window, select “USB mass storage device” and
click the “Stop” button (see image 2). The “Stop a Hardware device” window will pop up
as shown (see image 3)
ÅImage 2
Image 3
20
Table of contents
Other MP-Man MP3 Player manuals

MP-Man
MP-Man MPF405 User manual

MP-Man
MP-Man CLIPSY User manual

MP-Man
MP-Man MP122 User manual

MP-Man
MP-Man MP-CL1 User manual

MP-Man
MP-Man SAMBAWOM User manual

MP-Man
MP-Man MP- F59 User manual

MP-Man
MP-Man MP239 User manual

MP-Man
MP-Man MP127 User manual

MP-Man
MP-Man MP-FOL10 User manual

MP-Man
MP-Man BT24 User manual

MP-Man
MP-Man BT28 User manual

MP-Man
MP-Man MP-FOL9 User manual

MP-Man
MP-Man BT29 User manual

MP-Man
MP-Man FIESTA2 User manual

MP-Man
MP-Man MP-FUB55 User manual

MP-Man
MP-Man MP-FOL6 Manual

MP-Man
MP-Man MP-FUB27 User manual

MP-Man
MP-Man MP-F75 User manual

MP-Man
MP-Man MP-F60 User manual

MP-Man
MP-Man TS17 Series User manual