Mpio FL 350 User manual

In this manual are described method to use the product and precautions.
(Contents described in this User’s Manual may change without prior notice for
performance improvement of the product or due to change of specifications.)
Always read this User’s Manual before using this product.
MPIO will do our best to repay for our customer’s love via better products.
In accordance with the Copyright Act, behaviors to simulate, copy, reproduce
or translate all or some of software and documents of this product are
prohibited without prior consent by MPIO Co., Ltd. and behavior to reduce
them in the pattern for electronic media or a machine to read are also
prohibited.
* Microsoft, Windows, Windows Explorer and Windows logo are
Microsoft Corporation’s registered mark or trademark.
* Intel and Pentium are Intel Corporation’s registered trademark.
* Macintosh and Macintosh logo are Apple Computer, Inc.’s registered
mark or trademark.
* Systems and products included in this User’s Manual are relevant
corporation's or institutions registered mark or trademark, and or Mark
is not always specified expressively.
FAQ (Failure Diagnosis)
Safety Instructions
Composition
Parts Name and how to use the byttons
Volume control
Listening to music
NAVIGATION
REPEAT
Cautions
Introduction
PC-based operation requirements
Basic Operation
How to disassemble/assemble
necklace type of earphone
Operating Software Installation
Music Search (Navigation)
Detailed Information on Music Mode
ERASE a function
Detailed Information on FM TUNER Mode
[ Table of Contents ]
- Do not listen to music and FM radio broadcasting with a headphone or an
earphone while you drive a bicycle, motorcycle or automobile. This may cause a
dangerous accident and is illegal depending on districts.
- Decrease the volume of a headphone or an earphone when listening to music
or FM broadcasting while walking. This may cause an accident.
- Do not listen to music with a headphone or earphone for a long time.
The professionals point out danger of audible power to be damaged in use of
earphone for a long time for all portable audio devices.
We aren't responsible for data loss and damage that may occurs while data
transmission between the player and a computer.
If you save an important data in the player, be sure to back them up.
We aren't responsible for the damaged data if the saved data is lost
due to a mechanical trouble, malfunction and other causes (external shock,
power failure, etc.) Be careful.
Be sure to back up the data saved in the player before applying for Customer
Service. This company doesn’t perform a separate backup process for a received
product, considering that the customer has already backed up the data. Therefore,
this company isn’t responsible for data damage that occurs during the service.
Be sure to hold the plug when inserting and removing the USB terminal of the
player from a computer.
Do not shock or shake the jointed part when the player is connected with a computer.
User safety
Traffic-related safety
Protection of Audible Power
Data storage
Using Environments
Places of too high temperature
Places of too low temperature (Operation temperature 5°C ~ 40°C)
Humid places
Places under danger of submersion
Dusty places
Places exposed to the direct rays of the sun
In a vehicle
Near a heat sources
Places under severe vibration
Near a magnetic substance
* Avoid placing or using the player at the places mentioned below.
Do not give a strong shock to the player.
Do not disassemble, repair and modify the player without permission.
Do not put foreign materials into the player.
Ex) Clip, Paper, Water, Beverage, etc.
If the surface of the player is stained, clean it with a soft cloth or towel.
Never use a chemical solution.
Safety Instructions
Cautions
Environment where static electricity is severe.

Mini, thin, high quality MP3 Player
- Compact size of product desired to keep valuably as jewelry.
USB Mass Storage
- When the player is connected with a PC, it is easy for you to download and
upload data without a separate program since the player is automatically
recognized it as a mobile disk.
FM Radio function
- FM listening, searched frequency saving, Auto preset function.
USB 2.0 High Speed Data Transmission
3D Sound Effect
- Standard Preset EQ is a basic feature and a user can set 4 types of 3D sound
effect of Pure Studio, Concert Sound, Groove and Dynamic Bass.
Multi Format Player
- MP3, WMA, ASF formats are supported as Multi-Format player.
Graphic User Interface(GUI) for user’s convenience.
- A great effort has been made on GUI to enhance a user’s convenience.
The player offers graphic-oriented icon, simple and easy-accessible menu.
Navigation
- User’s convenience was improved since the player has a tree-type
composition like a window searcher so as to easily save and scan music file.
Voice Recording
Firmware upgrade
- We’ll do our best to improve the performance of the player through continuous
firmware upgrade service.
Introduction
Features
Introduction
Introduction
Specifications
Contents described in this User’s Manual may change without prior notice for
performance improvement.
- Memory capacity actually used may be reduced by logical file system irrespective of
memory capacity of product.
- Playing time may vary depending on operation method or menu setting.
- Data transmission rate may vary by specifications of the user’s PC.
- PC connection using extension cords like USB hub, etc will be excluded from warranty.
- Charging times of a rechargeable battery is limited and the user must replace battery if
constant time elapses.
- Life and charging times of battery may vary depending on user’s using method.
Memory Capacity
Decoding
Encoding
MP3(8~320Kbps), WMA(5~192Kbps), ASF
WAV
USB 2.0 High Speed
Max.10 hours (128Kbps MP3 file play, Volume 13)
Li-Polymer
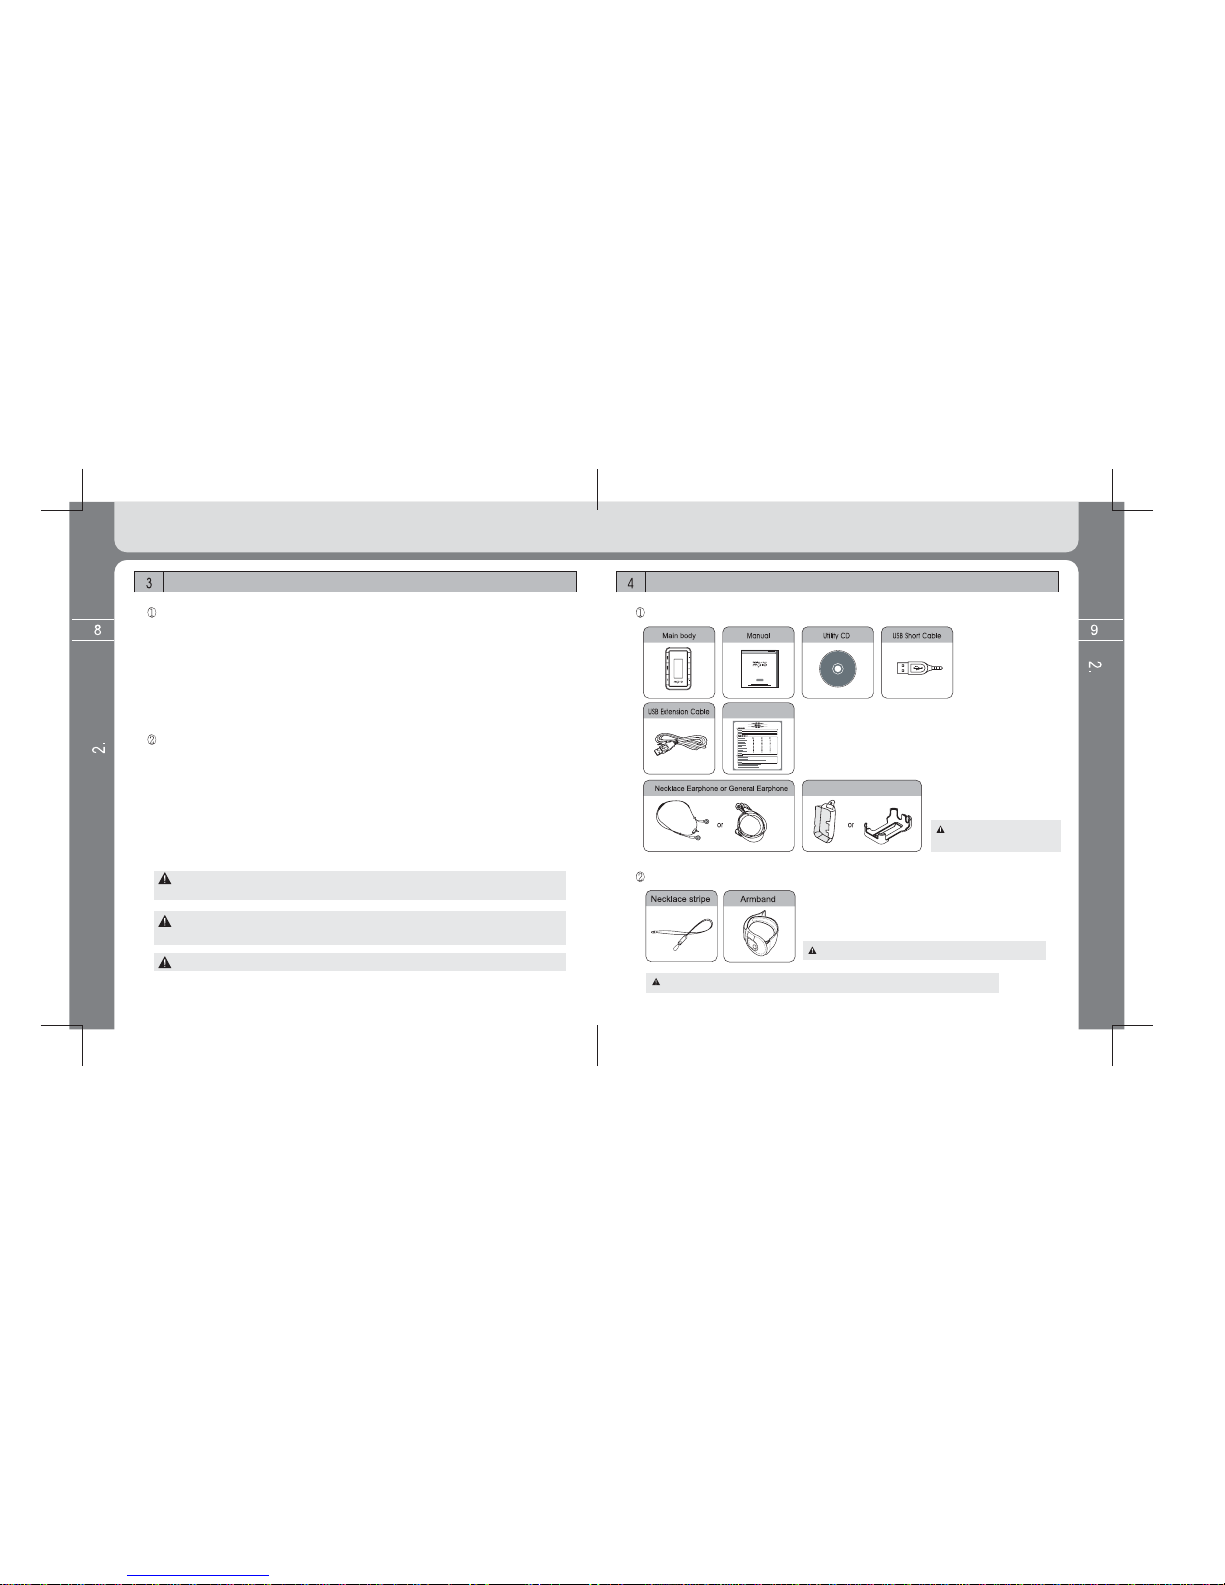
Composition
Basic components
Earphone and case may
vary depending on sale area
Additional components (optional)
Additional components may vary depending on sale area.
Spare parts may change without prior notice for improvement of product performance.
Introduction
Introduction
Product Warranty
Transparent Case or Hard Case
Charging or communication may not be done when using no-power hub in
a notebook computer.
Be sure to use the MPIO Utility provided for formatting.
PC-based operation requirements
IBM PC
- Main body: USB Interface (Rev 1.1) 2.0 supported, standard equipment and
CD-ROM Driver mounted
- CPU: Pentium 133MHz or more
- Memory: 64MB or more
- Hard disk space: 20MB or more
- Operational system: Windows 98/ 98SE/ ME/ 2000 / XP
Macintosh
- Main body: USB Interface (Rev V1.1) 2.0 supported, standard system and
CD-ROM Driver mounted
EX) Power Mac G3 (Blue & White)/G4 /G4 Cube, iMac / iBook, Powerbook,
Powerbook G4
- Memory: 64MB or more
- Hard disk space: 20MB or more
- Supported operational system: Macintosh OS 9.2 or more
Be sure to use USB cables provided since the MP3 Player may not
operate in connection of a PC by using extension cords.
Introduction
Introduction
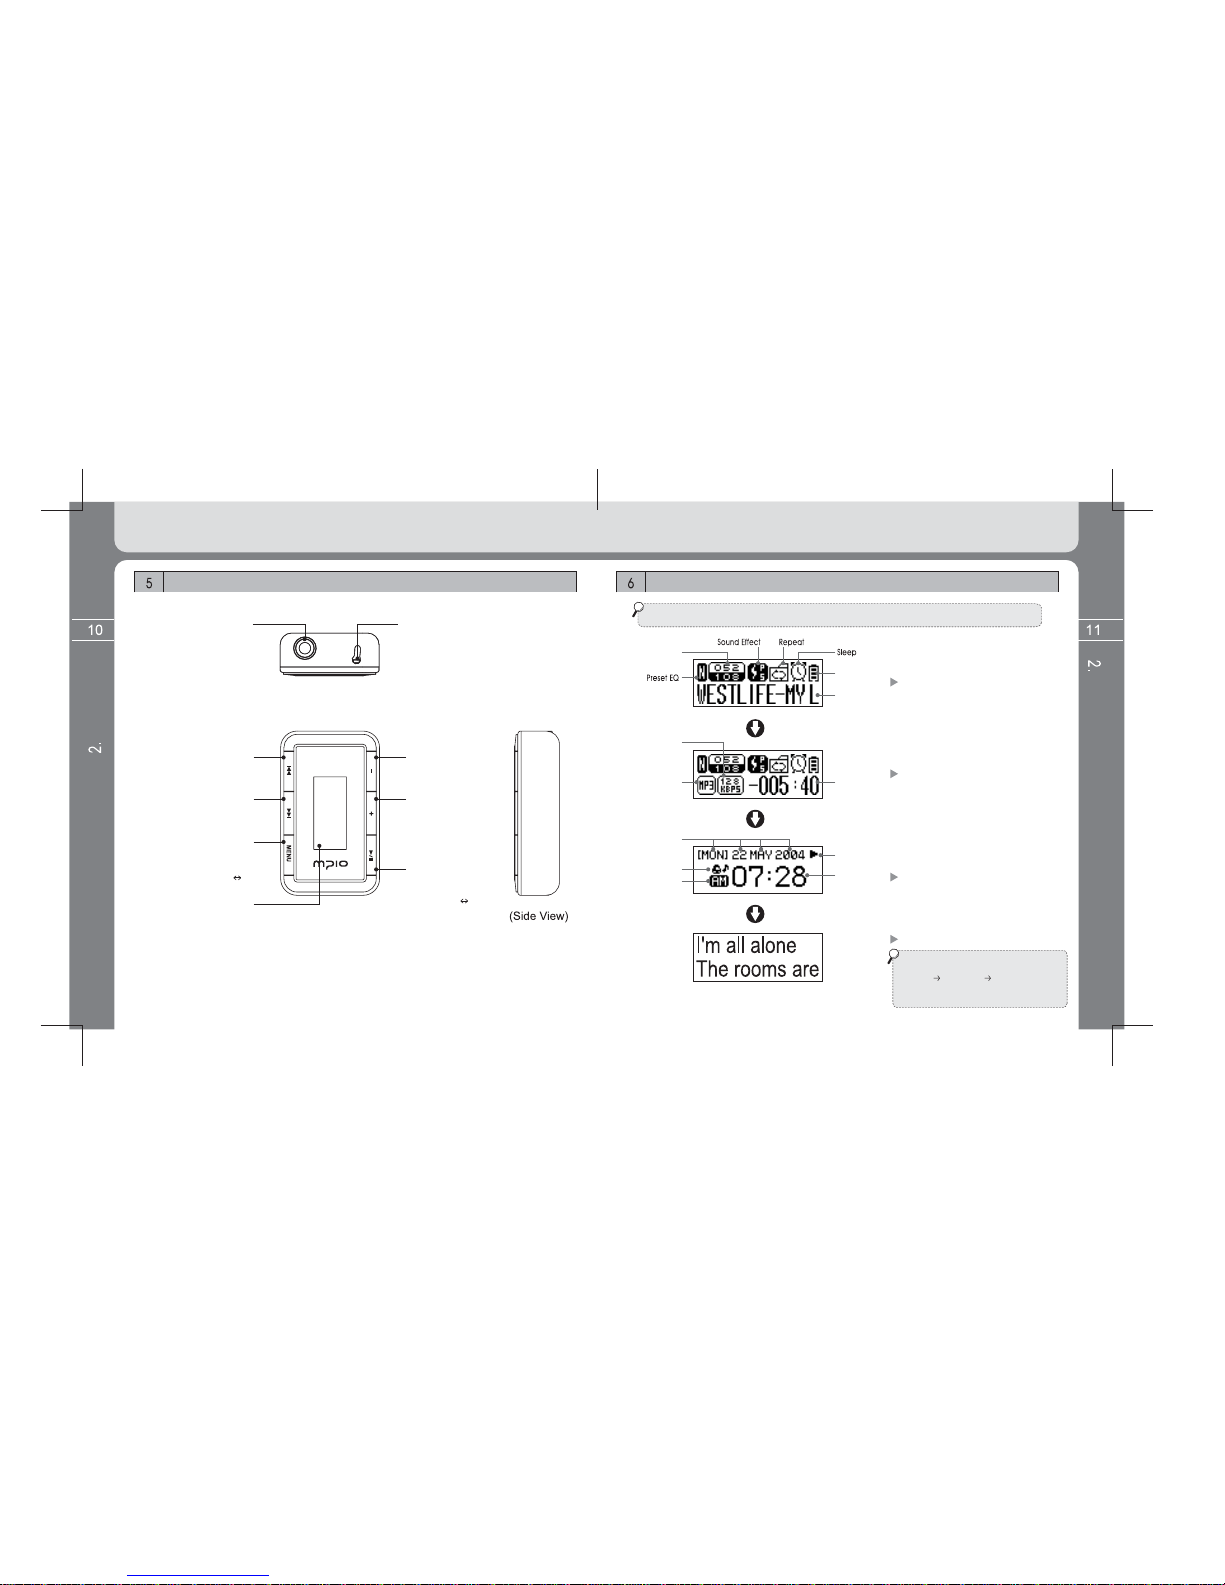
Configuration of LCD display
Part Name and how to use the buttons
(Top View)
(Front View)
* LCD information is changed as below if pressing the MENU button shortly.
VOL (–) button
Volume reduce
VOL (+) button
Volume increase/
Move to the upper menu
or folder in searching
Navigation or Menu.
PLAY/PAUSE button
Turn on/off/ Music file play,
Pause / FM SCAN
FM CHANNEL
mode change
Earphone connection terminal
& USB connection terminal
REW button
Previous music,
backward wind/menu move
FF button
Next music,
backward wind/menu move
MENU button
Menu entry (Long key)
Information change
function (Short key)
Sector repeat function
(when setting up A B
[sector repeat] in Menu)
LCD display
Displays file information,
FM listening screen and
menu setup status.
RESET
Current track/
No. of all tracks
Battery
remained
Music
information
Music information
display screen
Bit rate
File format Playing time
Playback condition
(only in playbak)
Format type / Bit rate /
Playing time display
Weekday/day/
month/year
Alarm setup status
A.M./P.M. Time display Date and watch display
Lyric support display time
If files have lyrics, lyrics are displayed on
the LCD screen as left figure when
[MENU] [DISPLAY] [LYRICS] setting
values are set to ON from OFF.
(For change of Lyrics Menu, see page 34.)
Basic Operation
Basic Operation
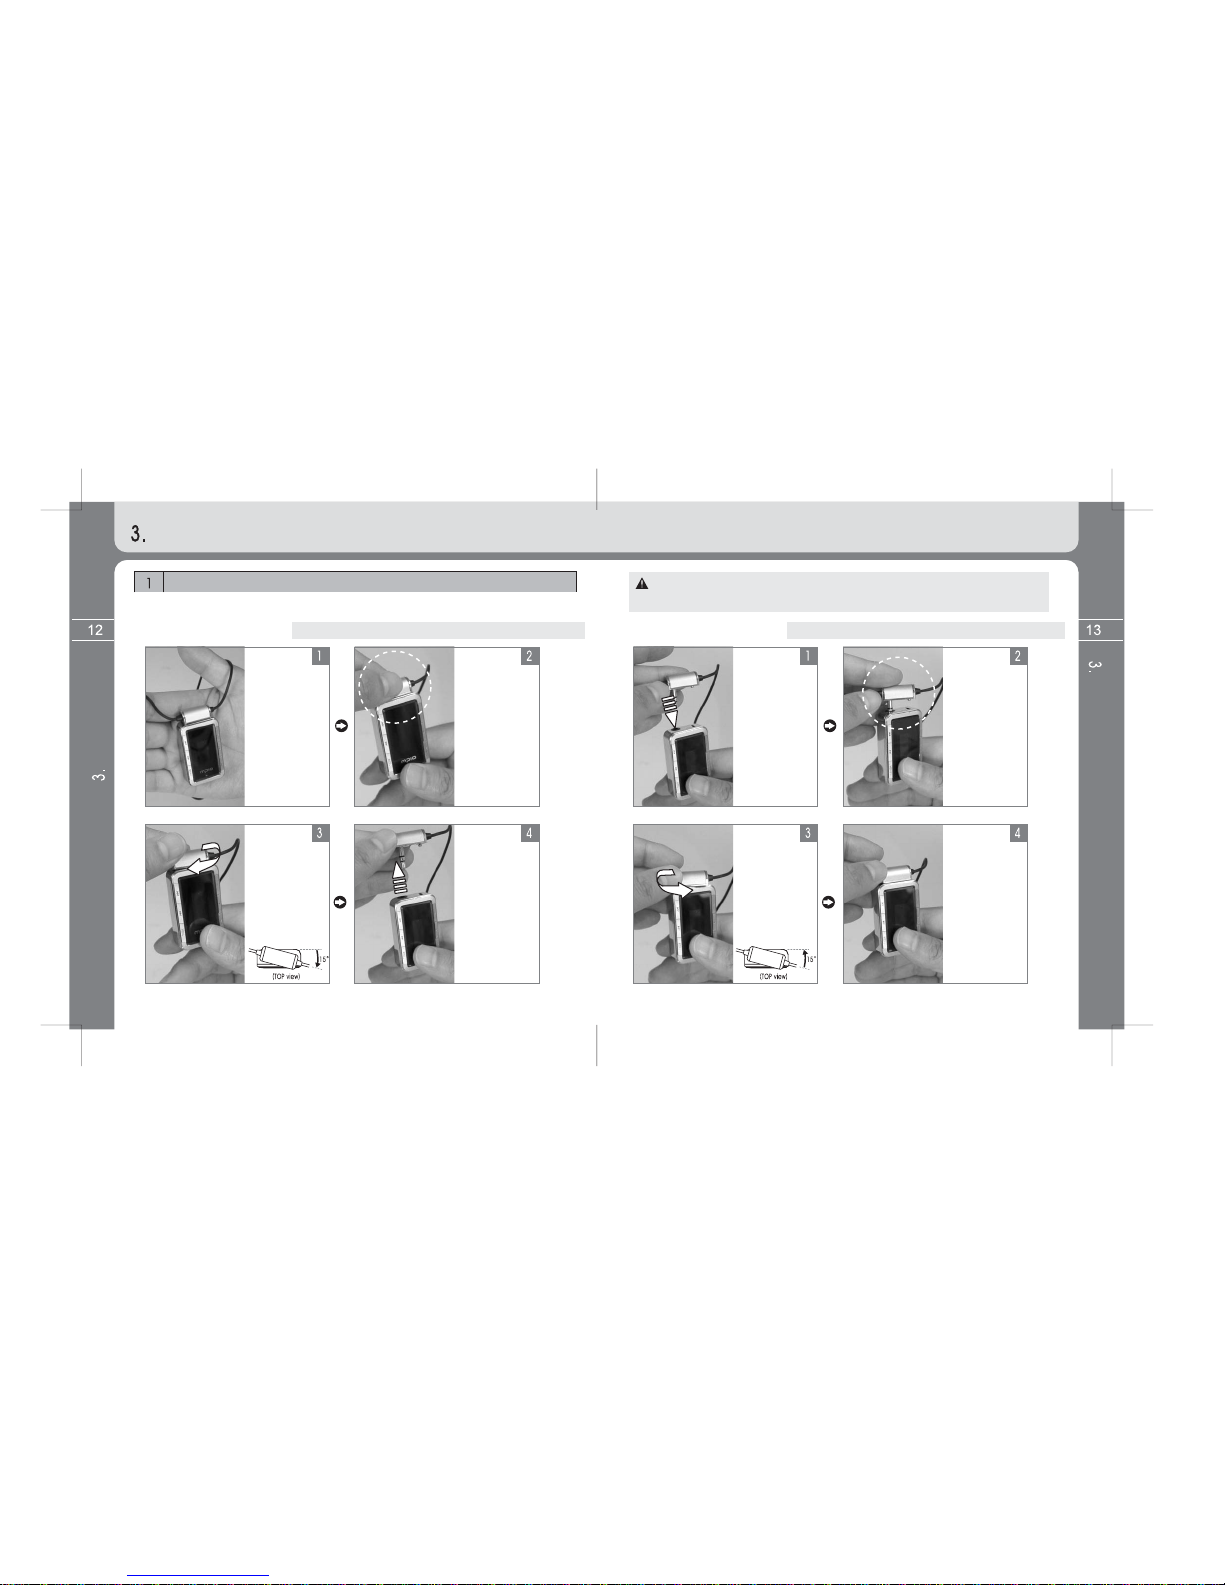
How to disassemble/assemble necklace type of earphone
Basic Operation
How to disassemble
necklace type of earphone
* Disassemble both main body and earphone as below figure.
Earphone
assembling
status when
opening the box.
Catch earphone
and main body
with both hands
respectively.
Catching the
earphone, twist
and turn it by
about 15 degree
clockwise.
(Earphone locking
status released)
Raise the
earphone to
arrow direction
to pull it out.
Either of necklace type of earphone or general high quality type of
earphone (MPIO-OP200) is provided depending on sale area.
How to assemble
necklace type of earphone
* Assemble both main body and earphone as below figure.
Insert the
earphone to
arrow direction.
Insert the
earphone into
the earphone
hole of the main
body for
connection.
After connection,
turn the earphone
by about 15 degree
anticlockwise while
somewhat applying
force until
“Tickle” sounds
(“Tickle” sound
means complete
connection status).
Completion of
connection.
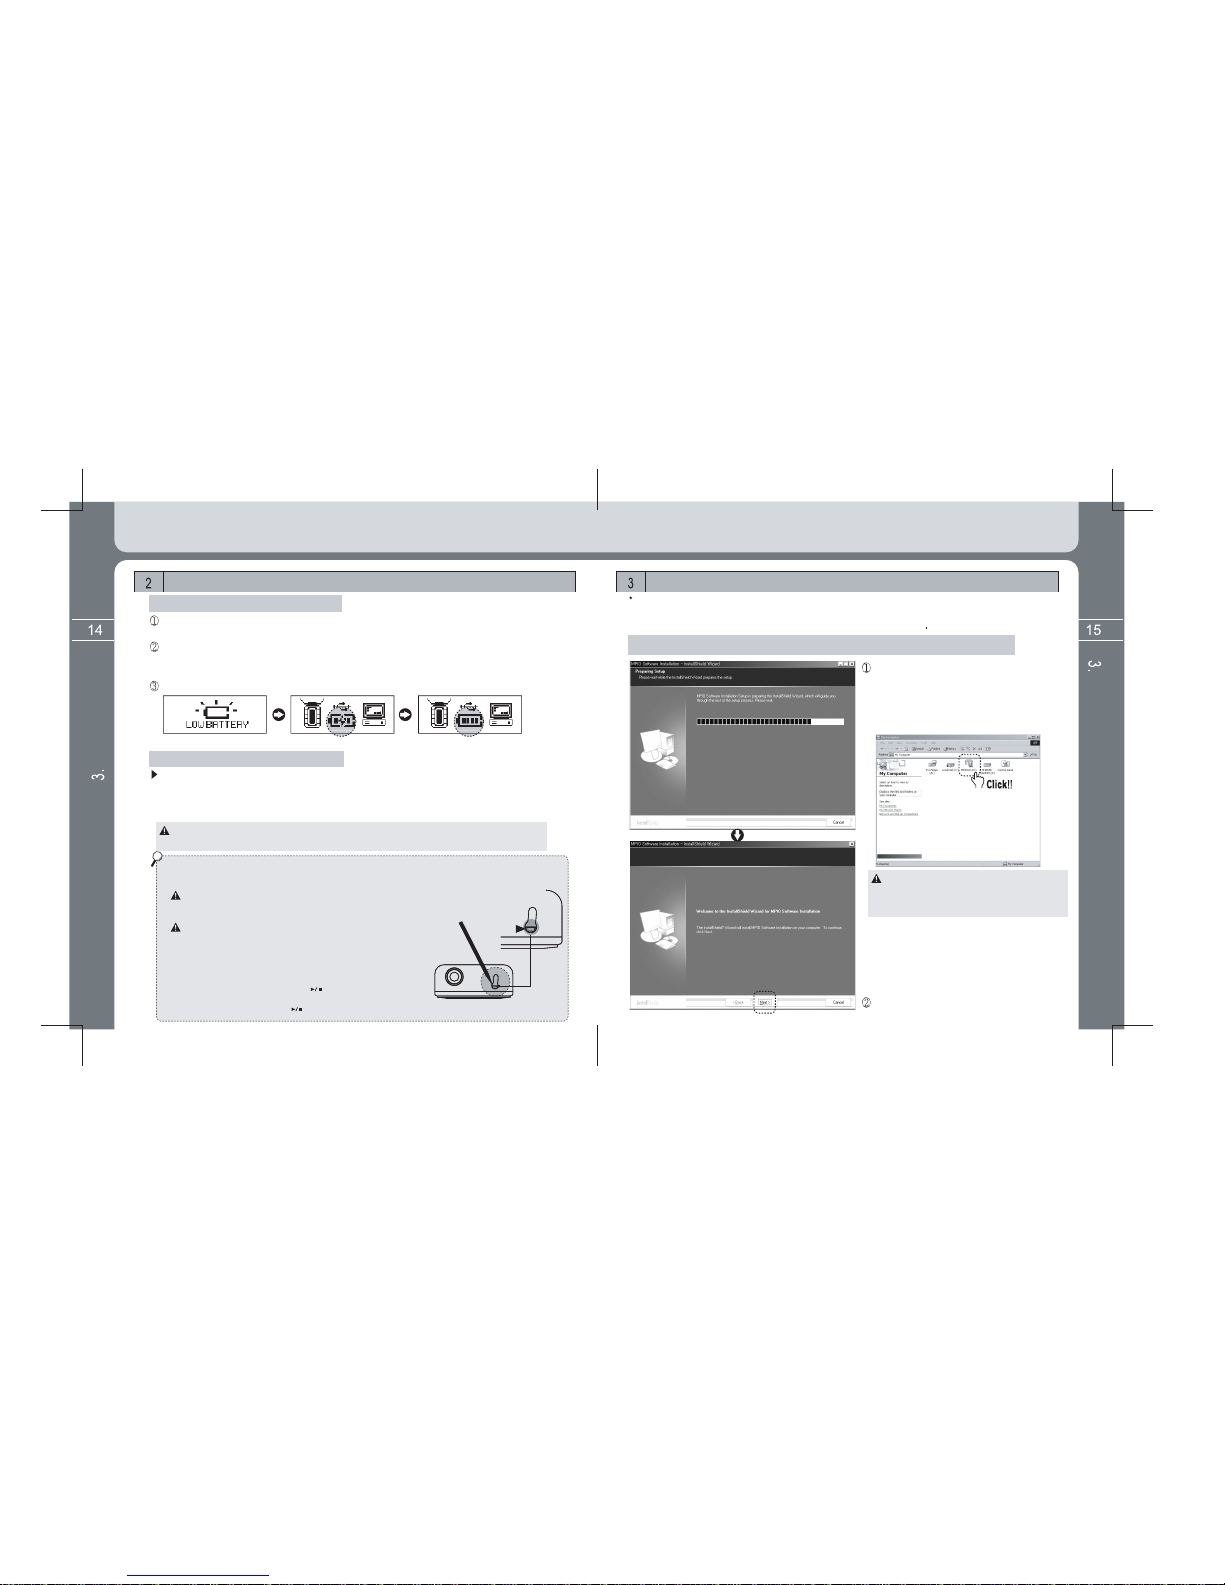
Operating Software Installation
The PC using Windows ME, Windows 2000 and Windows XP supports USB 2.0 or 1.1 Storage Device basically and
perceives the MP3 player as a portable storage device without installing a separate program. Thus, you can utilize the
MP3 player by using a Windows Explorer. For a computer using Windows 98/98SE, a ‘Windows 98 Device Driver’
should be installed first.
How to install Windows 98 Device Driver, MPIO Utility and other Utility
Insert the supplied CD in a computer
(CD-ROM). After a minute, automatic execution
is done and installation begins as left figure. If
automatic execution is not done,, select the
CD-ROM from the Window Searcher and then
double click it (See below figure).
The (D :) drive as shown in the capture figure is
provided as PC environment when preparing this
manual and thus is different from the drive name
of the actual user’s PC. It is only for reference.
Click the [Next] button.
Basic Operation
Basic Operation
Battery Charging
* Charging time: 3 hours (based on the completely discharged state)
* Playing time: Max. 10 hours
The charging and playing time depend on the user’s using environments.
Be sure to disassemble the USB cable from the PC when charging and
USB connection are not done.
Battery charging when FL350 is completely discharged and thus
the LCD turns off.
Connect the USB short cable provided with the earphone terminal
of the unit and the USB terminal of the PC.
Charging begins even if no display appears on the LCD screen.
Disassemble USB cable after 2~3 hours (When the LCD does
not turn on even by pressing the button after battery
charging, press the reset switch for 1~2 seconds with a pin or
pen, etc and then press the button again.) (Top view of FL350)
Charging with the product turns on.
'Low Battery' is displayed after remaining quantity of the battery icon increasingly
reduces and the battery must be charged.
Charging starts while the USB & Charging figure flickers on the LCD screen if
connecting the USB terminal of the PC after connecting the USB cable to the
earphone terminal of the product.
Bumping figure is displayed on the LCD screen if charging is completed.
Battery Charging Display Battery Bump Display
Charging with the product turned off
Charging is possible even with the product turned off.
Charging starts while the USB & Charging figure flickers on the LCD screen if
connecting the USB terminal of the PC after connecting the USB cable to the earphone
terminal of the product. A separate display does not appear on the LCD screen.
In case of charging with the product turned off, charging is more rapidly done than
charging with the product turned on.
Reset
Switch

Firstly select model of player and then click
the [Next] button.
If clicking the [Next] button, all utility programs
selected currently are installed.
The user can install necessary programs
optionally. However, 3 utility programs to be
installed are as below:
- Windows 98 Device Driver
- MPIO Utility
- Windows Media Player Plug-in
If clicking the [Install] button, utility programs
the user selected are installed sequentially.
If clicking the [Finish] button, all installation
precess are completed. The MPIO Utility icon is
shown as below on the ground screen.
For detailed information on MPIO Utility,
see the [6. Using MPIO Utility] page 44.
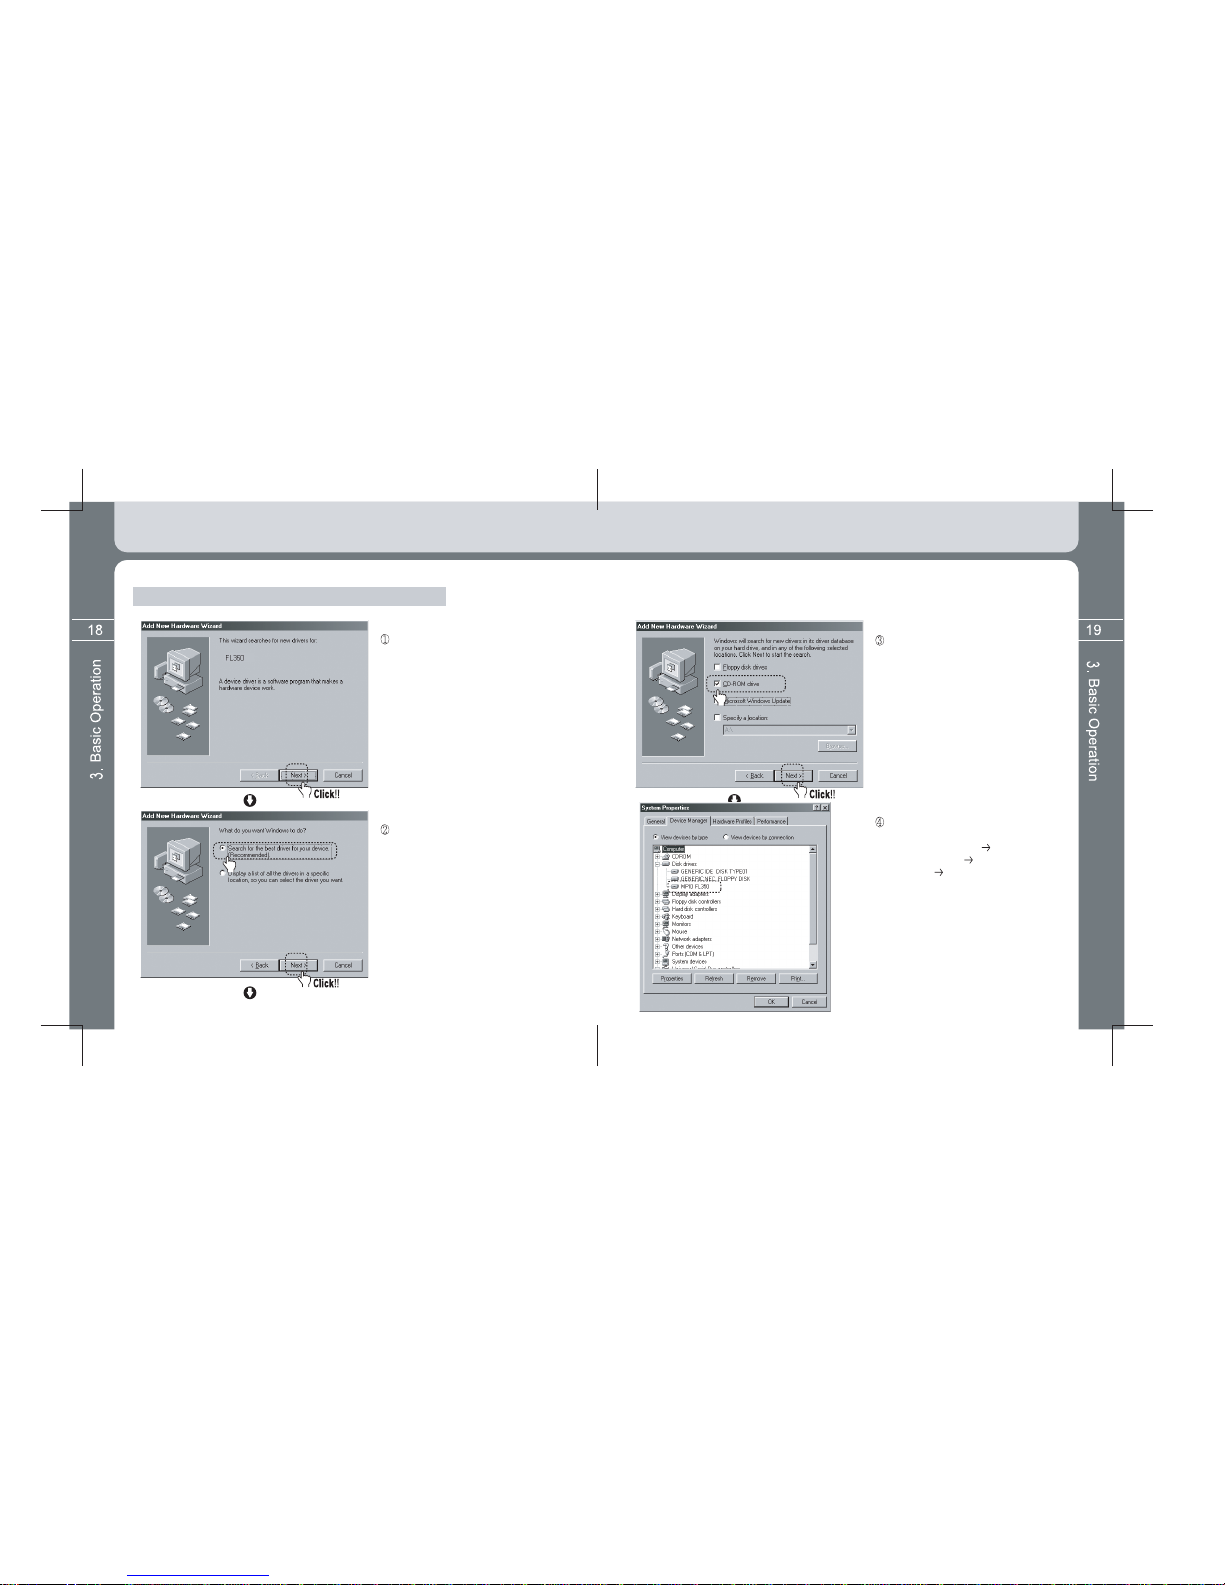
Where Windows 98 Device Driver is not automatically installed.
Connect USB cables of both product and
PC each other. Click the [Next] button if a
‘New Hardware Addition Magician’ window
appears as left figure.
Click the [Next] button after selecting the
‘Most Appropriate Driver for Device’ menu.
You can finally check whether installation
is normally done if entering into the next
path. [Control Device] [System]
[Device Manager] [Hard Disk
Controller] Sub Device.
It is normal only when a device called
‘MPIO FL350’ is displayed (See left figure).
Click the [Next] button after firstly inserting
the supplied Utility CD into the CD-ROM
and then selecting ‘CD-ROM Drive’ menu.
If doing so, a Complete Window appears
after sequence to copy and install
necessary driver file in the Utility CD is
processed. Installation is completed if
clicking the [Finish] button.

Find and select a music file desired to play and press the button shortly to play the music.
Press the button or the button while playing to play the previous or next music.
* Press the button after 10 seconds of playing to play from the beginning of the music file
being played.
* Press the button within 10 seconds after playing, to play the previous music file.
* Press and hold the , button to perform Fast Rewind /Fast Forward function.
Turn ON/OFF
Press and hold the button to turn on and display the Day and Watch screen.
If pressing any button in this case, Navigation screen appears.
Press and hold the button to turn off.
* If pressing any button shortly with backlight turned off in all modes, the button is used as
function to turn on only backlight. Every button performs its original function after the
backlight turns on. The purpose is to prevent unnecessary malfunction instead of the hold
button of the unit. However, any button immediately performs its original function when the
backlight continues to turns on or off. In addition, if leaving the backlight turned on for a
long time, consumption of the battery increases and has an effect on playing time.
Volume control
To increase the volume: Press the (+) button
To decrease the volume: Press the (-) button.
Press and hold the volume key to increase and decrease the volume fast.
(However, volume control is available only while playing music of listening FM.)
Music Search (Navigation)
Folder Exit: Return to the upper folder by pressing the Volume (+) button in the folder shortly.
Play and Pause of Music File
Press the button while playing to pause the music.
(For playing music file)
Music and data file download
Download and duplication of MP3 file with copyright is prohibited according to relevant
law and our company shall not be responsible for any items related to the copyright.
Connecting the MPIO Player with a computer.
For a PC using Windows 98/98SE, firstly install a 'Windows 98 Device Driver' in the
supplied Utility CD (For detailed installation method, see page 15).
Folder entry: Move to the upper or lower folder by using the button and then select
desired folder. Press the Menu button shortly to enter into the selected folder.
Where there is no music file saved
in the folder, ‘NO TRACKS’
message appears. Save music file.
[For MUSIC Mode] [For FM TUNER Mode]

Press and hold the Menu
bu
tt
o
n
a
n
d
m
o
v
e
t
o
th
e
m
a
in m
e
n
u
sc
r
ee
n.
S
elect the FM T
U
NER icon
by
usin
g
the
b
utton
and
p
ress the Menu
b
utton
shortl
y
a
g
ain.
Turn on and connect the USB cable with a computer and the USB terminal
(earphone terminal) of the player.
Check a USB link message in the LCD screen of the player as below.
(
Batter
y
char
g
in
g)
(
Bump of batter
y)
Battery charging is automatically
done in connection of USB.
Converting MUSIC mode ↔ FM T
U
NER mode
MUSIC Mode
The Mode
C
onversion screen
temporaril
y
appears and
moves to the FM T
U
NER
M
O
DE
.
FM TUNER Mode
Press and hold the MENU
button and move to the
main menu screen.
Select the MUSIC icon by
using the button and
press the MENU button
shortly again.
The Mode Conversion screen
temporarily appears and
moves to the MUSIC MODE.
Music and data file storage
Execute [Window Searcher] of a PC.
The PC recognizes FL350 as movable disk. (The user can check it in the ‘My Computer’.)
Thus, the user can execute command such as Save/Delete of data, To make Folder in
the same method as hard disk of the PC (Save data in the or method as below).
Copy & Paste: After selecting data to save, “copy” them and then “paste” them to
the movable disk.
Drag & Drop: After selecting data to save, drag them with the mouse left button
pressed and then drop the mouse left button at the movable disk
recognized.
Selected data are saved at the movable disk.
(After selecting data to save, [drag and drop] them at the
movable disk)
(Saving completing status at the movable disk)
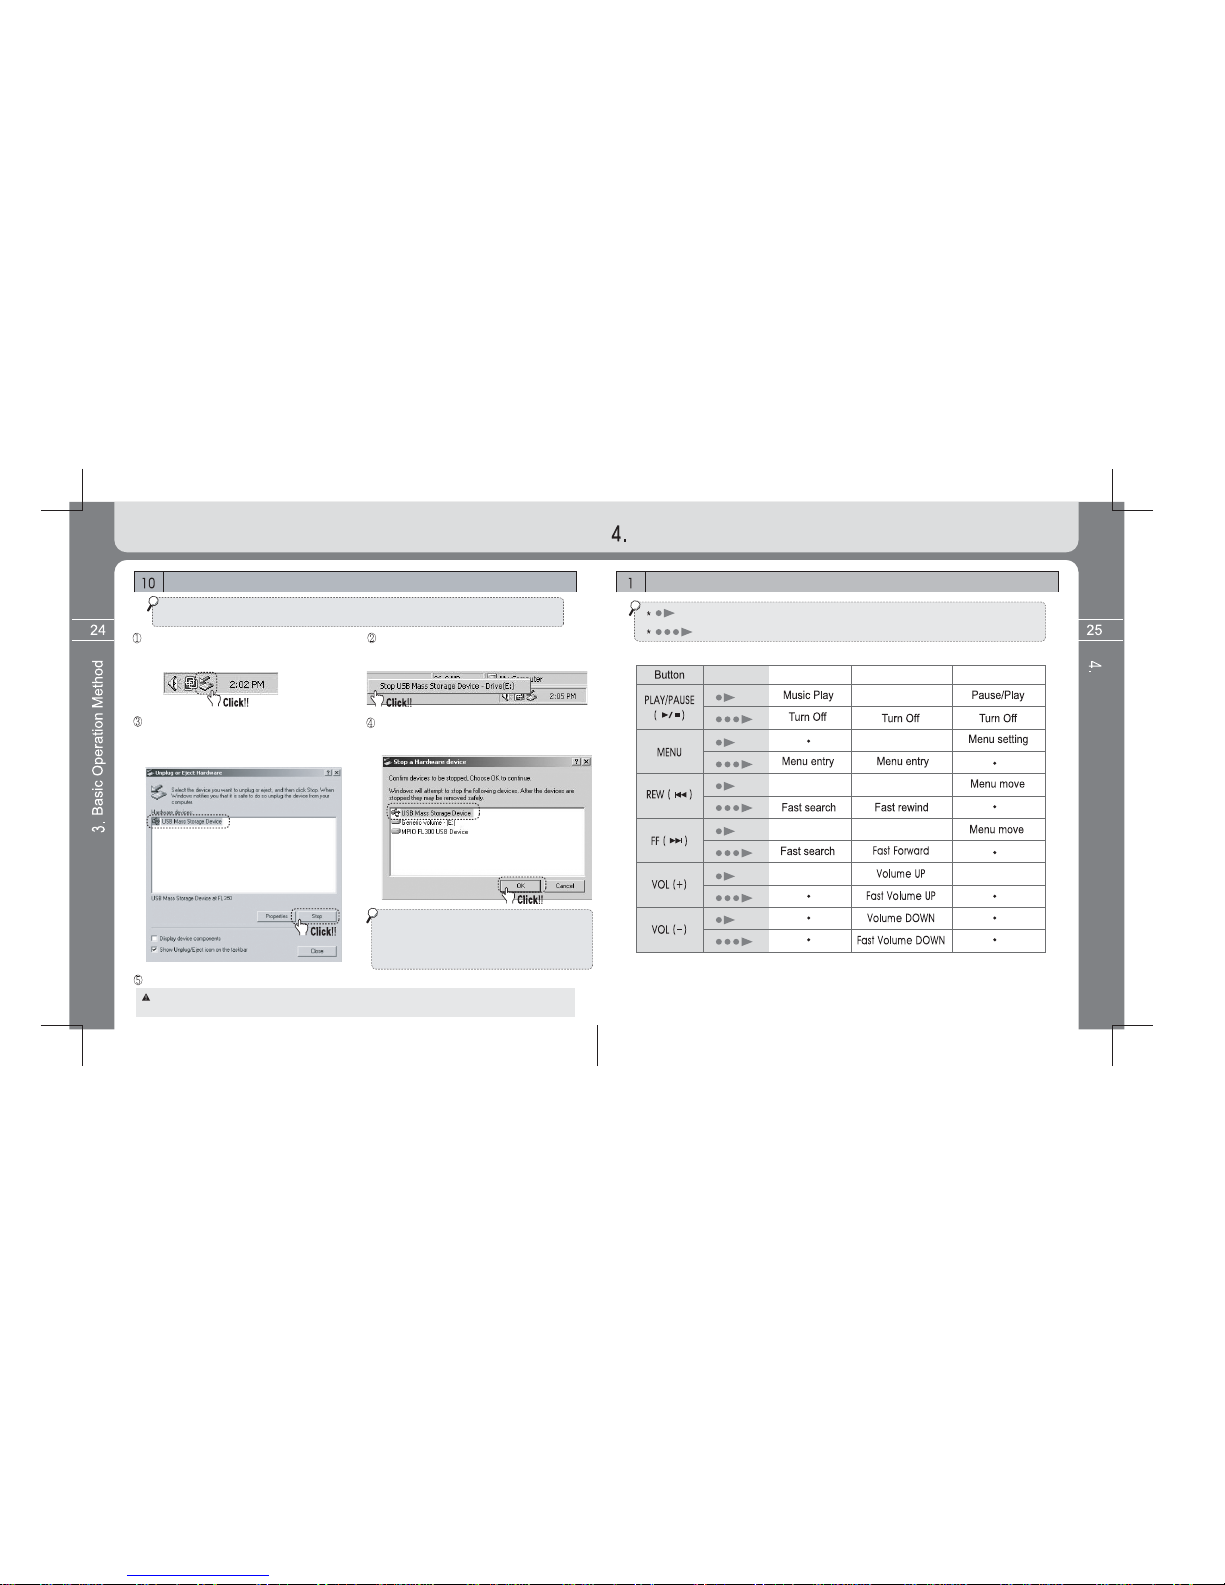
When ‘Stop of Hardware Device’ window
appears, check ‘USB Mass Storage Device’
and click the [OK] button.
Detailed Information on Music Mode
Detailed Information on Music Mode
Button operation
Information change/
Sector repeat
Previous music
search
Previous music playback
Next music
search Next music playback
Separate the PC and the player after checking the ‘Safe Removal of Hardware’ window.
Upper menu move
Upper folder move
: Means pressing the button shortly.
: Means to press and hold the button for more than a second.
Pause
For Playback
For Pause For Menu
The followings are recommended for safe disconnection of the player. Note data
loss or damage of player may result in if failing to follow instructions.
Locate the mouse on the ‘Removal and
Disconnection of Player’ icon of the Task Tray
and click the right button of the mouse.
Select ‘Hardware Disconnection or
Pull-out’ message to display the
below screen.
When ‘Safe Removal of Hardware’
window appears, select ‘USB Mass
Storage Device’ on the Hardware
Device window and click the [Stop] button.
For Windows 98 / 98 SE computer user
- There is no command for safe disconnection
between computer and the player. Therefore, check
whether file and data transmission are completed between
computer and the player before disconnecting.
Disconnecting product from a computer
Windows 2000 - Separate the PC and the player after pressing the [OK] button if the ‘Safe Removal of Hardware’ window appears.
Window XP - Separate the PC and the player if the ‘Safe Removal of Hardware’ completion message appears.
Operation

Search desired music by using the button.
Then press the button to play the music.
Press and hold the button to turn on.
Operating methods by function
When setting all menu, press the Volume (+) button to return to the upper
menu without setting values saved. (Menu escape function)
Listening to music
Search the next music or previous music by
using the button, and then press the
button to play the music.
NAVIGATION (music find)
Enter into the MENU screen by
pressing and holding the MENU
button while playing and then
select the Navi
g
ation icon.
* If pressing any button shortly with backlight turned off in all modes, the button is used as
function to turn on only backlight. Every button performs its original function after the backlight
turns on. The purpose is to prevent unnecessary malfunction instead of the hold button of the unit.
However, any button immediately performs its original function when the backlight continues to
turns on or off. In addition, if leaving the backlight turned on for a long time, consumption of the
battery increases and has an effect on playing time.
REPEAT setting (Repeat Playback)
Repeat Normal- Sequential play / Repeat One –Play only one music repeatedly / Repeat All –Unlimited sequential
play / Random – Random sequential play / Directory Normal – Sequential play of music only in folder /
Directory All - Unlimited sequential play of music only in folder /
Directory Random - Unlimited sequential play of music only in folder at random
Select the REPEAT icon after entering
into the Menu button by pressing and
holding the MENU button.
Select desired play status after
entering into the MENU button by pressing
the Menu button shortly.
Watch function
Press the MENU button shortly while playing music or listening to FM radio.
Format type, bit rate and playing time can be checked during play of music, and time
is displayed on the whole LCD screen if pressing the Menu button once again shortly.
Even in play of FM radio, time is displayed if pressing the Menu button shortly.
Using Watch function
* For further details of time setting and alarm time setting, see page 32 and 33.
Detailed Information on Music Mode
Detailed Information on Music Mode

The sector repeat startin
g
point
(
A
)
is set if pressin
g
the MENU button shortly while
playing files. The sector repeat ending point (B) is set if pressing the MENU button shortly
again at the ending point of the sector to repeat, and the A B sector is played repeatedly.
Recordin
g
be
g
ins if pressin
g
the Menu button after selectin
g
LOW
(g
eneral qualit
y)
o
r
HIGH (high quality). Recording temporarily stops if pressing the button shortly
while recording, and Pause function is released and recording is done if pressing it
shortl
y
once a
g
ain.
Function of the MENU button operates as the
sector repeat function of files being played while
the A B sector repeat function turns ON.
For your reference, music information and time
appear sequentially if pressing the MENU button
shortly when the A B sector repeat function turns OFF.
(For further information, see page 11.)
Change A B to ON from OFF.
Select the A B icon after entering into the
sub menu by pressing the MENU button shortly.
Setup of A B sector repeat function (Usefully used for foreign language study)
Select the SYSTEM icon after entering
into the MENU screen by pressing
and holding the MENU button.
The A B sector repeat point is released if pressing the MENU button shortly once again.
Select the VOICE RECORDER icon after entering into the MENU screen by pressing and
holding the MENU button. Select a desired recording quality after entering into the sub
menu by pressing the MENU button shortly.
* LOW recordin
g
time : 396 minutes
(
128MB
)
* HIGH recordin
g
time : 200 minutes
(
128MB
)
Voice recordin
g
is ended and saved in the RECORD Folder if pressin
g
the MENU button
while recordin
g
. Voice recodin
g
file is saved in the RECORD Folder in the form o
f
VOICE000.WAV
,
VOICE001. WA
V
....
Search and select voice recording file in the RECORD Folder for playing by list search in
NAVIGATION function or Pause status.
* 'ONLY STOP MODE’ popup message as left image appears and no
recording is done if entering into recording function while playing music.
Stop music being played for recording.
The popup message window disappears if pressing the button.
* Where there is no voice recording file saved in the Record folder,
‘NO TRACKS’ message appears.
Detailed Information on Music Mode
Detailed Information on Music Mode
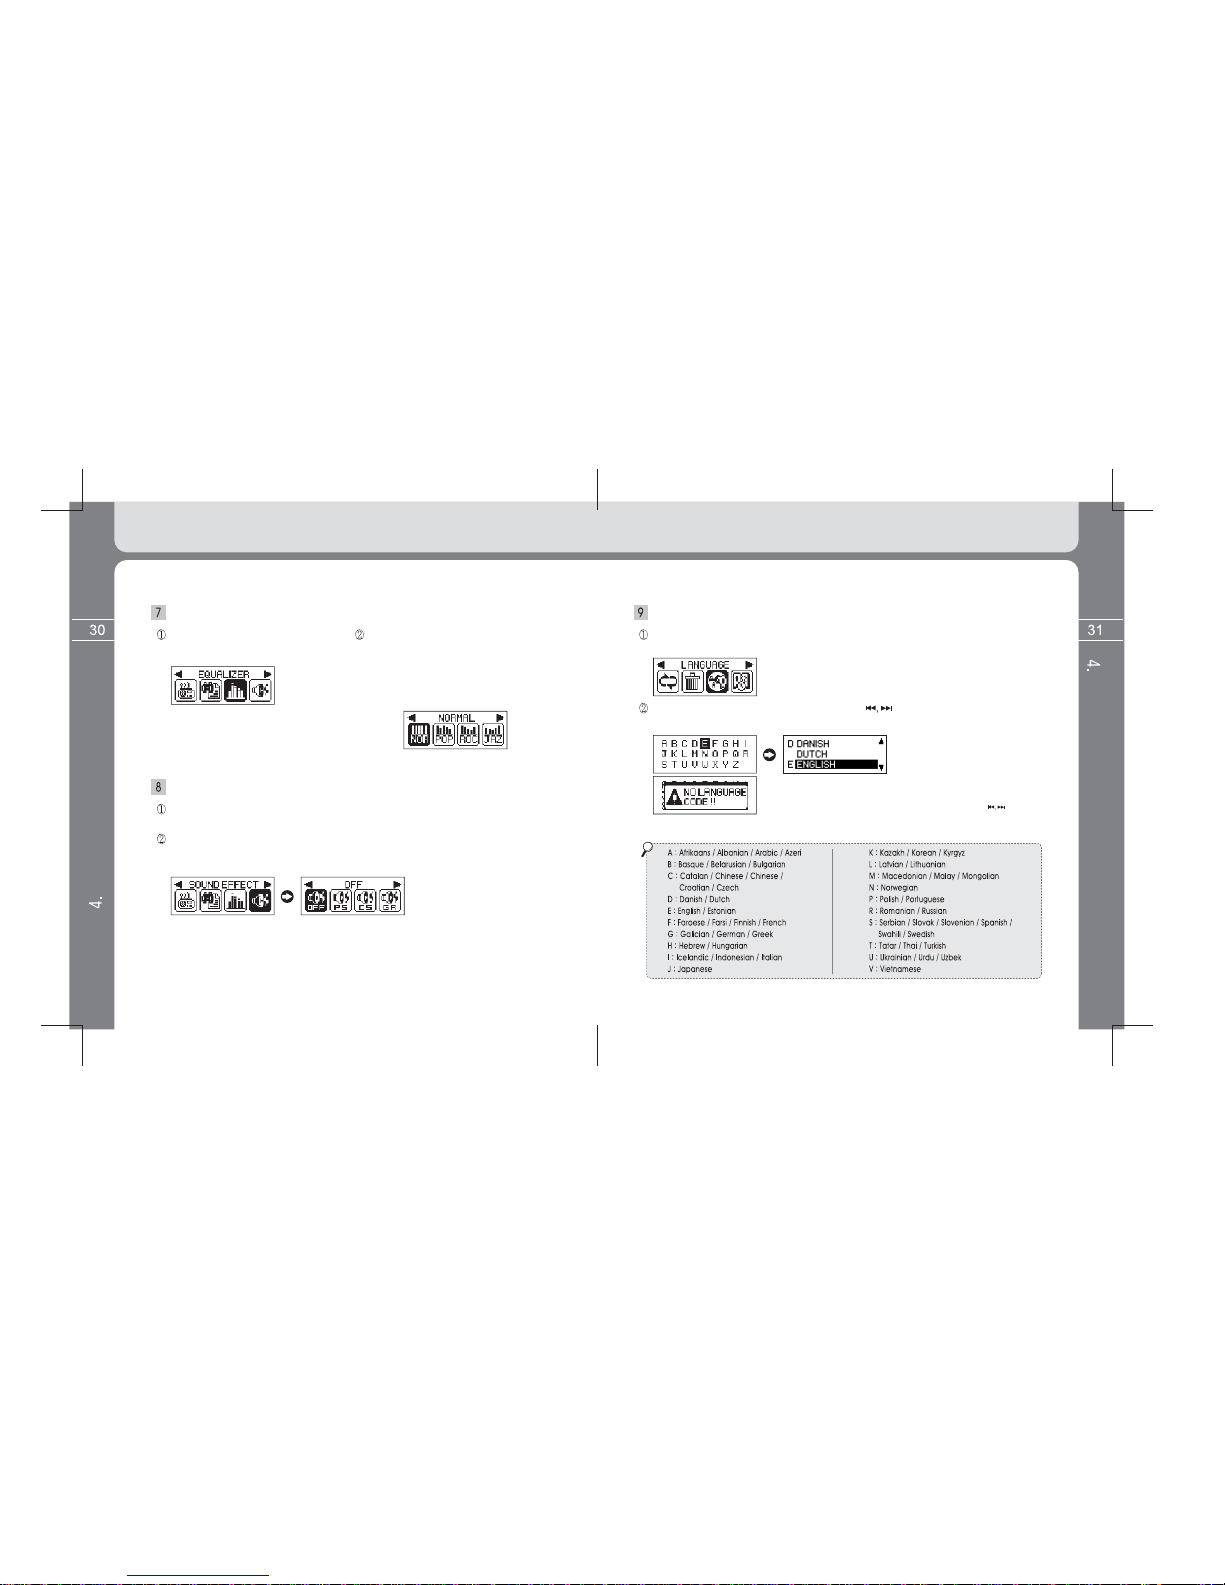
Setup EQUALIZER
Select the EQUALIZER icon after
entering into the MENU screen by
pressin
g
and holdin
g
the MENU
b
utton.
Set a desired PRESET EQ after entering into
the sub menu by pressing the MENU button.
(Composed of NORMAL / POP / ROCK /
JAZZ / CLASSIC / VOCAL)
Setup SOUND EFFECT
Select the SOUND EFFECT icon after entering into the MENU screen by pressing and
holding the MENU button.
Select a desired SOUND EFFECT icon after entering into the sub menu by pressing the
MENU button. (Composed of OFF / PURE STUDIO / CONCERT SOUND / GROOVE /
D
YNAMIC BASS
)
Setup LANGUAGE [ID3 TAG language]
Select the LANGUAGE icon after entering into the MENU screen by pressing and
holding the MENU button.
S
et a desired ID3 TAG lan
g
ua
g
e b
y
usin
g
the button after enterin
g
into the Menu
screen by pressing the MENU button shortly. Default ID3 TAG language is English.
(A popup message window appears as left image where there is no code
of language supported of A ~ Z alphabets when setting desired language.
The popup message window disappears if pressing the button.
55 ID3 TAG languages as below are supported.)
Detailed Information on Music Mode
Detailed Information on Music Mode
Relevant values are saved if pressin
g
the MENU button shortl
y
after settin
g
time b
y
using the button. The cursor moves to the next setup unit (Moves while values of
y
ear, month, da
y
, hour and minute are sequentiall
y
set
).
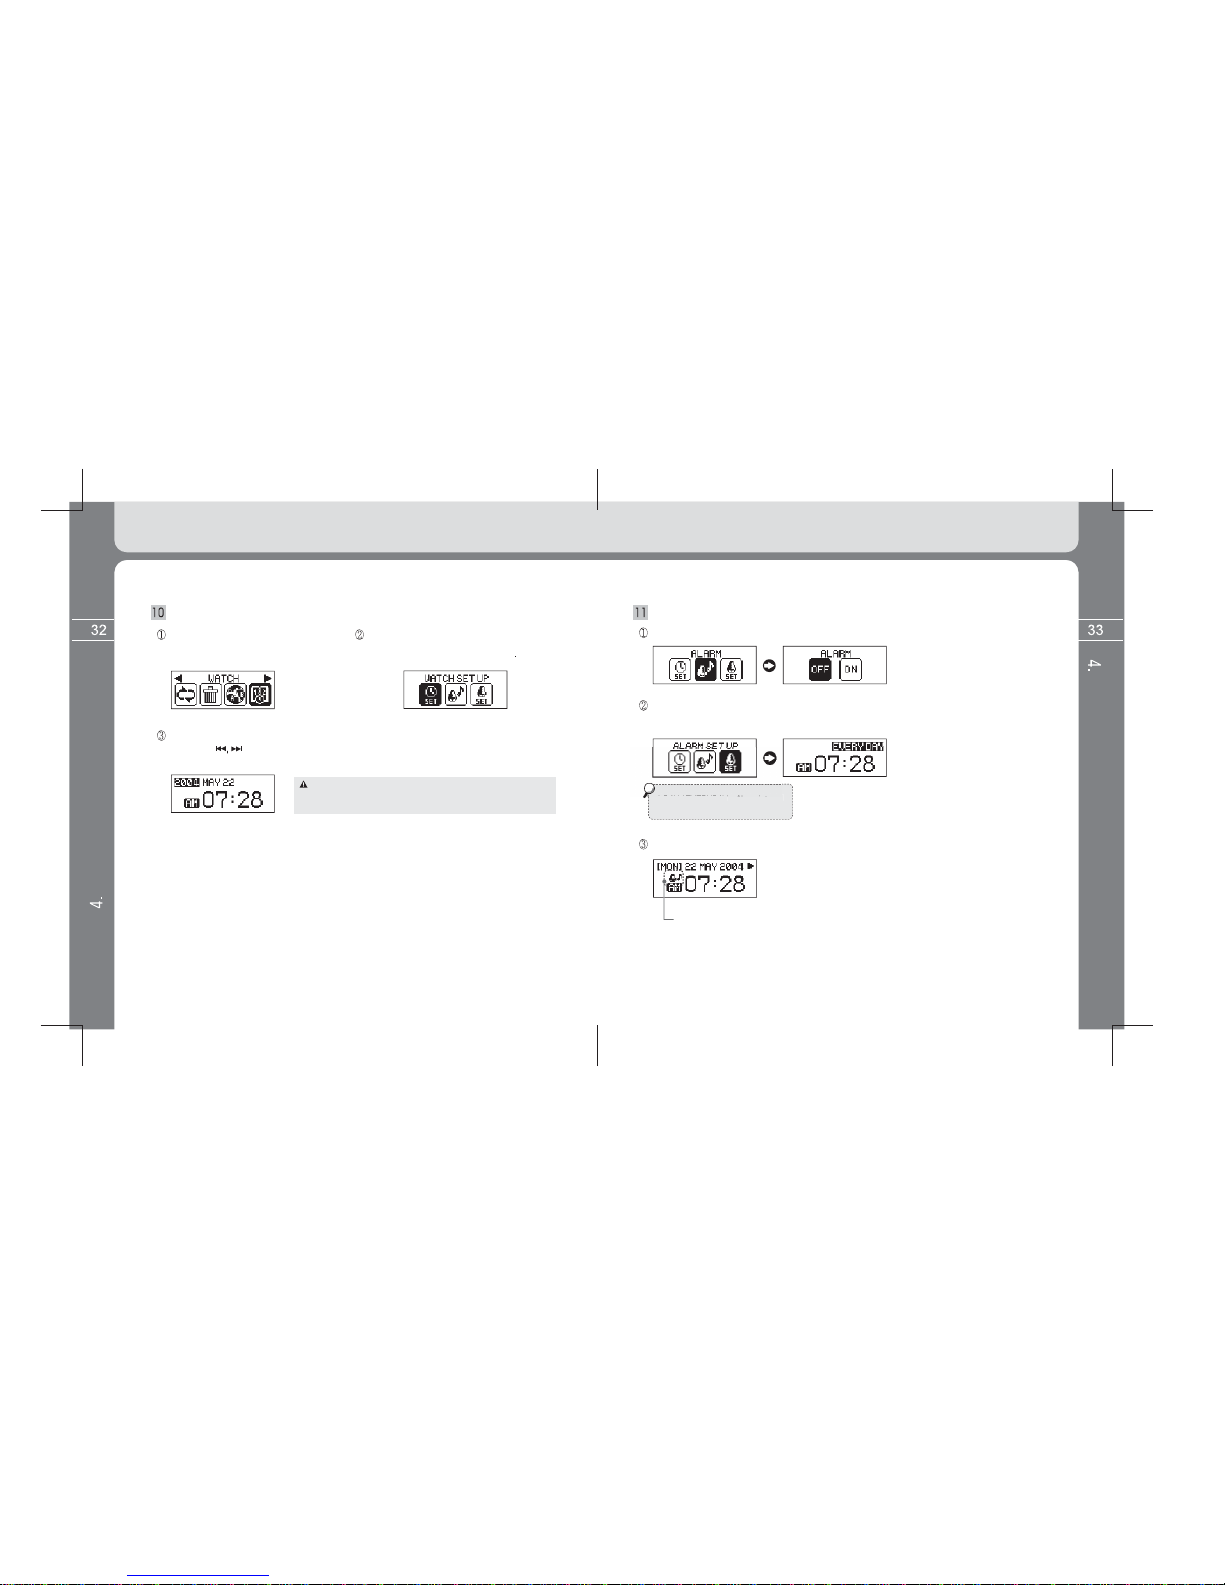
Setup WATCH
Select the WATCH icon after entering
into the MENU screen
by
pressin
g
and holdin
g
the MENU
b
utton.
Select the WATCH SET UP icon after entering
into the su
b
menu
by
pressin
g
the MEN
U
b
utton shortl
y
.
If setting year and changing month in this case, day setting
value is automatically changed to 1 as starting date.
Therefore, be sure to check day when setting a month.
Setup ALARM
Select the ALARM icon from the sub menu of WATCH and change it to ON from OFF.
Se
l
ec
t th
e
ALARM
S
ET
U
P i
co
n fr
o
m th
e
sub
m
e
n
u
o
f WAT
C
H
a
n
d
se
t in th
e
sa
m
e
m
ethod as time settin
g
.
1 DAY / EVERYDAY
–
Alarm interval
Hour / Minute – Alarm time Setup
The ALARM icon appears on the Watch screen when settin
g
alarm to ON
.
Alarm setup display icon.
Detailed Information on Music Mode
Detailed Information on Music Mode

S
ettin
g
values are saved if pressin
g
the Menu button shortl
y
after enterin
g
into desired
m
unu amon
g
DISPLAY menus
(
BACKLIGHT, CONTRAST, FILE INFO
)
in above
m
ethods and the settin
g
values
by
usin
g
b
utton
.
Select the DISPLAY icon by using the button and enter into the sub menu of Display
by pressing the MENU button once again shortly.
Setting values are saved if pressing the MENU button shortly after entering into the
desired Menu among SYSTEM (AUTO PLAY, A B, RESUME, SLEEP, AUTO
POWER OFF, FADE, INFO) and then setting value by the button in the above
method.
Setup SYSTEM (AUTO PLAY, A B, RESUME, SLEEP, AUTO POWER OFF, FADE, INFO)
Select the SYSTEM icon by using the button and enter into the sub menu of
system by pressing the MENU button once again shortly.
Setup DISPLAY (BACKLIGHT, CONTRAST, FILE INFO)
Enter into the MENU screen by pressing and holding the MENU button.
[ BACKLIGHT time setting ]
(
OFF, 3 ~ 30 seconds, ON
)
However, consumption of batter
y
increases
and thus has an effect on pla
y
in
g
time i
f
settin
g
to ON.
[ LCD contrast settin
g
]
(
1~5 step
)
Select file information to be displa
y
ed in the
LCD 2 line while pla
y
in
g
file
.
* TAG INFO: Displa
y
s ID3 TAG information.
* File name: Displa
y
s file name.
However, in case of chan
g
in
g
to TAG INFO
from FILE NAME, chan
g
e default ID3 TAG
lan
g
ua
g
e to desired ID3 TAG lan
g
ua
g
e as
described in LAN
G
UA
G
E settin
g
in pa
g
e 31.
If not doin
g
so, there is failure in case of non
-
En
g
lish ID3 TAG lan
g
ua
g
e not in En
g
lish.
D
efault ID3 TAG lan
g
ua
g
e is En
g
lish.
Setup SPEED CONTROL
Select the SPEED CONTROL icon after
entering into the Menu screen by
pressing and holding the MENU button.
Play speed is changed if pressing the
MENU button shortly after setting play
speed by using the button.
Enter into the Menu screen by pressing and holding the MENU button.
Automatic play is done for last files heard
before powering off. Automatic play is not
done if the file is deleted.
[ Setting of automatic play when powering on ]
* OFF: File is played only when pressing the
PLAY button after powering on.
* ON: File is automatically played if powering on.
Detailed Information on Music Mode
Detailed Information on Music Mode
For files whose pla
y
speed can be ad
j
usted, sample rate is applied to MP3 file of less than 22.05kHz.

* Select the ERASE icon by using the button after entering into the Menu screen
by
pressin
g
and holdin
g
the Menu
b
utton.
Press the Menu button a
g
ain
shortl
y
after selectin
g
the
ERASE ALL b
y
usin
g
the
button.
Pr
ess
th
e
MEN
U
bu
tt
o
n
again shortly after selecting
the ERASE FILE b
y
usin
g
the button.
[
Definition of 2 functions of menu button while
pla
y
in
g
music
]
*OFF: Bit rate and pla
y
in
g
time are displa
y
ed on the
LCD screen if pressin
g
the Menu button shortl
y
, and
Watch is displa
y
ed on the whole LCD screen if pressin
g
the
b
utton once a
g
ain shortl
y
.
* ON: Sector repeat is set if pressin
g
the MENU
button shortl
y
while pla
y
in
g
music
.
[Function selection to memorize and pla
y
the music fil
e
*INITIAL: Pla
y
s file pla
y
ed before powerin
g
o
f
f from
the be
g
innin
g
of the track
.
*
S
TOPPED: Memorizes stopped position of file pla
y
e
d
before powerin
g
off, in order to pla
y
from teh be
g
innin
g
o
f it
.
[Power off time reservation function]
(0 ~ 60 minutes)
[Automatic power off time reservation function]
It is automatically turned off after
standby time has passed when there is no button
operation in the Pause status.
(
3 ~ 30 minutes
)
[Function that volume slowl
y
increases when
pla
y
in
g
music
]
*OFF: Sound is loudl
y
heard in volume setup while
pla
y
in
g
file
.
*ON: Sound slowl
y
increases or reduces in volume
setup while pla
y
in
g
file
.
[Product information display]
Displays Firmware Version, Used Memory and Total
Memory information.
ERASE a function (Erase a file or all files) Function to erase files saved in memory.
[
Erase File
]
[
Erase All File
]
Ent
e
r int
o
th
e
ERA
S
E
MENU b
y
pressin
g
the
MENU
b
utton s
h
ort
ly.
P
ress t
h
e
MENU
b
utton
shortl
y
after enterin
g
into
th
e
ERA
S
E M
ode
a
n
d
searching a file to erase
.
A waste box icon
a
pp
ears in front of
file name.
Popup message appears
As left figure. In this case,
selected file is erased if
selecting the YES key.
Enter into the ERA
S
E MEN
U
b
y
pressin
g
the MENU
button shortly
.
Popup messa
g
e appears
as fi
g
ure. In this case, all
sa
v
ed
fil
es
a
r
e
e
r
ased
i
f
selectin
g
the YES ke
y.
Erase function is available onl
y
in stop status.
Popup message
appears as figure.
The popup messa
g
e window disappears if pressin
g
the button.
* VOLUME + button function
Consecutively press the Volume (+) button three times in order to exit
the ERASE Mode after erasing all desired files.
(The Volume (+) button increases volume as its original function as its original
function only when music file is playing. The button is used as Upper Menu
or Menu Cancel button in the Menu screen and is also used as button to exit
to the upper folder while Navigating (music search).
Detailed Information on Music Mode
Detailed Information on Music Mode
Sleep setup values are not saved after power off.

* Press and hold the button to turn on.
(Change to FM TUNER mode from MUSIC Mode as below figure.)
Enter into the Menu screen by pressing and holding the
MENU button. Select the FM TUNER icon by using the
button and then press the MENU button again shortly.
FM Screen Watch Screen
Detailed Information on FM TUNER Mode
FM Screen Watch Screen
Detailed Information on FM TUNER Mode
Button operation
Fast frequency
search
Fast frequency
search
Fast channel search
Fast channel search
Operating methods by function
It moves to the upper menu without setting values saved if pressing the Volume (+)
button when setting all menu status (Menu Exit function).
Music Mode
The Mode Change icon temporarily appears and moves to
the FM TUNER mode.
FM TUNER Mode
Search frequency by using the button.
* MUSIC mode starts when powering ON again, and even when powering
OFF in the FM TUNER mode.
SCAN Mode CHANNEL Mode For MENU
Menu Setup
FM radio listening
: Means pressing the button shortly.
: Means to press and hold the button for more than a second.
Upper menu move
Operation
Detailed Information on FM TUNER Mode
Table of contents
Other Mpio MP3 Player manuals


