Mpio DMB Plus User manual

2
Better and new Encoding MP3 player
Digital Sound
The MPIO maintains high
quality sound at all time.
What is MP3?
MP3 stands for MPEG 1/2 layer 3.
MP3 files can be compressed up to 1/20 size of
the original wave files.
What is the MPIO?
The MPIO stands for Multi-Play Internet AudiO,
is a new generation digital audio player.
You can purchase MP3 files on the internet
and download them directly to your MPIO for
CD quality sound without the need of casette
tapes or CDs.
Encoding Digital
Player!
Download files directly
to your MPIO and
enjoy the CD sound
quality now!.

3
CONTENTS
• This equipment has been tested and found to comply with the limits for a Class B digital device.
Player Features and Controls
Accessories
Inserting the battery
Display LCD Panel
Listening to the music
Installing Software on PC
Installing the MPIO Manager
Connecting the MPIO to PC
Functions of Jog button
Listening to the FM Radio
Listening to the Voice Record on PC
REP(Repeat) Mode
EQ(Equalizer) Mode
Repeat Segmentation Mode
4
6
7
8
9
10
11
13
14
15
21
24
25
26
Back Light Mode
Making MP3 files from an Audio Player
Formatting Internal Memory
Downloading Files to the MPIO
Listening to the MP3 file on PC
Erasing Files on the MPIO
Erasing Files on PC
Arranging the Playback Order
Downloading Additional Font to the MPIO
Inserting the SMC(Smart Media Card)
Troubleshooting
Safety Precautions
Technical Specifications
Warranty
27
28
31
32
34
36
37
38
40
41
42
43
44
45
4
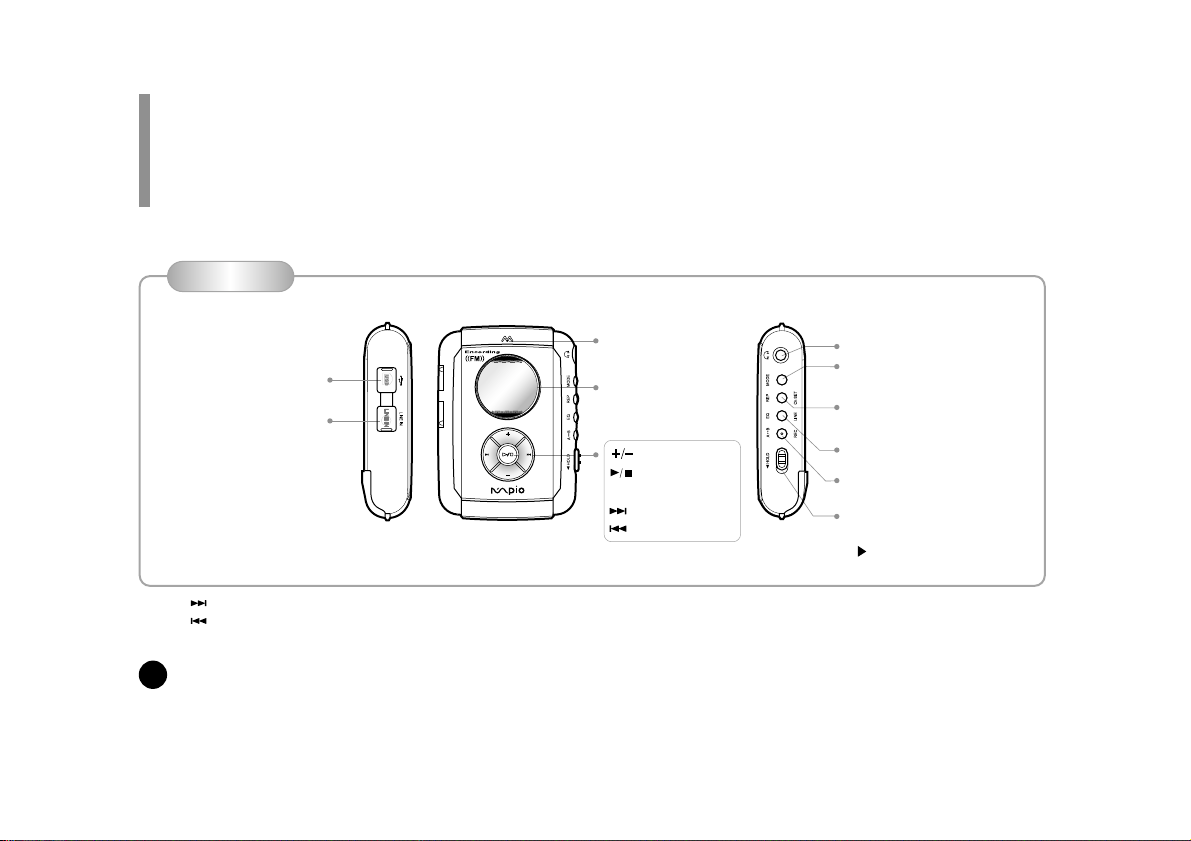
PLAYER FEATURES AND CONTROLS
Front Panel
USB Connector
Line-in Jack connecting the
MPIO to Audio (Stereo
Cable)
LCD
Forward
Rewind
Volume Control
Power on/ Play
Stop/ Power off
Earphone Jack
Mode button
(MP3/ FM Radio/ MP3 Record/ Erasing Files)
Repeat Segmentation/Record/
Back light Mode
Equalizer/ Record Selection
Repeat/ FM Channel Mode
Hold
(For the prevention of malfunction of player,
locate the Hold switch to the Hold position
( ). when this button is kept on, all buttons
will not operate.)
Note : Press and release to display next 3 tracks.
: Press and release to display previous 3 tracks.
Microphone
(INTRO/ NORMAL/ REPEAT ALL/ REPEAT1/
SHUFFLE)
(FLAT/POP/ROCK/CLASSIC/X-BASS)

5
Battery Case
SMC(Smart Media
Card) Slot
Eject button(SMC)
Rear Panel
Power On/ Play/ Pause
Stop/ Power Off
Volume Control (+/-)
Equalizer/ FM Mode
Earphone Jack
Rewind
Forward
Hold
(MP3 Mode: Forward
FM Radio Mode: Frequency DOWN)
(MP3 Mode: Rewind
FM Radio Mode: Frequency UP)
(Changing the FM Radio Channel)
Optional Remote Control
•Press and Hold button to enter FM Radio Mode.
6
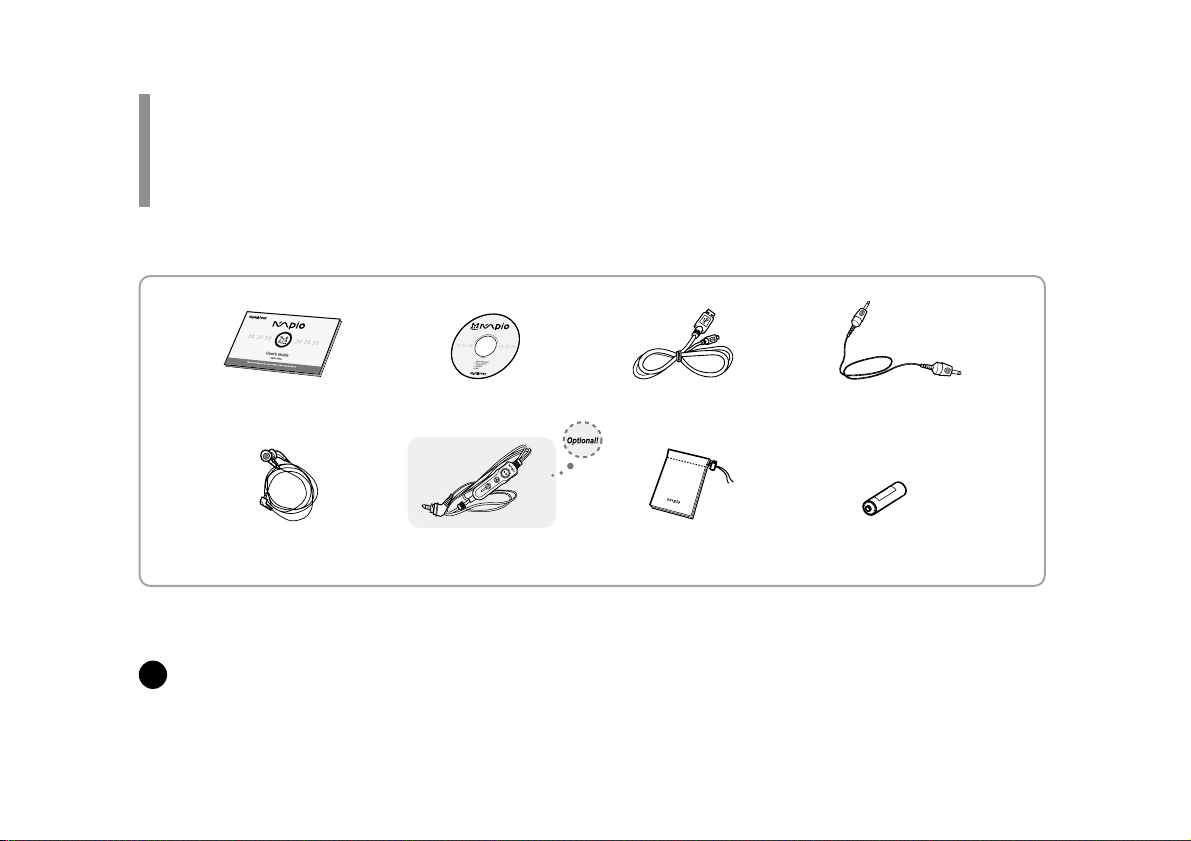
ACCESSORIES
USB CableUser's Guide Installation CD
Remote Control 1.5V AA type Battery
(1EA)
Stereo Cable
PocketEarphone

7
INSERTING THE BATTERY
1. Slide the battery cover in the
direction of the arrow. 2. Insert "AA" type battery with the
correct polarity. 3. Close the cover and slide it as
indicated until the battery cover
latches.
• You need one 1.5V AA type battery for your MPIO.

8
DISPLAY(LCD) PANEL
The indicator shows the amount of battery
remaining as belows:
If the battery icon shows empty and starts blinking,
it indicates the battery is almost gone.
(About 3 minutes left before the battery needs to be
replaced.)
Battery
Playback Icon
EQ (Equalizer Mode) Icon
→By selecting Equalizer
menu, you will see 5
different Equalizer
modes ( )
displayed. (see page
25)
MP3 Record Icon
REP (Repeat
Mode) Icon
(see page 24)
Battery Icon
※You can spend more electricity than usual while
listening to the radio or recording files.
9
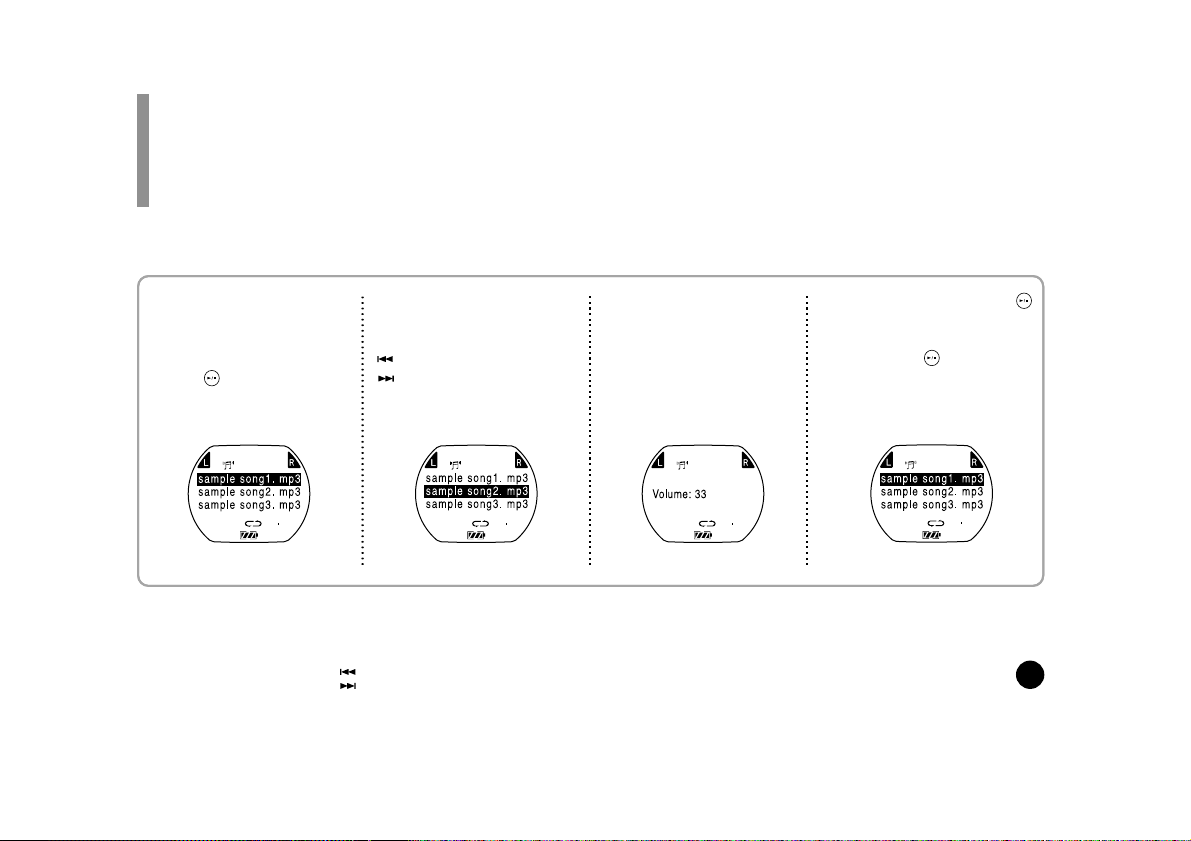
LISTENING TO THE MUSIC
2. Select the file what you
wish to listen to with
Jog button.
: Forward
: Rewind
3. Adjust the volume by
pressing the volume
(+/-) to your desired
level.
1. Turn the MPIO on by
pressing the PLAY
button.
Press the PLAY /STOP
button( ) again to play the
first selection.
4. Press the PLAY/STOP( )
button to stop playing.
To turn your MPIO off, press
and hold the ( ) button for
about 2 seconds.
• To select the files during the selection state
+ : Press and hold to move backward within the
current track.
- : Press and hold to move forward within the
current track.
: Press and release to display next 3 tracks.
: Press and release to display previous 3
tracks.
• If you do not press any buttons during in the
selection state, MPIO will automatically turn off
after 3 minutes.
• The level of volume is 00-40/MAX.
• Only during the playback state, you can
adjust the volume.
10
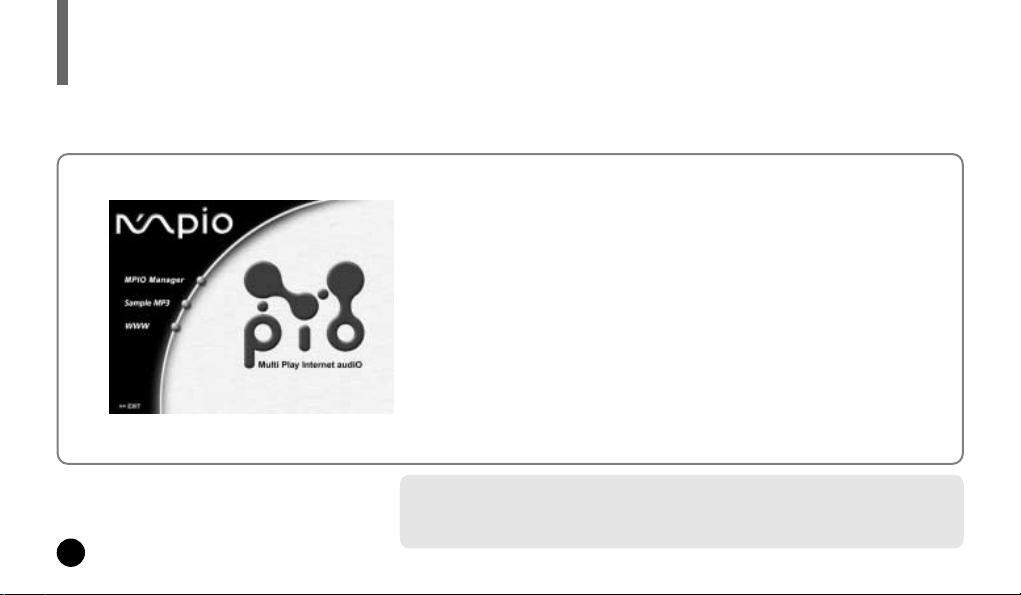
INSTALLING SOFTWARE ON PC
First, place the Installation CD into our CD-ROM drive. The
installation will start with the initial page as ou can see on the
left side of this page.
• MPIO Manager
MPIO Manager is for transferring files between PC and the MPIO.
You can download MP3 files and others to your MPIO.
You can also upload any other files (except MP3 and WMA files) to your
PC using this software.
• Sample MP3
You can enjoy 5 sample songs in MP3.
• WWW
You can get updated information and MPIO Manager from our website.
S stem Requirements
•
Pentium 133MHz or faster
•
CD-ROM drive
•
USB port
•
20MB free hard disk space
•
Windows 98/SE/ME/2000(PRO)/MAC OS (ver8.61~9.1)
Insert the Installation CD into the CD-ROM drive. The picture below will appear.

11
INSTALLING THE MPIO MANAGER
By pressing the 'Next' button you can install the MPIO Manager in order.
Welcome to the Install Shield Wizard for MPIO
Manager. The Install Shield wizard will install
MPIO Manager on your computer. To continue,
click NEXT.
Set up will install MPIO Manager in the following
folder (C:/ Program File/ Digitalway). To install to
the folder, click NEXT!
To install to a different folder, click Browse and
select another folder.
Click!Click!

12
You can designate the directory
of the icon folder. The icon will
be created after the installation
of the MPIO Manager.
The MPIO Manager is basically
placed just below the list of the
folders shown in Existing
Folders.
Select the Exiting Folders you
desire and click the NEXT button
to install the MPIO Manager.
It shows the process of
the installation.
MPIO Manager icon will
be created with the
selected drive directory
on your Windows
desktop after finishing
the MPIO Manager
software setup.
• The installation of MPIO Manager has been finished well.
Click!
13
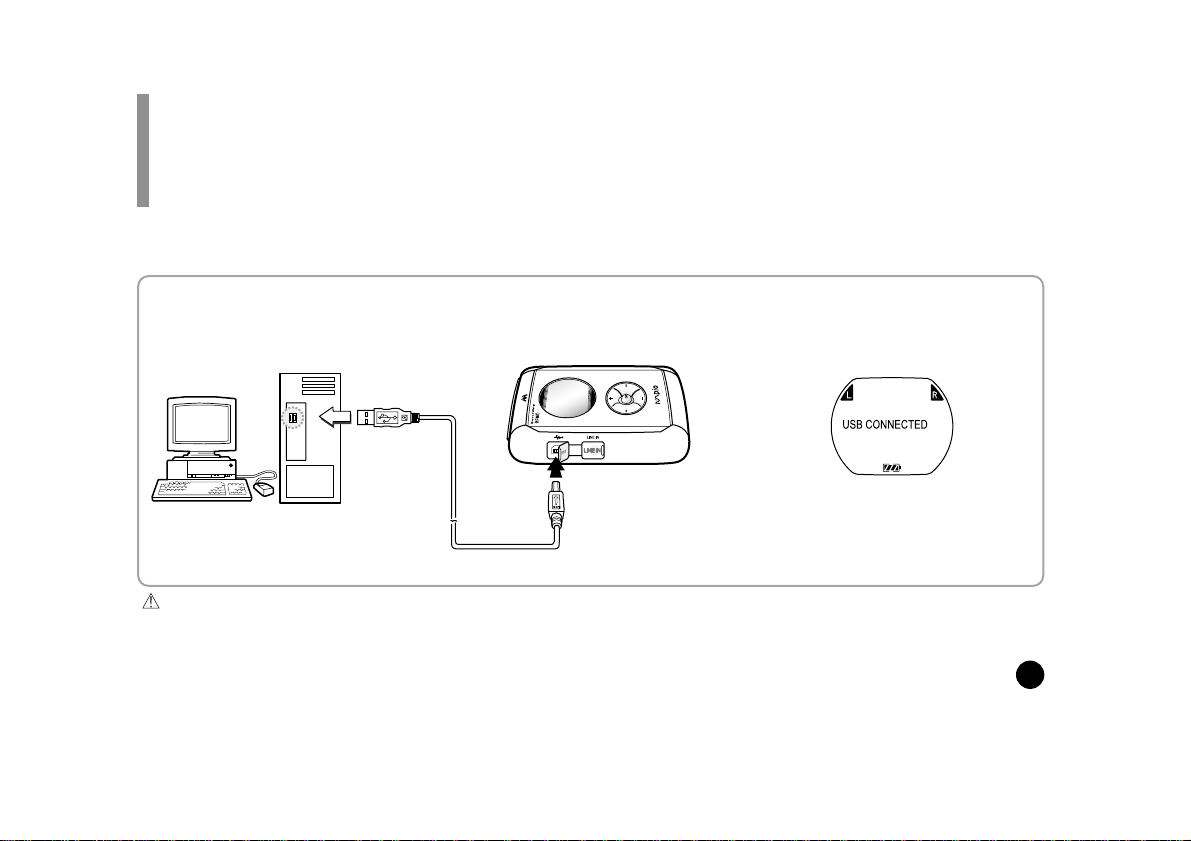
CONNECTING THE MPIO TO PC
1. Connect the USB Cable to the
USB port of the computer.
Attention
Please connect the USB Cable to your MPIO only when your MPIO is in the stop mode.
If you connect the USB Cable to your MPIO in the playing mode of your MPIO, the set can become wrong.
Please connect the USB Cable to your MPIO, only after your Stereo Cable is separated from the Line-In jack.
USB CONNECTED will
appear on the LCD of the
player.
2. Turn the MPIO on and connect
the USB Cable to your MPIO.
Before you download MP3 files into the MPIO, you must connect the MPIO to your PC using the supplied USB cable.
14
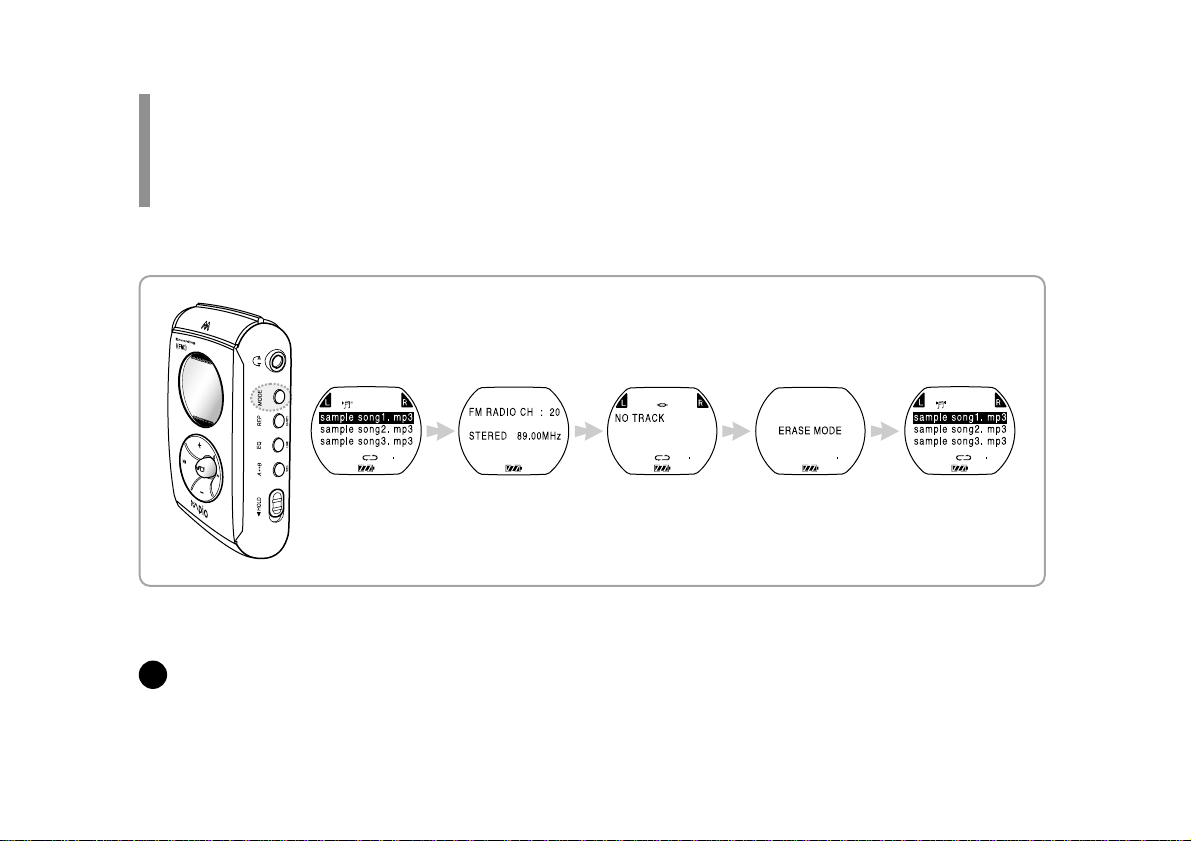
FUNCTIONS OF JOG BUTTON
By using Jog button, you can set the MPIO as you like.
Press Jog button and four different modes are displayed on the LCD.
Each mode has 'under mode'.
◆File Arrangement ◆
Initial mode FM Radio mode MP3 Record mode Erase Mode Initial
mode (Play mode)
Initial mode FM Radio
mode MP3 Record
mode Erase Mode Initial mode

15
LISTENING TO THE FM RADIO
By using Jog button, you can listen to the FM Radio. You can also record the music files.
Press Jog button and each of menu is displayed on LCD.
Initial mode FM Radio
mode
1. Selecting FM Radio mode by
pressing Jog button on the initial
page.
2. Changing FM Channel
①Press (Fast Forward) button shortly and the
Frequency goes up by 0.05MHz.
②Press (Rewind) button shortly and the Frequency
goes down by 0.05MHz.
when you press
(Fast Forward) button
shortly
When you press
(Rewind) button shortly

16
3. To select Automatic Seeking mode for FM Channel
①Press and hold (Fast Forward) button, and the frequency will
go up and start seeking channel automatically.
②Press and hold (Rewind) button, and the frequency will go
down and start seeking channel automatically.
When you press and
hold (Fast Forward)
button.
When you press and
hold (Rewind)
button.
4. To stop Automatic Seeking mode
Press button to stop Automatic
Seeking mode.
Automatic Seeking mode can not find specific channel, according to the location where you listen to the radio.
17
④Store the selected
channel to the
channel 01. You can
store up to 20
channels.
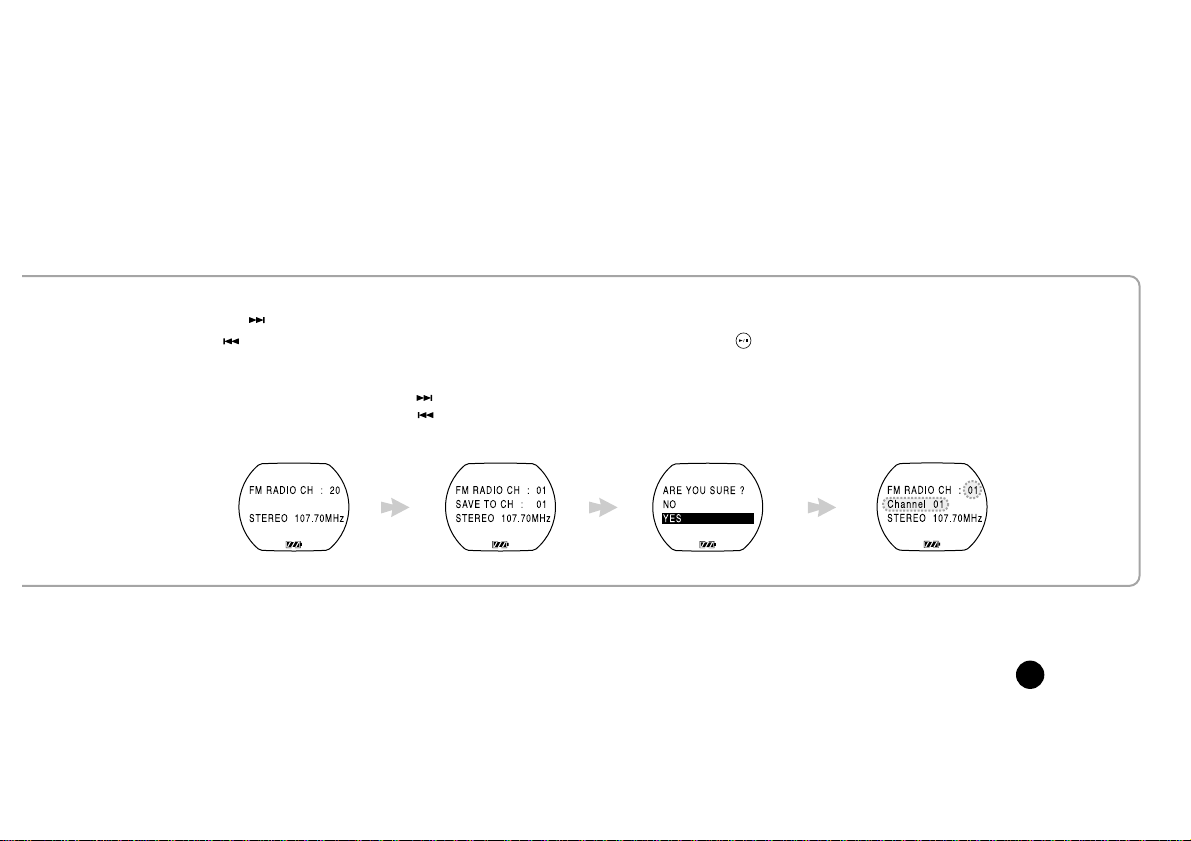
5. To store FM Channels
①Press (Fast Forward)
or (Rewind) button to
select the channel you
desire.
②Press REP button to
select Store mode. You
can select the channel
you want to store by using
(Fast Forward) or
(Rewind) button.
③Select “YES” by
using button to
store the selected
channel.

18
6. To listen to the FM Radio
①Press (Fast Forward) or (Rewind)
button to select the channel you want.
You can also select the channel you
stored.
②Press button while listening to the
FM Radio, and you can listen to the
preset FM channel in order.
19
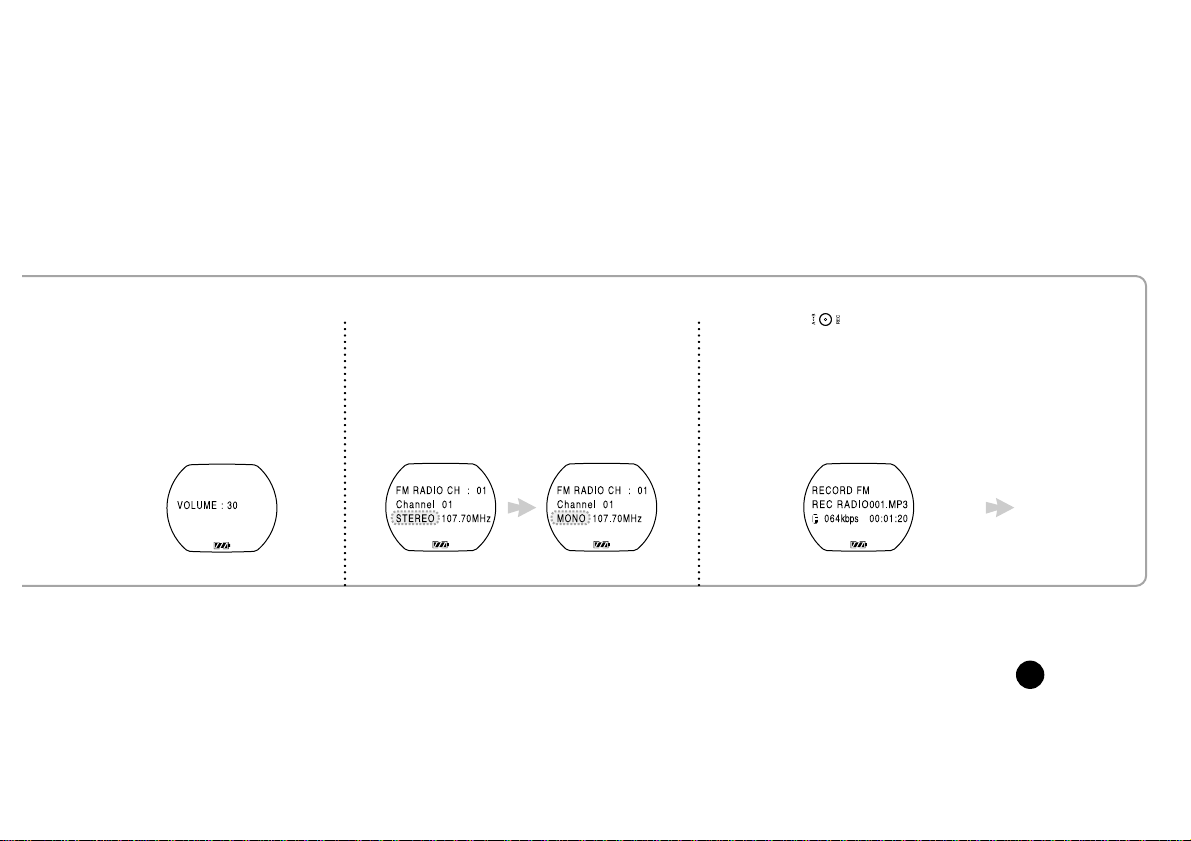
7. To adjust the volume,
press the (+/-) button
during the current
playback.
8. To switch from STEREO to MONO
mode, press EQ button.
Your MPIO comes with pre-installed
STEREO type.
9. Recording FM Radio
①Press (AB/REC) button to record
files during the play mode.

20
②Press (AB/REC)
button again to stop the
recording.
③The recorded files will be stored in
the form of RADIO001.MP3,
RADIO002.MP3, RADIO003.MP3...,
in order.
④To listen to the recorded files, go
back to the initial page (Standby
Status) and select the desired files
before pressing (PLAY/STOP)
button .

21
LISTENING TO THE VOICE RECORD ON PC
Set the mode from MPIO to MP3 RECORD first.
①Press the mode button twice to set
the MP3 RECORD mode.
The mode is in Selection State now. ②Press (EQ/LINE) button, and
the "RECORD INPUT IS LINE IN"
message will be displayed on LCD.
(Refer to page 28)
Initial mode FM Radio
mode MP3 Record
mode
• If there is the 'FULL' message, you must delete MP3 Music file or Voice file to have sufficient memory space for voice recording.
(Refer to page36)
• Voice recording is available only there is sufficient memory space in internal memory. You can not record your voice in external
memory card (SMC).
Table of contents
Other Mpio MP3 Player manuals


