Mr Fothergill's Little Gardeners 14514 User manual

Instructions
All-in-One
Greenhouse Kit
One
h
Greenh
All in
Gh
hK
Greenhouse Kit
All-in-One
Greenhouse Kit
All-in-One
Greenhouse Kit
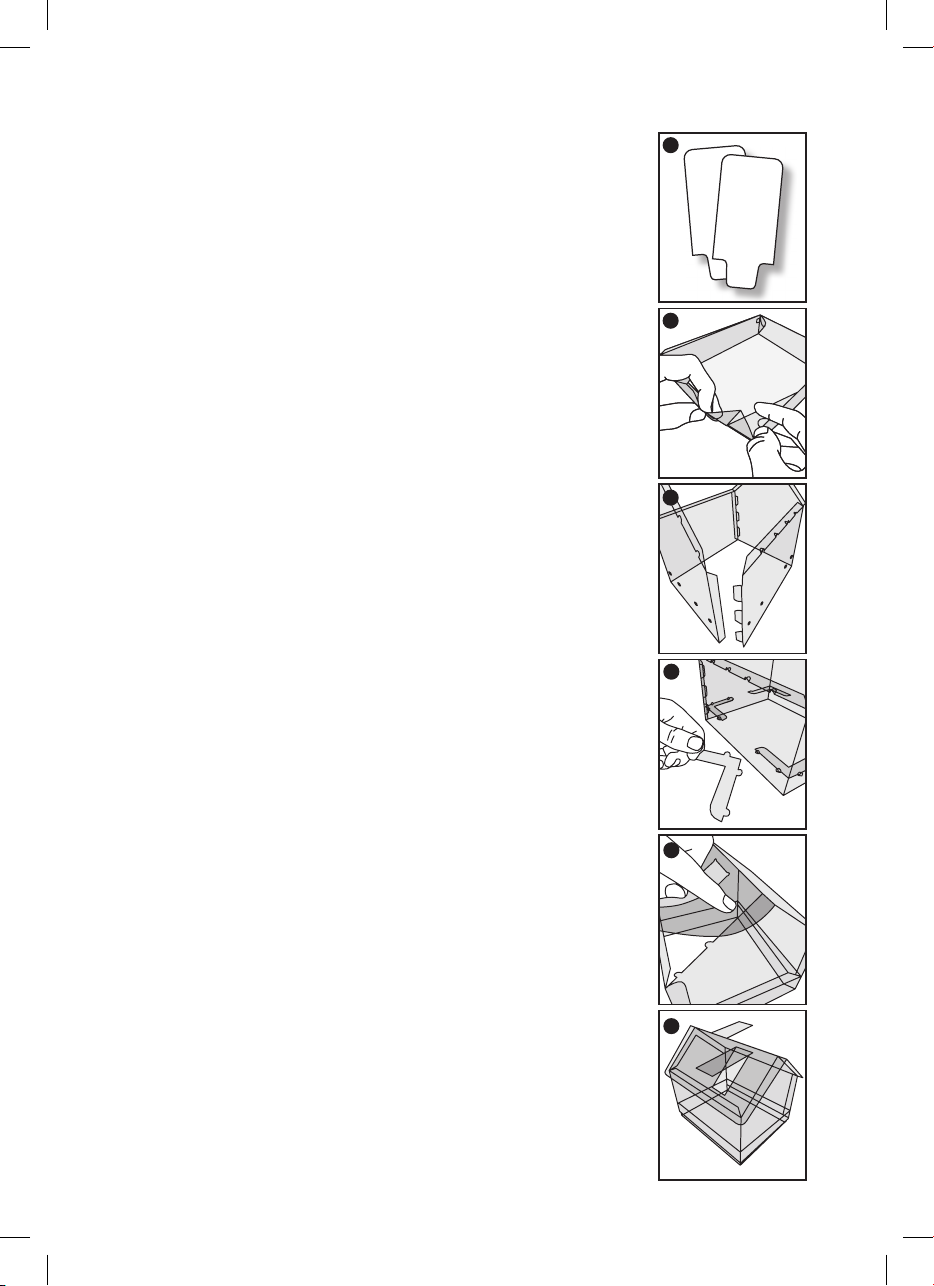
Greenhouse Construction
For younger children it may be advisable for a grown up to help.
1. Set aside the two plain white seed tags.
These are to be used when growing. Write your name
and what you are growing on them.
Base
2. Select the large plain transparent base unit. Fold in all
four sides and also the top lip.
3. Create the corners of the base by folding the walls in
together, and fold along the diagonal line at 45°. Hold the
corners together by slotting in the pre-cut side pegs into
the holes on the edge of the wall.
Roof
4. Carefully fold the rectangular window panels along the
highlighted line, and slot the short side of the window
into the top of the roof until it clicks into place.
Green House Walls
5. Fold the walls of the greenhouse into a rectangle, along
the pre-cut edges and slot the tabs into the pre-cut slots
along the neighbouring wall, creating a rectangle.
6. Using the plain L shaped brackets, re-enforce the inside
corners of the greenhouse walls by slotting the round
pegs through the pre-cut holes on the walls of the
greenhouse. Repeat for all four corners.
7. Fold the top lip over on the pre-printed walls of the
greenhouse. Ensure the round pegs remain upright.
(These will later be attached to the roof)
8. Connect the roof to the walls of the greenhouse by
slotting the round pegs of the walls to the pre-cut holes
of the roof.
9. Add the greenhouse to the base unit.
10. Decorate the greenhouse by folding and fixing the name
tag to the side.
3
1
5
6
8
9
Basil is an excellent source of
vitamins K and A, iron and calcium!
It contains lots of other anti-oxidants
and minerals too, which help you
grow big and strong!
Getting Started
Step 1 Once you have put your greenhouse together, place the base of the greenhouse on a flat
board, such as a kitchen tray. Remove the packaging from the Jiffy® soil pellets and place
them in the middle of the base.
Step 2 Add 750ml of water into the base of the greenhouse and watch as the Jiffy® soil pellets
quickly grow!
Step 3 Break up any lumps in the soil and spread it out evenly so it is level.
Growing your Plants’…
You can grow all three plant types at the same time or just one at a time – whichever you prefer. If
you grow them at the same time, just plant each type in their dedicated row and only use some of the
seeds so your plants won’t be overcrowded. If you do separate sowings you may want to use just two
of the soil pellets and hold onto the third – this will act as a refill and will replace the soil used when
your seedlings have been transplanted into the garden.
Basil Sweet Sow at any time of year.
Herbs are quick to grow – you see results in just days! Basil can be grown year
round and its delicious taste makes it great to use in cooking.
Step 1 Put the soil in the base of the greenhouse (see “Getting Started”
instructions).
Step 2 Form holes in the soil half-a-fingernail deep and 3cm apart. Sprinkle
a few basil seeds in the holes and carefully cover the seeds with soil. Water
gently until the soil is moist, then put the top on the greenhouse and place
on a light windowsill.
Step 3 When the seedlings appear, open the ventilation flaps in the
greenhouse roof.
Step 4 When they are about 7cm tall, remove the top of the greenhouse – you can
start picking leaves straight out the greenhouse, or transplant the seedlings
into pots or the garden. When doing this, carefully lift the basil from the
soil – try not to break the roots and make sure you hold the plants by their
leaves and not their stems. Make a small planting hole for them in the
garden or a pot, planting them about 25cm apart. Place your herbs into the
holes and gently press the soil back into place, then water them in. Now
you can use beautiful, fresh basil in your cooking!
Giant Sunflower Sow from Spring to Summer.
Easy to start indoors and then plant outside to grow tall. They will attract beautiful butterflies and other
wildlife to feed on the flowers.
Step 1
Put the soil in the base of the greenhouse (see “Getting Started” instructions)
Step 2 Press half-a-fingernail deep holes 4cm apart in the soil. Push a seed into
each hole and carefully cover the seeds with soil. Water gently until the
soil is moist, then put the top on the greenhouse and place on a light
windowsill.
Step 3 When the seedlings appear, open the ventilation flaps in the greenhouse
roof. When they are about 12cm tall, remove the top of the greenhouse. In
Spring and Summer, put the sunflowers outside during the day and bring
them in again at night. Do this for a week to get them used to the outside
conditions.
Step 4 Carefully lift your sunflowers from the soil – try not to break the roots and
be sure to hold them by a leaf and not the stem! Make some planting holes
for them in a flower bed, making sure they’re 45cm apart. Place your little
sunflowers into the holes and gently firm the soil back around them, then
water them in. Make sure you don’t let them dry out, and keep them
weed free.
Step 5 Once they are used to their new home, water them grow tall
and look out for great big sunflowers after about 12 weeks!
When sunflowers are
young, they face east in the
morning and follow the sun
as the earth moves
during the day

Tomato Cherry Camp Joy
Sow early Spring to Summer.
These sweet, juicy fruits are fast growing and make for the perfect addition to school lunch boxes –
have them as a snack, in salads, or hot dishes too.
Step 1 Put the Jiffy ® soil pellet soil in the base of the greenhouse (see “Getting Started”
instructions)
Step 2 Press half-a-fingernail deep holes 4cm apart in the soil. Pop a tomato seed into each hole
and carefully cover it with soil. Water gently until the soil is moist, then put the top on the
greenhouse and place on a light windowsill.
Step 3 When the seedlings appear in 10-14 days, open the ventilation
flaps in the greenhouse roof. After about a week, remove the
top of the greenhouse. In Spring and Summer, put the tomatoes
outside during the day and bring them in again at night. Do this
for a few days to get them used to the outside conditions.
Step 4 Carefully lift your tomato plant from the soil – try not to break the
roots, and be careful when handling the stems. Make a planting
hole for them in a sunny garden bed outside, making sure its
roots are planted about 50cm apart from your other plants. For
best results, you may want to support these plants with a stake.
Step 5 Water daily, and pinch out the side shoots as they appear. Once
red and ripe, pick the tomatoes and enjoy!
Lots of people think
tomatoes are a vegetable,
but they’re really a fruit!
You can also grow other herbs,
veggies and flowers in your
greenhouse! Check out the rest of
the Little Gardeners range today. When moving seedlings,
make sure you only handle the
leaves and not the stem as
that can damage them.
Greenhouses have been
around since ancient Rome!
Mr Fothergill’s Seeds
Australia: PO Box 6065,
South Windsor, NSW 2756
www.mrfothergills.com.au
WARNING:
This is not a toy. Contains plastic bag. To avoid danger of suffocation, keep away from
babies and children. Please knot the bag before throwing away.
Small parts and expanding soil are possible choking hazards.
Not suitable for children under 3 years of age - parental supervision is recommended.
Other Mr Fothergill's Greenhouse Kit manuals

Popular Greenhouse Kit manuals by other brands

Juliana
Juliana Veranda Assembly instructions

STC
STC Easy2Build Easy-Grow Assembly instructions

Barney
Barney Dachnaya Tryoshka Assembling manual

Poly-Tex
Poly-Tex FieldPro Gothic High Tunnel 20 installation instructions

AeroGarden
AeroGarden 100302-BLK quick start guide

Redpath
Redpath Tunnelhouse Mk2 manual

Janssens
Janssens EOS ROYAL Mounting instructions

Janssens
Janssens HELIOS Senior - Master Mounting instructions

Robinsons
Robinsons Victorian RANBY 7 Assembly instructions

FILCLAIR
FILCLAIR Splendid 3,00x1,50 m manual

Palram
Palram CANOPIA LEAN TO 8x4 / 1.2x2.4 How to assemble

Palram
Palram CANOPIA MAJORCA How to assemble


