manuals.online logo
Brands
  1. Home
  2. •
  3. Brands
  4. •
  5. Janssens
  6. •
  7. Greenhouse Kit
  8. •
  9. Janssens HELIOS Senior - Master User manual

Janssens HELIOS Senior - Master User manual

HANDLEIDING
MOUNTING INSTRUCTIONS
INSTRUCTIONS DE MONTAGE
AUFBAUANLEITUNG
MONTAGE-VEJEDNING
MONTERINGSVEILEDNINGEN
ISTRUZIONI DI MONTAGGIO
HELIOS Senior - Master
Also applies to: Helios Hobby-Victorian-Mur, Eos Hobby-Victorian-Mur, Twin,…
Version 2021_2
h�s://janssens-alusystems.be/downloads
MANUAL
Manual
Manual
+
PRODUKTINFORMATIE
Geachte klant,
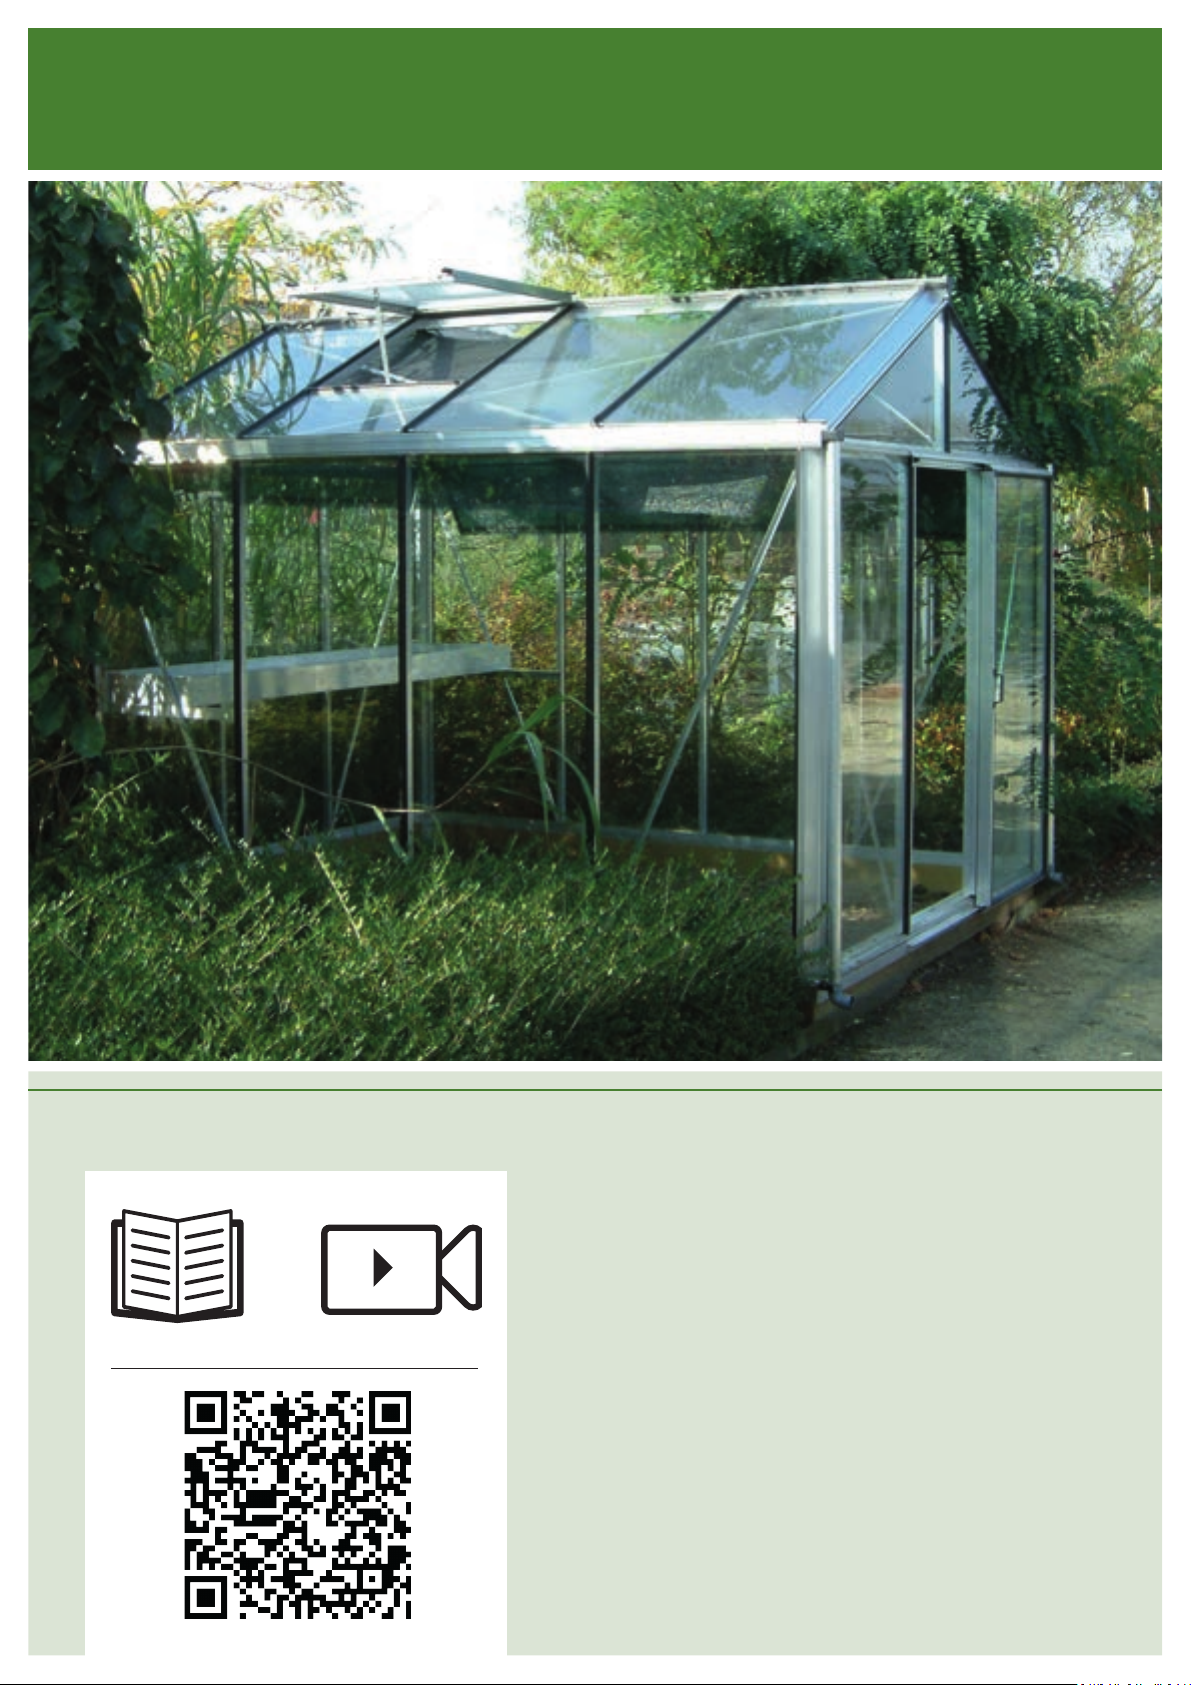
U heeft met de aanschaf van deze aluminium serre een
juiste keuze gemaakt waarmee wij u veel plezier wensen.
OPMERKINGEN
Deze handleiding is vooreerst opgesteld voor alle
standaardconstructies maar bevat voldoende aanwijzingen
om een vlotte montage van andere uitvoeringen te
garanderen. De zwarte rubber strips zijn aan de binnenkant
met olie behandeld, dit garandeert een eenvoudige en
snelle montage. Deze serre heeft het kweken van planten
en bloemen tot doel en wordt slechts betreden voor het
gebruik door een hiervoor bevoegde persoon. Kleine
ondichtheden en condensatiewater in deze constructies zijn
dan ook toelaatbaar! Mogelijke zwarte plekken op de
profielen zijn eenvoudig met een
aluminiumreinigingsmiddel af te nemen, het betreft geen
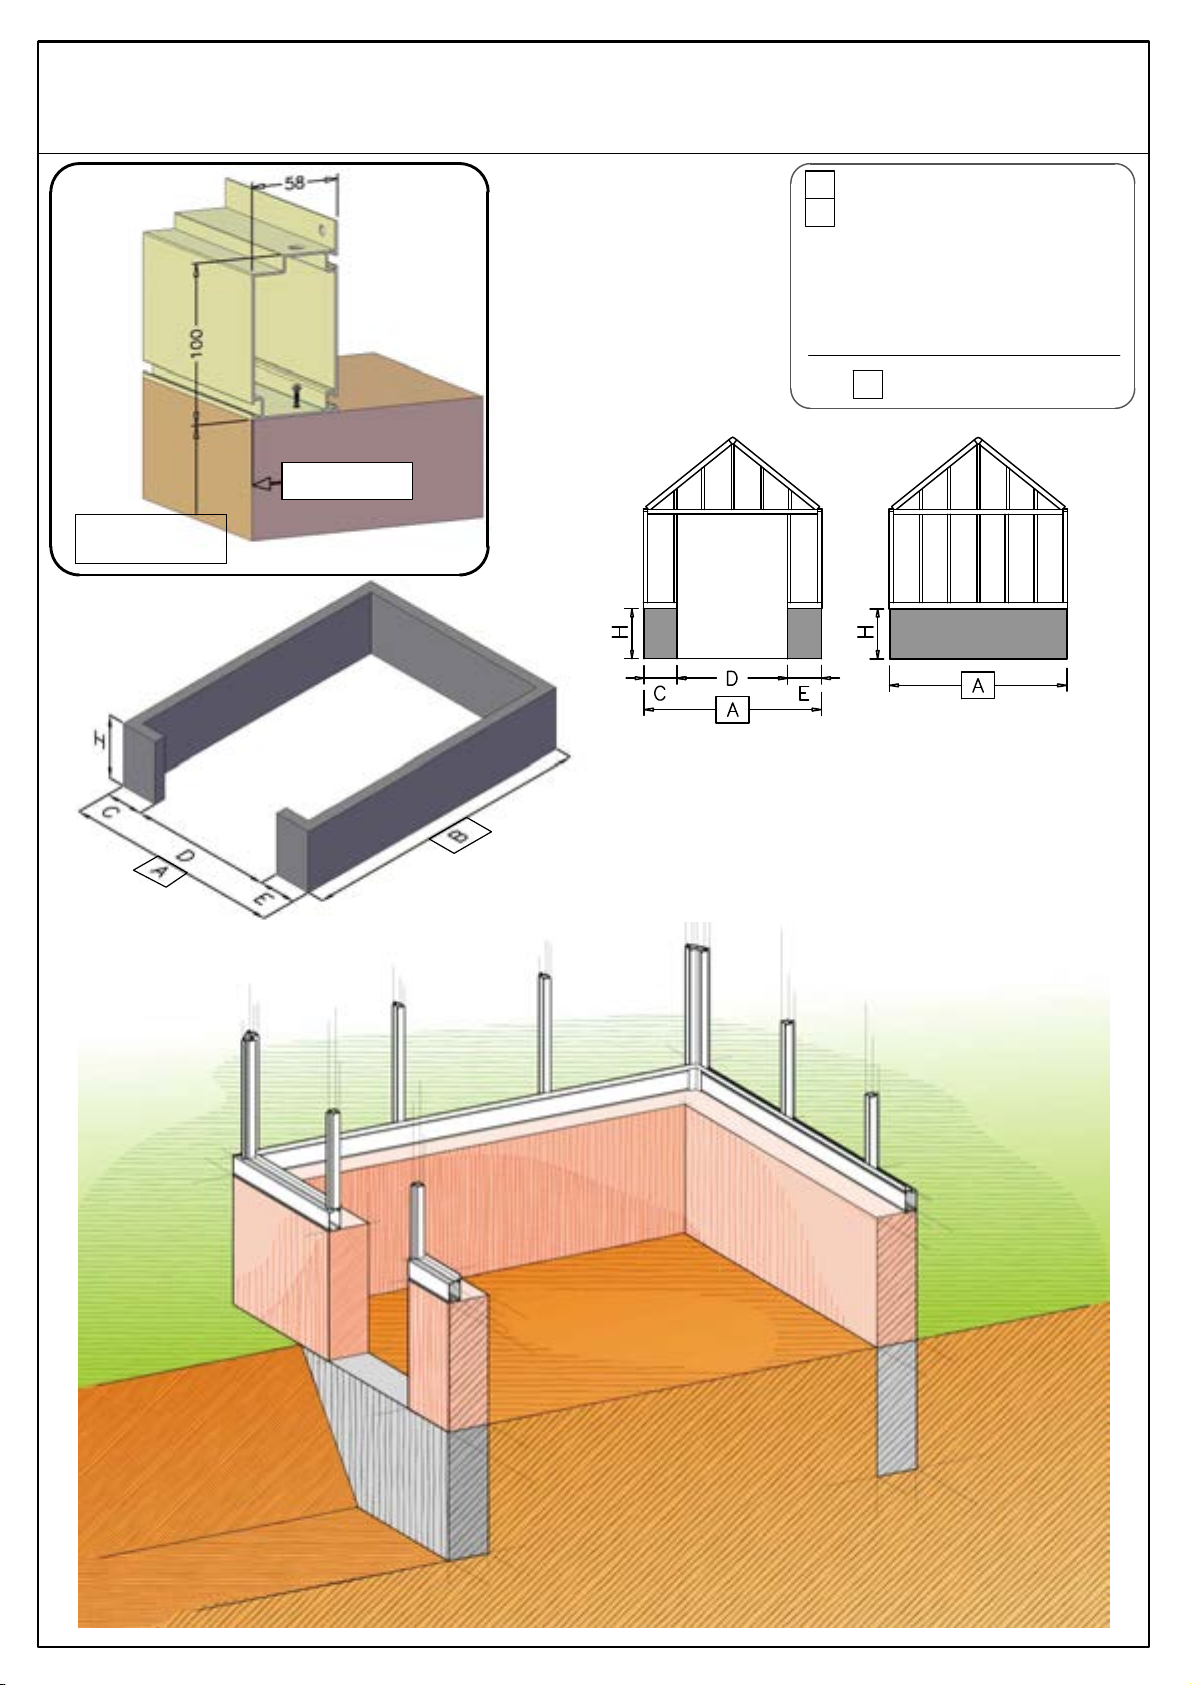
productiefouten. De serre dient geplaatst te worden op een
voldoende draagkrachtige betonfundering die voorzien is
tot op vaste vorstvrije grond. De verankering van de serre
alsook het regelmatig controleren van de toestand dient
steeds door de eigenaar of exploitant te worden voorzien.
Het dak van de serre dient in de winter van sneeuw bevrijd
te worden, of op een gepaste manier ondersteund worden.
De serre moet op een van de wind afgeschermde plaat
opgebouwd worden. Tijdens de montage dient men
gepaste beschermende kledij te dragen (b.v.
veiligheidshandschoenen) om kwetsuren te vermijden. Men
dient steeds de lokaal gebruikelijke bouwverordeningen in
acht te nemen.
VOLGORDE VAN DE MONTAGE
Opbouw en montagevolgorde is voor alle modellen
hetzelfde.
- Uitsorteren van aluminium profielen volgens
modelgrootte.
- Montage en opbouw van gehele constructie.
- Horizontaal en waterpas stellen van de constructie.
- Verankering van de constructie.
- Beglazing.
BENODIGD GEREEDSCHAP
Schroefsleutel Nr. 10, schroevendraaier, waterpas,
boorapparaat en boortje Ø4.2, metaalzaag,
werkhandschoenen, schaar (voor het snijden van rubber).
Constructiewijzigingen onder voorbehoud.
PRODUCT INFORMATION
Dear customer
Thank you for buying a high-quality aluminium greenhouse.
REMARKS
In all drawings you find the mounting-instructions for all
basic standard-models. However this manual should be a
sufficient guidance for all special-case greenhouses. This
greenhouse is designed for cultivation of plants/flowers.
Therefore leakage, water drops and condensation inside
the building are allowed. The building may only be entered
by competent persons during cultivation or maintenance.
Aluminium profiles that are not painted may show black
stains, these stains are not a production error: they can be
easily removed with a aluminium cleaner available at every
good drugstore. The rubber strips have been treated with
oil/silicone on the interior to facilitate the assembly. The
building should be mounted on a solid concrete foundation
deep enough to get a solid and frost-free ground.
Anchoring of the foundation should be made by the owner
or operator and should be checked periodically. During
winter the roof has to be cleared of snow or supported in a
suitable way. The greenhouse should be built in a location
protected from strong winds. Protective gear (such as
protective gloves) should be used during mounting in order
to avoid injuries. One should at all times pay attention to
the local building regulations.
ASSEMBLY ORDER
The assembly procedure is the same for all our
greenhouses.
- Sorting of the profiles according the model.
- Mounting of the complete aluminium construction.
- Leveling of the construction using a waterlevel.
- Securing the building to the ground
- Glazing.
REQUIRED TOOLS
Socket wrench nr. 10 or spanner nr. 10, water-level,
screwdriver, drilling machine + drill 4.2 mm, scissors (to cut
the rubber).
We reserve the right to change the construction without
prior notice!
INFORMATION SUR LE PRODUIT
Cher client,
Nous vous félicitons à l’achat de la serre en aluminium.
REMARQUES
Dans ce manuel vous trouvez les instructions de montage
pour tous les modèles standards. Par contre, ce manuel est
aussi un bon guide pour tous les modèles spéciaux. La
serre est une verrière pour cultiver des plantes et des
légumes: des petites fuites et de l’eau de condensation sont
autorisées.
Les couvercles noirs en caoutchouc sont, à l’intérieur,
traités à l’huile. Ceci garantie un montage simple et rapide.
Si les profilés en alu montrent des taches noires, il ne s’agit
pas d’un défaut de production. Ces taches peuvent
facilement être enlevées au moyen de nettoyants pour
aluminium, qui sont disponible sur le marché. Une
fondation à l’abris du gel et portance suffisante est
nécessaire. Pendant l’hiver il faut enlever la neige de la
toiture ou étançonner le toit. Il faut construire la serre dans
un endroit protégé du vent. Afin d’éviter des blessures lors
de la montage, il faut porter des vêtements de travail, qui
pourrons vous protéger (p.ex. des gants de sécurité). En
tout cas il faut respecter les règles urbanistiques locales.
DÉROULEMENT DU MONTAGE
L’ordre de montage est identique pour tous les modèles :
- Triage des profilés en alu en fonction des dimensions du
modèle.
- Assemblage des profilés et montage de la structure.
- Alignement vertical et horizontal de la construction.
- Pose du vitrage.
OUTILLAGE NÉCESSAIRE
Clef N° 10, tournevis, niveau à bulle, perceuse et foret
Ø4.2mm, scie à métaux, gants de travail, ciseaux (pour la
mise à longueur du joint en caoutchouc).
Sous réserve de tout changement.
PRODUKT INFORMATION
Sehr geehrter Kunde,
Wir möchten Ihnen zum Kauf dieses Gewächshauses
gratulieren.
ANMERKUNGEN
Die Aufbauanleitung bezieht sich zunächst auf das
Standardmodell. Für Sonderkonstruktionen gibt es
zusätzliche Hinweise zur Montage. Das Gewächshaus sollte
in einer windgeschützten Lage montiert werden. Während
des Winters sollte das Dach von Schnee befreit werden
oder durch geeignete Maßnahmen abgestützt werden! Alle
Konstruktionen sind bauseits in geeigneter Weise am
Aufstellungsort zu verankern! Im Jedem Fall muss ein
frostfreies Betonfundament vorhanden sein. Das
Gewächshaus ist vom Betreiber regelmäßig auf ihren
ordnungsgemäßen Zustand zu untersuchen.
Unlackierte Alu-Profile können schwarze Flecken
aufweisen, hierbei handelt es sich nicht um einen
Produktionsfehler. Mit einem handelsüblichen Alu-Reiniger
lassen sich diese weitestgehend entfernen. Die
Gewächshäuser dienen der Kultur von Pflanzen und werden
durch gärtnerische tätige oder entsprechend autorisierte
Personen oder nur in deren Begleitung betreten. Kleine
Undichtigkeiten, Wassertropfen und Kondensat sind
zulässig. Das mitgelieferte Dichtungsgummi ist an der
Innenseite mit Talg behandelt, was zu einer schnelleren und
einfacheren Montage beiträgt. Bei der Montage muss man
Schutzausrüstung tragen z.B. Sicherheitshandschuhe, um
Verletzungen zu vermeiden. In jedem Fall muss die
landesübliche Bauordnung beachtet werden!
MONTAGEABLAUF
Der Montagevorgang ist bei allen Modellen gleich:
- Auslegen der Alu-Profile gemäß Modellgröße.
- Aufbau der Alu-Konstruktion.
- Horizontale und vertikale Ausrichtung der Konstruktion.
- Verankerung der Konstruktion.
- Verglasung.
BENÖTIGTES WERKZEUG
Schraubenschlüssel Nr. 10, Schraubenzieher, Wasserwaage,
Bohrmaschine und Bohrer (4.2 mm) Metallsäge, Schere (für
das Zuschneiden der Gummidichtung).
Konstruktionsänderungen behalten wir uns vor.
PRODUKT-INFORMATION
Kære kunde,
Tillykke med Deres nye drivhus. De har valgt et højt
kvalitetsprodukt, som De vil få megen fornøjelse af.
BEMÆRKNINGER:
Denne montage-vejledning er først og fremmest lavet for
alle vores standardkonstruktioner, men kan også bruges til
montage af specielkonstruktioner, da der er inkluderet flere
supplerende anvisninger. Drivhusets funktion er at dyrke
planter og blomster; små utætheder samt kondens er tilladt
i disse konstruktioner. Drivhuset kan bedst placeres et
beskyttet sted. Alle gummilister er indvendigt behandlet
med olie, som sikrer en enkelt og hurtigt montage. (Pas på
det kan smitte af på fliserne) .På underkanten af tagrenden
er der forudset en rille, hvor der IKKE skal monteres
gummilister. Mulige sorte pletter på profilerne kan nemt
fjernes med et aluminiums rengøringsmiddel – disse er ikke
produktionsfejl. Drivhuset skal placeres på en bæredygtig
undergrund, en terrasse eller et rigtig fundament. Taget
skal holdes snefrit om vinteren, eller skal støttes på en
passende måde. Husk at overholde de lokale
byggeforskrifter.
FREMGANGSMÅDEN FOR MONTAGEN:
Opbygning og montage er den samme for alle størrelser.
- Lægge alle dele frem
- Monter hele aluminiumskonstruktionen
- Sæt konstruktionen i vatter og i vinkel.
- Monter glasset
VÆRKTØJ:
Nøgle nr. 10, skruetrækker, vatterpas, boremaskine og bor
Ø 4,2 mm, arbejdshandsker, saks (for at klippe
gummilisterne)
Vi tar forbehold om endringer i konstruksjonen.
PRODUKTINFORMASJON
Kjære kunde
Til lykke med Deres nye drivhus. De har valgt ett høy-
kvalitetsprodukt, som vi håper De vil få meget glede av.
BEMERKNINGER
Denne monteringsveiledningen er først og fremst laget for
alle våre standardkonstruksjoner, men kan også brukes til
montering av spesialkonstruksjoner, da det er inkludert
flere supplerende anvisninger. Drivhusets funktion er at
dyrke planter og blomster; små utætheder samt kondens er
tilladt i disse konstruktioner. Drivhuset kan bedst placeres
et beskyttet sted. Alle gummilistene er innvendig behandlet
med olje, som sikrer en enkel og hurtig
montering. (Vær obs på at oljen kan smitte av.) På
underkanten av takrennen er det en rille hvor det IKKE skal
monteres gummilister. Mulige sorte pletter på profilene
kan lett fjernes med ett aluminiums rengjøringsmiddel –
disse er ikke produksjonsfeil. Drivhuset skal placeres på en
bæredygtig undergrund, en terrasse eller et rigtig
fundament. Om vinteren bør taket gjøres fritt for snø.
Drivhuset bør plasseres på et lunt sted. De bør bruke
beskyttende tøy som for eksempel hansker ved montering.
Husk at overholde de lokale byggeforskrifter.
FREMGANGSMÅTE VED MONTERING
Oppbygging og montering er den samme for alle størrelser.
- Legg alle deler frem.
- Monter hele aluminiumskonstruksjonen
- Sett konstruksjonen i vater og vinkel.
- Monter glassene / isolerplastplatene.
VERKTØY
Nøkkel nr. 10, skrutrekker, vater, boremaskin og bor Ø
4,2mm, metallsag, arbeidshansker, saks (for å klippe
gummilistene).
Vi tar forbehold om endringer i konstruksjonen.
PRODUKTINFORMATION FÖR
MONTAGE VÄXTHUS
Bästa kund.
Tack för att Ni köpt ett växthus av aluminium med hög
kvalitet.
På de följande sidorna hittar ni monteringsanvisningar för
de varierande modellerna samt skisser på de olika
profilerna. För de hus som inte är lackerade (ren
aluminium) kan det ibland finnas mörkare fläckar vilket är
naturligt. Dessa kan med lätthet tvättas bort med en
aluminiumrengörare som kan köpas i färghandeln.
Gummiprofilerna har blivit behandlade med olja för att
underlätta vid montering. Grundarbetet måste vara utfört
på sådant sätt att marken inte rör sig vid tjäle samt att
huset bör vara förankrat genom fastgjutning. Vid snöfall
under vintern bör snön tas ned från taket. Vid rikligt snöfall
bör huset gärna stöttas i mitten på nocken speciellt om Ni
inte befinner Er på plats där under vinterhalvåret.
Växthuset bör placeras på en skyddad del av trädgården där
vinden är mindre stark. Vid montering av glasen bör
handskar användas för att skydda mot skärskador.
Följ de lokala lagar vad gäller bygglov.
MONTERINGSFÖLJD
Monteringsföljden är den samma för alla växthusen.
- Sortera upp profilerna och placera dem i den ordning som
de skall monteras.
- Montera ihop hela aluminiumkonstruktionen innan
glasning.
- Kryssmät diagonalerna noggrant samt använd ett
vattenpass innan glasningen.
- Glasning.
VERKTYG SOM BEHÖVS VID MONTERING
Fast nyckel nr. 10 eller hylsnyckel nr. 10, Vattenpass,
Skruvmejsel, Sax (för klippning av gummilist),
Borrmaskin och borr 4.2 mm samt 6.5 mm.
Vi förbehåller oss för rätten att ändra i konstruktionen utan
att i förväg meddela sådant.
INFORMAZIONI GENERALI SUL
PRODOTTO
Caro Cliente,
Ti ringraziamo per aver scelto una Serra in alluminio di
“alta-qualità”.
OSSERVAZIONI
Nei disegni sono specificate le istruzioni di montaggio per
tutti i modelli standard. In ogni caso questo manuale risulta
essere una guida più che sufficiente anche per
l’installazione di Serre realizzate “su misura”. I profili
d’alluminio potrebbero presentare alcune macchie scure.
Tali macchie non sono dovute ad errori di produzione e
possono altresì essere rimosse usando comuni prodotti per
la pulizia dell’alluminio, disponibili nelle migliori rivendite
specializzate. Le guarnizioni in gomma sono trattate con olii
speciali al fine di facilitarne l’applicazione. Il terreno sul
quale viene posata la serra deve essere opportunamente
isolato e predisposto per la realizzazione di una
fondamenta in cemento. In inverno, è consigliabile
rimuovere la neve dal tetto o supportare la Serra
dall’interno. Consigliamo inoltre di installare la Serra in una
zona riparata dal vento. Durante la fase di installazione è
preferibile usare dispositivi ed attrezzatura di protezione
personale (es.: guanti) allo scopo di evitare qualsiasi danno
alle persone. Consigliamo vivamente di verificare le
normative locali vigenti in merito alla realizzazione di
strutture di questa tipologia.
FASI DI MONTAGGIO
La procedura di installazione è uguale per tutte le Serre.
- Verificare e disporre in ordine tutti I profili in alluminio
che compongono la Serra.
- Montare completamente la struttura in alluminio.
- Livellare la struttura e controllarne lo squadro degli angoli
e delle diagonali.
- Posizionare le lastre di tamponamento (vetro,
policarbonato etc.).
ATTREZZATURA NECESSARIA PER IL
MONTAGGIO
Chiave inglese o chiave a bussola nr.10, livella ad acqua
(bolla), cacciavite, trapano con punta ø4 mm, forbici (per
tagliare la guarnizione).
Ci riserviamo il diritto di apportare eventuali modifiche del
prodotto in qualsiasi momento e senza preavviso.
FUNDERINGSPLAN
PLAN DE FONDATION
FOUNDATION DRAWING
FUNDAMENT PLAN
" HELIOS + EOS "
AB
X
2.360mm2.360mm
3.098mm 3.098mm
3.836mm3.836mm
4.574mm
6.050mm
5.312mm
" HELIOS MUR + EOS MUR "
A = 3.098 | 3.836
B = 2.360 | 3.098 | 3.836
4.574 | 5.312 | 6.050
C = 829 | 1.567 | 2.305
D = 703
E = 829 | 1.567 | 2.305
!!! A = C + D + E !!!
A = 3.098 | 3.836
B = 2.360 | 3.098 | 3.836
4.574 | 5.312 | 6.050
C = 829 | 1.567 | 2.305
D = 1.441
E = 829 | 1.567 | 2.305
!!! A = C + D + E !!!
A|B|C|E
H200 | 400
600 | 1.025
Alle maten zijn buitenmaten van de aluminium constructie.
All dimensions are external dimensions of the aluminum profiles!!
Toutes les dimensions sont des dimensions extérieures de la construction en alu!
Alle Maße sind Außenmaße des Aluminium-Konstruktion!
" HELIOS MUR 236 + EOS MUR 236 MODULE 37 "
A = 2.360
B = 2.360 | 3.098 | 3.836
4.574 | 5.312 | 6.050
C = 829
D = 703
E = 829
!!! A = C + D + E !!!
A|B|C|E
H200 | 400
600 | 1.025
Alle maten zijn buitenmaten van de aluminium constructie.
All dimensions are external dimensions of the aluminum profiles!!
Toutes les dimensions sont des dimensions extérieures de la construction en alu!
Alle Maße sind Außenmaße des Aluminium-Konstruktion!
" HELIOS MUR 236 DD + EOS MUR 236 DD"
MODULE 37
A = 2.360
B = 2.360 | 3.098 | 3.836
4.574 | 5.312 | 6.050
C = 459
D = 1.442
E = 459
!!! A = C + D + E !!!
A|B|C|E
H200 | 400
600 | 1.025
Alle maten zijn buitenmaten van de aluminium constructie.
All dimensions are external dimensions of the aluminum profiles!!
Toutes les dimensions sont des dimensions extérieures de la construction en alu!
Alle Maße sind Außenmaße des Aluminium-Konstruktion!
PAKLIJST
LIST DES PIECES
PARTS LIST
TEILELISTE
PALLET HELIOS SENIOR
WEIGHT: SENIOR
S23 355 kg
S24 447 kg
S34 530 kg
S36 635 kg
DIMENSIONS:
800 x 900 x 2300 mm
POSITION GLAS DIMENSIONS S23 S24 S34 S36
sliding door 730 x 1650 mm 1 pc 1 pc 1 pc 1 pc
gabels 730 x 1650 mm 13 pc 17 pc 19 pc 23 pc
triangle H1 1099 x 74 x 543 mm 4 pc 4 pc - -
triangle H2 730 x 74 x 411 mm - - 4 pc 4 pc
triangle H3 730 x 414 x 696 mm (113 plat) - - 4 pc 4 pc
roof 730 x 1250 mm 7 pc 10 pc - -
roof 730 x 1650 mm - - 10 pc 13 pc
roofwindow 730 x 825 mm 1 pc 2 pc 2 pc 3 pc
underneed roofwindow 730 x 425 mm 1 pc 2 pc - -
underneed roofwindow 730 x 825 mm - - 2 pc 3 pc
ITEM S23 S24 S34 S36
ESD_183_ZS 1 pc 1pc 1 pc 1 pc
DAKR_HEL 1 pc 2 pc 2 pc 3 pc
PRO6578 corner profile 1630 mm 4 pc 4 pc 1630 mm 4 pc 4 pc
PRO1456 glazing bar gable 1630 mm 8 pc 12 pc 1630 mm 14pc 18 pc
PRO6918 endbar roof 1230 mm 4 pc 4 pc 1630 mm 4 pc 4 pc
PRO1456 glazing bar roof 1230 mm 6 pc 10pc 1630 mm 10 pc 14 pc
PRO10980 round tube Ø40 1700 mm 2 pc 2 pc 1700 mm 2 pc 2 pc
PRO21214 wind bracings gabel 1795 mm 8 pc 8 pc 1795 mm 8 pc 8 pc
PRO1748 rubber 12m/rol 4 pc 5 pc 6 pc 7 pc
ZAK_H 1 pc 1 pc 1 pc 1 pc
screw 4.8x38 DIN7504 N A2 2 pc
bolt M6x25 DIN933 A2 4 pc
screw 4.8x19 DIN7504 M A2 10 pc
glasholder 32 pc
PVC Ø40 90° 2 pc
PVC gutter pieces 2 + 2 pc
BAG_GLASS SPACERS 1 pc 1 pc 1 pc 1 pc
spacers 80 pc
silicone 1 pc
RIDGE DECORATION box 1 pc 1+1 pc 1+1 pc 2+1 pc
SPANDREL 3 pc
PALLET HELIOS MASTER
WEIGHT: MASTER
M23 384 kg
M24 485 kg
M34 567 kg
M36 676 kg
M46 630 kg + 170 kg
DIMENSIONS:
800 x 900 x 2300 mm
POSITION GLAS DIMENSIONS M23 M24 M34 M36 M46
sliding door 730 x 1850 mm 1 pc 1 pc 1 pc 1 pc 1 pc
gabels 730 x 1850 mm 12 pc 16 pc 18 pc 22 pc 24 pc
underneed louvre-vent 730 x 825 mm 1 pc 1 pc 1 pc 1 pc 1 pc
triangle H1 1099 x 74 x 543 mm 4 pc 4 pc - - -
triangle H2 730 x 74 x 411 mm - - 4 pc 4 pc -
triangle H3 730 x 414 x 696 mm (113 plat) - - 4 pc 4 pc -
triangle H4 730 x 72 x 357 mm - - - - 4 pc
triangle H5 730 x 360 x 645 mm - - - - 4 pc
triangle H6 361 x 648 x 737 mm (133 plat) - - - - 4 pc
roof 730 x 1250 mm 6 pc 9 pc - - -
roof 730 x 1650 mm - - 9 pc 12 pc -
roof 730 x 2000 mm - - - - 10 pc
roofwindow 730 x 825 mm 2 pc 3 pc 3 pc 4 pc 6 pc
underneed roofwindow 730 x 425 mm 2 pc 3 pc - - -
underneed roofwindow 730 x 825 mm - - 3 pc 4 pc -
underneed roofwindow 730 x 1180 mm - - - - 6 pc
ITEM M23 M24 M34 M36 M46
LAMELLEN + ZAKJE_LAMEL 1 pc 1 pc 1 pc 1 pc 1 pc
ESD_183_ZS 1 pc 1pc 1 pc 1 pc 1 pc
DAKR_HEL 2 pc 3 pc 3 pc 4 pc 6 pc
PRO6578 corner profile 1830 mm 4 pc 4 pc 1830 mm 4 pc 4 pc 1830 mm 4 pc
PRO1456 glazing bar gable 1830 mm 8 pc 12 pc 1830 mm 14pc 18 pc 1830 mm 20 pc
PRO6918 endbar roof 1230 mm 4 pc 4 pc 1630 mm 4 pc 4 pc 1986 mm 4 pc
PRO1456 glazing bar roof 1230 mm 6 pc 10pc 1630 mm 10 pc 14 pc 1986 mm 14 pc
PRO10980 round tube Ø40 1900 mm 2 pc 2 pc 1900 mm 2 pc 2 pc 1900 mm 2 pc
PRO21214 wind bracings gabel 1975 mm 8 pc 8 pc 1975 mm 8 pc 8 pc 1975 mm 8 pc
PRO1748 rubber 12m/rol 5 pc 6 pc 7 pc 8 pc 9 pc
ZAK_H 1 pc 1 pc 1 pc 1 pc 1 pc
screw 4.8x38 DIN7504 N A2 2 pc
bolt M6x25 DIN933 A2 4 pc
screw 4.8x19 DIN7504 M A2 10 pc
glasholder 32 pc
PVC Ø40 90° 2 pc
PVC gutter pieces 2 + 2 pc
BAG_GLASS SPACERS 1 pc 1 pc 1 pc 1 pc 1 pc
spacers 80 pc
silicone 1 pc
RIDGE DECORATION box 1 pc 1+1 pc 1+1 pc 2+1 pc 2 + 1 pc
SPANDREL 3 pc 3 pc
ZAK_BOUT 1 pc
nut cap M6 50 pc
nut M6 50 pc
bolt M6x12 DIN933 A2 50 pc
ITEM S23 / S24 S34 / S36 M46
M23 / M24 M34 / M36
PRO6120 foundation profile 2360 mm 2 pc 3098 mm 2 pc 3836 mm 2 pc
B19_1030 round tube Ø19 1030 mm 2 pc 1030 mm 2 pc
L40X40GATFUND 400 mm 4 pc 400 mm 4 pc 400 mm 4 pc
PRO20229 horizontal gable prof. 2244 mm 2 pc 2982 mm 2 pc 3720 mm 2 pc
PRO21214 wind bracings roof 2543 mm 4 pc 2757 mm 4 pc 2980 mm 4 pc
PRO1456 glazing bar 547 mm 2 pc 703 mm 2 pc 736 mm 2 pc
PRO1456 glazing bar 90 / 65 396 mm 2 pc 345 mm 2 pc
PRO1456 glazing bar 90 / 65 634 mm 2 pc
PRO1456 glazing bar 65 / 90 396 mm 2 pc 345 mm 2 pc
PRO1456 glazing bar 65 / 90 634 mm 2 pc
E400330 halfmoon glazingrubber 1 pc 20 lm 1 pc 20 lm 1 pc
SAPAKHELIOS 1 pc 1 pc 1 pc
PVC gable pieces 4+4+2 pc
bolt M6x50 DIN933 A2 16 pc
Nut M6 16 pc
L2G 10 pc
COLLI A HELIOS SENIOR + MASTER
WEIGHT:
M23/M24 19 kg
M34/M36 25 kg
M46 29 kg
DIMENSIONS:
250 x 150 x 2800 mm M23 / M24 / S23 / S24
3300 mm M34 / M36 / S34 / S36
4050 mm M46
ITEM S23 / M23 S24 / S34 S36
M24 / M34 M36 / M46
PRO6120 foundation profile 3098 mm 2 pc 4574 mm 2 pc 6050 mm 2 pc
PRO20227 gutter profile 3098 mm 2 pc 4574 mm 2 pc 6050 mm 2 pc
PRO6760 ridge profile 3098 mm 1 pc 4574 mm 1 pc 6050 mm 1 pc
ZAK_BOUT 2 pc 3 pc 3 pc
nut cap M6 50 pc
nut M6 50 pc
bolt M6x12 DIN933 A2 50 pc
L40X40GATFUND 400 mm 2 pc
COLLI B HELIOS SENIOR + MASTER
WEIGHT:
M23 26 kg
M24 / M34 39 kg
M36 / M46 52 kg
DIMENSIONS:
250 x 150 x 3200 mm M23 / S23
4700 mm M24 / M34 / S24 / S34
6250 mm M36 / M46 / S36
HANDLEIDING
INSTRUCTIONS DE MONTAGE
MOUNTING INSTRUCTIONS
AUFBAUANLEITUNG
PRO6760
Ø 19
PRO20229
PRO1456
TRE
PRO210
PRO6918
PRO1456
PRO6120
HELIOS
PRO20227
PRO6578
PAGE: H_1
B
L = 600
B = LENGTH > 6m10
A
PRO6760
PRO6760
!
25 x 15 x 600
55 x 20 x 600
PRO20227
PRO20227
25 x 15 x 600
25 x 25 x 600
PRO6120
PRO6120
!
PAGE: H_2
X
X
M6x15
M6x50
B
A
PRO6120
PRO210
PRO6120
PAGE: H_3
OPTION: HINGED DOOR OPTION: SLIDING DOOR OPTION: LOW THRESHOLD
PRO29909
PRO29909
PAGE: H_4
M6x15
PRO6578
PAGE: H_5

This manual suits for next models

9

Other Janssens Greenhouse Kit manuals

Janssens Victorian Vi-34 User manual

Janssens

Janssens Victorian Vi-34 User manual

Janssens HELIOS SL User manual

Janssens

Janssens HELIOS SL User manual

Janssens GIGANT User manual

Janssens

Janssens GIGANT User manual

Janssens KATHEDRAL User manual

Janssens

Janssens KATHEDRAL User manual

Janssens Helios Orangerie User manual

Janssens

Janssens Helios Orangerie User manual

Janssens EOS ROYAL User manual

Janssens

Janssens EOS ROYAL User manual

Popular Greenhouse Kit manuals by other brands

Mercia Garden Products 04LEAN0804-V1 General instructions

Mercia Garden Products

Mercia Garden Products 04LEAN0804-V1 General instructions

Farmers Friend Caterpillar Tunnel Assembly and instruction manual

Farmers Friend

Farmers Friend Caterpillar Tunnel Assembly and instruction manual

Dancover GH152190 Assembly instructions

Dancover

Dancover GH152190 Assembly instructions

St Helens GH350 user manual

St Helens

St Helens GH350 user manual

Palram Grand Gardener Prestige 8x8 manual

Palram

Palram Grand Gardener Prestige 8x8 manual

ClearSpan PB00250R4 manual

ClearSpan

ClearSpan PB00250R4 manual

Eagle Peak IM GHPC36-GRN-AZ instruction manual

Eagle Peak

Eagle Peak IM GHPC36-GRN-AZ instruction manual

Vitavia VA0002-DM Assembly instructions

Vitavia

Vitavia VA0002-DM Assembly instructions

FILCLAIR Serralux 2,70m manual

FILCLAIR

FILCLAIR Serralux 2,70m manual

Palram CANOPIA TURINO 3x4,25 How to assemble

Palram

Palram CANOPIA TURINO 3x4,25 How to assemble

AeroGarden 100610-BLK quick start guide

AeroGarden

AeroGarden 100610-BLK quick start guide

Gardeney 88 manual

Gardeney

Gardeney 88 manual

Palram Victory Orangery Assembly instructions

Palram

Palram Victory Orangery Assembly instructions

Robinsons Renown Assembly instructions

Robinsons

Robinsons Renown Assembly instructions

Vitavia 87001013V Assembly instructions

Vitavia

Vitavia 87001013V Assembly instructions

Grandio ASCENT GRA-812-GR user manual

Grandio

Grandio ASCENT GRA-812-GR user manual

SuperCloset SuperNova instruction manual

SuperCloset

SuperCloset SuperNova instruction manual

Zipper Mowers ZI-CR-2M user manual

Zipper Mowers

Zipper Mowers ZI-CR-2M user manual

manuals.online logo
manuals.online logoBrands
  • About & Mission
  • Contact us
  • Privacy Policy
  • Terms and Conditions

Copyright 2025 Manuals.Online. All Rights Reserved.