MSI DIGIVOX mini Hybrid User manual

DIGIVOX mini Hybrid
User Manual


Copyright and Trademark Notice
©2007 by MSI. All rights reserved.
Information in this document is subject to change without notice. No part of this
document may be reproduced or transmitted in any form or by any means, electronic
or mechanical without prior written permission of MSI.
MSI makes no representation or warranties with respect to the contents hereof and
specifically disclaims any implied warranties of merchantability or fitness for any
particular purpose. MSI reserves the right to revise this manual and to make changes
in its content without obligation to notify any person or organization of such revision or
change. In no event shall MSI be liable to you or any third party for any consequential,
incidental, direct, indirect, special, punitive, or other damages (including without
limitation, damages for loss of profits, interruptions, loss of information, pecuniary loss,
etc.), even if MSI has been advised of the possibility of such damages arising from any
defect or error in this manual or product.
Windows®is a trademark of Microsoft Corporation. All other brand names used in this
document are registered trademarks of their respective companies.
CE Statement: This equipment has been tested and complies with EN 55013:
2001/A1: 2003+EN61000-3-2:2000+EN61000-3-3:1995/A1:2001
EN55020:2002+A1:2003+A2:2005, IEC 61000-4-2: 1995+A1: 1998+A2:2000 ) standards.

COPYRIGHT NOTICES
The material in this document is the intellectual property of MICRO-STAR
INTERNATIONAL. We take every care in the preparation of this document, but no
guarantee is given as to the correctness of its contents. Our products are under
continual improvement and we reserve the right to make changes without notice.
TRADEMARKS
All trademarks are the properties of their respective owners.
MICRO-STAR INTERNATIONAL Statement
All contents are subject to change without notice.
One year guarantee is for the device only. Warranty for accessories expired within
seven days of purchase date.
WEEE Statement
English: To protect the global environment and as an environmentalist,
MSI must remind you that...Under the European Union ("EU") Directive on
Waste Electrical and Electronic Equipment, Directive 2002/96/EC, which
takes effect on August 13, 2005, products of "electrical and electronic
equipment" cannot be discarded as municipal waste anymore and
manufacturers of covered electronic equipment will be obligated to take back such
products at the end of their useful life. MSI will comply with the product take back
requirements at the end of life of MSI-branded products that are sold into the EU. You
can return these products to local collection points.
Deutsch: Hinweis von MSI zur Erhaltung und Schutz unserer UmweltGemäß der
Richtlinie 2002/96/EG über Elektro- und Elektronik-Altgeräte dürfen Elektro- und
Elektronik-Altgeräte nicht mehr als kommunale Abfälle entsorgt werden. MSI hat
europaweit verschiedene Sammel- und Recyclingunternehmen beauftragt, die in die
Europäische Union in Verkehr gebrachten Produkte, am Ende seines Lebenszyklus
zurückzunehmen. Bitte entsorgen Sie dieses Produkt zum gegebenen Zeitpunkt
ausschliesslich an einer lokalen Altgerätesammelstelle in Ihrer Nähe.
Français: (Q WDQW TX¶pFRORJLVWH HW DILQ GH SURWpJHU O¶HQYLURQQHPHQW 06, WLHQW j
rappeler ceci...Au sujet de la directive européenne (EU) relative aux déchets des
équipement électriques et électroniques, directive 2002/96/EC, prenant effet le 13
août 2005, que les produits électriques et électroniques ne peuvent être déposés
dans les décharges ou tout simplement mis à la poubelle. Les fabricants de ces
équipements seront obligés de récupérer certains produits en fin de vie. MSI prendra
en compte cette exigence relative au retour des produits en fin de vie au sein de la
communauté européenne. Par conséquent vous pouvez retourner localement ces
matériels dans les points de collecte.
Srpski: 'DEL]DãWLWLOLSULURGQXVUHGLQXLNDRSUHGX]HüHNRMHYRGLUDþXQDRRNROLQLL
SULURGQRMVUHGLQL06,PRUDGDYDVSRGHVWLGD«3R'LUHNWLYL(YURSVNHXQLMH(8R
RGEDþHQRM HNHNWURQVNRM L HOHNWULþQRM RSUHPL 'LUHNWLYD (& NRMD VWXSD QD
snagu od 13. $YJXVWD SURL]YRGL NRML VSDGDMX SRG HOHNWURQVNX L HOHNWULþQX
RSUHPXQHPRJXYLãHELWLRGEDþHQLNDRRELþDQRWSDGLSURL]YRÿDþLRYHRSUHPHELüH
SULQXÿHQLGDX]PXQDWUDJRYHSURL]YRGHQDNUDMXQMLKRYRJXRELþDMHQRJYHNDWUDMDQMD
06, üH SRãWRYDWL ]DKWHv o preuzimanju ovakvih proizvoda kojima je istekao vek

WUDMDQMDNRMLLPDMX06,R]QDNXLNRMLVXSURGDWLX(82YHSURL]YRGHPRåHWHYUDWLWLQD
lokalnim mestima za prikupljanje.
Polski: $E\FKURQLüQDV]HĞURGRZLVNRQDWXUDOQHRUD]MDNRILUPDGEDMąFDRHNRORJLĊ
06, SU]\SRPLQD ĪH=JRGQLH ] '\UHNW\Zą 8QLL (XURSHMVNLHM 8( GRW\F]ąFą
odpadów produktów elektrycznych i elektronicznych (Dyrektywa 2002/96/EC), która
ZFKRG]L Z Ī\FLH VLHUSQLD W]Z ³SURGXNW\ RUD] Z\SRVDĪHQLH HOHNWU\F]QH L
elektroniczne QLHPRJąE\üWUDNWRZDQHMDNRĞPLHFLNRPXQDOQHWDNZLĊFSURGXFHQFL
W\FK SURGXNWyZ EĊGą]RERZLą]DQLGR RGELHUDQLD LFK Z PRPHQFLH JG\ SURGXNW MHVW
Z\FRI\ZDQ\ ] XĪ\FLD 06, Z\SHáQL Z\PDJDQLD 8( SU]\MPXMąF SURGXNW\
(sprzedawane na terenie Unii Europejskiej Z\FRI\ZDQH ] XĪ\FLD 3URGXNW\ 06,
EĊG]LHPRĪQD]ZUDFDüZZ\]QDF]RQ\FKSXQNWDFK]ELRUF]\FK
Türkçe: dHYUHFL|]HOOL÷L\OHELOLQHQ06,GQ\DGDoHYUH\LNRUXPDNLoLQKDWÕUODWÕU$YUXSD
%LUOL÷L $% .DUDUQDPHVL (OHNWULN YH (OHNWURQLN 0DO]HPH $WÕ÷Õ (&
.DUDUQDPHVLDOWÕQGD$÷XVWRVWDULKLQGHQLWLEDUHQJHoHUOLROPDN]HUHHOHNWULNOL
YH HOHNWURQLN PDO]HPHOHU GL÷HU DWÕNODU JLEL o|SH DWÕODPD\DFDN YH EX HOHNWRQLN
FLKD]ODUÕQUHWLFLOHULFLKD]ODUÕQNXOODQÕPVUHOHULELWWLNWHQVRQUDUQOHULJHULWRSODPDkla
\NPO RODFDNWÕU $YUXSD %LUOL÷L¶QH VDWÕODQ06, PDUNDOÕ UQOHULQ NXOODQÕP VUHOHUL
ELWWL÷LQGH06,UQOHULQJHULDOÕQPDVÕLVWH÷LLOHLúELUOL÷LLoHULVLQGHRODFDNWÕUhUQOHULQL]L
\HUHOWRSODPDQRNWDODUÕQDEÕUDNDELOLUVLQL]
ýHVN\: =iOHåt QiP QD RFKUDQČ åLYRWQtKR SURVWĜHGt - VSROHþQRVW 06,
XSR]RUĖXMH3RGOH VPČUQLFH (YURSVNp XQLH (8 R OLNYLGDFL HOHNWULFNêFK D
HOHNWURQLFNêFKYêURENĤ(&SODWQpRGVUSQDMH]DNi]iQROLNYLGRYDW
HOHNWULFNp D HOHNWURQLFNp YêUREN\ Y EČåQpP NRPXQiOQtP RGpadu a výrobci
HOHNWURQLFNêFKYêURENĤQDNWHUpVHWDWRVPČUQLFHY]WDKXMHEXGRXSRYLQQLRGHEtUDW
WDNRYpYêUREN\]SČWSRVNRQþHQtMHMLFKåLYRWQRVWL6SROHþQRVW06,VSOQtSRåDGDYN\QD
RGHEtUiQt YêURENĤ ]QDþN\ 06, SURGiYDQêFK Y ]HPtFK (8 SR VNRQþHQt MHMLFh
åLYRWQRVWL7\WRYêUREN\PĤåHWHRGHY]GDWYPtVWQtFKVEČUQiFK
Magyar: Annak érdekében, hogy környezetünket megvédjük, illetve
N|UQ\H]HWYpGĘNpQWIHOOpSYHD]06,HPOpNH]WHWLgQWKRJ\$](XUySDL8QLyÄ(8
2005. augusztus 13-iQKDWiO\EDOpSĘD]HOHNtromos és elektronikus berendezések
hulladékairól szóló 2002/96/EK irányelve szerint az elektromos és elektronikus
EHUHQGH]pVHNW|EEpQHPNH]HOKHWĘHNODNRVViJLKXOODGpNNpQWpVD]LO\HQHOHNWURQLNXV
berendezések gyártói kötelessé válnak az ilyen termékek visszavételére azok
hasznos élettartama végén. Az MSI betartja a termékvisszavétellel kapcsolatos
követelményeket az MSI márkanév alatt az EU-n belül értékesített termékek
esetében, azok élettartamának végén. Az ilyen termékeket a legközelebbi
J\ĦMWĘKHO\UH viheti.
Italiano: 3HU SURWHJJHUH O¶DPELHQWH 06, GD VHPSUH DPLFD GHOOD QDWXUD WL ULFRUGD
FKH« ,QEDVHDOOD'LUHWWLYDGHOO¶8QLRQH(XURSHD(8VXOOR6PDOWLPHQWRGHL0DWHULDOL
Elettrici ed Elettronici, Direttiva 2002/96/EC in vigore dal 13 Agosto 2005, prodotti
appartenenti alla categoria dei Materiali Elettrici ed Elettronici non possono più essere
eliminati come rifiuti municipali: i produttori di detti materiali saranno obbligati a ritirare
ogni prodotto alla fine del suo ciclo di vita. MSI si adeguerà a tale Direttiva ritirando tutti
LSURGRWWLPDUFKLDWL06,FKHVRQRVWDWLYHQGXWLDOO¶LQWHUQRGHOO¶8QLRQH(XURSHDDOODILQH
del loro ciclo di vita. È possibile portare i prodotti nel più vicino punto di raccolta.

Ɋɭɫɫɤɢɣ: Ʉɨɦɩɚɧɢɹ MSI ɩɪɟɞɩɪɢɧɢɦɚɟɬ ɚɤɬɢɜɧɵɟ ɞɟɣɫɬɜɢɹ ɩɨ ɡɚɳɢɬɟ
ɨɤɪɭɠɚɸɳɟɣ ɫɪɟɞɵ, ɩɨɷɬɨɦɭ ɧɚɩɨɦɢɧɚɟɦ ɜɚɦ, ɱɬɨ.... ȼɫɨɨɬɜɟɬɫɬɜɢɢ ɫ
ɞɢɪɟɤɬɢɜɨɣ ȿɜɪɨɩɟɣɫɤɨɝɨ ɋɨɸɡɚ (ȿɋ) ɩɨ ɩɪɟɞɨɬɜɪɚɳɟɧɢɸ ɡɚɝɪɹɡɧɟɧɢɹ
ɨɤɪɭɠɚɸɳɟɣ ɫɪɟɞɵ ɢɫɩɨɥɶɡɨɜɚɧɧɵɦ ɷɥɟɤɬɪɢɱɟɫɤɢɦ ɢɷɥɟɤɬɪɨɧɧɵɦ
ɨɛɨɪɭɞɨɜɚɧɢɟɦ (ɞɢɪɟɤɬɢɜɚ WEEE 2002/96/EC), ɜɫɬɭɩɚɸɳɟɣ ɜɫɢɥɭ 13 ɚɜɝɭɫɬɚ
2005 ɝɨɞɚ, ɢɡɞɟɥɢɹ, ɨɬɧɨɫɹɳɢɟɫɹ ɤɷɥɟɤɬɪɢɱɟɫɤɨɦɭ ɢɷɥɟɤɬɪɨɧɧɨɦɭ
ɨɛɨɪɭɞɨɜɚɧɢɸ, ɧɟ ɦɨɝɭɬ ɪɚɫɫɦɚɬɪɢɜɚɬɶɫɹ ɤɚɤ ɛɵɬɨɜɨɣ ɦɭɫɨɪ, ɩɨɷɬɨɦɭ
ɩɪɨɢɡɜɨɞɢɬɟɥɢ ɜɵɲɟɩɟɪɟɱɢɫɥɟɧɧɨɝɨ ɷɥɟɤɬɪɨɧɧɨɝɨ ɨɛɨɪɭɞɨɜɚɧɢɹ ɨɛɹɡɚɧɵ
ɩɪɢɧɢɦɚɬɶ ɟɝɨ ɞɥɹ ɩɟɪɟɪɚɛɨɬɤɢ ɩɨ ɨɤɨɧɱɚɧɢɢ ɫɪɨɤɚ ɫɥɭɠɛɵ. MSI ɨɛɹɡɭɟɬɫɹ
ɫɨɛɥɸɞɚɬɶ ɬɪɟɛɨɜɚɧɢɹ ɩɨ ɩɪɢɟɦɭ ɩɪɨɞɭɤɰɢɢ, ɩɪɨɞɚɧɧɨɣ ɩɨɞ ɦɚɪɤɨɣ MSI ɧɚ
ɬɟɪɪɢɬɨɪɢɢ EC, ɜɩɟɪɟɪɚɛɨɬɤɭ ɩɨ ɨɤɨɧɱɚɧɢɢ ɫɪɨɤɚ ɫɥɭɠɛɵ. ȼɵ ɦɨɠɟɬɟ ɜɟɪɧɭɬɶ
ɷɬɢ ɢɡɞɟɥɢɹ ɜɫɩɟɰɢɚɥɢɡɢɪɨɜɚɧɧɵɟ ɩɭɧɤɬɵ ɩɪɢɟɦɚ.
Español: MSI como empresa comprometida con la protección del medio ambiente,
recomienda: Bajo la directiva 2002/96/EC de la Unión Europea en materia de
desechos y/o equipos electrónicos, con fecha de rigor desde el 13 de agosto de 2005,
los productos clasificados como "eléctricos y equipos electrónicos" no pueden ser
depositados en los contenedores habituales de su municipio, los fabricantes de
equipos electrónicos, están obligados a hacerse cargo de dichos productos al termino
de su período de vida. MSI estará comprometido con los términos de recogida de sus
productos vendidos en la Unión Europea al final de su periodo de vida. Usted debe
depositar estos productos en el punto limpio establecido por el ayuntamiento de su
localidad o entregar a una empresa autorizada para la recogida de estos residuos.
Nederlands: 2PKHWPLOLHXWHEHVFKHUPHQZLO06,XHUDDQKHULQQHUHQGDW«'H
richtlijn van de Europese Unie (EU) met betrekking tot Vervuiling van Electrische en
Electronische producten (2002/96/EC), die op 13 Augustus 2005 in zal gaan kunnen
niet meer beschouwd worden als vervuiling. Fabrikanten van dit soort producten
worden verplicht om producten retour te nemen aan het eind van hun levenscyclus.
MSI zal overeenkomstig de richtlijn handelen voor de producten die de merknaam MSI
dragen en verkocht zijn in de EU. Deze goederen kunnen geretourneerd worden op
lokale inzamelingspunten
TotalMedia Interface Overview
3.2 Main Menu
3.3 TV Scanning
3.4 2 Tuner signal scanning
3.8 Music Management
3.9 Radio Management
3.5 Total Media Interface Instruction
3.6 DVD Management
3.7 Pictur Management
15
18
19
4. Medio Converter
13
14
20
20
28
28
4.1 File Comvert
DIGIVOX mini Hybrid
3.10 Video Management
nd
21
3.11 Setting 22
5. Remote Control 30
30
5 Remote Control Overview
29
4.2 You Tube Setting

Getting Started
1
1. Getting Started
1.1 Introduction
Thank you for choosing the DIGIVOX mini Hybrid TV tuner and video capture unit.
This product turns your PC into a powerful desktop multimedia system quickly and
easily. Capture video and still images and experience real-time MPEG-2 recording.
The DIGIVOX mini Hybrid provides you with a high quality TV viewing experience
with true stereo sound!
1.2 Features
1.3 Package Contents
When removing the contents of the package, please inspect all items to ensure no
damage was sustained during shipping. The following items should be included in the
package:
DIGIVOX mini Hybrid
Software Package CD*
Quick Installation Guide
Portable antenna for DVB-T**
Remote control
** The included antenna is only suitable for areas with a strong DVB-T signal. If you have reception
problems, first try to move or reorient the antenna. Otherwise, you may need to use a stronger
antenna for better reception.
AV/S-Video cable
Worldwide Analog TV reception from cable/air TV
Watch free-to-air digital terrestrial TV and Listen Digital Radio (not DAB) on your
PC or laptop.
Real-time recording from Digital / Analog TV
Supports TimeShifting and Schedule Recording function
Additional AV/S-Video Input, be able to connect other video sources (such as DVD
Player/VCD/VHS/Camcorder)
Support HDTV
Remote control function
Windows Vista Certified

Getting Started
2
1.4 System Requirements
To successfully use the DIGIVOX mini Hybrid solution, please ensure that your
system meets the following requirements:
Pentium®4 or AMD Athlon 2.0 GHz or faster, 2.4GHz or faster recommended
512 MB RAM (minimum),1GRAM recommended
One available USB 2.0 port
AC97 compatible sound card
2GB free HD space
CD-ROM drive (for driver/software installation)
DirectX 9.0c or higher installed
Graphics card/chipset with full support for DirectX 9.0
Microsoft XP SP3, XP MCE compatible or Vista installed
*When using the DIGIVOX mini Hybrid with Windows Media Center , you must install a 3rd party
MPEG - 2 ecoder (such as Power DVD 6 or WinDVD6 or NVIDIA MPEG-2 decoder) in order to
usethe DIGIVOX mini Hybrid with Windows Media Center.
Installation
3
2. Installation
The following sections provide step-by-step instructions on installing and configuring
t ard, accessories and software.
Before installing your DigiX mini II A/D III0, insert the installation CD and an
installati n menu should load aut m ti lly.
If you use Windows XP or MCE 2005, click on Windows XP/MCE 2005.Ifyouuse
Windows Vista, click on Windows Vista.
If the Autostart program does not appear automatically
when you insert your Installation CD, start it manually by
running the InstallCD.exe file located on the Installation
CD, or by clicking the Start button, choosing Run…, and
typing in D:\InstallCD.exe.
(if D: is your CD-ROM drive)
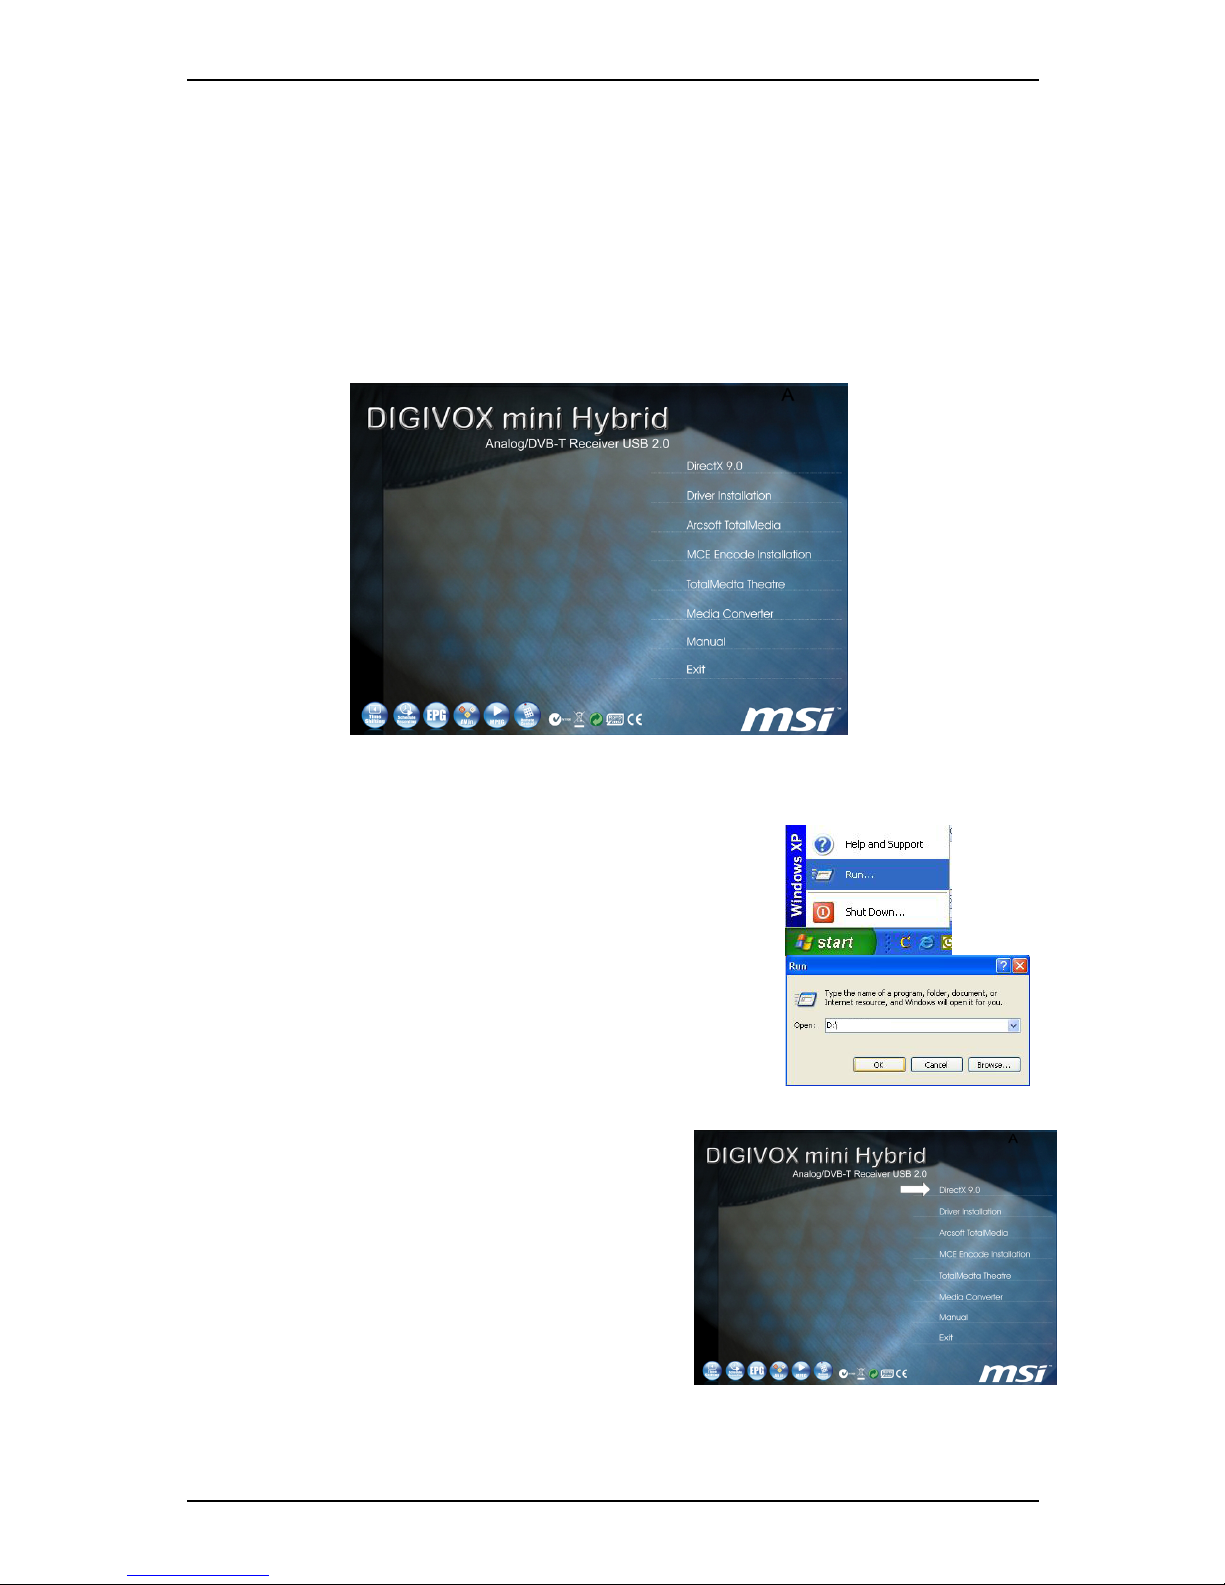
2.1 DirectX 9.0
Click on DirectX 9.0 and follow the prompts to
install DirectX. After the installation is completed,
shut down the computer.
The following sections provide step-by-step instructions on installing and configuring
the card, accessories and software.
Before installing your DIGIVOX mini Hybrid , please insert the installation CD and
installation menu should load automatically.
If the Autostart program does not appear automatically when you insert your
installation CD, start it manually by running the
Autorun.exe file located on the installation CD, or by
clicking the Start button, choosing Run…., and typing in
D:\autorun.exe (if D: is your CD-ROM drive)
DIGIVOX mini Hybrid requires to be supported by
DirectX 9.0 or above. If the DriectX on your PC is
lower then 9.0 version, please install DirectX 9.0
from autorun page.
Clicks on DirectX 9.0 and follow the prompts to
install DirectX. After the installation is completed,
shut down the computer.
Autorun.exe
Installation
4
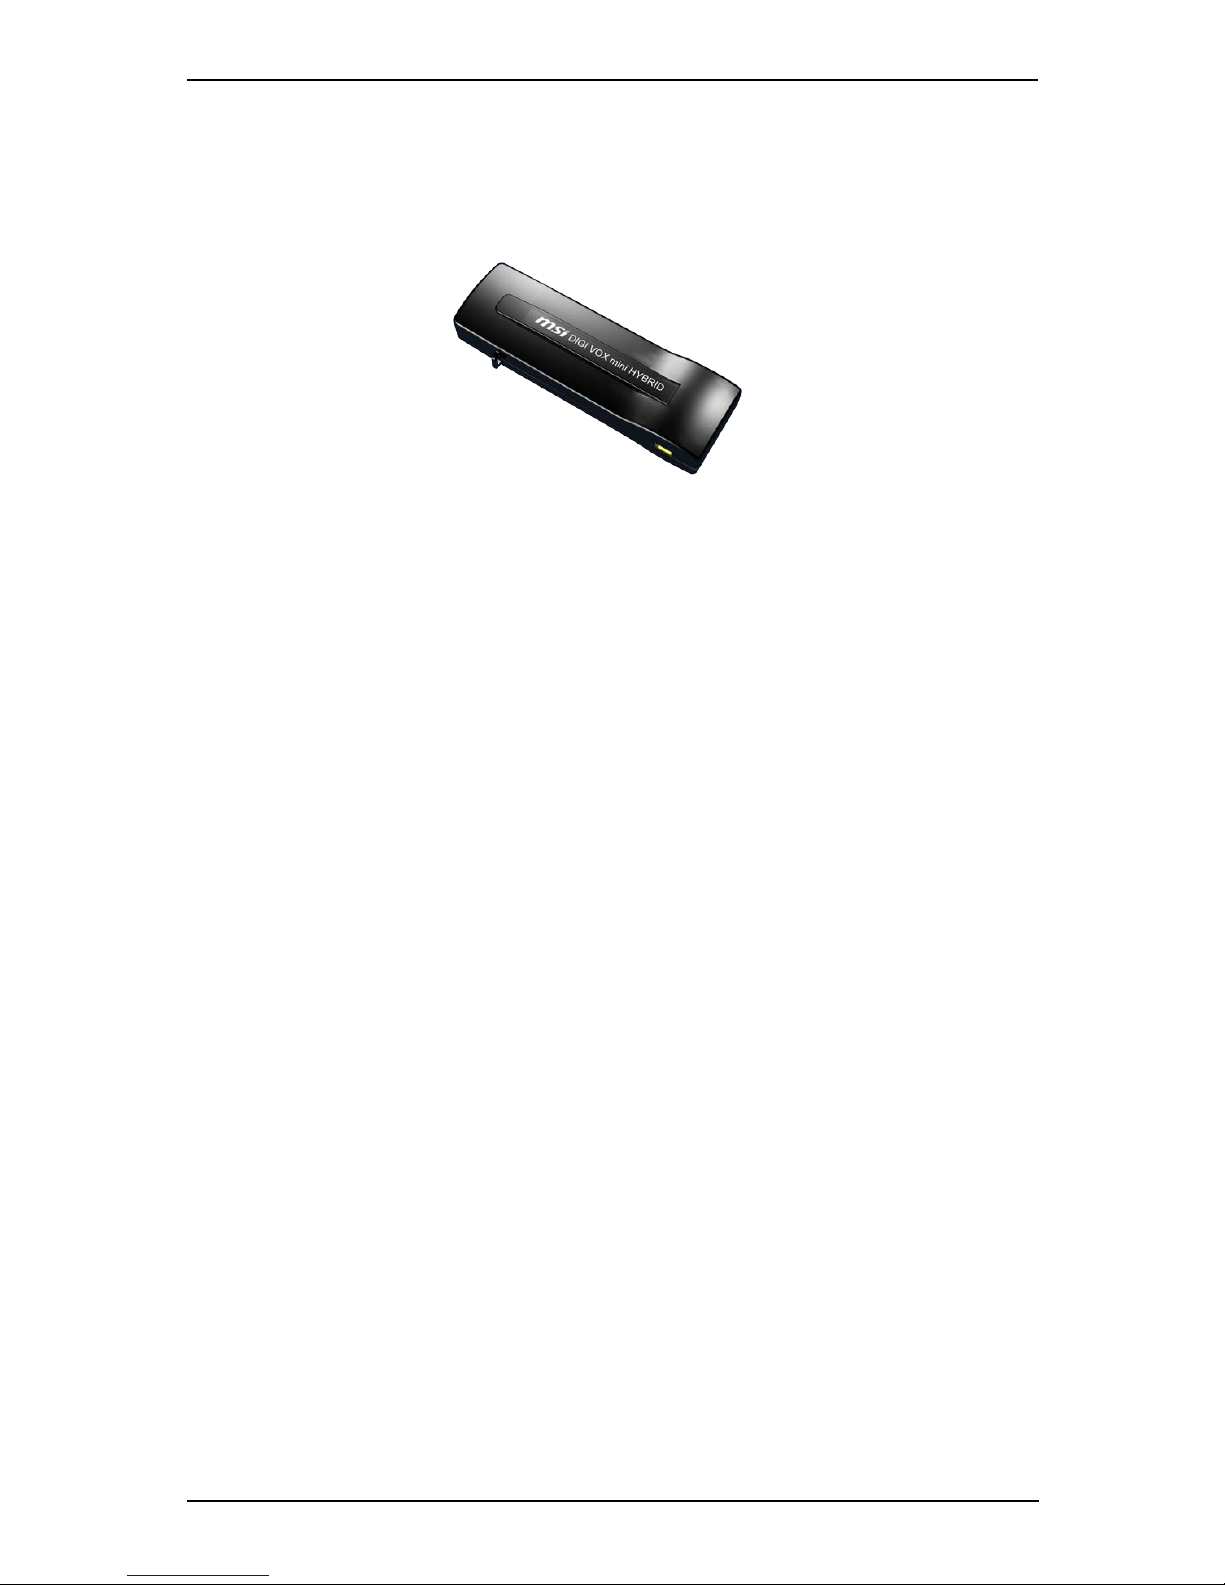
2.2 Connecting the DIGIVOX mini Hybrid
Connect the RF dongle to the connection port on the DIGIVOX mini Hybrid connect
your digital antenna to the RF dongle.
Now plug the DIGIVOX mini Hybrid unit into an open USB 2.0 port on your PC.
Installation
5
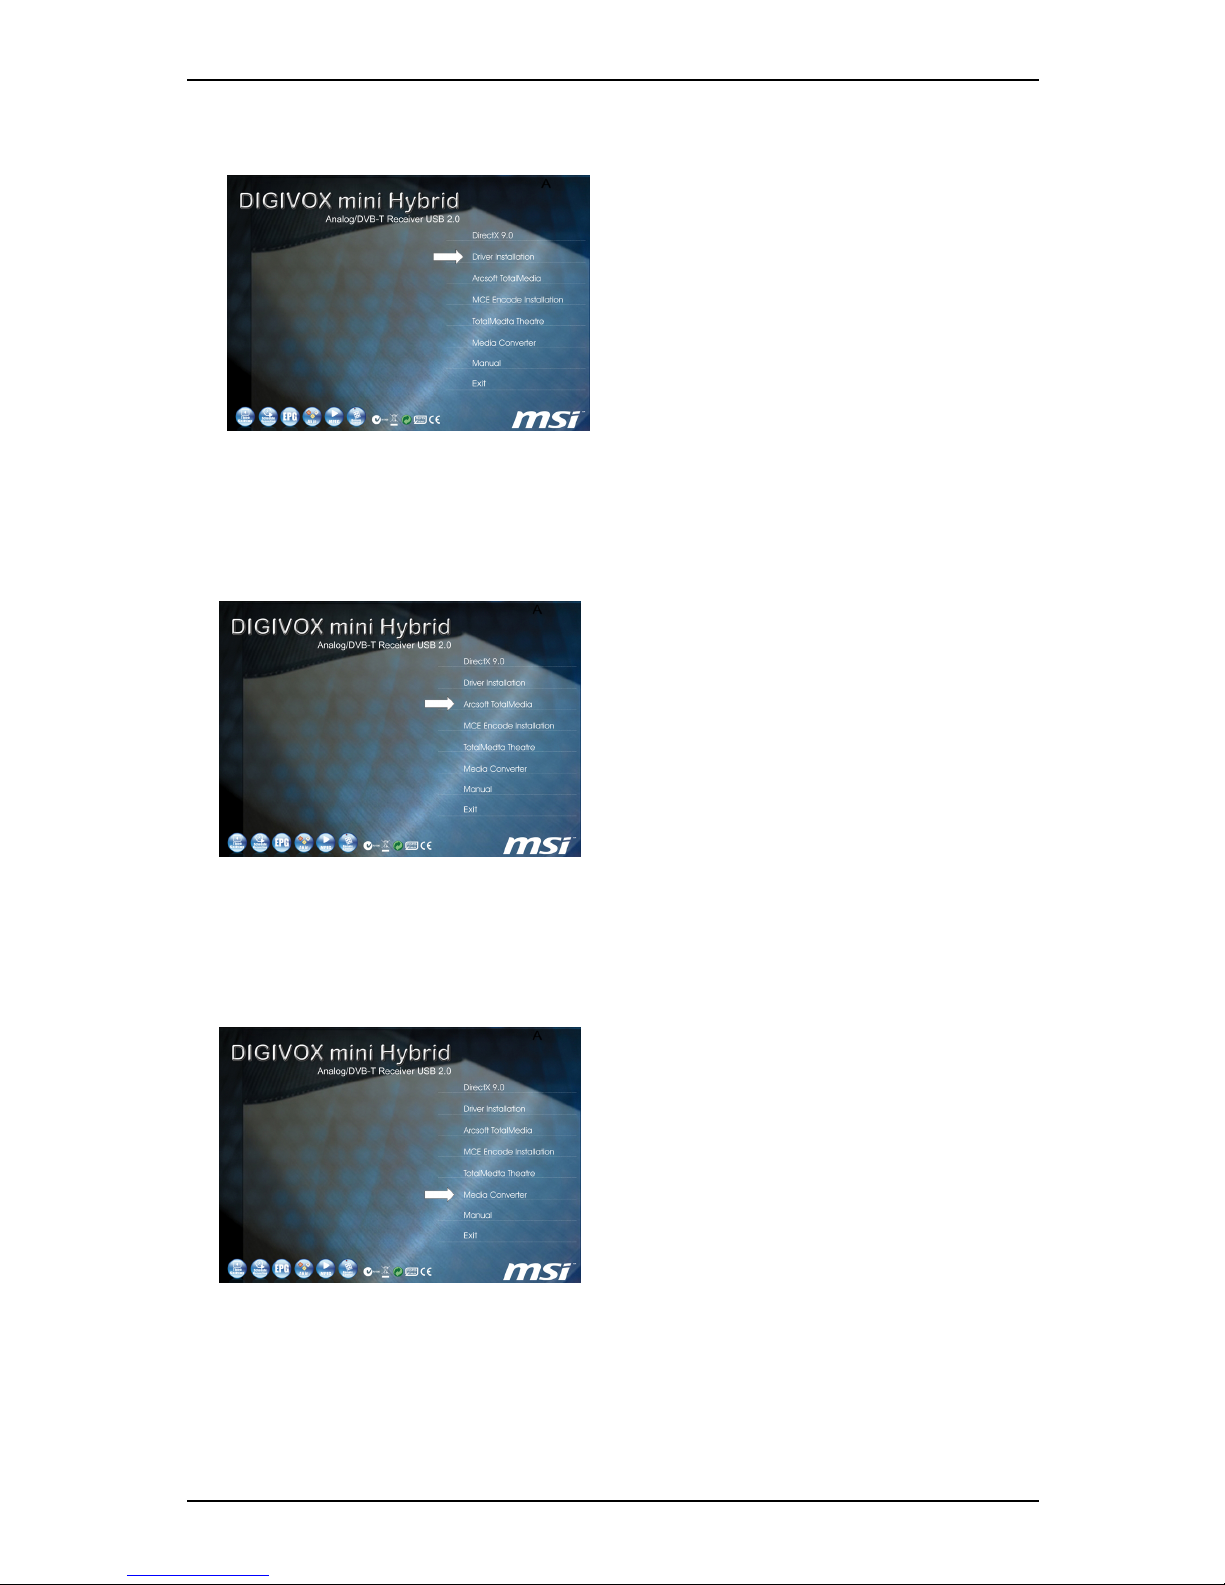
2.3 Driver Installation
.
2.4 Installation of the TV application
2.5 Installation of Media Converter
.
From the installation menu, please click on Driver Installation to install DIGIVOX mini Hybrid
driver. Follow the prompts to complete installation of the driver.
Install the TV software by clicking “Arcsoft Total Media”. Just follow the prompts to
install the software
Click on Media Converter to install the software. Just follow the prompts to
complete installation
Installation
6
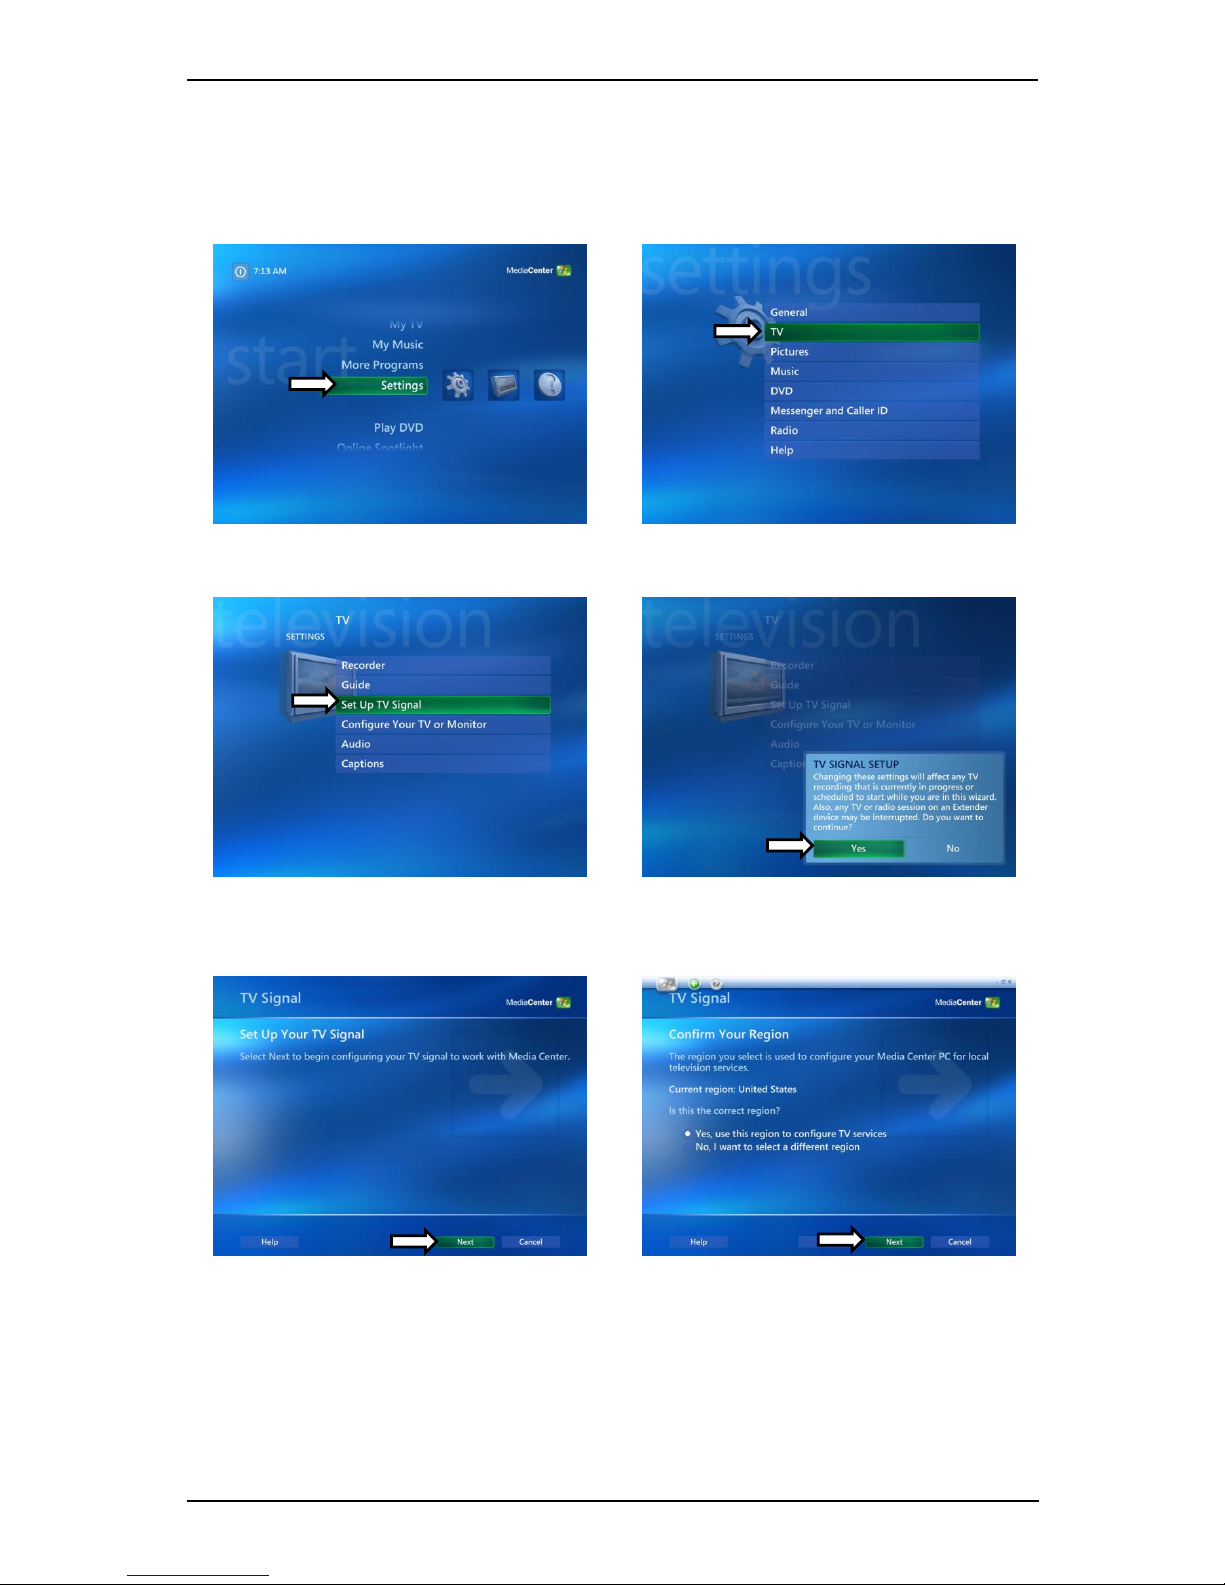
2.6 Setup of Media Center (MCE 2005)
Double-click the My TV icon on your desktop to start Media Center.
Click on Settings.
Now click on TV.
Click on Set Up TV Signal.
A warning message will appear. Click
Yes.
Click Next.
Select Yes, use this region to
configure TV services if your current
region is displayed. If not, select No, I
want to select a different region.
Click Next.

Installation
7
If you chose to select your region,
select your region from the list and
click Next.
Click the circle next to Set Up Guide
Settings and click Next.
Click on Next.
If you want to use the Media Center
Guide, select Yes and follow the
onscreen prompts. If not, select No.
Click Next.
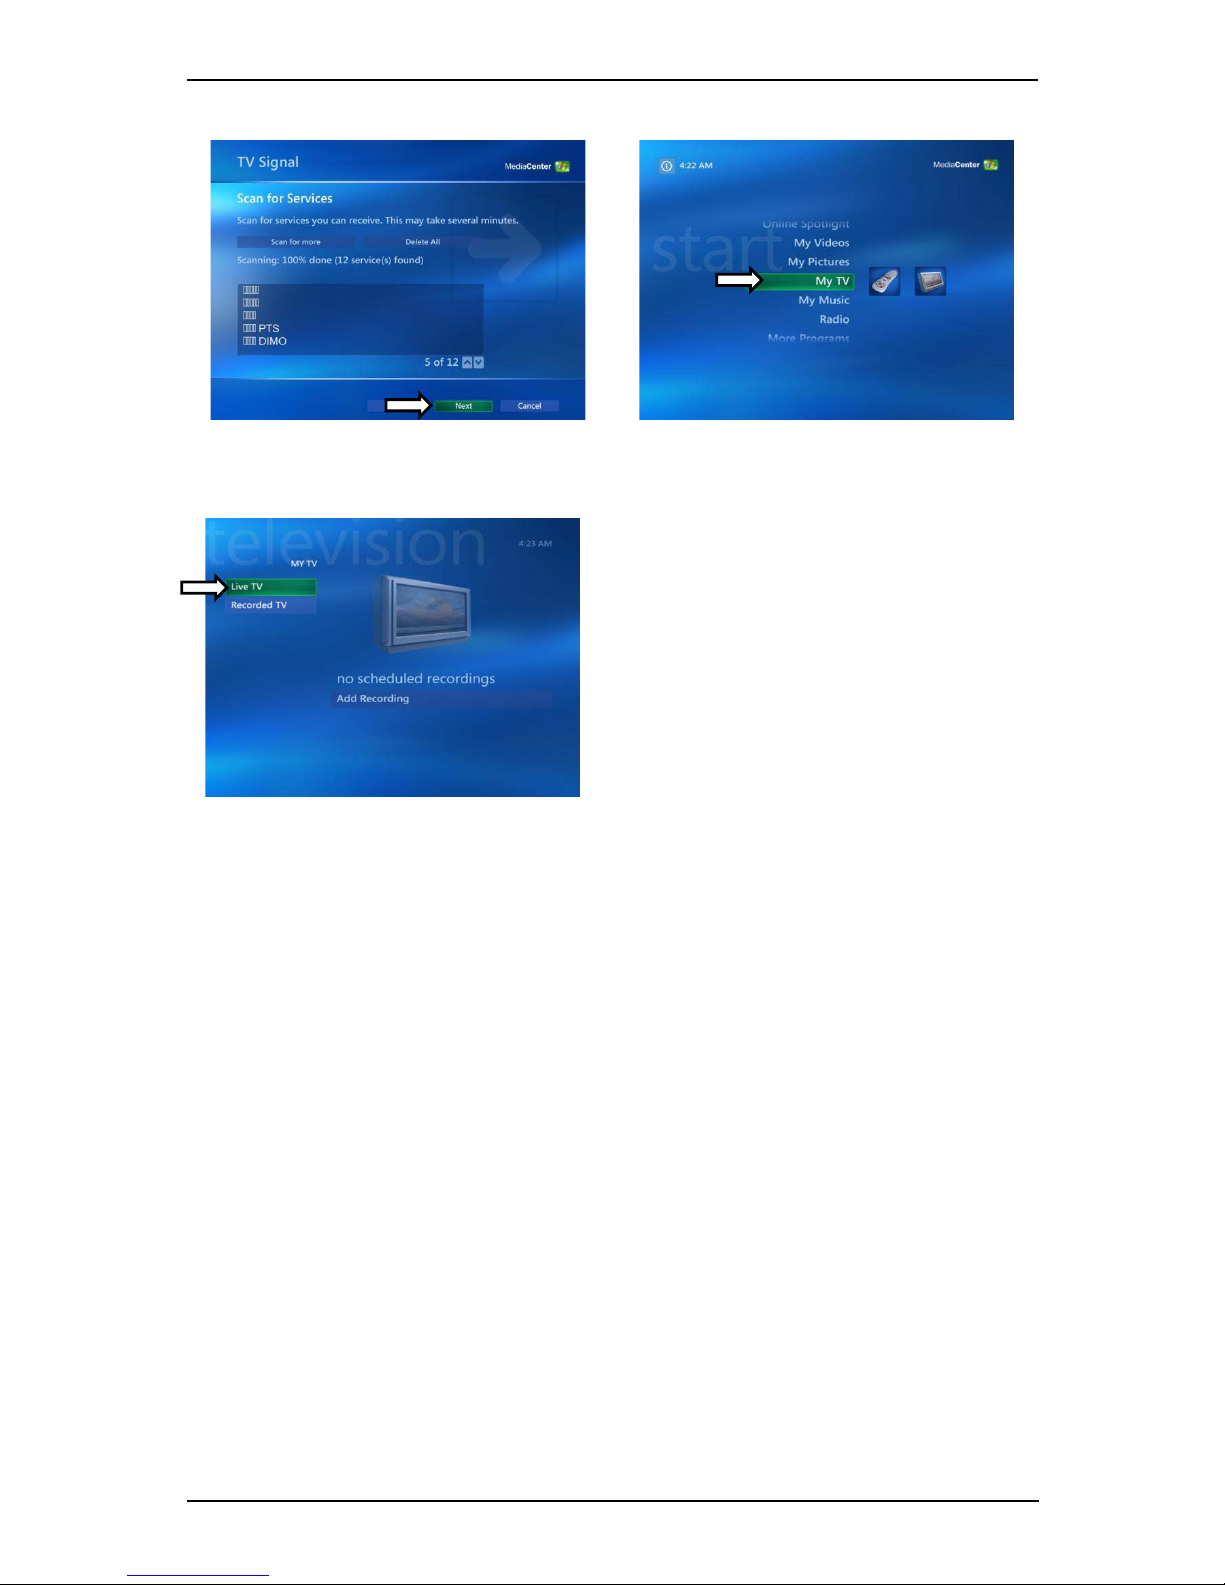
Click Start Scan to begin a channel
scan.
Windows MCE will now scan for
available channels in your area. This
may take a few minutes.
Installation
8
When the scan is finished, click Next To watch TV, click on My TV from the
main menu.
Click on Live TV and you can now start
watching TV! For more details on how
to use Media Center, consult your
Windows MCE user manual or online
help.
!In order to use the DIGIVOX A/D III with MCE 2005, you must install
an MCE Certified MPEG-2 decoder (also known as a DVD decoder) in order to
watch and record TV in Windows MCE. This DVD decoder is not included on
the installation CD. To install a DVD decoder, you can install software such as
CyberLink PowerDVD, InterVideo XPack, Sonic CinePlayer, nVidia DVD
Decoder or other such product that includes a DVD decoder.
!If you are unable to scan any channels or configure both tuners, make sure you
have updated your copy of Windows MCE through Update Rollup 2 (KB900325)
and through all available updates on Windows Update (including optional
updates).

Installation
9
2.7 Setup Media Center (Vista Premium Users)
1. Click on the Media Center icon
from the Start Menu or the QuickStart bar.
2. From the welcome screen, select
Custom setup and click OK.
3. Click Next and follow the onscreen
instructions to set up Media Center.
4. When you reach the Optional
Setup screen, select Configure tuner,
TV signal, and Guide and click Next.
5. If you are in the currently displayed
region, select Yes, use this region to
configure TV services and click Next.
Otherwise, click No, I want to select a
different region, click Next, and choose
your region from the list that appears then
click Next.
6. Here, select your TV signal
source. Select Antenna and click Next.

Installation
10
7. Here, choose Digial Terrestrial and
click Next .8. Click Start Scan and let the
channel scan finish, then click Next after
it finishes.
9. Here, select Yes if you want to use
Media Center’s Guide feature, or No if not.
Click Next.
10. This completes setup of your TV
card with Media Center. You can
continue to set up the rest of the options,
or you can select I am finished and
Next to finish setup.
.

__________________________________________________________
3.Total Media
3.1 Total Media Interface Overview
1. Full Screen
2. EPG
3. Channels
4. Recorded TV
5. Schedule
6. Capture Frame
7. Teletext
8. Settings
9. Playback
10. Stop
11. Backward
12. Forward
13. Skip to beginning
14. Skip to end
15. Volume Bar
16. Volume Down
17. Volume Up
18. Channel Down
19. Channel Up
20. My Favorite
21. Aspect Ratio
22. MTS
23.RECORD
__________________________________________________________
Total Media
1
2
3
4
5
6
7
8
9
10
23
11
12 14
13 15
16
17
18 20
19 21
22
11
__________________________________________________________
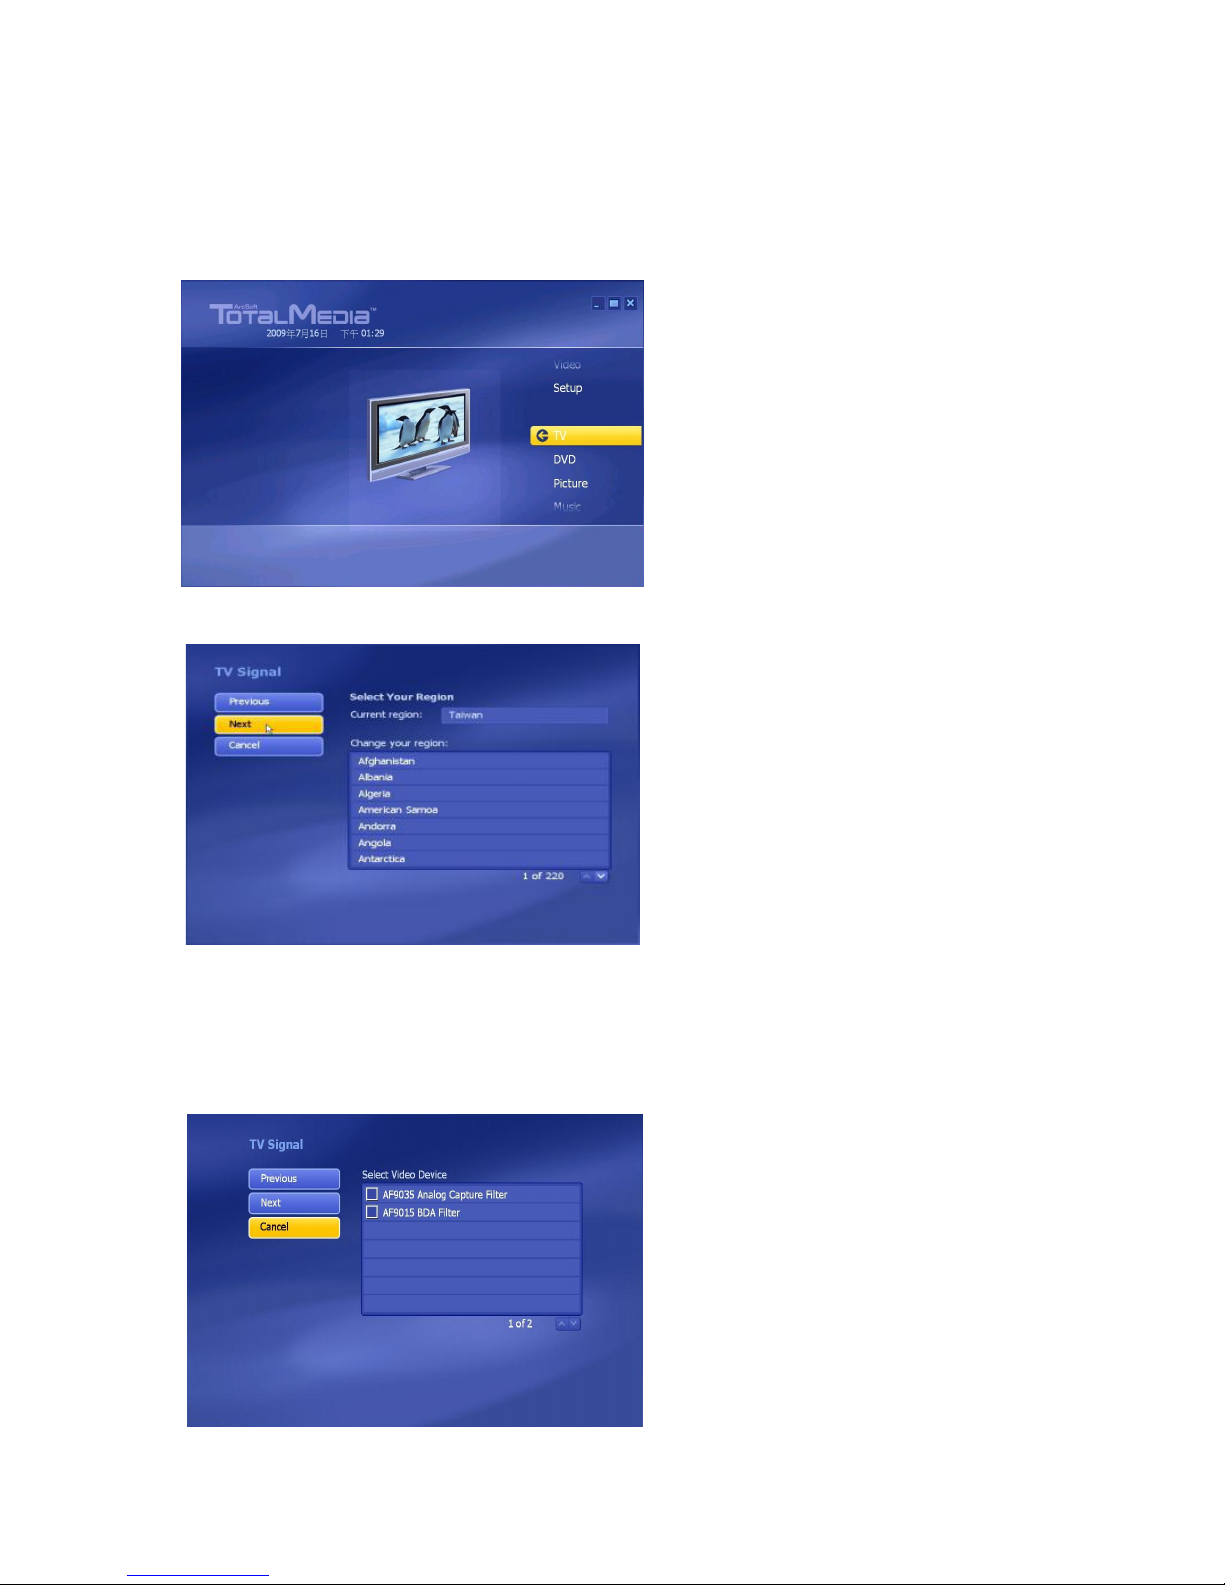
3.2 Main Menu
Total Media is a Media Center Like software. You can not only watch Digital TV but a
Picture and Video Management tool. The below software instruction will guide you to
learn the magic of Total Media 3.5
3.2-1
3.2-2
__________________________________________________________
12
Total Media
Choose Region
Select Device
Please choose “AF9035 Analog Capture Filter” for scanning ATV signal
Please choose “AF9015 BDA Filter” for scanning DTV signal
3.3 TV Scanning
3.3-1
Select Audio Device
Choose “Audio Pin Source”
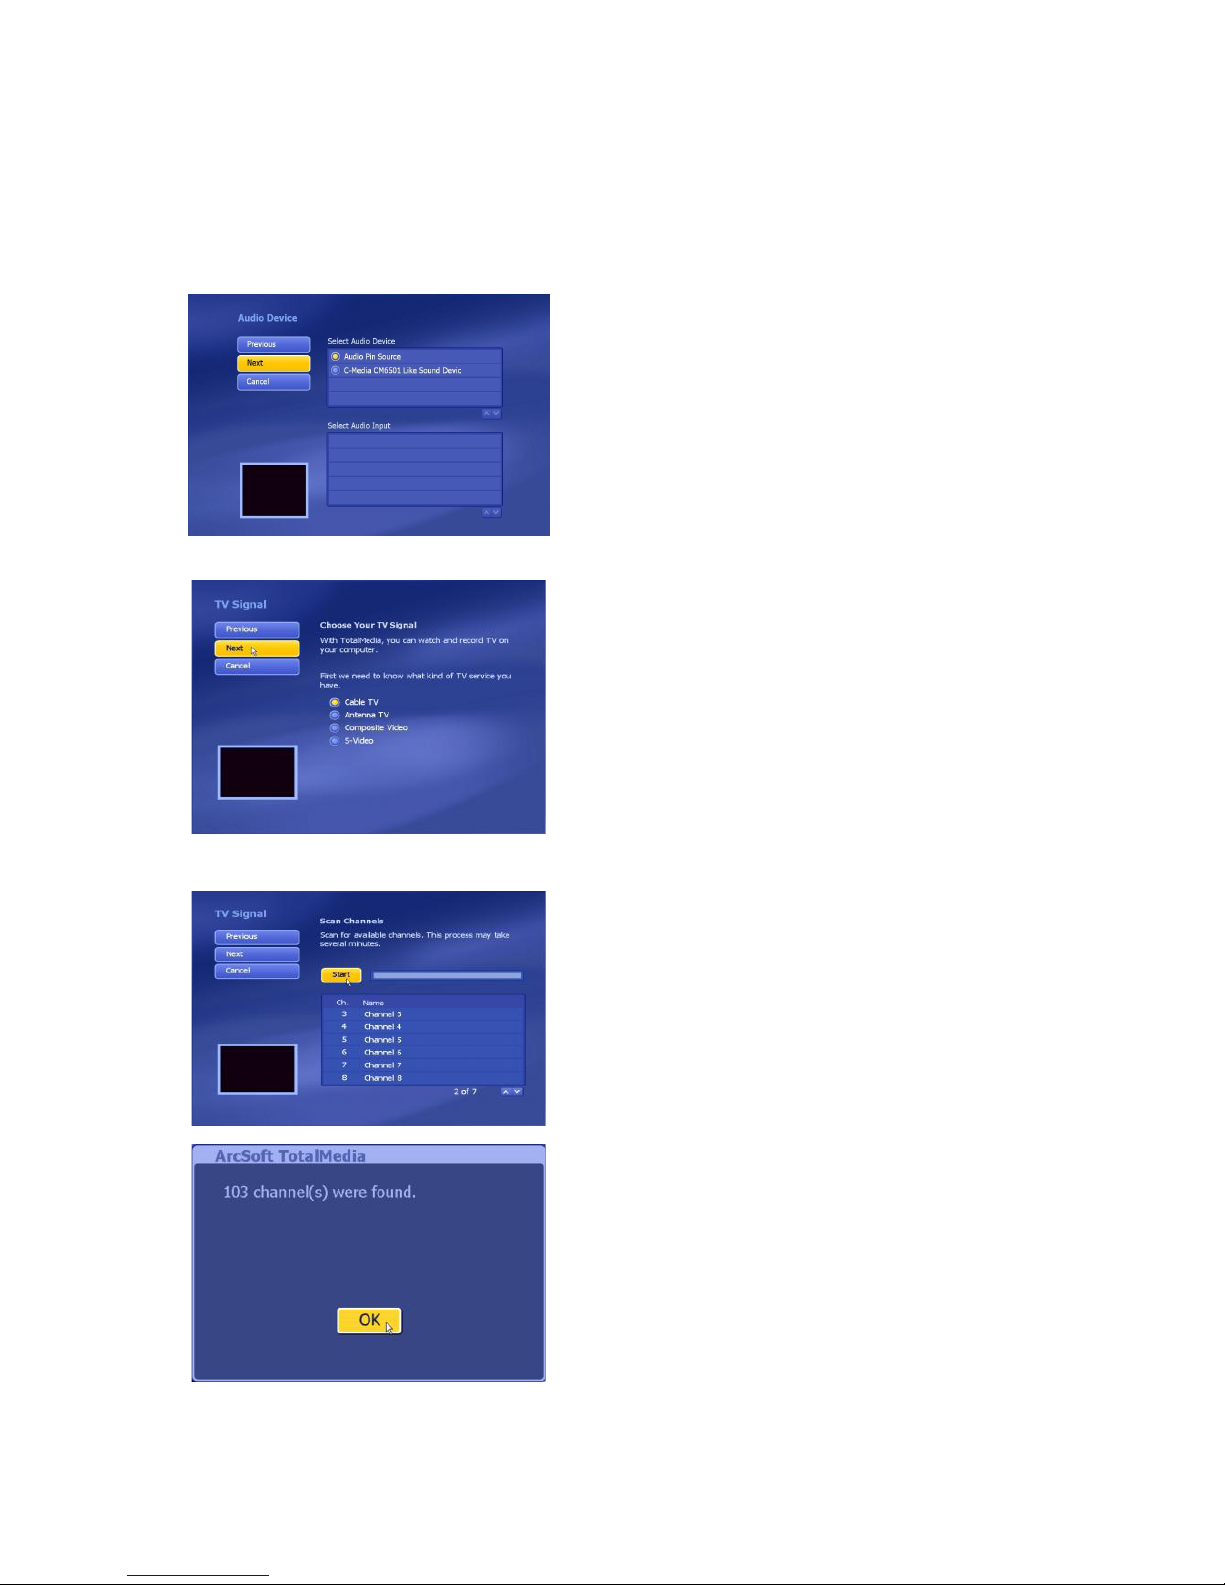
3.3-2
Choose “CableTV”or “AntennaTV” for Analog TV signal scanning
3.3-3
Press “Start” to scan channels
__________________________________________________________
13
__________________________________________________________
Total Media
Analog TV
This manual suits for next models
1
Table of contents
Other MSI TV Tuner manuals

MSI
MSI TV anywhere Plus User manual

MSI
MSI VOX II User manual

MSI
MSI Theater 650PRO User manual

MSI
MSI DigiVOX mini User manual

MSI
MSI Digi Vox UItimate HD User manual

MSI
MSI Theater 550PRO User manual

MSI
MSI TV@nywhere A/D User manual

MSI
MSI DigiVox mini II V3.0 User manual

MSI
MSI TV@nywhere Duo User manual

MSI
MSI Digital@nywhere-ATSC User manual


