MSI DigiVOX mini User manual

DIGI VOX mini Deluxe
ENGLISH
X
X
XP
P
P
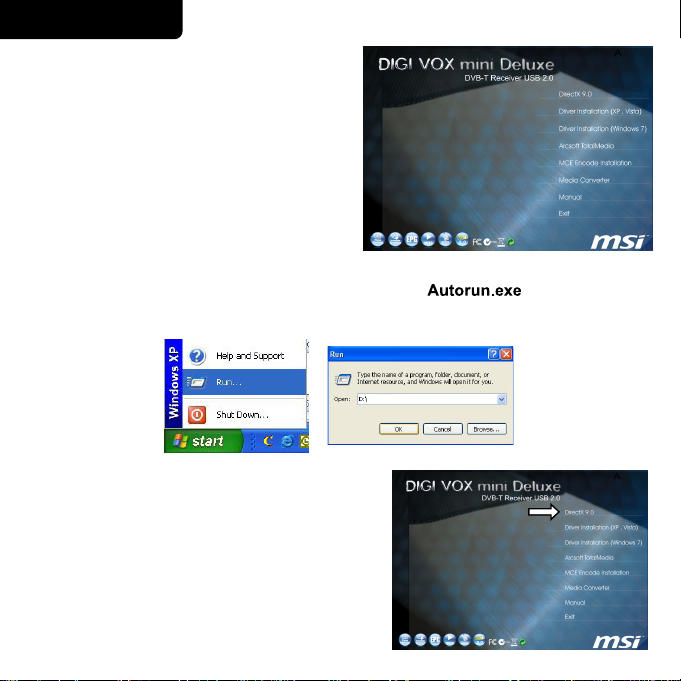
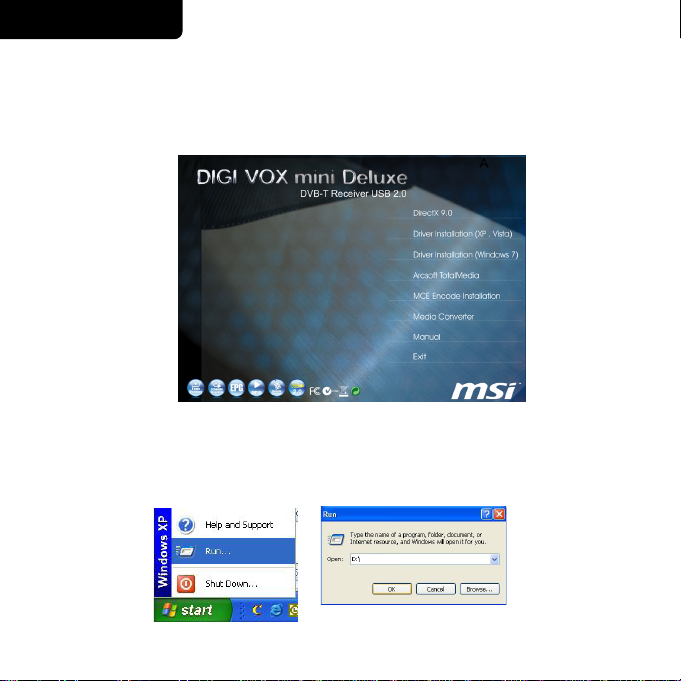
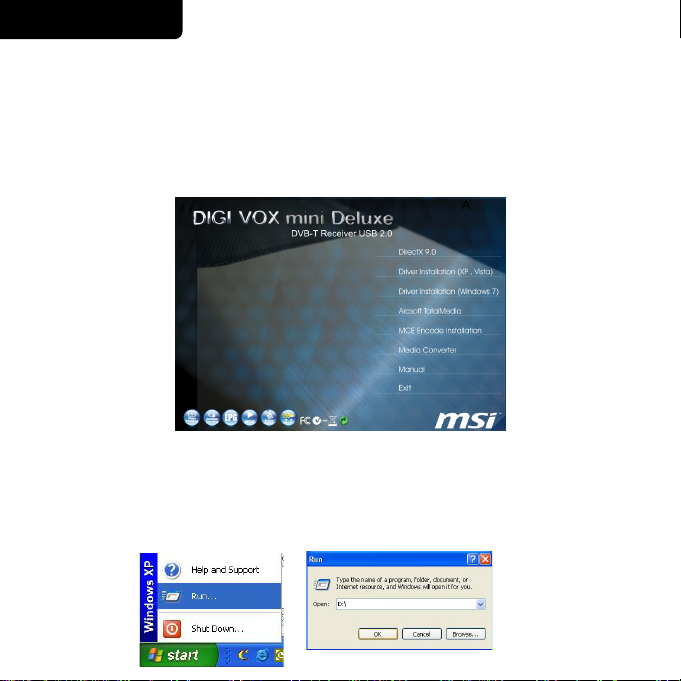
1. Before installing your DIGI VOX mini
Deluxe,inserttheinstallationCDand
aninstallation menu should load
automatically.
If you use Windows XP or MCE 2005,
click on Windows XP/MCE 2005.Ifyou
use Windows Vista, click on Windows
Vista.
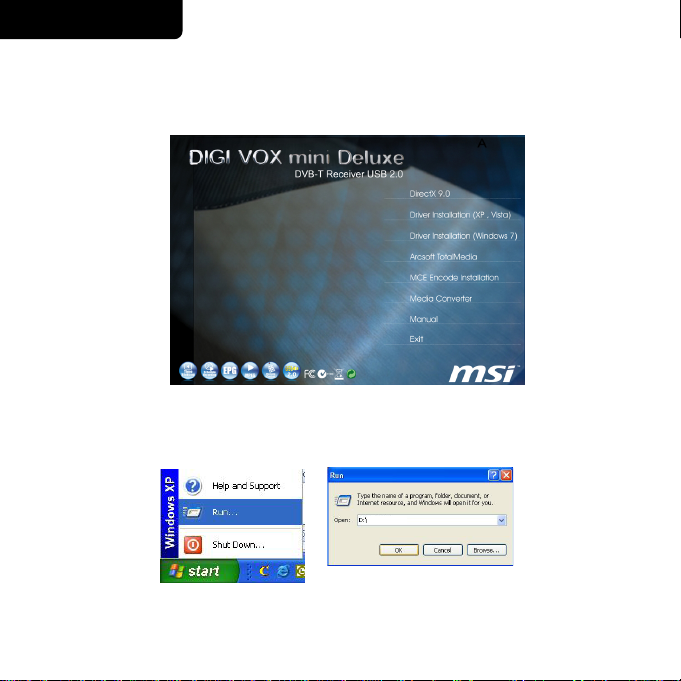
Note: If the Autostart program does not appear automatically when you insert your
Installation CD, start it manually by running the file located on
the Installation CD, or by clicking the Start button, choosing Run…,and
typing in D:\Autorun.exe . (if D: is your CD-ROM drive)
(XP Users) Click on DirectX 9.0 and follow the
prompts to install DirectX. After
the installation is completed, shut
down the computer.AA
Auto run.exe

ENGLISH
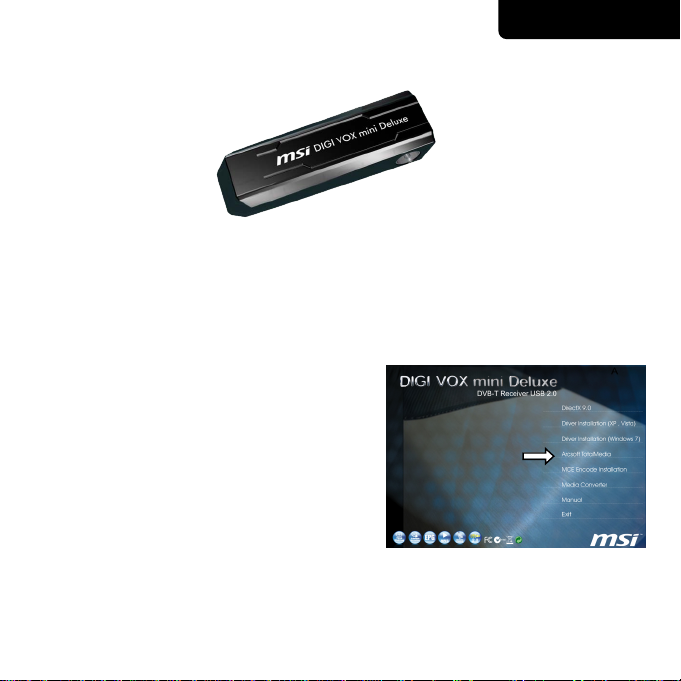
2. Connect the RF adapter to the connection port on the back of the DIGI VOX
mini Deluxe.Connect your TV antenna to the RF adapter.
Now plug the DIGI VOX mini Deluxe unit into an open USB 2.0 port on your PC.
3. Driver Installation
4. Installation of the TV application
Install the TV software by clicking “Arcsoft
Total Media”. Just follow the prompts
toinstthe software
From the installation menu, please click on
Driver Installation to install DIGI VOX mini
Deluxe driver. Follow the prompts to complete
installation of the driver.

FRANÇAIS
1. Avant d’installer la DIGI VOX mini Deluxe, vous devrez installer DirectX 9.0c ou
une version plus récente sur votre ordinateur. Insérez le CD accompagnant la
carte DIGI VOX mini Deluxe et l’installation commencera automatiquement.
Appuyez sur DirectX 9.0 et suivez les instructions qui apparaissent à l’écran.
Remarque : Si le programme d’installation ne démarre pas automatiquement
lorsque vous insérez le CD d’installation, appuyez sur le Bouton Start
de Windows puis sur Run... et entrez D:\ Autorun.exe (si D:\
correspond à la lettre de votre lecteur CD-ROM).
Auto run.exe

FRANÇAIS
2. Connectez l’adaptateur RF au port de connexion à l’arrière du DIGI VOX mini
Deluxe. Connectez votre antenne TV à l’adaptateur RF.
Branchez à présent l’unité DIGI VOX mini Deluxe sur un port USB 2.0 disponible
de votre PC.
3. Après avoir rallumé votre ordinateur, Windows XP détectera automatiquement
la présence du nouveau matériel et une fenêtre « Nouveau matériel détecté »
s’ouvrira. Si vous ne l’avez pas encore fait, veuillez insérer le CD d’installation
du DigiVOX mini II V3.0 dans votre lecteur CD-ROM.
4. Dans le menu d’installation, appuyez sur
« Arcsoft TotalMedia ». Suivez les
instructions qui apparaissent à l’écran pour
installer le programme d’application TV.
DEUTSCH
1. Bevor Sie Ihre neue DIGI VOX mini Deluxe installieren, müssen Sie zuerst
DirectX 9.0c oder Nachfolger auf Ihrem Betriebssystem installieren. Legen
Sie Ihre DIGI VOX mini Deluxe Software-CD ein. Das Installationsmenü wird
automatisch geöffnet. Klicken Sie hier auf DirectX 9.0 und folgen dann den
Anweisungen auf dem Bildschirm.
Hinweis: Falls das Autostart-Programm nicht automatisch gestartet wurde, legen
Sie bitte Ihre Installations-CD ein, klicken auf die Start-Schaltfläche und
dann Ausführen… und tippen dann D:\Autorun.exe (wobei D:\ für Ihr
CD-ROM-Laufwerk steht) ein.
Auto run.exe

DEUTSCH
2. Verbinden Sie den RF-Adapter mit dem entsprechenden Anschluss an der
Rückseite der DIGI VOX mini Deluxe. Verbinden Sie Ihre TV-Antenne mit dem
RF-Adapter.
Stecken Sie nun die DIGI VOX mini Deluxe in einen freien USB 2.0-Anschluss an
Ihrem PC ein.
3. Nach dem Neustart erkennt Windows XP automatisch die Anwesenheit einer
neuen Hardwarekomponente in dem System und öffnet das
"Hardware-Assistent"-Fenster. Wenn das nicht der Fall ist, legen Sie bitte die
DIGI VOX mini Deluxe Software-CD in Ihr CD-ROM-Laufwerk ein.
4. Klicken Sie auf auf dem
Installationsmenü. Folgen Sie den
Anweisungen auf dem Bildschirm, um die
TV-Software zu installieren.
Arcsoft TotalMedia
ITALIANO
1. Prima di installare DIGI VOX mini Deluxe, si deve installare DirectX versione 9.0c
o superiore. Inserire il CD con il software per DIGI VOX mini Deluxe e il menu di
installazione viene caricato automaticamente. Fare clic su DirectX 9.0 e
seguire le istruzioni presentate a schermo.
Nota: Se i programma Autostart non viene visualizzato automaticamente quando
si inserisce il CD Installation, fare clic su Start , e quindi su Run (Esegui)…
e digitare D:\Autorun.exe (se D:\ è la lettera che indica l’unità CD-Rom).
Auto run.exe
ITALIANO
2. Collegare l’adattatore RF alla porta di connessione sul retro di DIGI VOX mini
Deluxe. Collegare l’antenna TV all’adattatore RF.
Collegare l’unità DIGI VOX mini Deluxe. ad una porta USB 2.0 libera sul PC.
3. Dopo aver riavviato il computer, Windows XP rileva automaticamente la
presenza di un nuovo componente hardware e viene visualizzata la finestra
‘Trovato nuovo hardware’. Qualora non fosse ancora stato fatto, inserire il CD
con il software DIGI VOX mini Deluxe. nel lettore per CD-ROM.
4. Dal menu di installazione fare clic su
Arcsoft TotalMedia. Seguire i messaggi
per installare il software TV.

NEDERLANDS
1. Voordat u uw nieuwe DIGI VOX mini Deluxe. installeert, dient u DirectX 9.0c of
hoger te installeren voor uw besturingssysteem. Plaats de software-cd van uw
DIGI VOX mini Deluxe. Het installatiemenu zou automatisch moeten worden
gestart. Klik hier op DirectX 9.0 en volg de richtlijnen op het scherm.
Opmerking: Als het programma voor het automatisch starten niet op het scherm
verschijnt wanneer u de installatie-cd plaatst, klik dan op de knop
Start, daarna op Ui t voeren… en typ D:\Autorun.exe (als D:\ de
stationsletter is van uw cd-romstation).
Auto run.exe

NEDERLANDS
2. Sluit de RF-adapter aan op de aansluiting op de achterkant van de DIGI VOX mini
Deluxe. Sluit uw tv-antenne aan op de RF-adapter.
Sluit de DIGI VOX mini Deluxe.-eenheid aan op een vrije USB 2.0-poort op uw pc.
3. Nadat de computer opnieuw is opgestart, detecteert Windows XP automatisch
de aanwezigheid van een nieuwe hardwarecomponent in het systeem en wordt
het venster "Wizard Nieuwe hardware gevonden" geopend. Als u dat nog niet
hebt gedaan, plaats dan de software-cd van de DIGI VOX mini Deluxe. in uw
cd-rom-station.
4. Klik in het installatiemenu op
. Volg de richtlijnen op het scherm
om het programma TV te installeren.
Arcsoft
TotalMedia

ESPAÑOL
1. Antes de instalar la nueva unidad DIGI VOX mini Deluxe, es necesario instalar
DirectX 9.0c o posterior en el sistema operativo. Inserte el CD de software de
DIGI VOX mini Deluxe. y el menú de instalación debe iniciarse automáticamente.
Aquí, haga clic en DirectX 9.0 y siga las instrucciones que aparecen en
pantalla.
Nota: Si el programa de inicio automático no aparece automáticamente después
de insertar el CD de instalación de, haga clic en el botón Inicio, elija
Ejecutar yescribaD:\Autorun.exe (donde D:\ es la unidad de CD-ROM).
Auto run.exe

ESPAÑOL
2. Conecte el adaptador de RF al puerto de conexión situado en la parte posterior
del dispositivo DIGI VOX mini Deluxe. Conecte la antena de TV al adaptador de
RF.
Ahora enchufe la unidad DIGI VOX mini Deluxe a un puerto USB 2.0 disponible
de su PC.
3. Después de reiniciar el sistema, Windows XP detectará automáticamente la
presencia de un nuevo componente de hardware en el equipo y mostrará la
ventana ‘Asistente para hardware nuevo encontrado’. Si aún no lo ha hecho,
inserte el CD de software de DIGI VOX mini Deluxe en la unidad de CD-ROM.
4. En el menú de instalación, haga clic en
. Siga los mensajes
para instalar el software de TV.
Arcsoft TotalMedia

PORTUGUÊS
1. Antes de instalar a sua nova DIGI VOX mini Deluxe, é necessário instalar o
DirectX 9.0c ou acima no seu sistema operativo. Introduza o CD com o
software da sua DIGI VOX mini Deluxe, o menu de instalação deve aparecer
automaticamente. Neste menu, clique em DirectX 9.0 e siga as instruções no
ecrã.
Nota: Se a instalação não for iniciada automaticamente aquando da introdução
do seu CD de instalação, clique em Start (Iniciar), e de seguida em Ru n …
(Executar) e digite D:\ (se D:\ corresponder à sua unidade de
CD-ROM). Autorun.exe
Auto run.exe

PORTUGUÊS
2. Ligue o adaptador RF à porta de ligação existente na parte de trás do DIGI VOX
mini Deluxe. Ligue a antena do televisor ao adaptador RF.
De seguida, ligue a unidade DIGI VOX mini Deluxe a uma porta USB 2.0
disponível no seu PC.
3. Após reiniciar o computador, o Windows XP detecta automaticamente a
presença de um novo hardware no sistema apresentando a janela ‘Found New
Hardware Wizard’ (Assistente de novo hardware encontrado). Se ainda não o
fez, coloque o CD do software da DIGI VOX mini Deluxe na sua unidade de
CD-ROM.
4. No menu de instalação, clique na ligação
. Siga as instruções
para instalar o software TV.
Arcsoft TotalMedia
ǼȁȁǾȃǿȀDZ
1. !ıȣȞįȑıİIJİ IJȠ DIGI VOX mini Deluxe ıĮȢ,ʌȡȫIJĮ ʌȡȑʌİȚ ȞĮ
İȖțĮIJĮıIJȒıİIJİ IJȠ DirectX 9.0c.
I. ǼȚıȐȖİIJİ IJȠ CD ȜȠȖȚıȝȚțȠȪ IJȠȣ DIGI VOX mini Deluxe ıIJȘ ȝȠȞȐįĮ
CD-ROM IJȠȣ ȣʌȠȜȠȖȚıIJȒ ıĮȢ.
II. ȆİȡȚȝȑȞİIJİ ȝİȡȚțȐ įİȣIJİȡȩȜİʌIJĮ țĮȚ IJȠ ʌȡȩȖȡĮȝȝĮ ȠįȒȖȘıȘȢ șĮ ȟİțȚȞȒıİȚ
ĮȣIJȩȝĮIJĮ.ȀȐȞIJİ țȜȚț ıIJȠ DirectX 9.0 țĮȚ ĮțȠȜȠȣșȒıIJİ IJȚȢ ȠįȘȖȓİȢ ıIJȘȞ
ȠșȩȞȘ.
ȈȘȝİȓȦıȘ :ǹȞ IJȠ ʌȡȩȖȡĮȝȝĮ İȖțĮIJȐıIJĮıȘȢ IJȠȣ DIGI VOX mini Deluxe įİȞ
ȟİțȚȞȒıİȚ ĮȣIJȩȝĮIJĮ:
1. ȀȐȞIJİ țȜȚț ıIJȠ ȀȠȣȝʌȓ Start (DzȞĮȡȟȘ ,țĮȚ ȑʌİȚIJĮ țȐȞIJİ țȜȚț ıIJȠ
Run…(ǼțIJȑȜİıȘ
2. ȆȜȘțIJȡȠȜȠȖȒıIJİ D:\ (ȩʌȠȣ IJȠ D:\ İȓȞĮȚ IJȠ ȖȡȐȝȝĮ IJȘȢ
ȝȠȞȐįĮȢ CD-ROM,țĮȚ ȑʌİȚIJĮ țȐȞIJİ țȜȚțıIJȠ OK.
Autorun.exe
Auto run.exe

ǼȁȁǾȃǿȀDZ
2. ȈȣȞįȑıIJİ IJȠȞ ʌȡȠıĮȡȝȠȖȑĮ RF ıIJȘ șȪȡĮ ıȪȞįİıȘȢ ıIJȠ ʌȓıȦ ȝȑȡȠȢ IJȠȣ
DIGI VOX mini Deluxe. ȈȣȞįȑıIJİ IJȘȞțİȡĮȓĮ IJȘȢ IJȘȜİȩȡĮıȘȢ ıIJȠȞ ʌȡȠıĮȡȝȠȖȑĮ
RF.
ȈȣȞįȑıIJİ IJȫȡĮ IJȘ ȝȠȞȐįĮ DIGI VOX mini Deluxe ıİ ȝȚĮ İȜİȪșİȡȘ USB 2.0 șȪȡĮ
ıIJȠȞ ȣʌȠȜȠȖȚıIJȒ ıĮȢ.
3. ǼȚıȐȖİIJİIJȠ CD ȜȠȖȚıȝȚțȠȪ IJȠȣ DIGI VOX mini Deluxe ıIJȘ ȝȠȞȐįĮ CD-ROM IJȠȣ
ȣʌȠȜȠȖȚıIJȒ ıĮȢ.
4. ȀȐȞIJİ țȜȚț ıIJȠ Įʌȩ IJȠ
ȝİȞȠȪ İȖțĮIJȐıIJĮıȘȢ ıIJȠ CD IJȠȣ
ʌȡȠȖȡȐȝȝĮIJȠȢ ȠįȒȖȘıȘȢ.ǹțȠȜȠȣșȒıIJİ IJȚȢ
ȠįȘȖȓİȢ ıIJȘȞ ȠșȩȞȘ.
Arcsoft TotalMedia

HRVATSKI
1. Prije instaliranja Vašega novoga pomagala TV Program, potrebno je u Vaš
operativni sustav instalirati DirectX 9.0c ili viši. Umetnite CD sa softverom TV
Program i instalacijski izbornik e se pokrenuti automatski. Zatim kliknite na
DirectX 9.0 i slijedite upute na ekranu.
Bilješka: Ako se Autostart program ne pojavi automatski, nakon umetanja
instalacijskogCD-a,kliknitenadugmeStart, a zatim Run… i upišite
D:\ (ako je D:\ oznaka za Vaš CD-ROM pogon).
Autorun.exe
Auto run.exe

HRVATSKI
2. Pove ite RF adapter na port za povezivanje koji se nalazi na stra njem dijelu
DIGI VOX mini Deluxe. Pove ite antenu s RF adapterom.
Sada spojiteDIGI VOX mini Deluxe na slobodan USB 2.0 port vašeg ra unala.
3. Nakon dizanja sustava, Windows XP automatski detektira prisutnost novoga
hardvera u sustavu i prikazuje prozor ‘Found New Hardware Wizard’
('Prona en novi hardver'). Ako to ve niste prije uradili, sada umetnite TV
Program instalacijski CD u Vaš CD-ROM pogon.
4. Na instalacijskom izborniku kliknite na
. Slijedite upute za
instaliranje softvera TV Program.
Arcsoft TotalMedia

EŠTINA
1. P ed instalací nové karty TV Program je t eba nainstalovat rozhraní DirectX
9.0c nebo vyšší pro pou ívaný opera ní systém. Po vlo ení disku CD se
softwarem pro kartu TV Program se automaticky zobrazí instala ní nabídka.
Zde klepn te na polo ku DirectX 9.0 a pokra ujte podle zobrazených pokyn .
Poznámka: Pokud se po vlo ení instala ního disku CD nespustí program
automatického spušt ní, klepn te na tla ítko Start , potom na p íkaz
Spustit… a zadejte umíst ní D:\ (jestli e D:\ je ozna ení
vaší jednotky CD-ROM).
Autorun.exe
Auto run.exe
Other manuals for DigiVOX mini
1
Table of contents
Languages:
Other MSI TV Tuner manuals

MSI
MSI TV anywhere Plus User manual

MSI
MSI Theater 550PRO User manual

MSI
MSI DIGIVOX mini Hybrid User manual

MSI
MSI Theater 650PRO User manual

MSI
MSI VOX II User manual

MSI
MSI Digital@nywhere-ATSC User manual

MSI
MSI Digi Vox UItimate HD User manual

MSI
MSI TV@nywhere A/D User manual

MSI
MSI DigiVox mini II V3.0 User manual

MSI
MSI TV@nywhere Duo User manual


