Much More Water BlueBox 450 RO User manual

Bluebox 450 RO
Operating manual

MuchMoreWater
BlueBox 450 Mobile Water Purification Unit
Content
Before using Bluebox 450.................................................................................................................... 3
Starting the Bluebox 450 – Electrical version. .................................................................................... 4
After using the BlueBox 450 – Electrical version ............................................................................... 6
Maintenance of Bluebox 450 ............................................................................................................... 7
Daily ................................................................................................................................................. 7
Every week ....................................................................................................................................... 8
Every month ..................................................................................................................................... 8
Membrane Cleaning ..................................................................................................................... 9
If any faults should occur… ............................................................................................................... 13
[IMPORTANT NOTE] ...................................................................................................................... 15

MuchMoreWater
Side 3 af 16
PART 1
Before using Bluebox 450
1. Connect the three coupling houses to the inlets and outlets located on the top,
longside of the BlueBox (see ill.). The hoses are marked with colours and the raw
water hose is of different size to avoid connecting it to the drinking water outlet by
accident.
Press red and blue ¾” hoses into the quick couplings. Follow the colour codes, red
sign red hose, blue sign, blue hose e.g.
2. Fill the black absorption tube with water and press the 1” hose into the quick
coupling (see ill.).
3. Affix the float filter as shown. The floating position can be adjusted with water. The
more water, the deeper it will sink.

MuchMoreWater
Side 4 af 16
PART 2
Starting the Bluebox 450 – Electrical version.
1. Connect the unit to a 230 V power supply (see ill.).
2. Before starting the pump make sure that the pressure valve is in open
position (see ill.). The Bluebox must not be started with pressure on, the
3 pre-filters might blast.
3. Switch on the black button to ON position.
4. Start the pump by pressing the green button (see ill.).
5. Let the pump run for 1-2 minutes until no more bubbles are detected from
the red hose.

MuchMoreWater
Side 5 af 16
6. Turn the pressure valve on the main block clockwise until the pressure
get to app. 8 bars. (see ill.).
7. Open the grey electricity box to check that the UV-indicators display
shows green light (see ill.).
8. Unclean water will come out of the red hose while drinking water can be
tapped from the blue hose. The volume of clean water per minute is
shown at the flow-meter.
Warning ! Never drink the water from the blue fresh-water tube
before the Bluebox 450 has been working for at least 5 minutes!!!!

MuchMoreWater
Side 6 af 16
PART 3
After using the BlueBox 450 – Electrical version
1. Carefully turn the blue pressure regulating handle on the main block
counter-clockwise until the pressure reads 0 bars (see ill.).
2. Let the Bluebox work 1 minute without pressure.
3. Press on the red button (see ill.).
4. Switch off the black button to OFF position.
Never stop the Bluebox with pressure on.

MuchMoreWater
Side 7 af 16
PART 4
Maintenance of Bluebox 450
Daily
1. Cleaning of the float-filter:
Screw off the red balloon and plastic top. Remove
the nylon and metal filters. Rinse them in clean
water with a brush. Affix the filter and check that
the crude filter is placed on top (see ill.).
2. Cleaning of the three pre-filters:
a) Screw off the three particle filter housings using
the admitted key to avoid damage on the
houses. (See ill.).
b) Remove the filter from the particle filter housings and rinse both the
housings and the filters with clean water (see ill.).
The filters must not be wrought or squeezed to get remaining water
out.
3. Reinstall the filters in the pipes and screw them into the sockets.

MuchMoreWater
Side 8 af 16
4. The filters should be changed when plant pressure is becoming too high or
when they are judged to being too dirty. Max. 6 months operating time..
5. Filers on the front of the electric box; these filters have to be cleaned from
dust e.g. every day.
6. The filters on the electric box have to be changed every month.
Every week
Lubrication of the pump
The pump is lubricated with grease at the point where the arrow marked
“grease” (see ill.). Remove the black plugs on the front of the Bluebox, to
reach the grease point. Be generous (3-4 good squeezes with the grease
tool; the pump cannot get too much grease. Some grease might run out of
the pump if it is full, but this is not damaging to the pump or the purifier.
Every month
Maintenance routines:
oCheck that all the connections and clamps are tightened.
oTighten front filters, RO filters and UV-light bulb.
oCheck that the drainage pipes in the container are not blocked.
oCheck all hoses for holes, tears and other breaches of water-tightness.
oCheck the pump’s membrane (ONLY if there is water leaking out of the small
hole at the bottom of the pump, the membrane is not watertight and must be
changed.

MuchMoreWater
Side 9 af 16
Membrane Cleaning
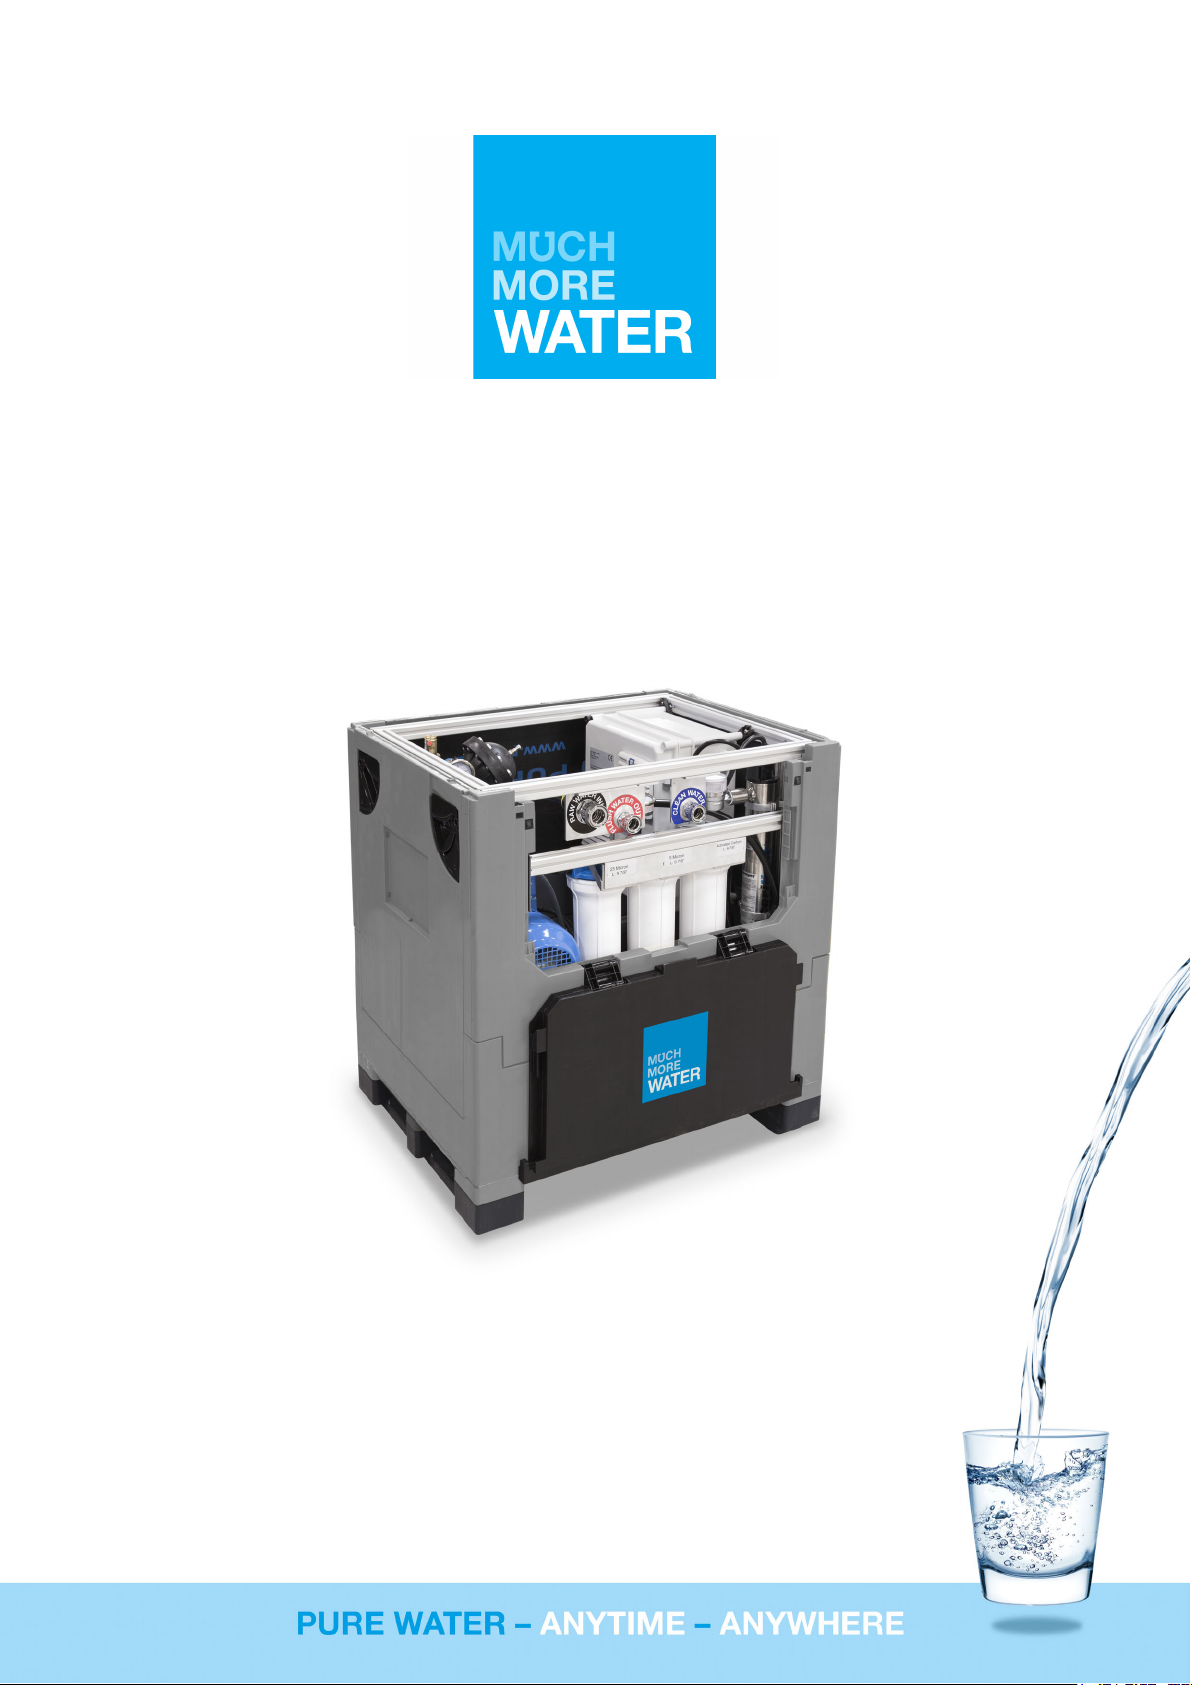
To make sure that the prescribed cleaning fluids are working
correctly, the system must be run with and without pressure,
which means that the blue handle at the main block (see ill.) are
in open position and then turned to closed position.
For cleaning, a clean tank with a capacity of approx. 50 litres must be
used.
Cleaning procedure with Sodium Hydroxide and Nitric Acid
(e.g. Divos 116 and Divos 2)
1. On screw the pre-filters and pull the inside out. Screw the filter
housings on again without the filters in.
2. Pre-rinse with clean water for 10 minutes.
3. Alkali cleaning (DIVOS 116)
Dilute 0.25 liter DIVOS 116 with 50 litres of water in the tank.
Start Bluebox 450 and let the system rinse without pressure
(blue handle in open position = “pressure off”) for 10 minutes.
After that the blue handle are turned to “Pressure on” and the Bluebox 450 must
work at this setting for 30 minutes at 8 bar’s pressure.
4. The system must now rinse with clean water for 10 minutes without pressure, and
then 10 minutes at 8 bar’s pressure.
5. Acid Cleaning (DIVOS 2)
Dilute 0.5 liter DIVOS 2 with 50 litres of water in the tank. Start the Bluebox 450 and
let the system rinse without pressure (blue handle in open pressure = “pressure off”)
for 10 minutes. After that the handles are turned to “Pressure on” and the Bluebox
450 must work at this setting for 30 minutes at 8 bar’s pressure.
6. After 30 minutes have passed, the tubes are placed in the tank, which is now filled
with clean water, and the system has to run for 15 minutes in “Pressure of”. After
that let the pump run for 15 minutes with the blue handle turned to “pressure on” so
that Bluebox 450 is rinsed all the way through.
7. When the cleaning process is finished, it is advisable to place the external hoses in
fresh water and let the Bluebox 450 run for approx. 10 minutes with the blue handle
in the position “Pressure on”.
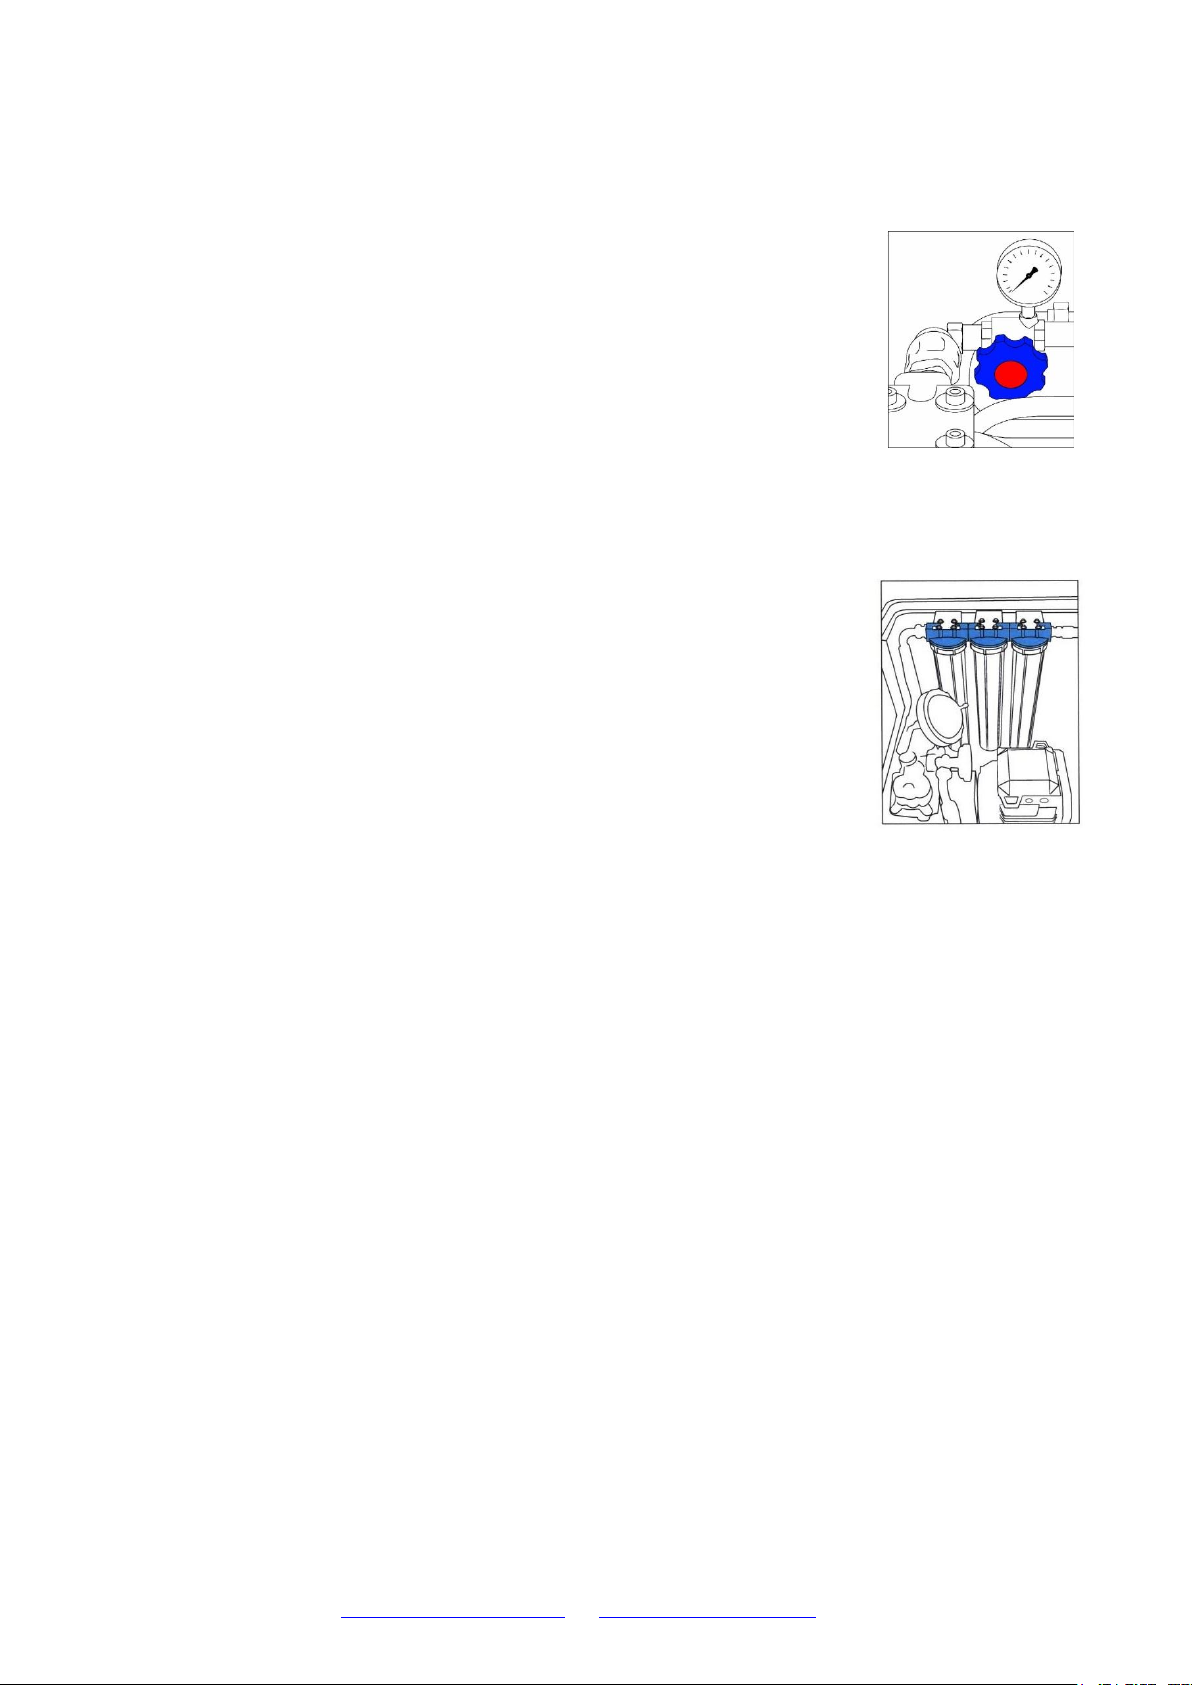
8. When the cleaning is finished, the system is closed down as described in “Part III –
After using Bluebox 450” (see ill.) and the 3 front-filters has to be changed (see ill.).

MuchMoreWater
Side 10 af 16
9. After more than 14 days of standstill and before storing, the Bluebox 450 must
undergo a complete cleaning process as described above.
Cleaning Procedure with RoClean products
The RO plant is organically or biologically fouled and requires cleaning. Avista
Technologies recommend cleaning with low pH then high pH cleaners RoClean P303 and
RoClean P111. This stepwise approach has been found to give good results in the past
with each wash reaching deeper layers of the foulant.
Caution
When cleaning with low pH first it should be certain that no hydrocarbon fouling can have
occurred on the membranes. If in doubt reverse the order of cleaner application and start
with the high pH clean.
All cleaning procedures should be carried out within the membrane manufacturers’
guidelines which in this case are:
DO NOT EXCEED
LIMIT
Cleaning Temperature
45oC
Cleaning pH (not below lower or above upper)
2 – 11
Cleaning Flowrate
9-10 m3/hr/8” pressure vessel
Cleaning differential pressure (MAX)
65 psi (6 element vessel)
Each array of membranes should be cleaned in parallel and the production of permeate
should be minimised by keeping the differential pressure low. The permeate lines should
be kept slightly open to prevent backpressure damage.
We would additionally recommend that the differential pressure should not exceed 40psi
during recirculation and that temperature should be raised as close to the membrane
temperature limit as practical to achieve the most efficient clean possible. This is most
important for the alkaline clean.
The following procedure should be repeated for each bank of membranes to be cleaned.
Detailed Cleaning Procedure
Flush Train
The train to be cleaned should be shut down and flushed with dechlorinated potable water
until the brine and feed conductivities are within 10% of each other (approx. 10 minutes).
Acidic Wash
A 2% w/v solution of RoClean P303 should be made up by adding 1kg of RoClean P303
per 50 litres of heated potable water. The water should be heated to a minimum of 15oC
and a maximum of 45oC. The total volume of cleaning solution required should be detailed
in your Operating and Maintenance manual.

MuchMoreWater
Side 11 af 16
Once the solution is mixed and the pH has been verified to be 2.5>pH<3.5 introduce the
cleaning solution to the (feed/brine side of the) plant at a low flow and displace the flushing
water to drain before diverting the flow to the CIP tank. Keep the cleaning fluid in contact
with the membranes for a total of 2 hours stopping and starting the recirculation pump
every 15 minutes to allow deep soaking and scouring action on the foulant layer. The
recirculation flow should be increased to the point where the differential pressure reaches
40psi or where the flow reaches 10 m3/hr/pressure vessel.
Note the pH, temperature, differential pressure, flowrate and any discolouration/changes to
the cleaning solution on a half hourly basis as before.
At the end of this period pump the solution out of the system and drain down to remove as
much solution as possible.
Flush out Remaining Acidic Solution
Rinse out the cleaning tank and then fill it with un-chlorinated potable water. Rinse each
pressure vessel until the conductivity of the outlet is within 20% of the inlet.
Make Up High pH Cleaning Solution and Circulate It
A 2% w/v solution of RoClean P111 should be made up by adding 1kg of RoClean P111
per 50 litres of heated potable water. The water should be heated to a minimum of 30oC
and a maximum of 45oC and it should be confirmed that the pH of the solution is between
10>pH<11.
Introduce the cleaning solution to the (feed/brine side of the) plant at a low flow and
displace the flushing water to drain before diverting the flow to the CIP tank. Keep the
cleaning fluid in contact with the membranes for a total of 2 hours stopping and starting the
recirculation pump every 15 minutes to allow deep soaking and scouring action on the
foulant layer. The recirculation flow should be increased to the point where the differential
pressure reaches 40psi or where the flow reaches 10 m3/hr/pressure vessel. The
permeate valve should be left (slightly) open to prevent any membrane damage.
Note the pH, temperature, differential pressure, flowrate and any discolouration/changes to
the cleaning solution on a half hourly basis.
At the end of this period pump the solution out of the system and drain down to remove as
much solution as possible.
Flush out Remaining Alkaline Solution
Rinse out the cleaning tank and then fill it with un-chlorinated potable water. Rinse each
pressure vessel until the conductivity of the outlet is within 20% of the inlet.
Restart the Plant

MuchMoreWater
Side 12 af 16
Return the plant to operating mode and start up the unit. Allow the unit to settle down for
an hour and take a set of readings.
The feed pressure and differential pressure should have improved significantly but the
product quality might have drifted off slightly. The quality will be expected to improve over
the next 24 hours as the membranes tighten up again after high pH cleaning.

MuchMoreWater
Side 13 af 16
If any faults should occur…
Symptom Reason Solution
Pump cannot Float-filter is clogged. Dismantle red float and clean net-filters
produce any with brush (see ill. On page 5)
pressure.
Absorption tube is Dismantle black absorption hose and fill
not filled with water. with water (see ill.).
Contra vent in ab- Take apart contra vent and clean inside.
sorption tube is
stuck.
Membranes in pump Pump is dismantled by loosing the bolts -
are defective. membranes are loosened and changed
(see ill.)
Vent valves in pump Pump is dismantled by loosening bolts
Are defective or and vents are cleaned or changed (see
clogged. ill.).
The pump is letting Tubes are tightened on absorption side
in air. on pump.
Clean water Check reasons in Check solutions in pump section.
capacity falls pump section.
The system must Follow the cleaning guide.
undergo a cleaning (see Part 5, “Every month”).
process.
The system is not Adjust work pressure to 8 bar (see ill.)
working at normal and check that the manometer on main-
work pressure. block shows 8 bar.
The lifting height The lifting height must be reduced to
(max. 6 meters) has under 6 meters.
been exceeded.
Clean water tube is Make sure that there is free passage
blocked or clogged in the blue clean water hose and that the
flow meter are not clogged by obstacles.

MuchMoreWater
Side 14 af 16
UV-light bulb Plug for light is not
gives no light connected.
UV-light bulb is not
Defective bulb.
Transformer is
defective.
Plug in lights.
Dismantle UV-housing and tighten bulb
screwed tight in its
socket.
Change bulb and check whether light
housing is tight (avoid looking directly at
UV-light for more than a couple of
seconds).
Change transformer, please contact
MuchMoreWater A/S or your local
distributor for further assistance
There is water Defective membrane- Change membrane- or membranes
coming out from the or membranes. (See ill.).
bottom of the pump

MuchMoreWater
Side 15 af 16
IMPORTANT NOTE
Please be aware of the following:
Make sure that the electricity supply is stable.
The Reverse Osmosis membranes (RO filters) in the Bluebox system normally have to be
changed every 2 years depending on the working hours and quality of feed water.
Please do not place the system in directly sunlight. Heat may affect the electronics in the
switch board box.
As the UV-light contains glass, the system must not be affected by hard shock.
The system must be free of dust and dirt.
The system must not be exposed for frost. Temperatures below 0 (zero) degrees Celsius can
ruin the R/O membranes. E.g. during a long-haul flight, the Bluebox should be started with
low pressure for a while in order to defrost the membranes without damaging them. For long
term storage in freezing temperatures, please contact www.MuchMoreWater.com
As an industrial standard for Reverse Osmosis, membranes output decreases with
temperature of raw water. (3% reduction per 1 degree C measured from 25 degree C)
Beware of silt and/or humus in raw water. They will both eventually spoil the R/O
membranes, since very small “plates” from humus or silt will fill up the membranes over
time. The only way to deal with this is to install an improved pre-filtration system.

Table of contents
Other Much More Water Water Filtration System manuals
Popular Water Filtration System manuals by other brands

Jandy
Jandy JS Series Installation and operation manual

CWS
CWS 82C user manual

Lakos
Lakos ILB installation guide

ClimaRad
ClimaRad Care H1C Additional Installation, Operation and Maintenance Instructions

Everpure
Everpure High Flow CSR Twin-MC2 Installation and operation guide

Velcon
Velcon VF-61 Installation instruction

AEM
AEM EASY DRUM manual

FSA
FSA GT1-26-5 quick start guide

Moen
Moen MicroTech 9000 Replacement instructions

WilTec
WilTec Naturewater 51098 instruction manual

Culligan
Culligan Smart Controller HE DF 12 Installation, Operation, and Service Instructions with Parts Lists

Watts
Watts Mueller 791 Installation, operation and maintenance manual