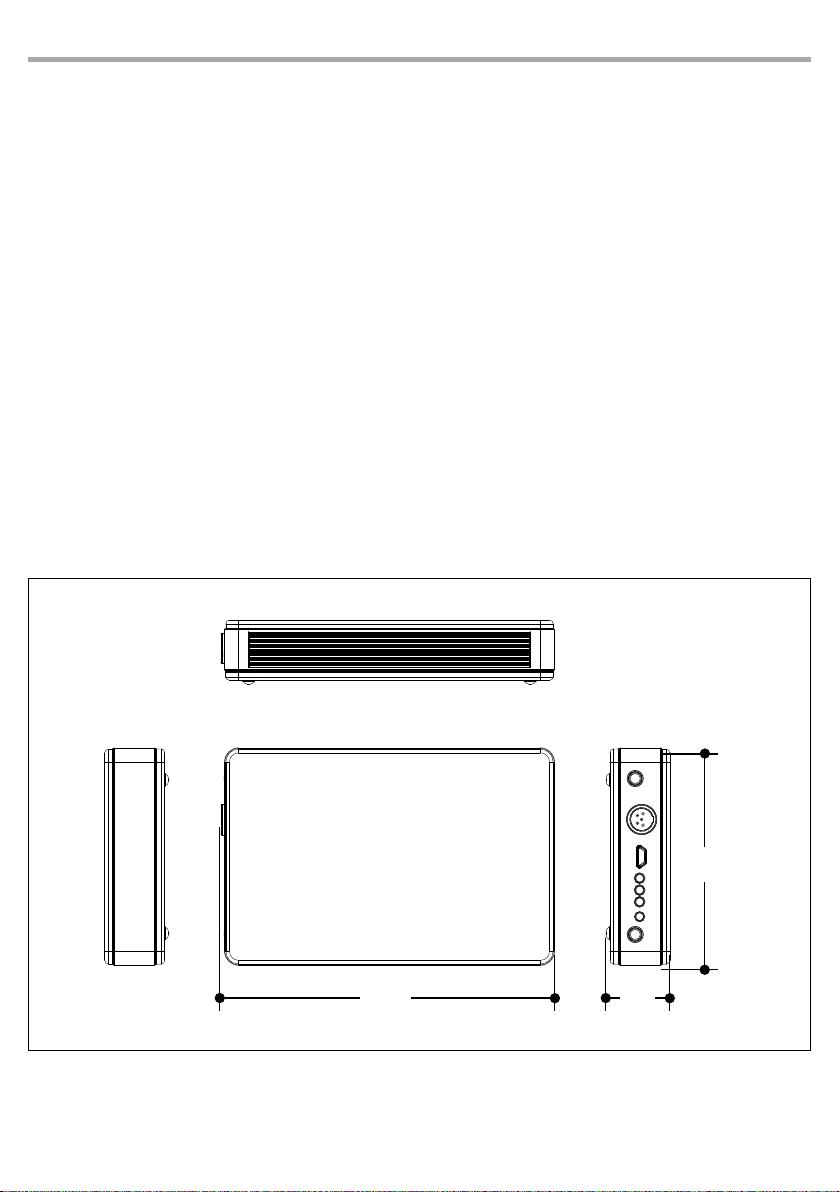
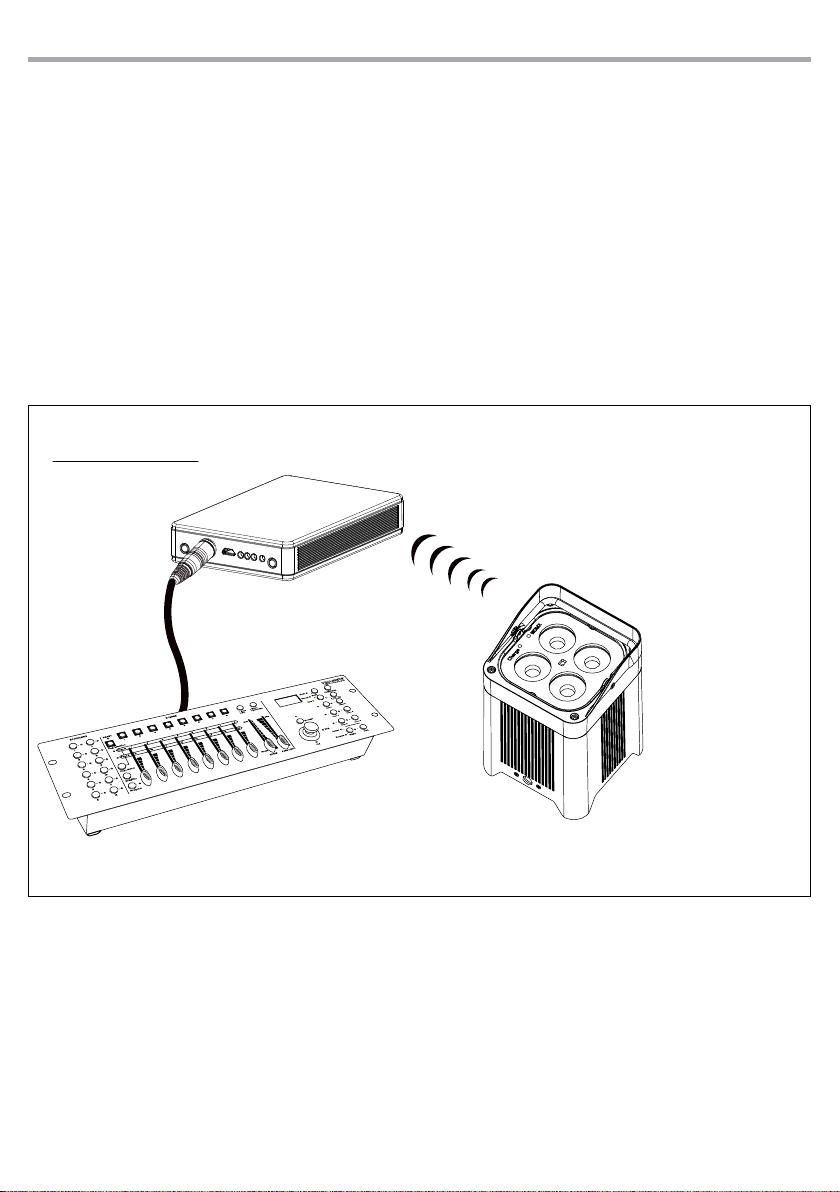
Music & Lights ProLights WDBBOX User manual

USER MANUAL
MANUALE UTENTE
EN - IT
WIRELESS TRANSMITTER
WDBBOX

WDBBOX
2
All rights reserved by Music & Lights S.r.l. No part of this instruction manual may be
reproduced in any form or by any means for any commercial use.
In order to improve the quality of products, Music&Lights S.r.l. reserves the right to modify
the characteristics stated in this instruction manual at any time and without prior notice.
All revisions and updates are available in the‘manuals’section on site www.musiclights.it
REV. 02-12/19

1
WDBBOX
Packing content • WDBBOX
• External power supply
• USB cable
• 5 pin DMX connector
• User manual
TABLE OF CONTENTS Safety
General instructions
Warnings and installation precautions
1 Introduction
1. 1 Description
1. 2 Technical specications
1. 3 Operating elements and connections
2 Functions and settings
2. 1 Operation
2. 2 Menu structure
2. 3 Recharge process
2. 4 Conguration
2. 5 Operation transmitter with DMX input
2. 6 Operation transmitter with WIFI input
2. 7 Connection of the DMX line
2. 8 Construction of the DMX termination
3 Maintenance
3. 1 Maintenance and cleaning the uni
Guidelines for lithium batteries devices
2
2
3
3
4
5
5
5
6
6
6
10
10
11
12

WDBBOX
2
WARNING! Before carrying out any operations with the unit, carefully read this instruction
manual and keep it with cure for future reference. It contains important information about
the installation, usage and maintenance of the unit.
SAFETY
General instruction
• The products referred to in this manual conform to the European Community Directives and are there-
fore marked with .
• The unit is supplied with hazardous voltage. Leave servicing to skilled personnel only. Never make any
modications on the unit not described in this instruction manual, otherwise you will risk an electric
shock.
• This device falls under PROTECTION CLASS III. It has to be always operated with an appropriate trans-
former. From time to time check the device, the power cord and transformer. Make sure that the trans-
former is the correct type, the one stated on the rear panel.
• The connection to the main network of electric distribution must be carried out by a qualied electrical
installer. Check that the main frequency and voltage correspond to those for which the unit is designed
as given on the electrical data label.
• This unit is not for home use, only professional applications.
• Never use the xture under the following conditions:
- in places subject to excessive humidity
- in places subject to vibrations or bumps;
- in places with a temperature of over 40°C.
• Make certain that no inammable liquids, water or metal objects enter the xture.
• Do not dismantle or modify the xture.
• All work must always be carried out by qualied technical personnel. Contact the nearest sales point for
an inspection or contact the manufacturer directly.
• If the unit is to be put out of operation denitively, take it to a local recycling
plant for a disposal which is not harmful to the environment.
Warnings and installation precautions
• If this device will be operated in any way dierent to the one described in this manual, it may suer
damage and the guarantee becomes void. Furthermore, any other operation may lead to dangers like
short circuit, burns, electric shock, etc.
• Before starting any maintenance work or cleaning the device, cut o power from the main supply.
• Always additionally secure the device with the safety rope. When carrying out any work, always comply
scrupulously with all the regulations (particularly regarding safety) currently in force in the country in
which the xture’s being used.
• This product is for indoor use only.
• When selecting installation location, take into consideration access and routine maintenance and pro-
gramming purposes.
• Install the xture in a well ventilated place.
• Keep any inammable material at a safe distance from the xture.
• During periods of non-use completely disconnect the product from power by unplugging it.
• Don’t connect the device to a dimmer pack.

3
WDBBOX
- 1 - INTRODUCTION
1.1 DESCRIPTION
WDBBOX is a new-generation light control system, conceived to obtain an easy and versatile platform for
LED projectors. The signal transmission is managed wired and wireless (through Wi-Fi), both in input, even
allowing to control the Wireless Solution xturesthrough a smartphones applications “Smarcolors”, avail-
able for IOS and Android devices.
1.2 TECHNICAL SPECIFICATIONS
• Transmitter and receiver in a single compact unit
• Battery life: 8 hours
• Battery charging time. 8 hours
• Compatible with SmartColor App
• Max Unobstructed Distance: 200 m
• Signal Input: XLR 5p, Wi-Fi
• Signal Output: XLR 5p, Wi-Fi
• Power supply (included): Input 100-240V 50/60Hz, Output DC 5V, 1.6 A
• Weight: 0,250 kg
• Dimensions (WxHxD): 85x25x130 mm
Fig.1Technical drawing
130
85
25

WDBBOX
4
1.3 OPERATING ELEMENTS AND CONNECTIONS
Fig.2
1. WIRELESS RESET BUTTON for wireless device pairing
2. DMX (XLR a 5 poli):
1= mass, 2 = DMX -, 3 = DMX +, 4 N/C, 5 N/C
3. MICRO PORT USB to charge the battery
4. WI-FI PAIRING LED INDICATOR: blinks for 5 seconds after
pressing the WIRELESS RESET button, and then intermit-
tently while connected to the devices.
5. DMX LED SIGNAL
6. WI-FI LED SIGNAL
7. BATTERY LIFE LED INDICATOR
8. POWER BUTTON to turn the device on / o
12345 6 78
Rear panel

5
WDBBOX
- 2 - FUNCTION AND SETTINGS
2.1 OPERATION
To turn on the WDBBOX press the POWER button (if the battery is low, insert the plug of the power cord
into a 100-240V ~ / 50-60Hz mains socket). The unit is immediately ready for operation.
Switch o the unit using the same switch after use.
2.2 MENU STRUCTURE
FUNCTION DESCRIPTION
BUTTONS
1st button
WIRELESS RESET ðPress to initiate pairing with wireless devices.
2nd button
POWER ðPress 3s to turn the power on/o.
1st + 2nd button
WIRELESS
RESET+POWER
ðPress simultaneously to switch between wired DMX andWIFI
modes.
LED SIGNAL
Red/Greeen ð
Green: power is currently 50–100%
Orange: power is currently 25–50%
Red: power is currently less than 20%
Blue ð
Wi-Fi signal
On:wi signal reception
Flashing: no wi signal detected
Red ð
DMX signal:
On: DMX signal reception
Flashing: no DMX signal detected
Orange ð
Wireless pairing:
Press Reset wireless: the indicator blinks 5 seconds during the
association
2.3 RECHARGE PROCESS
To charge the WDBBOX, insert the plug of the power cord into a mains socket (100-240V ~ / 50 - 60Hz). The
LED will light up on the unit to indicate that the battery charging process is in progress.
NOTE
- Recharge the battery within 3 days from the last use;
- Recharge the battery fully before using this product;
- Recharge the battery at a temperature between 0 ° C and 35 ° C;
- During charging, keep away from open ames or heating elements;
- Do not charge the battery for more than 24 hours.
- Perform a complete discharge / recharge cycle every 3 months.

WDBBOX
6
2.4 CONFIGURATION
The WDBBOX can be used two ways:
• It can be connected to any DMX controller and transmit to compatible lights.
• It can be connected to any DMX lights and receive from compatible controller (g.5).
2.5 OPERATION TRANSMITTER WITH DMX INPUT
To congure the WDBBOX as a transmitting unit so that it can transmit the signal to the connected units,
as shown in gure 5, refer to the following procedure:
• Connect a DMX cable from the DMX output of the controller to the DMX input of the WDBBOX so that
it can transmit the signal to the connected units.
• Turn on all the units.
• Connect the WDBBOX to the power supply (if necessary).
NOTE - All the lights must be set to the channel shown on the unit’s display.
2.6 OPERATION TRANSMITTER WITH WIFI INPUT (SMARTCOLORS APP)
To congure the WDBBOX as a transmitting unit so that it can be connected to the light projectors, as
shown in gure 6, it is necessary to refer to the following procedure:
• Connect the projector to power.
• Turn on the projector.
• Turn on the WDBBOX transmitter.
• Connect the WDBBOX to the power supply (if necessary).
• Press the WDBBOX WIRELESS RESET and POWER buttons simultaneously, which will generate a Wi-Fi
network called “WIFI TEST”.
• Set the channel for wireless data communication with the projector, after which the device will connect
to the WDBBOX network.
Fig.5 - Example conguration
DMX Controller
TRANSMITTER
Example
Device with
Integrated
Receiver
DMX IN

7
WDBBOX
• Install the SmartColors app on your Android / Apple device.
• Connect your Android / Apple device to the“WIFI-TEST”wireless network
• Launch the installed SmartColors app, for remote control of the projector.
NOTE
• The projector must be equipped with Wi-.
• You can sync an unlimited amount of Receivers to one Transmitter.
• To ensure strong signals, the units should be elevated or higher o the ground and remain in an unob-
structed line of sight of each other.
WDBBOX
TRANSMITTER
Example
Device with
Integrated
Receiver
Fig.6 - Example conguration
Now we try to add an example of projector: the SMARTBATPLUS.

WDBBOX
8
• From the main screen press“SMARTBATPLUS”, then will appear a new setup screen
• Select the same DMX CHANNEL MODE set on SMARTBATPLUS device, turning the wheel “CHANNEL
MODE”
• Select the same DMX ADDRESS set on SMARTBATPLUS, turning the wheel“DMX ADDRESS”.
• Press (+) to add the SMARTBATPLUS in your controlled device list.

9
WDBBOX
• In the main screen will appear a symbol square with a red number“1”
• Click on the square with the number 1 in red to control SMARTBATPLUS

WDBBOX
10
Fig.7
Fig.8
2.7 CONNECTION OF THE DMX LINE
DMX connection employs standard XLR connectors. Use shielded pair-twisted cables with 120Ω imped-
ance and low capacity.
The following diagram shows the connection mode:
ATTENTION
The screened parts of the cable (sleeve) must never be connected to the system’s earth, as this would
cause faulty xture and controller operation.
Over long runs can be necessary to insert a DMX level matching amplier.
For those connections the use of balanced microphone cable is not recommended because it cannot
transmit control DMX data reliably.
• Connect the controller DMX input to the DMX output of the rst unit.
• Connect the DMX output to the DMX input of the following unit. Connect again the output to the input
of the following unit until all the units are connected in chain.
• When the signal cable has to run longer distance is recommended to insert a DMX termination on the
last unit.
2.8 CONSTRUCTION OF THE DMX TERMINATION
The termination avoids the risk of DMX 512 signals being reected back along the cable when they reach-
es the end of the line: under certain conditions and with certain cable lengths, this could cause them to
cancel the original signals.
The termination is prepared by soldering a 120Ω 1/4 W resistor between pins 2 and 3 of the 5-pin male XLR
connector, as shown in gure.
DMX - OUTPUT
XLR socket
DMX - INPUT
XLR plug
Pin1 : GND - Shield
Pin2 : - Negative
Pin3 : + Positive
Example:
5 pin XLR connector

11
WDBBOX
- 3 - MAINTENANCE
3.1 MAINTENANCE AND CLEANING THE UNIT
• Make sure the area below the installation place is free from unwanted persons during setup.
• All screws used for installing the device and any of its parts should be tightly fastened and should not
be corroded.
• Housings, xations and installation spots (ceiling, trusses, suspensions) should be totally free from any
deformation.
• The main cables must be in impeccable condition and should be replaced immediately even when a
small problem is detected.
Usage and environment are contributing factors in determining the cleaning frequency.
Cleaning the unit:
• Unplug the product.
• Clean all external surfaces with a mild solution of non-ammonia glass cleaner or isopropyl alcohol.
• Apply a solution directly to a soft, lint-free cotton cloth or a lens cleaning tissue.
NOTE - Do not open this product for cleaning or servicing.

WDBBOX
12
Guidelines for lithium batteries devices
Optimize battery performance
• Lithium batteries work optimally when used regularly.
Long periods of non-use, either with minimum or maximum charge, reduce battery eciency and
lifetime.
• Recharge batteries with its original device or with the supplied power supply, N.B. in cool and well-
ventilated environments.
• Do not use the device during charging operation.
• Promptly disconnect the power supply when the charge is complete. It is preferable not to complete
the recharge at 100%, you can also do partial recharge.
If you do not use the device for a long time
• Keep the charge at about 50%. For a good battery eciency, long periods of inactivity must be
avoided with the state of charge at minimum and maximum.
A battery too low, it could run out to the point of making a new recharge impossible.
A battery too full, it may decrease the standard operating autonomy.
• Keep the device in a cool and dry place.


REV. 02-12/19
Music & Lights S.r.l. si riserva ogni diritto di elaborazione in qualsiasi forma delle presenti istruzioni per l’uso.
La riproduzione - anche parziale - per propri scopi commerciali è vietata.
Al ne di migliorare la qualità dei prodotti, la Music&Lights S.r.l. si riserva la facoltà di modicare, in qualun-
que momento e senza preavviso, le speciche menzionate nel presente manuale di istruzioni.
Tutte le revisioni e gli aggiornamenti sono disponibili nella sezione 'Manuali' sul sito www.musiclights.it

3
WDBBOX
• WDBBOX
• Alimentatore
• Cavo USB
• Connettore DMX 5 pin
• Manuale utente
Contenuto dell'imballo:
INDICE Sicurezza
Avvertenze generali
Attenzioni e precauzioni per l’installazione
1 Introduzione
1. 1 Descrizione
1. 2 Speciche tecniche
1. 3 Elementi di comando e di collegamento
2 Funzioni e impostazioni
2. 1 Funzionamento
2. 2 Struttura menu
2. 3 Ricarica batteria
2. 4 Congurazione
2. 5 Modalità trasmettitore con DMX input
2. 6 Modalità trasmettitore con WIFI inputi
2. 7 Collegamenti della linea DMX
2. 8 Costruzione del terminatore DMX
3 Manutenzione
3. 1 Manutenzione e pulizia del prodotto
Guida all'uso di dispositivi con batteria al litio
4
4
5
5
6
7
7
7
8
8
8
12
12
13
14

WDBBOX
4
ATTENZIONE! Prima di effettuare qualsiasi operazione con l’unità, leggere con attenzione
questo manuale e conservarlo accuratamente per riferimenti futuri. Contiene informazioni
importanti riguardo l’installazione, l’uso e la manutenzione dell’unità.
SICUREZZA
Avvertenze generali
• I prodotti a cui questo manuale si riferisce sono conformi alle Direttive della Comunità Europea e per-
tanto recano la sigla .
• Il dispositivo funziona con pericolosa tensione di rete. Non intervenire mai al suo interno al di fuori
delle operazioni descritte nel presente manuale; esiste il pericolo di una scarica elettrica.
• Questo dispositivo appartiene alla Classe di protezione III, pertanto deve operare sempre con un ap-
propriato trasformatore di tensione. Controllare periodicamente l’unità, il cavo di alimentazione ed
il trasformatore. Assicurarsi che quest’ultimo sia della tipologia corretta, come indicato nel pannello
posteriore del dispositivo.
• Le operazioni di collegamento alla rete di distribuzione dell’energia elettrica devono essere eettuate
da un installatore elettrico qualicato.Vericare che frequenza e tensione della rete corrispondono alla
frequenza ed alla tensione per cui l’unità è predisposta, indicate sulla targhetta dei dati elettrici.
• L’unità non per uso domestico, solo per uso professionale.
• Evitare di utilizzare l’unità:
- in luoghi soggetti ad eccessiva umidità;
- in luoghi soggetti a vibrazioni, o a possibili urti;
- in luoghi a temperatura superiore ai 40°C.
• Evitare che nell’unità penetrino liquidi inammabili, acqua o oggetti metallici.
• Non smontare e non apportare modiche all’unità.
• Tutti gli interventi devono essere sempre e solo eettuati da personale tecnico qualicato. Rivolgersi al
più vicino centro di assistenza tecnica autorizzato.
• Se si desidera eliminare il dispositivo denitivamente, consegnarlo
per lo smaltimento ad un’istituzione locale per il riciclaggio.
Attenzioni e precauzioni per l’installazione
• Se il dispositivo dovesse trovarsi ad operare in condizioni dierenti da quelle descritte nel presente
manuale, potrebbero vericarsi dei danni; in tal caso la garanzia verrebbe a decadere. Inoltre, ogni altra
operazione potrebbe provocare cortocircuiti, incendi, scosse elettriche, rotture etc.
• Prima di iniziare qualsiasi operazione di manutenzione o pulizia sull’unità togliere la tensione dalla rete
di alimentazione.
• Per l’installazione in sospensione è assolutamente necessario proteggere l’unità per mezzo di una fune
di sicurezza. Nell’eseguire qualsiasi intervento attenersi scrupolosamente a tutte le normative (in mate-
ria di sicurezza) vigenti nel paese di utilizzo.
• Questo prodotto è solo per uso interno.
• Quando si sceglie il luogo di installazione considerare la possibilità di facile accesso all’ unità per la
manutenzione ordinaria e il settaggio.
• Installare l’unità in un luogo ben ventilato.
• Mantenere i materiali inammabili ad una distanza di sicurezza dall’unità.
• Durante i periodi di non utilizzo scollegare completamente il prodotto dalla rete tramite staccando la
spina.
• Non collegare il prodotto a un dimmer pack.

5
WDBBOX
- 1 - INTRODUZIONE
1.1 DESCRIZIONE
WDBBOX è un dispositivo di controllo di nuova concezione ideato per avere una gestione versatile ed im-
mediata per proiettori LED. La trasmissione del segnale avviene tramite cavo e Wireless via Wi-Fi, entrambi
in ingresso, permettendo di poter controllare in remoto i proiettori Wireless Solution attraverso l’applica-
zione SmartColors, disponibile sia per dispositivi Android che IOS.
1.2 SPECIFICHE TECNICHE
• Trasmettitore e ricevitore in un unico e compatto dispositivo
• Autonomia batteria: 8 ore
• Tempo di ricarica della batteria. 8 ore
• Compatibile con SmartColors app
• Massima distanza di funzionamento: 200 m
• Signal d’ingresso: XLR 5p, Wi-Fi
• Signal d’uscita: XLR 5p, Wi-Fi
• Alimentatore (incluso): Ingresso 100-240V 50/60Hz, Uscita DC 5V, 1.6 A
• Peso: 0,250 kg
• Dimensioni (LxAxP): 85x25x130 mm
Fig.1Disegno tecnico
130
85
25

WDBBOX
6
1.3 ELEMENTI DI COMANDO E DI COLLEGAMENTO
Fig.2
1. TASTO WIRELESS RESET per accoppiamento dispositivo
wireless
2. DMX (XLR a 5 poli):
1= massa, 2 = DMX -, 3 = DMX +, 4 N/C, 5 N/C
3. MICRO PORTA USB per caricare la batteria
4. INDICATORE LED ACCOPPIAMENTO WI-FI: lampeggia per
5 secondi dopo aver premuto il tasto WIRELESS RESET, e
quindi a intermittanza mentre è collegato coi dispositivi.
5. INDICATORE LED DMX
6. INDICATORE LED WI-FI
7. INDICATORE LED DURATA DELLA BATTERIA
8. TASTO POWER per accendere/spegnere il dispositivo
12345 6 78
Pannello posteriore
Table of contents
Languages:
Other Music & Lights Lighting Equipment manuals