Musicmakers MOUNTAIN BANJO KIT User manual

MOUNTAIN BANJO KIT
Assembly Instructions
Updated April 2019
1 Textured Plastic Skin Head
1 Wood Tone Ring
1 Set of 5 Banjo Strings, Loop-end
7 Pearl Marking Dots, 1/4” dia.
48” Fretwire
4 Planetary Banjo Tuners (straight)
1 Tuner for 5th String
1 Blackwood Nut
1 Needle File
1 Bridge, 5/8”
1 Slotted Screw for 5th String
5 Escutcheon Tail Pins
3 Drill bits, 1/16”, 1/4”, & 3/8”
3 Tiny Nails
1 Leather Scrap, 3/4” X 1-1/2”
9 Wood Screws, #8 X 1-1/2”
7 Hex Drive Cap Screws, #10-24 X 3/4”
1 Hex Drive Cap Screw, #10-24 X 1-1/4”
1 Washer, #8
8 T-Nuts, #10-24 (installed in Back Ring)
1 Allen Wrench, 5/32”
1 Hardwood Driving Block
1 Double-Action Truss Rod, 18”
1 Truss Rod Cover w/3 screws
1 Assembly Instructions
HARDWARE
a) Main Body
b) Back Ring
c) Neck w/peghead
d) Fretboard
WOOD PARTS
A
B
C
D
Musicmakers
14525 61st ST CT N
Stillwater, MN 55082

651-439-91202
BEFORE YOU BEGIN
Inventory and inspect all your parts careful. If anything is miss-
ing or defective, please call or email right away.
_____A.
_____B. It is a good idea to read through the entire assembly instructions before you start, just to get
an overview of the project.
651-439-9120
INFO@HARPKIT.COM
p
A NOTE ABOUT GLUE
We strongly recommend that you use a common woodworking glue like Elmer’s Carpenter’s
Wood Glue or Titebond because they hold the parts more securely than most other
adhesives, and they are inexpensive and easy to use. DO NOT assemble the wood parts
of this project with 5-minute epoxy or super-glue or hot melt glue. The yellow colored
Elmer’s or Titebond is best.
When gluing parts together, be sure to put enough glue on the joint to wet the entire
surfaces to be joined. A good sign of proper gluing is that a little excess will squeeze out
around the joint when clamping pressure is applied. Too little glue may cause the parts
to separate later, whereas too much glue makes things messy. Always keep a damp rag
handy for quick cleanup, as necessary. It is especially helpful to keep your fingers clean
while gluing, because gluey fingerprints have the embarrassing tendency to appear on the
finished product in prominent places.
ASSEMBLY INSTRUCTIONS
INSTALL MARKING DOTS
(OPTIONAL)
____1. Find the center point at each end of the tapered fretboard
and draw a straight line down the front face to use as your
centerline for locating the marking dots. (fig. 1)
A typical banjo would have marking dots before frets 3, 5, 7,
10, 12, and 17. (fig.1)
Make a punch mark on your center line between the frets to
mark the location of the marking dots. Use a sharp (new) 1/4”
drill bit to bore shallow holes where you made your punch
marks. (fig. 2)
FIG. 1
FIG. 2
pIf you want to install any marking dots on a FRETLESS fingerboard, you’ll want to install
them exactly where the fret would be. Use our free FRET CALCULATOR online and use
25.4” (or 645mm) as the scale length - www.harpkit.com/fret-calculator

ww.harpkit.com 3
____2.
____4.
____3.
Use 5-minute epoxy or medium Superglue to glue the pearl dots into the wood. Press them
down until flush if the hole is deep enough. If not, you can sand them flush after the glue dries.
Start with 100 grit sandpaper, and finish off with about 180 grit, using a flat sanding block to
keep the playing surface flat. Be sure to sand off any excess glue residue too.
If you have a fretted banjo kit, you can install the frets
now, before gluing the fretboard in place. You’ll want
your fretboard on sturdy, solid workbench.
INSTALLING THE FRETS
SHAPING THE PEGHEAD
FIG. 3
Hold the end of wire over the slot in the fretboard, so
the end hangs over the edge of the wood just 1/16” or
so. Position the fretwire so that the ‘tang” will be driv-
en down in the fret slots (fig. 3).
Use a hammer to lightly tap the fretwire into the slot,
until the crown of the fret contacts the wood sur-
face. Your fretwire may be slightly curved, but it will
straighten as you tap it in.
FIG. 4
Clip off the excess wire close to the edges. Then use a
flat mill file to file the ends flush and smooth with the
wood. A belt sander also works well for smoothing the
ends of the fretwire -- it is soft metal, so it sands nicely
on a power sander.
Then angle the file (or sander) to put a 45 degree bevel on each end. Be sure to file with down-
ward motions only, lest you lift a fret back out of its slot.
FIG. 5
The peghead can be shaped to suit your taste. This is a nice opportunity to customize the
instrument and make it fancy. You’ll find a few templates adapted from some tradition designs
on page 15. You can use one these, draw your own, or look for more inspiration on the internet.
pWhen shaping the peghead, be sure to keep enough room to install the tuners and the
truss rod cover.

651-439-91204
____6.
____7.
____5. Install the double-action truss rod into the slot of the
neck, as shown. (fig. 6) Be sure to orient the barrel nut
toward the peghead, and down against the bottom of
the slot!
Press the truss rod into the slot until it is firmly seated.
Note that the truss rod works both directions, depend-
ing on which way you turn the nut. One way will put
a hump in the middle and the other way will bend the
ends upward. This allows you to correct for either type
of curve in the neck after the instrument is assembled.
INSTALL THE TRUSS ROD
INSTALL THE FRETBOARD
FIG. 6
FIG. 7
Prepare for installing the fretboard by test-fit-
ting it dry to see how it will be oriented on the
neck. Leave room near the peghead for the
blackwood “nut” to stand on the flat surface,
just before the taper of the peghead, as shown
here. The fretboard will butt up against the
nut, and the purpose of the nut will be to hold
the strings at the correct spacing and height
above the frets.
Use a pencil to mark where the fretboard
should end next to the nut. (fig. 7)
Before gluing the fretboard in place, it really helps to install
a couple of tiny “burrs” into the neck to help prevent the
fretboard from sliding out of position as you apply clamp-
ing pressure. Find the tiny nails in the hardware pack and
tap one near the peghead and the other near the heel of
the neck. (figs. 8 and 9) No need to drive them very deep.
Clip each nail close to the wood surface, leaving a small
sharp burr sticking up. (fig. 10)
Position the fretboard carefully on the neck and press it
down against the burr at each end so the underside of the
fretboard becomes dented by the burrs.
FIG. 8
FIG. 9
FIG. 10

ww.harpkit.com 5
____8. Gather a few clamps, a flat scrapwood clamping block, and some padding material. (fig. 11)
The type of clamp doesn’t matter so much (spring clamps, c-clamps, cam clamps, etc.) Just
don’t rely on weights to do the job because you cannot adjust pressure where you need it with
weights.
For padding, we use strips of heavy foam rubber from an old floor mat, but you can cut strips
of leather, terrycloth toweling, or carpet pad instead.
FIG. 11
Make a dry run first, without
glue, just to set the clamps to
the right gap for each position,
and to make sure the fretboard
can be quickly re-positioned
after the glue is applied.
clamping block
padding
more padding
Clamps
p
When satisfied with your system,
spread glue on the top of the neck
and place the fretboard on it, mak-
ing sure the burrs fall into the div-
ots made earlier. Clamp the whole
length of the fretboard, making
sure a little glue squeezes out along
the entire length on both sides.
You don’t want to have any gaps
between the fretboard and neck.
Use a wet towel to clean up excess
glue before it dries. (fig. 12)
____10.
____9. FIG. 12
FIG. 13
FIG. 14
When the fretboard is dry, remove the clamps and begin
shaping the back of the neck to suit your grip. We have only
done basic rounding for you. When we finish off this banjo,
we like to alter the profile as shown at right. Do this with
coarse sanding blocks, rasps, and/or scrapers until you are
happy with the shape. Be careful to keep the overall thick-
ness at least 1”, including the fretboard. (fig. 13)
CAUTION: Don’t sand the tang at the end of the neck.
That has been carefully fitted to the hole in the body
already, so it should not need sanding.
p

651-439-91206
____11.
____12.
p
p
The wide end of your fretboard is square, and it may extend a little beyond the supporting
part of the neck. This is fine, as it will not interfere with the body, but you may sand a curve to
match the end of the neck if you wish. You may also scallop the topside to give more strum-
ming space under the strings at that end. You’ll need a drum sander for those curves.
Use the same pattern that you used for cutting the peghead shape to mark the location of the
tuning machines on the peghead. Use the 1/16” bit to drill a guide hole. Be sure to drill these
holes perpendicular to the peghead.
Now use the 3/8” bit to drill out the holes to the correct size but PLEASE - take care to test the
hole size in a piece of scrap wood first. Our tuner stock can vary and may require a different
size bit.
Using a wood backing underneath the peghead will help prevent tearout.
If you went off the deep end and designed something wild and crazy, then we suggest making a
paper outline of it and drawing the string lines up from the nut to see where you want to place
the tuning pegs.
Now you are ready for final sanding. Take your time to scrub out machining marks and remove
glue residue from all the areas that will be visible on the finished instrument. Use 60 or 80 grit
sandpaper for heavy shaping, but then switch to 100 or 120 grit to smooth the surfaces more,
and then move to 180 grit for finer smoothing. This will prepare the instrument for finishing.
A random orbital sander will hasten this process dramatically!
NOTE: It is smart to keep the back ring screwed to the main body while sanding, so you
smooth and shape the outside of those parts equally.
OPTIONAL: If you want to decorate the body of your banjo, this would be a good time to do
that work. Some people enjoy carving solid wood like this, and others like decorating with a
woodburning tool. Another nice option is to install inlay around the body. If you want to add
painted decorations, we recommend sealing the wood with one clear coat first, then sand it
smooth before applying the decorative paints. Further clear coats will seal in the decorations.
STAINS or DYES -- These are coloring agents and should only be used if you want to change
the natural color of the wood. We usually do not apply stains to our projects, especially when
they are made with naturally beautiful hardwoods such as cherry or walnut. These woods
look best with a clear finish. But, if you want to color the wood, your staining should be accom-
plished before applying a surface finish such as oil, varnish, or lacquer.
GENERAL FINISHING GUIDELINES
DRILL THE FOUR HOLES FOR THE TUNING MACHINES
FINAL SANDING
Mask off the top playing surface of the fretboard with masking tape. It is best to avoid
putting varnish or lacquer on this playing surface. After finishing the rest of the instrument,
you can remove the masking tape and lightly oil the fretboard with linseed oil, or just leave
it unfinished (that wood has natural oils for protection).

ww.harpkit.com 7
p
SUGGESTION: As you are applying the first coat of finish, watch carefully for glue residue
that prevents the finish from penetrating the wood. Take the time to sand or scrape the
glue off, before proceeding further with the finish. Scraping a sharp chisel across the
area usually does the trick without adding deep scratches in the surface. Yes, this can get
messy, but you’ll be glad you took the time to do it. Nothing looks more amateurish than a
woodworking project with glue spots still showing.
OIL or WAX -- Oil finishes will give your wood a low luster appearance, bringing out the nat-
ural color of the grain, but it tends to soak into the wood and appear dry and “thirsty” after
awhile. Some people are fond of a beeswax finish for a natural look, but it can show water
spots if it gets wet, so you may end up needing to re-wax or touch up the surface in the future.
POLYURETHANE VARNISH -- Any regular varnish will work fine on this project, but we
think a wipe-on polyurethane is the easiest to apply because it does not drip or sag -- just wipe
on a thin coat and wipe off the excess. The advantages of this finish are its simple application,
minimal odor, good durability, and deep, soft luster.
LACQUER -- Many professional instrument makers use lacquer for their finish. The most
readily available lacquer is called Deft Clear Wood Finish. It is best to purchase a can of liquid
to brush on as a sealer coat first, and then use an aerosol can of the same product to spray on
the final coats. The advantage of this finish is its quick drying time, but the disadvantage is the
strong odor of the toxic lacquer fumes.
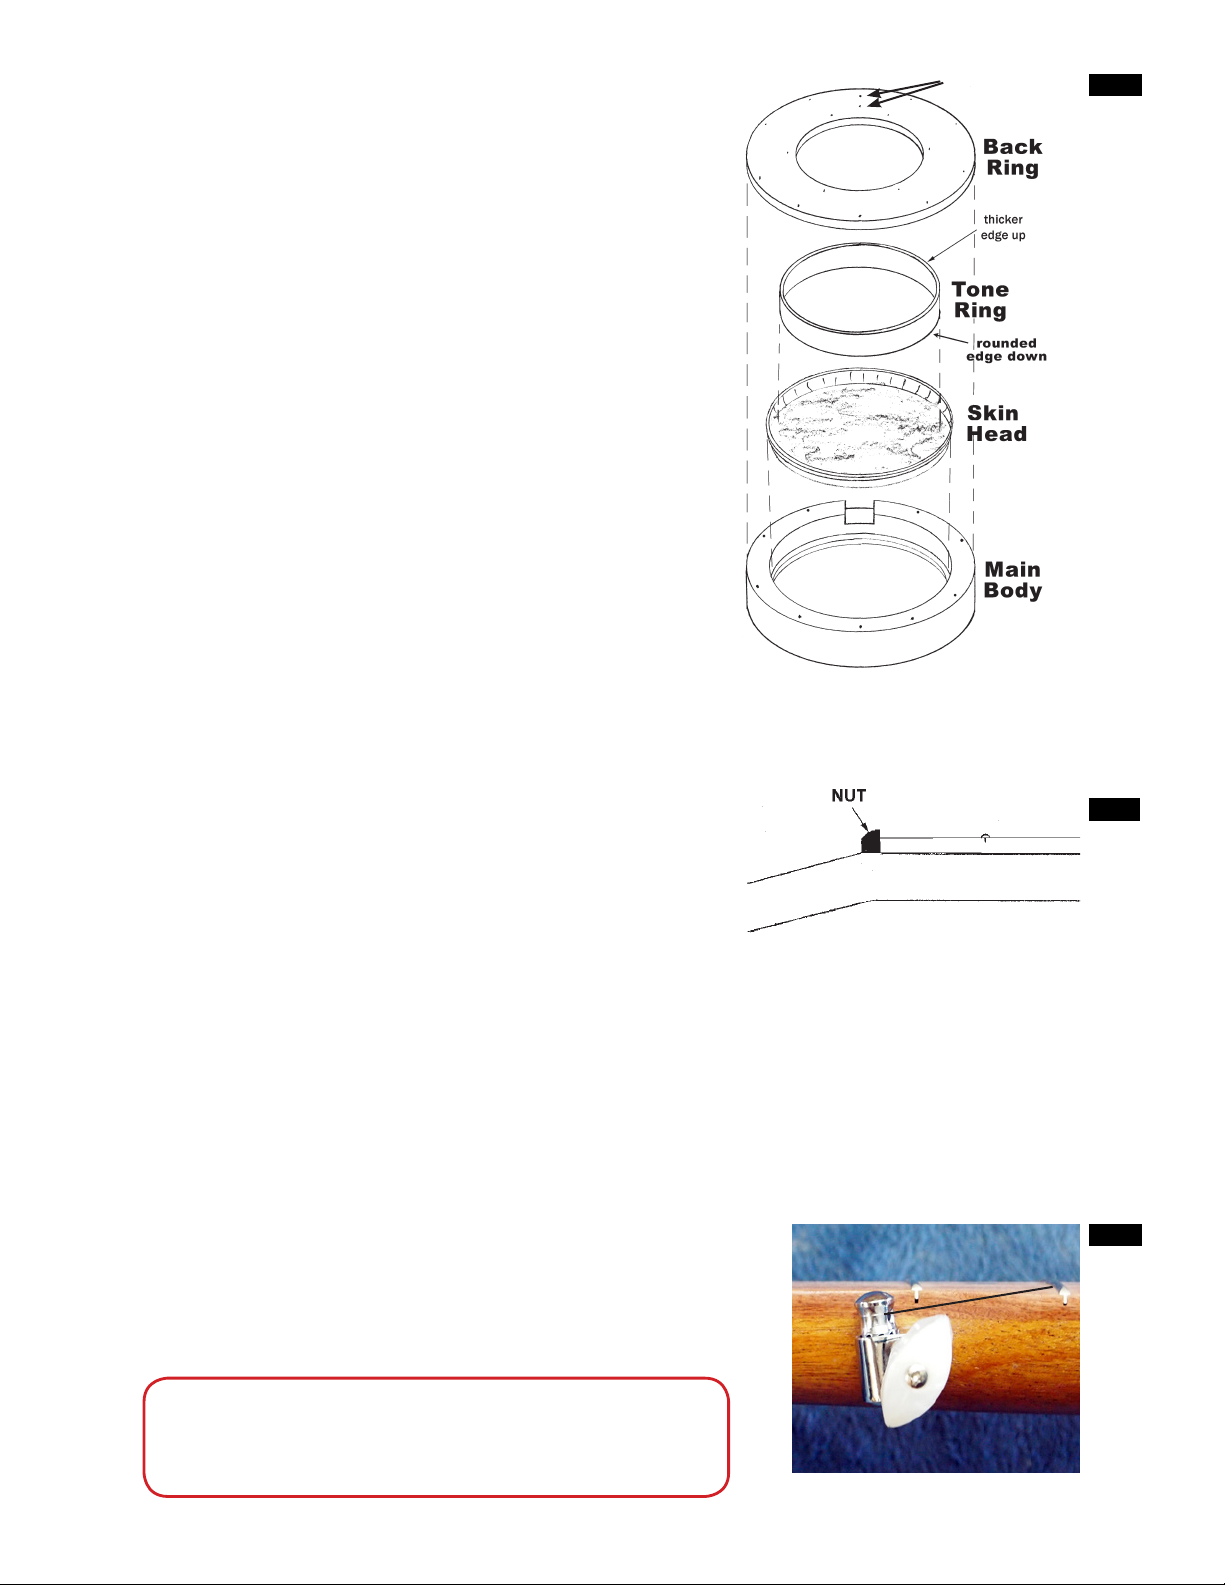
FINAL ASSEMBLY AND STRINGING
When the finish is dry, you can begin assembling
the parts with the hardware provided. First thing
is to make sure the t-nuts are installed in the tang
of the neck and inside the body.
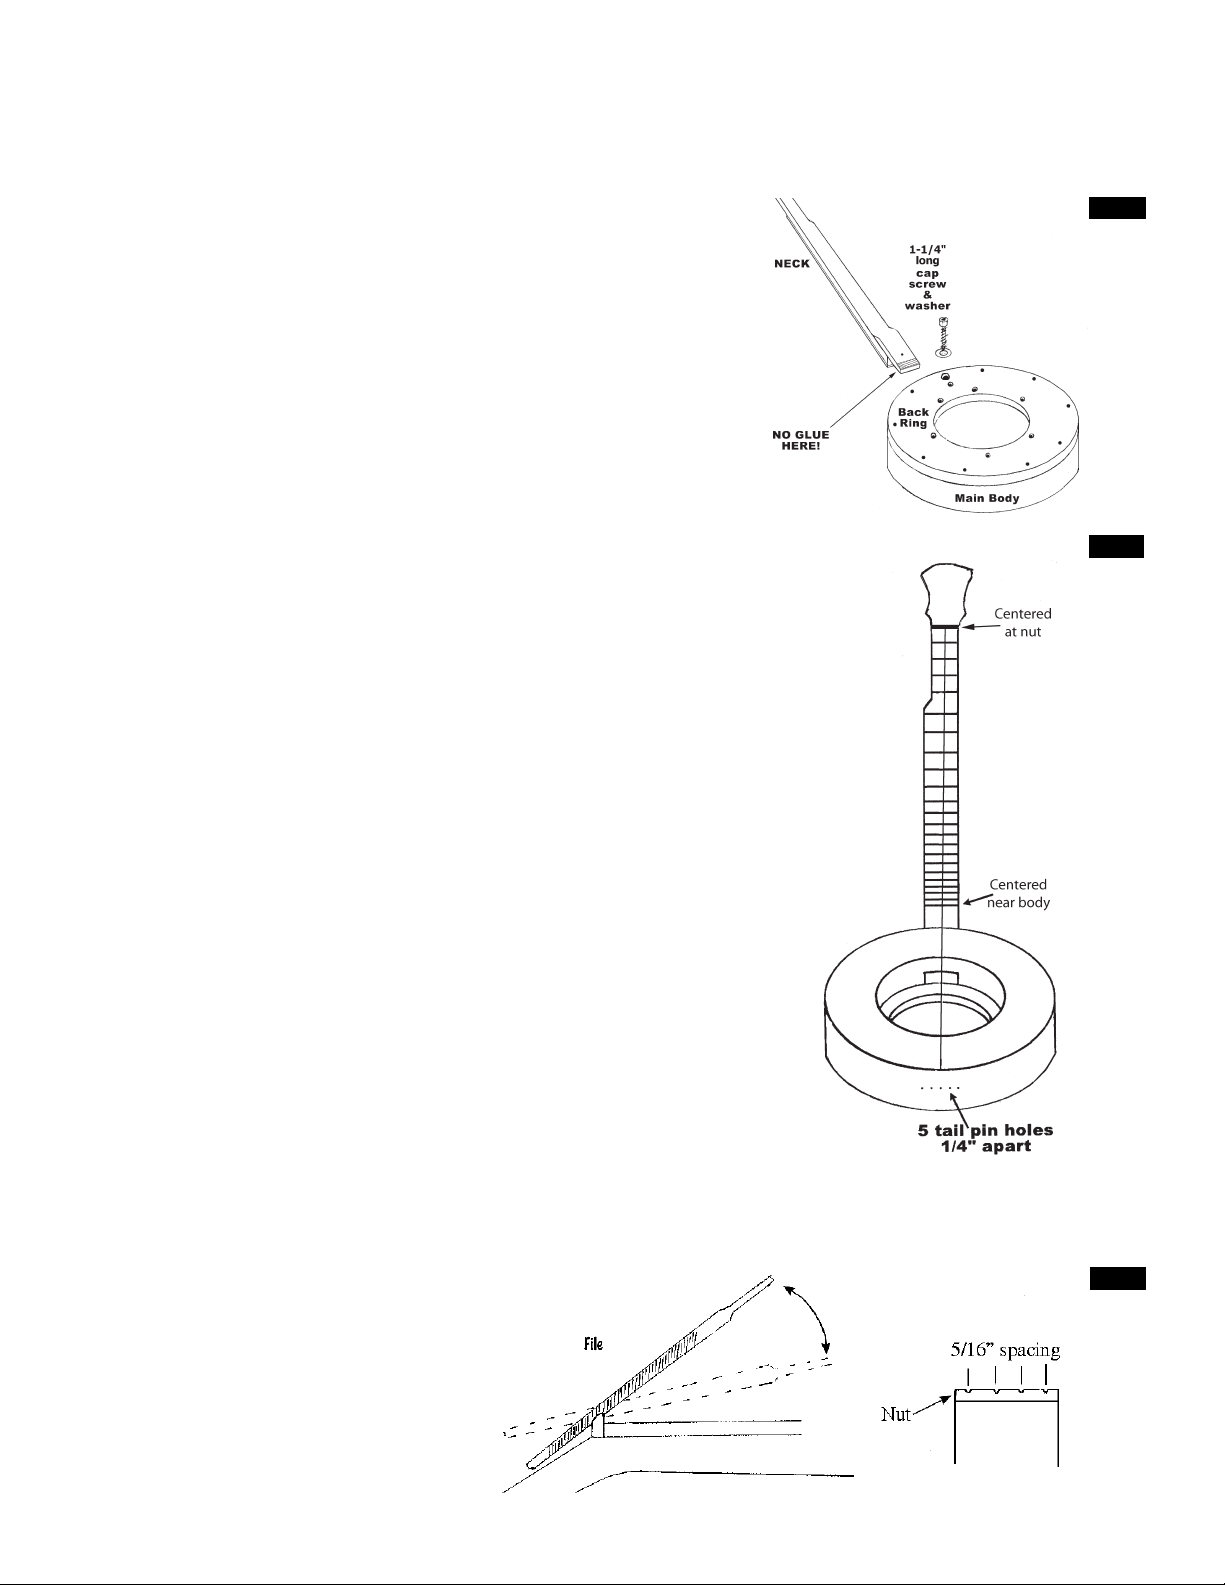
We should have already installed a t-nut in the
tang of the neck (fig 14, pg 5). If it is not there
yet, then press it in carefully (don’t pound with a
hammer) so as not to crack the wood.
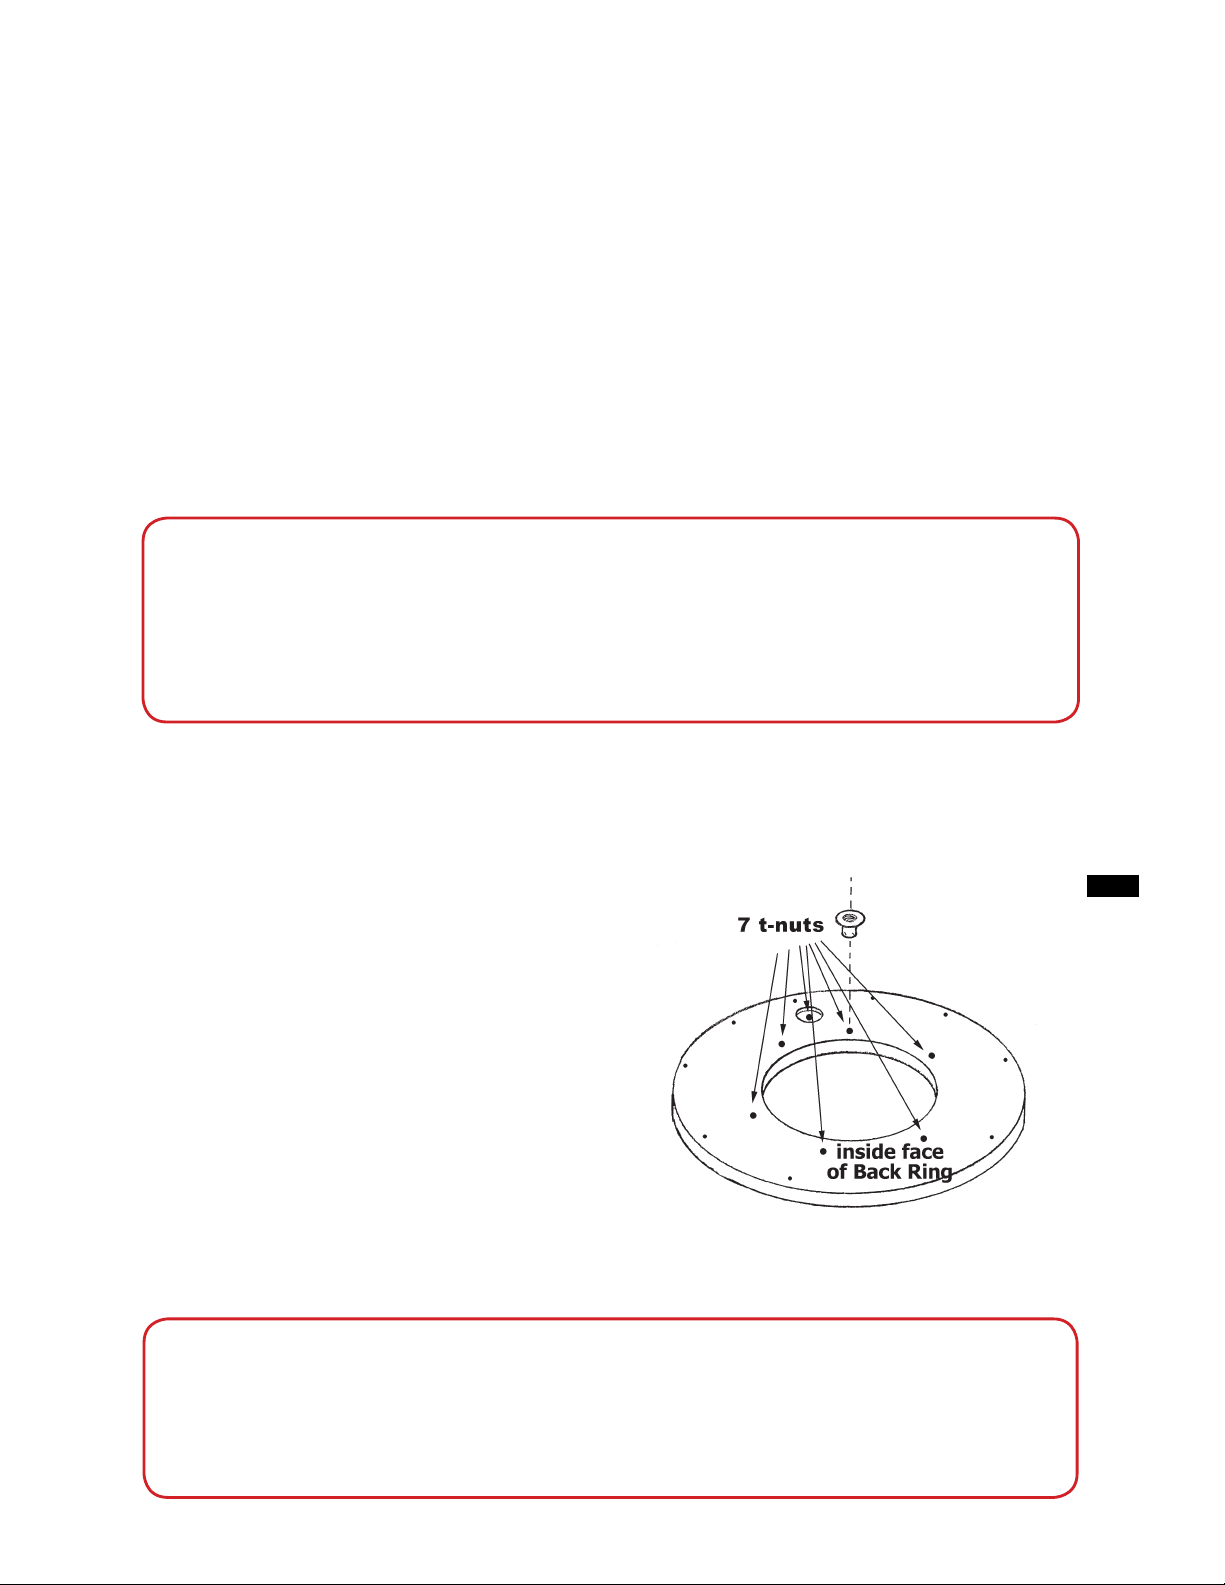
Then you’ll need to unscrew the back ring from
the body to check for seven t-nuts inside there.
Install them carefully by pressing them in against
a flat table so as not to crack the wood. (fig 15) A
drill press (turned off) works great as a pressing
tool.
FIG. 15
SUGGESTION: Sometimes the threads get a little misshapen on the t-nuts, making it hard
to start the cap-screws into them. It is helpful to take a moment now to drive a cap-screw
through each t-nut from the inside of the back ring, just to clear out any burrs or straighten
the threads. Then you’ll have an easier time with the cap screws later. Don’t leave the
screw in the t-nut though. Just thread it in and back out again to clear the threads.
p

651-439-91208
Now you can assemble the body with the skin head
and tone ring as shown at right, using the nine wood
screws provided (No glue).
IMPORTANT: Take care to orient the parts correctly!
(fig. 16) The two extra holes in one part of the back
ring should be centered over the large slot in the main
body. Also, the label on the skin head looks best when
centered under the strings.
Notice that the tone ring has a rounded edge that
should push against the inside of the skin head as
the wider flat edge is pressed downward by six sock-
et-head screws for applying tension to the skin head.
We don’t glue the back ring in place because we figure
someone will eventually need to take the banjo apart
for cleaning, refinishing or repair in the future.
Use the 5/32” allen wrench to install 7 cap screws into
the back of the body so they press evenly on the tone
ring. You can tighten these screws equal amounts to
add tension to the skin head. We like it when thumb
pressure on the front of the skin head can only push
it down about 1/8” or so.
Fit the blackwood nut against the narrow end of the fret-
board and shape it down to match the illustration here.
(fig. 17) It should stand at least 1/16” above the surface
of the fretboard, and the top can be sloped downward
toward the peghead for easier filing of string notches.
This wood sands very nicely if you lay your sandpaper on the table and rub the wood across
the paper to achieve the size and shape you need. Once you have it fitting properly, polish it up
with fine sandpaper (400-600 grit).
Then use Superglue or 5-minute epoxy to glue the nut in place, taking care to center it so one
end does not poke out beyond the edge of the neck (that would be uncomfortable when you
play).
Install the 5th peg into the hole in the side of the neck, as
shown. (fig. 18) Use your fingers to get it started, and take
a look from the side view to make sure the post is turned a
little off vertical to make it easy to wind the string on it at
the angle from the top of the fretboard.
FIG. 16
FIG. 17
FIG. 18
extra
holes
____14.
____15.
____16.
Path of string
NOTE: Some of the 5th pegs are too small to seat securly
in the hole without help. If this is the case, you’ll want
to epoxy the 5th Peg in place.
p

ww.harpkit.com 9
Re-assemble the peg with the nylon washer, the plastic but-
ton, and the screw. (fig. 19)
The more you tighten the screw, the harder it will be to turn
the button for tuning.
Install the 4 straight gears using a crescent wrench or nut
driver, as shown here. The washer and threaded sleeve go
down through the top of the peghead to engage the main
body of the gear. (fig. 21)
FIG. 19
FIG. 20
FIG. 21
____17.
____18.
Remove the white button and nylon washer from the tuner
so you can slide the hardwood driving block over the shaft.
(fig. 19) Tip the neck on edge and move to the corner of your
work table so you can tap the 5th gear down into the hole.
Be sure to pad the underside of the neck -- the small leather
scrap included with the kit works well for that.
Install the truss rod cover with the small black screws pro-
vided. Use a 1/16” drill bit to drill pilot holes for the screws.
(fig. 22)
You’ll need a #1 Phillips screwdriver for those tiny screws.
(fig. 23)
____19.
FIG. 22
FIG. 23
1/16” bit
#1 size philips
screwdriver
Something you almost never hear -
“Say, isn’t that the banjo player’s Porshe parked
outside?”

651-439-912010
____20.
____21.
____22.
____22.
FIG. 24
FIG. 25
FIG. 26
INSTALL THE NECK
INSTALL THE STRINGS
Now you can install the neck into the body. It should be a
tight fit. There are 2 cap screws left in your kit -- one longer
than the other. The long one needs the washer. Screw that
one into the hole closest to the top edge of the body and into
the hole in the tang. (fig. 24) It should thread itself into the
t-nut in the tang, but you may need to wiggle the neck a little
to get it started.
Screw the last short cap screw into the lower hole until it
contacts the metal plate on the tang. This will be used for
tilting the neck forward and back, but the upper screw must
be loosened before you can make that sort of adjustment.
Find the center of the fretboard at each end, as shown in
diagram. (fig. 25) Put masking tape on the wood for mark-
ing these centers. Notice that the line between these two
centers will be off-center in the middle of the fretboard, but
that’s OK. We are allowing room for the short 5th string.
Lay a long straight-edge between these two center points
and down to the bottom of the body. Mark where the line
ends at the bottom, and extend it over the edge and down
an inch or so on the side of the body. Use a ruler to draw a
perpendicular line on the side of the body, and to mark 5
points spaced about 1/4” apart, two marks on either side of
the center point, as shown in drawing. (fig. 25)
Punch into the wood with an awl at each point, and use the
1/16” drill bit to drill pilot holes for the tail pins. No special
angle is required -- just drill straight into the thick wood to
a depth of about 1/2”.
Then you can remove the tape and use a hammer to tap the
tail pins in so the heads are about 1/8” above the surface of
the wood.
We have included a needle
file in the kit for filing narrow
grooves in the nut to hold four
of the strings. Space the strings
roughly 5/16” apart, and make
the grooves very shallow at first.
Work the file at angles to ease the
string over the top of the nut.
(fig. 26)

ww.harpkit.com 11
____23.
____24.
FIG. 27
FIG. 28
NOTE: If you purchased
NylGut strings for your
banjo, you’ll need to form
a loop at the end of each
string and tie that loop into
an overhand knot. (fig.27)
We include a leather scrap to protect the body of the banjo
from being scratched by the strings as they pass over the bot-
tom edge. Use masking tape to hold the leather in place as you
install the strings.
Hook the looped end of the string #4 onto the 2nd tailpin from
the left and hold it up to the lower left peg on the peghead.
See fig. 28 to see how the strings are numbered.
Before you start winding the string on the peg, pull the string
past the peg and clip it off about 3” beyond peg. That is the
amount of excess that needs to get wrapped around the post
of the tuning peg.
Pull the string back until the clipped end just pokes through
the hole in the peg. Start turning the peg as you hold the
string so it winds around the peg until it becomes taut -- but
not too tight! Be cautious about over-tightening the strings.
You don’t want to break one this quickly....
NOTE: Strings should wind toward the center of the
peghead. (fig. 28)
You will probably need to make some adjustments at the back
of the banjo to get this first string to hang properly above the
fretboard:
Use the 5/32” Allen wrench to loosen the long screw at the
top of the body (in back) by just one turn or so. Then switch
the wrench to the screw below it and tighten that screw as
you watch how the neck moves. The goal is to push the peg-
head downward until this first string hangs about 1/4” over
the frets nearest the body. When you get to that point, switch
back to the upper screw and tighten it back up again. You
can do more fine adjusting after the rest of the strings are
installed.
p
Find the bridge and slide it under the string, positioning the bridge on the skin head 25-3/8”
from the nut. This string should rest in the second groove from the left end of the bridge.
____25.
____26. Install three more strings following the diagram above (fig. 28) hooking their loops over the
proper tailpins as you install them in order.
Leave the left-hand tail pin open for the 5th string.
HINT: If you find the lighter strings slipping on the tuning
pegs, take care to cross at least one of the wraps over
another as you turn the peg. This helps cinch the string to
the outside of the post. (fig. 29)
FIG. 29
p
String #1
D4
String #2
B3
String #3
G3
String #4
D3

651-439-912012
____27.
INSTALL THE STRINGS (CONT.)
Once the first four strings are installed, you can
plan the placement of the 5th string. It will be cra-
dled in the groove of a tiny slotted screw provided
in the kit, as shown in this drawing. (fig. 30)
Use an awl to punch-mark the location for the slot-
ted screw, as shown below. You want the screw to
be about 1/8” away from the 5th fret, and it should
match the spacing of the other 4 strings as much
as possible.
Drill a pilot hole with the 1/16” bit provided, to a
depth of about 1/4”, and insert the slotted screw so
it will hold the string in its slot.
Then you can install the 5th string, having it wrap
around the tuning peg. (fig. 30)
FIG. 30
5th fret
Banjos use what is called re-entrant tuning. This
means that the top string (string #5) is tuned
higher than the next string down (string #4)
MIDDLE
C4
A3F3 B3D3 E3 G3F2 B2 C3
G2 A2 E4 F4 E5D5
C5
D4 A4G4 B4
String 5String 1String 2String 3String 4
You’ll often see banjo tunings written out like
this - gDGBD
The strings are listed, left to right starting with
the lowercase letter indicating the 5th (shortest)
string. Next is string 4, then string 3 and so on.
p
5th String
G4
String 1
D4
String 2
B3
String 3
G3
String 4
D3
FIG. 31

ww.harpkit.com 13
FINE ADJUSTMENTS
NECK ANGLE
The entire neck can be adjusted (tilted) forward or
backward with two capscrews in back of the body,
where the tang enters the body (see arrows on pho-
to).
Whenever you adjust the neck, you need to loosen the
upper cap screw first to allow the angle to be changed
by the lower cap screw. The lower screw determines
the playing “action” or height of the strings off the
fretboard when they are not pressed against a fret.
Use the 5/32” Allen wrench for these adjustments.
We like to set the strings so they have a gap of about
3/16” at the last fret (near the body). Then tighten the
upper screw again to hold the neck firmly in place.
NUT GROOVES
Check the height of the strings at the 1st fret too. We
like a gap of about 1/32” under the strings at the 1st
fret (that’s about the thickness of a credit card). You
can file the grooves in the nut a little deeper to lower
the strings at this end, as needed. This will make the
strings easier to press down to the frets.
SKIN HEAD TENSION
Skin head tension is a matter of preference. Basically,
a tighter head will produce a brighter tone with lon-
ger sustained ring, and a looser head will produce a
more muted tone with shorter sustained ring. Use
the 5/32” Allen wrench to adjust the 7 capscrews indi-
cated on the photo for tightening or loosening the
skin head.
Now we recommend doing some fine adjust-
ments on your banjo. This instrument allows
complete adjustment of the neck, the skin head,
and the string action. Here are some sugges-
tions:
Loosen neck
Adjust neck angle
Loosen/Tighten
skinhead
FIG. 32

651-439-912014
TRUSS ROD: The truss rod is used for achieving a relatively flat playing surface on the fret-
board. We don’t want it perfectly flat, however, because that can cause some string buzzing.
Remember that the truss rod works in two different directions, you can use it to put a slight
hump in the middle of the neck or to put a slight dish in the middle. You’ll want the latter, and
here’s how to test it:
The most playable fretboards have a very slight dip in the middle. If you press a string down
against the first fret with one hand, and the same string against the last fret with the other (at
the same time), you should see a slight gap between
the string and the fret located about at the mid-
point. This gap (known as “relief”) can be adjusted
by turning the truss rod with the allen wrench pro-
vided. Just be careful not to force the truss rod too
hard -- you don’t want to break the rod! Your goal
is to have about 1/32” to 1/16” space under the string
in the middle when the string is held down against
the 1st and last frets at the same time.
ADDING A STRAP: You may add a shoulder
strap to this instrument to make it easier to
play while standing or walking. We like a stan-
dard guitar strap with two mounting buttons
that are placed at approximately the “2 o’clock”
and “8 o’clock” positions on the body as illus-
trated at right.
FIG. 33
NOTES

ww.harpkit.com 15
NUT
Follow whichever curved lines you
like best. Note that some will be
easier to cut and sand than others.
NUT
PEGHEAD TEMPLATES
Here are a few peghead templates. You can cut these out and trace the shape on your peghead.
If you aspire to be a banjo player, best to develop a sense of humor now!
Why do banjo tunes have names?
So you can tell them apart.
What is the difference between a macaw and a banjo?
One is loud, obnoxious, and noisy; the other is a bird.
What is the definition of a genteleman?
Someone who can play the banjo but doesn’t.
Why are there no banjos in Star Wars?
Because it’s set in the future.

Musicmakers
14525 61st ST CT N
Stillwater, MN 55082
Table of contents
Other Musicmakers Musical Instrument manuals

Musicmakers
Musicmakers Dakota Mandola KIT User manual

Musicmakers
Musicmakers 17/16 Hammered Dulcimer Kit User manual

Musicmakers
Musicmakers Voyageur User manual

Musicmakers
Musicmakers Mountain Dulcimer KIT User manual

Musicmakers
Musicmakers BALLAD HARP KIT User manual

Musicmakers
Musicmakers DELUXE THUMB PIANO KIT User manual

Musicmakers
Musicmakers Hurdy Gurdy User manual

Musicmakers
Musicmakers Reverie 2 User manual

Musicmakers
Musicmakers HARP WHEELS KIT User manual

Musicmakers
Musicmakers Reverie Harp Kit User manual