Mustang Survival MSD660vAF User manual

HT0661 (Rev12Jun2012)
MSD660vAF
SENTINEL – AVIATION RESCUE SWIMMER DRY SUIT
AIR NATIONAL GUARD
DO NOT REMOVE PRIOR TO SALE

TABLE OF CONTENTS
DESCRIPTION..................................................................................... 1
MSD660vAF – Aviation Rescue Swimmer Dry Suit ......................... 1
Air National Guard ........................................................................ 1
SENTINEL SERIES SIZING GUIDE.......................................................... 3
STEP 1 – Measuring....................................................................... 3
STEP 2 – Sizing .............................................................................. 4
STEP 3 – Suit Length ..................................................................... 5
INSTRUCTIONS FOR USE .................................................................... 5
Neck Seals and Wrist Fitting ......................................................... 5
Attaching Suspenders.................................................................... 6
DONNING THE SUIT........................................................................... 7
CLEANING AND MAINTENANCE........................................................ 9
Cleaning........................................................................................ 9
Maintenance ................................................................................. 9
STORING THE DRY SUIT................................................................... 10
Folding and Packing .................................................................... 10
LEAK TESTING ................................................................................. 10
Leak Testing Procedure ................................................................ 11
REPAIRS ........................................................................................... 14

RAPID REPAIR NECK SEAL INSTRUCTIONS........................................ 15
Assemble Materials .................................................................... 15
Heat Remove Current Neck Seal.................................................. 15
Prepping the Materials................................................................. 17
Attaching a Heat Activated Neck Seal.......................................... 17
Inspect Replacement.................................................................... 18
RAPID REPAIR WRIST SEAL INSTRUCTIONS....................................... 19
Assemble Materials...................................................................... 19
Heat Remove Current Wrist Seal.................................................. 19
Attaching a Heat Activated Wrist Seal ......................................... 21
Inspect Replacement.................................................................... 23
RAPID REPAIR PATCH INSTRUCTIONS ............................................... 23
Limits of Repair ........................................................................... 23
Assemble Materials...................................................................... 23
Apply Patch ................................................................................. 24
Inspect Repair.............................................................................. 25
EXHAUST VALVE REPLACEMENT...................................................... 25
ACCESSORIES.................................................................................. 26
Limited Warranty ......................................................................... 27
CONTACT ........................................................................................ 28

1
DESCRIPTION
MSD660vAF – AVIATION RESCUE SWIMMER DRY SUIT
AIR NATIONAL GUARD
The MSD660vAF is a specialized dry suit designed to aid in
hypothermia protection during surface operations in or on the water
when worn with insulating undergarments.
The MSD660vAF uses Mustang Survival’s new platform design.
Designed to improve fit and function, the MSD660vAF is based on
sound engineering and user feedback. This has been achieved through:
• Extensiveuseofthe2003CAESERanthropometricdataset
ensures the sizing and patterns of the suits fit the greatest number
of individuals, improving range of motion without adding bulky
extramaterial.Sizingdataisbasedonareviewof2,500North
American3-Dbodyscans.
• Increasednumberofsizesprovidesabetterfitforendusers
without customization.
• Standardexpandedsizing(suchasshortandtallsizing)forall
sizesofsuits(Small-3XL).
In addition to Mustang’s platform design, the MSD660 has a number
of other salient characteristics:
• Single-layerwaterproof,breathabletri-laminateGORE-TEX®
BD6.5shellfabric.
• Heatactivatedadhesivewristandneckseals,allowforrapidfield
replacement of neck and wrist seals with the use of simple field
replacement tools.
• Reinforcedmoldedfoamkneeandelbowpadsthatprovide
increasedkneeandelbowprotectionandwearresistance.(NOTE:
All reinforced areas incorporate drainage to preclude entrapped
water)
• Reinforcedseat/thigharea.(NOTE:Allreinforcedareas
incorporatedrainagetoprecludeentrappedwater)
• Lowprofile,lightweight,andcorrosionresistantTIZIP®waterproof
zippers, are easy to operate and require less maintenance than
typical waterproof zippers incorporating brass metal teeth.
• Rightarmairexhaustvalvetoventexcesstrappedairoutofthe
suit.

2
• SOLASgraderetro-reflectivetapeontheuppershouldersand
arms for increased visibility.
• Leftarmlowprofilezipperedshoulderpocketwithdualpen
holders.
• 2x4inchVelcro®patch located on left chest for attachment of
nametag
• Leftandrightthighelasticizedexpandingcargopocketswith
drainage mesh and Velcro®secured top cover entry, provide
maximumstoragecapacityandexhibitalow-profilefunction
when empty.
• Neoprenecummerbundwithwaistadjustmenttabsallowssnug
waistadjustabilitywithoutimpedingmobility.
• Lowprofileadjustablewristovercuffs.
• Adjustableinternalsuspendersprovidedacustomizedfitand
facilitatewearingthesuitsinthehalf-doffedpositiontoprevent
overheating while preparing for missions or attending a briefing.
• Universallysizedwaterproof,breathablesocksarepermanently
attached and ankle cuffs reduce entry of small debris into
footwear thereby reducing wear on the socks.
• Waterproofentryandreliefzippersarecoveredtoprovideflame
retardancy and help to protect the zipper teeth from damage or
contamination.
TheMSD660vAFiseasilydonned/doffedbythewearerusinga
diagonal watertight entry zipper across the torso and wearer’s left
shoulder and includes a relief zipper. Customized fit can be achieved
throughadjustmentoftheinternalsuspenderstomodifytrunklength
for improved range of motion.
Every MSD660vAF produced by Mustang is leak tested to ensure
waterproof integrity prior to leaving our factory. All suits are 100%
tested to ensure the highest level of reliability and performance.
WARNING: Dry suits alone provide inadequate
protection for extreme climate differences. All users
should wear appropriate thermal undergarments to
prevent hypothermia (in cold climates) and moisture
wicking undergarments to prevent heat stroke (in warm
climates).

3
WARNING: Dry suits are not inherently buoyant. All
users should wear appropriate flotation devices with
the dry suit. Water rescue is inherently dangerous.
Users should be aware of risks associated with water
rescue and complete training in the use of water rescue
equipment and techniques.
SENTINEL SERIES SIZING GUIDE
The Mobility Based Sizing™ platform is like none other currently
in the industry. To order a suit that fits you best, please follow the
instructions below:
STEP1–MEASURING
For accurate measurements, please refer to the measurement diagram
and instructions provided.
Allmeasurementsshouldbetakenwitha”tailors”(flexible)tape
while wearing garments and any accessories such as body armor
usually worn under the dry suit
LOCATION VALUE PROCEDURE
1 Chest Measure the horizontal circumference around the chest
atmaximumgirth.Formales,thisistypicallywherethe
tape runs under the armpits at the scye. For females,
this is at the bustline.
2Waist Measure the horizontal circumference around the waist
(belt)line.
3 Hips Measure the horizontal circumference around the hips
andbuttockatmaximumgirth.
4Sleeve With your arms horizontal, bent at the elbows, and
withyourfiststouchingknuckle-to-knuckleoutfrom
the chest, measure the distance from the center of the
back along the outside of the arm to the outer tip of
the wrist.
5Inseam Measure the vertical distance from the crotch to the
floor. Use a book pressed firmly up between the legs
and measure from the top of the book.
6TorsoHoop Withyourshouldersrelaxedandthetaperunning
over the center of one shoulder and between the legs,
measure the vertical trunk circumference
7Height Vertical standing height with good posture and no
footwear.

4
STEP2–SIZING
Based on your measurements, determine your size according to the
chart below. If all your measurements fall between the ranges of two
sequentialsizes(suchasbetweenSandM)selectthesizethatbest
fitsyourTorsoHoopandInseam.
6
3
2
1
7
5
4
MEASURING LOCATIONS
Figure 1
LOCATION XS S M L1 L2 XL XXL 3XL
Chest 35-38" 37-40" 39-42" 41-44" 43-46" 45-48" 49-52" 53-56"
Waist 29-32" 31-34" 34-37" 35-38" 37-40" 41-44" 46-49" 51-54"
Hips 37-40" 38-41" 39-42" 40-43" 41-44" 43-46" 47-50" 53-56"
Sleeve 29-31" 31-33" 33-35" 34-36" 35-37" 36-38" 37-39" 38-40"
Inseam 28-30" 30-32" 32-34" 33-35" 34-36" 34-36" 34-36" 34-36"
TorsoHoop 59-62" 62-65" 65-68" 67-70" 69-72" 71-74" 76-79" 78-81"

5
STEP3–SUITLENGTH
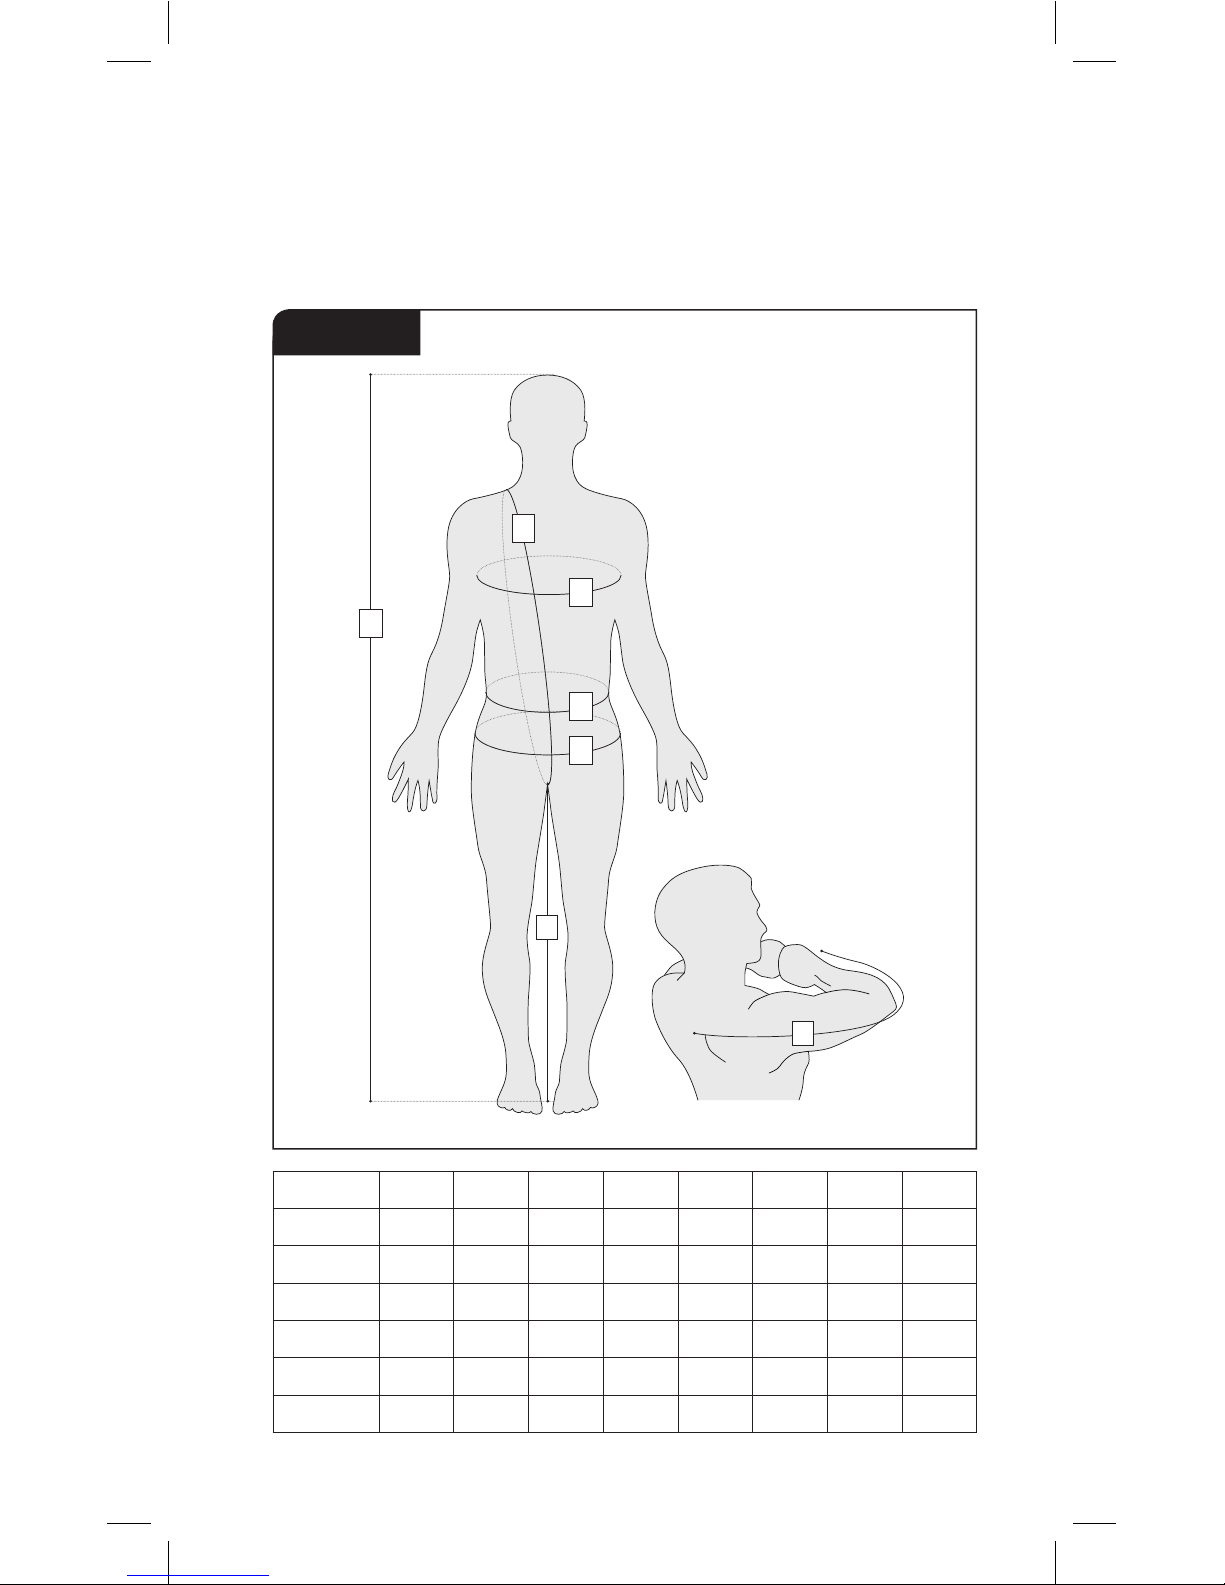
Based on your height, determine your suit length according to the
chart below.
HEIGHT XS S M L1 L2 XL XXL 3XL
Short 57-60" 61-64" 65-68" 66-69" 68-71" 70-73" 72-75" 72-75"
Regular 60-63" 64-67" 68-71" 69-72" 71-74" 73-76" 75-78" 75-78"
Long 63/-
66/"
67/-
70/"
71/-
74/"
72/-
75/"
74/-
77/"
76/-
79/"
78/-
81/"
78/-
81/"
FollowingSteps1-3shouldbringyoutoonecomprehensivesizesuch
as L1 Short or Medium Regular, which is a combination of your overall
measurements(chest,waist,etc.)andyourheight.
*Pleasenote:IfallyourmeasurementDONOTfallintotherange
oftwosequentialsizes,forexample,chestmeasurementisMedium
butWaistmeasurementisinL2,youmayrequireafullcustomized
suit.PleasecontactyourMustangSurvivalRepresentativeformore
information.
INSTRUCTIONS FOR USE
This manual supplies instructional, maintenance and safety
information for the MSD660, Aviation Rescue Swimmer’s Dry Suit.
NECK SEALS AND WRIST FITTING
The Rubber Neck Seals and Wrist Seals may be trimmed at the initial
fitting,butthesealstendtoadjusttothewearerafterashortperiod
oftime.Ifnoexcessivesealrestrictionexists,andsealfitisacceptable
to the user, the seals should be left as is. Neck seals shall fit snugly
and remain in direct contact with the neck through all normal head
movements. Wrist seals shall fit tightly enough to prevent water entry,
but not tight enough to restrict blood flow. If seal sizing is required,
proceed as follows:
CAUTION: Trim neck seals with extreme caution. A
smooth trim line is essential. Excessive or careless
trimming could result in loose seals that leak and
necessitate replacement. Avoid nicking seal fabric, as
this could result in tearing the seals when donning and
doffing, and also could result in skin irritation.
1. If neck seal trimming is necessary, mark a line around
circumference of neck opening. Trimming increments shall not
exceed1/4inchatatime.

6
2. Carefullycutalongthislinewithasharppairofscissors.
3. Trimwristsealsinsamemannerasneckseals,excepttrimming
incrementsshallnotexceed1/8inchatatime.
4. Aftertrimmingseals,havetheuserdonthesuittodetermineseal
restrictionandwater-sealingcharacteristics.Makeanyadditional
adjustmentstotheseal.
ATTACHINGSUSPENDERS
Figure2 To attach suspenders please follow
the instructions below. The
removable suspenders can be used
toimprovefit,lowerin-water
resistance and reduce rescuer
fatigue.Suspenderscanbeadjusted
to a comfortable and secure position.
Figure3
1. Completely unzip the entry zipper.
2.Openthesuitsothatthetwoattachmentpointsarevisible.
3.Threadtheendofthenylonstrapattachedtothesuitthroughthe
rectangular clip on the suspenders.
4.Oncethenylonstraphasbeenthreaded,flarethesewnfoldsonthe
strap to prevent it from passing back through the rectangular clip.
Figure4 Figure5

7
5.Repeatthesestepsfortheotherattachmentpoint.
6.Usethesuspenderstrapendstoadjustforasecurecomfortablefit.
DONNING THE SUIT
Before donning the suit, ensure that appropriate undergarments have
been selected for the conditions.
CAUTION: Always don the dry suit on a clean surface
such as a towel or tarp to avoid attracting debris.
Pebbles, sand, dirt and other debris on the ground can
cause damage to dry suit sock and compromise the
suit’s integrity.
CAUTION: Use extreme care when donning the dry suit.
Prior to donning, remove all rings, watches, earrings,
necklaces and eyeglasses that will cause damage to
wrist and neck seals. Footwear other than socks must
not be worn inside the dry suit.
Suit Preparation Prior to Donning
1. EnsurethattheVelcro®wristcoversareunfastenedandtheankle
gussets are unzipped and opened.
2. EnsureVelcro®waistadjustersareloosened.
3. Ensurethatthewaterproofentryzipperisfullyopened.
4. Ensure the suspenders are pulled out of the suit legs.
Donning the Suit
1. Slide your legs into the suit until your toes reach the end of the
socks.
2. Donthesuspenders.Ensuretheyarecrossedinbackbutnot
twisted.
3. Applytalcumpowderinsidewristseals.
4. Placetherightarmintotherightsleeve.
5. Carefullyplacetherighthandintotherightcuffbypointingthe
fingers straight, tucking the thumb underneath and inserting the
hand through the seal. Do not make a fist when putting your wrist
through the seal.
6. RolltheVelcro®wristcoversbackandrefastentoasnugfit.

8
7. RepeatSteps4-6fortheleftarm.
8. Bringtheupperportionofthesuitoveryourhead,aligningthe
neck opening with the top of the head. Reach inside the top of
the neck seal with fingers and gently pull the seal outward and
down as you push your head through. Flatten any folds or rolls of
the seal against the skin.
9. Closethewaterproofentryzipper.Reachoveryourleftshoulder
with your right hand and grasp the zipper toggle. While holding
the top of the zipper, pull the toggle down until the zipper is
completely fastened.10. Ensure the waterproof relief zipper is
completely closed and the slider is fully engaged with the zipper
stop. Stow the zipper toggle in the yellow loop located under the
zipper cover.
WARNING: Failure to completely close the waterproof
entry zipper and the relief zipper will result in leakage
of water inside the suit and reduction of survival time
when in the water. Have a fellow team member double-
check each slide fastener to ensure they are completely
closed against their sealing plugs.
11. CloseanklegussetzippersandsecurelyfastentheVelcro®
adjustmenttabs.
12. Burpthesuitbeforewaterentry.Crossarmsinfrontandgently
slide fingers between the neck seal and your neck, squat down
andforceexcessairthroughtheneckopening.
Doffing the dry suit
1. Remove all equipment worn over the suit.
2. Thoroughlyrinsedowntheexteriorofthesuitwhilewearingit,
paying special attention to the seals and zippers. Remove all dirt,
salt and debris.
3. LoosenVelcro®waistandankleadjustmenttabs.Unziptheankle
zippers.
4. Completelyopenthewaterproofzipper.Ifnotcompletelyopen,
the zipper faces the risk of damage to the zipper during doffing.
CAUTION: Placing undue force on the zipper may
damage the seal and harm the integrity of the suit.
Never forcefully yank on the zipper.

9
5. Insertfingersbetweennecksealandneck.Gentlystretchtheseal
outward and upward while pulling neck seal over your head.
6. With an unclenched fist, slowly pull each hand through wrist seals
while holding the rubber seal open.
CAUTION: Pulling on the rubber wrist seal may damage
the seal.
NOTE: If wearing suspenders, remove suspenders prior
to proceeding
8. Pullsuitdownpasthipsandslidelegsfromthesuit.
9. Followthecleaningandstorageinstructionsforthesuit.
CLEANING AND MAINTENANCE
CLEANING
1. Thoroughly rinse your dry suit after every use.
CAUTION: Do not dry clean. Do not iron. Do not bleach.
2. Treatstainswithapre-washtreatmentsuchasShout®orSpray
‘nWash®.Followthemanufacturer’sinstructions.Rinsewell.
3. Machinewashwarm(104°F/40°C)ongentlecycleusingagentle
powder or liquid detergent. Do not use fabric softener, bleach or
wash-intreatments,astheycanaffectthesuit’sbreathability.
4. Tumble-dryusinganairsetting
MAINTENANCE
Regularzippermaintenanceisrecommendedtomaintainawater-tight
seal, inhibit corrosion and keep the zipper gliding freely. These steps
are essential to zipper longevity:
1. Clean the zipper of any heavy deposits of mud, sand, salt or
foreign substances using warm soapy water.
2. TIZIP®MasterSeal zippers need to be lubricated on the docking
endfromtimetotime.PleaseusetheoriginalTIZIP®lubricant or
other available zipper lubricant as listed below.
3. Carefullyapplyoverthedockingendsurfacesonfrontandback
and inside where they connect to the zipper chain.

10
CAUTION: TIZIP®MasterSeal zippers do not require
the zipper chain to be lubricated, only the docking end.
Lubricating the zipper chain may affect the zippers
performance and is not recommended.
4. Repeatbeforelongtermstorageleavingthesliderclosedand
whenever the area is dry during use.
Care Product Product Name Supplier
Cleaning Fluid ZipCare
Lubricant
McNett
Tizip
Lubricating ZipTech
Lubricant
McNett
Tizip
STORING THE DRY SUIT
Hangthesuitwithallzippersopen.
FOLDINGANDPACKING
1. Ensure that the suit is thoroughly clean and dry and that the main
entry zipper is in the closed position before folding and packing.
2. Laythesuitflatonitsbackonahorizontal;cleansurface,
allowingthesuittobefullyextendedwithnoneoftheparts
overlapping.
3. Foldtheleftsleeve,fromtheshoulder,straightacrossthebodyof
the suit. Fold the right sleeve, from the shoulder, straight across
the body of the suit on top of the folded left arm.
4. Foldthesocksovertopofthelegsuntiltheyreachcrotchlevel.
5. Foldthelegs,fromthecrotch,uptothechestlevel,rightbelow
the folded sleeves.
6. Fold the suit in half.
7. To pack, roll or fold the suit ensuring that the zippers do not crease.
LEAK TESTING
Leak testing is an important part of regular care and maintenance.
Follow these instructions to test for leaks.

11
NOTE: Mustang recommends the use of its MA8836
Dry Suit Test Kit when performing leak testing. If using
alternate test equipment, care should be taken not to
damage the wrist or neck seals.
Figure 6 During testing, all components,
seams, sealed areas, and
attachments shall remain intact
and shall not show any sign of
separation, leakage, or other
damage.
Haveaqualifiedtechniciantestfor
leaks after suit repairs, on periodic
inspection, prior to issue and every
sixmonthsthereafter,andwhen
a visual inspection raises any doubt about the integrity of the suit’s
waterproofing.
To perform the suit leakage test: Turn the suit inside out, with the
entry zipper and relief zipper slide fasteners fully closed.
LEAKTESTINGPROCEDURE
The following suit leakage test uses Mustang Survival Dry Suit Test Kit
(MA8836).Yourequipmentmaydifferand,ifso,thetestshouldbe
adjustedaccordingly.
1. Completelyloosentheadjustableneckseal,ifequipped.Turnthe
dry suit inside out.
2. Placetheneckplugintothedrysuit,throughthemainentry
zipper. Close the main entry zipper by reaching in through the
neck opening to pull the zipper toggle.
Figure 7 Figure8

12
3. Pullthenarrowerendoftheneckplugthroughtheopeningofthe
neck seal.
4. Stretchthenecksealtofitsecurelyaroundtheneckplug(theend
withthesmallerdiameter).
Figure9 Figure 10
5. Fitthecinchingstrapovertheneckseal.
6. Securethecinchingstrapbypullinguptheexcessstrap,and
fasten the Velcro closures.
Figure 11 Figure12
7. Clamp both wrist seals with the clamps provided.
8. Connectthetwocoiledpneumatichosestotheoutputsideofthe
controlbox.Thetwohosesareinterchangeable.
Figure13 Figure14

13
9. Connecttheotherendsofthecoiledhosestotheneckplug.It
doesnotmatterwhichhoseconnectstowhichplug.Figure15
shows the correct configuration.
10. Ensure your configuration matches Figure 16, that shows the two
coiledpneumatichosescorrectlyattachedtothecontrolboxand
the neck plug.
Figure15 Figure 16
11. Connecthigh-pressureairsourcetotheinputsideofthecontrol
box.Theairpressureshouldbenogreaterthan150psi.
NOTE: Ensure the control lever is set in the off position
before the high-pressure air is connected.
12. Thecontrolboxhasonepressuregaugeandtwocontrols.The
black control lever has three positions as labeled on the control
box.Theknurledknobcanbeturnedtorestricttheairflow
traveling into the dry suit.
13. Movethecontrollevertothefastposition.Thesuitshouldinflate
rapidly. Once the suit appears ¾ inflated, move the lever to the
slow position. Turn the knurled knob to restrict the airflow rate
untilthesuitinflatesupto12in.waterpressure.Twisttheknurled
knobfurthertoholdpressureinsidethesuitat12in.water.
Figure 17
Figure18

14
14. Spraytheentiresuitwithagentlesoapandwatersolutionof
0.5%soaptowaterbyweight.Payparticularattentiontothe
seams and zippers.
15. Examineanyareaofthesuitwherebubblesareformingandtake
actiondependingontheseverityasfollows(notethatbubbles
forming at a rate of less than one per second are probably not
leaks):
16. Small foamy bubbles collecting slowly on seam: Entrapped air. No
leak present, no action required.
17. Small foamy bubbles collecting quickly on seam: Uncertain.
Agitate seam around bubbles to remove any entrapped air. If
bubbles persist after 10 minutes then consider as leak, mark leak
area with a china marker, and document on the inspection record.
18. Steadystreamoflargerbubbles:Leak.Markleakareaand
document on the inspection record.
19. Anyothertypeofbubbleformationoranysignofbubblesona
panel shall be treated as a leak.
20. Whenthetestiscompleted,movethecontrollevertotheoff
position. Remove the clamps from the suit and disassemble the
restofthetestkit.Hangthesuittodry.
SUMMARY
TheMustangSurvivalDrySuitTestKitModelMA8836shouldbeused
with Mustang Survival dry suits. Ensure qualified technicians use this
equipment.Awell-maintainedsuitmeanssurvivalinemergenciesfor
which normal clothes were not designed.
CAUTION: The use of metal hangars may damage the
dry suit.
REPAIRS
The protection provided by this dry suit relies very much on its
watertightcharacteristics.Itisextremelyimportantthatdamagedsuits
are handled in accordance with the following repair requirements.
If your suit is configured for use with Mustang’s heat activated
seal replacement system, seal replacement can be accomplished by
following the instructions provided in the section below.
Qualified repair personnel can normally perform minor repairs, with
adequatefacilities.Themanufacturershouldperformallmajorrepairs.

15
RAPID REPAIR NECK SEAL INSTRUCTIONS
An online video tutorial of this procedure is available for viewing at
mustangsurvival.com. It may be helpful to watch this video in addition
to the instructions below.
ASSEMBLE MATERIALS
Make sure that you have all of the necessary equipment and materials
to perform the neck seal replacement correctly.
You will need ONE of the following tool kits:
RapidRepairNeckandWristSealToolKit(Part#RE0001)
OR
RapidRepairNeckSealToolKit(Part#RE0002)
&RapidRepairHandIron(Part#RE0004)
Tools and Equipment Supplied by User:
Light work gloves
Additionally you’ll need ONE of the following Rapid Repair
Neck Seals:
SEAL PART# SEAL DESCRIPTION COMES STANDARD
WITH SUIT SIZES
RE0005-L Rapid Repair Rubber Neck Seal, Thin, Large XS-3XL
RE0005-S Rapid Repair Rubber Neck Seal, Thin, Small -
RE0006-L Rapid Repair Rubber Neck Seal, Thick, Large XS-3XL
RE0006-S Rapid Repair Rubber Neck Seal, Thick, Small -
RE0007-L Rapid Repair Neoprene Neck Seal, Large XL-3XL
RE0007-M Rapid Repair Neoprene Neck Seal, Medium M-L2
RE0007-S Rapid Repair Neoprene Neck Seal, Small S
RE0007-XS RapidRepairNeopreneNeckSeal,ExtraSmall XS
HEATREMOVECURRENTNECKSEAL
The neck seal in your current dry suit can be removed by using a
simpleheatingmethodwithaMustangHandIron.
1. Preheattheirontoitsmaximumtemperature,approximately310ºF.
2. Placethecirclejiginsidethesuit,whitesideup,inthemiddleof
thenecksealopening.Aproperlyplacedjigwillmakeaniceflat
surface for the seal to sit against, with the bulk of the suit and
collaroutoftheway.SeeFigure19.

16
3. Flattenoutwrinklesaroundtheperimeteroftheneckseal
attachment area. Make sure there are no materials caught
betweenthecirclejigandtheneckseal.
4. Pickapointonthenecksealasastartingpointandheatuntil
adhesivehassoftened,approximately15seconds.SeeFigure20.
Figure19 Figure20
5. Grabnecksealandpullthenecksealawayfromthesuitusing
only light force. The neck seal will separate from the suit in the
area that was heated. Gloves may help as the neck seal will be
hotwherecontactedbytheiron.SeeFigure21.
CAUTION: Stop pulling the neck seal away from the
suit when resistance is encountered.
6. Continuetoheatanadjacentsectionofthenecksealfor15
seconds.
7. Lightlypullthenecksealtodetachtheadjacentsection.
8. Repeatsteps6-7untiltheoldnecksealhasbeenremoved.
9. Removethecirclejigfromthesuitwhenfinished.
Figure21 Figure22

17
PREPPINGTHEMATERIALS
Oncetheexistingnecksealisremoved,itistimetopreparethe
materials for the neck seal replacement. Make sure you have all of
your tools and materials nearby during the replacement process.
1. Withthecirclejigstillinsidethesuit,centerthejiginthemiddle
of the neck seal opening. You should have about 1” of suit
materialaroundtheoutsideofthecirclejig.SeeFigure23.
Figure23 Figure24
3. Peelthebackingpaperoffthereplacementheatactivatedneckseal.
4. Placethereplacementnecksealintotheopeningonthesuit.The
heat adhesive portion of the neck seal should be inside the suit
facingup.Thereshouldbea1/8inchedgeofadhesivevisible
around the edge of the suit. Figure25
SeeFigure24.
5. Ensurethatthereareno
wrinkles in the fabric or
neck seal. Folding the neck
seal in on itself will help to
keep its shape and aid in the
replacement process. See
Figure25.
ATTACHINGAHEATACTIVATEDNECKSEAL
Once your materials are prepped you are ready to attach your new
neck seal.
1. Preheathandirontoitsmaximumtemperature,approximately
310ºF.
2. Startbyheatingsmallsectionsaroundtheedgeoftheneckseal
for3–5secondstotackandholdthenecksealinplace.Continue
tocheckthealignmentbeforeheatingeachspot.SeeFigure26.
Table of contents
Other Mustang Survival Protection Device manuals
Popular Protection Device manuals by other brands

SK
SK MEGAPOD SA17-SK User instruction manual

Stihl
Stihl ADVANCE DURO 00886110611 User information

Eaton
Eaton Crouse-Hinds GFS Series Installation & maintenance information

Waxman
Waxman LeakSmart Water Valve Installation & operation manual

Trend Micro
Trend Micro TippingPoint TPS TX Series Hardware Specification and Installation Guide

Wasserstein
Wasserstein Screen Protector for Fitbit Sense 2 user manual