Mustek MVVR-100 User manual

- 1 -
Welcome to MVVR

- 2 -
Table of Contents
Know Your MVVR ................................................. 4
Know Your LCD Display ......................................... 5
Introduction ............................................................ 6
Using It for the First Time ........................................... 7
Power-On .......................................................... 7
Memory Capacities .............................................. 7
Information Display ............................................. 8
Digital Still Camera Mode ........................................... 9
Taking Your First Picture ....................................... 9
Using the Self-Timer ............................................ 10
Playing Images on a Home TV Set ............................ 10
Toggle Between NTSC and PAL ................................ 11

- 3 -
Digital Voice Recorder Mode ....................................... 13
Volume Adjustment ............................................. 13
Digital Video Camera Mode ......................................... 14
Using It As a PC Camera ....................................... 14
Other Functions (All Modes) ........................................ 15
To Delete One/All Images and Recordings .................. 15
Hold ................................................................ 15
Connecting It to a Computer ................................. 16
Specifications ......................................................... 17

- 4 -
2
3
4
5
6
7
8
9
10
11
12
1
Know Your MVVR
1. Front LED
2. Viewfinder
3. Lens
4. LCD
5. Delete 1/Delete All
6. Rear LED
7. Hold
8. Volume/Info
9. Mode/Power
10. Record/Stop
11. Play/Stop, Prev. Chap./
Next Chap., Timer
12. Speaker

- 5 -
1
2
3
4
5
6 7 8 9 10
11
Know Your LCD
Display
1. Battery Level
2. Locked
3. Volume Level
4. Self-Timer
5. Picture Counter
6. MP3
7. Recording
8. Playing
9. Minute Display
10. Second Display
11. Mode Indicator

- 6 -
Introduction
Thank you for using this MVVR. With this enjoyable multi-
media companion, you can take pictures and short video clips,
or record brief voice messages. With a USB-compatible com-
puter, you can even use it as a MP3 player or PC-camera.
This MVVR is versatile, yet compact, allowing you to take
it anywhere. You can also connect it to a TV set or a loud-
speaker. We hope you will find this MVVR a daily source of
pleasure.
Note: When you connect to a computer, please install
batteries and turn on this MVVR at first. Then you can con-
nect it to your computer’s USB port.

- 7 -
Using It for the First Time
Power-On
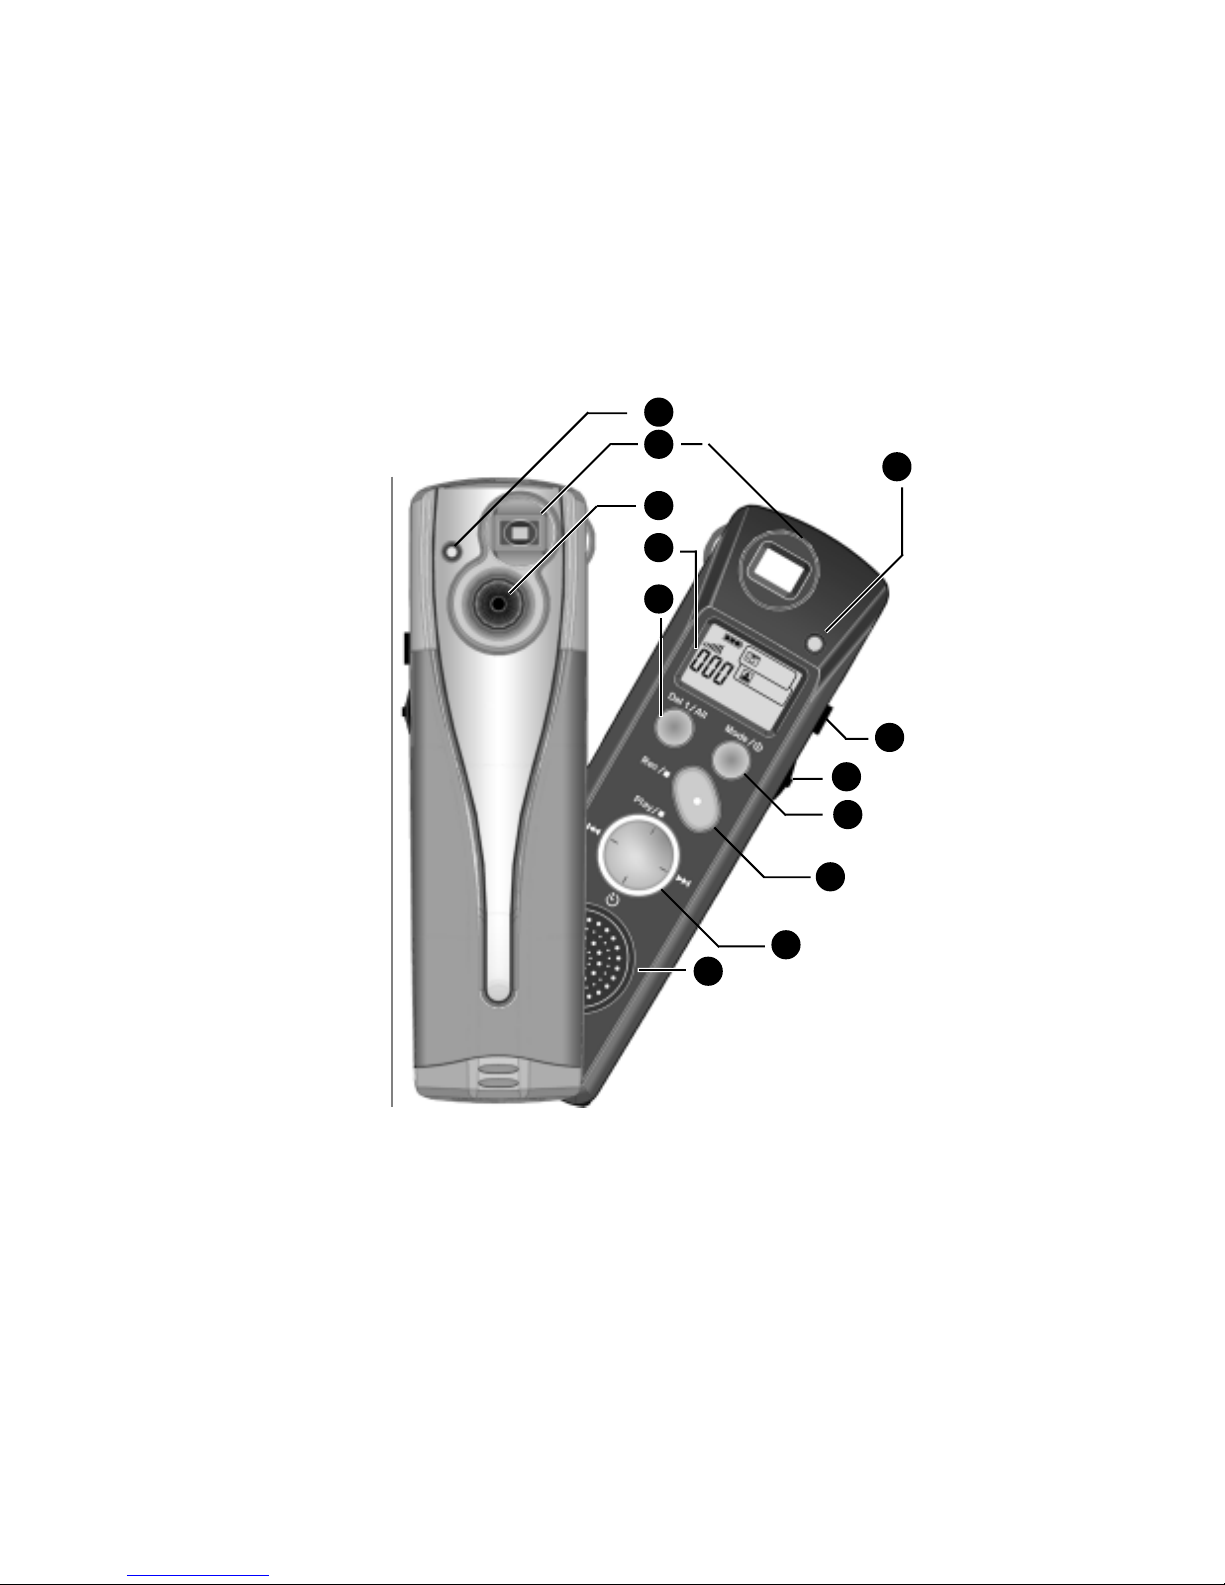
To use this MVVR, press the button. In a few sec-
onds, you will see the main interface light up. You should re-
format the internal memory by executing “delete all” the first
time you use this MVVR.
To shut off this MVVR, just leave it unused for a while and
it will turn itself off. To reactive it, please press again.
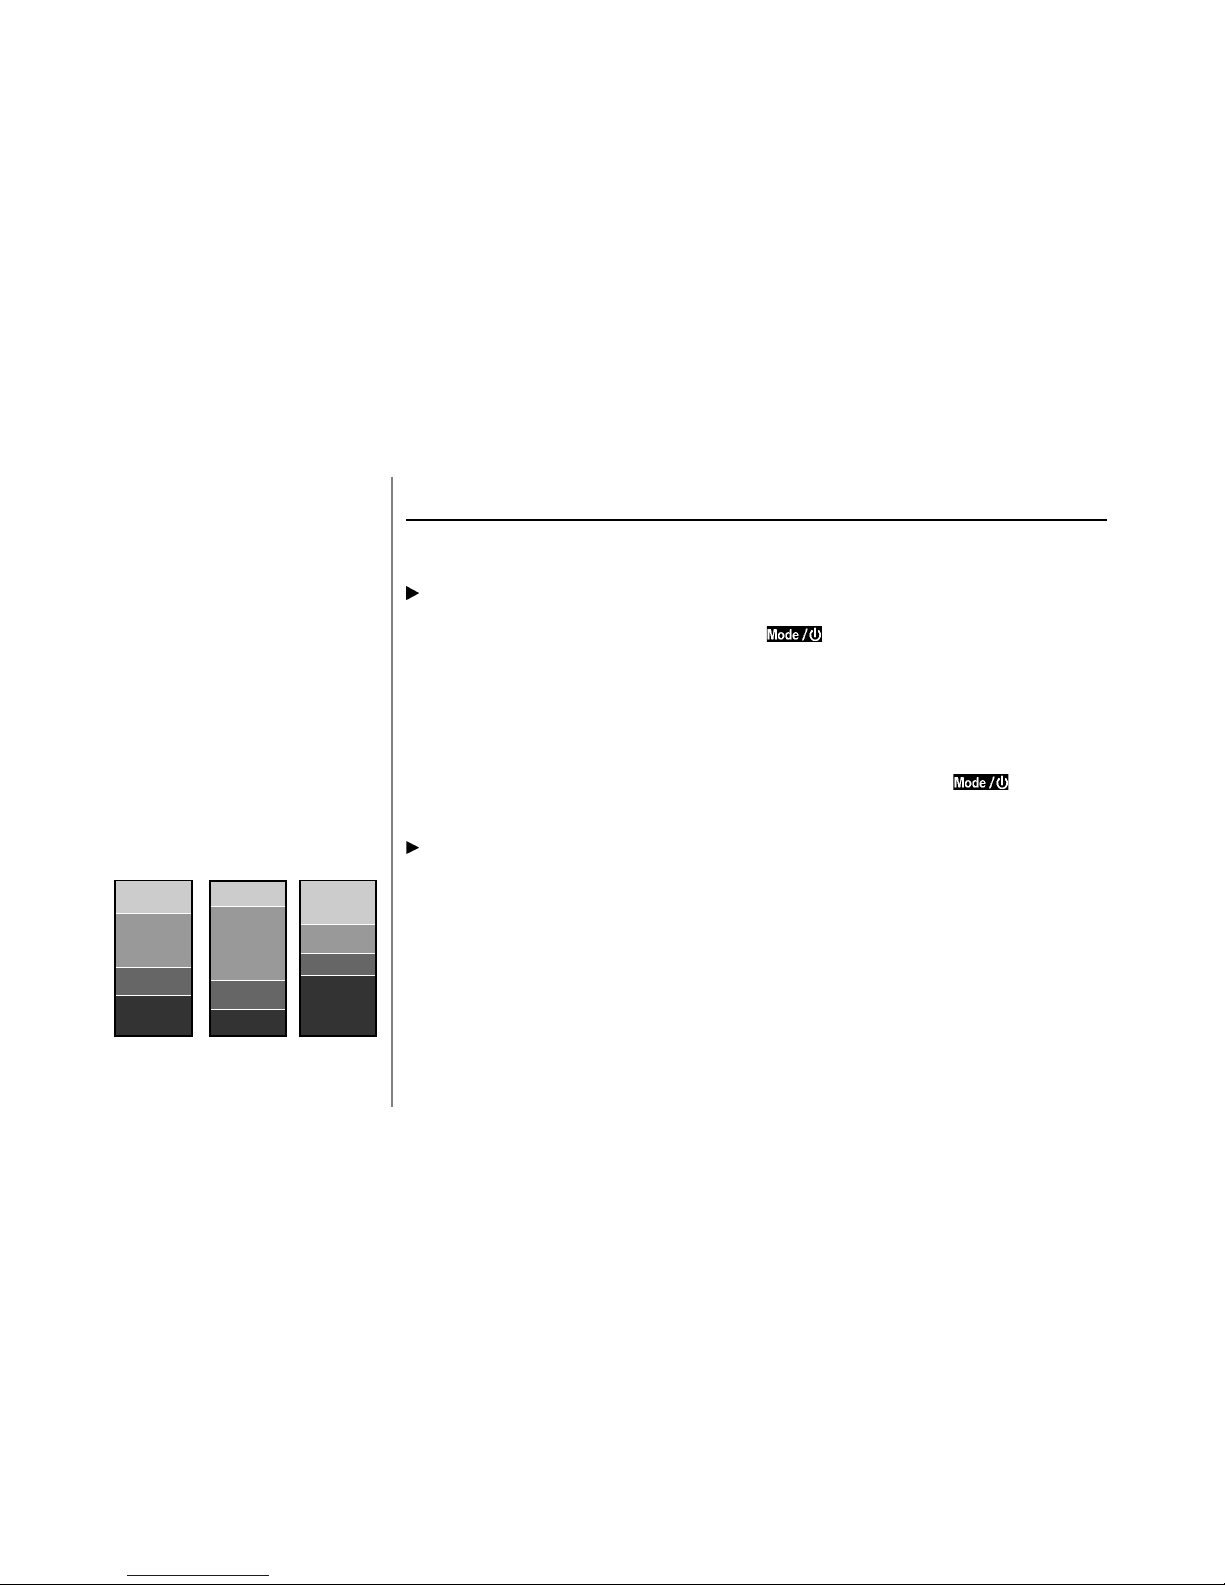
Memory Capacities
To improve memory-use efficiency, this MVVR has a
memory pool of built-in, non-volatile memory (Flash
memory). It is used by all modes. If you record some audio
and video clips, you will not be able to take the maximum
number of pictures.
Memory Allocation
Pics
MP3
Audio
Video
Pics
MP3
Audio
Video
Pics
MP3
Audio
Video

- 8 -
Information Display
Press the volume dial in DSC or DVR mode to see the
amount of remaining memory. The remaining picture count or
maximum remaining lengt of time for voice recording in min-
utes/seconds will be shown. In this case, your MVVR can
either record approximately up to 270 pictures or 408 minutes
and 25 seconds of audio.
Either 270 pictures or 408 minutes
and 25 seconds of audio.

- 9 -
Digital Still Camera Mode
Taking Your First Picture
Use the viewfinder to frame your subjects. Make sure
your MVVR is in DSC mode, then press the shutter. The rear
LED will light up for a couple of seconds. Your MVVR will be
ready for the next shot when the LED is off.
Because this MVVR is compact, your fingers may block the
view of the MVVR’s lens without notice. Be careful to keep
your fingers from the lens to ensure that you do not obscure
your sight with fingers.
Keep your fingers
away from the lens.

- 10 -
Using the Self-Timer
This MVVR comes with a built-in 10-second self-timer.
Press the button, then the shutter, the picture will be taken
after ten seconds. During this period, the LED in front will be
blinking.
You can place this MVVR on its own camera stand before
using the self-timer.
Playing Images On A Home TV Set
To connect this MVVR to a TV set, please use the supplied
analog video cable. The video jack ( ) is on the MVVR’s left
side. Most TV sets have RCA video-in jacks, which are compat-
ible with this MVVR. If your TV set does not have one, you can
connect it to a VCR (Video Cassette Recorder) and bypass the
signal to your TV set.
The front LED will blink
before taking ticture.
The self-timer is
set to 10 seconds.

- 11 -
Toggle Between NTSC and PAL
NTSC ( ) and PAL ( ) are TV signal formats. NTSC is used
primarily in North America and Japan. PAL is used in many
West European countries including the United Kingdom and
Germany. Instead of NTSC and PAL, France and many East
European countries including Russia use another format simi-
NTSC
PA L
SECAM
Worldwide TV signal formats
NTSC
PA L
SECAM
You can toggle between
NTSC and PAL to your TV set’s
preference.

- 12 -
lar to PAL called SECAM. Normally, a SECAM TV set can also
display PAL contents. So if you are in a SECAM country, you
can set your MVVR to PAL. If you don’t know which one to use,
you can experiment. It will not harm your TV.
If your TV does not properly display the pictures, press
the volume dial and then press the shutter to select the right
format.
If the video is only slightly distorted, you may need to
check the connection between your MVVR and the TV set.
Correct Incorrect
You can toggle between
NTSC and PAL using the volume
dial and the shutter.

- 13 -
Digital Voice Recorder Mode
To record a message, press . A bullet will be displayed
under the message number. To stop recording, press again
or press .
Press or to select a message. Press to play the
selected message. Press or again to stop playing.
You can download prerecorded MP3 audio files to this
MVVR. The imported MP3 files will be placed before recorded
audio clips. Let's say you have recorded two audio clips, which
are numbered one and two. After that you imported three
MP3 music files. The three MP3 files will be displayed as MP3
one to three. Your audio clips will be just numbers one and
two.
Volume Adjustment
You can adjust playback volume by using the volume dial.
To save energy, you may want to use earphone instead of the
built-in speaker. The earphone jack ( ) is on the MVVR’s left
side.
A bullet will be displayed
during recording.

- 14 -
Digital Video Camera Mode
This MVVR itself can take silent movies. You can even
connect it to a computer to capture sound clips when in the
PC Camera mode. You can take as many as three 25-second
movies or many more shorter movies with this MVVR’s internal
memory.
The allowable maximum length of the clips is subject to
memory usage and configuration.
Using It As a PC Camera
You can connect this MVVR to a computer with its sup-
plied USB cable and use it as a PC camera. The USB socket
( ) is on the MVVR’s left side. Please refer to the online
manual for detailed instructions. With a compatible video
capture program, you can use it to capture sound movies.
You can use this MVVR
as a PC camera.
Three or more movies no
longer than 25 seconds each.
Movie 1
Movie 2
Movie 3
Movie 1
Movie 2
Movie 3
Movie 4
Movie 1
Movie 2
Movie 3
Movie 4
Movie 5
25
sec.
25
sec.
25
sec.

- 15 -
Other Functions
(
All Modes
)
To Delete One/All Images and Recordings
Press once, you will be asked if you want to delete
current file. Press it the second time, you will be asked if you
want to delete all files including images and sound/video
recordings as well. If you want to keep the files, press
again, you will return to the main menu. Or if you want to
delete file(s), please press the shutter to confirm.
Hold
Push the Hold slider up to lock all keys. If you are playing
anything, the MVVR will continue playing it to the end. If you
are recording audio, the MVVR will continue recording until it
uses up all available memory.
It’s easy to manage your
files using DEL functions.
Movie
MP3
Image
Movie
Audio
Movie
MP3
Image
Movie
Audio
Unused
Shutter
Shutter
Unused
Movie
Image
Movie
Audio

- 16 -
Connecting It To A Computer
With a computer, you can export/import multimedia files
to and from this MVVR. Please refer to the online manual for
instructions on using the driver software.

- 17 -
Specifications
Internal Memory: 16 MB
Image Sensor Type: CMOS
Dimensions: 133 mm x 37 mm x 31 mm (L x W x H)
Focusing Range: 60 cm to infinity
Weight: 110 g (including batteries)
I/O Interface: USB 1.1
Batteries: 2 AAA alkaline batteries
Picture Count: Up to 250-270 frames
Audio Recording Time: Up to 6.5 hrs
MP3 Playing Time: About 16 minutes
(subject to files’ compression ratios)
Video Recording Time: Three or more sections, each section up to 25
seconds. Total length no more than 75 seconds.
Frame Rate: 320 x 240, 8 fps (stand alone mode)
640 x 480, 15 fps (PC camera mode)
Table of contents