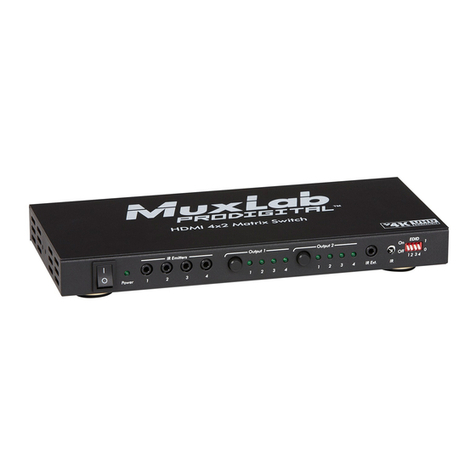
MuxLab 100508 User manual

© Muxlab Inc. 2020 94-000934-A / SE-000934-A
HDMI 4x4 Matrix Switch 4K/60
Operation Manual
100508

HDMI 4x4 Matrix Switch, 4K/60 Installation Guide
© Muxlab Inc. 2020 1
SAFETY PRECAUTIONS
To insure the best performance from the product, please read all instructions carefully before using the device.
Save this manual for future reference.
⚫Follow basic safety precautions to reduce the risk of fire, electrical shock and injury.
⚫Do not dismantle the housing or modify the module. It may result in electrical shock or burns.
⚫Do not open or remove the housing of the device as you may be exposed to dangerous voltage or other
hazards.
⚫To prevent fire or shock hazard, do not expose the unit to rain, moisture and do not install this product near
water. Keep the product away from liquids.
⚫Spillage into the housing may result in fire, electrical shock, or equipment damage. If an object or liquid falls
or spills on to the housing, unplug the module immediately.
⚫Do not use liquid or aerosol cleaners to clean this unit. Always unplug the power to the device before
cleaning.
⚫Using supplies or parts not meeting the products’ specifications may cause damage, deterioration or
malfunction.
⚫Refer all servicing to qualified service personnel.
⚫Install the device in a place with adequate ventilation to avoid damage caused by overheat.
⚫Unplug the power when left unused for a long period of time.
⚫Information on disposal of devices: do not burn or mix with general household waste, please treat them as
normal electrical waste.
NOTICE: Please read this manual carefully before using this product.

HDMI 4x4 Matrix Switch, 4K/60 Installation Guide
© Muxlab Inc. 2020 2
Table of Contents
1.Introduction ......................................................................................................................................................... 2
2. Features............................................................................................................................................................... 3
3. Package Contents................................................................................................................................................ 3
4. Specifications ...................................................................................................................................................... 4
5. Panels Description............................................................................................................................................... 5
5.1 Front Panel................................................................................................................................................. 5
5.2 Rear Panel .................................................................................................................................................. 5
6. Remote Control................................................................................................................................................... 6
7. Operate and Connect.......................................................................................................................................... 6
8. Web GUI Interface............................................................................................................................................... 7
9. Control Protocol................................................................................................................................................ 10
Overview ............................................................................................................................................................... 10
1.1 UART control configuration...................................................................................................................... 10
1.2 TCP control............................................................................................................................................... 10
2. Command Description ...................................................................................................................................... 10
2.1 Command Format (in Hex)....................................................................................................................... 10
2.1.1 Header code................................................................................................................................... 10
2.1.2 Command type............................................................................................................................... 10
2.1.3 Checksum....................................................................................................................................... 10
3. Command detail................................................................................................................................................ 11
3.1 EDID Manage(0x01)............................................................................................................................ 11
3.1.1 Select fixed EDID ............................................................................................................................ 11
3.1.2 Learn EDID from Sink ..................................................................................................................... 12
3.2 Matrix port map manage(0x02)......................................................................................................... 12
3.2.1 Map the selected output port to the specify input port ............................................................... 13
3.2.2 Map all the output ports to an input port..................................................................................... 13
3.2.3 Read all the output mapping information..................................................................................... 14
3.3 Network configuration(0x05)............................................................................................................. 14
3.3.1 Network setting Sub-command..................................................................................................... 14
3.3.2 Read Matrix switch current IP information.................................................................................... 15
3.3.3 Configure DHCP/static IP mode ..................................................................................................... 16
1.Introduction
The HDMI 4x4 Matrix, 4K/60 connects Four (4) HDMI sources to Four (4) displays. This matrix provides Four
HDMI outputs, and each HDMI output supports resolutions from 1080p Full HD up to 4K/60 plus all 3D
formats. It works with Blu-Ray players, Set-Top boxes, Home Theater PCs, and game consoles that connect to
an HDMI display. Any source is accessible at all times to any display, and may be selected via various control
methods, including IR Remote Control, RS-232, TCP/IP or by using the selection buttons on the front panel.
HDMI 4x4 Matrix Switch, 4K/60 Installation Guide
© Muxlab Inc. 2020 3
2. Features
⚫HDMI V2.0 supports: 4K x 2K @60Hz, 1080P @120Hz, and 1080P 3D @60Hz.
⚫Deep Color support 36/30/24-bit.
⚫HDR 4:2:2 12 Bit
⚫Supports LPCM 7.1CH, Dolby True HD, Dolby Digital Plus, DTS-HD Master, Dolby Atmos and DTS:X Audio
transmission.
⚫Allows any source to be displayed on multiple displays at the same time.
⚫Allows any HDMI display to view any HDMI source at any time.
⚫Supports RS-232 control, TCP/IP Control, IR Remote Control, and On-Panel Control.
⚫HDMI connectors with Locking nuts
3. Package Contents
⚫One (1) HDMI 4x4 Matrix Switch, 4K/60
⚫One (1) 12V/2A DC power adapter
⚫Three (3) Blades: US, UK and Euro
⚫One (1) Quick Reference Sheet
⚫One (1) HDMI Matrix IR Remote
⚫One (1) RS232 Terminal Block
Notes:Confirm that the product and accessories are all included. If not, please contact the supplier from which
you purchased the unit.

HDMI 4x4 Matrix Switch, 4K/60 Installation Guide
© Muxlab Inc. 2020 4
4. Specifications
Video Bandwidth
594 MHz
Support Video Resolution
480i,576i,480p,576p,720p,1080i,1080p@
24/30/50/60Hz, 4K@60Hz, 1080P3D@60Hz
Audio
LPCM, compressed (Dolby, DTS) and HBR
HDCP
Revision 1.4 & 2.2
HDR
4:2:2 12 Bit
Input Ports
Four (4) HDMI Receptacle
One (1) RS-232 Terminal Block Connector
One (1) Ethernet Port (Control)
Output Ports
Four (4) HDMI Receptacle
Control
Push Button, RS232, Telnet, Web GUI & IR
ESD Protection
Human-body Model:
± 8kV (Air-gap discharge)
± 4kV (Contact discharge)
Power Supply
One (1) 110-240V/12VDC/2.0A power
supply with interchangeable blades
Dimensions
10.63”4.33”x0.98” (270 × 110 × 25 mm)
Weight
2.40lb (1090 g)
Chassis Material
Metal
Chassis Color
Black
Operating Temperature
0 ºC to 40 ºC / 32 ºF to 104 ºF
Storage Temperature
−20 ºC to 60 ºC / −4 ºF to 140 ºF
Relative Humidity
20 to 90 % RH (non-condensing)
Compliance
Regulatory: FCC, CE, RoHS
Warranty
1 Year
Ordering Information
100508 4X4 HDMI Matrix Switch, 4K/60

HDMI 4x4 Matrix Switch, 4K/60 Installation Guide
© Muxlab Inc. 2020 5
5. Panels Description
5.1 Front Panel
No.
Name
Description
1
IR
IR sensor for the remote control of the 8x8.
2
Output 1
Press the “HDMI OUT 1” button repeatedly to switch to your
desired source, and the LED will illuminate to indicate which input
source is being selected, and routed to HDMI 1 display
3
Output 2
Press the “HDMI OUT 2” button repeatedly to switch to your
desired source, and the LED will illuminate to indicate which input
source is being selected, and routed to HDMI 2 display
4
Output 3
Press the “HDMI OUT 3” button repeatedly to switch to your
desired source, and the LED will illuminate to indicate which input
source is being selected, and routed to HDMI 3 display
5
Output 4
Press the “HDMI OUT 4” button repeatedly to switch to your
desired source, and the LED will illuminate to indicate which input
source is being selected, and routed to HDMI 4 display
6
Power
The LED will illuminate when the power switch is turned on.
5.2 Rear Panel
No.
Name
Description
1
Power
Plug the 12VDC/2A power supply adapter into the unit and
connect the adaptor to the AC wall outlet.
2
HDMI
Input
Connect each of these HDMI input ports to the HDMI output
ports of your source equipment, such as a DVD player, set-top-
box, etc.
3
HDMI
Output
Connect each of these HDMI output ports to the HDMI input
ports of an HDMI display.
4
RS232
Connect to a PC or Laptop via RS232 terminal to D-Sub 9-pin
cable, for the transmission of RS-232 control commands.
5
Ethernet
Connect to your Ethernet network. May be managed via the
device’s web interface, by a PC on the same network.

HDMI 4x4 Matrix Switch, 4K/60 Installation Guide
© Muxlab Inc. 2020 6
6. Remote Control
① Power: Press the button to turn on/off the unit.
② Input Select for HDMI Output 1:
Press 1, 2, 3 or 4 to select the desired input source for HDMI Output 1.
③ Input Select for HDMI Output 2:
Press 1, 2, 3 or 4 to select the desired input source for HDMI Output 2.
④ Input Select for HDMI Output 3:
Press 1, 2, 3 or 4 to select the desired input source for HDMI Output 3.
④ Input Select for HDMI Output 4:
Press 1, 2, 3 or 4 to select the desired input source for HDMI Output 4.
7. Operate and Connect
1. Make sure all equipment is powered off. Insert and connect cables carefully with the power SWITCHED
OFF. Connecting and disconnecting cables while the unit is powered can result in damage to equipment.
2. Connect upto 4 sources such as a Blu-Ray Player, a game console, an A/V Receiver, a Cable or Satellite
Receiver, etc. to the HDMI inputs on the unit. Note that high-quality/premium 4K HDMI cables are
recommended.
3. Connect the HDMI output ports to Ultra High-Definition displays such as an 4K TVs and projectors that
support HDMI connectivity. Note that high-quality/premium 4K HDMI cables are recommended.
4. For power, plug in the unit power jack first, and then plug in the power supply to the wall.
5. Power on each device in the same sequence. At this point each display connected should display the
assigned source (input 1 at default when powered on initially), scroll through each of the sources on each
display to ensure everything is in proper working order. Use the included IR remote to test the switching
function. If a display is having difficulty receiving the HDMI signal, access the display’s menu and adjust
the resolution (lowest to highest until signal is displayed). Please note that a 24 Hz vertical refresh rate
may work better than 60 Hz or higher.

HDMI 4x4 Matrix Switch, 4K/60 Installation Guide
© Muxlab Inc. 2020 7
8. Web GUI Interface
1. Use an Ethernet cable to connect the LAN port on the matrix switch to an unused, active port on the
Ethernet Switch or Router.
2. Get the IP Address by CMD.exe. Enter “ping matrix” into CMD windows as follows.
3. Enter the IP Address into any web browser as follows.
4. Enter Username and Password to login the Web GUI
Default Username is: admin
Default Password is: admin

HDMI 4x4 Matrix Switch, 4K/60 Installation Guide
© Muxlab Inc. 2020 8
Under the Route Setting tab, the User can set any input port to any output port, one by one, or set any input
port to one or more output ports.
In the EDID Management interface, the User can load a Default EDID to any input port, and you can also learn
the EDID from any output port to any input port.

HDMI 4x4 Matrix Switch, 4K/60 Installation Guide
© Muxlab Inc. 2020 9
In the IP Settings tab, you can set the IP Settings such as:
· Enable or disable DHCP
· Host IP
· Net Mask
· Gateway
NOTE: Default IP setting is with “DHCP” enabled.

HDMI 4x4 Matrix Switch, 4K/60 Installation Guide
© Muxlab Inc. 2020 10
9. Control Protocol
Overview
All control commands are supported via the UART interface or TCP interface.
1.1 UART control configuration
Refer to the below configuration for accessing the UART.
1. Set baud rate to 115200bps
2. Set data to 8 bits
3. Set parity to none
4. Set stop bit to 1
5. Flow control is none
1.2 TCP control
How to get the HDMI Matrix IP Address?
Power on the Matrix Switch, and then connect to the Ethernet Switch or Router. Get the Matrix switch IP address
through one of the below two methods.
1. Run cmd.exe from the PC, then input “ping matrix”.
2. Use the UART PORT to send the “get current IP address command”.
The TCP port is 8080.
2. Command Description
2.1 Command Format (in Hex)
Header Code
(2bytes)
Command Type
(1byte)
Length
(2byte)
Parameters
Checksum
(1byte)
0xCC 0xDD
-------------
N
Data[0]~data[N-1]
The commands are in Hex.
2.1.1 Header code
All the commands start with 0xCC 0xDD.
2.1.2 Command type
Command type
code
EDID Manage
0x01
Matrix port map manage
0x02
Network configuration
0x05
2.1.3 Checksum
Checksum equal to
0xCC^0xDD^CommandType^length[0]^length[1]^Parameter[0]…^parameter[i]
Example: 0Xcc 0Xdd 0x01 0x00 0x03 0x05 0x03 0x01 0x14

HDMI 4x4 Matrix Switch, 4K/60 Installation Guide
© Muxlab Inc. 2020 11
0xCC xor 0xDD xor 0x01 xor 0x00 xor 0x03 xor 0x05 xor 0x01=0x14
3. Command detail
3.1 EDID Manage(0x01)
EDID Manage Command is used to configure the input HDMI EDID, This matrix supports two EDID management modes:
1. Select a fixed EDID, which is the system default method (10 EDID types)
2. Learn the EDID from the SINK device
There are two sub-commands used for EDID manage, the first data portion of the parameter is used for the sub-command.
Sub-command
code
Select fixed EDID
0x05
Learn EDID from SINK
0x04
3.1.1 Select fixed EDID
Head Code
(2bytes)
Command type
(1byte)
Length (2byte)
parameters
Checksum
(1byte)
0xCC 0xDD
0x01
0x00 0x03
0x05 Data[1] Data[2]
0xXX
Parameter description:
Data[0] (0x05):sub-command, used for selecting fixed EDID.
Data[1]:select EDID index, which is the matrix switch default method. Refer to the below table.
DATA[1] index
EDID type
0
4KX2KP60_HDPCM_HDR
1
4KX2KP60_HDPCM
2
4KX2KP60_dolby_DTS5.1_HDR
3
4KX2KP60_dolby_DTS5.1
4
4KX2KP60_2Ch PCM Audio_HDR
5
4KX2KP60_2Ch PCM Audio
6
4KX2KP30_HD Audio_HDR
7
4KX2KP30_HD Audio
8
4KX2KP30_dolby_DTS5.1_HDR
9
4KX2KP30_dolby_DTS5.1
10
4KX2KP30_2CH AUDIO_HDR
11
4KX2KP30_2CH AUDIO
12
1080P60 HD PCM_HDR
13
1080P60 HD PCM
14
1080P60 Dolby_DTS5.1_HDR
15
1080P60 Dolby_DTS5.1
16
1080P60 2Ch audio_HDR
17
1080P60 2Ch audio
18
1080i60 HD AUDIO
19
1080i60 Dolby DTS 5.1

HDMI 4x4 Matrix Switch, 4K/60 Installation Guide
© Muxlab Inc. 2020 12
20
1080i60 2Ch audio
Data[2]:select the HDMI input port which needs to configure the EDID.
Data[2]
HDMI input port
0
Input 1
1
Input 2
2
Input 3
3
Input 4
Example: HDMI input2 configure to 4KX2KP60_dolby_DTS5.1.
Command is: 0xCC 0xDD 0x01 0x00 0x03 0x05 0x03 0x01 0x14
3.1.2 Learn EDID from Sink
This command is used for learn the EDID from output HDMI port to input HDMI port. If sending this command, the matrix
switch will get the EDID from the selected output HDMI port first, and then update the selected input HDMI port. If the selected
output HDMI doesn’t connect to any sink, this command is invalid.
Head Code(2bytes)
Command type(1byte)
Length (2byte)
parameters
Checksum
(1byte)
0xCC 0xDD
0x01
0x00 0x03
0x04 Data[1] Data[2]
0xXX
Parameter description:
0x04:sub-command for EDID manage, indicates that this command is used to learn the EDID from the sink device.
Data[1]: Select the output HDMI port which matrix switch gets the EDID.
DATA[1]
Sink
0
HDMI OUT 1
1
HDMI OUT 2
2
HDMI OUT 3
3
HDMI OUT 4
Data[2]:Select the input HDMI port which needs to learn the EDID from the select output HDMI port
Data[2]
HDMI input port
0
Input 1
1
Input 2
2
Input 3
3
Input 4
Example: Learning EDID from HDMI input 1 port to HDMI output 3 port.
Command is: 0xCC 0xDD 0x01 0x00 0x03 0x04 0x02 0x00 0x15
3.2 Matrix port map manage(0x02)
The matrix port map manage has four sub-commands (the first data of parameters is used for sub-command), sub-commands are

HDMI 4x4 Matrix Switch, 4K/60 Installation Guide
© Muxlab Inc. 2020 13
defined as shown below:
Sub-command
code
Map the selected output port to the specify input
port
0x01
Map all the output ports to an input port
0x02
Read all the output mapping information
0x05
3.2.1 Map the selected output port to the specify input port
Head Code(2bytes)
Command type
(1byte)
Length (2byte)
parameters
Checksum
(1byte)
0xCC 0xDD
0x02
0x00 0x03
0x01 Data[1] Data[2]
0xXX
Parameter description:
0x01: sub-command, this command is used to map one HDMI output port to the specify HDMI input port
Data[1]: HDMI input port index
0→Input 1
1→Input 2
2→Input 3
3→Input 4
Data[2]:HDMI output port index
0→Output 1
1→Output 2
2→Output 3
3→Output 4
Example: Connecting HDMI output port 3 to HDMI input port 2.
Command is: 0xCC 0xDD 0x02 0x00 0x03 0x01 0x01 0x02 0x12
3.2.2 Map all the output ports to an input port
Head Code(2bytes)
Command type
(1byte)
Length (2byte)
parameters
Checksum
(1byte)
0xCC 0xDD
0x02
0x00 0x02
0x02 Data[1]
0xXX
Parameter description:
0x02: sub-command, used to set all the HDMI output ports to a selected input port
Data[1]: Connecting an HDMI input port to all the HDMI output ports
0→Input 1
1→Input 2
2→Input 3
3→Input 4
Example: Connect all the HDMI output ports to HDMI input 3
Command is: 0xCC 0xDD 0x02 0x00 0x02 0x02 0x02 0x11

HDMI 4x4 Matrix Switch, 4K/60 Installation Guide
© Muxlab Inc. 2020 14
3.2.3 Read all the output mapping information
Command: PC→ matrix, gets the matrix switch mapping information
Head Code(2bytes)
Command type(1byte)
Length (2byte)
parameters
Checksum
(1byte)
0xCC 0xDD
0x02
0x00 0x02
0x05 0x00
0x14
Parameter area description:
0x05: sub-command
0x00: reserve
Matrix switch responds to PC.
Head Code(2bytes)
Command type(1byte)
Length (2byte)
parameters
Checksum
(1byte)
0xCC 0xDD
0x02
0x00 0x05
0x05 Data[1]data[2]data[3] data[4]
0xXX
Parameter area description:
0x05: Sub-command
Data[1]: indicates HDMI output 1 links to which HDMI input port
Data[2]: indicates HDMI output 2 links to which HDMI input port
Data[3]: indicates HDMI output 3 links to which HDMI input port
Data[4]: indicates HDMI output 4 links to which HDMI input port
index
port
0
Input 1
1
Input 2
2
Input 3
3
Input 4
3.3 Network configuration(0x05)
Network setting has three sub-commands (the first data parameter is used for the sub-command). The sub-command is defined as
shown below:
Network setting Sub-command
code
Set static IP address
0x01
Read Matrix current IP information
0x02
Configure DHCP/static IP mode
0x04
3.3.1 Network setting Sub-command
Before setting static IP Address, you need to configure the matrix switch to work in static IP mode.
Head Code(2bytes)
Command type
(1byte)
Length (2byte)
parameters
Checksum
(1byte)
0xCC 0xDD
0x05
0x00 0x0D
0x01 Data[1]~Data[12]
0xXX
Parameter area description:
0x01: sub-command, set static IP address
Data[1]~Data[4]: these four bytes indicates the setting IP address, example 192.168.31.113

HDMI 4x4 Matrix Switch, 4K/60 Installation Guide
© Muxlab Inc. 2020 15
Data[1]—0xC0 (192)
Data[2]—0xA8 (168)
Data[3]—0x1F (31)
Data[4]—0x71 (113)
Data[5]~Data[8]:these four bytes indicatess the net mask,example:255.255.255.0
Data[5]—0xFF (255)
Data[6]—0xFF (255)
Data[7]—0xFF (255)
Data[8]—0x00 (0)
Data[9]~Data[12]:these four bytes indicates the gateway,example:192.168.31.1
Data[9]---0xC0 (192)
Data[10]—0xA8 (168)
Data[11]—0x1F (31)
Data[12]—0x01 (1)
3.3.2 Read Matrix switch current IP information
Command: PC→matrix
Head Code(2bytes)
Command type(1byte)
Length (2byte)
parameters
Checksum
(1byte)
0xCC 0xDD
0x05
0x00 0x02
0x02 0x00
0x14
Matrix responds to PC.
Head Code(2bytes)
Command type
(1byte)
Length (2byte)
parameters
Checksum
(1byte)
0xCC 0xDD
0x05
0x00 0x0E
0x02 DATA[1]~DATA[13]
0x14
0x02: sub-command, reading matrix switch current IP address
Data[1]~Data[4]: these four bytes indicates the setting IP address, example 192.168.31.113
Data[1]—0xC0 (192)
Data[2]—0xA8 (168)
Data[3]—0x1F (31)
Data[4]—0x71 (113)
Data[5]~Data[8]: these four bytes indicates the net mask, example:255.255.255.0
Data[5]—0xFF (255)
Data[6]—0xFF (255)
Data[7]—0xFF (255)
Data[8]—0x00 (0)
Data[9]~Data[12]: these four bytes indicates the gateway, example:192.168.31.1
Data[9]---0xC0 (192)
Data[10]—0xA8 (168)
Data[11]—0x1F (31)
Data[12]—0x01 (1)
Data[13]:This byte indicates the DHCP/static IP mode the matrix switch is set to, 1—DHCP mode, 0—static IP mode

HDMI 4x4 Matrix Switch, 4K/60 Installation Guide
© Muxlab Inc. 2020 16
3.3.3 Configure DHCP/static IP mode
Head Code(2bytes)
Command type
(1byte)
Length (2byte)
parameters
Checksum
(1byte)
0xCC 0xDD
0x05
0x00 0x02
0x04 Data[1]
0xXX
Parameter Area description:
0x04: sub-comand, setting DHCP/static IP mode
Data[1]: indicates DHCP mode/static IP mode, 1—DHCP mode, 0—static IP mode
Example: setting matrix switch to static IP mode
Command is: 0xCC 0xDD 0x05 0x00 0x02 0x04 0x00 0x12

HDMI 4x4 Matrix Switch, 4K/60 Installation Guide
© Muxlab Inc. 2020 17
Regulatory Compliance
Disclaimer
Information in this document is subject to change without notice. The manufacturer does not make any
representations or warranties (implied or otherwise) regarding the accuracy and completeness of this document
and shall in no event be liable for any loss of profit or any other commercial damage, including but not limited
to special, incidental, consequential, or other damages.
No part of this document may be reproduced or transmitted in any form byany means, electronic or mechanical,
including photocopying, recording or information recording and retrieval systems without the express written
permission of the manufacturer.
All brand names and product names used in this document are trademarks, or registered trademarks of their
respective holders.
2321 Cohen Road, Saint-Laurent, Quebec, Canada. H4R 2N7
Tel: (514) 905-0588 Fax: (514) 905-0589
Toll Free (North America): (877) 689-5228
E-mail: videoease@muxlab.com URL:
www.muxlab.com
Other manuals for 100508
1
Table of contents
Other MuxLab Matrix Switcher manuals

MuxLab
MuxLab 500470 User manual

MuxLab
MuxLab 500444 User manual

MuxLab
MuxLab PRODIGITAL 500442 User manual

MuxLab
MuxLab 500412 User manual

MuxLab
MuxLab 500413 User manual

MuxLab
MuxLab 500418-POE-UK User manual

MuxLab
MuxLab 500416-POE-US User manual

MuxLab
MuxLab 100508 User manual

MuxLab
MuxLab 500418-POE User manual

MuxLab
MuxLab 500412-V2 User manual