manuals.online logo
Brands
  1. Home
  2. •
  3. Brands
  4. •
  5. MuxLab
  6. •
  7. Transmitter
  8. •
  9. MuxLab 500016 User manual

MuxLab 500016 User manual

8495 Dalton Road, Montreal, Quebec, Canada. H4T 1V5
Tel: (514) 905-0588 Fax: (514) 905-0589
Toll Free (North America): (877) 689-5228
E-mail: [email protected] URL: www.muxlab.com
© MuxLab Inc. 94-000306-G SE-000268-G
Specifications
Environment S-Video equipment
Devices DVD players, satellite receivers, laptops, notebooks, monitors, LCD
projectors, CCD cameras, video switchers, S-Video splitters, S-Video
converters and other S-Video equipment.
Transmission Transparent to the user
S-Video Audio (500017 only)
Bandwidth DC to 6 MHz 20 Hz ~ 20 kHz
Peripherals’
Impedance
75 ohms Source 100 ΩMx, Receiver 10 kΩmin.
Max. Input 1.1 Vp-p 1.1 Vp-p
THD NA Less then 0.007% @ 1 kHz
Insertion Loss Less than 2 dB per pair from
DC to 6 MHz
Less than 2 dB per pair
Return Loss Better than 15 dB over the
frequency range
N/A
Common Mode
Rejection Ratio
Greater than 40 dB over the
frequency range
N/A
Max. Distance:
Cat5e/6 UTP/STP
1,000 ft (305 m) 3250 ft (1 km)
Pin Configuration
(RJ45)
Luma: Pins 7(R) & 8(T)
Chroma: Pins 4(R) & 5(T)
Reverse Polarity Sensitive
Audio 1: Pins 1(R) & 2(T)
Audio 2: Pins 3(R) & 6(T)
Cable:
Cat5e/6 UTP/STP
24 AWG or lower solid copper twisted pair wire
Impedance: 100 ohms at 1 MHz Maximum capacitance: 20 pf/ft
Attenuation: 6.6 dB/1,000 ft at 1 MHz
Connectors 500016: One (1) 4-pin Mini DIN and one (1) RJ45
500017: One (1) 4-pin Mini DIN, two (2) RCA jacks and one (1) RJ45
The 500017 comes with one (1) 6” dual-RCA stereo audio cable
Temperature Operating: 0° to 55°C Storage: -20° to 85°C
Humidity: Up to 95% non-condensing.
Enclosure Fire retardant plastic
Dimensions 500016: 1.875” x 1.0” diameter plus 5” S-Video lead
500017: 2.40” x 2.25” x 1.00” plus 5” S-Video lead
Weight 500016: 1.0 oz (28 g)
500017: 4.1 oz (118 g)
Warranty Lifetime
Order Information 500016 S-Video Balun
500017 S-Video/Audio Balun
S-Video Balun – 500016
S-Video/Audio Balun – 500017
Quick Installation Guide
Overview
The S-Video Balun allows a single S-Video signal to be transmitted via an unshielded twisted pair
(UTP) cable in a point-to-point connection for more versatile cabling.
The product is available in two models: The S-Video Balun (500016) and the S-Video/Audio Balun
(500017). Used in pairs, the S-Video Balun eliminates costly and bulky S-Video cables, allowing S-
Video equipment to be connected or moved to any convenient modular outlet. The S-Video Balun
works in conjunction with MuxLab’s CCTV-Audio/Video Distribution Hub (500200), allowing S-
Video programming to be distributed via UTP. The 500017 has a 20 Hz- 20 kHz bandwidth for Hi-
Fidelity applications.
Applications
The S-Video Balun allows pre-existing twisted pair cables to be used in such applications as
classroom video distribution, overhead projector systems, PC-training systems and tradeshow
PC-demo systems in the S-Video environment.
© MuxLab Inc.
Installation
To install the S-Video Balun, perform the following steps:
Caution: Do not attempt to open the housing. There are no user-serviceable parts inside the
VGA Balun. Opening the unit will void your warranty.
1. Turn off power and disconnect the S-Video source and S-Video monitor.
2. Make certain that modular outlets and cross connects to which you will connect the S-Video
Balun are configured properly and labeled appropriately to identify the circuit.
Caution: Do not connect the S-Video Balun to a telecommunication outlet wired to
unrelated equipment. Making such a connection may damage the equipment and/or
the balun. Please ensure that all wiring is “straight-through” twisted pair.
3. Verify that the desired twisted pairs are not being used for other LAN or telephone equipment.
4. The S-Video Baluns operate in pairs.
5. Connect the S-Video Balun (500016 or 500017) to the S-Video port of the source equipment
(i.e., DVD or VCR). If the S-Video/Audio Balun is being installed, connect the audio
connectors to the audio source via RCA-type audio/video jumper cables.
Caution: Do not mount the balun over equipment ventilation openings. Covering the
openings may cause the equipment to overheat.
6. Connect a 4-pair Cat5e/6 cable from the RJ45 8-position modular jack of the S-Video Balun
to the twisted pair cabling of the building. The 500016 requires two pairs. The 500017
requires four pairs if both S-Video and stereo audio are used.
7. At the destination point, connect an S-Video Balun to the S-Video monitor or projector.
8. Connect a 4-pair Cat5e/6 cable from the RJ45 connector of the S-Video Balun to the
appropriate modular wall outlet. See typical application below. If the S-Video/Audio Balun is
being installed, connect the audio connectors to the audio inputs (i.e., loudspeakers) via RCA-
type audio/video jumper cables.
9. Power on the S-Video equipment at both ends and adjust the monitor image and audio levels
to the desired settings.
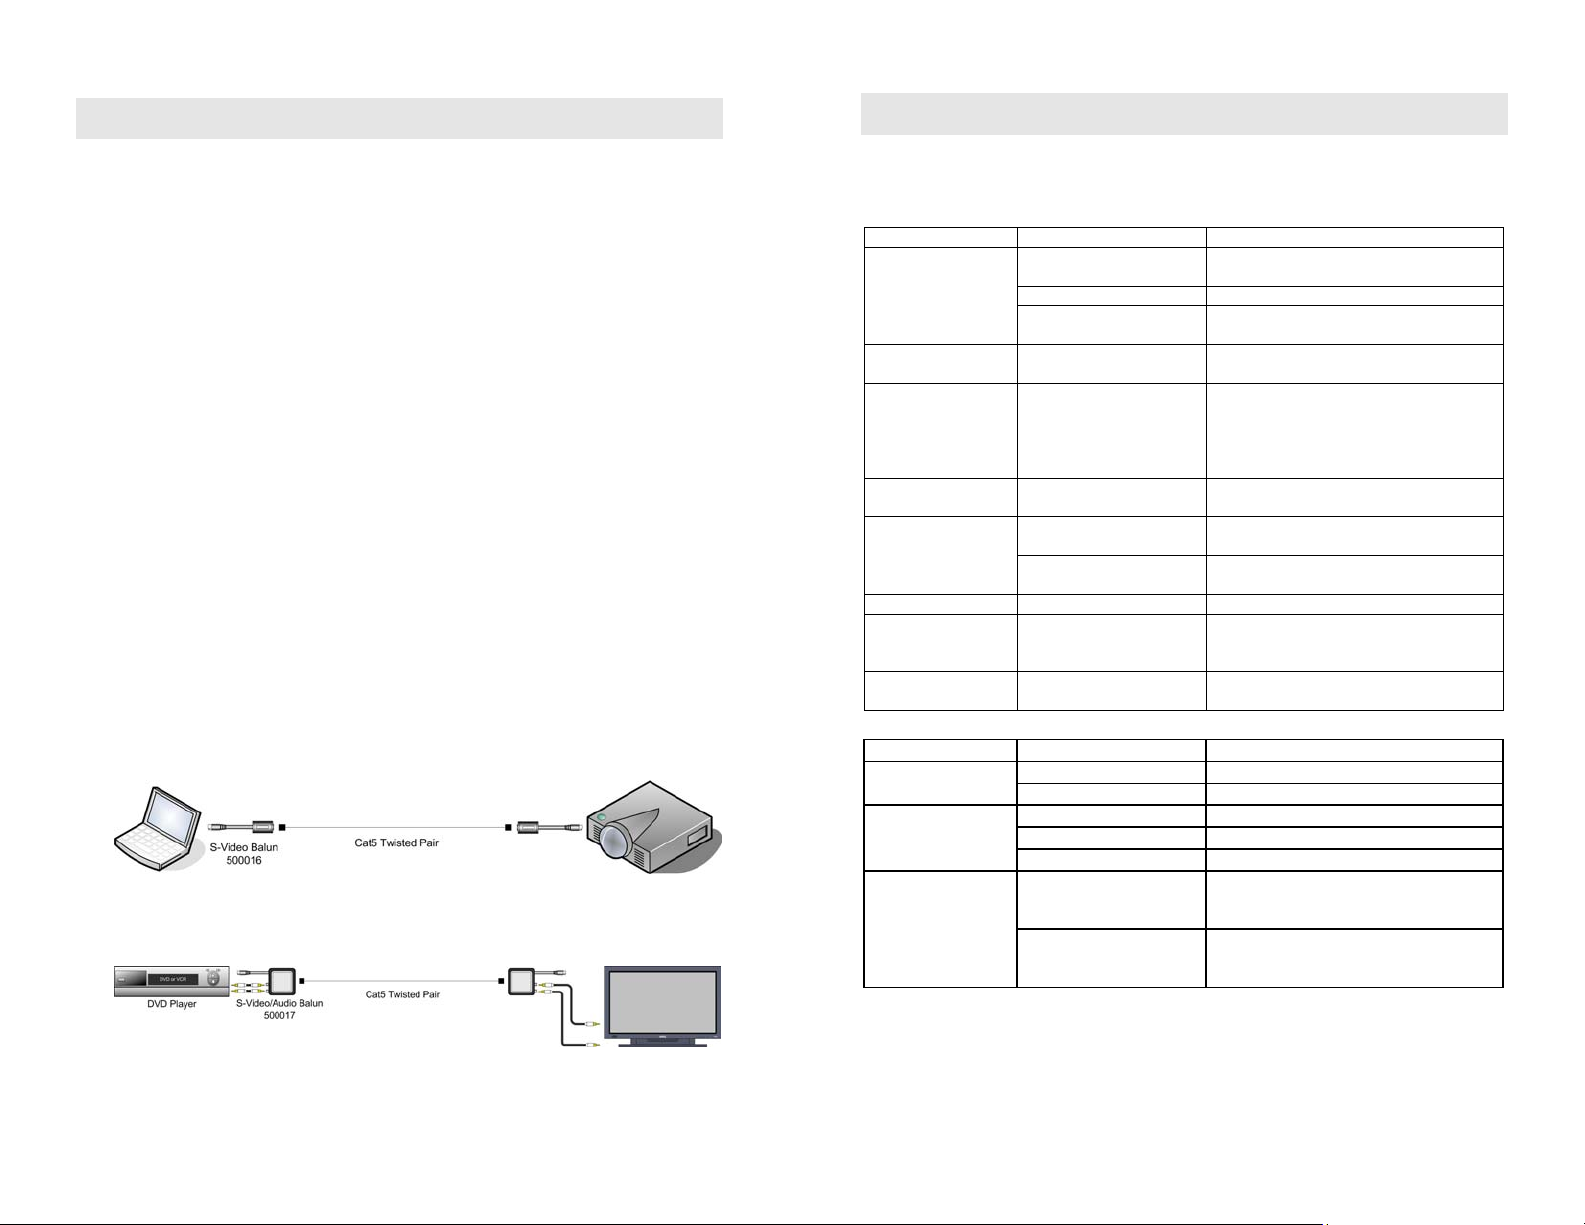
S-Video Projection Using 500016
S-Video and Audio Using 500017
Troubleshooting
The following tables describe some of the symptoms, probable causes and possible solutions
regarding the S-Video Balun:
Video Symptom Probable Cause Possible Solutions
No continuity in video link Verify cable continuity between pairs of
baluns.
Power off Check power supplies of video equipment.No video
Improper connection and/or
swapped pair
Check that baluns are connected to correct
video inputs and outputs
Unusual colors Reversed polarity Check wiring and ensure straight-through
polarity
Background
pattern EMI interference
Identify possible radiating frequency sources
(i.e., wireless LANs, switching power
supplies). Try to isolate them from the video
connection. Use shielded twisted pair
grounded at both ends.
Smearing Exceeded distance Verify cable grade. Use higher-grade cable if
necessary.
Exceeded distance Verify cable grade. Use higher-grade cable if
necessary. Increase contrast on monitor.
Weak contrast
Unusual link attenuation Verify cable distance using ohmmeter or
cable tester.
Image not stable Defective link or equipment Verify video equipment interface integrity.
Horizontal bars
moving slowly
Substantial crosstalk
between multiple video
sources
Consecutively turn off other video sources to
determine which video source is the cause of
interference.
Snowy picture Distance is near limit Verify cable grade; use higher-grade cable if
necessary; reduce color intensity at monitor.
Audio S
y
m
p
tom Probable Cause Possible Solutions
EMI interference Check that wiring is not too close to
Poor Quality Audio Split pair Correct the UTP pairs if they are split.
Power-off Check power supply.
Open contact Check wiring to ensure continuity.
No Audio
Defective Audio Balun Change Audio Baluns for another pair.
Distance exceeds specs
Check DC loop resistance.
Reduce cable length or eliminate high-loss
components.
Weak Audio Lower grade UTP cable is
introducing high signal
losses.
Use signal repeater for extended distance.
Replace cable by higher grade.

This manual suits for next models

1

Other MuxLab Transmitter manuals

MuxLab 500764-TX User manual

MuxLab

MuxLab 500764-TX User manual

MuxLab 500053-WP-UK User manual

MuxLab

MuxLab 500053-WP-UK User manual

MuxLab 500058-WP-UK User manual

MuxLab

MuxLab 500058-WP-UK User manual

MuxLab 500056-PRO User manual

MuxLab

MuxLab 500056-PRO User manual

MuxLab 500763-TX User manual

MuxLab

MuxLab 500763-TX User manual

MuxLab 500764-TX User manual

MuxLab

MuxLab 500764-TX User manual

MuxLab 500038-WP-US User manual

MuxLab

MuxLab 500038-WP-US User manual

MuxLab 500060 User manual

MuxLab

MuxLab 500060 User manual

MuxLab 500010 User manual

MuxLab

MuxLab 500010 User manual

MuxLab SE-000857-C User manual

MuxLab

MuxLab SE-000857-C User manual

MuxLab 500052-PRO-BNC User manual

MuxLab

MuxLab 500052-PRO-BNC User manual

MuxLab Stereo Hi-Fi Balun User manual

MuxLab

MuxLab Stereo Hi-Fi Balun User manual

MuxLab 500777-TX User manual

MuxLab

MuxLab 500777-TX User manual

MuxLab 500777-TX-DECO User manual

MuxLab

MuxLab 500777-TX-DECO User manual

MuxLab 500773-TX User manual

MuxLab

MuxLab 500773-TX User manual

MuxLab 500028-WP-UK User manual

MuxLab

MuxLab 500028-WP-UK User manual

MuxLab 500032 User manual

MuxLab

MuxLab 500032 User manual

MuxLab 500039-2PK User manual

MuxLab

MuxLab 500039-2PK User manual

MuxLab 500763-TX User manual

MuxLab

MuxLab 500763-TX User manual

MuxLab 500052 User manual

MuxLab

MuxLab 500052 User manual

MuxLab 500755-AMP-TX User manual

MuxLab

MuxLab 500755-AMP-TX User manual

Popular Transmitter manuals by other brands

Shure P4T user guide

Shure

Shure P4T user guide

William Sound WIR TX-9 DC Installation guide & user manual

William Sound

William Sound WIR TX-9 DC Installation guide & user manual

Niko 410-00001 manual

Niko

Niko 410-00001 manual

Linear Multi-Code 1051 user manual

Linear

Linear Multi-Code 1051 user manual

Comtek M-216 Operator's manual

Comtek

Comtek M-216 Operator's manual

Burkert 8025 UNIVERSAL quick start

Burkert

Burkert 8025 UNIVERSAL quick start

Lectrosonics MM400C instruction manual

Lectrosonics

Lectrosonics MM400C instruction manual

MJK Expert 1400 manual

MJK

MJK Expert 1400 manual

Emerson Rosemount OCX 8800 Reference manual

Emerson

Emerson Rosemount OCX 8800 Reference manual

Extron electronics XTP T VGA user guide

Extron electronics

Extron electronics XTP T VGA user guide

Verint Nextiva S1100 user guide

Verint

Verint Nextiva S1100 user guide

technetix AIMA3000.FT5S user manual

technetix

technetix AIMA3000.FT5S user manual

Erreka IRIS IR04 quick start guide

Erreka

Erreka IRIS IR04 quick start guide

Ritron Quick Talk Basic owner's manual

Ritron

Ritron Quick Talk Basic owner's manual

Sennheiser SKM 1030 Product sheet

Sennheiser

Sennheiser SKM 1030 Product sheet

Honeywell ADEMCO 5878 Installation and setup guide

Honeywell

Honeywell ADEMCO 5878 Installation and setup guide

KROHNE TT 51 Series Handbook

KROHNE

KROHNE TT 51 Series Handbook

F&F FW-RC4-AC v2 manual

F&F

F&F FW-RC4-AC v2 manual

manuals.online logo
manuals.online logoBrands
  • About & Mission
  • Contact us
  • Privacy Policy
  • Terms and Conditions

Copyright 2025 Manuals.Online. All Rights Reserved.