MWf lineo User manual

EDELSTAB 4-in-1
LINEO
Gebrauchsanweisung 6
Operating Manual 14
Mode d’emploi 22
Istruzioni per l’uso 30
Instrucciones de uso 38
Gebruiksaanwijzing 46
Brugsanvisning 54
Användarguide 60
Käyttöohje 66
Bruksanvisning 72
nl
da
sv
fi
no
de
en
fr
it
es

Aufbau Stabmixer
1 Drehring (Einstellung Geschwindigkeit)
2 Ein-Taste
3 Turbo-Taste
4 Entriegelungsknopf (Rückseite)
5 Pürierstab
6 Schutzkappe
7 Messbecher mit Anti-Rutsch-Sockel
Design of blender
1 Swivel (speed setting)
2 On button
3 Turbo button
4 Release knob (reverse)
5 Purée rod
6 Protective cap
7 Measuring jug with anti-slip base
Montage du mixeur plongeant
1 Commutateur rotatif (réglage de la vitesse)
2 Touche ON
3 Touche Turbo
4 Bouton de déverrouillage (face arrière)
5 Mixeur plongeant
6 Bouchon protecteur
7 Pot gradué avec socle antidérapant
Struttura del mixer ad immersione
1 Anello girevole (impostazione della velocità)
2 Pulsante ON
3 Pulsante TURBO
4 Pulsante di sgancio (lato posteriore)
5 Frullatore ad immersione
6 Cappuccio di protezione
7 Misurino con base anti-scivolo
Montaje de la minipimer
1 Anillo giratorio (ajuste de la velocidad)
2 Botón On
3 Botón Turbo
4 Botón de desbloqueo (parte trasera)
5 Batidora
6 Tapa protectora
7 Vaso medidor con zócalo antideslizante
Onderdelen van de staafmixer
1 Draairing (instellen snelheid)
2 Aan/Uit-knop
3 Turbo-knop
4 Ontgrendwelingsknop (achterkant)
5 Mixerstaaf
6 Beschermkap
7 Maatbeker met antislip-voet
Produktoversigt stavblender
1 Drejering (indstilling af hastighed)
2 Tænd-knap
3 Turbo-knap
4 Udløserknap (bagside)
5 Blenderfod
6 Beskyttelseskappe
7 Målebæger med anti-glide-foden
Stavmixerns uppbyggnad
1 Vred (inställning av hastighet)
2 På-knapp
3 Turboknapp
4 Upplåsningsknapp (baksida)
5 Mixer
6 Skyddskåpa
7 Mätglas med halksäkra sockeln
Sauvasekoittimen osat
1 Kääntörengas (nopeuden säätö)
2 Käynnistysnäppäin
3 Turbonäppäin
4 Vapautusnäppäin (takapuolella)
5 Sekoitussauva
6 Suojakansi
7 Mitta-astia liukumatonta alustaa
Stavmikserens komponenter
1 Dreiering (innstilling hastighet)
2 På-knapp
3 Turbo-knapp
4 Utløserknapp (bakside)
5 Pureringsstav
6 Beskyttelseskappe
7 Målebeger med antisklisokkelen
1
2
3
5
4
7
6
max.

Zubehör-Set
8 Oberteil mit integriertem Adapter
9 Behälter
10 Edelstahl-Messer
11 Anti-Rutsch-Sockel
12 Adapter
13 Schneebesen
14 Milchaufschäumer
Accessory set
8 Upper part with integrated adapter
9 Container
10 Stainless steel knife
11 Anti-slip base
12 Adapter
13 Whisk
14 Milk frother
Accessoires
8 Partie supérieure avec adaptateur intégré
9 Réservoir
10 Couteau en acier
11 Socle antidérapant
12 Adaptateur
13 Fouet
14 Moussoir à lait
Kit accessori
8 Parte superiore con adattatore integrato
9 Recipiente
10 Coltello di acciaio legato
11 Piedino antiscivolo
12 Adattatore
13 Frusta
14 Schiumatore
Juego de accesorios
8 Pieza superior con adaptador integrado
9 Recipiente
10 Cuchilla de acero inoxidable
11 Base antideslizante
12 Adaptador
13 Batidor
14 Espumador de leche
Accessoires set
8 Bovendeel met geïntegreerde adapter
9 Kom
10 Roestvrij stalen messen
11 Antislipvoet
12 Adapter
13 Garde
14 Melkopschuimer
Tilbehørssæt
8 Overdel med integreret adapter
9 Beholder
10 Kniv af rustfrit stål
11 Skridsikker fod
12 Adapter
13 Piskeris
14 Mælkeskummer
Tillbehörssetets
8 Överdel med inbyggd adapter
9 Behållare
10 Rostfri kniv
11 Halksäkert underlag
12 Adapter
13 Visp
14 Mjölkskummare
Lisävarustesetin
8 Yläosa integroidulla adapterilla
9 Astia
10 Jaloteräksinen terä
11 Liukumaton alusta
12 Adapteri
13 Vispilä
14 Maidonvaahdotin
Tilbehørssettet
8 Overdel med integrert adapter
9 Beholder
10 Rustfri stålkniv
11 Sklisikker fot
12 Adapter
13 Visp
14 Melkeskummer
8
9
10
11 12
13
14

6 7
dede
Gebrauchsanweisung
Wichtige Sicherheitshinweise
▪ Zubehör und Gerät können von Personen mit redu-
zierten physischen, sensorischen oder mentalen Fähig-
keiten oder Mangel an Erfahrung und/oder Wissen
benutzt werden, wenn sie beaufsichtigt oder bezüglich
des sicheren Gebrauchs des Gerätes unterwiesen wur-
den und die daraus resultierenden Gefahren verstanden
haben.
▪ Zubehör und Gerät darf durch Kinder nicht benutzt
werden. Das Zubehör, Gerät und seine Anschlussleitung
sind von Kindern fernzuhalten.
▪ Kinder sollten beaufsichtigt werden, um sicherzustellen,
dass sie nicht mit dem Zubehör und dem Gerät spielen.
▪ Das Gerät ist bei nicht vorhandener Aufsicht, bei Stö-
rung während des Betriebs und vor dem Zusammenbau,
dem Auseinandernehmen oder Reinigen stets durch
Ziehen des Netzsteckers vom Netz zu trennen.
▪ Vorsicht beim Umgang mit dem Zubehör und dem
Gerät. Vor dem Wechseln der Aufsätze unbedingt deren
Stillstand abwarten.
▪ Vorsicht beim Umgang mit den scharfen Schneidmes-
sern sowie beim Leeren der Schüssel und beim Reini-
gen.
▪ Reinigen Sie nach Verwendung des Zubehöres und des
Gerätes alle Flächen/Teile, die mit Nahrungsmitteln
in Berührung gekommen sind. Bitte befolgen Sie die
Hinweise im Kapitel „Reinigung und Pflege“.
▪ Wenn die Anschlussleitung dieses Gerätes beschädigt
wird, muss sie durch den zentralen Kundendienst des
Herstellers oder eine ähnlich qualifizierte Person ersetzt
werden. Durch unsachgemäße Reparaturen können
erhebliche Gefahren für den Benutzer entstehen.
▪ Dieses Gerät ist dafür bestimmt, im Haushalt und
ähnlichen Anwendungen verwendet zu werden, wie
beispielsweise:
⋅in Küchen für Mitarbeiter in Läden, Büros und
anderen gewerblichen Bereichen;
⋅in landwirtschaftlichen Anwesen;
⋅von Kunden in Hotels, Motels und anderen Wohn-
einrichtungen;
⋅in Frühstückspensionen.
Das Gerät ist nicht für den rein gewerblichen
Gebrauch bestimmt.
Vor dem Benutzen
Die Gebrauchsanweisung aufmerksam lesen. Sie enthält wichtige Hinweise für
den Gebrauch, die Sicherheit und die Wartung des Gerätes. Sie soll sorgfältig
aufbewahrt und gegebenenfalls an Nachbenutzer weitergegeben werden. Das
Gerät darf nur für den vorgesehenen Zweck, gemäß dieser Bedienungsanleitung,
verwendet werden. Beim Gebrauch die Sicherheitshinweise beachten.
Technische Daten
Nennspannung: 220-240 V~ 50/60 Hz
Leistungsaufnahme: 590-700 W
Schutzklasse: II
Weitere Sicherheitshinweise
▪ Gerät nur an Wechselstrom - mit Spannung gemäß Typschild am Gerät
anschließen. Zuleitung und Stecker müssen trocken sein.
▪ Den Netzstecker nicht an der Leitung oder mit nassen Händen aus der Steck-
dose ziehen.
▪ Den Pürierstab erst einschalten, wenn er sich im Mixgut befindet. Vor dem
Herausnehmen den Stillstand abwarten.
▪ Die Antriebseinheit nicht in Wasser/Lebensmittel tauchen.
▪ Das Gerät, Zubehör und die Anschlussleitung vor Hitzeeinwirkung schützen.
▪ Wenn das Gerät während der Arbeit blockiert, sofort abschalten und die
Ursache, z. B. ein verklemmtes Obst- oder Gemüsestück beseitigen.
▪ Heiße Lebensmittel/Flüssigkeiten vor der Verarbeitung auf ca. 80°C (Messbe-
cher(7)) abkühlen lassen. Achtung! Beim Umgang mit heißen Lebensmittel/
Flüssigkeiten besteht Verbrühungsgefahr.
▪ Das Gerät und das Zubehör nicht in Betrieb nehmen bzw. sofort Netzstecker
ziehen, wenn:
⋅Gerät oder Netzkabel beschädigt ist
⋅der Verdacht auf einen Defekt nach einem Sturz oder Ähnlichem besteht.
In diesen Fällen das Gerät zur Reparatur geben.
▪ Das Gerät und Zubehör nicht im Freien verwenden.
▪ Bei Zweckentfremdung, falscher Bedienung, nicht fachgerechter Reparatur
und bei der Verwendung von Zubehör, das nicht für dieses Gerät vorgesehen
ist, wird keine Haftung für eventuelle Schäden übernommen. Ebenso sind
Garantieleistungen in solchen Fällen ausgeschlossen.

8 9
de
Verwendung
Mit dem Pürierstab kann weiches Obst und gegartes Gemüse passiert und Baby-
nahrung oder Püree zubereitet werden.
Das Zubehör ist zum Zerkleinern und Mischen von Lebensmitteln, Aufschäumen
von Milch oder Aufschlagen geeignet. Detailierte Verwendungsmöglichkeiten der
einzelnen Zubehörteile finden Sie im Kapitel „Inbetriebnahme“. Eine andere oder
darüberhinausgehende Verwendung gilt als bestimmungswidrig.
Beim Gebrauch die Sicherheitshinweise beachten.
Bei Zweckentfremdung, falscher Bedienung, Nichtbeachtung der Gebrauchsan-
leitung oder nicht fachgerechter Reparatur wird keine Haftung für eventuelle
Schäden übernommen. Ebenso sind Garantieleistungen in solchen Fällen ausge-
schlossen.
Inbetriebnahme
Bitte reinigen Sie alle Teile, wie im Abschnitt „Reinigung und Pflege“ beschrieben,
bevor diese mit Lebensmitteln in Kontakt kommen.
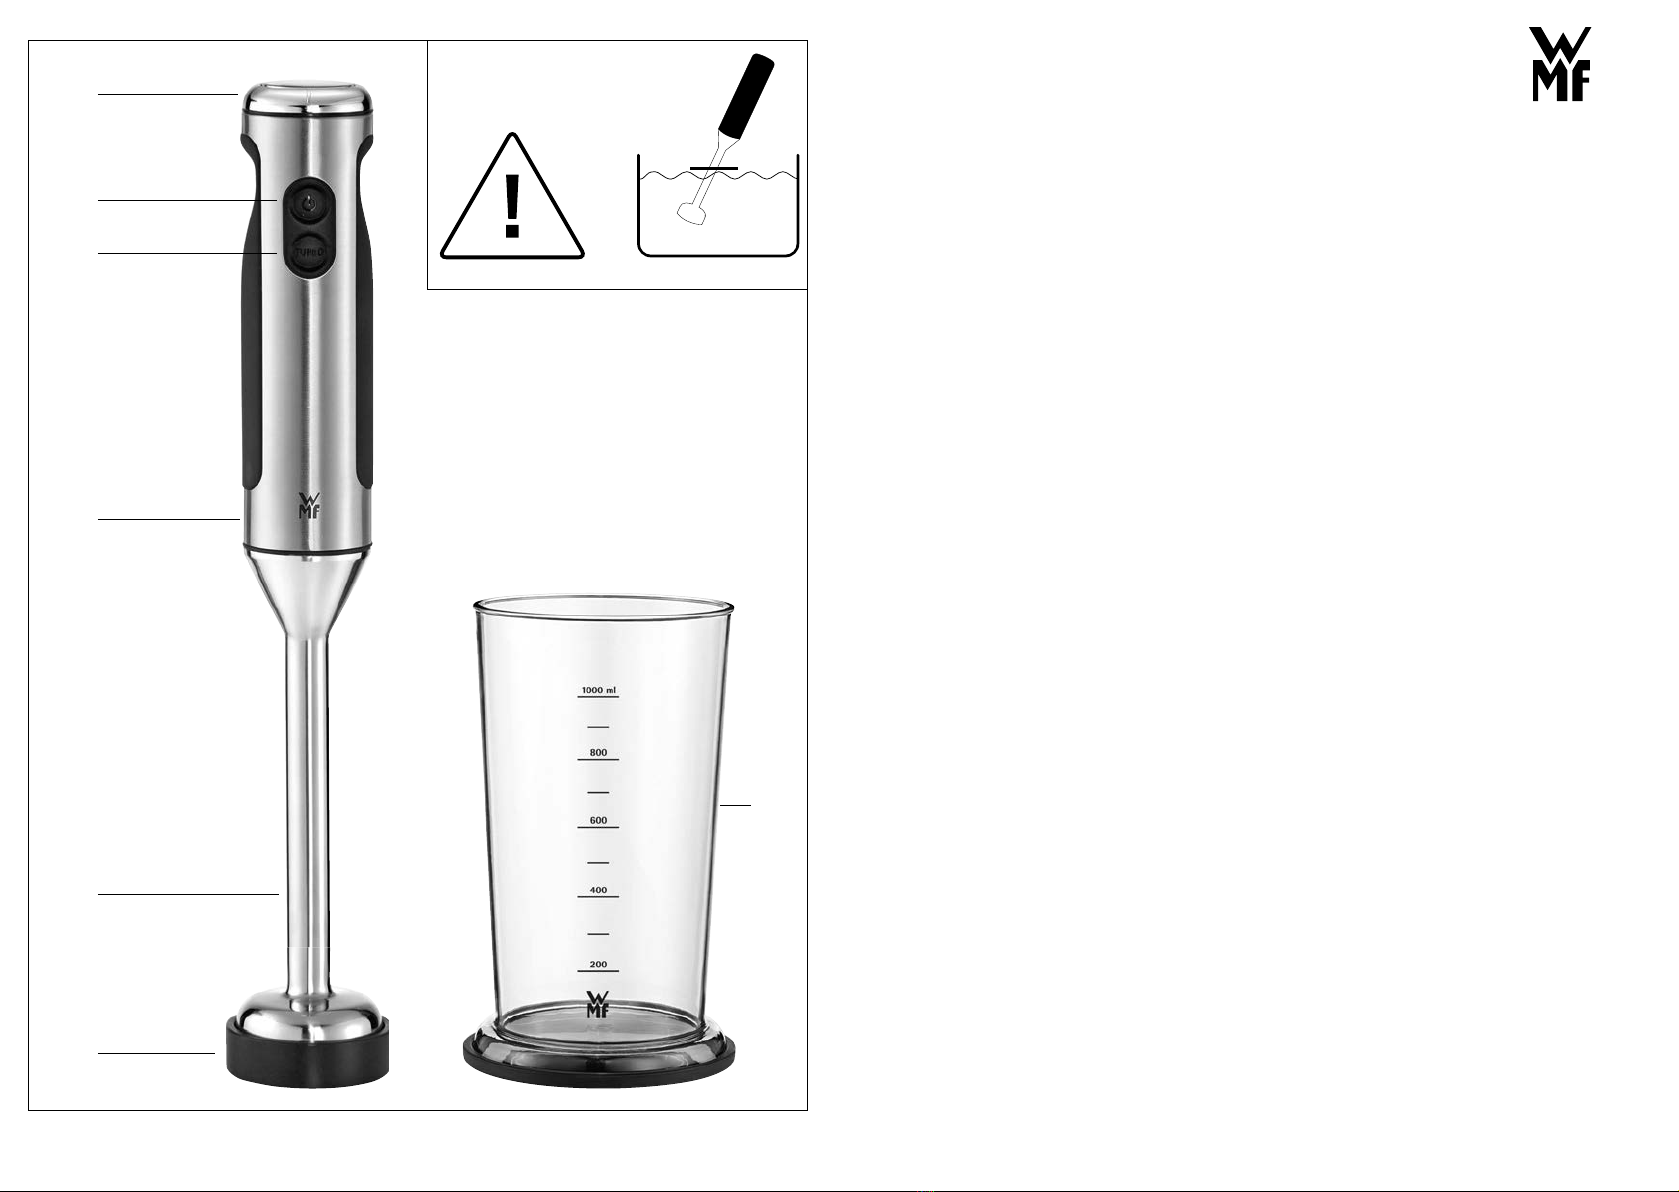
Pürierstab
Mit dem Pürierstab (5) kann weiches Obst und gegartes Gemüse passiert und
Babynahrung oder Püree zubereitet werden. Große Teile zuvor grob zerteilen.
▪ Bereiten Sie die gewünschten Nahrungsmittel vor und füllen Sie die Nah-
rungsmittel in ein ausreichend großes hohes und stabiles Gefäß, z. B. dem
mitgelieferten Behälter (7). Für einen sicheren Stand verwenden Sie den
Anti-Rutsch-Sockel.
▪ Hinweis: Bei der Verarbeitung von Karotten oder Lebensmitteln mit ähnlicher
Konsistenz, füllen Sie maximal 600 ml in den Behälter.
▪ Achtung! Der mitgelieferte Behälter (7) ist nicht hitzebeständig. Die max.
Temperatur liegt bei 80°C. Lassen Sie kochende Nahrungsmittel erst etwas
abkühlen bevor Sie beginnen.
Verwenden Sie den Behälter (7) nicht für die Aufbewahrung von Lebensmit-
teln.
▪ Vergewissern Sie sich, dass das Gerät von der Stromversorgung getrennt
ist.
▪ Setzen Sie den Schaft des Pürierstabs (5) unten an der Kupplung der Antriebs-
einheit an und drücken Sie diesen und die Antriebseinheit gegeneinander bis
der Pürierstab (5) an der Antriebseinheit hörbar einrastet und somit verriegelt
ist. Zwischen Antriebseinheit und Pürierstab (5) darf kein Zwischenraum
bleiben. Der Pürierstab (5) muss fest am Gerät sitzen und darf nicht wackeln
oder herunterfallen.
Drehen Sie ggfs. den Schaft des Pürierstabs (5) beim Andrücken auf die
Antriebseinheit. Der Pürierstab (5) muss hörbar an der Antriebseinheit einras-
ten und verriegeln.
▪ Wählen Sie am Drehring (1) oben auf dem Gerät die gewünschte Geschwin-
digkeit.
▪ Halten Sie den Pürierstab (5) in das Nahrungsmittel.
Vorsicht: Beim Arbeiten spritzt es leicht. Um Spritzer zu vermeiden, sollte das
untere Ende mit den Klingen des Pürierstabs (5) immer vollständig bedeckt
sein. Halten Sie das Gerät bei flüssigen Nahrungsmitteln leicht schräg, um
eine bessere Durchmengung zu erreichen.
max.
Wenn Sie heiße Nahrungsmittel verarbeiten, dann achten Sie darauf, das
Gerät nicht in den Dampf zu halten, um Kondensation auf der Antriebseinheit
zu vermeiden.
Schützen Sie das Antriebseinheit und Ihre Hände eventuell mit einem kleinen
sauberen Küchenhandtuch vor heißem Dampf. Wischen Sie Kondenswasser am
Gehäuse sofort ab.
▪ Stecken Sie nun erst den Netzstecker in die Steckdose.
▪ Halten Sie das Gefäß mit einer Hand fest und drücken Sie auf die
Ein-Taste (2) . Der Motor beginnt zu arbeiten.
▪ Sobald Ihre Nahrungsmittel die gewünschte Beschaffenheit haben, spätestens
aber nach 1 Minute, lassen Sie die Ein-Taste (2) los.
Alternativ können Sie auch zum Verarbeiten die Turbo-Taste (3) drü-
cken, das Gerät arbeitet dann mit Höchstgeschwindigkeit.
▪ Warten Sie den Stillstand des Motors sowie der Werkzeuge ab und nehmen
Sie den Pürierstab (5) dann aus dem Gefäß heraus.
Ziehen Sie immer den Netzstecker aus der Steckdose, bevor Sie das Gerät auf
einer geeigneten Unterlage ablegen.
Zerkleinerer
Mit dem Zerkleinerer können Sie Zwiebeln, Obst, Gemüse, Hartkäse, Kräuter,
Nüsse und Fleisch hacken und zerkleinern.
▪ Nehmen Sie Schutzabdeckung vom Messer ab.
Setzen Sie das Edelstahl-Messer (10) in die Aufnahme am Boden des Behälters
(9).
Drehen Sie das Edelstahl-Messer (10), bis dieses in die Aufnahme nach unten
gleitet.
▪ Achtung: Die Messer sind scharf. Setzen Sie deshalb immer die Schutzabde-
ckung auf, wenn Sie nicht mit den Messern arbeiten.
Geben Sie die Lebensmittel höchstens bis zur MAX-Markierung in den Behälter
(9) und setzen Sie das Oberteil mit integriertem Adapter (8) auf.
Für einen sicheren Stand, bringen Sie den gummierten Anti-Rutsch-Fuß (11)
am Boden des Behälters (9) an.
Achtung: Füllen Sie maximal 200 ml dünnflüssige Lebensmittel ein.
▪ Setzen Sie die Antriebseinheit des Stabmixers auf den im Oberteil integrierten
Adapter (8). Drücken Sie die Kupplung der Antriebseinheit auf den Adapter (8),
bis der Behälter (9) mit Oberteil hörbar einrastet und somit verriegelt ist.
Zwischen Antriebseinheit und Adapter (8) darf kein Zwischenraum bleiben.
▪ Wählen Sie am Drehring (1) die gewünschte Geschwindigkeit. Verwenden Sie
für härtere Lebensmittel eine höhere Geschwindigkeit.
▪ Nach dem Anschließen des Netzsteckers drücken Sie die Einschalttaste (2)
mehrfach in kurzen Impulsen, bis das gewünschte Ergebnis erreicht ist. Halten
Sie den Behälter (9) mit einer Hand dabei fest. Alternativ können Sie auch
zum Verarbeiten die Turbo-Taste (3) drücken, das Gerät arbeitet dann
mit Höchstgeschwindigkeit.
▪ Ist das gewünschte Ergebnis erreicht, warten Sie den Stillstand des Motors
sowie des Messers ab und ziehen Sie den Netzstecker.
▪ Lösen Sie das Oberteil von der Antriebseinheit durch drücken des Entrie-
gelungs-Knopfes (4). Danach können Sie das Oberteil (8) vom Behälter (9)
abnehmen und das Messer vorsichtig entnehmen.
▪ Verwenden Sie den Behälter (9) nicht für die Aufbewahrung von Lebensmit-
teln.

10 11
de
Milchaufschäumer
Mit dem Milchaufschäumer können Sie Milch für z. B. Cappuccino, Latte Macchi-
atto oder auch Desserts aufschäumen.
▪ Befestigen Sie den Adapter (12), indem Sie diesen auf den Milchaufschäumer
(14) mit leichtem Druck aufstecken. Der Adapter (12) rastet hörbar ein.
▪ Setzen Sie den Adapter (12) unten an der Kupplung der Antriebseinheit
an und drücken Sie diesen und die Antriebseinheit gegeneinander bis der
Milchaufschäumer (14) an der Antriebseinheit hörbar einrastet und somit ver-
riegelt ist. Zwischen Antriebseinheit und Adapter (12) darf kein Zwischenraum
bleiben. Der Milchaufschäumer (14) muss fest am Gerät sitzen und darf nicht
wackeln oder herunterfallen.
▪ Füllen Sie die Milch ein Gefäß mit hohem Rand und tauchen Sie den
Milchaufschäumer (14) in diese ein.
▪ Wählen Sie am Drehring (1) die gewünschte Geschwindigkeit.
Nach dem Anschließen des Netzsteckers drücken und halten Sie die Einschalt-
taste (2) , bis das gewünschte Ergebnis erreicht ist.
Alternativ können Sie auch zum Verarbeiten die Turbo-Taste (3) drü-
cken, das Gerät arbeitet dann mit Höchstgeschwindigkeit.
▪ Bewegen Sie den Milchaufschäumer (14) in leichten, kreisenden Bewegungen.
Sobald der Schaum aufsteigt, führen Sie den Milchaufschäumer (14) soweit
nach oben, so dass dieser immer nur knapp unterhalb der Oberfläche arbeitet.
▪ Ist das gewünschte Ergebnis erreicht, warten Sie den Stillstand des Motors
sowie des Milchaufschäumers (14) ab und ziehen Sie den Netzstecker.
▪ Lösen Sie den Adapter (12) von der Antriebseinheit durch drücken des
Entriegelungs-Knopfes (4). Ziehen Sie den Adapter (12) nach oben vom
Milchaufschäumer (14) ab.
Schneebesen
Mit dem Schneebesen können Sie z. B. Eischnee, Sahne aufschlagen oder auch
Shakes, Nachspeisen, Fertigsuppen, Soßen oder Mayonnaise zubereiten.
▪ Befestigen Sie den Adapter (12), indem Sie diesen auf den Schneebesen (13)
mit leichtem Druck aufstecken. Der Adapter (12) rastet hörbar ein.
▪ Setzen Sie den Adapter (12) unten an der Kupplung der Antriebseinheit an
und drücken Sie diesen und die Antriebseinheit gegeneinander bis der Schnee-
besen (13) an der Antriebseinheit hörbar einrastet und somit verriegelt ist.
Zwischen Antriebseinheit und Adapter (12) darf kein Zwischenraum bleiben.
Der Schneebesen (13) muss fest am Gerät sitzen und darf nicht wackeln oder
herunterfallen.
▪ Füllen Sie die Zutaten in ein geeignetes Gefäß mit und tauchen Sie den
Schneebesen (13) ein.
▪ Wählen Sie am Drehring (1) die gewünschte Geschwindigkeit.
Nach dem Anschließen des Netzsteckers drücken und halten Sie die Einschalt-
taste (2) , bis das gewünschte Ergebnis erreicht ist.
Alternativ können Sie auch zum Verarbeiten die Turbo-Taste (3) drü-
cken, das Gerät arbeitet dann mit Höchstgeschwindigkeit.
▪ Ist das gewünschte Ergebnis erreicht, warten Sie den Stillstand des Motors
sowie des Schneebesens (13) ab und ziehen Sie den Netzstecker.
▪ Lösen Sie den Adapter (12) von der Antriebseinheit durch drücken des
Entriegelungs-Knopfes (4). Ziehen Sie den Adapter nach oben vom Schneebe-
sen (13) ab.
Reinigung und Pflege
Nach Gebrauch sofort den Netzstecker ziehen.
Reinigen Sie den Pürierstab (5) sofort nach jedem Gebrauch, damit antrocknende
Speisereste die Lager des Pürierstabs (5) nicht beschädigen können.
Zum Vorreinigen lassen Sie den Pürierstab (5) einfach kurz in einem Gefäß mit
heißem Wasser laufen.
Der Pürierstab (5) wird zum Betrieb am Gerät verriegelt und kann nur durch
Druck auf den Entriegelungs-Knopf (4) gelöst werden. Der Pürierstab (5) kann
nun abgenommen werden.
Zur sicheren Aufbewahrung stellen Sie den Pürierstab (5) in die Schutzkappe (6).
Reinigen Sie das Zubehör sofort nach jedem Gebrauch, damit antrocknende
Speisereste dieses nicht beschädigen können.
Verwenden Sie keine scheuernden Reinigungsmittel.
spülmaschinen-
geeignet
unter fließendem
Wasser abspülbar
feucht abwischen
Antriebseinheit
Pürierstab (5)
Schutzkappe (6)
Messbecher mit
Anti-Rutsch-
Sockel (7)
Oberteil mit
integriertem
Adapter (8)
Behälter (9)
Edelstahl-Messer
(10)
Anti-Rutsch-
Sockel (11)
Adapter (12)
Schneebesen (13)
Milchaufschäu-
mer (14)

12 13
de
Garantie-Information
Für unsere Geräte übernehmen wir gegenüber dem Endkunden eine 24-monatige
Haltbarkeitsgarantie. Sie beginnt mit dem Kauf des Gerätes durch den Endkunden
und gilt im Gebiet der Bundesrepublik Deutschland.
Ansprüche aus dieser Garantie sind unter Vorlage des Kaufbelegs direkt gegen-
über unserem zentralen Kundendienst geltend zu machen.
Von der Garantie ausgeschlossen sind Schäden durch normalen Verschleiß,
unsachgemäßen Gebrauch, sowie unterbliebene Pflege.
Der Endkunde besitzt zusätzlich zu den Ansprüchen aus dieser Garantie gesetzli-
che Ansprüche wegen Mängeln des Gerätes gegenüber seinem direkten Verkäu-
fer/Händler, die durch diese Garantie nicht eingeschränkt werden.
Das Gerät entspricht den Europäischen Richtlinien 2014/35/EG, 2014/30/EG und
2009/125/EG.
Dieses Produkt darf am Ende seiner Lebensdauer nicht über den normalen
Haushaltsabfall entsorgt werden, sondern muss an einem Sammelpunkt für das
Recycling von elektrischen und elektronischen Geräten abgegeben werden.
Die Werkstoffe sind gemäß ihrer Kennzeichnung wiederverwertbar. Mit der Wie-
derverwendung, der stofflichen Verwertung oder anderen Formen der Verwertung
von Altgeräten leisten Sie einen wichtigen Beitrag zum Schutze unserer Umwelt.
Bitte erfragen Sie bei der Gemeindeverwaltung die zuständige Entsorgungsstelle.
Änderungen vorbehalten

14 15
enen
Operating Manual
Important safety information
▪ The accessory and device can be used by persons with
reduced physical, sensory or mental capabilities or
lack of experience and knowledge if they have been
given supervision or instruction concerning use of the
appliance in a safe way and understand the hazards
involved.
▪ The accessory and device shall not be used by children.
The accessory, device and its connecting cable are to be
kept away from children.
▪ Children should be supervised in order to ensure that
they do not play with the accessory and device.
▪ The device is always to be disconnected from the mains
by disconnecting the power plug when there is no
supervision present or if there is a fault during opera-
tion, prior to assembly, disassembly or cleaning.
▪ Use caution when handling the accessories and device.
It is essential to wait for the moving parts to stop
before changing the attachments.
▪ Use caution when handling the sharp cuttings blades
as well as when emptying the bowl and when cleaning.
▪ After using the accessory and device, clean all surfaces/
parts that came into contact with food. Please follow
the instructions in the chapter “Cleaning and care.”
▪ If the appliance’s connection cable is damaged then
it must be replaced by the manufacturer’s central
customer service department or by a similarly quali-
fied person. Improper repairs may constitute a serious
threat for users.
▪ This appliance is intended to be used in household and
similar applications such as:
⋅staff kitchen areas in shops, offices and other wor-
king environments;
⋅farm houses;
⋅by clients in hotels, motels and other residential
type environments;
⋅bed and breakfast type environments.
The appliance is not designed for sole commercial
use.
Before use
Read the operating manual carefully. It contains important information about the
use, safety and maintenance of the appliance. It should be kept in a safe place
and passed on to further users if appropriate. The appliance should only be used
for the intended purpose and in accordance with this user manual. Respect these
safety instructions when using the appliance.
Technical data
Rated voltage: 220-240 V~ 50/60 Hz
Power consumption: 590-700 W
Protection class: II
Additional safety instructions
▪ Connect the appliance to an alternating current only, with voltage in accord-
ance with that shown on the appliance‘s type label. The wire and plug must
be dry.
▪ Never disconnect the mains plug from the socket by the cord or with wet
hands.
▪ Only switch the blender on once it has been placed in the food to be blended.
Only remove from the food once the appliance has come to a stop.
▪ Do not immerse the drive unit in water/foodstuff.
▪ The device, accessory and the connection cable should be protected from the
effects of heat.
▪ If the appliance becomes blocked during use, switch it off immediately and
remove the offending object, for example a piece of fruit or vegetable which
has become stuck.
▪ Allow hot food / liquids to cool to approximately 80°C (measuring cup (7))
before processing. Attention! There is a risk of scalding when handling hot
food / liquids.
▪ Stop using the device and accessory and/or disconnect the mains plug
immediately if:
⋅The appliance or mains cable is damaged
⋅There is any suspicion of a fault after dropping the appliance or similar.
In such cases, send the appliance to be repaired.
▪ Do not use the device and accessory outdoors.
▪ No liability is accepted for damages resulting from misuse, incorrect opera-
tion, improper repairs or the use of accessories not designed for this appliance.
Claims under warranty are likewise excluded in such cases.

16 17
en
Use
The immersion blender can be used to blend soft fruit and cooked vegetables, or
to prepare baby food or purees.
The accessory is suited for crushing and mixing food, frothing milk or for whip-
ping. Detailed application possibilities for the individual accessory parts can be
found in the chapter “Start-up.” Any other use or excessive use is not considered
proper.
Observe the safety instructions during use.
In the case of misuse, improper operation, non-observance of the instructions for
use or unprofessional repairs, no liability will be assumed for any damages. Claims
under warranty are likewise excluded in such cases.
Start-up
Please clean all parts described in the “Cleaning and care” section before allowing
them to come into contact with food.
Purée rod
The immersion blender (5) can be used to blend soft fruit and cooked vegetab-
les, or to prepare baby food or purees. Large items should be roughly chopped
beforehand.
▪ Prepare the desired foodstuff and place in a receptacle which is sufficiently
large, tall and stable, such as the container (7) provided. Use the anti-slip base
to ensure a secure standing position.
▪ Note: When chopping carrots or similar foodstuff only fill in container
maximum 600 ml.
▪ Caution! The container (7) provided is not heat resistant. The maximum tem-
perature it can withstand is 80°C. Allow boiled foodstuffs to cool somewhat
before beginning.
Do not use the container (7) for storing food.
▪ Make sure that the appliance is disconnected from the power supply.
▪ Attach the blender (5) stem at the bottom of the drive unit coupling and press
together with the drive unit until you hear an audible click from the blender
(5) meaning that it is locked in place. There should not be any gap between
the driver unit and the blender (5). The blender (5) must be held firmly in the
appliance and should not wobble or fall out.
If necessary, turn the shaft of the purée rod (5) when pressing on the drive
unit. The purée rod (5) must audibly click onto the drive unit and lock.
▪ Choose the desired speed setting using the rotary swivel (1) on the top of the
appliance.
▪ Hold the blender (5) in the foodstuff.
Caution: spattering is likely when using the appliance. To avoid any spat-
tering, the lower end with the blender (5) blades should always be entirely
covered. For liquid foodstuffs, the appliance should always be held at a slight
angle for improved blending.
If using hot foodstuffs, be careful not to hold the appliance in the steam to
avoid any condensation forming on the drive unit.
If necessary, protect the drive unit and your hands from hot steam with a
small, clean kitchen towel. Wipe any condensation off the housing immedia-
tely.
max.
▪ Now connect the mains plug to the socket.
▪ Hold the appliance firmly in one hand and press the on switch (2) . The
motor will begin to operate.
▪ As soon as your foodstuff has reached the desired consistency, and after a
maximum of one minute, release the on switch (2) .
Alternatively you can also press the turbo button (3) , which will incre-
ase the speed of the appliance.
▪ Wait until the motor and the gadgets have come to a stop, then remove the
blender (5) from the appliance.
Always remove the mains plug from the socket before placing the appliance
on a suitable surface.
Chopper
With the chopper, you can chop and mince, onions, fruit, vegetables, hard cheese,
herbs, nuts and meat.
▪ Remove the protective cover from the knife.
Place the stainless steel knife (10) into the receptacle at the bottom of the
container (9).
Turn the stainless steel knife (10) until it slides to the bottom of the recepta-
cle.
▪ Attention: The blades are sharp. For this reason, always replace the protective
cover when the blades are not in use.
Place the food in the container (9) so that it is no higher than the MAX mark-
ing and place the upper part with the integrated adapter (8) on top.
For better stability, attach the rubber anti-slip base (11) to the bottom of the
container (9).
Attention: Fill with a maximum of 200ml of thin liquid food.
▪ Insert the drive unit of the hand-held blender on the adapter (8) integrated
into the upper part. Press the coupling of the drive unit onto the adapter (8)
until the container (9) with the upper part audibly clicks into place and is
therefore locked.
There may be no gap between the drive unit and the adapter (8).
▪ Use the rotary ring (1) to select the desired speed. Use a higher speed for
harder food.
▪ After connecting the mains plug, press the on switch (2) in multiple short
bursts until you achieve the desired result. Hold the container (9) with one
hand during the process. Alternatively, you can also press the turbo button (3)
to process. The device then operates at full speed.
▪ Once the desired result is achieved, wait until the motor and knife stop and
disconnect the mains plug.
▪ Loosen the upper part from the drive unit by pressing the unlock button (4).
You can then remove the upper part (8) from the container (9) and carefully
remove the knife.
▪ Do not use the container (9) for storing food.

18 19
en
Milk frother
With the milk frother, you can froth milk, e.g. for cappuccinos, latte macchiatos
or even desserts.
▪ Attach the adapter (12) by inserting it into the milk frother (14) with light
pressure. The adapter (12) audibly clicks into place.
▪ Attach the adapter (12) down onto the coupling of the drive unit and push it
against the drive unit until the milk frother (14) audibly clicks onto the drive
unit and is therefore locked. There may be no gap between the drive unit
and the adapter (12). The milk frother (14) must sit firmly on the device and
should not be loose or fall off.
▪ Pour milk into a container with a high rim and insert the milk frother (14) into
this container.
▪ Use the rotary ring (1) to select the desired speed.
After connecting the mains plug, push and hold the on-switch (2) until the
desired result is achieved.
Alternatively, you can also press the turbo button (3) to process. The
device then operates at full speed.
▪ Move the milk frother (14) in slight circular movements.
As soon as the foam rises, move the milk frother (14) upwards so that it is
always working just below the surface.
▪ Once the desired result is achieved, wait until the motor and milk frother (14)
stop and disconnect the mains plug.
▪ Loosen the adapter (12) from the drive unit by pressing the unlock button (4).
Pull the adapter (12) away from the milk frother (14).
Whisk
With the whisk you can, for example, prepare beaten egg whites, whip cream or
shakes, desserts, soups, sauces or mayonnaise.
▪ Attach the adapter (12) by inserting it into the whisk (13) with light pressure.
The adapter (12) audibly clicks into place.
▪ Attach the adapter (12) down onto the coupling of the drive unit and push it
against the drive unit until the whisk (13) audibly clicks onto the drive unit
and is therefore locked. There may be no gap between the drive unit and the
adapter (12). The whisk (13) must sit firmly on the device and should not be
loose or fall off.
▪ Put the ingredients into a suitable container and insert the whisk (13).
▪ Use the rotary ring (1) to select the desired speed.
After connecting the mains plug, push and hold the on-switch (2) until the
desired result is achieved.
Alternatively, you can also press the turbo button (3) to process. The
device then operates at full speed.
▪ Once the desired result is achieved, wait until the motor and whisk (13) stop
and disconnect the mains plug.
▪ Loosen the adapter (12) from the drive unit by pressing the unlock button (4).
Pull the adapter (12) away from the whisk (13).
Cleaning and care
Disconnect the mains plug immediately after use.
Always clean the blender (5) immediately after use to prevent dried-on leftovers
from damaging the bearing of the blender (5).
For preliminary cleaning, let the blender run for a short period time in a recepta-
cle containing hot water.
The blender (5) is locked into the appliance during use and can only be removed
by pressing the release button (4). The blender (5) can now be removed.
For safe storage, put the purée rod (5) in the protective cap (6).
Clean the accessory immediately after use so that dried-on residual food cannot
damage the accessory.
Do not use any abrasive cleaning agents.
Dishwasher-safe Can be rinsed
under running
water
Wipe with a
damp cloth
Drive unit
Purée rod (5)
Protective cap (6)
Measuring jug
with anti-slip
base (7)
Upper part
with integrated
adapter (8)
Container (9)
Stainless steel
knife (10)
Anti-slip base
(11)
Adapter (12)
Whisk (13)
Milk frother (14)

20 21
en
For UK use only
▪ This product is supplied with a 13 A plug conforming to BS 1363 fitted to the
mains lead. If the plug is unsuitable for your socket outlets or needs to be
replaced, please note the following. If the plug is a non-rewireable one, cut
it from the mains lead and immediately dispose of it. Never insert it into a
socket outlet as there is a very great risk of an electric shock.
▪ The replacement of the plug at the mains lead has to be done according to the
following instructions:
Important: The wires in this mains lead are coloured in accordance with the
following code:
blue Neutral
brown Live
As the colours of the wires in the mains lead of this
appliance may not correspond with the coloured markings
identifying the terminals in your plug, proceed as follows:
⋅the wire which is coloured blue must be connected to the terminal which
is marked with the letter N or coloured black,
⋅the wire which is coloured brown must be connected to the terminal
which is marked with the letter L or coloured red.
Do not connect any wire to the terminal which is marked
with the letter E or by the earth symbol , or coloured green or green and
yellow.
▪ If a 13 A (BS 1363) plug is used it must be fitted with a 3 A fuse conforming
to BS 1362 and be ASTA approved. If any other type of plug is used, the
appliance must be protected by a 5 A fuse either in the plug or adapter or at
the distribution board. If in doubt - consult a qualified electrician.
▪ Never use the plug without closing the fuse cover.
The appliance complies with European directives 2014/35/EC, 2014/30/EC and
2009/125/EC.
At the end of its life, this product must not be disposed of in normal household
waste but must instead be delivered to a collection point for recycling electric
and electronic appliances.
The materials are recyclable in accordance with their labelling. The reuse,
recycling and or other use of old appliances makes an important contribution to
protecting our environment.
Please ask your local administration for the appropriate disposal point.
Subject to alterations

22 23
frfr
Mode d’emploi
Consignes de sécurité importantes
▪ Les personnes ayant des capacités physiques, senso-
rielles ou mentales restreintes ou ayant un manque
d’expérience et/ou de connaissance peuvent utiliser
l’accessoire et l’appareil, s’ils sont surveillés et s’ils ont
été instruits pour utiliser cet appareil en toute sécurité
et s’ils ont compris les dangers pouvant résulter de
l’usage de l’appareil.
▪ Les enfants n’ont pas le droit d’utiliser l’appareil et
l’accessoire. L’accessoire, l’appareil et son câble de rac-
cordement sont à tenir hors de la portée des enfants.
▪ Les enfants devraient être surveillés pour s’assurer qu’ils
ne jouent pas avec l’accessoire et l’appareil.
▪ L’appareil doit toujours être débranché en cas d’ab-
sence de surveillance, de dysfonctionnement pendant
l’utilisation et avant le montage, le démontage ou le
nettoyage.
▪ Attention en manipulant l’accessoire et l’appareil.
Attendez impérativement l’arrêt complet avant de
changer les accessoires.
▪ Attention en manipulant la lame tranchante, mais aussi
en vidant le saladier et en nettoyant.
▪ Après avoir utilisé l’accessoire et l’appareil, nettoyez
toutes les surfaces/pièces qui sont entrées en contact
avec les aliments. Veuillez suivre les instructions du
chapitre « Nettoyage et entretien ».
▪ Si le câble d’alimentation de l’appareil est endommagé,
il doit être remplacé par le SAV central du fabricant
ou par une personne qualifiée. Des réparations non
conformes peuvent engendrer de graves dangers pour
l’utilisateur.
▪ L’appareil est conçu pour un usage domestique ou pour
des applications similaires telles que :
⋅idans des cuisines pour le personnel dans des
boutiques, des bureaux ou d’autres secteurs profes-
sionnels;
⋅dans des exploitations agricoles;
⋅par des clients dans des hôtels, des motels et
d’autres établissements;
⋅dans des chambres d’hôtes.
L’appareil ne doit pas faire l’objet d’un usage pro-
fessionnel.
Avant l’utilisation
Lire attentivement le mode d’emploi. Il contient des consignes importantes pour
l’utilisation, la sécurité et l’entretien de l’appareil. Il doit être conservé soigneu-
sement et transmis en cas de remise à une tierce personne. L’appareil ne doit être
utilisé que pour l’usage prévu conformément à ce mode d’emploi. Respecter les
consignes de sécurité lors de l’utilisation.
Caractéristiques techniques
Tension du secteur: 220-240 V~ 50/60 Hz
Puissance: 590-700 W
Catégorie de protection: II
Consignes de sécurité supplémentaires
▪ Brancher l’appareil uniquement au courant alternatif - à la tension conforme
aux indications de la plaque signalétique sur l’appareil. Le câble d’alimentation
et la prise doivent être secs.
▪ Ne pas débrancher l‘appareil en tirant sur le câble ou avec de mains mouillées.
▪ Mettre le mixeur plongeant en marche quand il se trouve dans la préparation
à mixer. Attendre l‘arrêt complet avant de le retirer.
▪ Ne pas immerger le bloc moteur dans l’eau / aliment.
▪ Protégez l’appareil, l’accessoire et le câble d’alimentation de la chaleur.
▪ Si l‘appareil se bloque lors de l‘utilisation, éteignez le immédiatement et
éliminez la cause, p.ex. un morceau de fruit ou de légume coincé.
▪ Laisser refroidir les liquides/aliments bouillants à env. 80° (pot gradué (7))
avant de les mixer. Attention ! Risque de s’ébouillanter en manipulant des
liquides/aliments chauds.
▪ Ne mettez pas l’appareil et l’accessoire en marche ou débranchez-les immédia-
tement si:
⋅l’appareil ou le câble d’alimentation sont endommagés.
⋅une défaillance est soupçonnée suite à une chute ou équivalent.
Dans ces cas, emmenez l‘appareil en réparation.
▪ N’utilisez pas l’appareil et l’accessoire à l’extérieur.
▪ Nous déclinons toute responsabilité pour des dommages éventuels causés
par un usage non conforme, une utilisation erronée et par une l’utilisation
d’accessoires non compatibles avec l’appareil. Dans des tels cas toute interven-
tion sous garantie est exclue.

24 25
fr
Utilisation
Vous pouvez mouliner des fruits mûrs et des légumes cuits avec le mixeur plon-
geant et préparer de la nourriture pour nourrissons ou de la purée.
L’accessoire sert à hacher et amalgamer les aliments, faire mousser le lait ou
battre. Vous trouverez les modalités d’utilisation détaillées de chacune des
pièces des accessoires au chapitre « Mise en service ». Toute autre utilisation est
considérée conforme.
Respectez les consignes de sécurité lors de l’utilisation.
Nous déclinons toute responsabilité pour des dommages éventuels en cas
d’utilisation détournée, de mauvaise utilisation, de réparation inappropriée. Dans
des tels cas toute intervention sous garantie est exclue.
Mise en service
Veuillez nettoyer toutes les pièces comme indiqué dans le chapitre «Nettoyage et
entretien» avant qu’elles n’entrent en contact avec les aliments.
Mixeur
Vous pouvez mouliner des fruits mûrs et des légumes cuits avec le mixeur (5)
plongeant et préparer de la nourriture pour nourrissons ou de la purée. Couper de
gros morceaux au préalable.
▪ Préparez les aliments choisis et mettez les dans un récipient suffisamment
grand, creux et stable, p.ex. dans le récipient fourni (7). Pour un bon maintien,
utilisez un socle antidérapant.
▪ Attention ! Le récipient fourni (7) n’est pas résistant à la chaleur. La tem-
pérature maximale est de 80°. Laissez refroidir des aliments encore chauds au
préalable.
N‘utilisez pas le récipient (7) pour conserver les aliments.
▪ Assurez-vous que l’appareil est éteint.
▪ Apposez la tige du bras mixeur (5) au dessous du raccord du bloc moteur
et appuyez l’un contre l’autre jusqu’à ce que le bras mixeur (5) s’enclenche
dans le bloc moteur avec un déclic et se verrouille. Il ne doit y avoir aucun
espacement entre le bloc moteur et le bras mixeur (5). Le bras mixeur (5) doit
être bien fixé sur l’appareil et ne doit pas bouger ou tomber.
Tournez le cas échéant la tige du presse-purée (5) en appuyant sur le bloc
moteur. Le presse-purée (5) doit s‘enclencher et se verrouiller au bloc moteur
par un déclic.
▪ Choisissez sur le variateur de vitesse (1) de l’appareil la vitesse souhaitée.
▪ Enfoncez le bras mixeur (5) dans la préparation.
Attention ! Il peut y avoir des éclaboussures. Pour éviter les éclaboussures,
l’extrémité inférieure avec les lames du mixeur (5) plongeant devrait toujours
être couverte. En mixant des aliments liquides tenez l’appareil légèrement
incliné pour obtenir un mélange plus homogène.
Si vous mixez des aliments chauds veillez à ne pas tenir l’appareil au dessus
de la vapeur pour éviter la condensation sur le bloc moteur.
Protégez, le cas échéant le bloc moteur et vos mains des vapeurs chaudes avec
un torchon propre. Enlevez immédiatement toute trace de condensation sur
l’appareil avec un chiffon.
▪ Branchez seulement maintenant l’appareil.
max.
▪ Tenez l’appareil fermement avec une main et appuyez sur le bouton «On» (2)
. Le moteur se met en marche.
▪ Dès que les aliments ont la consistance voulue, mais au plus tard une minute
après, lâchez le bouton «On» (2) .
Vous pouvez également appuyer sur le bouton turbo (3) , l’appareil
fonctionnera alors à la vitesse maximale.
▪ Attendez l’arrêt complet du moteur et des accessoires et retirez le bras mixeur
(5) du récipient.
Débranchez toujours l’appareil avant de le poser sur un support adapté.
Hacheur
Le hacheur vous permet de concasser des noix et de hacher des oignons, des
légumes, des fromages à pâte dure, des herbes et de la viande.
▪ Retirez le dispositif de protection du couteau.
Mettez le couteau en acier (10) dans le logement au fond du récipient (9).
Tournez le couteau (10) pour le faire glisser en bas dans le logement.
▪ Attention : Les lames sont tranchantes. Aussi, n’obligez pas de toujours poser
le dispositif de protection quand vous ne manipulez pas les couteaux.
Versez les aliments sans dépasser le marquage MAX dans le récipient (9) et
posez la partie supérieure avec l‘adaptateur (8) intégré.
Pour une tenue stable, ajoutez le socle antidérapant (11) en caoutchouc au
fond du récipient (9).
Attention: Remplissez au maximum 200 ml d’aliments fluides.
▪ Posez le bloc moteur du mixeur plongeant sur l’adaptateur (8) intégré à la
partie supérieure. Appuyez sur le raccord du bloc moteur situé sur l’adaptateur
(8) jusqu’à ce que le récipient (9) s’enclenche avec la partie supérieure en
émettant un bruit et soit ainsi verrouillé.
Aucun espacement ne doit être observé entre le bloc moteur et l‘adaptateur
(8).
▪ Sélectionnez la vitesse souhaitée sur le commutateur rotatif (1). Accélérez la
vitesse pour les aliments plus durs.
▪ Après avoir branché l’appareil enfoncez la touche de mise en marche (2)
à plusieurs reprises en courtes impulsions jusqu’à l’obtention du résultat
désiré. Tenez fermement le récipient (9) d’une main. Vous pouvez également
appuyer sur le bouton turbo (3), l’appareil fonctionnera alors à la vitesse
maximale.
▪ Une fois le résultat souhaité obtenu, attendez que le moteur et le couteau
soient complètement arrêtés, puis débranchez.
▪ Détachez la partie supérieure (8) du bloc moteur en appuyant sur le bouton de
déverrouillage (4). Vous pouvez ensuite retirer la partie supérieure du récipient
(9) et enlever le couteau avec précaution.
▪ Utilisez le récipient (9) pour conserver les aliments.
Moussoir à lait
Le moussoir à lait vous permet de faire mousser du lait pour concocter par ex. un
cappuccino, un latte macchiato ou des desserts.
▪ Fixez l’adaptateur (12) en l’emboîtant sur le moussoir à lait (14) par une légère
pression. L’adaptateur (12) s’enclenche en émettant un petit bruit.
▪ Apposez l’adaptateur (12) au-dessous du raccord du bloc moteur et appuyez
l’un contre l’autre jusqu’à ce que le moussoir à lait (14) s’enclenche dans le

26 27
fr
bloc moteur avec un déclic et se verrouille. Il ne doit y avoir aucun espace-
ment entre le bloc moteur et l’adaptateur (12). Le moussoir à lait (14) doit être
bien fixé sur l’appareil et ne doit pas bouger ou tomber.
▪ Versez du lait dans un récipient à haut bord et plongez le moussoir à lait (14)
dans celui-ci.
▪ Sélectionnez la vitesse souhaitée sur le commutateur rotatif (1).
Après avoir branché, appuyez et maintenez enfoncée la touche de mise en
marche (2) jusqu‘à l‘obtention du résultat souhaité.
Autrement, vous pouvez procéder en appuyant sur la touche turbo (3)
et l‘appareil tournera à plein régime.
▪ Déplacez le moussoir à lait (14) par de légers mouvements circulaires.
Dès que la mousse a monté, soulevez le moussoir à lait (14) de manière à ce
qu‘il agisse juste en-dessous de la surface.
▪ Une fois le résultat souhaité obtenu, attendez que le moteur et le moussoir à
lait (14) soient complètement arrêtés, puis débranchez.
▪ Détachez l’adaptateur (12) du bloc moteur en appuyant sur le bouton de ver-
rouillage (4). Retirez l’adaptateur (12) du moussoir à lait (14) en le soulevant.
Fouet
Le fouet vous permet par ex. de battre des œufs en neige, la crème ou de
prépayer des frappés, des desserts, des soupes cuisinées, des sauces ou de la
mayonnaise.
▪ Fixez l’adaptateur (12) en l’emboîtant sur le fouet (13) par une légère pression.
L’adaptateur s’enclenche en émettant un petit bruit.
▪ Apposez l’adaptateur (12) au-dessous du raccord du bloc moteur et appuyez
l’un contre l’autre jusqu’à ce que le fouet (13) s’enclenche dans le bloc moteur
avec un déclic et se verrouille. Il ne doit y avoir aucun espacement entre le
bloc moteur et l’adaptateur (12). Le fouet (13) doit être bien fixé sur l’appareil
et ne doit pas bouger ou tomber.
▪ Prenez un récipient approprié pour y incorporer les ingrédients, puis plongez
le fouet (13).
▪ Sélectionnez la vitesse souhaitée sur le commutateur rotatif (1).
Après avoir branché, appuyez et maintenez enfoncée la touche de mise en
marche (2) jusqu‘à l‘obtention du résultat souhaité.
Autrement, vous pouvez procéder en appuyant sur la touche turbo (3)
et l‘appareil tournera à plein régime.
▪ Une fois le résultat souhaité obtenu, attendez que le moteur et le fouet (13)
soient complètement arrêtés, puis débranchez.
▪ Détachez l’adaptateur (12) du bloc moteur en appuyant sur le bouton de
verrouillage (13). Retirez l’adaptateur du fouet (13) en le soulevant.
Nettoyage et Entretien
Débranchez l’appareil immédiatement après l’utilisation.
Nettoyez le bras mixeur (5) immédiatement après chaque utilisation, pour que les
restes d’aliments séchés ne puissent pas endommager le palier du bras mixeur (5).
Pour un prénettoyage laissez tourner le bras mixeur (5) simplement un bref
instant dans un récipient rempli d’eau chaude.
Le bras mixeur (5) est verrouillé sur l’appareil pour la mise en marche et ne peut
être déverrouillé qu’en appuyant sur le bouton «Déblocage» (4). Vous pouvez
maintenant retirer le bras mixeur (5).
Pour une conservation sûre, insérez le mixeur plongeant (5) dans le bouchon
protecteur (6).
Nettoyez immédiatement l’accessoire après chaque utilisation pour éviter que des
résidus alimentaires en train de sécher endommagent celui-ci.
N’utilisez aucun nettoyant abrasif.
Lavable au
lavevaisselle
Rincer sous l’eau
courante
Essuyer avec un
chiffon humide
Bloc moteur
Mixeur plon-
geant (5)
Bouchon protec-
teur (6)
Pot gradué avec
socle antidéra-
pant (7)
Partie supérieure
avec adaptateur
intégré (8)
Récipient (9)
Couteau en acier
(10)
Socle antidéra-
pant (11)
Adaptateur (12)
Fouet (13)
Moussoir à lait
(14)

28 29
fr
L’appareil est conforme aux Directives Européennes 2014/35/EG, 2014/30/EG et
2009/125/EG.
Au terme de son utilisation ce produit ne doit pas être éliminé avec les déchets
ménagers habituels, mais il doit être dépose à un point de collecte pour le
recyclage d’appareils électriques et électroniques.
Les matériaux sont recyclables conformément à leur identification. Grâce à la
réutilisation, le recyclage de matériaux ou d’autres formes de recyclage des
vieux appareils vous contribuez de manière significative à la protection de notre
environnement.
Veuillez contacter votre municipalité pour connaître le centre de traitement
compétent.
Sous réserve de modifications

30 31
itit
Istruzioni per l’uso
Importanti istruzioni per la sicurezza
▪ Gli accessori e l’apparecchiatura possono essere utiliz-
zate da persone con ridotte capacità fisiche, sensoriali
o mentali o che mancano di esperienza e/o di cono-
scenza, solo se sono sorvegliate o se sono state istruite
riguardo all’utilizzo sicuro dell’apparecchio e se ne
hanno compreso i pericoli risultanti.
▪ Sia gli accessori che l’apparecchio non devono essere
utilizzati da bambini. Tenere gli accessori, l’apparecchio
ed i suoi cavi di collegamento fuori dalla portata dei
bambini.
▪ I bambini vanno sorvegliati per accertarsi che non
giochino né con gli accessori né con l’apparecchio.
▪ L’elettrodomestico deve essere sempre scollegato,
staccando previamente la spina dalla presa di corrente
nei seguenti casi: quando rimane incustodito, in caso di
guasto durante il funzionamento, prima del montaggio
e dello smontaggio o della pulizia.
▪ Fare attenzione quando si maneggiano gli accessori e
l’apparecchio. Prima di sostituire gli utensili bisogna
assolutamente attendere che si siano arrestati.
▪ Prestare molta attenzione alle lame affilate quando si
svuota la coppa e durante la pulizia.
▪ Dopo aver usato gli accessori e l’apparecchio pulire
tutte le superfici/componenti, che siano venuti a con-
tatto con alimenti. Si prega di seguire le istruzioni nel
Capitolo “Pulizia e manutenzione”.
▪ Se il cavo di collegamento dell’apparecchio è guasto,
bisogna farlo sostituire dal servizio clienti centrale del
fabbricante o da un’altra persona competente del set-
tore. Le riparazioni improprie recano un grande pericolo
per l’utente.
▪ Questo apparecchio può essere utilizzato solo in ambito
domestico e in applicazioni simili, come ad esempio:
⋅in cucine per i dipendenti di negozi, uffici e altri
settori commerciali;
⋅in tenute agricole;
⋅da clienti in hotel, motel e altri impianti di soggi-
orno;
⋅in bed & breakfast.
Questo apparecchio non è destinato ad un uso
commerciale.
Prima dell’uso
Si leggono attentamente le istruzioni per l’uso. Danno indicazioni importanti
riguardanti l’uso, la sicurezza e la manutenzione dell’apparecchio. Va conservato
con cura, specialmente se è trasmesso a un utente successivo. L’apparecchio
va adoperato per l’uso previsto seguendo le istruzioni per l’uso. Le istruzioni di
sicurezza vanno seguite durante l’uso.
Dati tecnici
Tensione nominale: 220-240 V~ 50/60 Hz
Potenza assorbita: 590-700 W
Classe di protezione: II
Ulteriori istruzioni di sicurezza
▪ L’apparecchio va messo sotto tensione alla corrente alternata soltanto
seguendo la targhetta dell’apparecchio. La spina e il connettore devono essere
asciutti.
▪ Non si stacca la spina sul circuito o con mani bagnate dalla presa.
▪ Si accende il frullatore a immersione quando è pronto per l‘uso. Si aspetta che
sia fermo prima della rimozione.
▪ Non si immerge l’unità di azionamento nell’acqua/cibo.
▪ L’apparecchio, gli accessori e la linea vanno protetti dal calore.
▪ Se l‘apparecchio si blocca, bisogna spegnerlo subito e individuare la causa, ad
es. un pezzo di verdura o di frutta appiccicato.
▪ Prima di trattarli, far raffreddare gli alimenti / i liquidi caldi fino a circa 80°C
(misurino (7)). Attenzione! Quando si ha a che fare con liquidi caldi si corre il
rischio di scottarsi.
▪ Non usare l’apparecchio e gli accessori e staccare subito la spina, se:
⋅l’apparecchiatura o il cavo d’alimentazione sono guasti
⋅si sospetta un difetto dopo una caduta od un evento simile.
In questi casi far riparare l‘apparecchio.
▪ Sia l’apparecchio che gli accessori non devono essere usati all’aperto.
▪ Si declina qualsiasi responsabilità in caso di uso per uno scopo diverso da
quello previsto, di uso improprio, di riparazione non fatta da un professionista
e di uso di accessori che non sono previsti per questo apparecchio. In questi
casi sono escluse anche le richieste di garanzia.

32 33
it
Utilizzo
Con il frullatore a immersione si possono frullare frutta morbida e verdure cotte e
preparare il cibo per i neonati o dei purè.
Questi accessori sono adatti per triturare e miscelare alimenti, per schiumare latte
o per battere. Le varie possibilità di impiego dettagliate dei singoli componenti
degli accessori si trovano nel Capitolo “Messa in servizio”. Non ne è previsto
nessun altro tipo d’uso.
Durante l’uso osservare scrupolosamente le istruzioni per la sicurezza.
Non ci si assume nessuna responsabilità in caso di uso per uno scopo diverso da
quello previsto, di mancata osservanza delle istruzioni per l’uso oppure in caso
di riparazione non professionale. In questi casi sono escluse anche le richieste di
garanzia.
Messa in servizio
Si prega di pulire tutti i pezzi, come descritto nel paragrafo “pulizia e manuten-
zione”, prima che vengano a contatto con gli alimenti.
Frullatore ad immersione
Con il frullatore a immersione (5) si possono frullare frutta morbida e verdure
cotte e preparare il cibo per i neonati o dei purè. Si tagliano innanzitutto i pezzi
più grossi grossolanamente.
▪ Si prepara la quantità desiderata di cibo e si riempie con il cibo una ciotola
stabile che sia abbastanza grande e alta, ad es. il recipiente (7) fornito. Per
garantire una posizione di sicurezza, utilizzare una base anti-scivolo.
▪ Attenzione! Il recipiente (7) fornito non resiste al calore. La temperatura non
deve superare 80 gradi. SI lascia raffreddare un attimo il cibo prima di iniziare.
Non utilizzare il contenitore (7) per la conservazione degli alimenti.
▪ Bisogna accertarsi che l’apparecchio separato dall’alimentazione elettrica.
▪ Si inserisce il gambo del frullatore a immersione (5) giù’ all’accoppiamento
dell’unità di azionamento e si premono questi e l’unità di azionamento l’uno
contro l’altro finché si senti che il frullatore a immersione (5) si agganciano
all’unità di azionamento e dunque si bloccano. Non ci deve rimanere spazio tra
l’unità di azionamento e il frullatore a immersione (5). Il frullatore a immer-
sione (5) devono essere posti in modo stabile sull’apparecchio e non devono
traballare o cadere.
Eventualmente ruotare l’asta del frullatore ad immersione (5) premendo
sull’unità di azionamento. Il frullatore ad immersione (5) si deve innestare in
modo udibile sull’unità di azionamento e bloccarsi.
▪ Si alza l’interruttore di velocità (1) sull’apparecchio fino alla velocità deside-
rata.
▪ Si regge il frullatore a immersione (5) nel cibo.
Attenzione: Si spruzza facilmente durante il lavoro. Per evitare spruzzi,
l’estremità inferiore della lama deve sempre essere completamente ricoperta.
Si regge l’apparecchio nei cibi liquidi leggermente in obliquo per ottenere una
migliore miscelazione.
Se si lavora del cibo caldo, bisogna stare attenti di non reggere l’apparecchio
nel vapore per evitare condensazione sull’unità di azionamento.
Conviene proteggere l’unità di azionamento e le mani possibilmente con un
max.
piccolo panno pulito da cucina dal vapore caldo. Si deve asciugare l’acqua di
condensa dal contenitore.
▪ Si stacca la spina dalla presa.
▪ Si regge bene la ciotola con una mano e si preme il pulsante ON (2) . Il
motore si sta avviando.
▪ Una volta che il cibo abbia la consistenza desiderata, si deve liberare il pul-
sante (2) entro 1 minuto.
In alternativa, si può durante la lavorazione premere il pulsante Turbo (3)
un l’apparecchio lavora a piena velocità.
▪ Si deve aspettare che il motore e gli utensili siano fermi per poi prendere il
frullatore a immersione (5) dalla ciotola.
Si stacca sempre la spina dalla presa prima di mettere l’apparecchio su un
supporto idoneo.
Trituratrice
Con la trituratrice si possono sminuzzare e triturare cipolle, frutta, verdura,
formaggio duro, erbette, noci e carne.
▪ Rimuovere il rivestimento protettivo dal coltello.
Si mette il coltello in acciaio (10) nella presa sul fondo del recipiente (9).
Far girare il coltello di acciaio (10), finché questo non scivola nella presa verso
il basso.
▪ Attenzione: I coltelli sono aguzzi. Bisogna sempre mettere un rivestimento
protettivo quando i coltelli non vengono usati.
Inserire gli alimenti fino al segno di MASSIMO nel contenitore (9) e mettere la
parte superiore con adattatore integrato (8).
Per garantire una posizione di sicurezza, fissare il piedino antiscivolo (11) di
gomma sulla base del contenitore (9).
Attenzione: Riempimento massimo di 200 ml di alimenti fluidi.
▪ Mettere l’unità di azionamento del frullatore ad immersione sull’adattatore
integrato (8) nella parte superiore. Spingere l’attacco dell’unità di aziona-
mento sull’adattatore (8), finché il contenitore (9) e la parte superiore non
scattano udibilmente in posizione bloccandosi.
Fra l‘unità di azionamento e l‘adattatore (8) non deve esserci nessun interspa-
zio.
▪ Selezionare sulla rotellina (1) la velocità desiderata. Utilizzare per gli alimenti
più duri una maggiore velocità.
▪ Dopo aver collegato la spina, si preme più volte il pulsante di attivazione
(2) a brevi impulsi fin quando il risultato desiderato non viene raggiunto.
Sostenere bene il contenitore (9) con una mano. In alternativa, durante la
lavorazione, si può usare anche il tasto Turbo (3) , con il quale l’apparec-
chiatura funziona a velocità elevata.
▪ Una volta ottenuto il risultato desiderato, attendere l’arresto del motore e del
coltello e staccare la spina.
▪ Svitare la parte superiore dell’unità di azionamento premendo il pulsante di
rilascio (4). Dopodiché si può togliere la parte superiore (8) del contenitore (9)
e rimuovere con cautela il coltello.
▪ Non utilizzare il contenitore (9) per la conservazione degli alimenti.

34 35
it
Schiumatore
Con lo schiumatore si può schiumare il latte per esempio per il cappuccino od il
latte macchiato o anche dessert.
▪ Collegare l’adattatore (12) esercitando una leggera pressione sullo schiumatore
(14). L’adattatore (12) scatta in posizione in modo udibile.
▪ Posizionare l’adattatore (12) sotto l’attacco dell’unità di azionamento e
premere l’uno contro l’altro finché lo schiumatore (14) non scatta in posi-
zione in modo udibile sull’unità di azionamento, bloccandosi. Tra l’unità
di azionamento e l’adattatore (12) non deve esserci nessun interspazio. Lo
schiumatore (14) deve essere saldamente alloggiato sull’apparecchio e non
deve né traballare né cadere.
▪ Versare il latte in un recipiente dal bordo alto ed immergervi dentro lo
schiumatore (14).
▪ Selezionare sulla rotellina (1) la velocità desiderata.
Dopo aver collegato la spina, premere il pulsante di attivazione (2) , finché
non si sia ottenuto il risultato desiderato.
In alternativa, durante la lavorazione, si può usare anche il tasto Turbo (3)
, con il quale l‘apparecchiatura funziona a velocità elevata.
▪ Far effettuare allo schiumatore (14) movimenti leggeri e circolari.
Non appena si forma la schiuma, guidare lo schiumatore (14) verso l‘alto, in
modo che venga a trovarsi sempre appena sotto la superficie.
▪ Una volta ottenuto il risultato desiderato, attendere l’arresto del motore e
dello schiumatore (14) e staccare la spina.
▪ Svitare l’adattatore (12) dell’unità di azionamento premendo il pulsante di
rilascio (4). Togliere l’adattatore (12) dall’alto dello schiumatore (14).
Frusta
Con la frusta si possono montare per esempio albumi a neve, panna o anche
preparare shake, dessert, minestre, salse o maionese
▪ Collegare l’adattatore (12) esercitando una leggera pressione sulla frusta (13).
L’adattatore (12) scatta in posizione in modo udibile.
▪ Posizionare l’adattatore (12) sotto l’attacco dell’unità di azionamento e pre-
mere l’uno contro l’altro finché la frusta (13) non scatta in posizione in modo
udibile sull’unità di azionamento, bloccandosi. Tra l’unità di azionamento e
l’adattatore (12) non deve esserci nessun interspazio. La frusta (13) deve essere
saldamente alloggiata sull’apparecchio e non deve né traballare né cadere.
▪ Inserire gli ingredienti in un contenitore adatto ed immergervi la frusta (13).
▪ Selezionare sulla rotellina (1) la velocità desiderata.
Dopo aver collegato la spina, premere il pulsante di attivazione (2) , finché
non si sia ottenuto il risultato desiderato.
In alternativa, durante la lavorazione, si può usare anche il tasto Turbo (3)
, con il quale l‘apparecchiatura funziona a velocità elevata.
▪ Una volta ottenuto il risultato desiderato, attendere l’arresto del motore e
della frusta (13) e staccare la spina.
▪ Svitare l’adattatore (12) dell’unità di azionamento premendo il pulsante di
rilascio (4). Togliere l’adattatore dall’alto della frusta (13).
Pulizia e manutenzione
La spina va staccata subito dopo l’uso.
Pulire l’apparecchio possibilmente subito dopo il lavoro cosicché residui di cibo
asciutti non danneggino i supporti del frullatore a immersione (5).
Prima di pulire, si lasciano il frullatore a immersione (5) per breve tempo in acqua
calda.
Il frullatore a immersione (5) sono bloccati all’apparecchio durante il servizio e
può’ essere sciolto soltanto premendo il pulsante di sbloccaggio (4). Si può allora
rimuovere il frullatore a immersione (5).
Per garantire la conservazione corretta, disporre il frullatore ad immersione (5)
nella capsula di protezione (6).
Pulire l’accessorio subito dopo l’uso, di modo che i residui di cibo seccati
non lo possano danneggiare.
Non usare detergenti abrasivi.
lavabile in
lavastoviglie
sciacquabile
sotto acqua
corrente
pulire con un
panno umido
Unità di aziona-
mento
Frullatore ad
immersione (5)
Cappuccio di
protezione (6)
Misurino con
base anti-scivolo
(7)
Parte superiore
con adattatore
integrato (8)
Recipiente (9)
Coltello di acciaio
legato (10)
Piedino antisci-
volo (11)
Adattatore (12)
Frusta (13)
Schiumatore (14)

36 37
it
L’apparecchio è conforme alle direttive europee 2014/35/CE, 2014/30/CE e
2009/125/CE.
Alla fine del suo ciclo di vita non buttare il prodotto nella spazzatura domestica,
ma consegnarlo in un centro di riciclaggio di apparecchi elettrici o elettronici.
I materiali possono essere riciclati in conformità con la loro etichettatura. Grazie
al riciclaggio, al recupero e ad altre forme di recupero di vecchi apparecchi, si
riesce a contribuire in modo significativo alla protezione dell’ambiente.
Per informazioni relative al centro di smaltimento, si prega di contattare
l’amministrazione comunale.
Con riserva di modifiche

38 39
eses
Instrucciones de uso
Advertencias de seguridad importantes
▪ Este aparato y sus accesorios no deben utilizarlos
personas con alguna discapacidad física, psíquica o
sensorial ni aquellas que carezcan de la experiencia y/o
conocimientos necesarios para usarlos si no cuentan
con la instrucción necesaria para una utilización segura
del aparato, ya que podría representar un peligro para
su seguridad.
▪ Este aparato y sus accesorios no pueden ser utilizados
por menores. Mantenga el aparato, los accesorios y
cables de conexión alejados de los niños.
▪ Vigile a los niños en todo momento para asegurarse de
que no jueguen con el aparato ni los accesorios.
▪ El aparato deberá ser desconectado de la red retirando
el enchufe en los siguientes casos: cuando no esté
vigilado, en caso de fallos durante el funcionamiento
y antes de su montaje, cuando vaya a desmontarlo o
limpiarlo.
▪ Tenga precaución al manipular el aparato y los acces-
orios. Antes de cambiar los accesorios, espere a que el
aparato se pare por completo.
▪ Cuidado con las cuchillas afiladas, así como al vaciar el
bol y al limpiar.
▪ Una vez utilizado el aparato y los accesorios, limpie
todas las superficies y piezas que hayan estado en con-
tacto con los alimentos. Para ello, siga las instrucciones
contenidas en el apartado „Limpieza y cuidados“.
▪ Si el cable de conexión del aparato está dañado, deberá
ser sustituido por el departamento de atención al
cliente central del fabricante o por una persona cualifi-
cada. Las reparaciones inadecuadas podrían suponer un
serio peligro para el usuario.
▪ Este aparato está diseñado para uso doméstico u otras
aplicaciones similares, tales como:
⋅en cocinas para el personal de tiendas, oficinas y
otros ámbitos comerciales;
⋅en fincas agrícolas;
⋅por clientes de hoteles, moteles y otros estableci-
mientos;
⋅en pensiones con desayuno.
No se ha diseñado el aparato para su uso comercial.
Antes de usarlo
Lea detenidamente las instrucciones de funcionamiento. Contienen información
importante sobre el uso, seguridad y mantenimiento del aparato. Guárdelas en un
lugar seguro y déselas a futuros usuarios cuando corresponda. Utilice el aparato
solo para el fin para el que se ha diseñado y siempre siguiendo las instrucciones
de este manual. Respete siempre las precauciones de seguridad al utilizar este
aparato.
Datos técnicos
Tensión nominal: 220-240 V~ 50/60 Hz
Consumo de energía: 590-700 W
Clase de protección: II
Otras advertencias de seguridad
▪ Conecte el aparato solo a una fuente de corriente alterna, con una tensión
que se corresponda con la que figura en la etiqueta del aparato. El cable y el
enchufe deben estar secos.
▪ No desenchufe nunca el aparato tirando del cable o con las manos mojadas..
▪ Enchufe solo la batidora después de ponerla en el alimento a batir. Sacarla
solo del alimento cuando se haya parado el aparato.
▪ No sumerja la unidad principal en agua/alimento.
▪ El aparato, los accesorios y el cable de conexión deben protegerse del calor.
▪ Si se bloquea el aparato durante su uso, apáguelo inmediatamente y quite el
objeto que causó la obstrucción, por ejemplo una pieza de fruta o verdura que
haya quedado atascada.
▪ Deje que los alimentos/líquidos calientes se enfríen a 80° C (vaso medidor (7))
antes del procesamiento. Atención: existe riesgo de escaldadura durante la
manipulación de alimentos/líquidos calientes.
▪ No ponga a funcionar el aparato ni los accesorios y desconéctelos inmediata-
mente de la red si:
⋅el aparato o cable de red están dañados,
⋅sospecha que se haya podido producir un fallo después de una caída o
similar.
En ese caso, llévelo a reparar.
▪ No utilice el aparato ni los accesorios en exteriores.
▪ No se aceptará ninguna responsabilidad por los daños debidos a un mal uso,
funcionamiento incorrecto, reparaciones inadecuadas o el uso de accesorios
no diseñados para este aparato. En estos casos, las reclamaciones en periodo
de garantía también quedarán excluidas.
Other manuals for lineo
1
This manual suits for next models
1
Table of contents
Languages:
Other MWf Kitchen Appliance manuals