My Paw's Best Friend CLICKER COLLAR User manual

MY PAW’S BEST FRIEND’S CLICKER COLLAR™
OWNER’S MANUAL
Activate your warranty @ mypawsbestfriend.com
It is imperative that you introduce the collar to your dog in the correct
manor as noted inside this manual.
The Clicker Collar™ training program is based on proven animal
behavior models. Your dog should be trained to be very excited when
you present the collar to him in our Clicker, Treat and Praise™ training
method. Training sessions should be a fun and rewarding time for the
both of you.
Train with love, respect praise and treats.
Your Best Friend will love you for it, and your Paw’s Best Friend will
too.

Get your free training guide and
activate your warranty at mypawsbestfriend.com
2
Table of Contents
Activate your warranty at mypawsbestfriend.com......................................... 1
Introduction........................................................................................................ 2
The Clicker Collar™ Training Method........................................................ 3
Features ........................................................................................................... 3
Safety Features................................................................................................ 4
Your Best Friend’s Comfort and Safety....................................................... 4
Getting Started – Use and Features.................................................................. 5
Collar Assembly .............................................................................................. 5
Charging the Clicker Collar™ ...................................................................... 5
Clicker Collar™ Operations & Linking....................................................... 5
Battery Replacement ...................................................................................... 6
The Remote Buttons ....................................................................................... 6
How To Match The Clicker Collar™ With The Remote............................ 7
Getting Started – Training ................................................................................ 7
The FREE Online Training Guide, Warranty and Operator’s Guides .... 7
How To Introduce the Clicker Collar™ to Your Best Friend.................... 7
Quick Start training guide ............................................................................. 8
Thoughts for successful training ................................................................... 8
Troubleshooting Guide................................................................................... 9
The Clicker Collar™ does not seem to be working ...................................... 9
The Clicker Collar™ Is Not Charging ........................................................ 10
My Dog Does Not Respond When I send a Correction .............................. 10
Terms, Conditions and Compliance............................................................ 10
Safety Guidance ............................................................................................ 11
Warranty registration & download your free training guide .................. 11
Contact Information..................................................................................... 11
Introduction
Hello, I’m Roger Schroeder of My Paw’s Best Friend and inventor of the
Clicker Collar™.
Thank you for caring enough about your best friend to train her using the
newest and most humane positive reinforcement training system in the world
today.
The electronic collar training community has been criticized for the unethical
treatment of animals. Far too often manufactures just sell their shock collar to
their customers and don't even have the courtesy to teach them how to train with
it. What happens then is that this person unwittingly subjects his or her best
friend to electronic abuse.

Get your free training guide and
activate your warranty at mypawsbestfriend.com
3
The reason I invented the Clicker Collar™ was to stop the shock collar abuse.
Forcing any animal to do something by fear, intimidation and pain is inhumane.
Training by love, respect and understanding results in a more binding love and
trust without any toxic mental side effects. It amazingly has a shorter learning
time and is immensely more fun.
The Clicker Collar™ is a revolutionary new training system that combines the
universally accepted and humane Clicker Collar™ training method that
incorporates the long distance advantages of non-shock electronic collar
training with the time tested and humane clicker training method.
When you first open your Clicker Collar™ box you will notice that a
nonconductive nylon comfort guard has disabled the electrodes on your Clicker
Collar™. Although we don't feel that this stimulus function should be used in
everyday training, we also realize that sometimes in certain life or death
situations it may be a necessity. For example, when your pet starts chasing a car
or hiking on a trail and he comes across a rattlesnake or scorpion. Sometimes
using this drastic measure is the only way to keep your Best Friend safe until
they are properly trained.
In order to activate the stimulus portion of the collar the nonconductive comfort
guards need to be screwed off and replaced by the electric prongs. Place the
guards someplace where you can find them again so you can put them back
onto the collar once the threat is over.
The Clicker Collar™ Training Method
The Clicker Collar™ training method can used to change any undesirable
behaviors such as digging, chewing or excessive barking as well as to teach
them tricks.
The clicker training method is used in both Hollywood and on stage in Las
Vegas and has taught many different animals how to perform.
Our Clicker Collar™ training method is firmly rooted in the lessons learned
over the decades by these professional trainers and now those same training
methods are going to be taught to you and your best friend.
Features
My Paw’s Best Friend Clicker Collar ™ training system rewards your pooch
with our “ Clicker, Treat and Praise ™” training method. Used correctly, our
Clicker Collar™ simplifies the learning process.

Get your free training guide and
activate your warranty at mypawsbestfriend.com
4
•There are two methods of correcting an unwanted behavior: Vibration
for a gentle correction and Stimulus. The optional Stimulus mode is to
be used in emergency situations only.
•Nonconductive comfort guards to cover the electrodes for your dogs
comfort
•LED screen
•Four-day standby time
•The remote can be used to control up to three different Clicker
Collars™.
•Four levels of correction and vibration
•900-foot range
•Waterproof up to 16 feet underwater
Safety Features
•The stimulus part of the collar does not work when wet. Only the sound
and vibrate modes will continue working until the collar is once again
dry and the stimulus function resumes
•The signals only last as long as long as the “OK”button is pushed. You
decide how long to send the signal, not a microchip.
•When receiving signals the LED indicator light on the receiver/collar
will come on
•There is a very small flashlight on the remote. The remote was not
designed to be a flashlight but we did incorporate it into the unit.
Your Best Friend’s Comfort and Safety
•The wearing of the Clicker Collar™ should represent to your best
friend that a training session is in progress and that he should be paying
attention to receive the Clicker, Treats and Praise™ rewards. Therefore
the collar should be removed at the end of all training sessions.
•Always keep the nonconductive comfort guards in place unless you feel
you need the stimulus function of the collar to curb a life threatening
behavior. Replace the comfort guards as soon as you correct the said
behavior.
•Read the training manual thoroughly and follow directions.
•If you have an aggressive dog we recommend that you consult a
positive dog training professional or veterinarian to see if there is a
physical reason like pain that is causing this behavior.

Get your free training guide and
activate your warranty at mypawsbestfriend.com
5
Getting Started – Use and Features
Collar Assembly
The nonconductive comfort guards that come installed on the collar disable the
Stimulus portion of the collar. Please do not remove these in favor of the metal
prongs unless you and you Best Friend have failed to curb the life-threatening
behaviors through the Clicker, Treat and
Praise™ training. This portion of the
collar should only be used as a last resort.
If you feel you really need to use this
portion of the collar please choose the
correct size of the optional prongs so that
they touch the skin through the thickness
of the hair on your buddy’s neck and then
screw them onto the collar.
Once you feel comfortable that your dog does not exhibit life threatening
behavior please replace the prongs with the more comfortable nonconductive
comfort guards.
Charging the Clicker Collar™
1. Turn off the Collar by holding down the power button for three seconds
2. Plug the wall charger into the wall socket, then lift the rubber cover on
the Clicker Collar™ and plug in the charger.
3. A green LED light will flash on the Clicker Collar™ during the
charging process
4. When fully charged a constantly lit green LED light will be displayed
5. Replace the rubber cap after charging to keep the dirt and water out of
the collar.
6. The red light will dim when the battery needs to be recharged.
Note: Let the batteries in the Clicker Collar™ completely charge the first time
you charge it.
Turn off the collar when not in use, and charge it every 10 days to keep the
batteries healthy. Do not charge the battery for more than 12 hours at a time.
Clicker Collar™ Operations & Linking
1. Turn on the remote by simply instating the batteries. No need to ever
turn it off, it will do that for you.
2. To turn the Clicker Collar™ ON, press and hold the on/off button for 3
seconds. You should now hear 2 beeps from the Clicker Collar™. The

Get your free training guide and
activate your warranty at mypawsbestfriend.com
6
Red light will blink for 4 seconds. The Clicker Collar™ is now being
linked together with the remote.
To turn the Clicker Collar™ OFF,press and hold the on/off button for 3
seconds. A beep will sound indicating the deactivation of the unit, and the Red
light will flash four more times.
When worn by your dog the Clicker Collar™ will automatically go into sleep
mode if not activated by the remote or no movement is detected for longer than
30 seconds.
The Clicker Collar™ takes 3 seconds to code with the remote when coming out
of the sleep mode.
Note: When done correctly, the red LED light on the Clicker Collar™ will flash
every 3 seconds. This demonstrates that it is fully functioning.
Battery Replacement
1. Replace the batteries on the remote by sliding the battery cover open on
the back.
2. Insert 3 AAA batteries correctly by paying attention to the positive and
negative connectors. Incorrect installation of the batteries will cause
damage to the unit.
3. Replace the cover.
4. The batteries inside the Clicker Collar™ are permanently installed and
therefore not replaceable.
The Remote Buttons
1. Flashlight: Push down the button to activate the
flashlight. Push down again to switch the flashlight
off. Remember the flashlight is a value added option
and it was purposely designed to be dim because if it
is used too much it will drain the batteries of the
remote.
2. Mode: Push down the button to select the Click,
Vibration, or Stimulus mode. The stimulus mode will
not work unless the nonconductive comfort guards are
removed and the conducting prongs are attached.
3. OK: This is used to send the selected signal to the
Clicker Collar™. The remote will transmit a signal to
your best friend for as long as you hold the button

Get your free training guide and
activate your warranty at mypawsbestfriend.com
7
down. Remember to train by the Clicker, Treat and Praise™ training method.
Training should be Terrific not Traumatic™.
4. Level: Avoid any level that is more than what is needed to get the job done.
Adjust the level of “Vibration and Stimulus” modes with level 1 being the
lowest level, and level 4 being the highest.
It is extremely important to be kind. If the optional stimulus mode is used
always start at the lowest level possible to curb only the life threatening
behavior, and try to work down as the training becomes more and more
successful until it is no longer needed.
5. Dog Selector: Be sure to select the correct Clicker Collar 1, 2, or 3. The LCD
will indicate which collar you have selected.
How To Match The Clicker Collar™ With
The Remote
1. Select which collar number you want to
use on the remote’s LED screen.
2. Turn the Clicker Collar™ on by holding it
down for about three seconds and you will
hear 2 beeps from the collar indicating the
collar is now turned on and the flashing light is indicating the collar is
automatically paring with the remote.
NOTE: Keep in mind that as a safety precaution, only one collar can be
selected at a time.
Stimulus Test: With the included glass test light placed across the conductive
collar prongs, change the remote mode to the Stimulus. Next, press the OK
button, and the test light should turn on.
Getting Started – Training
The FREE Online Training Guide, Warranty and Operator’s Guides
Before introducing the Clicker Collar™ to your Best Friend, please download
our free Clicker Collar™ Training guide and register your warranty at:
mypawsbestfriend.com.
How To Introduce the Clicker Collar™ to Your Best Friend
This is a very important step and no other training should be done until it has
been accomplished.

Get your free training guide and
activate your warranty at mypawsbestfriend.com
8
Open up the Clicker Collar™ so that it can easily be slipped over your dog’s
head. Allow for your little girl to sniff and explore her Clicker Collar™. When
she touches it to his nose send a “click”sound to the collar and give her a small
treat. (Clicker, Treats and Praise™).
Continue with the Clicker, Treat and Praise™ method until she will allow you
to slip it over her head and she is happy to wear it. She will now associate the
collar as being a good thing that brings her many clicks, treats and praise.
As with all training, proceed slowly and patiently teaching only one goal at a
time as you gain trust in each other. Using the Clicker Collar™ methods you
will become a very effective trainer as your dog becomes a very attentive best
friend and ready to start a lifetime of fun, love and mutual understanding.
Quick Start training guide
The Clicker Collar Training method is all about rewarding your best friend
when he does something you want him to do with a click sound, followed by a
treat and then praise. Clicker, Treat and Praise™! It is as simple as that.
The more generous you are with Clicker Treat and Praise™ the longer the
training sessions will last and the faster your dog will learn.
If your dog starts to get tired of the training sessions it is time to stop and give
him one more Clicker Treat and Praise™ as you take off the collar.
Vibration is used to tell your dog that the behavior he is offering is not the one
you want him to present.
The stimulus is only to be used in life threatening situations and it is disabled on
the collar by two nonconductive comfort guards when you receive it. If you
need to use this function replace the comfort guards with the electronic prongs.
Please replace the comfort guards once the stimulus function is no longer
needed.
Thoughts for successful training
You will have plenty of success using the Clicker, Treat and Praise™ training
method.
Please keep these simple and easy positive training tips in mind:
1. Eliminate one unwanted behavior or teach one trick at a time. Trying to
do too much may confuse your best friend.
2. Keep in mind that “bad behaviors” are at times natural behaviors that
are genetically woven into every dog as we breed them to suit our needs.

Get your free training guide and
activate your warranty at mypawsbestfriend.com
9
Understand that some dogs were born to dig, hunt or protect. When you
understand the psychology of your dog, you will have an easier time
training him. He is not doing a certain behavior to annoy you, but
because he thinks this is what you want him to do.
3. Many of these behaviors like excessive barking, digging, chewing and
sometimes-even aggression can be the result of boredom.
Keep your dogs well exercised, environmentally stimulated and relaxed.
It is your job, as a proud pet parent, to understand that your dogs need
mental stimulation every day. Visit your pet store and buy Fido some
great interactive dog toys, like pull toys, chew toys and squeakers.
4. Understand that the main idea behind the Clicker, Treat and Praise™
training method is to, in a positive way, direct Fido into the new
behavior that you want him to do. Dogs want to please you every
second of every day. It is up to you to teach them how.
5. To be 100% successful using our Clicker Collar™ training method, pet
parents must always use consistency, patience and repetition throughout
the entire training process. Your pooch will love you for it!
Keep in mind that this positive reinforcement training takes time and patience.
It is all about rewarding Fido with his favorite treat and praise so that he’ll grow
up to be a good doggie citizen. Your buddy will learn to associate the sounds of
the Clicker Collar™ with a food reward like his favorite treat.
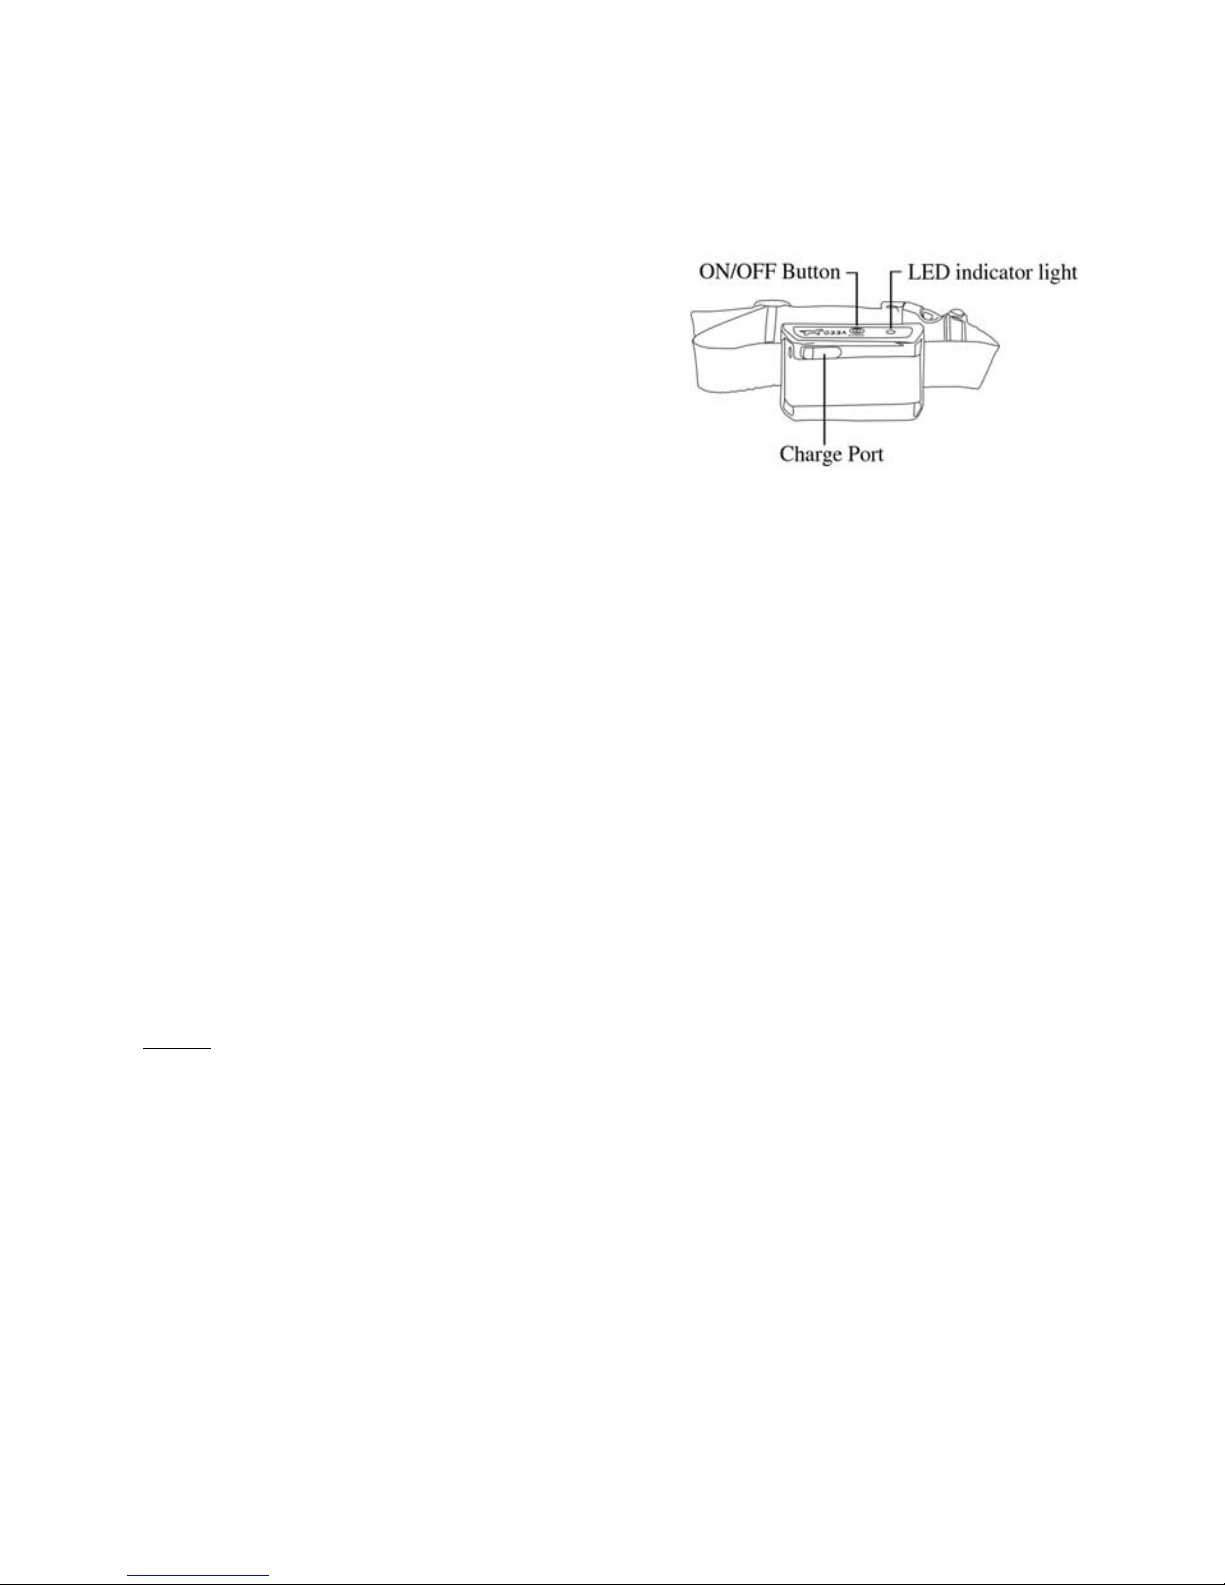
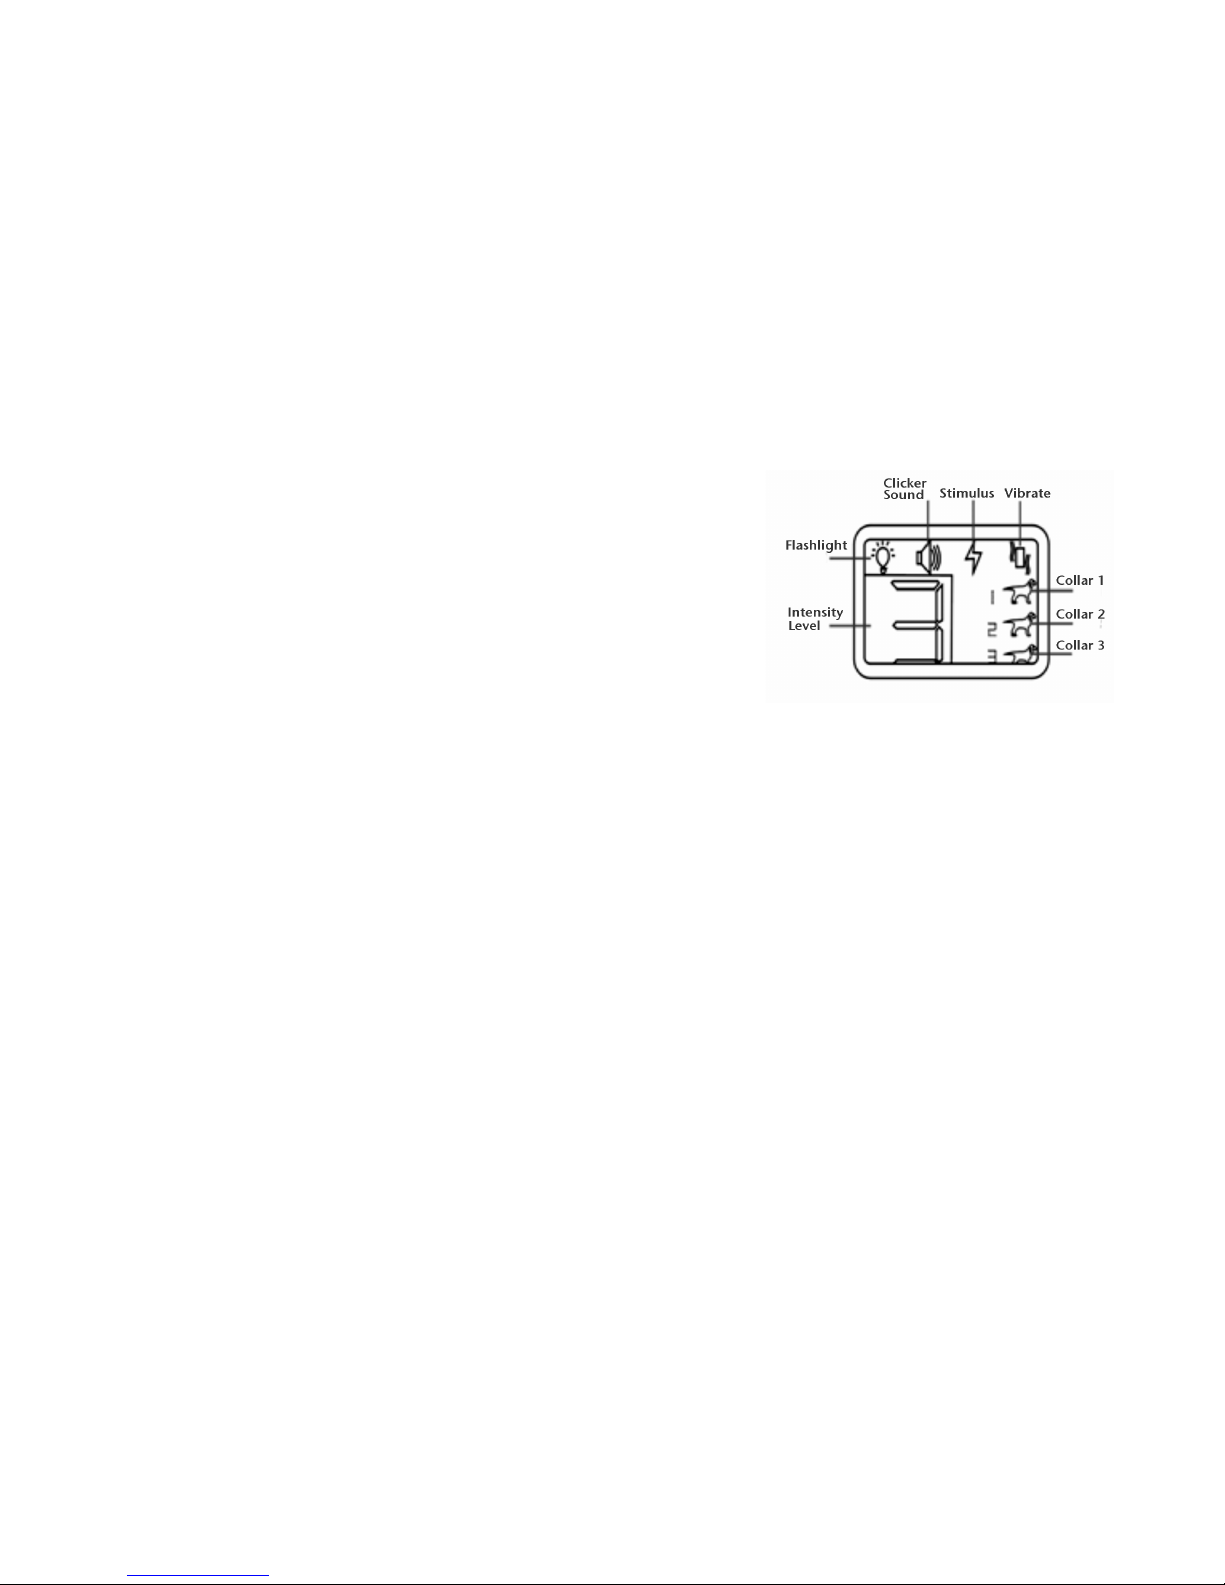
With that said, when first introducing the Clicker Collar™ to your furry best
friend, you first need to turn it on and become familiar with how it operates
yourself. Explore the various functions, learn how to send a click, vibration, and
understand how to set it on the lowest level. If you are using the optional prongs
the collar must fit so they touch the skin at all times.
NOTE: The collar should only be worn when training. This makes wearing the
collar a special event for your pup, filled with promises of treats and love.
Doing this will also make your dog more comfortable, keep skin problems to a
minimum and save your furniture from being rubbed against when Fido tries to
rub it off.
Happy Training and don't forget the treats!
Troubleshooting Guide
The Clicker Collar™ does not seem to be working
If the Clicker Collar™ does not work, change the setting to the click mode, and
press the OK button. If the Clicker Collar™ is functioning correctly you should
hear the sound.

Get your free training guide and
activate your warranty at mypawsbestfriend.com
10
Check that the remote has good batteries in it and the collar is charged. The
LED on the remote should light when any button is pressed and the red light on
the collar should flash every 3 seconds.
Try the different collar numbers to see if you are on the wrong collar number.
Relink the Clicker Collar™ to the remote as described earlier in this manual.
When only the sound and vibration modes operate, but the Stimulus does not,
the safety feature may be detecting that the collar is wet.
If you have done all the above, your unit may need to be serviced. Please
contact Customer Service at: support@mypawsbestfriend.com
The Clicker Collar™ Is Not Charging
Make sure that the charger is plugged into the wall outlet securely and that the
charging pole is plugged firmly into the Clicker Collar™.
The green LED light on the Clicker Collar™ should flash when charging and be
solid green when charged.
If these methods do not produce a positive outcome the collar may need to be
serviced. Please contact service@mypawsbestfriend.com.
My Dog Does Not Respond When I send a Correction
Always start with lowest levels of vibrate and stimulation. Be sure to check that
the receiver/collar is on. Check the sound and vibrate functions. Recharge the
batteries if they are not working.
When only the sound and vibration modes operate, but the Stimulus does not,
the safety feature may be detecting that the collar is wet.
Make sure that the correction probes are positioned properly, and that both of
the probes are in contact with your dog’s skin. The Clicker Collar™ should be a
comfortable fit.
Terms, Conditions and Compliance
The Clicker Collar™ Remote Training System is intended for the sole purpose
of positive behavior training in dogs. It is not intended for use on humans. The
Clicker Collar™ Remote Training System does not assume any liability for the
improper use of the Clicker Collar ™Training System. It is not intended to
punish, injure, provoke or harm. Using this product in a way in which it was not
intended is strictly prohibited, and can result in a violation of Federal, State or
local laws.

Get your free training guide and
activate your warranty at mypawsbestfriend.com
11
Read the training manual thoroughly and follow directions.
This product is not intended for use on elderly dogs, or dogs in poor health,
dogs that are expecting pups or lactating females.
We recommend that you consult a positive dog training professional that
specializes in aggressive dogs, if you’re trying to correct your dog’s aggression
towards people, other dogs and animals.
Safety Guidance
The Clicker Collar™ arrives with an adapter to charge the collar. My Paws Best
Friend recommends that you only use the supplied adaptor. You are advised not
to handle the metal probes on the Clicker Collar™ when the remote is in use.
Warranty registration & download your free training guide
Please register your Clicker Collar™ at mypawsbestfriend.com to claim your
warranty, your free Clicker Collar™ Training e-book along with an electronic
copy of this manual at mypawsbestfriend.com.
Contact Information
service@mypawsbestfriend.com
© 2015 My Paw’s Best Friend
If you are happy with our little homegrown company please tell a friend. If you
have any problem with our products please contact our customer service at
support@mypawsbestfriend.com.
Table of contents