Nacra F18 Evolution User manual

ASSEMBLY MANUAL
CAREFULLY READ THIS MANUAL BEFORE OPERATING YOUR NACRA.
!

Dear Customer,
Thank You for purchasing a Nacra F18 Evolution. Before you start using this Nacra, read this Operator’s Manual and owner’s Manual
carefully and familiarize yourself with this boat and its operations. For your own safety and a longer operating lifespan of your brand new
Nacra, follow the instructions and warning notices in this Manual and owner’s manual carefully.
Outside manuals we have an extensive dealer network around the world. Naturally, these Nacra dealers knows everything there is to
know about your Nacra and can provides you with the best service possible. So please call your dealer in your region for any servicing
needed and make sure that only genuine spares are used for your Nacra.
This manual will familiarize you with the operation and maintenance of your new Nacra. It will also provide you with important safety
information which should be read and understood before moving on to assemble your Nacra.
If this is your rst sailboat, or you are not familiar with this kind of sailboat? For your own comfort and safety, please ensure that you
obtain handling and operating experience before assuming control of this Nacra catamaran. Nacra Sailing experience centres, National
Sailing Federations or yacht clubs will be pleased to advise you about sailing schools or competent instructors.
When you have any query, please feel free to contact your local dealer. Manuals can also be found on our website
https://www.nacrasailing.com/support/

Table of Content
0. Tools ................................................................................................................................................................................................
1. Platform assembly ........................................................................................................................................................................
1.1 Hull assembly ..................................................................................................................................................................................
1.2 Front crossbar pre-bend ................................................................................................................................................................
1.3 Trampoline .......................................................................................................................................................................................
1.4 Spinnaker blocks ............................................................................................................................................................................
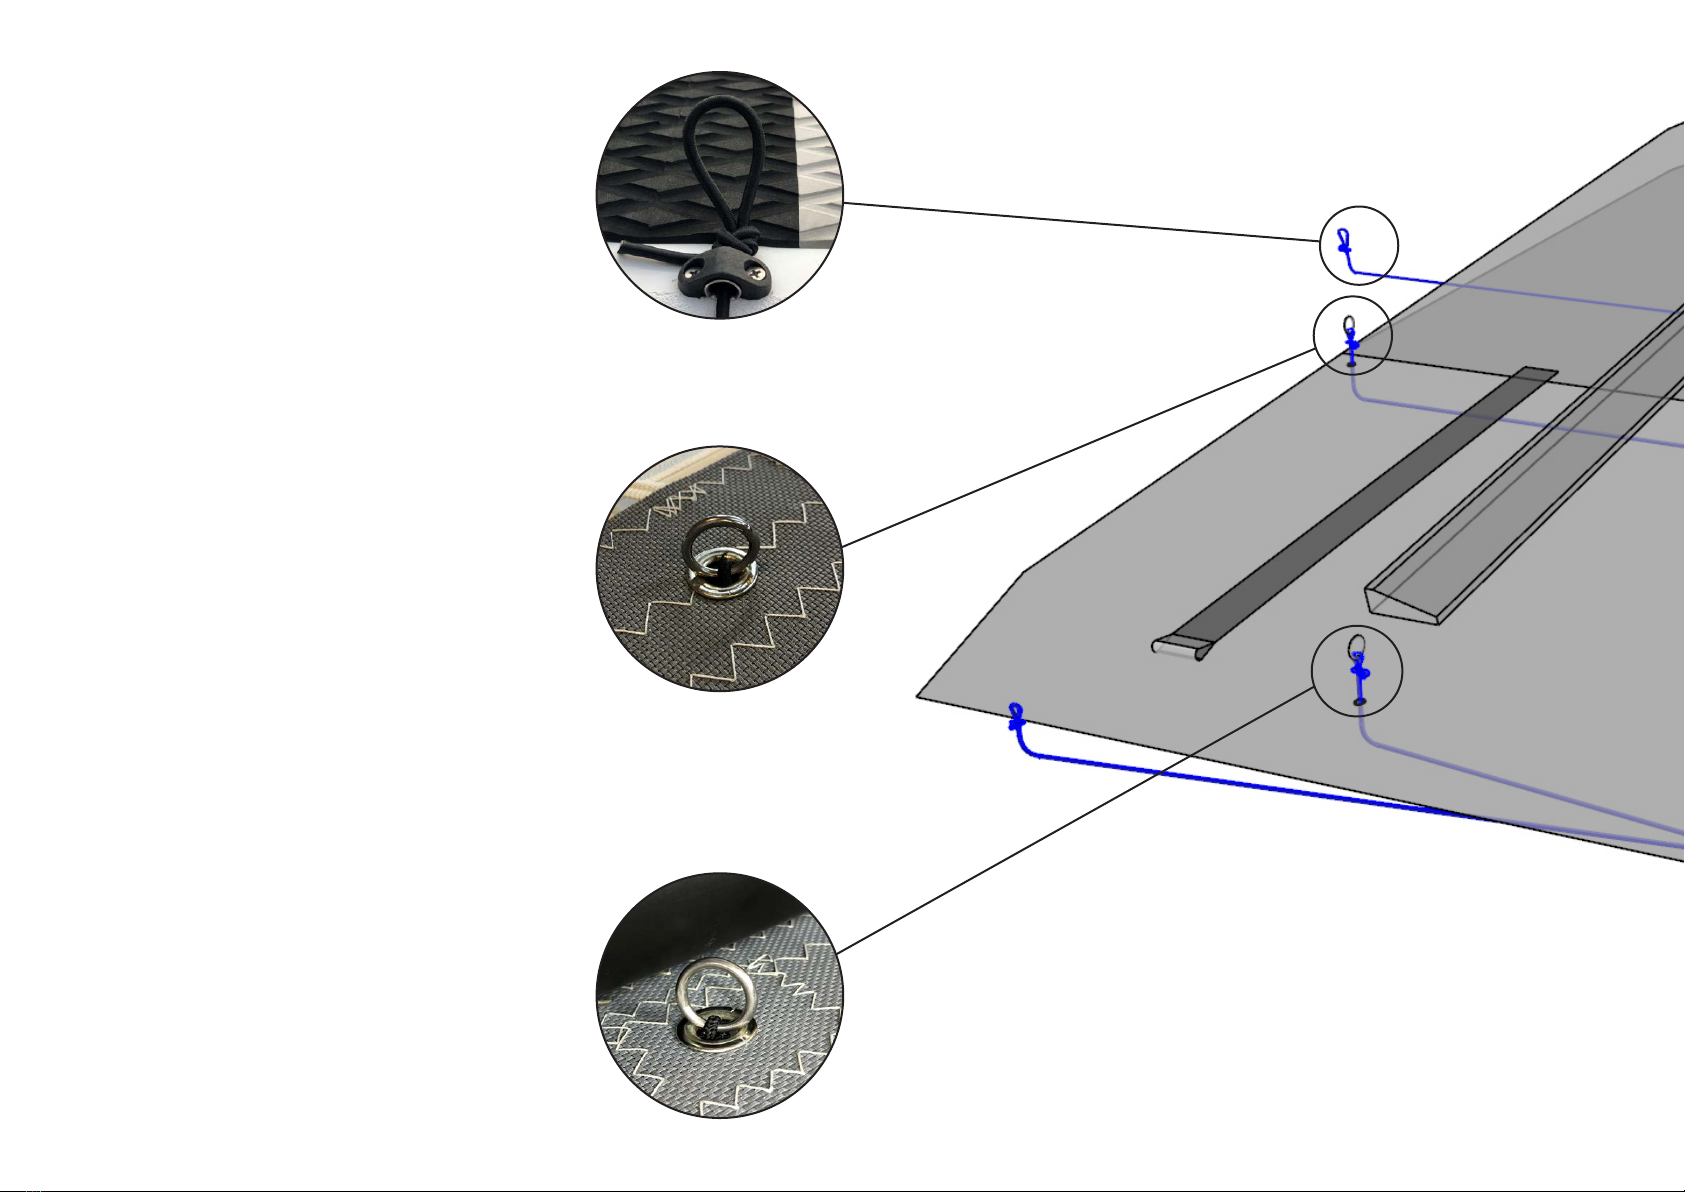
1.5 Trapeze shockcord ..........................................................................................................................................................................
1.6 Spinnaker sheet rings .....................................................................................................................................................................
1.7 Spinnaker halyard rings .................................................................................................................................................................
1.8 Mast rotation continuous system...................................................................................................................................................
1.9 Chickenline system (optional) ........................................................................................................................................................
1.10 Righting line .....................................................................................................................................................................................
2. Mast assembly ...............................................................................................................................................................................
2.1 Diamond wires .................................................................................................................................................................................
2.2 Spreaders .........................................................................................................................................................................................
2.3 Spreader rake .................................................................................................................................................................................
2.4 Diamond tension .............................................................................................................................................................................
2.5 Spinnaker halyard ...........................................................................................................................................................................
2.6 Main halyard ....................................................................................................................................................................................
2.7 Fixing the stays ................................................................................................................................................................................
2.8 Jibhalyard .........................................................................................................................................................................................
2.9 Cunningham system .......................................................................................................................................................................
3. Rudders ...........................................................................................................................................................................................
4. Rigging ............................................................................................................................................................................................
4.1 Preparation .......................................................................................................................................................................................
4.2 Raising the mast ...............................................................................................................................................................................
4.3 Lowering the mast ............................................................................................................................................................................
4.4 Snuerbag .........................................................................................................................................................................................
4.5 Bowsprit .............................................................................................................................................................................................
5
6
6
7
7
10
10
10
10
12
14
16
18
18
18
19
20
20
21
22
23
23
24
26
26
27
29
30
30

4.6 Jibsheet continuous system..............................................................................................................................................................
4.7 Cunningham continuous system......................................................................................................................................................
4.8 Jibcunningham ...................................................................................................................................................................................
4.9 Mastrotation ......................................................................................................................................................................................
4.10 Spinnaker halyard ............................................................................................................................................................................
4.11 Mainsheet 1:10 .................................................................................................................................................................................
4.12 Boom .................................................................................................................................................................................................
5. Setting the sails ..............................................................................................................................................................................
5.1 Spinnaker sheet ................................................................................................................................................................................
5.2 Spinnaker ...........................................................................................................................................................................................
5.3 Raising the jib ....................................................................................................................................................................................
5.4 Lowering the jib ................................................................................................................................................................................
5.5 Battens ...............................................................................................................................................................................................
5.6 Traveler system ................................................................................................................................................................................
5.7 Raising the mainsail ..........................................................................................................................................................................
5.8 Lowering the mainsail ......................................................................................................................................................................
6. Notes ................................................................................................................................................................................................
7. Standing rigging .............................................................................................................................................................................
8. Parts ................................................................................................................................................................................................
8.1 Arrival of parts ...................................................................................................................................................................................
8.2 Rigbox .................................................................................................................................................................................................
8.3 Rigbox assembly kits ........................................................................................................................................................................
32
34
36
38
38
39
40
40
40
40
41
42
42
42
43
44
46
47
48
48
49
50

0. Tools
5
• Torque wrench
• Socket 9/16
• Socket 5/16 hex
• Philips screwdriver
• Flat screwdriver
• Wrench 1/2
• Wrench 7/16 2x
• Wrench 9/16
• Wrench 11mm
• Wrench 17mm
• Wrench 22mm
• Allen tool size 3mm
• Measurement tape
• Long nose plier
• “Loose” tension gauge (xed)
• Grease (watertight + lithium based)

1.1 Hull assembly
1. Place the starboard and port hull next to each
other and make sure that the hulls are facing the
same way. Level the hulls, preferable with the
big wheel trolley and sterns supports.
2. Place the crossbars in the crossbar sockets on
the hulls and make sure that the crossbars are
facing the right way.
• The front crossbar has a jib track mounted,
which should be on top and facing the front of
the boat.
• The rear crossbar has two eyelets mounted on
the back which should be facing the back of the
boat.
Take time to align the crossbars !
3. Grease the eight beambolts and make sure
the berglass washer is at the bottom and the
metal washer is on top. The washers for the front
crossbar are already put in the slot on top of the
front crossbar.
4. Handtight all the bolts before putting tension on
them.
5. After hand tightening the bolts, use a torque
wrench to tighten the beambolts to 30 Nm
maximum.
Do not exceed the recommended 30
Nm, over tightening the bolts results in
damaged threads.
6. Make sure you place the cam wedge correctly
underneath the camcleat. See the picture below.
Tools needed:
- Torgue wrench - Socket 5/16 hex
- Socket 9/16 - Philips screwdriver
7. Grease the pre-drilled holes next to the
dagerboardcase. Screw the harken cam cleats
on the hulls using the bolt 8-32 UNC. The wire
fairlead is facing inwards.
1. Platform assembly
6
8. Attach the carbo 57mm ratchamatic single/swivel
and the spring to the strap eye on both sides.

7
• There should always be a pre-bend on the front
crossbar. This is been achieved by the tension on
the dolphinstriker.
• On new beams the tension on the dolphinstriker
must be reset after:
- 2 hours of sailing and
- 10 hours of sailing
• Reset without mast!
• During the season check the pre-bend regularly.
1.2 Front crossbar pre-bend
1. Release the tension on the nut located on top.
2. Release the tension on the nut located under the
crossbar.
3. Put grease on both nuts.
4. Measure 15mm from top side of the crossbar to
the bottom side of the upper nut.
5. Tension the nut underneath the crossbar until
both nuts are tightened.
Check pre-bend always without mast
mounted on.
Tools needed:
- Wrench 22mm
- Wrench 1/2
1.3 Trampoline
Tools needed:
- Long nose plier
1. Insert the trampoline plates from the outside
into the trampoline slot on the front. Do this on
the starboard and port side.
2. Insert the trampoline tie-rod into the slot on the
rear of the trampoline.
• Un-install the self tacking jib track from the front
crossbar.
Be aware that the pins have dierent
dimensions.

8. Loop the laces using the trampoline tie buttons.
9. Tension the line slightly and secure it
temporarily.
10. Tie the side lace line on
starboard
side to the
most front loop closest to the front crossbar.
Make sure the trampoline is in the middle
of the catamaran.
11. Feed the line through the loops from top to
bottom.
12. Loop around the bolt and continue
underneath
the line.
13. Tension the line slightly.
4. Fixate the trampoline with the trampoline plate
on the buttons on the front crossbar. Make sure
you bring the two loose aps between the beam
and the dolphin striker.
5. The plate needs to be all the way against the
front crossbar. Make sure the buttons stick out
properly.
6. Wrap the trampoline around the front crossbar,
make sure the six cutouts t the self tacking jib
track bases.
7. Re-install the self tacking jib track.
8
14. Tie the lacing line temporarily with half-hitch
knot at the last loop.
15. The beginning of the port side is a reection of
the starboard side.
3. Loop the rear lacing line through the tie rod as
shown in the picture. Start at the port side of the
trampoline.

9
16. Feed the line through the loops from bottom to
top.
17. Loop around the bolt and continue
above
the
line.
18. Tension the line slightly and tie it temporarily at
the last loop.
19. Now fully tension the trampoline sideways from
front to rear.
20. To secure the line, feed it underneath the
second loop and tie the lacing line with half-hitch
knots.
21. Continue until you reach the end of the line and
install a security knot.
22. Finally tension the trampoline backwards from
port to starboard.
23. After tightening go back two buttons, to secure
the line.
24. Tie the rear lacing line with half-hitch knot.
Continue until you reach the end of the line.
25. Close the trampoline with the two zippers
underneath.
26. Use the strapeye on the rear crossbar to tie the
V-strap in the middle.
27. Tie the hiking straps by using the hiking strap
ties.
This step is performed after installing
all systems running in between the two
trampoline layers.

1.5 Trapeze shockcord
1.6 Spinnaker sheet rings
1.7 Spinnaker halyard rings
1. Knot a loop in the trapeze shockcord and feed
the other end through the fairlead.
2. Pull the shockcord underneath the trampoline
to the other side.
3. Feed the shockcord through the fairlead and
knot a loop.
1. Tie a 15mm ring to the end of the shockcord.
2. Feed the shockcord through the eyelet from
above and pull the shockcord to the other side
and feed it through the eyelet from below.
3. Attach a 15 mm ring to the end of the shockcord.
1. Tie a 15mm ring to the end of the shockcord.
2. Feed the shockcord through the eyelet from
above and pull the shockcord underneath the
rear crossbar to the last tramp button.
3. Attach the shockcord with a bowline on the
tramp lace rear.
10
1.4 Spinnaker blocks
1. Attach the four 29mm carbo single xed
assymetric blocks on the right positions as
shown in the picture.
2. Attach the two carbo 40mm single/swivel blocks
to the loops on both sides located at the front of
the trampoline.

11

1.8 Mast rotation continuous system
1. Tie the two 16mm blocks on both sides on the loops
underneath the trampoline.
2. Attach the shockcord (blue) by making a bowline to
the loop at the port side.
3. Take the loose end of the shockcord and feed it
through the 16mm block on starboard side. Attach
the 16mm block on the end of the shockcord with a
bowline.
4. Fixate the line (orange) on the starboard side in the
rear camcleat and feed it between the trampoline
and the tramp lace underneath the trampoline. Pull
it upwards through the big eyelet in the middle.
5. Feed the line through the Harken lead ring and
return it down below through the same eyelet
towards the port side.
6. Feed it between the trampoline and tramp lace
and feed the line through the rear camcleat. And
through the ring.
Go from the front to the back through both of
the 16mm block so that the line does not cross.
7. Feed it between the trampoline and the tramp
lace underneath the trampoline, continue through
the 16mm block (attached to the shockcord) on
starboard side and feed it back through the xated
16mm block on port side.
8. Finally pull the line towards the starboard side and
feed it between the trampoline and the tramp lace.
Then feed the line through the ring.
9. Attach both ends to each other as shown in photo A
with two bowlines.
10. Adjust the connection to locate it inside the
trampoline.
12

13
A
Start
End

1.9 Chickenline system (optional)
1. Remove both endcaps from the rear crossbar.
2. Instal the 16mm blocks on both endcaps.
3. Knot one end of the (port) ckickenline to the
shockcord with two bowlines.
4. Knot the other end of the chickenline to the
shackle with a bowline and install the shackle to
the outside hole at the upper gudgeon on port
side.
5. Feed the shockcord (where the port chickenline
is tied to) through the hole in the port endcap.
6. Pull the shockcord to the other side with a long
thin rod. Take a close look at the drawing, the
line/shockcord is crossing the crossbar diagonal.
7. Feed the shockcord through the 16mm block
from top to bottom.
8. Pull the shockcord to the other side and feed it
through the 16mm block
from bottom to top
.
9. Tie the starboard line with a bowline to the
shackle and install the shackle to the outside
hole at the upper gudgeon on starboard side.
10. Finally pull the shockcord diagonal to the
starboard side (at this point there is a lot of
tension on the shockcord) and knot it to the
starboard line with two bowlines, make sure you
feed the line through the endcap.
14
Tools needed:
- Flat screwdriver

15

1.10 Righting line
1. Tie the 20mm ring with a 4mm line to the middle
tramp tie button.
2. Attach the shockcord with a bowline to the
dolphin striker rod.
3. Feed the other end of the shockcord through the
20mm ring and tie it to the second 20mm ring
with a bowline.
4. Attach the righting line to the loop under the
front crossbar, on any side.
5. Feed the line through the ring and attach the
line on the other loop underneath the front
crossbar.
16

17

2. Mast assembly
2.1 Diamond wires
1. Take the brass tting from the rigbox kit
diamond adjuster and the diamond wires.
2. Feed the diamond wire through the slots in the
mast. Grease the threaded ends of the diamond
wires and t one end into the brass tting. Turn
until you see the full hole in the end which sticks
out of the brass tting.
• It is preferable to place the mast on supports
while building the mast.
The brasstting is asymmetric. Make sure
the brasstting is in the same position as
shown in the pictures!
Tools needed: - Wrench 17mm
- Long nose plier - Grease
3. To t the other diamond wire into the brass
tting let another person help you by turning
the diamond wire at the other end.
4. Mount the split rings on the diamond wires.
5. Grease the diamond adjuster bolt and adjust the
washers and mastbase with the washer on top.
Make sure the bolt is at least 5mm in the brass
tting.
The ring must be on the outside!
2.2 Spreaders
Tools needed:
- Long nose plier - Grease
1. Grease the spreader tip
2. The spreadertip must be inserted at least 1cm!
Later on you can set the prefered spreader rake.
3. Assemble the two spreader bars using the clevis
pins 3/16 x 5/8.
6. Place the mastbase on the mast and pull the
diamondwires further up through the diamond
slots in the mast.
7. Bend the diamond wire tang away from the
mast.
8. Attach the fork terminals of the diamondwires
on the tangs with the two clevis pins 1/4 x 1/2
from the spreader attachment rigbox kit.
18

4. Take the spreader tip cover and a monel-wire
piece. Wind the wire around the spreader arm
and put the two ends through the cover. Slide
the cover over the spreader arm.
5. Attach the spreader to the mast with the
spreadertip facing forward.
• The splitrings must face the bottom of the
mast!
6. Slide the diamond wires into the slots of the
spreaders.
• Make sure the diamond wire is completely in
the slot!
7. Twist the wire ends around each side of the
diamond wire.
8. Twist the two ends into each other.
9. Cut o the excess monel wire and ensure it is
bent neatly onto the diamond wires to prevent
the wire from tearing the sails.
Protect your sails, make sure no sharp wire
ends are sticking out!
2.3 Spreader rake
• Measure the spreader rake by placing a batten
on the diamond stays next to the spreaders.
Measure to the back of the mainsailtrack.
• You can change the spreader rake by unleashing
the tension on the diamond wires and adjusting
the spreader tips. Always check if the spreader
tips are screwed out equally.
• Basic settings: set spreader rake on 45 mm.
Not respecting the minimum or maximum
spreader rake can cause severe damage/
breakage of the mast while sailing.
• For specied tuning settings, check the
trimsheets on www.nacrasailing.com
Minimum spreader rake Maximum spreader rake
15 mm 70 mm
10. Use self amalgamating tape to tape the spreader
ends and the pins and rings
19
First perform 2.4 Diamond tension before
continuing the next steps.

2.4 Diamond tension
Tools needed:
- Wrench 17 mm
- “Loose” tension gauge (xed)
1. Put tension on the diamond wires by tensioning
the diamond adjuster bolt with a wrench size
17mm. Use the “loose” tension, or an equivalent
gauge to measure the tension on the diamond
wires.
Basic setting Nacra F18 Evolution
* Set the diamond wire tension at 35 (loose), 225 KG
for 4mm wire.
2. After putting tension on the mast check if the
mast is straight. Take a look along the sail
groove from mast base to mast top.
If the mast is bended to
starboard:
• Unleash the diamond tension
• Detach the
port
diamond wire at the tang and
shorten the wire with 1 full twist clockwise.
• Attach the
port
diamond wire at the tang and
put tension on the diamond adjuster bolt again.
Redo this process if necessary
If the mast is bended to
port:
• Unleash the diamond tension
• Detach the
starboard
diamond wire at the tang
and shorten the wire with 1 full twist clockwise.
• Attach the
starboard
diamond wire at the tang
and put tension on the diamond adjuster bolt
again. Redo this process if necessary
Diameter wire Minimum load
(KG)
Maximum load
(KG)
4 mm 195 KG 360 KG
Overdoing the minimum or maximum
diamond wire tension can cause severe
damage to the mast while sailing.
3. Tape the rings of the diamond tang when done. 2.5 Spinnaker halyard
• Tape the ends of the bale line to slide easily
through the pre drilled holes!
1. Take the spin bale line and a carbo 29 mm T2
block.
2. Feed one end of the spin bale line through the
pre drilled holes in the mast and tie a gure 8
knot.
3. Feed the other end of the spin bale line through
the middle of the 29mm block and feed it
through the pre drilled holes and xate it tightly
with a gure 8 knot.
4. Install the block line to the top of the block and
the strapeye above. Fixate the block on the
same height as the bale line is positioned.
20
Table of contents
Other Nacra Boat manuals
Popular Boat manuals by other brands

Acadia
Acadia AYC CHARTERER Operation manual

Blue Wave Boats
Blue Wave Boats I80 Super Tunnel Specification sheet

Johnson Controls
Johnson Controls Old Town SPORTSMAN BigWater ePDL+ 132 manual

KAYAKS2FISH
KAYAKS2FISH NEXTGEN 11.5 owner's manual

Sea Eagle
Sea Eagle RIB11 Instruction & owner's manual

Oru Kayak
Oru Kayak The Coast Assembly guide