Naos Bio-deur DPE-82452 User manual

USER MANUAL
Automatic Soap Dispenser
Please read user manual carefully before using
Thank you for choosing the dispenser. May it bring convenience to
your future life
Dispensing:Gel/liquid Dispensing:Foam Dispensing:Spray
PRODUCTSIZE:
BATTERYINSTALLATIONSTEPS:
COMPONENTDESCRIPTION:
USAGE EXAMPLE:
SPECIFICATIONS:
If you choosethe dispenser of foam, please refer to the following
instructions
NAME:
INDUCTION WAY:
INDUCTION DISTANCE:
MATERIAL:
CAPACITY:
REFILLABLE LIQUID:
DISPENSING:
DOSE:
BATTERY:
POWER ADAPTER:
Automatic foam dispenser DPE-82452
infrared reection
the shortest 3CM the longest 10±2CM
ABSaPP
1000ml
foamsoap
foam
:0.7≈0.8ml :1.4≈1.6ml
8 AAalkaline batteries
Input voltage AC100~240V 50/60Hz
Output voltage: DC6.0V 2A(Optional)
Remove the bottle, open battery compartment andinsert 8 AAalkaline
batteries
Remove bottle Removethe battery
compartment cover Insert batteries
Key
Visible window
Adapter socket
Bottle cap
Bottle
Pump
Front cover
Bottom shell
Battery
compartment
Internal unit
Once button
Twice button
ON/OFF
LED indicator
U-shapepart
Screw hanging
hole
Sensor light
Outlet
Key
(in installation package)
Induction distance:
the shortest 3CM
the longest 10±2CM
BIONISS
Toutdroit réservé 2020© BIONISS © 2020BIONISS All rights reserved
NAOS CORPORATION INC, Québec, Canada J0C 1K0.1-819-395-2332

INSTALLATIONNOTES:
When installing, please keepbelow space of dispenseratleast
30CM.Choosea suitable place to install machine, donot let the
dispenserget wet.
Insert the key intothe correspondinghole of dispenser.(A-1)
Pressing downon keyhole and swinging cover down. (A-2)
Remove bottle. (A-3)
Accordingto the screw hole position on the bottom shell, use pen
to mark,xscrews andthen hangdispenser.(A-4)
Open the battery compartment cover and insert 4 or8AAalkaline
batteries correctly. (A-5)
Pour liquid into the bottle (Must remove bottle to addliquid). (A-6)
Put the bottle into the dispenser vertically and parallel. (A-7)
Pump head need to be locked in the correct position of U-shape
part. (A-8)
INSTRUCTIONSFORUSE:
INSTRUCTIONSFOR CLEANING
ORREPLACING THEFILTER
LED
FILTERDISASSEMBLY STEPS:
When the dispenser isreceiving power,the LED will ashGREEN and
RED to let your know it is functioning.When in standy,the LED will ash
GREEN every ve seconds.
Open front cover and pressON /OFF to turn the dispenser on or o.
(ON:the LEDwill ashGREEN; OFF: the LED will ashRED).
Press the6button,the LED will ashGREEN once to indicate that the
signalis received, the LED will be in GREEN and the dispenserwill
dischargeone dose when you trip the sensors.
Press the66button,the LEDwill ash GREENtwice to indicate that the
signalis received, the LED will be in GREEN and the dispenserwill
dischargetwo doses when you trip the sensors.
When use at rsttime,trip the sensorsunderneath with the hand5~8
times, the liquid can be dischargednormally after the air is exhausted.
The soapdispenser is not workingwhen the cover is opened. Please
close the front cover after adjustingthe liquid dischargeposition.
1.When the dispenser is powered on or the doseis adjusted, LEDwill
ashGREEN 1 or 2 times continuously.
2.TheLEDwill ashGREEN every vesecondswhen instandby.
3.TheGREEN LED will light upwhen the dispenser isdischargingdoses.
4.TheLED will ash REDwhen battery is in low power; The LEDwill ash
RED andGREEN at same time when battery is in deep low power.
5.TheLEDwill ashGREEN and RED alternately when the dispenser
senses abnormalities,such as:lter clogging,powerexhaustion, no
liquid discharge,etc..If the abnormality is eliminated, shut downand
restart to return to normal.
6.TheLED wil ash GREEN continuously when there is an obstacle below
the dispenser,remove the obstacle to return normal.
Thiscontent applies: Foam soapdispenser,it is recommendedto clean or
replace lter accessoriesin the following cases:
1-Nofoam orlittle foam
2-Stopforoneweek after use
3-Usedfor morethan 3months
4-TheLED ashesRED andGREEN continously,check if the lter is blocked
CAUTION
Do notexposeto sunlightto avoid product deformation
Do not use the dispenser violently, it will damagethe product
Remove the battery and pour out liquid when not used for a
longtime
Please clean the product regularly
Donot rinse with water, it will damagethe product
Do not drop or hit the product onpurpose
Do not usestrongcorrosive chemical solvents toclean the
product,which will damageand deform theproduct surface
Donot allow dust to enter the soapbottle
Thepumpmaybe blocked. Ifyound that the insideof the bottle is dirty, please
replace the soap solution and clean the pump
Can cause productfailure
For repairs, please consult our customer service.
Never dismantle, repair, modify, etc. without permission
Do not pour corrosivechemicals, etc.
Keepaway fromre
1-Removethe bottle
2-Pullout the front housingof the
pump
3-Removethe lter byhand,
tweezersor othertools
4-Cleanthedirt remaining onboth
endsof the lter and replace it in
the original order
5-Assemblethe front housinginplace
PRODUCTWARRANTY INSTRUCTIONS
The companyensures the products shippedfrom the factory meet the relevant
safety standardsand technical requirements, which can display all functions under
normal use and maintenance.
Within one year from the date of purchase,if it is conrmedby our maintenance
personnel that the failure is damageddue to manufacturing processesor
materials, thenthe warranty is free.
For one of the followingreasons,you cannot enjoy the free warranty service
terms of our companyduringthe warranty period:
Product damagecaused by incorrect use
Product damagecausedby incorrect installation
Product damagecausedbycustomer's unauthorizedmodication
Natural disasters andman-madedamage
The companyonly performs product after-salesmaintenance services with valid
tickets and correspondingproduct warranty cards.
Donot exposethe product to moisture or water
Once the product issold, donot accept any returns unless it is quality problem
bottle
pump
Pumpassembly
diagram
Filter
assembly
lter
Pump
front shell
Enlarge diagram
Pump assemblydiagram

Manuel d’utilisation
Distributeur automatique de savon
Veuillez lire le manuel d'utilisation attentivement avant
d'utiliser.
Merci davoir choisi ce distributeur. Il apportera de la commodité à
votre vie.
Distributeur: Gel/liquide Distributeur: Mousse Distributeur: vaporisant
DIMENSIONS PRODUIT:
ÉTAPES INSTALLATIONDES PILES:
DESCRIPTIONDESCOMPOSANTES:
EXEMPLE DʼUTILISATION:
SPÉCIFICATIONS:
Si vous choississezd'utiliser le distributeur mousse,veuillez consulter
les instructions suivantes
NOM:
INDUCTION WAY:
DISTANCE:
MATÉRIAUX:
CAPACITÉ:
LIQUIDEREMPLISSABLE:
DISTRIBUTEUR:
DOSE:
PILES:
BLOC DʼALIMENTATION:
Distributeur demousseautomatique DPE-82452
Détection infrarouge
Minimum: 3CM Maximum: 10±2CM
ABSaPP
1000ml
Liquide moussant
Mousse
:0.7≈0.8ml :1.4≈1.6ml
8AAPiles alkaline
Tensionentré: AC100~240V 50/60Hz
Tensionsortie: DC6.0V 2A(Optional)
Retirer la bouteille, ouvrir le compartimentà piles et insérer 8piles AA
alcaline
Retirer la bouteille Retirer le couvert du
compartiment despiles Insérer les piles
Clé
Fenêtre
Prise AC/DC
Bouchon
Bouteille
Pompe
Couvercle AV
Coqueinférieur
Boîtierpiles
Unité interne
Bouton dose 1
Bouton dose 2
Marche/Arrêt
Indicateur DEL
Pièce forme U
Troudʼinstallation
Lumière capteur
Sortie
Clé
(Inclusdanslʼemballage)
Distance dʼinduction:
Minimum: 3CM
Maximum: 10±2CM
BIONISS
Toutdroit réservé 2020© BIONISS © 2020BIONISS All rights reserved
NAOS CORPORATION INC, Québec, Canada J0C 1K0.1-819-395-2332

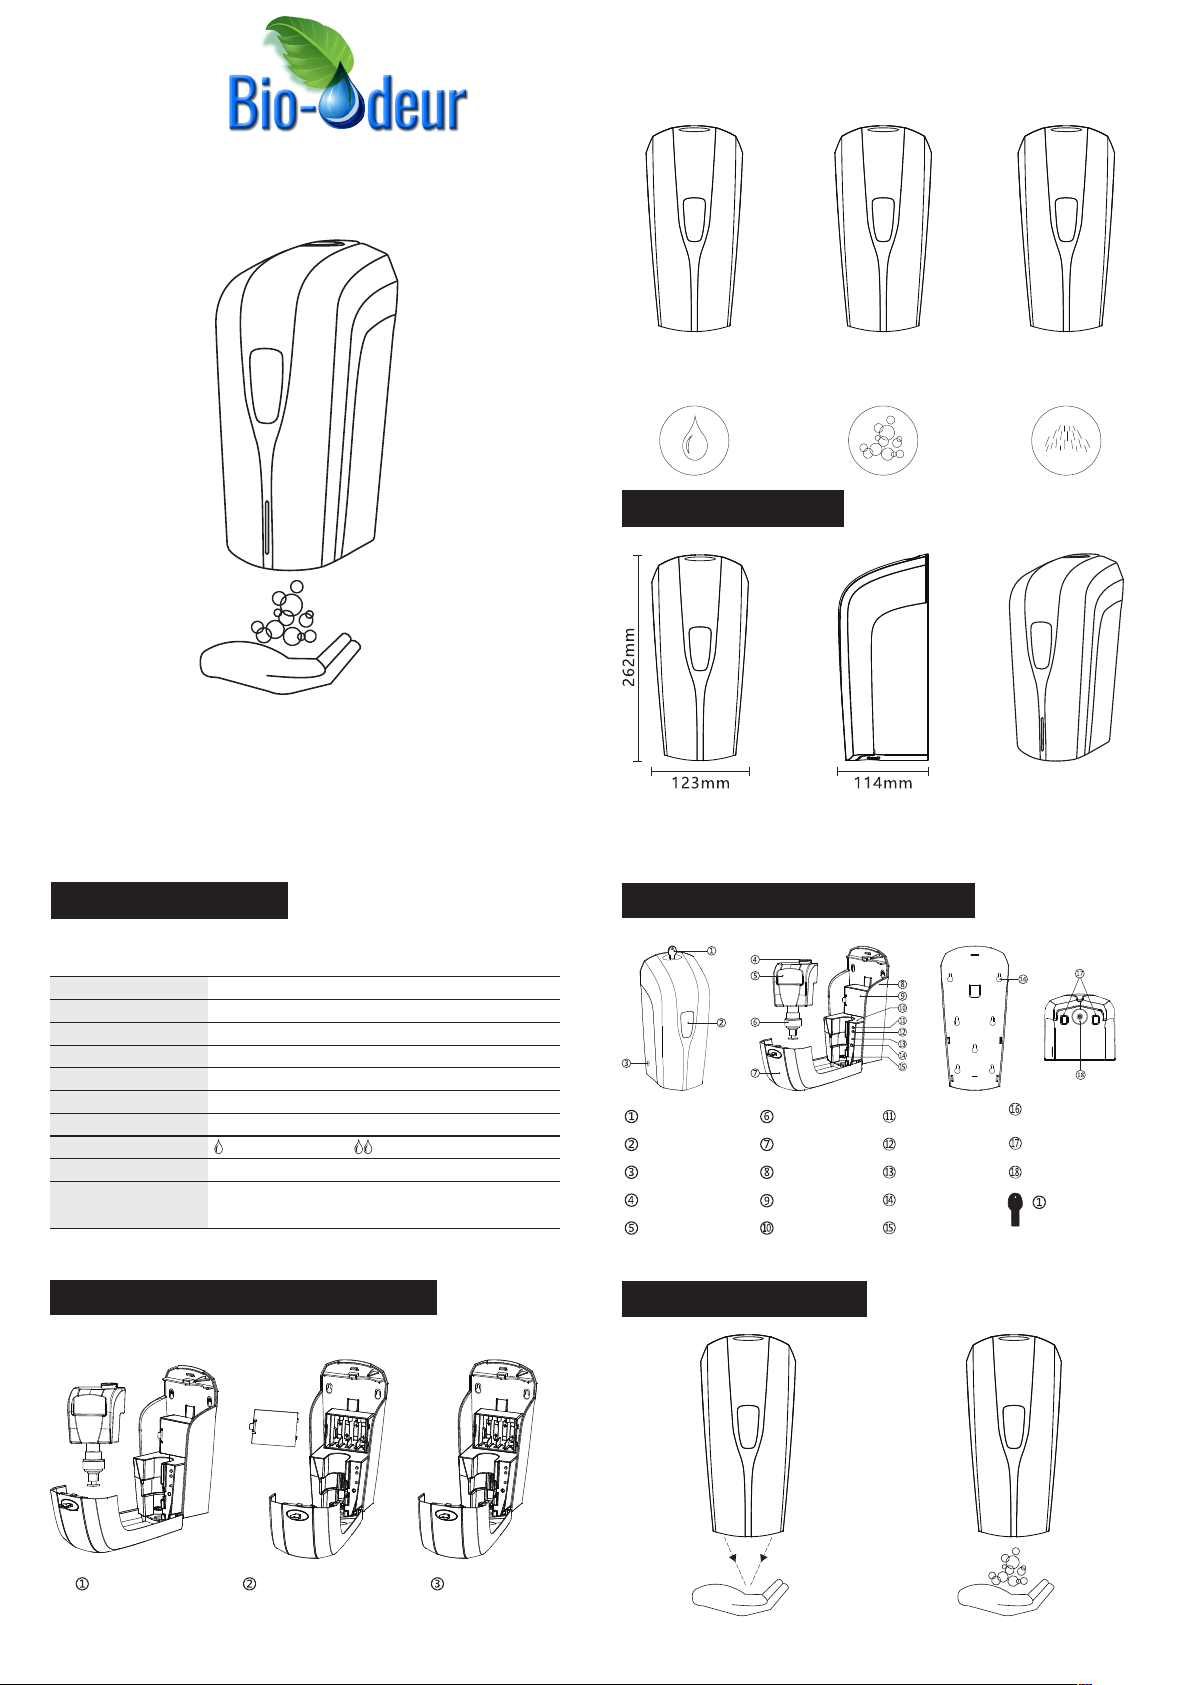
NOTESD'INSTALLATION:
Lorsde l'installation veuillez garderune distance d'au moins
30cmsousl'appareil. Choississezun endroit approprié pour
installer l'appareil et veuillez vousassurerque l'appareil ne sera
pas mouillé.
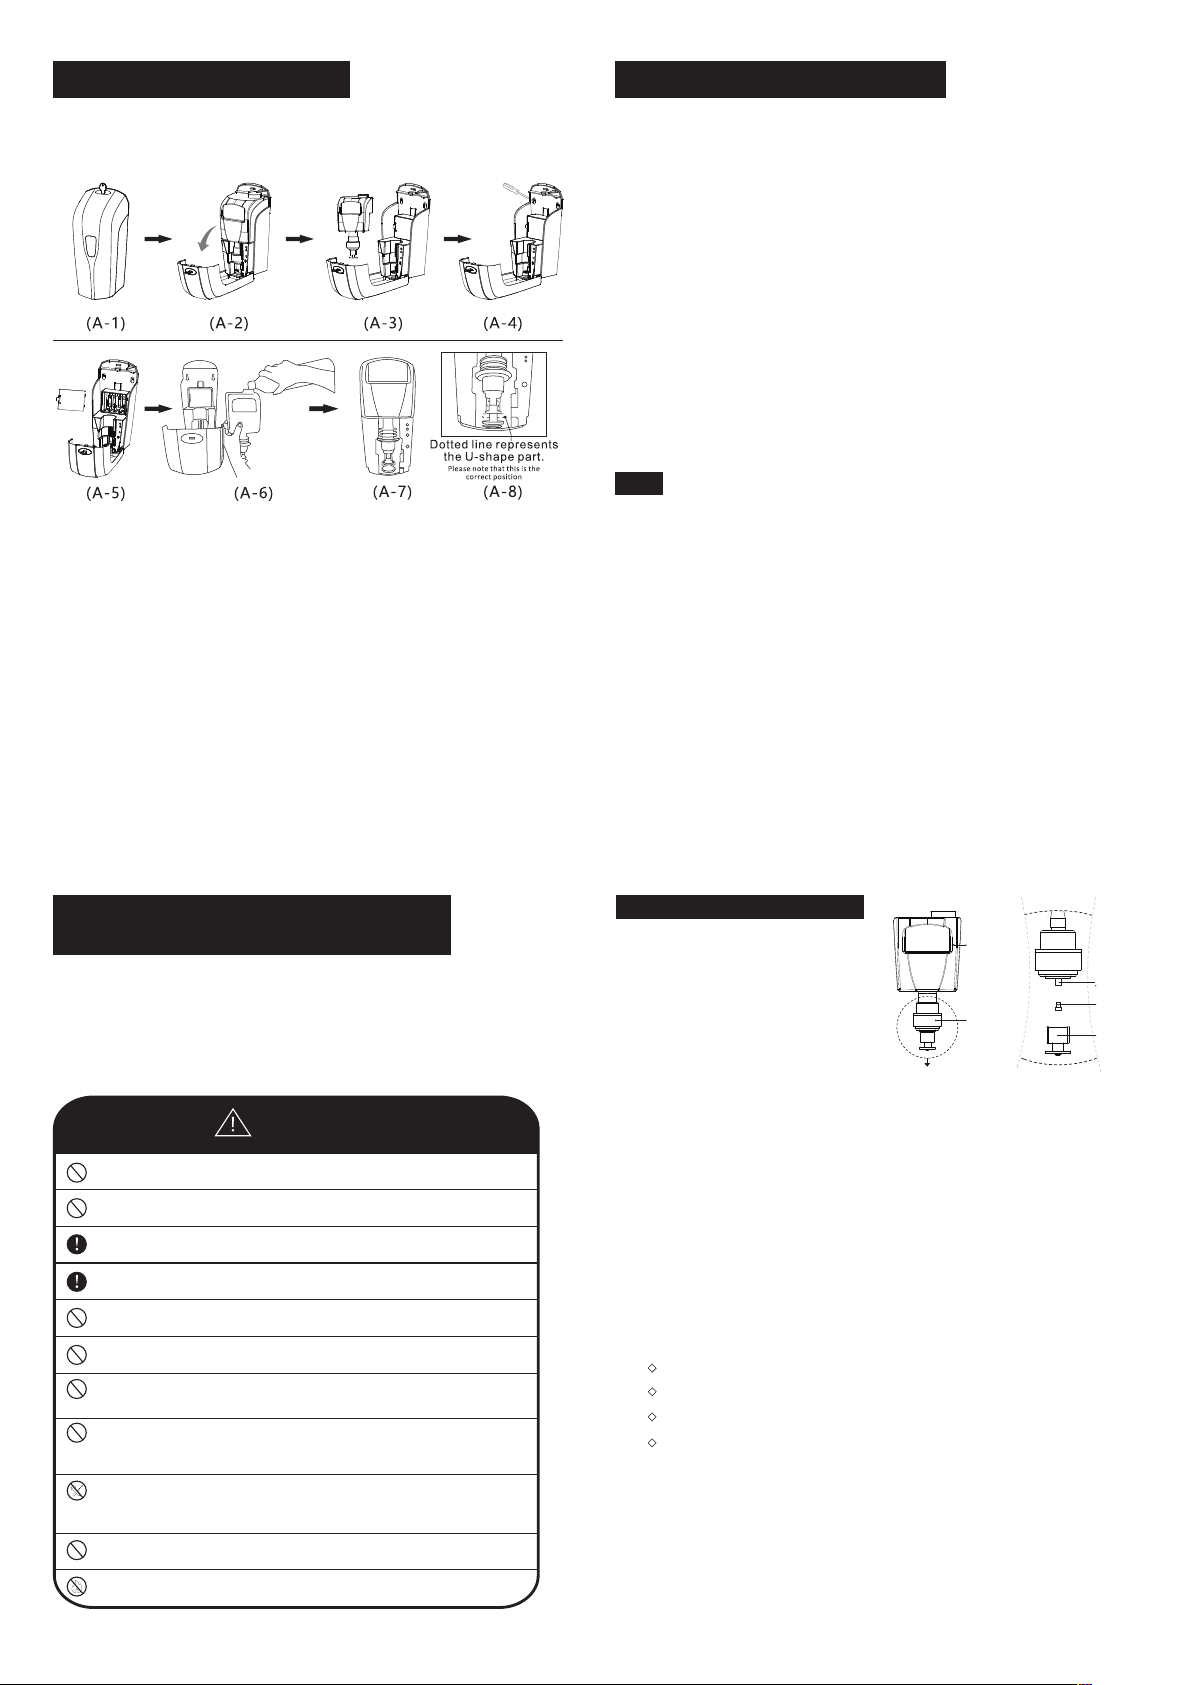
Insérer laclé dans letrou correspondant. (A-1)
Appuyer surletrou dela clé et basculer lecouvercle vers le bas. (A-2)
Retirer la bouteilles. (A-3)
Vériezla position dutrou devis au basde l'appareil,
marquerlaposition àl'aide d'un stylo, visser les vis et
accrocer le distributeur. (A-4)
Ouvrezle compartiment depiles et insérer 4 ou8piles
alcaline AAcorrectement. (A-5)
Verserliquid dansla bouteille (Doit retirer la bouteille pour
verser). (A-6)
Mettre la bouteille dansle distributeur verticalementet
parallèlement. (A-7)
Têtede la pompedoit être verrouillée dansla bonne
position de la pièce en U. (A-8)
INSTRUCTIONSPOUR UTILISATION:
INSTRUCTIONSPOUR NETTOYEROU
REMPLACER LE FILTRE
DEL
ÉTAPES DE DÉSASSEMBLAGE DU FILTRE:
Lorsquele distributeur reçoit du courant, le DELclignotera VERTet
ROUGE pourvousaviser qu'il est en fonction.
Ouvrir le couvercle avant et peser sur Marche/Arrêt pourallumer ou
éteindre le distributeur. (MARCHE:le DELclignotera VERT;ARRÊT:le
DEL clignotera rouge).
Peser sur le bouton ô, le DEL clignotera une fois pourindiquer que
le signalest reçu, le DEL seraVERTet le distributeur relâchera une
dose lorsqueles capteurs seront activés.
Peser sur le bouton ôô, le DEL clignotera deuxfois pour indiquer
que le signalest reçu, le DEL seraVERTet le distributeur relâchera
deuxdoseslorsque lescapteurs seront activés.
Lorsde la première utilisation, veuillez activer les capteurs 5-8fois
avec la main pourque le distributeur relâche le savon normallement
aprèsavoir évacuél'air de l'appareil.
Le distributeur ne fonctionne paslorsqu'il est ouvert. Veuillezfermer
le couvercle avant lorsque l'ajustement du savonest terminé.
1.Lorsquele distributeur est en marche et que le dosageest ajusté, le
DEL clignotera VERT une ou deuxcontinuellement.
2. LeDELclignotera VERT toutes les 5secondes lorsqu'enmode
veille.
3. Le DELVERTs'allumera quand le distributeur relâche les doses.
4. Le DELclignotera ROUGE lorsque les piles sontfaible; le DEL
clignotera ROUGE et VERT en mêmetemps lorsque les piles sont
très faible.
5. Le DELclignotera VERTet ROUGE en alternance lorsque le
distributeur détectera des anomaliestelles que: ltre bloqué,
épuisement ducourant, aucune évacuation de liquide, etc. Si
l'anomalie est résolue,éteindre et redémarrer l'appareil pourrevenir
à la normale.
6. Le DELclignotera VERT continuellement si un obstacle est placé
sousle distributeur,retirer l'obstacle pour revenir à la normale.
Ce contenu s'applique si: Distributeur à mousse,il est recommandéde
nettoyer ou remplacer les accessoires de ltre dansles cas suivants:
1-Aucunemousseou peu demousse
2-Arrêterpendant 1 semaine après utilisation
3-Utiliserpendant plus de 3 mois
4-DELclignoterougeet vert continuellement, vérier si ltre est bloqué
ATTENTION
Ne pas exposerau soleil pouréviter déformationdu
Ne pas utiliser le produit violemment, ceci l'endommagera
Retirer la pile et déverser le liquide lorsque l'appareil est
inutilisé pendant une longue période
Nettoyer le distributeur régulièrement
Ne pas rincer à l'eau, ceci endommageral'appareil
Ne pasfaire tomber ni frapper intentionnellement l'appareil
Nepasutiliser desolvantchimiquecorrosif pournettoyer l'appareil, ceci
endommageraet deformera lasurfacedudistributeur
Empêcher la poussière de s'introduire dansla bouteille
La pompepourrait bloquer. Si vous trouvezl'intérieur de la bouteille sale,
veuillezremplacer le savon liquide et nettoyer la pompe.
Peut causer la défaillance du produit
Pour réparations, veuillezconsulter notre service à la clientèle.
Ne jamaisdémonter, réparer, modier , etc sanspermission
Ne pasyverser de produitschimiques corrosifs
Tenirloin du feu
1-Retirerlabouteilles
2-Retirer le boîtier avant dela pompe
3-Retirerle ltre àla mainouàl'aide depinceou
autreoutil.
4-Nettoyer la saleté dechaque extrémitésdu
ltreet replacerdanssapositioninitiale.
5-Remettre le boîtier avantde la
pompe.
INSTRUCTIONSSUR LAGARANTIE DUPRODUIT
La compagnieassurequeles produits expédiésde la manufacture respecte
les standards de sécurité et les exigencestechiques qui peuvent acher
toutes les fonctionslors d'une utilisation et entretien normale.
Dansun délai d'un an suivant la date d'achat, si conrmépar notre
personnel d'entretien que la défaillance est due auxprocédésde
fabrication ou des matériauxla garantie sera honnorée.
Pour les raisons suivantes,la garantie ne pourra pasêtre appliqué
conformément auxtermes de service de la compagniependant la période
de garantie:
◊Produit endommagéduàunusageincorrect
◊Produit endommagédu à une installation incorrecte
◊Produit endommadé duà unemodication non autorisée
◊Désastresnaturels et dommagescausésparl'humain
La compagnieeectue seulement les services d'entretien après vente
avec billet valide et garantiecorrespondantevalide.
Ne pasexposerce produit à l'eau ou à l'humidité
Une fois que le produit est vendu, nousn'acceptons aucun retours
sauf si le produit comporte unproblème de qualité.
Bouteille
Pompe
Schéma dʼassemblage
dela pompe assembly
Assemblage
du ltre
Filtre
Pompe
Boîtier avant
Schémaagrandi
Schémadʼassemblage de la pompe
LignePointillée
représentelapièceenU
Veuilleznoterqeuceciest
labonneposition
Table of contents
Languages:
Popular Bathroom Fixture manuals by other brands

Signature Hardware
Signature Hardware RIGI 948674 quick start guide

agape
agape DOT LINE ADTL0472 Assembly instructions

Kohler
Kohler K-792-H2 Homeowner's guide

OVE
OVE NIKO 48 3492202 installation manual

Fantini Rubinetti
Fantini Rubinetti Venezia 3429000001 Care and maintenance

Presto
Presto 27115 quick start guide

clage
clage EKE Operating and installation instructions

Signature Hardware
Signature Hardware 948188 quick start guide

Helvex
Helvex WC Austral installation guide

BELLOSTA
BELLOSTA M-Uno 8811/1A Installation instruction

Intra
Intra Piezo SLS 01NPB Instructions for use

Hans Grohe
Hans Grohe Pulsify S 24382 0 Series Assembly instructions