10
W415-0377 / E / 11.26.07
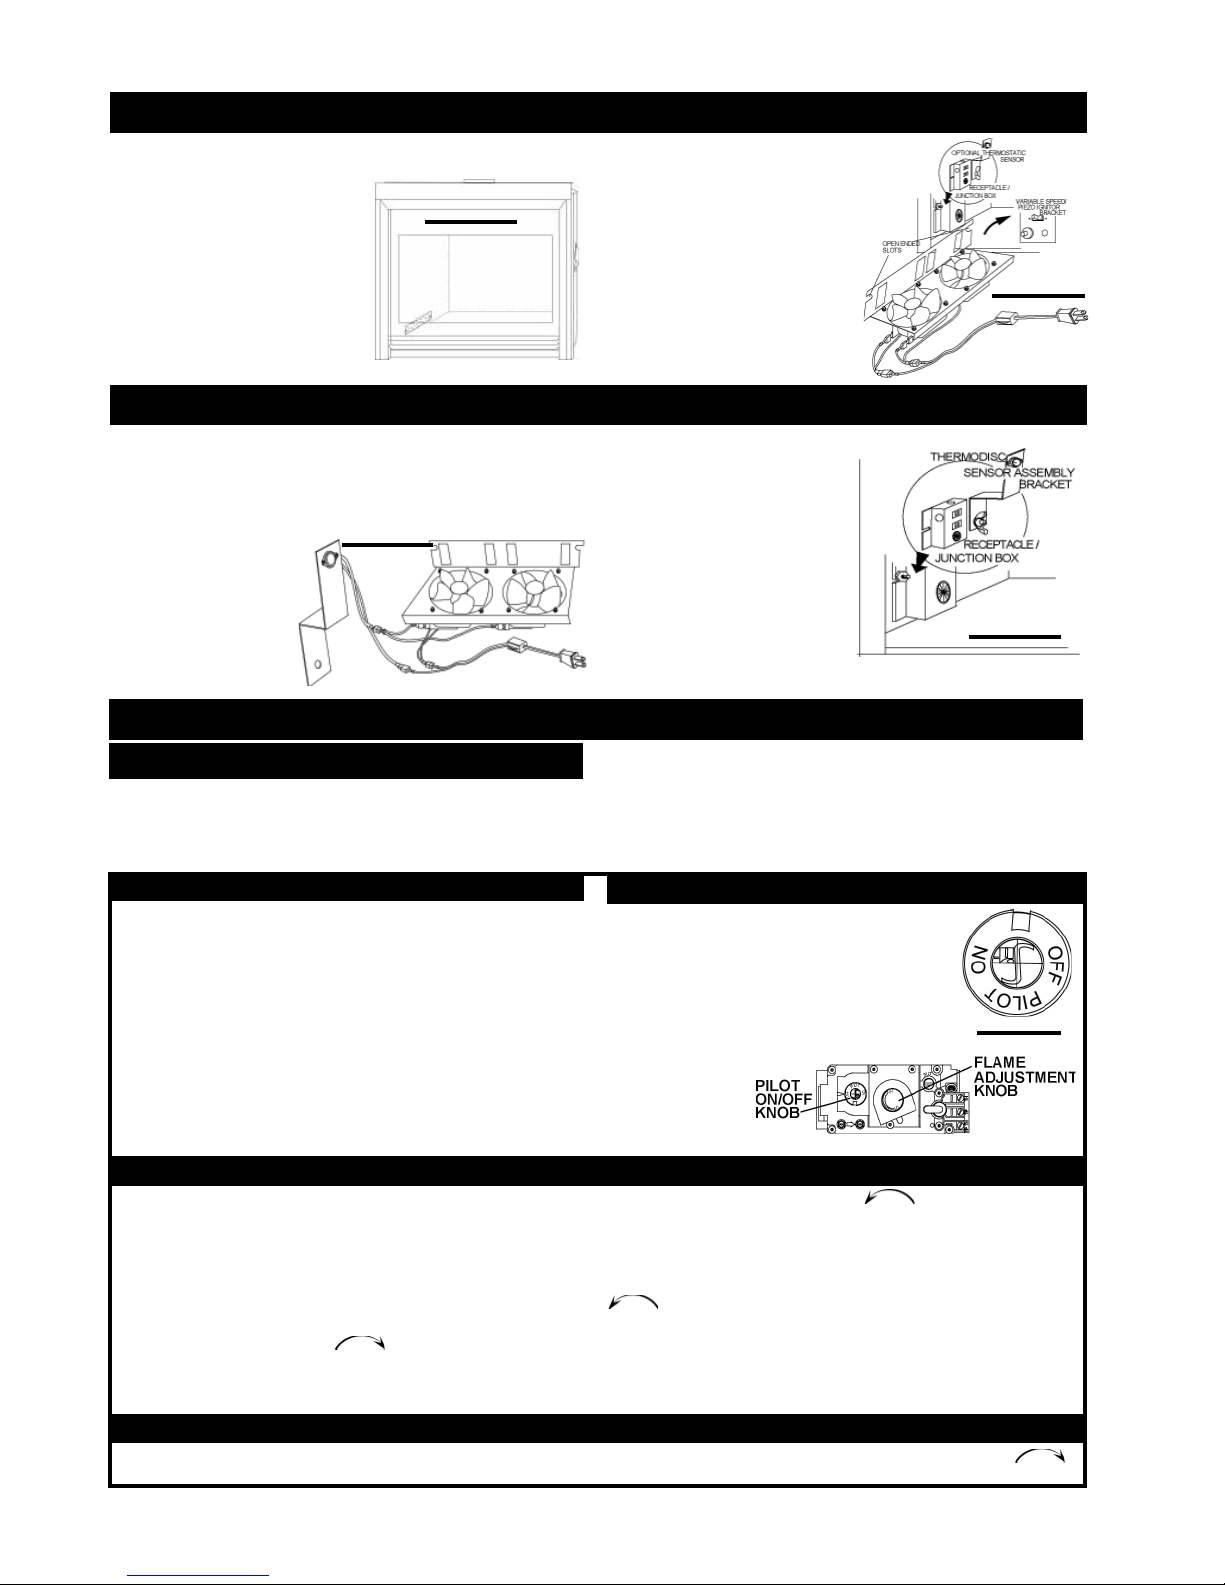
FIGURE 27
Position the vibration reducing pad into the clip and
onto the threaded stud at the other end, piercing
a hole into the pad. The fan assembly must be
able to be positioned entirely onto the pad.
Slide the fan assembly past the controls and
and into the clip. Secure using the lock
washer and nut provided.
Plug the harness cord connectors
onto the connections of the fan as
illustrated. Plug the power cord into
the receptacle.
ELECTRICAL INSTALLATION TO BE DONE BY A QUALIFIED IN-
STALLER and must be connected and grounded in accordance with
local codes. In the absence of local
codes, use the current CSA C22.1 CA-
NADIAN ELECTRICAL CODE in Canada or the
ANSI/NFPA 70 NATIONAL ELECTRICAL CODE
in the United States.
The wire harness provided in this kit is a
universal harness. When installed, en-
sure that any excess wire is contained,
preventing it from making contact with
moving or hot objects.
FIGURE 26
OPTIONAL FAN INSTALLATION
Attach and secure the sensor assembly bracket to the securing stud
located next to the receptacle/junc-
tion box at the bottom left of the unit
using the lock washer and wing nut.
Ensure that the thermodisc touches
the firebox wall.
Plug the power cord back into the
receptacle.
When installed, ensure that any ex-
cess wire is contained, preventing it
from making contact with moving or
hot objects.
FIGURE 29
FIGURE 28
This optional kit is meant to be used only in conjunction with the GD65
Fan Kit, shown above, which may be ordered from your Wolf Steel /
Napoleon® dealer.
With the thermostatic sensor option, the fan, when turned on, becomes
thermally activated, and will automatically run approximately 10 minutes
after the fireplace has been lit
and for approximately 30-45
minutes after the fireplace has
been turned off.
Use of the fan increases the
output of heat.
Unplug the power cord from
the receptacle. Connect all
wires as shown.
THERMOSTATIC SENSOR CONTROL
• Turn off all gas to the fireplace.
• Open windows.
• Do not try to light any appliance.
• Do not touch any electric switch; do not use any
phone in your building.
• Immediately call your gas supplier from a neighbour's
phone. Follow the gas supplier's instructions.
• If you cannot reach
your gas supplier,
call the fire depart-
ment.
A. This fireplace is equipped with a pilot which must be lit by hand while
following these instructions exactly.
B. Before operating smell all around the fireplace area for gas and
next to the floor because some gas is heavier than air and will set-
tle on the floor.
C. Use only your hand to turn the gas control knob. Never use tools. If
the knob will not turn by hand, do not try to repair it. Call a qualified
service technician. Force or attempted repair may result in a fire or
explosion.
D. Do not use this fireplace if any part has been under water. Immedi-
ately call a qualified service technician to inspect the fireplace and
replace any part of the control system and any gas control which
has been under water.
WARNING: The gas valve has an interlock device which will not allow
the pilot burner to be lit until the thermocouple has cooled. Allow ap-
proximately 60 seconds for the thermocouple to cool.
When lighting and re-lighting, the gas knob cannot be turned from pilot
to off unless the knob is depressed slightly.
1. Stop! Read the above safety information on this label.
2. Turn off all electric power to the fireplace.
3. Turn the gas knob clockwise to off.
4. Wait five (5) minutes to clear out any gas. If you smell gas including
near the floor. Stop! Follow "B" in the above safety information on
this label. If you don't smell gas go the next step.
5. Turn gas knob counter-clockwise to pilot.
6. Depress slightly and hold gas knob while lighting the pilot with the push
button ignitor. Keep knob depressed for one minute, then release. If
pilot does not continue to burn, repeat steps 3 through 5.
7. With pilot lit, depress and turn gas knob counter-clock-wise
to on.
8. If equipped with remote on-off switch/thermostat, main burner may
not come on when you turn valve to on. Remote switch must be in
the on position to ignite burner.
9. Turn on all electric power to the fireplace.
1. Turn off all electric power to the fireplace if service is to be per-
formed.
2. Push in gas control knob slightly and turn clockwise t o
off. Do not force.
When lit for the first time, the fireplace will emit a slight odour for a few
hours. This is a normal temporary condition caused by the curing of
the logs and the "burn-in" of internal paints and lubricants used in the
manufacturing process and will not occur again.
After extended periods of non-operation such as following a vacation or
a warm weather season, the fireplace may emit a slight odour for a few
hours. This is caused by dust particles in the heat exchanger burning off.
In both cases, open a window to sufficiently ventilate the room.
Purge all gas lines with the glass door of the fireplace removed.
Assure that a continuous gas flow is at the burner before install-
ing the door.
OPERATION / MAINTENANCE
OPERATING INSTRUCTIONS
FOR YOUR SAFETY READ BEFORE LIGHTING: WHAT TO DO IF YOU SMELL GAS
LIGHTING INSTRUCTIONS
TO TURN OFF GAS
GAS KNOB