transmitter with
a clearance of
1mm to 2 mm
(1mm is about
the thickness
of a penny).
(Fig. 9). If the
magnet and
transmitter are
not aligned
or not close
enough
together, the
computer will
not pick up a
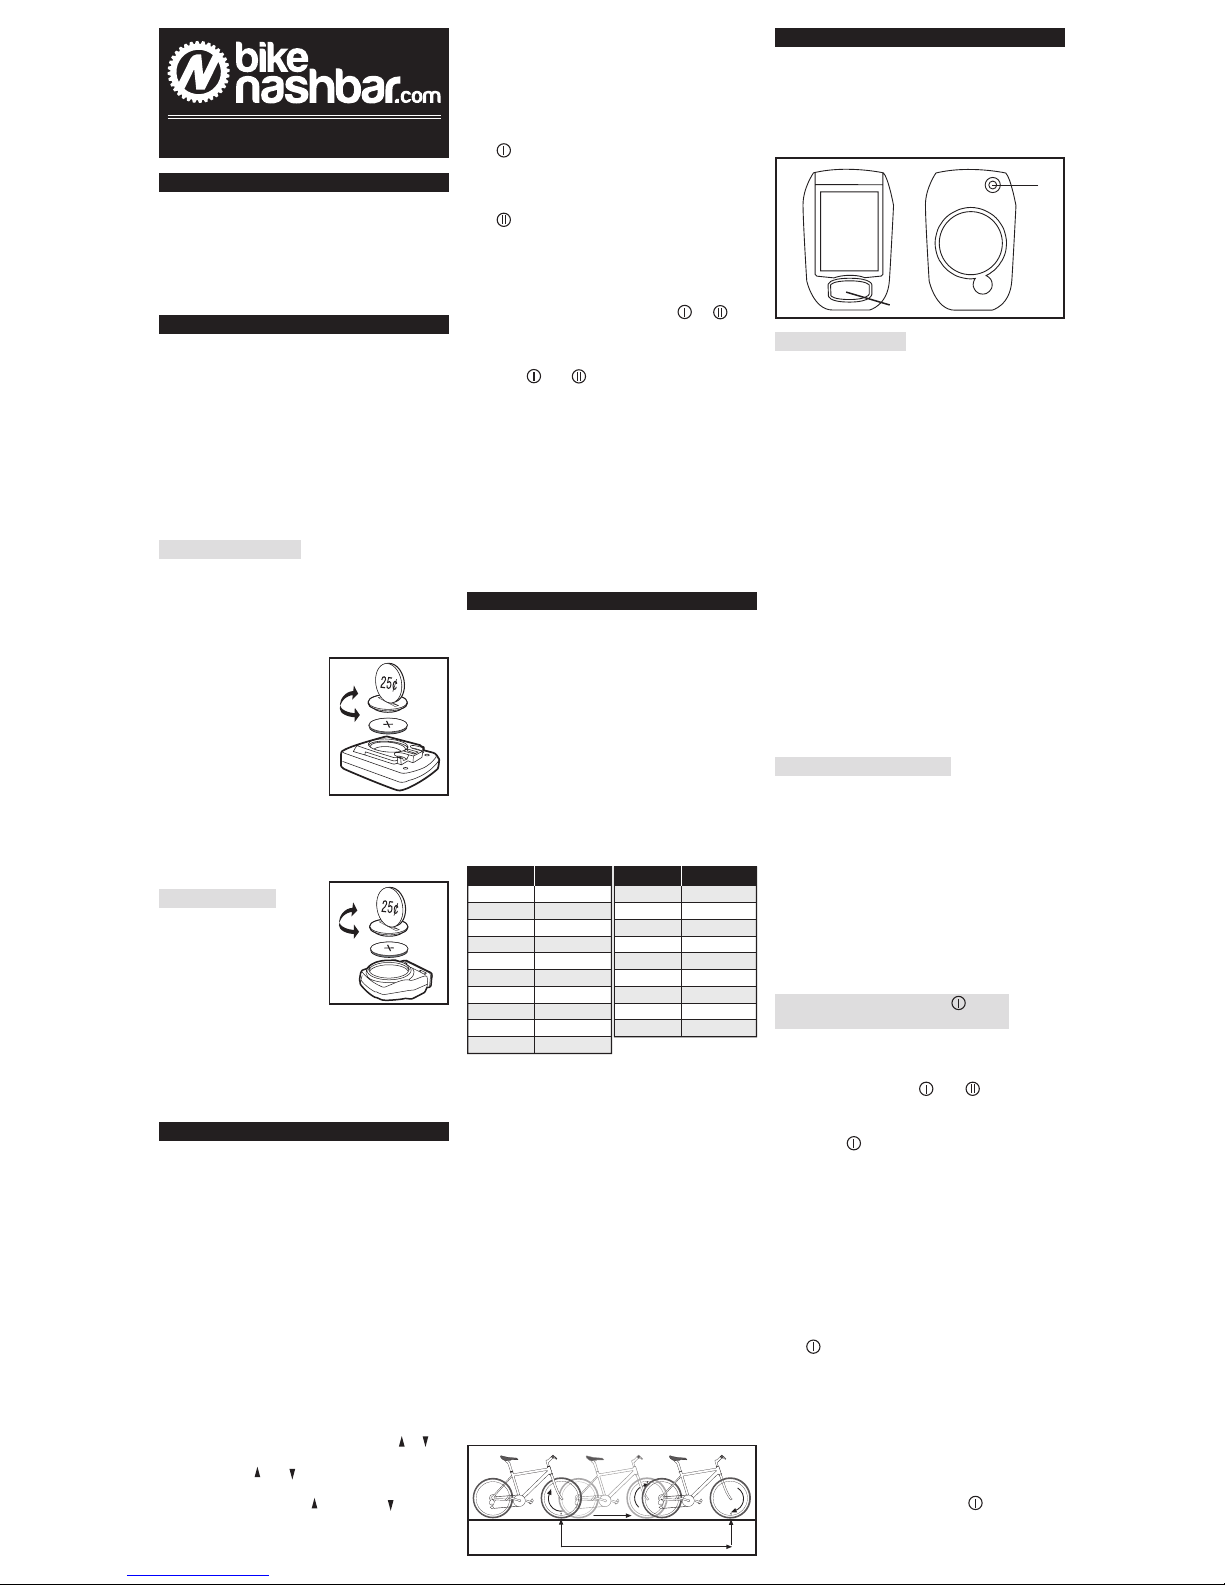
STEP 2: Attach the computer head to the
bracket. Press the computer head into
SELECT TEMPERATURE SCALE
STEP 1: After the odometer has been set
(see above), the computer will automatically
advance to the temperature scale selection
screen. “°F” or “°C” will flash at the bottom of
the screen.
STEP 2: Press the SET button to select
Fahrenheit (°F) or Celsius (°C).
STEP 3: If you wish to program wheel
size , press the MODE button to return to
the wheel size selection and programming
screen. Otherwise hold the MODE button to
exit set-up.
PROGRAM WHEEL SIZE AND
ODOMETER (ODO2)
STEP 1: Press the MODE button to advance
to the Total Odometer display screen (ODO).
Hold the SET button for 4 seconds to enter
set-up mode. Press the MODE button one
time until “ ” or “ ” flashes at the top of the
screen.
STEP 2: Press the SET button to select
wheel size . Press the MODE button to
advance to the wheel size setting.
STEP 3:
The left-most digit will flash. Press the
SET button to adjust the value according to the
wheel circumference determined above (see
“Determine Wheel Size”). Then press the MODE
button to advance to the next flashing digit.
STEP 4: Repeat this sequence until the
correct wheel size has been entered. Then
press the MODE button to advance to the
odometer programming screen for wheel
size (ODO2). If you don’t wish to program
the odometer, hold the MODE button to exit
set-up.
STEP 5: The left-most digit of the odometer
valve will flash. Press the SET button to
adjust the value. Then press the MODE
button to advance to the next flashing digit.
STEP 6:
Repeat this sequence until the
odometer value for wheel size has been set.
Hold the MODE button to exit set-up mode.
SET THE CALORIE COUNTER
The Nashbar Tempo Wireless uses weight
and gender to calculate calories burned
during exercise. In order for the calorie
counter to provide an accurate measurement,
you must enter your weight and gender.
STEP 1:
Press the MODE button to advance
to the Calorie display screen (KCAL). Hold the
SET button for 4 seconds to enter set-up mode.
STEP 2: “MALE” or “FEMALE” will flash
at the bottom of the screen. Press the SET
button to select gender, then press the
MODE button to advance to the weight scale
selection screen.
STEP 3: “kg” or “Lb” will flash at the bottom
of the screen. Press the SET button to select
Kilograms (kg) or Pounds (Lb). Then press
the MODE button to advance to the weight
input screen.
STEP 4: The weight value will flash at the top
of the screen. Press the SET button (or press
and hold) to adjust the weight value (from 44
to 330 Lbs). Hold the MODE button to exit
set-up mode.
INSTALLATION
Wireless transmission makes installation
simple. Begin by attaching the computer
bracket to the handlebar or stem.
STEP 1: The mounting bracket consists of
two parts and can be configured for handlebar
or stem mounting (Fig. 5). Use the included
zip-ties to attach the bracket to the handlebar
or stem.
Tighten
the zip-ties
securely
and trim
the excess
length with
scissors or
fingernail
clippers.
STEP 2: Press the MODE button one time
until or flashes at the top of the screen.
STEP 3: Press the SET button to select
wheel size or . Hold the MODE button to
exit set-up.
PROGRAM ODOMETER
The Nashbar Tempo Wireless includes a
separate odometer for wheel size (ODO1)
and wheel size (ODO2). The total
odometer (ODO) displays the combined
mileage total from ODO1 and ODO2.
Therefore, to program the odometer (for
example, after replacing a battery or when
transferring mileage from another computer)
program ODO1 and/or ODO2. See “Program
the Computer.”
RESET DISPLAY SCREENS
The Nashbar Tempo Wireless maintains a
separate odometer reading for wheel size
and . Average Speed, Maximum Speed,
Trip Distance, Calorie and Ride Timer values,
however, are combined for both wheel sizes
and are reset simultaneously.
STEP 1: To simultaneously reset Average
Speed, Maximum Speed, Trip Distance,
Calories and Ride Timer for wheel size and
, press the MODE button to advance to the
Ride Timer display screen (TM).
STEP 2:
Hold the SET button for 4 seconds
to clear the ride data. The three Odometer
values (ODO1, ODO2 and ODO) will not
be reset.
NOTE: Entering set-up mode (to select
wheel size or adjust settings) will not reset the
display screens or clear any ride data.
MAINTENANCE
COMPUTER
If you notice a change in the display screen
contrast or if the figures become faint, it may
be time to replace the computer battery.
See “Battery Installation”. We recommend
replacing both the computer and transmitter
batteries at the same time.
TRANSMITTER
Periodically check the alignment of the wheel
magnet and transmitter and make sure the
space between them is 5mm or less. Remove
any signs of rust or corrosion from the magnet
to ensure proper function.
TROUBLESHOOTING
1. Computer display is blank or very light
The computer battery may be weak or
installed incorrectly. Make sure the battery
is installed with the positive (+) pole facing
the battery cover, or replace the battery with
a fresh one.
2.
Computer display becomes dark or black
The ambient temperature may be too high.
Allow the computer to cool, and the display
will return to normal.
3.
Computer display appears to update slowly
The ambient temperature may be too low.
When the temperature rises, the display
will return to normal. Note: Even when the
display is affected by cold, the computer will
continue to record data normally.
4. Absent or erratic speed reading
Check the alignment of the wheel magnet
and transmitter, and make sure that the
space between the two is 2 mm or less.
Adjust as necessary and re-test.
Make sure the computer transmitter
batteries are installed correctly and fully
charged. If in doubt, replace both batteries
with fresh ones.
Even coded wireless cycle computers are
occasionally affected by electromagnetic
interference from high voltage power lines,
motor driven equipment and other wireless
devices (such as heart rate monitors). If you
experience unusually high speed readings,
check your surroundings for possible
sources of electromagnetic interference and
move away from the source.
Fig 7
the bracket
and rotate it
clockwise to
lock in place
(Fig. 6). You
should feel the
computer head
click securely
into the bracket.
STEP 3: Using
the included
zip-ties, loosely
mount the
transmitter (so
that you can
slide it around)
to the fork blade
on the same
side of the bike
as the computer
(Fig. 7 & 8).
The Nashbar
Tempo Wireless
transmission
range is 24”
(60cm). The
transmitter must
be mounted
within 24” of
the computer
in order for
the computer
to receive the
signal. We
recommend
mounting the
transmitter
to the front
(leading) edge
of the fork
blade to avoid
problems in the
event that the
transmitter contacts the spokes during a ride.
STEP 4: Attach the wheel magnet loosely
to one of the spokes on the same side of the
wheel as the transmitter. Adjust the position
of the magnet and transmitter so that the
magnet passes the alignment mark on the
signal from the transmitter or the reading will
be inconsistent and erratic. Most problems
that occur when installing a new computer are
related to magnet and transmitter alignment
and spacing.
STEP 5: Once the transmitter and wheel
magnet are aligned properly, securely tighten
both in place. Trim the excess zip-tie ends
from the transmitter with scissors or fingernail
clippers.
STEP 6: Test the unit to make sure
everything is adjusted and working properly.
Pick up the front end of the bicycle and spin
the front wheel. The computer should register
a speed reading within 1-2 seconds. If not,
check the alignment of the wheel magnet and
transmitter and make sure the space between
the two is 2mm or less. Adjust as necessary
and re-test.
SELECT WHEEL SIZE OR
If you switch your computer between bikes
with different wheel sizes, don’t forget to
select the appropriate wheel size setting
before each ride.
STEP 1: In the Total Odometer display
screen (ODO), hold the SET button for 4
seconds to enter set-up mode.
Fig 8
Fig 9
1111-1 BN-TEMPW Made in Taiwan
For Technical Support, call 1-800-888-2710
MAX 24”
COMPUTER