Nature's Miracle P-98280 User manual

User Manual for Models:
P-98280, P-98281
SINGLE CAT & MULTI-CAT
SELF-CLEANING
LITTER BOX
Customer Care Line:
USA/Canada
1-800-645-5154
or visit our website
www.naturesmiracle.com
®

2
PLEASE READ AND SAVE THIS USE AND CARE MANUAL.
Prior to operating this product, please read all directions in this manual
carefully.
Safety Information
CAUTION: Not intended for use with kittens less than 6 months or
weighing less than 5 lb. If your kitten is under 6 months of age or weighs
less than 5 lb., leave the unit UNPLUGGED and scoop waste until the
kitten is 6 months old and weighs more than 5 lb.
CAUTION: Only hard-clumping litter should be used in your Nature's
Miracle®Self-Cleaning Litter Box. Clumping litter is not intended for use
with kittens under 6 months. If your kitten is under 6 months, always use
litter formulated for kittens and leave your Nature's Miracle
Self-Cleaning Litter Box UNPLUGGED and scoop waste until the kitten is
6 months old.
CAUTION: THIS IS NOT A TOY. Never allow small children to play in or
around this device.
CAUTION: NOTE TO PREGNANT WOMEN AND IMMUNE-SUPPRESSED
INDIVIDUALS: CAT FECES CAN SOMETIMES TRANSMIT A DISEASE
CALLED “TOXOPLASMOSIS.” ALWAYS WASH HANDS THOROUGHLY
AFTER HANDLING USED LITTER.
CAUTION: Not intended for use by incapacitated or older cats that may
experience difficulty in entering or leaving the litter box.
CAUTION: Encouraging your cat to use an indoor litter box, or properly
disposing of outdoor cat feces, is beneficial to overall water quality.
Please do not flush cat litter in toilets or dispose of it outdoors in gutters
or storm drains.
CAUTION: For cat use only and intended solely for the elimination of cat
waste. Do not attempt to use this product for any other reason.
SAVE THESE INSTRUCTIONS.

3
TABLE OF CONTENTS
WELCOME . . . . . . . . . . . . . . . . . . . . . . . . . . . . . . . . . . . . 4
ACCLIMATING YOUR CAT . . . . . . . . . . . . . . . . . . . . . . . . . . .4
GETTING STARTED . . . . . . . . . . . . . . . . . . . . . . . . . . . . . . . 5
Unpacking Instructions . . . . . . . . . . . . . . . . . . . . . . .5
Litter Box Parts . . . . . . . . . . . . . . . . . . . . . . . . . . . . 6
ASSEMBLY INSTRUCTIONS . . . . . . . . . . . . . . . . . . . . . . . . . . 7
Preparing the Waste Receptacle . . . . . . . . . . . . . . . . . . 7
Filling the Litter Tray . . . . . . . . . . . . . . . . . . . . . . . . 7
Attaching the Paw Cleaning Ramp . . . . . . . . . . . . . . . . . 8
Powering Your Litter Box . . . . . . . . . . . . . . . . . . . . . . 8
OPERATION . . . . . . . . . . . . . . . . . . . . . . . . . . . . . . . . . . .9
Getting to Know the Control Panel. . . . . . . . . . . . . . . . . 9
Daily Use . . . . . . . . . . . . . . . . . . . . . . . . . . . . . . . 10
CARE AND CLEANING . . . . . . . . . . . . . . . . . . . . . . . . . . . . 11
Weekly Cleaning. . . . . . . . . . . . . . . . . . . . . . . . . . 11
Paw Cleaning Ramp. . . . . . . . . . . . . . . . . . . . . 11
Waste Receptacles . . . . . . . . . . . . . . . . . . . . . 12
Motion Sensors & Top Housing . . . . . . . . . . . . . . 12
Monthly Cleaning . . . . . . . . . . . . . . . . . . . . . . . . . 13
Rake Removal and Cleaning . . . . . . . . . . . . . . . . 13
Litter Tray . . . . . . . . . . . . . . . . . . . . . . . . . . 14
TROUBLESHOOTING . . . . . . . . . . . . . . . . . . . . . . . . . . . . . 16

4
WELCOME TO THE NATURE'S MIRACLE®FAMILY!
Thank you for purchasing a Nature's Miracle®Self-Cleaning Litter Box! This Use
& Care Manual will provide useful information on operating and maintaining
your litter box, finding accessories and troubleshooting for common issues.
If you have any additional questions or concerns, or cannot find the information
you need, please call our customer care line at 1-800-645-5154.
ACCLIMATING YOUR CAT
Some cats are particular when it comes to their litter box area. In some cases,
your cat may need to get used to its Nature's Miracle®Self-Cleaning Litter Box,
which means you will need to acclimate your cat before removing your old litter
box. This can be executed with the tips below:
• When setting up, place your Nature's Miracle Self-Cleaning Litter Box next to
your old litter box.
• Do not clean your previous litter box. Cats prefer to use a clean box. The
Nature's Miracle Self-Cleaning Litter Box will always be clean, so they will
transition to the new box on their own.
• If your cat seems timid around the Nature's Miracle Self-Cleaning Litter Box,
you can turn it off for two to three days so it will not automatically run while
they transition. Each day, manually activate the box two to three times to allow
your cat to get used to it before setting it to clean automatically.
• As soon as your cat is acclimated, set your Nature's Miracle Self-Cleaning
Litter Box to clean automatically and remove the previous litter box.

5
Getting Started
UNPACKING INSTRUCTIONS
Note: No tools required for setup.
1. Find a clean and dry location for your Nature's Miracle®Self-Cleaning Litter
Box.
Note: For optimal performance, do not place your Nature's Miracle
Self-Cleaning Litter Box in a moist environment or in direct sunlight.
2. Unpack and lay out all parts and accessories listed in the LITTER BOX
PARTS section of this Use & Care Manual. The AC adapter and carbon filters
can be found inside the waste receptacles.
3. Remove all tape securing the waste receptacle compartment cover.
4. Remove packing foam from the top of the rake mount.
5. Selecting Litter: Clumping litter is not included. Your Nature's Miracle
Self-Cleaning Litter Box is designed to work with Nature's Miracle Clumping
Cat Litter or other hard-clumping litters. For Nature's Miracle Clumping Cat
Litter options, visit www.naturesmiracle.com.
CAUTION: Do not use any form of non-clumping litter, crystal or pearl-like
litters in your Nature's Miracle Self-Cleaning Litter Box.

6
ADDITIONAL ACCESSORIES FOR PURCHASE
See products/litter & litter box accessories on naturesmiracle.com
LITTER BOX PARTS
Product may vary slightly from what is illustrated.
GETTING TO KNOW YOUR NATURE'S MIRACLE®LITTER BOX
Control Panel
1. Nighttime Light Sensor
2. AUTO/OFF/MAINT Mode Switch
3. LED Indicator Lights
Litter Box
4. AC Adapter Outlet (backside of unit)
5. Litter Tray Latches (both sides)
6. Top Housing
7. Paw Cleaning Ramp†
8. Paw Cleaning Ramp Attachment
Posts (both sides)
9. Waste Receptacle Compartment
Cover†
10. Litter Tray
11. Smart Detection Motion Sensors
(both sides)
12. Rake Track Guide (both sides)
13. Removable Rake†
Accessories
14. Scoop & Rake Cleaner†
15. AC Adapter†
16. Waste Receptacle and Receptacle
Lid†
17. Carbon Filter†
Note: † indicates consumer replaceable/
removable parts
11
12
13
16
17
9
10
14
7
8
5
4
6
1
2
3
15

7
Assembly Instructions
PREPARING THE WASTE RECEPTACLE
1. Remove Carbon Filter from plastic sleeve. Peel off paper
strip to expose the adhesive. Place filter adhesive side
down in square-shaped insert in the center of the Waste
Receptacle Lid. (Figure A)
2. Close Waste Receptacle Compartment Cover (do not
latch the tabs on the sides).
3. Slide Waste Receptacle into place, using the plastic
channels as a guide for the Waste Receptacle Lid.
(Figure B)
4. Slide in until locking tab on the Waste Receptacle
Lid engages the notch on the Waste Receptacle
Compartment Cover. (Figure C)
FILLING LITTER TRAY
CAUTION: Do not use any form of non-clumping litter,
crystal or pearl-like litters in your Nature’s Miracle®
Self-Cleaning Litter Box.
1. Fill the Litter Tray so the litter level is between the MIN
and MAX fill lines located on either side of the Litter
Tray. (Figure D)
TIP: For optimal performance, continue to replace the
litter to reach the Min and Max line as waste is being
removed.
2. Use the Litter Scoop & Rake Cleaner to evenly distribute
the litter in the Litter Tray.
CAUTION: Do not overfill or underfill unit or it will not
operate properly or effectively.
C
D
A
B
C

8
ATTACHING PAW CLEANING RAMP
1. Position the Paw Cleaning Ramp with the mat side facing
up and the notches at the top.
2. Place the notches of the Paw Cleaning Ramp over the
Paw Cleaning Ramp Attachment Posts on each side of
the Waste Receptacle Compartment Cover and snap into
place. (Figure E)
3. Tug slightly on ramp to ensure that it is latched.
POWERING YOUR LITTER BOX
1. Remove AC Adapter from packaging and plug it into the
DC jack connector outlet in the back, below the Control
Panel. (Figure F)
2. Plug the AC Adapter into a standard electrical outlet.
3. Your Nature's Miracle®Self-Cleaning Litter Box is now
ready to operate.
E
F

9
Operation
GETTING TO KNOW THE CONTROL PANEL
1. AUTO Mode: This mode powers the unit to automatically clean the litter box
after each use.
2. MAINT Mode: This mode positions and stops the Rake at the front of the
litter box. It is used to remove and/or clean the Removeable Rake.
3. Power OFF Position: The center switch location turns OFF the litter box
(when not using, always unplug the AC Adapter for safety).
4. Green Power Indicator Light: Your litter box is powered ON
- A constant green light indicates that the litter box is operating as NORMAL.
- An intermittent blinking green light (blinks once every second) indicates
that CLEANING mode is activated.
5. Red Indicator Light:
- An intermittent blinking red light (blinks twice quickly every two seconds)
indicates the litter box has stalled and is in BLOCK mode (see
Troubleshooting on page 16 for more details).
- A fast blinking red light (blinks quickly continuously) indicates the rake is
stalled after attempting five times to clear the blockage and is in FAULT
mode (see Troubleshooting on page 16 for more details).
6. Nighttime Light Sensor: When there is no light hitting this sensor, the
Nighttime Lights on each side of the litter box activate for added visibility.
1
4 5
6
2
3

10
DAILY USE
1. Turn the AUTO/OFF/MAINT switch to AUTO; the Green Indictor Light will
turn on.
Note: The rake will automatically run through an AUTO cleaning cycle to
smooth out litter.
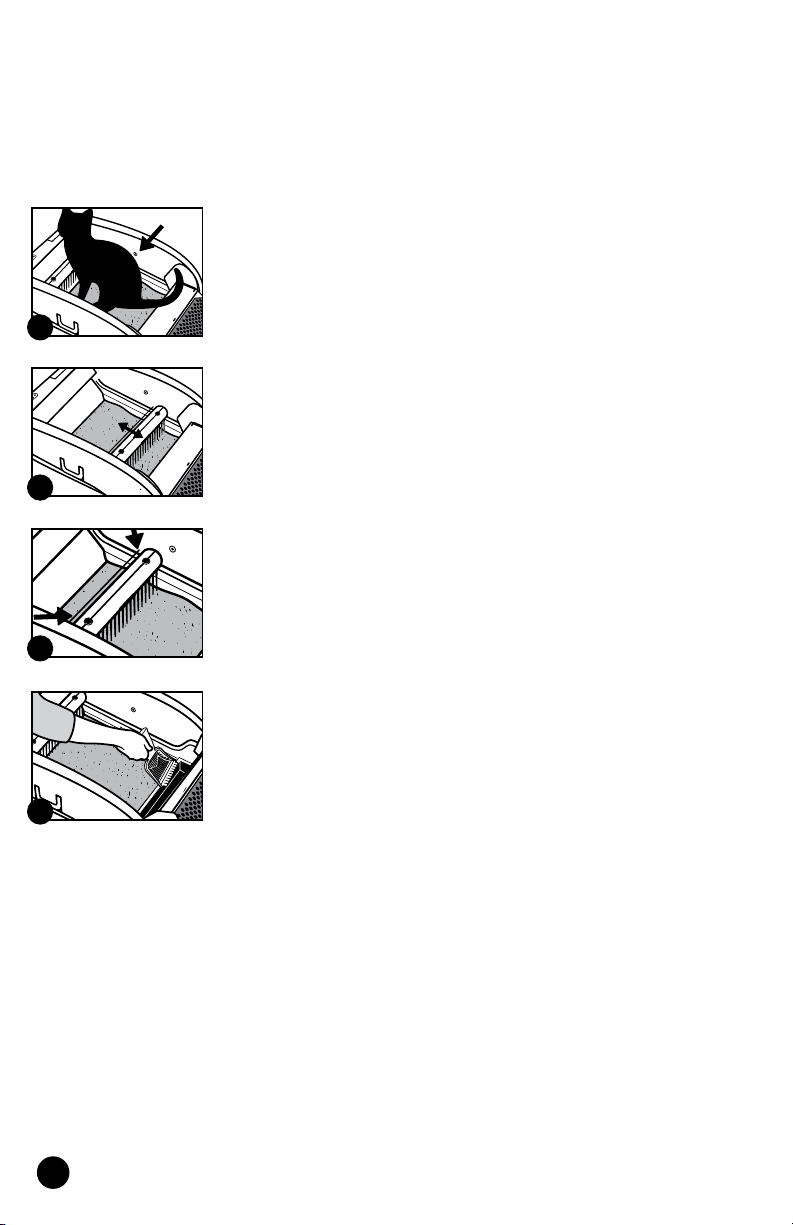
2. When your cat enters and leaves the litter box, the motion
sensors will activate the AUTO cleaning cycle. Sensors
must be blocked for at least 10 seconds to activate the
AUTO cleaning cycle. (Figure G)
Important: Unit will not start AUTO cleaning cycle while
cat is in the box.
3. After 15 minutes, the AUTO cleaning cycle will start and
the Rake will move forward and back to scoop waste
clumps into the Waste Receptacle. (Figure H)
Note: If the cat re-enters and leaves the litter box
before the initial 15 minutes have passed, the timer will
automatically reset and delay the Rake action for an
additional 15 minutes.
Note: Rake will stop and reverse direction if the safety
bar (located behind the Rake) touches any object as it
completes the AUTO cleaning cycle. (Figure I)
Important: If the Rake encounters a blockage, it will
attempt to complete its cleaning cycle five times, if
unsuccessful, the Rake will return to the home position
and the Red Indicator Light will blink quickly to
indicate FAULT mode (see Troubleshooting on page 16
for more details).
4. If small litter clumps remain in the Litter Tray after the
rake has completed an AUTO cleaning cycle, you can use
the Litter Scoop & Rake Cleaner to move these particles
to the Waste Receptacle by lifting the Waste Receptacle
Compartment Cover. (Figure J)
G
I
H
J

11
5. If clumps of litter become stuck to the Removable Rake,
use the teeth design on the Litter Scoop & Rake Cleaner
to clean between the teeth on the Rake. (Figure K)
6. The disposable Waste Receptacles and Waste Receptacle
Lids will keep odors and waste trapped until you are
ready to replace the Waste Receptacle. Once the Waste
Receptacle is full, remove and replace the Waste
Receptacle as instructed in the section REMOVING THE
WASTE RECEPTACLE on page 12.
Care & Cleaning
Note: Your Nature's Miracle®Self-Cleaning Litter Box is designed to minimize
daily maintenance. Simply replace the waste receptacle and follow the
instructions for weekly cleaning.
Weekly Cleaning
CLEANING THE PAW CLEANING RAMP
The paw cleaning ramp is designed to remove litter from your cat’s paws as it
exits the litter box.
1. Grasp the ramp on either side near the Attachment Posts
and carefully lift up and unsnap the notches of the Ramp
from the Posts on both sides of the Waste Receptacle
Compartment Cover.
2. To avoid spilling loose litter particles, grasp the rubber
mat on one side and carefully lift up to remove.
(Figure L)
3. Tip over and empty the mat holder into the trash to
dispose of loose litter particles.
4. Line up the top notches of the rubber mat and secure to
the Paw Cleaning Ramp by pressing the rubber mat onto
the four mat posts on the Ramp. Reattach the Ramp to
the litter box as instructed on page 8.
L
K

12
REMOVING, DISPOSING AND REPLACING
THE WASTE RECEPTACLE
Caution: We recommend avoiding contact with waste material. Wear rubber
or latex gloves when handling used Waste Receptacle. Pregnant women and
immune-deficient people should avoid contact with cat waste at all times.
1. Remove Paw Cleaning Ramp by lifting up and unsnapping
the notches of the Ramp from the Posts on both sides of
the Waste Receptacle Compartment Cover.
2. Push down on the tab and notch feature on the Waste
Receptacle Compartment Cover and pull out to release
the Waste Receptacle. (Figure M)
3. Lift to lock the tabs on each side of the Waste Receptacle
to secure the Waste Receptacle Lid into place. (Figure N)
4. Safely dispose of the full Waste Receptacle.
CAUTION: Encouraging your cat to use an indoor litter
box, or properly disposing of outdoor cat feces, is
beneficial to overall water quality. Please do not flush
cat litter in toilets or dispose of it outdoors in gutters
or storm drains.
5. Replace the new Waste Receptacle and Waste
Receptacle Lid as instructed in PREPARING THE WASTE
RECEPTACLE on page 7.
CLEANING THE MOTION SENSORS & TOP HOUSING
Note: The Smart Detection Motion Sensors on the inside walls of the litter box
are what activate the AUTO cleaning cycle. Keep sensors free of dust to ensure
proper operation.
1. Use a soft, dry cloth or towel to gently wipe the Smart
Detection Motion Sensors and remove any dust on a
WEEKLY basis. (Figure O)
2. Use the cloth to wipe the exterior surfaces along the top
and sides of the top housing to maintain its appearance.
M
N
O

13
Monthly Cleaning
Note: Clean thoroughly once a month to ensure optimal operation.
Important: We recommend wearing rubber or latex gloves when handling the
soiled rake or litter tray.
RAKE REMOVAL & CLEANING
Note: The Rake is removable for thorough cleaning. For quick cleaning, you can
simply use the teeth on the Scoop & Rake Cleaner to clean between the teeth of
the rake.
1. To remove the Rake for cleaning, move the
AUTO/OFF/MAINT Switch to the MAINT mode position.
The Green Indicator Light will blink slowly.Note: The
Rake will automatically return to the home position 5
minutes after activating the MAINT cycle.
2. Removable Rake will move forward and stop at the front
of the litter box.
3.While continuing to press the two buttons on the top
of the Rake housing assembly, release and detach by
pulling the Rake out. (Figures P & Q)
Important: Do not operate the unit without the Rake
attached.
4. Wash the Rake with a soft cloth using warm water and
mild detergent. Dry thoroughly.
Note: Do not use scouring pads or harsh abrasive
chemicals.
5. Hold Rake with both hands and align the two
indentations on the Rake with the two buttons on the
Rake housing assembly.
6. Push Rake into the Rake housing assembly until it snaps
into place both on top and on the bottom of the Rake.
7. Move the AUTO/OFF/MAINT switch to OFF, then back to
AUTO to return the Rake in the proper home position.
P
Q

14
Litter Tray Cleaning
Note: It is not necessary to clean the tray each time you refill. Litter Tray
cleaning is recommended once a month.
1. To remove the Litter Tray for cleaning, check to make
sure Rake is in home position.
2. Turn the AUTO/OFF/MAINT switch to OFF and unplug the
unit to prevent accidental activation.
3. Remove the Paw Cleaning Ramp by following the
instructions on page 11.
4. Lift the latches on both sides of unit (Figure R). This will
separate the Litter Tray from the Top Housing.
5. Lifting by the latches, move the top housing off and away
from the Litter Tray. (Figure S)
6. Dispose of all used litter in the Litter Tray. To ensure
proper disposal of litter, follow the manufacturer’s
instructions on the litter package.
CAUTION: Encouraging your cat to use an indoor litter
box, or properly disposing of outdoor cat feces, is
beneficial to overall water quality. Please do not flush
cat litter in toilets or dispose of it outdoors in gutters or
storm drains
7. Wipe the Litter Tray with a damp cloth. If further cleaning
is necessary, the Litter Tray can be fully immersed in
water and washed with a mild detergent or taken outside
to clean with a garden hose.
Important: Do not spray, soak or immerse the Top
Housing in water.
8. Wipe the edges and sides of the Top Housing, as well
as the Smart Detection Motion Sensors located on each
side.
R
S

15
9. If the Rake Track Guide on either side of the Top
Housing has any litter caked on, use a soft, damp cloth
to clean. (Figure T)
Note: Keeping these Rake Track Guides clean will
ensure the Rake functions properly.
Important: Do not spray, soak or immerse the Top
Housing in water.
10. Dry Litter Tray thoroughly before reassembling.
Tip: Before reassembling, you can spray the inside of
the Litter Tray surface and Removable Rake with
non-stick cooking spray or silicone spray and wipe off
with a soft, dry cloth. This will help to prevent clumps
from adhering to the surface of the Litter Tray.
11. Place the clean Litter Tray on a flat surface. Carefully
lower Top Housing onto the Litter Tray, lining up the
latches on the sides with the tabs. (Figure U)
12. Lock the two latches by pressing lower part of each
latch firmly against the tabs on the Litter Tray until
each latch clicks and locks into place. (Figure V)
13. Refill the litter by following the FILLING LITTER TRAY
instructions on page 7.
T
U
V

16
Troubleshooting
INDICATOR LIGHTS
Problem Possible Cause Solution
Red Indicator
Light blinks twice
quickly every
two seconds;
Rake moves
continuously
Litter box is in BLOCK
mode and has encountered
a blockage – either in front
of or behind the Rake –
that is preventing it from
returning. It will attempt
to clear the blockage five
times before entering
FAULT mode.
Turn the AUTO/OFF/MAINT
switch to OFF and unplug
the unit. Use the Litter
Scoop & Rake Cleaner to
clear any clumps or block-
ages that are blocking the
Rake from completing its
cycle. Check that the Rake
Track Guide is clear of
debris and buildup. Level
off the litter so it is below
the MAX line, and once the
blockages are removed, plug
the unit in and power on.
Red Indicator Light
blinks quickly
repeatedly; Rake
stalled
Litter box is in FAULT
mode and the Rake has
stalled after cycling five
times to try to clear the
blockage unsuccessfully.
The litter box will stop
until the unit is powered
down.
Turn the AUTO/OFF/MAINT
switch to OFF and unplug
the unit. Use the Litter
Scoop & Rake Cleaner to
clear any clumps or block-
ages that are blocking the
Rake from completing its
cycle. Check that the Rake
Track Guide is clear of
debris and buildup. Level
off the litter so it is below
the MAX line, and once the
blockages are removed, plug
the unit in and power on.
Mode Indicator
Light does not turn
on when
AUTO/OFF/MAINT
switch is turned on
Litter box is not receiving
power.
Check to be sure that
the unit is plugged into a
working outlet.
Check to make sure the AC
Adapter is plugged into the
back of the unit.

17
RAKE OPERATION
Problem Possible Cause Solution
Rake moves
continuously Litter box is in BLOCK
mode and has encountered
a blockage – either in front
of or behind the Rake –
that is preventing it from
returning. It will attempt
to clear the blockage five
times before entering
FAULT mode.
Turn the AUTO/OFF/ MAINT
switch to OFF and unplug
the unit. Use the Litter
Scoop & Rake Cleaner to
clear any clumps or block-
ages that are blocking the
Rake from completing its
cycle. Check that the Rake
Track Guide is clear of
debris and buildup. Level
off the litter so it is below
the MAX line, and once the
blockages are removed, plug
the unit in and power on.
Rake has stalled
and stopped
working
Litter box is in FAULT
mode and the Rake has
stalled after cycling five
times to try to clear the
blockage unsuccessfully.
The litter box will stop
until the unit is powered
down.
Turn the AUTO/OFF/MAINT
switch to OFF and unplug
the unit. Use the Litter
Scoop/Rake Cleaner to clear
any clumps or blockages
that are blocking the Rake
from completing its cycle.
Check that the Rake Track
Guide is clear of debris and
buildup. Level off the litter
so it is below the MAX, line
and once the blockages are
removed, plug the unit in
and power on.
Rake does not
move after the cat
exits the litter box
and 15 minutes
have passed
Smart Detection Motion
Sensors may be dusty.
No power to the litter box
Wipe the Smart Detection
Motion Sensors with a soft,
dry cloth to remove any dust.
Check to be sure that
the unit is plugged into a
working outlet.
Check to make sure the AC
Adapter is plugged into the
back of the unit.

18
MISCELLANEOUS
Problem Possible Cause Solution
Waste clumps stick
to the Litter Tray Litter Tray surface may
need cleaning.
Litter level is too low.
Clean Litter Tray thoroughly
as instructed on pages
14-15.
Ensure the litter level is
between the MIN and MAX
lines located on the Litter
Tray.
Rake does not
completely clean
the litter box
Low quality litter may have
been used.
Always use premium,
hard-clumping cat litter. Do
not use any form of
non-clumping litter, crystal
or pearl-like litter. Visit
www.littermaid.com to
review our hard-clumping
litters.
Litter box is
making a popping
noise when
automatically
scooping
There is excess litter in
the Rake Track Guide
channels.
If the Rake Track Guide
channels on either side of
the Top Housing have any
litter particles caked on, use
a soft, damp cloth to clean.
(See Figure T on page 15)
Keeping these Rake Track
Guides clean will ensure the
Rake functions properly.

19
NEED HELP?
For service, repair or any questions regarding your appliance, call
1-800-645-5154 or visit www.naturesmiracle.com. Do not return the product
to the place of purchase. Do not mail the product back to the manufacturer
or bring it to a service center.
*ONE-YEAR LIMITED WARRANTY
(Applies only in the United States and Canada)
What does it cover?
Any defect in material or workmanship; however, Spectrum Brands Pet LLC's
liability will not exceed the purchase price of the product.
For how long?
One year after the date of original purchase.
What will we do to help you?
Provide you with a reasonably similar replacement product that is either new or
factory refurbished.
How do you get service?
• Save your receipt as proof of the date of sale.
• Call our toll-free number, 1-800-645-5154, for general warranty service.
What does your warranty not cover?
• Damage from commercial use.
• Damage from misuse, abuse or neglect.
• Products that have been modified in any way.
• Products used or serviced outside the country of purchase.
• Accessory items that are packed with the unit.
• Shipping and handling costs associated with the replacement of the unit.
• Consequential or incidental damages. Please note, however, that some
states do not allow the exclusion or limitation of consequential or incidental
damages, so this limitation may not apply to you.
How does state law relate to this warranty?
This warranty gives you specific legal rights, and you may also have other rights
that vary from state to state.

Manufactured for
Spectrum Brands Pet LLC
3001 Commerce St.
Blacksburg, VA 24060
17-33440
®/TM/© 2021 Spectrum Brands, Inc.
or one of its affiliates.
All Rights Reserved.
This manual suits for next models
1
Table of contents
Other Nature's Miracle Pet Care Product manuals