Naxa NX-831 User manual

NX-831
PROGRESSIVE SCAN
IMPORTANT
READ THESE INSTRUCTIONS
BEFORE USE AND RETAIN
FOR FUTURE REFERENCE.
INSTRUCTION MANUAL
DVD PLAYER WITH
PROGRESSIVE SCAN

SAFETY INFORMATION
Dear customers
We take theopportunity to thank you for purchasingthis DVD player. We stronglyrecommend that you study
carefully the operationinstructions before attemptingto operate the unit and thatyou have notedthe listed
precautions.
Note
This unit canbe used onlywhere the power supply is 90V-240V~ 50/60Hz.
Caution
* DVD PLAYER ISA CLASS 1 LASER PRODUCT. HOWEVER THEPLAYER EMITSAVISIBLE LASER
BEAM WHICH COULDCAUSE HAZARDOUS RADIATION EXPOSURE IFDIRECTED. BE SURE TO
OPERATE THEDVD PLAYERCORRECTLYAS INSTRUCTED WITHOUTOPENING CABINETAND
LOADER COVER.
* WHEN THEPLAYER ISPOWERED ON, DO NOT PLACE YOUREYES CLOSE TOTHE OPENING OFTHE
DISC TRAYOR OTHER OPENINGSTO LOOK INTO INSIDE OF THE PLAYER.
* WHEN THEPLAYER ISPOWERED ON, DO NOT REMOVE THEPROTECTIVE CAP ONTHE OPTICAL
SCART.RED BEAM EMITTED WILL HARMYOUR EYES ESPECIALLY TOCHILDREN WHEN YOULOOK
AT OPTICALSCART.PUTTING ON THEPROTECTIVE CAP WHEN THE SCARTIS IDLE.
* RADIOACTIVE DANGERMAY BECAUSED IF YOUDO NOT FOLLOWTHE METHOD STIPULATED
HERE FOR THEOPERATION,ADJUSTMENT OR CONTROL.
* PLEASE CONSIGNTHE MAINTENANCE TO PROFESSIONALTECHNICIAN.
Copy Protection:
This DVD playersupports Macrovison copyprotection. On DVD disc that includea copy protectioncode, if the
contents of theDVD disc arecopied using a VCR, the copyprotection code preventsthe videotape copy from
playing normally.
Apparatus Claims ofU.S. Patent Nos.4,631,603.4,577,216.4,819,098and 4,907,093 licensed for limited viewing
uses only.
This product incorporatescopyright protection technologythat is protected by method claimsof certain U.S.
Patents and otherintellectual property rightsowned by Macrovision Corporation and otherright owners. Useof this
copyright protection technologymust be authorizedby Macrovision Corporation, and is intendedfor home and
other limited viewinguses only unlessotherwise authorized by Macrovision Corporat ion. Reverse engineering or
disassembly is prohibited.

CONTENT
1. Brief Instructionof Controls
2. Preparations
2.1 Accessories
2.2 Battery installationof remote controller
2.3 System connection
2.4 Play modesetting
3. Basic operation
3.1 Play disc
4. Description offunction
4.1 OSD
4.2 Play Mode
4.3 Subtitle
4.4 Angle
4.5 Audio
4.6 Title
4.7 Menu
4.8 Direction key
4.9 Number key
4.10 RepeatA-B
4.11 Repeat
4.12 Zoom
4.13 Volumeand mute
4.14 L/R
4.15 Prog
4.16 Slow
5. Setting OfThe System
6. Operation OfMP3 function
7. JPEG
8. Troubleshooting guide
9. Care ofdiscs
10. Technical Specification
1
3
3
3
3
4
4
4
5
5
5
5
5
5
5
5
5
5
5
5
5
5
5
6
6
10
10
11
11
12
6

- 1 -
1. Brief Instruction of Controls
Front panel:
Back panel:
OPEN/CLOSE PLAY/PAUSE STOP
POWER
NX-831
YPb/Cb Pr/Cr
VIDEO
S-VIDEOCOAXIAL OPTICALLR
AUDIO OUT DIGITAL OUT DIGITAL OUTVIDEO OUT
25
36
Digital signal COAXIAL output jack
4
2CH L output jack
1
2CH R output jack
Component output jack for progressive scan
S-VIDEO output jack
1 2 3 4 5
12
34 5
6.Stop
5.Play/pause
4.Open/close
3.Sensor
6
6
1.Disc tray
2.Power
VIDEO output jack
7
Digital signal OPTICAL output jack
7

- 2 -
Remote Controller
STANDBY
10+
9
654
321
0
78
ANGLE
PROG
MENU
ENTER
SETUP
REV FWD PREV NEXT
RETURN REPEAT STEP GOTO
SLOW VIDEO
VOL- VOL+
PLA
Y/P
AUS
E
L/R
MUTEA-B
N/P
OSD
TITLE
OPEN/CLOSE
AUDIO
SUBTITLE
ZOOM
STOP
PBC
VIDEO
NUMBER KEYS
OSD
A-B REPEAT
REPEAT
ENTER
ZOOM
MUTE
VOL+/VOL-
PLAY/PAUSE
STOP
SLOW
MOVE()
AUDIO
STANDBY
SUBTITLE
N/P
SETUP
PROG
MENU
TITLE
REV PREV
NEXT
OPEN/CLOSE
ANGLE
GOTO
FWD
1
2
3
4
5
6
7
8
9
10
11
12
13
14
15
16
17
18
19
20
21
22
23
24
25
26
27
28
29
30
31
32
L/R
STEP
PBC
RETURN

- 3 -
1. Remote controller 2. Audio/Videocable 3. Users manual
4. Batteries 5.Guarantee letter
(Check whether itis fully equippedafter opening the box ).
2.1 Accessories
2. Preparations
2.2 Battery installationof remote controller
,
Place twoAAA batteriesin the battery compartment. Be surethe polarities arecorrect. There shouldbe no large
obstacles between the remotecontroller and the mainunit.
2.3 System connection
(1) When makingconnection between this unitand other components, besure all connection arepower-off.
(2) Audio/Videocables are connected according to the different colour identificationand they should be fitted firmly.
Yellow tovideo terminal
White to audioterminal(L)
Red to audioterminal(R)
(3) Scheme ofconnection
L
VIDEO
Pb/Cb
Y
RS-VIDEO
Pr/Cr
COAXIAL OPTICAL
Audio out Digital out Video out Digital out
Stereo amplifier
2CH input
2CH input
Y Pb/Cb Pr/Crinput
Video input
S-Video input
Multi Standard TV
Optical input
Coaxial input
Digital Home Theateramplifier
BASS
TREBLE
ECHO
DOWN UP
VOLUME
INPUT SELECTOR
MUTE
KARAOKE
CHANNEL
TEST
MODE
3STEREO
PROLOGIC
BYPASS
EXCITE
POWER
MIC
2
1
1
MICVOL
2
MIC
BASS
TREBLE
ECHO
DOWN UP
VOLUME
INPUT SELECTOR
MUTE
KARAOKE
CHANNEL
TEST
MODE
3STEREO
PROLOGIC
BYPASS
EXCITE
POWER
MIC
2
1
1
MICVOL
2
MIC

2.4 Play modesetting
If you foundthe picture couldnot spread all screen
or no color, please select PAL, NTSCor auto by
pressing (P/N) key.
Please use remotecontrol to operatethe function as
described below:
Once all theconnection of thesystem have been done,
this machine willbe ready forservice. Prior to play, make
sure to completethe following preparatoryoperations.
1. Switch onTV and selectAVmode. If it s S-Video
connect select S-Videomode.
2. Switch onamplifier if itis connected, select AC-3 or
DVD mode.
3. Plug-in ofDVD player
Step 1: PressSTANDBY buttonon the front panel,
Disc Loading shownon screen.
,
Step 2: Press(OPEN/CLOSE) key on the front panel, the
tray comes outautomatically.
Step 3: Placedisc on thetray, press(OPEN/CLOSE) key
to close thetray, thedisc type willbe shown on the
upper left cornerof the screen.
Note: Press (STANDBY) key onthe remote controller to
bring the unit into standby status.
Please use remotecontrol to operatethe function as
described below:
Once it hasread the disc,this machine will start
playing automatically.
If it isa DVD, the machine will showthe DVD menuor
title menu.
If it isa VCD2.0 disc, the machine willactivate PBC
playback control status.
If it isa CD, this machine will startplaying in the
sequence.
3. Basic operation
3.1 Play disc
Press (PLAY)key to return play back whiledisc stop,
pause or step.
PAUSE key:
Press (PAUSE)key to put the playback intemporary
halt.
PREV key:
Press (PREV) keyto skip backward to the title before
current.
NEXT key:
Press (NEXT) keyto skip forward to the title after
current.
REV key:
Press (REV) keyto get 2X, 4X, 8X, 16X or normal
play circular fastreverse function on disc playing.
FWD key:
Press (FWD) keyto get 2X, 4X, 8X, 16X or normal
play circular fastreverse function on disc playing.
STOP key:
Press (STOP) keyfirst time to follow by a(PLAY) key
will an autoresume to thelast played location. Press
(Stop) key twicewill halt the playback completely.
VIDEO key:
Press (VIDEO) keyto select the signal source:
YUV,P-scan,Interlace.
- 4 -

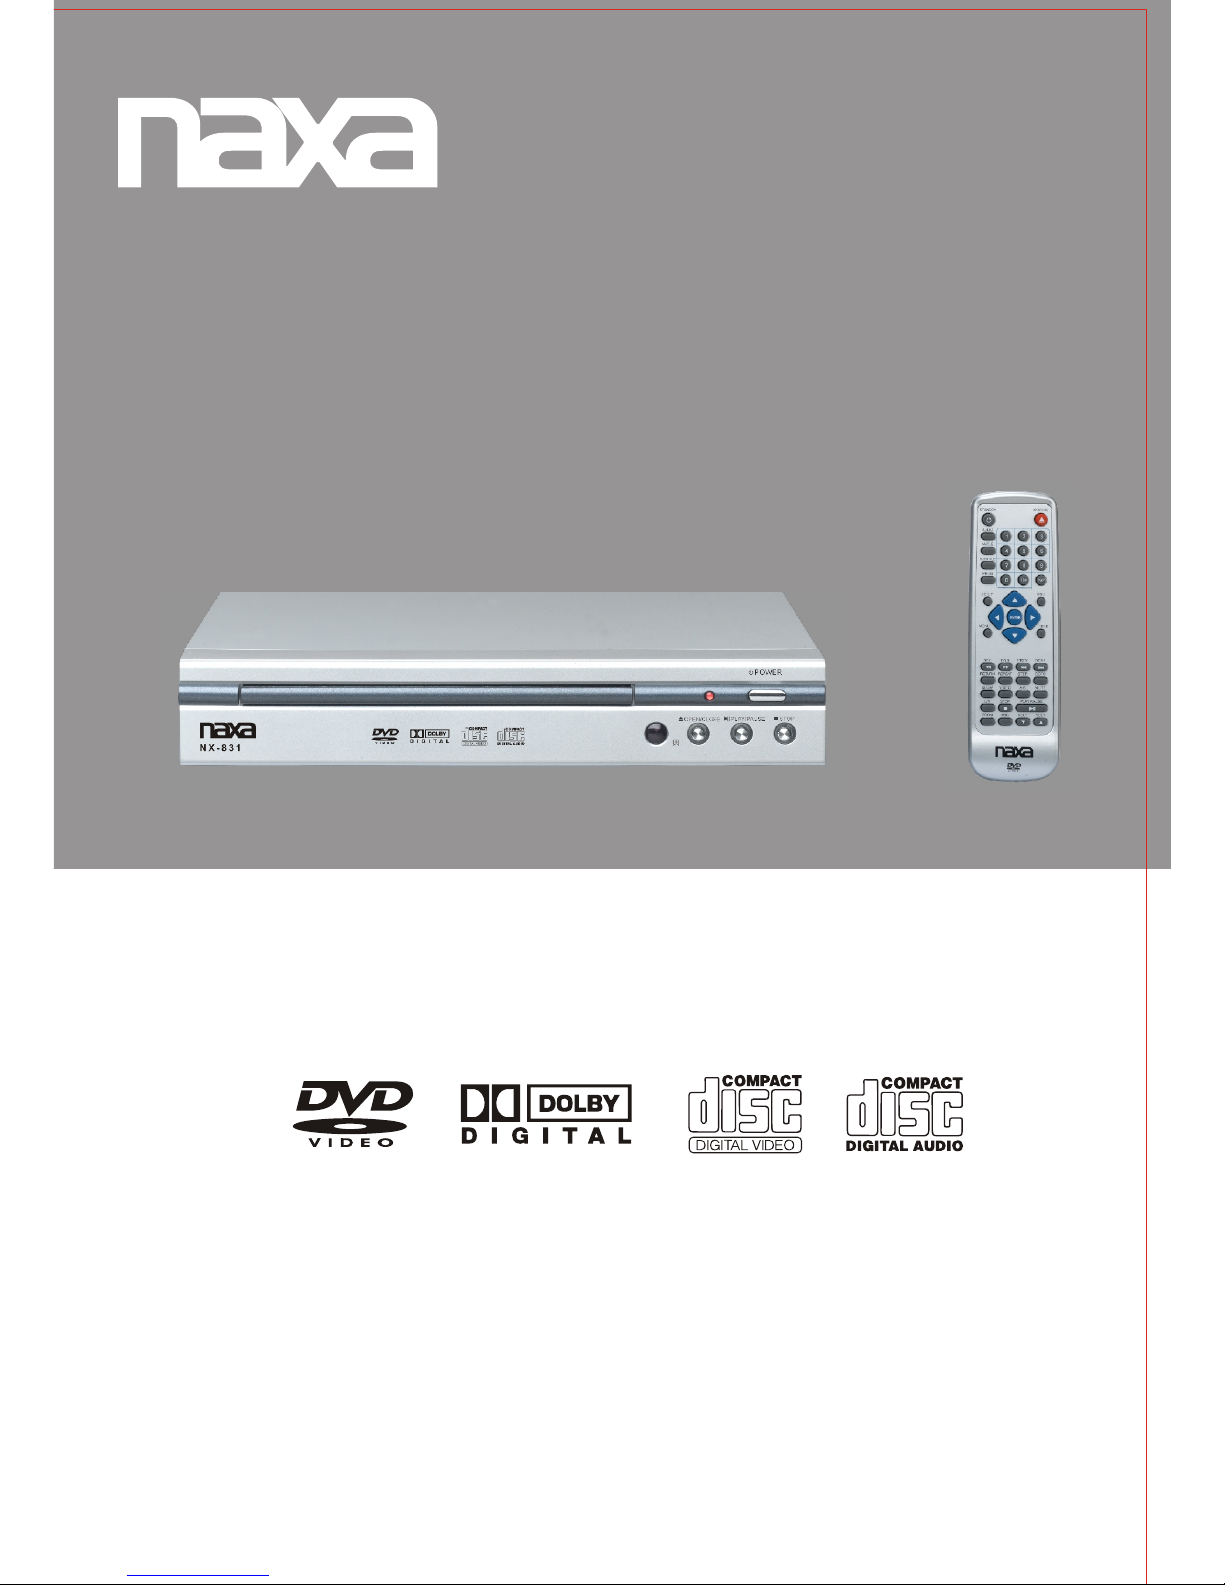
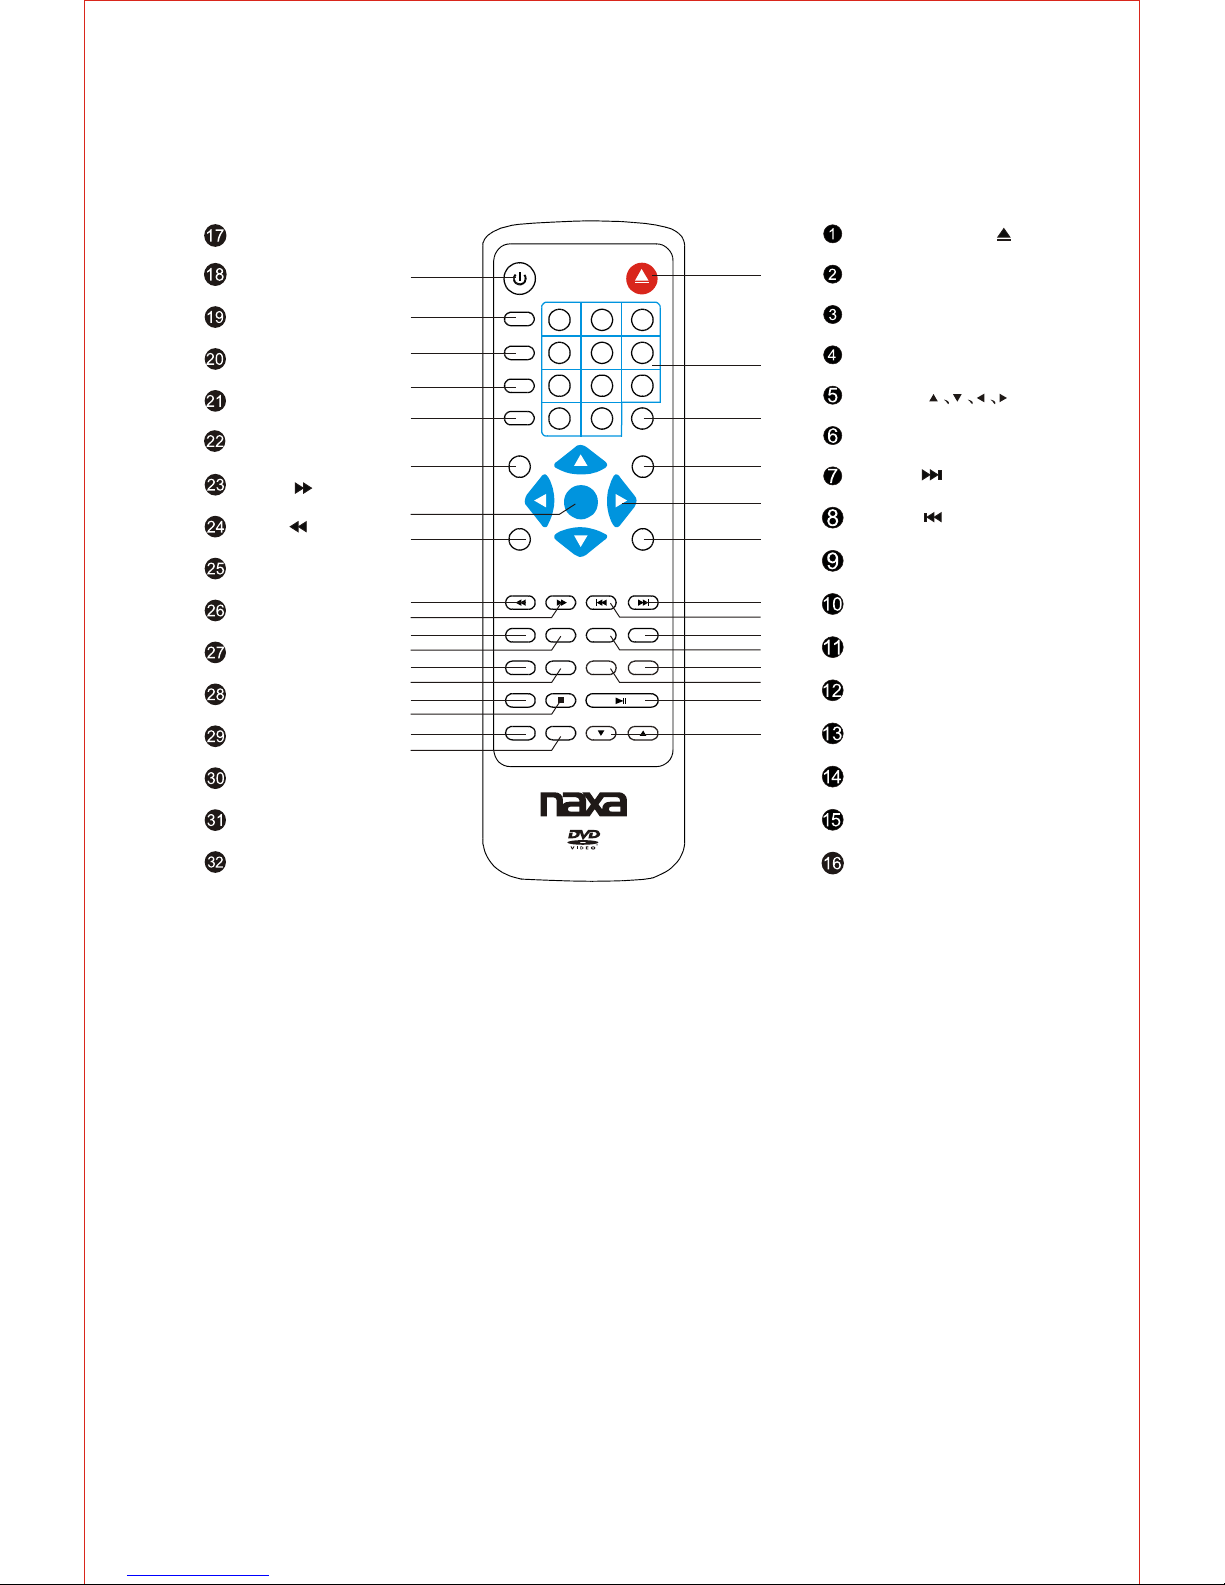
Please use remotecontrol to operate the function as
described below:
In the conditionof DVD disc playing, press (OSD)
key on theremote controller todisplay the elapsed
time of thecurrent title, remain time of the current title,
remain time ofthe current chapter. total title,current
title,total chapter,currentchapter and other
information of thedisc. In the condition of VCD disc
playing, press (OSD) keyon the remote controller to
display single elapsedtime, single remaintime, display
off and otherinformation of the disc circular.
Press (N/P) keyrepeatedly to get PAL,AUTO,NTSC
display on thescreen.
4. Description of function
4.1 OSD
4.2 Play mode
4.3 Subtitle
This function mayenable you to select multi subtitle
languages (as manyas 32 kindsand only for the disc
with multi subtitleencode). Press (SUBTITLE) key to
get desired display. For example.to select language 2
from 8 options.
4.4 Angle
During athletic match,concert or theatricalprogram,
press (ANGLE) keycontinually on remote controllerto
select various angleto view thesame image (This
operation works onlyfor the discwith multi angle
encoded).
4.5 Audio
4.6 Title
There are 8kinds of languagefor selection.
Press (AUDIO) keyto select language (this
operation works onlyfor the disc with multi language
encoded). For example,to select language 1 from 2
language options, soundfield effect AC-3, 2 channels,
English.
When play SVCD,VCD or CD disc, press (L/R)
key to selectmono left, Mono right, mix mono ,stereo.
For DVD discplaying, press (TITLE)key to get title menu.
Press (MENU) keyto return to main menu for DVD disc
playing.
4.7 Menu
For VCD 2.0disc playing, inthe condition of PBC ON,
song selection canonly be donewhen the playing
returned to themain menu. Inthe condition of PBCOFF,
press relevant numberkey to getfavorite song during
playing.
4.8 Direction key
4.9 Number key
4.11 Repeat
4.12 ZOOM
4.13 Volumeand Mute
There are fourdirection keys to assist in navigation.
They are normallyuse while in title, navigation, and
setup menu.
Press relevant numberkey to playthe favorite chapter
or tittle accordingto the numberon the menu.
For DVD discplaying, press (REPEAT) key torepeat
title, chapter,all or close repeat, For VCD disc playing,
press (REPEAT)key to repeat track, all orclose repeat.
The picture maybe enlarged by up to 4 times to facilitate
you to enjoya particular actionor still picture. Press
(ZOOM) key 3times, the ZOOM scales will be 2x, 3x
4x respectively.Pressing direction key to move the
screen while zoomin. Pressing thebutton once again
will return tonormal play status.
Press (VOL+) keyto increase volume, press (VOL-)
key to reducevolume till tono volume output.
Press (MUTE) keyto get mute, press it again to recover
it from mute.
4.14 L/R
- 5 -
4.10 Repeat A - B
First time pressing(A-B) key toset initial point (A):
Second time pressing(A-B) key toset end Point (B)
After setting, theprogram repeats playingfrom Ato B.
Third time pressing(A-B) key tocancel repeat.

In the conditionof disc playing, press (PROG) key on
remote controller tocome into program status; Enter
the track Numbersdesired, 2, 4, 6 and 8, for example,
if you enterwrong number,you can press direction
key move thecursor to wrongpoint, again input the
numbers, when finished,then using direction key
move the cursorto start button, then press (ENTER)
to start playing.Select (exit) and press ENTER to
exit the programfunction.
4.16 PROG
4.17 SLOW
5. SETTING OF THE SYSTEM
1. DVD menusetting
Press (SLOW) keyrepeatedly, you will enjoy theslow
motion at a1/2, 1/4, 1/8and 1/16 slower forward
speed.
Press the SETUPbutton on the remote controller,the
SETUP MENU (main)will be displayed.
1. Afteraccessing the SETUPMenu, press the
direct ion buttonsfor up and down movement to select
and item desired,then press the (ENTER) button to
confirm your entryand move to the sub-menu. Use the
left and rightdirection buttons to move the pointer, and
the up anddown direction buttonsto select the option
desired. Also,press the (ENTER) button to confirm
your selection, pressleft direction button to return the
last menu. Now, setup of the current functionis
completed.
2. To end thesetup, press the SETUP button again.
In the SETUPMENU, you may choose any ofthe
following options asyou like.
TV DISPLAY
General Audio Dolby Video Preference
- - General setup page - -
Tv Display ps
Angle Mark On
Osd Lang Eng
Captions Off
Screen Saver On
Hdcd Off
Last memory On
Regardless of whatscreen format is chosen,if the screen
displays in 4:3format,the picture canonly be shown in that
format.With DVDs,the screenformat is convertible. If the
screen displays only in4:3 format, when a DVD with16:9
display format isused,the picture willbe flattened.
TV
screen
Film
format Normal
4:3
4:3
16:9
16:9
Full view Mailbox Wide screen
ANGLE MARK
When a DVD providing multiple angles is used,the user may
select a particular shooting angle.the operating instructions
stated in "Angle Mark".
OSD LANG
The user mayuse this item to set the language of the
setup menu and screendisplay to English,Spanish...
The operating instructions stated in "OSD Language".
CAPTIONS
Set captions is "on", "off".
Note:This function doesn't workif the DVD doesn't show it.
SCREEN SAVE
If the screen saver is on, when your DVD player is in Stop,
Open, or No Disc state, or there is a frame frozen for more
than 180sec, the screen saver will be displayed, This featrue
can protect the screen from damage.
ON: Choose this setting to activate the screen saver.
OFF: Choose this setting to cancel the screen saver.
GENERAL SETUP
Go To General setup page
- 6 -

HDCD
Set HDCD is ."off ","1X","2X "
LAST MEMORY
AUDIO SETUP
Includes Speaker setup, spdif setup.
SPEAKER SETUP
Include DOWNMIX, FRONT SPEAKER, CENTER SPEAKER, REAR SPEAKER, SUBWOOFER.
SPDIF SETUP
Spdif output,Audio digital signals canbe output through COAXIAL and OPTICAL in rear
panel.There are 3optinal audio outputmodes:spdif off,spdif/rawand spdif/pcm.
a) SPDIF / OFF: From the Coaxial Output jack and the Optical Output jack, no
signal is output.
b) SPDIT/RAW: Choose this setting if your DVD player is connected to a power
amplifier with coaxial cable or an optical cable. When playing a disc
recorded with Dolby Digital, and MPEG audio formats, the corresponding
digital signals will be output from the Coaxial Output jack or Optical Output
jack. This players digital output jacks are designed for a connection to a
Dolby Digital, or MPEG receiver or decoder.
c) SPDIF/PCM: Choose this setting if your DVD player is connected to a
2-channel digital stereo amplifier; When playing a disc recorded whit Dolby
Digital and MPEG audio formats, audio signals will be modulated into a
2-channel PCM signal, and it will be output from the Coaxial Output jack or
Optical Output jack.
General Audio Dolby Video Preference
- - Audio setup page - -
Downmix
Spdif output
DOWNMIX
Set the audio output in Lt/Rt , Stereo or Off mode.
FRONT SPEAKER
Set the speaker in Large or Small mode.
CENTER SPEAKER
Set the speaker in Large , Small or Off mode.
REAR SPEAKER
Set the speaker in Large , Small or Off mode.
SUBWOOFER
Set the speaker in On or Off mode.
Go To audio setup page
-7-
Press " setup"button from remotecontroller and press" last memory " to " on". This
function is nowenabled. You can nowput a disc into player,and after playing 8 seconds or
more ,press "standby " buttonor " poweroff " ...when u play the disc again,it will begin
playing from theposition where itlast stopped, Ifthis function isNOT enabled thenthe
disc will notcontinue from thelast memory position.

DOLBY SETUP
Dolby digital setup includes DUAL MONO and DYNAMICrange compress.
DUAL MONO
If you have Dolby digital output in your amplifier/decoder, you mayselect stereo, L.Mono
R.Mono and Mix.Mono sound accordingly.
DYNAMIC
Choose this settingto adjust thedynamic ratio andget different effect. If adjusting to FULL,
the audio signalpeak value willbe the minimum;while adjusting toOFF,maximum.
VIDEO SETUP
Includes COMPONENT , TV MODE,SHARPNESS,BRIGHTNESS and CONTRAST.
COMPONENT
a. Off: Choose this setting if your DVD player is connected to a TV with composite
video cables.
b. YUV: Choose this setting if your DVD player is connected to a TV with YUV
video cables.
TV MODE
P-scan: Choose this setting if your DVD player is connected to a TV with P-scan
Y Pb/Cb Pr/Cr video cables.
General Audio Video PreferenceDolby
- - Dolby Digital setup - -
Dual Mono
Dynamic
Go To Dolby Digital setup
General Audio Dolby PreferenceVideo
- - Video setup page - -
Component Off
Tv Mode
Sharpness LOW
Brightness 00
Contrast 00
Go To Video setup page
-8-

BRIGHTNESS
Press right arrow button to enter adjustment BRIGHTNESS mode; press up and down buttons
to make adjustment.
Press left arrow button to return to setup menu.
CONTRAST
Press right arrow button to enter adjustment CONTRAST mode ; press right and left buttons to
make adjustment.
Press enter button to return to setup menu.
SHARPNESS
Set SHARPNESS mode,there are 3 optional modes:High,Medium and Low.
PREFERENCE SETUP
TV TYPE
During stop mode, press the SETUP button to access the setup menu, which
includes items of TV TYPE,AUDIO Language, SUBTITLE, DISC MENU language, DEFAULT .
Preset values are essential to a DVD player. The user may change these items as desired.
PREFERENCE
According to the Color System of the TV, you can choose the TV System.
a. NTSC: Choose this settings if your DVD player is connected to a NTSC TV.
The United States uses NTSC, while Europe uses the PAL broadcast system.
If your picture is colorless and rolling, you have chosen the incorrect broadcast
system.
Press the N/P button to change the system back.
b. PAL: Choose this settings if your DVD player is connected to a PALTV
c. AUTO: Choose this settings if your DVD player is connected to a multi-system TV.
AUDIO LANGUAGE
Choose the audiolanguage your prefer. if thedisc you are playing has that language available,
it will outputthat language,this machine provides English,French,Spanish,Chinese,Portuguese,
Korean,Russian,Thai and others as the built-in disc dubbing language options.
SUBTITLE LANGUAGE
Choose the subtitlelanguage your prefer. if thedisc you areplaying has that language available,
it will displaysubtitle in that language,this machine provides English,French,Spanish,Chinese,
Portuguese,Korean,Russian,Thai,off and othersas the built-indisc dubbing languageoptions.
General Audio Dolby Video Preference
- - Preference page - -
Tv Type Pal
Audio Eng
Subtitle Eng
Disc Menu Eng
Default
Go To Preference page
- 9 -

6. OPERATION OF MP3 FUNCTION
MP3 is an audio compression mode using Level 3 of the
international standard MPEG, whereby sound signal is
compressed in a rate of 12:1. AMP3 disc can record
music for play of over 600 minutes or record over 170
songs, rivaling CDs in sound quality.
Toplay a MP3 disc
Select the track using direction buttons
1. Follow the basic operating instructions to insert a
MP3 disc, this machine will start to search the
information on the disc and show it in the display.
Using this function,the user will be able to enjoy a
particular song or all the songs on the disc over and over
again.
2. Press direction key to select MP3 file and press
ENTER key to play.
Repeat play
1. Choose a particular song to be repeated.
2. Press the REPEAT button you can choose folder
repeat or cancel the repeat function.
Other functions:
When a MP3 disc is played, the features of mute,
volume control, pause and forward and backward
search will also be available. The operations are the
same with those of CDs.
JPEG adopting the most efficient compression is
widely used as picture storage type flattened and
stored format.
Even if pictures are compressed 15-20 times. They
still have good effect. Supported by most picture
processing software, fit for picture storage, it has small
date and easy use. This machine can read. JPEG-
format picture CD disc.
7. JPEG
DISC MENU LANGUAGE
Choose the disc menu language your prefer.
if the disc you are playing has that language
available,it will display the menu in that language,
this machine provides English,French,Spanish,
Chinese,Portuguese,Korean,Russian,Thai and
others as the built-in disc dubbing language
options.
DEFAULT
This option will resume the original settings of
this machine except the PASSWORD.
- 10 -

Select to playby menu
1. Put indisc, the machinesearches disc information
and main menudisplays on screen.Press number key
from 1 toselect picture, pressplay key to make sure.
2. Press directionkey to select picture, then press
ENTER key tomake sure.
3. In conditionof stop, select direction key to select
other pictures.
4. In conditionof stop, select the first line file item onthe
right, then pressplay key to return to upper menu
Other functions:
When playing pictureCD. The machine allows pause,
repeat and browsing. Usethe Next or Previous key to
browse. Press ZOOMkey to enlarge picture. While in
zoom mode pressfast forward ofbackward key to
control the zoomscale. To move the view area of the
enlarged picture, usethe direction keys.
In view mode,pictures can berotated with direction
keys. The typeof slide show transition can beselected
from the navigationmenu or simply by pressing
PROGRAM key.
For your convenience, wehave enlisted some points
to help solveproblems you mightencounter while using
DVD player.
* Make surethe good connectionbetween player and
other appliances such sapower amplifier orTV.
* Make surethe right operationon TV andpower
amplifier.
8. Trouble shooting guide
No sound
No picture
* Make surethe good connectionbetween player and
other appliances such asTV.
* Make sureTV works well.
* Make surethe DVD playeris in correct mode,
otherwise,
press VIDEO buttonseveral times to solve it.
Disc does not play
Remote controller does not work
Picture dividing
* Make surethe disc is loaded correctly (label side is
facing up onthe disc tray)
* Make surethe disc is clear.
* Move theobstacle between player andremote
controller away.
* Point theremote controller at the remote control
sensor.
* Check thebattery.
* Make surethe disc is clear and no any scratch onit.
* For theplayer is controlled by micro-computer, if
encountering problem, switchoff the power first, and
switch on againin a few second, by then if no mistakeis
displayed, the playercould work well.
The main unitwill be in safe mode of it does notrespond
to any operationdue to interference by accident or
strong noise signals,To resolve this problem,you must
pull out thepower cord and plug it in again later 10
seconds.
SAFE MODE
NOTES ON CONDENSATION
Occasionally, condensationmay occur within the device,
resulting in dropsof water formingon the optical pick-up
inside the unit.This is much like the condensationthat
takes place ona glass ofcold water. This condensation
may affect theoverall performance of the machine.
Condensation occurs when:
1) It ismoved from acold area to a warm area.
2) Its surroundingarea is exposed to a sudden change in
temperature, for example,when located near an air
conditioner.
3) In summer, the unit is moved froma hot and humid
environment immediately intoan air-conditioned room.
4) The deviceis in a humid environment.
9. CARE OF DISCS
a. When loadingor removing thediscs, always hold them
by the centerand edge.
B. Do notstick or writeanything on the surface. Protect
discs against any fingerprint.
Protection
Cleaning
Storage
Wipe the discsfrom time to time using a soft cloth.
Always wipe fromthe center toward the edge.
a. Never warpthe discs. Duringno-use periods, store
them in theircases, while shouldbe kept vertically. Do
not expose discsto high temperature, dampness or
extremely low temperature,or else to may cause
damage to thediscs.
b. Do notexpose discs todirect sunlight.
The DVD playercontains laser devices.The top coverof
the DVD moduleacts as aprotective housing. Laser
radiation is dangerouswhen the topcover is removed or
opened. Avoiddirect exposure to beam during serviceor
repair.
-11-

Manufactured under licensefrom Dolby Laboratories.
Dolby , andthe double-D Symbolare trade marks of
Dolby Laboratories.
This product incorporatescopyright protection technology
that is protectedby method claims ofcertain U.S. patents
and other intellectualproperty rights ownedby
Macrovision Corporation andother rights owners.Use of
this copyright protectiontechnology must beauthorized by
Macrovision Corporation, andis intended forhome and
other limited viewinguses only unlessotherwise
authorized by MacrovisionCorporation. Reverse
engineering or disassemblyis prohibited.
10. Technical Specification
Type
TV mode
Disc mode
Resolution
Video S/N ratio
Frequency response
Audio S/N ratio
Dynamic range
Distortion
D/A converter
Video output
S-Video output
Audio output
Digital audio output
Channel
Power voltage
NX-831
PAL/AUTO/NTSC
DVD, VCD,CD, MP3,MPEG4,DIVX, CD-R, JPEG Picture CD
>500 lines
>56dB
20Hz-20KHz+/-1 dB
> 90dB
> 90dB
< 1%
96KHz/24bit
1Vp-p(75 O)
Y: 1Vp-p(75 O) C: 0.3Vp-p(75 O)
2.0V
Coaxial, optical
2
90V-240V~ 50/60 Hz
Specifications are subject tochange without notice.
-12-

NX-831
ESCANEO PROGRESIVO
IMPORTANTE:
LEER EL MANUAL COMPLETAMENTE ANTES
DE INSTALAR Y OPERAR ESTE PRODUCTO.
CONSERVAR EL MANUAL PARA FUTURAS
REFERENCIAS.
MANUAL DE OPERACIÓN
REPRODUCTOR DE DISCO
VERSÁTIL DIGITAL (DVD)
CON ESCANEO PROGRESIVO

INFORMACIÓN DE SEGURIDAD
Estimados Clientes
Aprovechamos la oportunidad para agradecerle la compra de este reproductor de DVD.
Recomendamos leer cuidadosamente las instrucciones de operación antes de operar la
unidad y tomar en cuenta todas las precauciones.
Nota:
Este reproductor de DVD solo debe usarse con una fuente de alimentación de 90 - 240 V~
50/60 Hz
Precaución:
= ES TE R EP RO DU CT OR E S UN P RO DU CT O LÁ SE R CL AS E 1. SIN EMBARGO EL
REPRODUCTOR EMITE UN LÁSER INVISIBLE QUE PUEDE CAUSAR EXPOSICIÓN A
RADIA CI ÓN L ÁS ER P EL IGROS A. A SE GU RAR SE DE O PER AR EL R EPR OD UC TOR
ADECUADAMENTE DE ACUERDO A LAS INSTRUCCIONES, NO ABRIR EL GABINETE NI
LA CUBIERTA SUPERIOR.
= CUANDO EL REPRODUCTOR ES ENCENDIDO, NO COLOCAR LOS OJOS CERCA DE
L A S A B E R T U R A S D E L A B A N D E J A D E L D I S C O O D E O T R A S A B E R T U R A S P A R A
OBSERVAR HACIA EL INTERIOR DEL REPRODUCTOR.
= C U A N D O E L R E P R O D U C T O R E S E N C E N D I D O , N O R E T I R A R L A C U B I E R T A
PROTECTORA DEL EL CAPTADOR ÓPTICO LÁSER, EL RAYO LÁSER ROJO EMITIDO
PUEDE DAÑAR LOS OJOS, ESPECIALMENTE A LOS NUÑOS CUANDO MIRAN HACIA
EL CAPTADOR ÓPTICO LÁSER. COLOCAR LA CUBIERTA PROTECTORA CUANDO EL
CAPTADOR ÓPTICO ESTA EN MODO DE NO OPERACIÓN.
= PU E D E HA B ER R A D IA C IÓ N L Á SE R P ELI G RO S A SI NO S I GU E L OS MÉ T OD O S
INDICADOS EN ESTE MANUAL PARA LA OPERACIÓN, AJUSTE O CONTROL.
= TODO SERVICIO DE MANTENIMIENTO O REPARACIÓN DEBE SER REFERIDO AL
CENTRO DE SERVICIO AUTORIZADO.
Protección de copiado:
Este reproductor de DVD apoya a la protección de copia de Macrovision. Los discos DVD
que incluyen el código de protección de copia, si el contenido del disco DVD es copiado
usando una videocasetera, el código de protección de copiado previene la copia de la
videocinta de la reproducción normal.
Este reproductor cuenta con las patentes americanas ,631,603.4,577,216.4,819,098 y
4,907,093 autorizadas para uso limitado.
Este reproductor de DVD incorpora la tecnología de derechos de autor protegido por las
le ye s de E .U .A .. L as p at en tes y otros d er ec ho s de d er ec ho s de a ut or p ro pi edad de
Macrovision Corporation y otros derechos de autor. El uso de estos derechos de autor
debe ser autorizada por Macrovision Corporation y esta diseñada para el hogar y otros
usos limitados a menos que exista una autorización por Macrovision Corporation. La
reingeniería o el desensamblado del reproductor esta prohibido.

ÍNDICE
1. Breve instrucción de los controles
2. Preparación
2.1 Accesorios
2.2 Instalación de las baterías en el control remoto
2.3 Conexión del sistema
2.4 Ajuste del modo de reproducción
3. Operación Básica
3.1 Reproducción de un disco
4. Descripción de las funciones
4.1 Despliegue en pantalla "OSD"
4.2 Sistema "N/P"
4.3 Subtitulo
4.4 Ángulo
4.5 Audio
4.6 Titulo
4.7 Menú
4.8 Botones de dirección
4.9 Botones numéricos
4.10 Repetir una sección A-B
4.11 Repetir
4.12 Acercamiento
4.13 Volumen y silencio
4.14 Izquierdo/Derecho "L/R"
4.15 Programa
4.16 Lento
5. Ajustes del sistema
6. Función MP3
7. JPEG
8. Guía para la solución de problemas
9. Cuidado de los discos
10. Especificaciones técnicas
1
3
3
3
3
4
4
4
5
5
5
5
5
5
5
5
5
5
5
5
5
5
5
6
6
10
10
11
11
12
6

- 1 -
1. Breve instrucción de los controles
Panel frontal:
Panel posterior:
OPEN/CLOSE PLAY/PAUSE STOP
POWER
NX-831
YPb/Cb Pr/Cr
VIDEO
S-VIDEOCOAXIAL OPTICALL R
AUDIO OUT DIGITAL OUT DIGITAL OUTVIDEO OUT
2
3
Conector de salida izquierda para 2 canales
1
Conector de salida derecha para 2 canales
Conector de salida compuesta para escaneo progresivo
1 2 3 4 5
12
34 5
6.Detener "<"
5.Botón de Reproducir/Pausar "4;"
4.Botón de Abrir/Cerrar "OPEN/CLOSE"
3.Sensor"IR"
6
6
1.Bandeja del disco
2.Interruptor de poder "POWER"
7
5
6
Conector de salida Coaxial de señal digital
4
Conector de salida de S-Video
Conector de salida de Video
Conector de salida Optica de señal digital
7

- 2 -
Control Remoto
VIDEO
BOTONES NUMERICOS
DESPLIEGUE EN PANTALLA
REPETIR UNA SECCIÓN A-B
REPETIR
ENTRAR
ACERCAMIENTO
SILENCIO
VOL+/VOL-
REPRODUCIR/PAUSAR
DETENER
LENTO
BOTONES DE DIRECCIÓN(3456)
AUDIO
ESPERA
SUBTITULO
NTSC/PAL
AJUSTES
PROGRAMACION
MENU
TITULO
REGRESO RAPIDO PREVIO
SIGUIENTE
ABRIR/CERRAR
ANGULO
IR
AVANCE RAPIDO
IZQ/DER
PASOS
CONTROLDEREPRODUCCIÓN
REGRESAR
STANDBY
10+
9
654
321
0
7 8
ANGLE
PROG
MENU
ENTER
SETUP
REV FWD PREV NEXT
RETURN REPEAT STEP GOTO
SLOW VIDEO
VOL- VOL+
PLA
Y/P
AUS
E
L/R
MUTEA-B
N/P
OSD
TITLE
OPEN/CLOSE
AUDIO
SUBTITLE
ZOOM
STOP
PBC
1
2
3
4
5
6
7
8
9
10
11
12
13
14
15
16
17
18
19
20
21
22
23
24
25
26
27
28
29
30
31
32
Table of contents
Languages:
Other Naxa DVD Player manuals