Naxa ND-861 User manual

R
HDMI DVD PLAYER
INSTRUCTION MANUAL
MODEL:ND-861
PLEASE READ CAREFULLY BEFORE OPERATING

CAUTION
RISK OF ELECTRIC SHOCK
DO NOT OPEN
CAUTION:
• THISDIGITALVIDEODISCPLAYEREMPLOYSA
LASERSYSTEM.
• TOENSUREPROPERUSEOFTHISPRODUCT,
PLEASEREADTHISOWNER`SMANUALCAREFULLY
ANDRETAINFORFUTUREREFERENCE.
• SHOULDTHEUNITREQUIREMAINTENANCE,
CONTACTANAUTHORIZEDSERVICEPROVIDER.
• MISUSEOFCONTROLS,ADJUSTMENTSTOTHE
UNITORTHEPERFORMANCEOFPROCEDURES
OTHERTHANTHOSESPECIFIEDHEREINMAY
RESULTINHAZARDOUSRADIATIONEXPOSURE.
• TOPREVENTDIRECTEXPOSURETOLASER
BEAM,DONOTTRYTOOPENTHEENCLOSURE.
VISIBLELASERRADIATIONMAYBEPRESENT
WHENTHEENCLOSUREISOPENED.
•DONOTSTAREINTOBEAM.
WARNING:
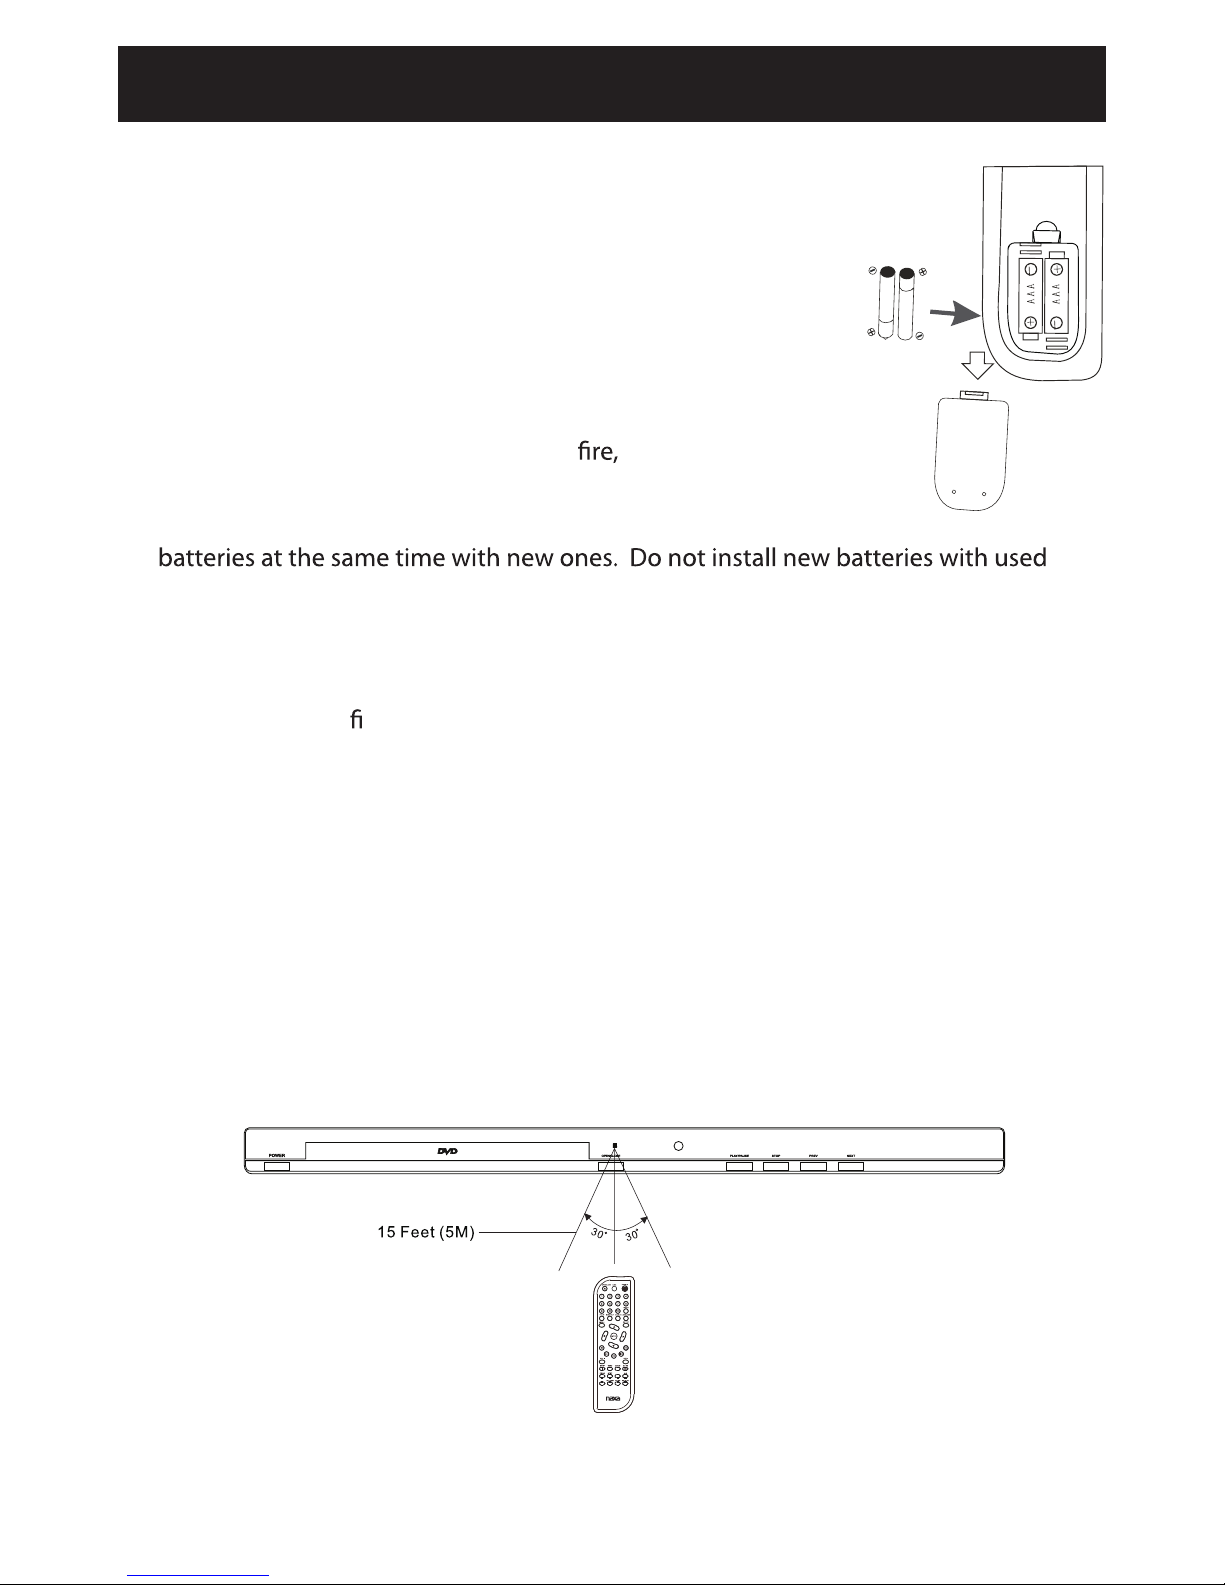
TOREDUCETHERISKOFFIREORELECTRICSHOCK,
DONOTEXPOSETHISPRODUCTTORAINOR
MOISTURE.
WARNING:
TOREDUCETHERISKOFFIREORELECTRIC
SHOCK,ANDANNOYINGINTERFERENCE,USETHE
RECOMMENDEDACCESSORIESONLY.
SURGE PROTECTORS:
It is recommended to use a surge protector for AC
connection.LightningandpowersurgesARENOT
covered under warranty for this product.
CAUTION:TOREDUCETHERISKOFELECTRICSHOCK,
DONOTREMOVECOVER(ORBACK).NOUSER-
SERVICEABLEPARTSINSIDE.REFERSERVICINGTO
QUALIFIEDSERVICEPERSONNEL.
The FCC Wants You to Know
This equipment has been tested and found to comply with the
limitsforaClassBdigitaldevice,pursuanttoPart15oftheFCC
Rules.These limits are designed to provide reasonable protection
against harmful interference in a residential installation.
Thisequipmentgenerates,usesandcanradiateradio
frequencyenergyand,ifnotinstalledandusedinaccordance
withtheinstructions,maycauseharmfulinterferenceto
radiocommunications.However,thereisnoguaranteethat
interference will not occur in a particular installation.
If this equipment does cause harmful interference to radio or
televisionreception,whichcanbedeterminedbyturningthe
equipmentoffandon,theuserisencouragedtotrytocorrect
the interference by one or more of the following measures:
•Reorientorrelocatethereceivingantenna.
•Increasetheseparationbetweentheequipmentand
receiver.
•Connecttheequipmentintoanoutletonacircuitdifferent
from that to which the receiver is connected.
•Consultthedealeroranexperiencedradio/TVtechnicianfor
additional suggestions.
Anychangesormodicationsnotexpresslyapprovedby
the party responsible for compliance could void the user’s
authority to operate the equipment.Where shielded interface
cables have been provided with the product or specified
additional components or accessories elsewhere defined to
beusedwiththeinstallationoftheproduct,theymustbe
used in order to ensure compliance with FCC regulation.
The lightning flash with arrowhead symbol within an equilateral
triangle is intended to alert the user to the presence of uninsulated
dangerous voltage within the product’s enclosure that may be of
sufficient magnitude to constitute a risk of electric shock to persons.
Theexclamationpointwithinanequilateraltriangleisintended
to alert the user to the presence of important operating and
maintenance (servicing) instructions in the literature accompanying
the appliance.
DANGER:Invisibleandhazardouslaserradiationwhenopenand
interlockfailedordefeated.Avoiddirectexposuretobeam.
WARNING:
USEUNDERSUPERVISIONOFANADULTDUETOLONGCORD
ThisunithasalongACcordorotherlongcordthatcaneasilybetrippedonorpulledon,causinginjury,
Pleasemakesureitisarrangedsoitwillnotdrapeoveratabletop,etc.whereitcanbepulledonby
children or tripped over accidentally.
EXERCISE CAUTION AS UNIT HAS SHARP POINTS.
Manufactured under license from Dolby Laboratories.
Dolby and the double-D symbol are trademarks of Dolby Laboratories.
1
Important Safety Instructions

Beforeusingtheunit,besuretoreadalloperatinginstructionscarefully.Pleasenotethatthesearegeneral
precautionsandmaynotpertaintoyourunit.Forexample,thisunitmaynothavethecapabilitytobe
connected to an outdoor antenna.
1) Read these instructions.
All the safety and operating instructions should be read before the product is operated.
2) Keep these instructions.
The safety and operating instructions should be retained for future reference.
3) Heed all warnings.
All warnings on the product and in the operating instructions should be adhered to.
4) Follow all instructions.
All operating and use instructions should be followed.
5) Do not use this apparatus near water.
Donotusethisproductnearwaterandmoisture,forexample:nearabathtub,washbowl,kitchensinkor
laundry tub; in a wet basement; or near a swimming pool.
6) Clean only with dry cloth.
Unplug this product from the wall outlet before cleaning. Do not use liquid cleaners or aerosol cleaners.
Use a dry cloth for cleaning.
7) Do not block any ventilation openings. Install in accordance with the manufacturers instructions.
Slots and openings in the cabinet and in the back or bottom are provided for ventilation to ensure reliable
operation of the product and to protect it from overheating. These openings must not be blocked or
covered.Theopeningsshouldneverbeblockedbyplacingtheproductonabed,sofa,rugorothersimilar
surface. This product should never be placed near or over a radiator or heat source.This product should not
be placed in a built-in installation such as a bookcase or rack unless proper ventilation is provided or the
manufacturer’s instructions have been adhered to.
8) Do not install near any heat sources such as radiators, heat registers, stoves, or other apparatus
(including amplifiers) that produce heat.
9) Do not defeat the safety purpose of the polarized or grounding-type plug. A polarized plug has two
blades with one wider than the other. A grounding type plug has two blades and a third grounding
prong. The wide blade or the third prong are provided for your safety. If the provided plug does not
fit into your outlet, consult an electrician for replacement of the obsolete outlet.
10) Protect the power cord from being walked on or pinched particularly at plugs, convenience
receptacles, and the point where they exit from the apparatus.
11) Only use attachments/accessories specified by the manufacturer.
12) Use only with the cart, stand, tripod, bracket, or table specified by the manufacturer,
or sold with the apparatus. When a cart is used, use caution when moving the cart/
apparatus combination to avoid injury from tip-over.
Anapplianceandcartcombinationshouldbemovedwithcare.Quickstop,excessiveforce
and uneven surfaces may cause the appliance and cart combination to overturn.
13) Unplug this apparatus during lightning storms or when unused for long periods of time.
Toprotectyourproductfromalightningstorm,orwhenitisleftunattendedandunusedforlongperiods
oftime,unplugitfromthewalloutletanddisconnecttheantennaorcablesystem.Thiswillprevent
damage to the product due to lightning and power-line surges.
14) Refer all servicing to qualified service personnel. Servicing is required when the apparatus has
been damaged in any way, such as power-supply cord or plug is damaged, liquid has been spilled or
objects have fallen into the apparatus, the apparatus has been exposed to rain or moisture or does
not operate normally, or has been dropped.
15) Power source
This product should be operated only from the type of power source indicated on the marking label.
Ifyouarenotsureofthetypeofpowersupplytoyourhome,consultyourappliancedealerorlocalpower
company.
Forproductsintendedtooperatefrombatterypower,orothersource,refertotheoperationinstructions.
16) Power lines
An outside antenna system should not be located in the vicinity of overhead power lines or other electric
lightorpowercircuits,orwhereitcanfallintosuchpowerlinesorcircuits.Wheninstallinganoutside
antennasystem,extremecareshouldbetakentokeepfromtouchingsuchpowerlinesorcircuitsas
contact with them might be fatal. 2
Important Safety Instructions

17) Overloading
Donotoverloadwalloutletsandextensioncordsasthiscanresultinariskofreorelectricshock.
18) Object and liquid entry
Neverpushobjectsofanykindintotheproductthroughopeningsastheymaytouchdangerousvoltage
pointsorshortoutpartsthatcouldresultinreorelectricshock.Neverspillorsprayanytypeofliquidon
the product.
19) Outdoor antenna grounding
Ifanoutsideantennaisconnectedtotheproduct,be
sure the antenna system is grounded so as to provide
some protection against voltage surges and built up
staticcharges.Section810oftheNationalElectricCode
ANSI/NFPA70providesinformationwithrespectto
propergroundingofthemastandsupportingstructure,
grounding of the lead-in wire to an antenna discharge
product,sizeofgroundingconductors,locationof
antenna-dischargeproduct,connectiontogrounding
electrodes and requirements for the grounding
electrodes.
20) Service
Donotattempttoservicethisproductyourselfasopeningorremovingcoversmayexposeyouto
dangerousvoltageorotherhazards.Referallservicingtoqualiedservicepersonnel.
21) Replacement parts
Whenreplacementpartsarerequired,besuretheservicetechnicianusesreplacementpartsspecied
bythemanufacturerorthosethathavethesamecharacteristicsastheoriginalparts.Unauthorized
substitutionsmayresultinreorelectricshockorotherhazards.
22) Safety check
Uponcompletionofanyserviceorrepairstothisproduct,asktheservicetechniciantoperformsafety
checks to determine that the product is in proper operating condition.
23) Wall or ceiling mounting
The product should be mounted to a wall or ceiling only as recommended by the manufacturer.
24) Damage requiring service
Unplug this product from the wall outlet and refer service to qualified service personnel under the
following conditions.
a) When the power-supply cord or plug is damaged.
b) Ifliquidhasbeenspilledorobjectshavefallenintotheproduct.
c) Iftheproducthasbeenexposedtorainorwater.
d) Iftheproductdoesnotoperatenormallybyfollowingtheoperatinginstructions.Adjustonlythose
controlsthatarecoveredbytheoperatinginstructions,asanadjustmentofothercontrolsmayresult
indamageandwillrequireextensiveworkbyaqualiedtechniciantorestoretheproducttoits
normal operation.
e) If the product has been dropped or the cabinet has been damaged.
f) Whentheproductexhibitsadistinctchangeinperformance-thisindicatesaneedforservice.
25) Note to CATV system installer
ThisreminderisprovidedtocalltheCATVsysteminstaller’sattentiontoArticle820-40oftheNECthat
providesguidelinesforpropergroundingand,inparticular,speciesthatthecablegroundshallbe
connectedtothegroundingsystemofthebuilding,asclosetothepointofcableentryaspractical.
NOTE:
Refer all servicing to qualified service personnel. Servicing is required when the unit has been damaged
in any way such as the following: the power-supply cordor plug has been damaged, liquid has been
spilled into unit, the unit has been exposed to rain or moisture, the unit has been dropped or the unit
does not operate normally.
3
Important Safety Instructions

NOTES ON HANDLING:
• WhenshippingtheDVDplayer,alwaysusethe
original shipping carton and packing materials.
Formaximumprotection,repacktheunitasit
was originally packed at the factory.
• Donotusevolatileliquids,suchasinsect
spray,neartheDVDplayer.Donotleave
rubber or plastic products in contact with the
DVD player for a long time. They will leave
marks on the finish.
• The top and rear panels of the DVD player
may become warm after a long period of use.
This is normal and not a malfunction.
• WhentheDVDplayerisnotinuse,besureto
remove the disc and turn off the power.
NOTES ON LOCATING THE DVD
PLAYER:
• When you place this DVD player near a
TV,radioorVCR,theplaybackpicture
may become poor and the sound may be
distorted.Inthiscase,movetheDVDplayer
awayfromtheTV,radioorVCR.
NOTES ON CLEANING:
Useasoft,dryclothforcleaning
• Forstubborndirt,soaktheclothinaweak
detergentsolution,wringwellandwipe.Usea
dry cloth to wipe it dry. Do not use any type
ofsolvent,suchasthinnerandbenzene,asthis
may damage the surface of the DVD player.
• If you use a chemical-saturated cloth to clean
theunit,followthatproduct’sinstructions.
NOTES ON MOISTURE CONDENSATION:
Moisture condensation damages the DVD
player. Please read the following carefully.
• Moisturecondensationoccurs,forexample,when
you pour a cold drink into a glass on a warm day.
Drops of water form on the outside of the glass.
Inthesameway,moisturemaycondenseonthe
opticalpick-uplensinsidethisunit,oneofthe
most crucial internal parts of the DVD player.
Moisture condensation occurs during the
following cases:
• When you bring the DVD player directly from a cold
place to a warm place.
• When you use the DVD player in a room where you
justturnedontheheater,oraplacewherethecold
wind from the air conditioner directly hits the unit.
• lnsummer,whenyouusetheDVDplayerinahot
andhumidplacejustafteryoumovedtheunitfrom
an air conditioned room.
• When you use the DVD player in a humid place.
Do not use the DVD player where moisture
condensation may occur.
• lfyouusetheDVDplayerinsuchasituation,itmay
damagediscsandinternalparts.Removethedisc,
connect the power cord of the DVD player to the
walloutlet,turnontheDVDplayerandleaveitON
fortwoorthreehours.Aftertwoorthreehours,the
DVD player will have warmed up and evaporated
any moisture. Keep the DVD player connected to
the wall outlet and moisture condensation will
seldom occur.
Warning:
Cleaningandadjustmentoflensesand/or
other components of playback mechanism
should be performed by a qualified service
technician.
4
Important Safety Instructions

PLAYABLE DISCS:
The following discs can be played back on this DVD player:
DISC TYPES:
DVD
Data on most DVDs is divided into sections called titles and
thenintosubsectionscalledchapters,eachofwhichisgiven
a title or chapter number. Some features of this DVD player
will not operate with some DVD discs as they are preset. If
afunctionyouselecteddoesnotrunasdesired,refertothe
manual accompanying the DVD disc.
Compatible with DVD/DVD±R/DVD±RW/Kodak Picture
JPEG/MP4.
AUDIO CD:
DataonanaudioCDisdividedintosectionscalledtracks,
each of which is given a track number.
Compatible with CD/CD-R/CDRW/MP3.
IMPORTANT:
ItisimportantthatyoureadthemanualthataccompaniestheDVDdisc,astherearefeaturesthat
areontheDVDplayerthatcannotbeusedwithcertainDVDs.Therearealsoextrafeaturesonthe
DVDdiscthataredifferentforeachDVDdisc,sotheyarenotexplainedinthisowner’smanual.
This player conforms to the NTSC and PAL color systems. However, if you are in the USA,
Canada or Mexico, leave this setting on NTSC. If incorrectly set to PAL, theTV picture may roll
Notes on Copyright:
Itisforbiddenbylawtocopy,broadcast,show,broadcastoncable,playinpublicandrent
copyrightedmaterialwithoutpermission.DVDvideodiscsarecopyprotected,andanyrecordings
made from these discs will be distorted. This product incorporates copyright protection technology
that is protected by method claims of certain U.S. Patents and other intellectual property rights
ownedbyMacrovisionCorporation,andisintendedforhomeandotherlimitedviewingusesonly,
unlessotherwiseauthorizedbyMacrovisionCorporation.Reverseengineeringordisassemblyis
prohibited.
Region management information:
This DVD Player is designed and manufactured to respond to the Region Management Information
that is recorded on a DVD disc. If the Region number described on the DVD disc does not
correspondtotheRegionnumberofthisDVDplayer,thisDVDplayercannotplaythatdisc.Youmay
not be able to play back some DVD video discs on this player if they were purchased from outside
yourgeographicareaormadeforbusinesspurposes.Whenyoutrytoplaybackanunauthorized
disc,WrongRegionappearsontheTVscreen.
THEREGIONNUMBERFORTHISDVDPLAYERIS:
See below for information regarding region numbers. 1
vertically. In this case, set the TV system to NTSC accord ngly.i
5
About Discs

Remote Control Receiver
Power On/Standby Button
Stop Button
Digital Coxial Audio Output jack
HDMI Output jack
124
5678
3
9
Power Indicator
Open/Close Button
Disc Tray
Play/Pause Button
Previous Button
Next Button
LR
1
2
3
4567
Power Cable Right Audio Output jack
Composite Video Output jack
Left Audio Output jack
Y/PbCb/PrCr Output jack
6
Product Overview
1
2
3
4
5
6
7
8
9
1
2
3
4
5
6
7

1. ( ) OPEN/CLOSE BUTTON
Opens and closes the disc tray.
3. 0-9 BUTTONS
To locate a title / chapter / track /specific time
10+ Button To select and switch to a track
that is higher than 10.
5. MENU BUTTON
To display the DVD root menu.
7. DIRECTION BUTTONS
Press to navigate and make for
on-screen menus.
ENTER Button
To confirm the selection or current operation.
8. REV / FWD BUTTONS
To perform fast reverse / fast forward playback.
9. PLAY/PAUSE BUTTON )
(
To start and pause the playback.
UTTON
selection
ND-861
WIDE
N/P
1
2
3
4
5
6
7
8
9
10
11
12 13
14 15
16
2. OSD BUTTON
To display the current playback information.
4. TITLE BUTTON
Go to title menu.
6. SUBTITLE BUTTON
To select one of the subtitle languages
programs on a DVD (if available).
10. VOL +/– BUTTONS
To increase and decrease volume.
11. ( )STOP BUTTON
To stop the playback.
12. VIDEO BUTTON
To change the video output mode.
UTTON
To play the contents of the disc in the order you
want by programming the track to be played.
14. STEP BUTTON
To play or move the playback forward frame by
frame.
15. N/PBUTTON
Switch to PAL/NTSC/AUTO TV system.
Return to previous screen.
7
Remote Control
16. RETURN B
13. PROGRAM B

23. MUTE BUTTON
Press to turn off /restore sound output from the player.
28. SLOW BUTTON
speeds.
22.PREV / NEXT BUTTONS
20. SETUP BUTTON
21. ANGLE BUTTON
To switch between multiple camera angles
programmed on a DVD (if available).
24. ZOOM BUTTON
To enlarge a picture on the screen.
25. A-B BUTTON
To repeat the playback from point A to point B
on a disc.
26. WIDE BUTTON
27. REPEAT BUTTON
To toggle between different repeat modes.
To switch the aspect ratio.
17. POWER BUTTON
Turns the power on or restores the DVD player to
standby mode.
18.
To skip directly to a specific time / title / chapter /
track on a DVD.
GOTO BUTTON
19. LANGUAGE BUTTON
Display the audio information or switch the channel.
ND-861
WIDE
N/P
17
18
19
20
21
22
2324
2526
2728
8
Remote Control
Press to toggle between slow motion playback
Press to skip to the previous/next track,
title, or chapter.
Press to access or exit the SETUP menu.

Battery Installation
1. Press the tabs on the back door and lift off.
yrettabehtotniseirettabezisAAAowttresnI.2
3. Replace the battery door.
BATTERY PRECAUTIONS:
•Improper or incorrect use of batteries may cause corrosion
or battery leakage, which could cause personal injury or
damage to property.
•Only use the battery type indicated in this manual.
•When the batteries are exhausted, the remote will not function. Replace both
ones and do not mix different types of batteries.
•Do not dispose of used batteries as domestic waste. Dispose of them in accordance
with local regulations.
HANDLING THE REMOTE CONTROL:
• Take care of your ngernails when you press and hold the battery release tab.
•Do not drop or cause impact to the remote control.
•Do not spill water or any liquid on the remote control.
•Do not place the remote control on a wet object.
•Do not place the remote control under direct sunlight or near sources of excessive
heat.
Remote Control Operation Range
Point the remote control at the DVD player no more than 5 metres from the remote
control sensor and within 60° of the front of the DVD player.The operating distance may
vary depending on the brightness of the room.
ND-86 1
WIDE
N/P
9
Operating the Remote Control
compartment
as shown in the illustration. Match the (+) and (–) polarity
symbol markings inside the battery compartment.
•Remove the batteries from the remote control before storing it for a long period
of time. This will reduce the chance of corrosion or battery leakage which could
result in physical injury and/or property damage including fire.

White
Red
Yellow
Connecting to a Stereo System With a Coaxial Cable
Method 1:
When connecting any external AV device or TV, do not connect the power cable to the
mains power socket until all other connections are complete.
TV
Connecting to a TV With an HDMI Cable
Method 2:
TV
HDMI cable not included
AV cable included
LR
coaxial cable not included
White
Red
Yellow
LR
10
Connections

Method 3:
Connecting to a TV with a Component Cable
Note: Audio Left= white
Audio Right= red
Yellow cable does not input
A/V Cable (included)
White Red Yellow
TV
White
Yellow
Red
LR
11
Connections
Component Video Cable (Y,Pb/Cb,Pr/Cr)(not included)

Method 4:
Connecting to a TV with an AV Cable
Method 5:
Connecting to a Stereo System and TV with an AV Cable
Note:Video=yellow
AudioLeft=white
AudioRight=red
Note:Video=yellow
AudioLeft=white
AudioRight=red
White
Red
Yellow
White
Red
Yellow
Stereo
A/VCable(included)
A/VCable(included)
TV
TV
White
Red
Yellow
LR
White
Red
Yellow
LR
12
Connections

Playback of a DVD
Unless otherwise stated, all operations described are based on Remote Control use.
1. Insert the AC plug from the DVD player to a conveniently located
2. Connect the DVD player to the external TV
Turn on the TV and setit to the input source that the DVD player is connected to.
3. Press the POWERbutton to turn the player on.
4. Pressthe OPEN/CLOSE button to open the disc tray. Place the disc in the center of
tray with the label side face up. Close the tray by pressing the OPEN/CLOSEbutton.
The unit will start playback automatically.
5. Press the STOP button to stop playback. The player will remember the point where
disc was stopped. If you press the button again, playback will start from this
point. To stop playback completely or to start again from the beginning, press the
STOP button twice.
Note: If the player will not be used for a long period of time, turn off the player and
unplug the AC Cord from the wall outlet.
SEARCH (FWD, REV)
During playback, press either the button or the to move the DVD forward or
backward at double (x2) speed to locate a section. Repeatedly press these
buttons and the speed will increase to x4, x8, x16, then resume normal playback.
Resume normal playback by pressing the button on the remote control or the
button on the unit.
Note: This function is not available on all discs.
SKIP (NEXT, PREV)
While a disc is playing, you can skip forward or backward a chapter or track at any time by
pressing the PREVor NEXTbutton.
AC outlet.
x32,
LANGUAGE:
Press the button repeatedly to selected available language/sound channels.
Note: This function is not available on all discs.
SUBTITLE:
Pressthe SUBTITLEbutton repeatedly to select the subtitle language or turn the subtitle
menu off. Note: This function is not available onall discs.
MENU:
Press the MENUbutton; the menu of the current DVD will appear on the screen. Press the
, ,, direction buttons to select the desired option,and then press the ENTER button
to confirm the selection. Note: Thisfunction is not available on all discs.
TITLE
Pressthe TITLEbutton; the title menu of the current DVD will appear on the screen.
Use the , ,, direction buttons to select the desired option, then press the ENTER
button to confirm the selection. Note: This function is not available on all discs.
LANGUAGE
13
Operating System

OSD (ON SCREEN DISPLAY)
During playback,press the OSDbutton repeatedly to read the information of playback status.
ZOOM
During movieplayback,presstheZOOM button repeatedly to zoom in thepicture
ANGLE
If the multi-angle icon
appears on the screen, it means more than one scene is
available on the current DVD. Press the ANGLEbutton repeatedly to select the desired
scenes. Note: This function is not available on all discs.
MUTE
Press the MUTEbutton to temporarily disable sound from the DVD player. Press it again
to restore the sound.
VIDEO
Pressthe VIDEObutton repeatedly to set video output modes.
STEP
During movie playback,press the STEP button repeatedly to play the movie frame by
frame. Resume normal playback by pressing the PLAY/PAUSE button on the remote
control or play/pause button on the unit.
by ZOOM X2, ZOOM X4, then ZOOM X1.
SLOW
During movie playback, press the SLOW button to slow down by x1/2, 1/4,1/8, 1/16, 1/32.
REPEAT
During movie playing, press button to repeat chapter /title/all.
REPEAT
A-B Repeat
Repeat a section between points A and B within a Title / Chapter / Track.
1. Press the A-B button to choose a starting point A.
2. Press the A-B button again to set an ending point B and complete the setting. The
selected section will be repeated from point A to B.
3. Press the A-B button a third time to cancel and exit.
WIDE
During movie playback, press the WIDE button to switch aspect ratio to 4:3PS, 4:3LB or 16:9.
N/P
Press the N/Pbutton to set the TV system to NTSC/PAL/AUTO accordingly.
GOTO
1. During playback, press the GOTObutton to search the title / chapter in the disc.
2. Press the button again to display the search menu.
3. Press the buttons repeatedly to select the select the title / chapter.
4. Press the 0-9, 10+ buttons to select title / chapter.
GOTO
14
Operating System
NOTE: DVD Disc can not be programmed.NOTE: DVD Disc can not be programmed.

15
Programming
2.Press the "PROG" Button to view the Program List screen (see below).
1.During VCD Disc playing, press the MENU Button on remote control repeatedly until "PCB Off"
appears on screen.
3. Use the Direction arrow buttons to select a position in the Program List (e.g., 2), then press the
RIGHT arrow to move to the "Title" column on the right. Select a track (e.g., 01) and press
4. Track 01 will appear on Program List in position 2.
5. After programming, press the "OK" Button to play the programmed tracks as desired.
ENTER to confirm. (Press STOP on the remote to clear any mistakes when programming.)

Press the SETUP button; the setting menu will appear on the screen (see below).
Use the Direction buttons to select and highlight the function you need to adjust.
Press the ENTER button to confirm the selection.
When you are done, press the SETUP button to save your changes and exit.
~Transition Effect: change the photo slideshow effect (Mask, Dissolve, Fade in,
Fade out, or Random).
~Show Type: Change the display mode to Fit Screen (fits the photo to the screen)
or Full Screen (stretches the photo to fill the whole screen).
~Color Tone: Apply a color filter. Normal (none), Black & White, or Classic.
~Browse: Change the way you browse the photos on the disc. Thumbnail (small
picture preview) or File Manage (file names).
Language Setup Page:Language Setup Page:Language Setup Page:
Photo Setting Page:Photo Setting Page:Photo Setting Page:
If OSD (On Screen Display Language), Menu, Audio or Subtitle is selected,
use the direction and ENTER buttons to set the desired language.
16
System Setup
~Interval Time: Select a time to set the interval time for photo playing.

~If TV Standard is selected, use the direction and ENTER buttons to set to
PAL, AUTO or NTSC to match the color system of the connected TV.
(Note: Select AUTO or NTSC in the US, Canada, and Mexico).
~If Display Type is
to 4:3PS (pan & scan), 4:3LB (letterboxed), or 16:9.
~If Video Output is selected, use the direction and ENTER buttons to enable
~If HDMI Resolution is selected, use the direction and ENTER buttons to
adjust the resolution output to match the native resolution of your TV.
~If Sharpness is selected, use the direction and ENTER buttons to adjust
image sharpness.
~If Contrast is selected, use the direction and ENTER buttons to adjust
the contrast level.
~If Brightness is selected, use the direction and ENTER buttons to adjust
to brightness level.
selected, use the direction and ENTER buttons to set the
aspect ratio
Display Setup Page:Display Setup Page:Display Setup Page:Display Setup Page:
17
System Setup
YUV P-SCAN (480p progressive scan)
component video connection (Y, Pb/Cb, Pr/Cr).
/YUV(interlaced scan) when the DVD
player is using the

Audio Setup Page:
1. If Digital Out is selected, use the direction and ENTER buttons to set the output
of the coaxial digital audio connector. Use SPIDF/PCM when connected to a TV
or other device that cannot decode digital audio. Use SPIDF/RAW when
connecting to a stereo system or other device that can decode digital audio.
2. Analog Out default setting is 2 channel (i.e., stereo).
3. If Downmix is selected, use the direction and ENTER buttons to set how the
player processes DVDs encoded with Dolby 5.1 surround sound for simpler
2-speaker environments.
--Lo/Ro: The rear left/right channels are kept separate. The rear left channel will
play on the left speaker; the rear right channel will play on the right speaker.
--Lt/Rt: The rear left/right channels are mixed together. The mixed output will
play on the left and right speakers.
--Auto: the speaker will play automatically without limitation.
Audio Setup Page:Audio Setup Page:Audio Setup Page:
18
System Setup

Custom Setup Page:
3. If Default is selected, use the direction and ENTER buttons to
reset all options to their default setting or press the SETUP button to exit.
Custom Setup Page:Custom Setup Page:Custom Setup Page:
19
System Setup
1. Set the screen saver to On or Off .
2.Angle Mark: when playing a multi-angle disc, set angle mark to on,
the multi-angle effect will be shown on screen.
Table of contents
Other Naxa DVD Player manuals