Naxa NHS-7008 User manual

42” Sound Bar with Bluetooth®
NHS-7008
Instruction Manual
Please read carefully before use and keep for future reference.

Page 2 Naxa Electronics
Table of Contents
Thank You ..................................................................... 3
In the Box ...................................................................... 3
Installing Your Sound Bar............................................ 4
On a Table Top.................................................................................4
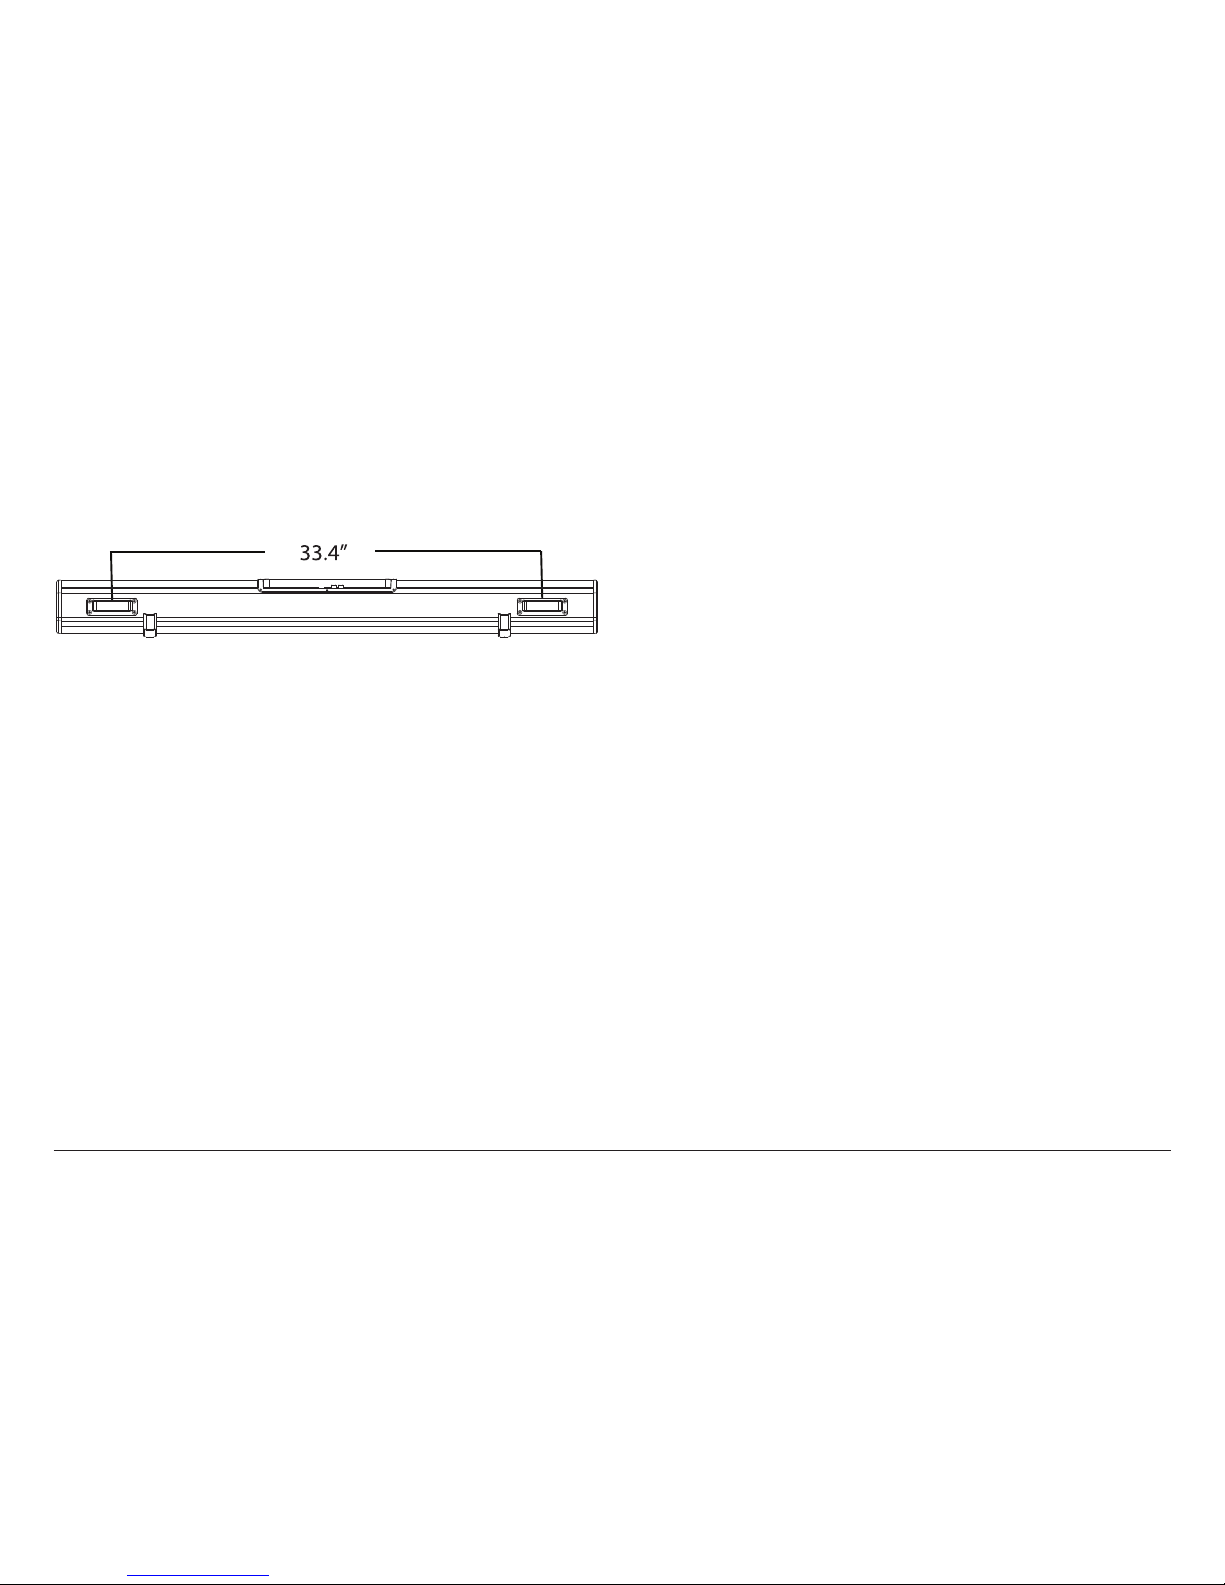
How to Mount the Sound Bar to a Wall......................................4
At a Glance .....................................................................7
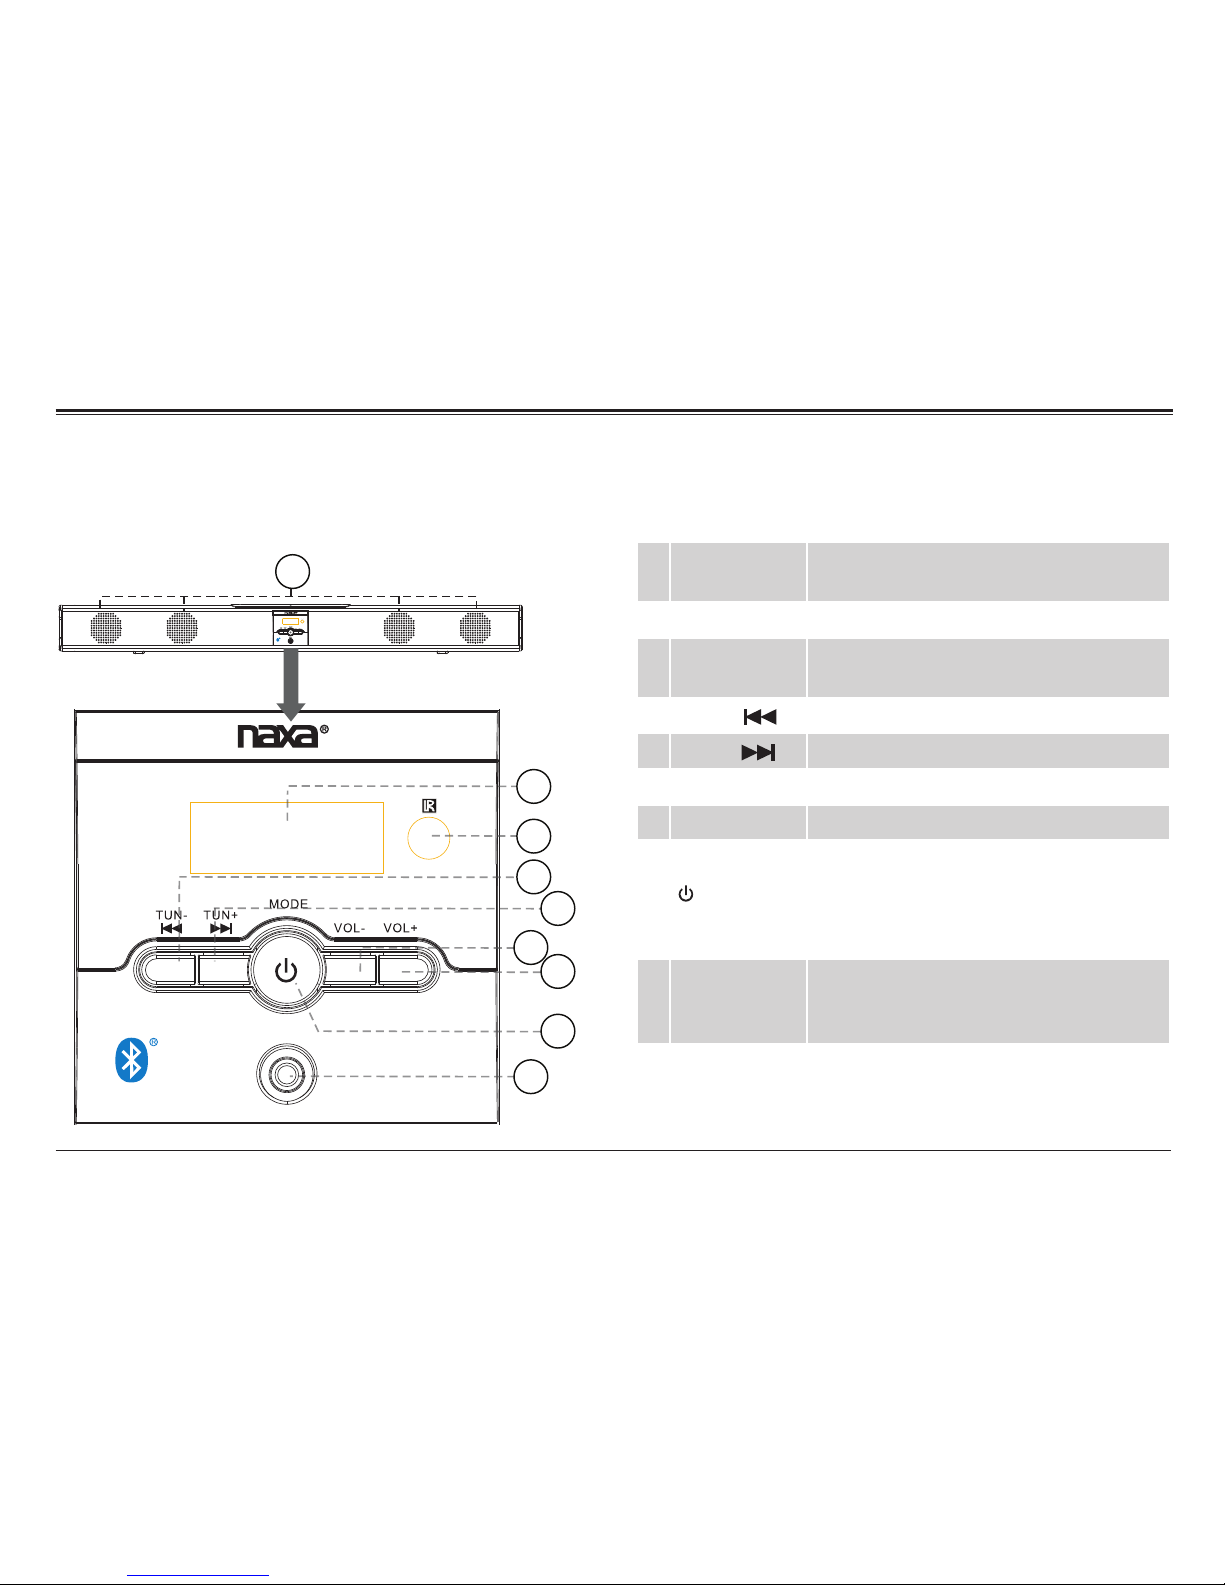
Front View ........................................................................................7
Remote Control.............................................................................. 9
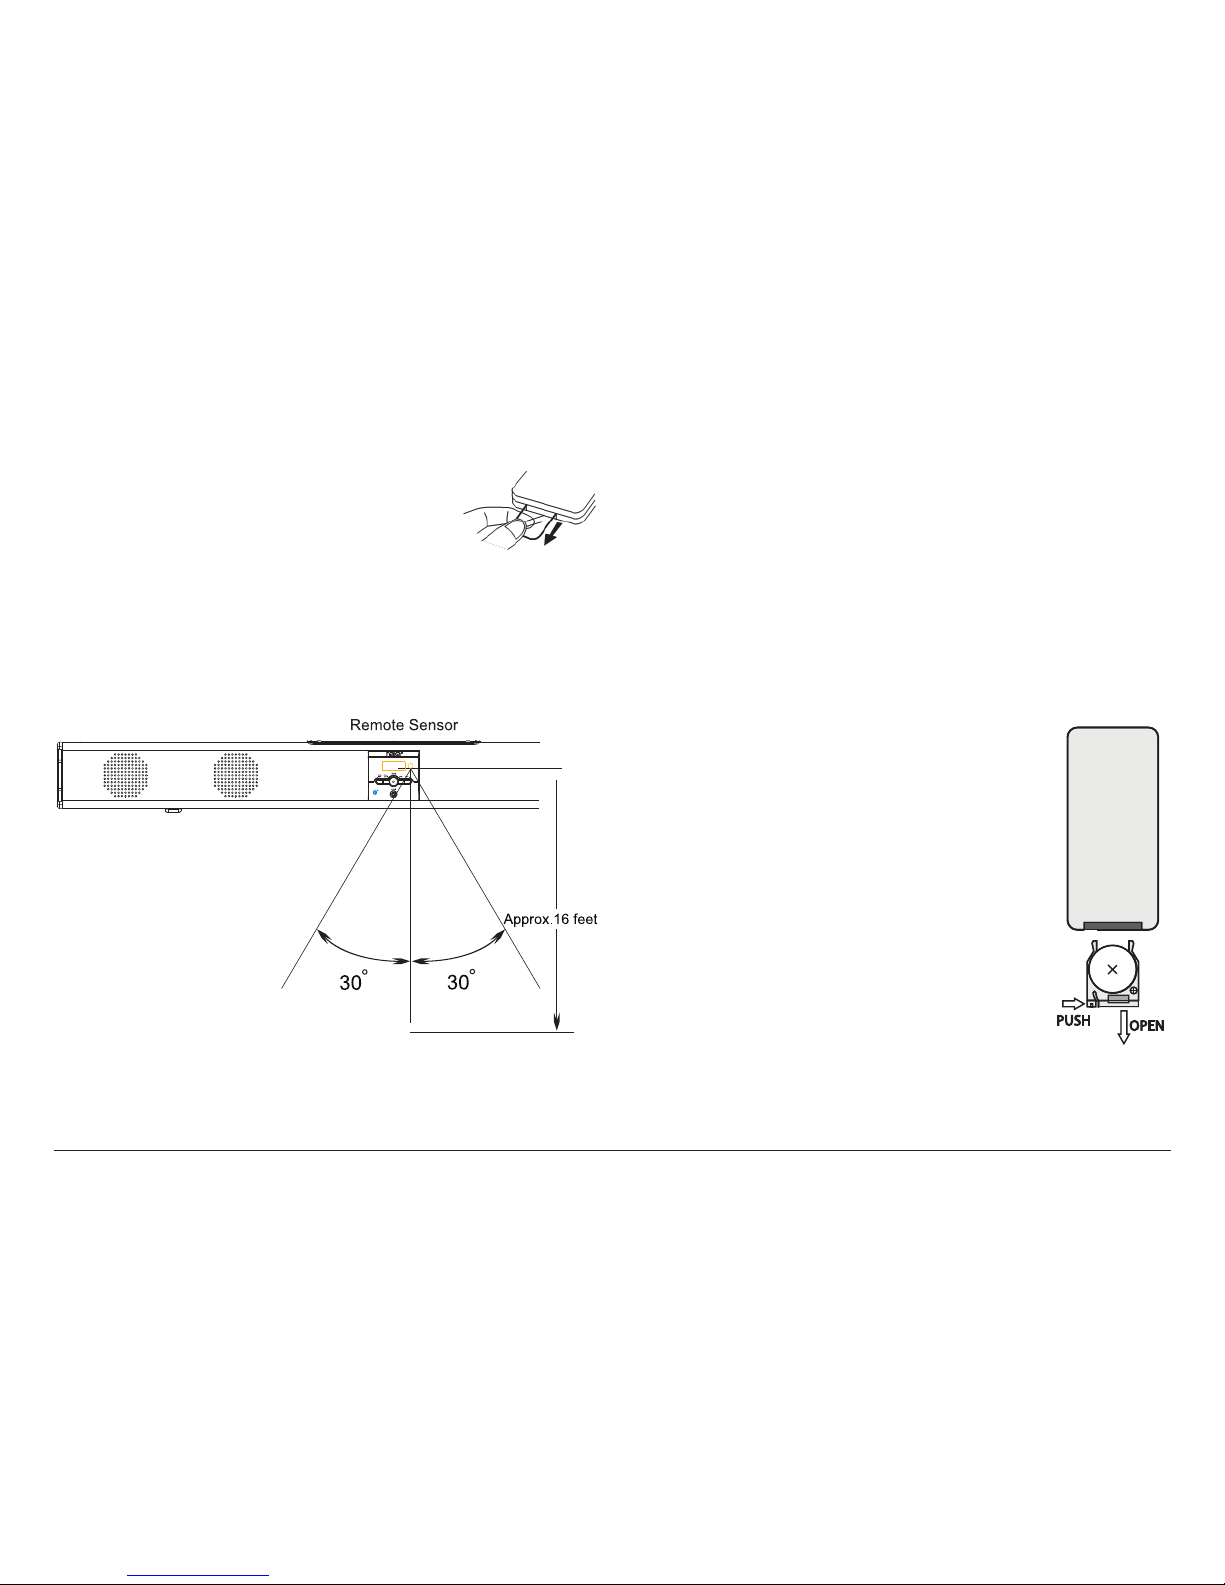
Using the Remote Control..................................................10
Replacing the Battery .........................................................10
Connecting Power........................................................ 11
Getting Started............................................................12
Turning the Unit On and Off .......................................................12
Setting the Time............................................................................12
Setting the Source Mode .............................................................12
Adjusting the Volume...................................................................13
Using FM Radio Mode ..................................................13
FM Radio Controls ........................................................................13
Optimizing FM Radio Reception.................................................13
Automatic Station Scan...............................................................13
Manual Station Preset ................................................................ 14
Using Bluetooth®Mode...............................................14
Pairing a Bluetooth®Device....................................................... 14
NFC One-Touch Setup..................................................................15
Bluetooth®Controls .....................................................................15
Using AUX 1 Mode.........................................................16
Using AUX 2 Mode ........................................................16
Using OPTI Mode.......................................................... 17
Using USB & SD Modes................................................. 17
Warnings and Precautions..........................................18
Troubleshooting Guide............................................... 22
Specications ............................................................. 23
Support ....................................................................... 23

www.naxa.com Page 3
Thank You
We know you have many choices when it comes to
technology; thank you for choosing us here at Naxa
Electronics. Established in 2001 in Los Angeles, Califor-
nia, we are dedicated to delivering products that en-
tertain and delight.
We trust that you will be happy with your purchase.
Please read this manual carefully and save it for refer-
ence. You may also nd the latest FAQ, documentation,
and other product material at our website. Come visit
us on the web at www.naxa.com and see all that we
have to offer!
In the Box
Please take a moment to make sure that you have ev-
erything in the list below. Although we make every ef-
fort to ensure that each Naxa device is securely packed
and sealed, we know a lot can happen in between us
and you. If anything is missing, check back with your
local retailer to get immediate assistance. If they can-
not help you, please contact our Naxa Support team at
www.naxa.com/naxa_support.
•NHS-7008
•AC power adapter
•Wall mount kit
•Remote control
•RCA audio cable
•AUX audio cable
•User manual

Page 4 Naxa Electronics
Installing Your Sound Bar
On a Table Top
Find a at and level surface to place your sound bar.
Most people position the sound bar centered below
their TV.
When placing the Sound Bar on an entertainment cen-
ter, bookshelf, or any type of enclosed space, be sure
to allow space around the Sound Bar for ventilation.
If the Sound Bar is enclosed in a tight space without
adequate ventilation, heat generated by the Sound Bar
could produce a potential heat hazard.
How to Mount the Sound Bar to a
Wall
A wall mounting kit is included in the box for your
convenience. However, each installation environ-
ment is unique and has its own requirements; you may
need additional material to prepare the sound bar for
mounting.
You will need the following:
•Included wall mounting kit (2 wall brackets, 4
screws, 4 drywall plugs)
•Pencil
•Level
•Ruler
•Drill
•Hammer (for drywall installations only)
•Cross-head screwdriver

www.naxa.com Page 5
Naxa Electronics recommends that wall mounting be
performed by a qualied professional installer. Naxa
is not liable for any accidents or damage to property
or the sound bar due to incorrect installation.
1. Using a level and ruler, use a pencil to mark 2 points
on the wall that are 33.4 inches apart. Use the level
to ensure that the points are on the same horizon-
tal plane.
1
2
3
2. Use the wall brackets as a template to mark a sec-
ond set of points on the wall. Make sure the bracket
is level before marking the wall, and that the points
are level with each other.
3. Use the drill to drill a hole at each of the 4 marked
points on the wall. Select a drill bit that is appropriate
for your wall’s construction. If you are using the dry-
wall plugs as directed in step 4, make sure the diam-
eter of the drill bit matches the diameter of the plugs.
4. For drywall installations only; for wood, skip to
step 5: using a hammer, gently insert the drywall
plugs in each of the holes. The plugs should t
completely into the hole, with the tops of the plug
ush with the wall.
(For installations in brick or concrete walls, please
obtain masonry plugs from your local hardware
store.)
5. Use a screwdriver and two screws to afx the left
bracket to the wall, then do the same for the right
bracket. Hand-tighten the screws; do not over-
tighten them! Note the orientation of the hooks
on the bracket in the illustration.
1. Screws
2.Wall bracket
3.Drywall plugs
(optional)

Page 6 Naxa Electronics
6. Make sure that the brackets are stable and rmly
attached to the wall. Locate the mount points on
the rear of the sound bar, then hook the sound bar
onto the brackets.
⚠⚠The wall that the brackets are mounted on
should be of sufcient strength to support
the weight of the sound bar, and the brack-
ets should be perpendicular to the oor.

www.naxa.com Page 7
At a Glance
Front View
AUX 1
1
2
3
4
6
9
8
7
5
1 Speakers Full-range drivers and built-in
subwoofers.
2 Display screen Displays status information.
3 Remote
sensor
Detects signals from the remote control.
4 TUN– / Tuning down, Previous/Reverse
5 TUN+ / Tuning up, Next/Forward
6VOL– Volume down
7 VOL+ Volume up
8 MODE Press to change the active connection
mode (FM, BT, USB, CARD, OPTI, AUX 1,
AUX 2).
Press to turn the unit on and off.
9 AUX 1
connector
AUX 1 mode. 3.5mm stereo connection
for devices with 3.5mm line-out or head-
phone output.

Page 8 Naxa Electronics
10 Power
socket
Connector for the included power adapter.
11 AUX 2
connector
AUX 2 mode. RCA stereo connection for
devices with red and white RCA left/right
audio output.
12 OPTI
connector
OPTI mode. Digital optical audio connec-
tion for devices with optical audio output.
13 USB port USB mode. Load USB memory sticks here.
The USB port is designed for media play-
back from ash memory devices. It is not
designed to charge high-power devices.
14 CARD CARD mode. Load memory cards here.
Refer to the specications for a list of sup-
ported memory card types.
15 ANT Antenna lead. Extend and position the
antenna wire for optimal radio signal
reception.

www.naxa.com Page 9
Remote Control
TUN- TUN+
MODE
Power/standby. Press to turn the
unit on or off (standby).
MODE Mode. Press to change the active
source mode.
Mute. Press to temporarily dis-
able or to restore the sound.
FM SCAN FM scan. Press to nd FM radio
stations within reception range.
TUN– Tuning down. Press to tune to a
lower radio station.
Previous. Press to skip to the
previous track (BT, USB, SD).
TUN+ Tuning up. Press to tune to a
higher radio station.
Next. Press to skip to the next
track (BT, USB, SD).
M+ Memory up. Press to go to the
next FM radio preset station.
EQ Equalizer. Press to change the
audio equalizer preset.
CLOCK
MO/ST
Clock. Press and hold to adjust.
Mono/Stereo. Press to change
between FM mono and stereo
reception mode. Using mono
mode will give you the best
change of receiving stations
from far away.
VOL– Volume down. Press to decrease
the volume level.
VOL+ Volume up. Press to increase the
volume level.
BASS– Bass down. Press to decrease
the bass level.
Pause or resume playback (BT,
USB, SD).
BASS+ Bass up. Press to increase the
bass level.
TREBLE– Treble down. Press to decrease
the treble level.
TREBLE+ Treble up. Press to increase the
treble level.

Page 10 Naxa Electronics
Using the Remote Control
Before using the remote for the rst
time, remove and discard the plastic
insulation tab as shown.
Aim the IR emitter of the remote control at the remote
sensor and then press a key.
The remote control will work within 16 feet of the re-
mote sensor and within 30 degrees from center.
⚠L Obstacles between the unit and transmit-
ter may prevent the remote control from
working. Direct sunlight, incandescent or
uorescent lamps, or any other strong
light shining on the remote sensor of the
unit may prevent the remote control from
working properly.
Replacing the Battery
The remote control is powered by one (1) “CR2025”-
type battery.
1. Squeeze the tab of the battery com-
partment to the right while drawing
the battery tray out.
2. Take note of the orientation of the
existing battery. Replace it with a new
“CR2025” lithium battery, making
sure to match the polarity of the old
battery (as well as the +/- markings
on the remote control.
3. Push the tray back into place.
⚠L The battery in the remote will
last for approximately 1 year. Replace the
battery if the remote control does not

www.naxa.com Page 11
work. Always dispose of batteries accord-
ing to your local municipal regulations.
⚠⚠The batteries used in the remote control
may present a re or chemical burn if
mistreated. Do not recharge, disassemble,
incinerate, or heat the battery (~212°F). Do
not mix old with new batteries, or different
types of batteries. Remove the batteries
from the remote if it will not be used for a
long period of time. Keep batteries away
from children.
Do not spill water on the remote control.
Do not use the remote control for other
equipment at the same time.
Battery Precaution
Heed the following when handling the battery used in this device.
1. Use only the size and type of battery specied.
2. Be sure to install the battery properly by matching the polarities indi-
cated in the battery compartment. Installing a battery with reversed
poles may cause damage to the device.
3. Remove the battery from the device if it is empty or will not be used
for a long time to prevent damage or injury from leakage.
4. Do not charge a battery that is not designed for charging.
Connecting Power
Use the included AC power adapter to connect the unit
to AC household power.
•Connect the two-pronged end of the adapter to a
household power outlet.
•Connect the barrel plug end of the adapter to the
Power socket [10] of the unit.
⚠⚠The adapter supports AC 100-240V power
only. Do not connect the power adapter to
a power outlet other than that which is in-
dicated here and on the rating label of the
power adapter as this may result in the risk
of re or electric shock.
Disconnect the unit from power if it will not
be used for a long time.
Do not handle the power plug with wet
hands. Doing so may cause electric shock.
Do not use the adapter with any other power
source.

Page 12 Naxa Electronics
Getting Started
Turning the Unit On and O
To turn the unit on, press the button [8]. The display
screen [2] will light up.
To place the unit in Standby mode, press the but-
ton on the remote until the display screen [2] shows the
time.
To turn the unit off completely, disconnect the unit
from power.
Setting the Time
The time is shown on the display screen [2] when the
unit is in Standby mode. To set the time:
1. Press and hold the CLOCK/MO/ST button on re-
mote control. The hour digit will blink.
2. Press the TUN- or TUN+ button [4, 5] to adjust the
hour while it is blinking. Press CLOCK/MO/ST to
save the hour; the minutes will blink.
3. Press the TUN- or TUN+ button [4, 5] to adjust the
minutes while it is blinking. Press CLOCK/MO/ST to
save the minutes. The time is now set.
Setting the Source Mode
Press MODE [8] to set the active source mode. This
controls which connection is being used.
The display screen [2] will indicate which mode has
been selected when MODE [8] is pressed.
Display Screen Connection Mode
FM FM radio
BT Bluetooth®
USB USB [13]
CARD SD/SDHC card reader [14]
OPTI Optical audio input [12]
AUX1 3.5mm audio input [9]
AUX2 RCA stereo input [11]

www.naxa.com Page 13
Adjusting the Volume
•Use the VOL– and VOL+ keys [6, 7] to decrease or
increase the volume level, respectively.
•Press the MUTE key on the remote to disable sound
output completely. Press the MUTE key again to
restore sound output.
Using FM Radio Mode
Press MODE [8] to set the active mode to FM.
FM Radio Controls
To do this... ...do this
Tune to a higher frequency Press TUN+
Tune to a lower frequency Press TUN–
Auto-tune to a higher station Press and hold TUN+
Auto-tune to a lower station Press and hold TUN–
Tune to the next preset station Press M+
Toggle between Mono and Stereo
reception modes
Press CLOCK/MO/ST
To do this... ...do this
Save a station to preset memory Press FM SCAN
Scan for stations and auto save
them to preset memory
Press and hold FM
SCAN
Optimizing FM Radio Reception
•Fully extend the FM antenna wire [15] and position
it for best radio reception.
•Use FM mono mode if a radio station is far away
and its signal is weak. Press the CLOCK/MO/ST but-
ton on the remote to change between Mono and
Stereo modes.
Automatic Station Scan
Use the station scan feature to nd stations within
broadcast reception range and save them to preset
memory.
1. Press and hold the FM SCAN button on the remote.
The sound bar will search for and store stations au-
tomatically.

Page 14 Naxa Electronics
Manual Station Preset
To save a station as a preset:
1. Press TUN– or TUN+ to tune to the station you want
to save.
2. Press the FM SCAN button the remote. The display
screen [2] will ash “CH00”.
3. Press M+ on the remote to change the preset sta-
tion (e.g., CH01, CH02).
4. Press FM SCAN to save the station to the selected
preset station.
Using Bluetooth®Mode
Press MODE [8] to set the active mode to BT.
Pairing a Bluetooth®Device
You will need to pair your Bluetooth device with the
sound bar the rst time you use them together.
1. Turn the sound bar on and press MODE [8] to set
the active mode to BT. The sound bar will now be
ready to pair with a device.
2. Use your Bluetooth device to search for avail-
able devices. The sound bar will announce itself as
“NHS-7008.”
3. Select NHS-7008. Use the pairing code “0000” if
your device asks for one.
⚠L Make sure Bluetooth® is enabled on your
device. Please refer to the instructions that
came with your device to learn more about
how to connect it to other Bluetooth devices.
Only one device can be paired with the sound

www.naxa.com Page 15
bar at a time. Disable Bluetooth on other
devices to prevent interference.
NFC One-Touch Setup
If you have a device that is equipped with NFC and
Bluetooth, you can pair the device to the sound bar
with a single tap. It’s just that easy!
1. Place the sound bar in Bluetooth®mode (press the
MODE button [8] until “BT” appears on screen.
2. Locate the NFC sensor on the “NFC” sticker on the
sound bar. Touch the back ofyourdeviceto the sound
bar sensor. The sound bar will detects your device.
3. Your device may ask you for permission to pair with
the sound bar. Select “yes” and pairing is complete!
⚠L Before attempting to use NFC to set up your
Bluetooth connection, make sure that Blue-
tooth and NFC are enabled on your device.
For devices running Android™ OS, you can
nd the NFC option in the “Settings > Wire-
less & Networks > More...” menu screen.
Bluetooth®Controls
To do this... ...do this
Pause or resume playback on a con-
nected device.
Press .
Skip to the next track on a con-
nected Bluetooth device.
Press .
Skip to the previous track on a con-
nected Bluetooth device.
Press .

Page 16 Naxa Electronics
Using AUX 1 Mode
Press MODE [8] to set the active mode to AUX 1.
Use a 3.5mm AUX cable to connect devices with head-
phone out or line out connectors (e.g., smartphones,
MP3 players, portable audio devices).
Operate the external device as directed by its manu-
facturer to control playback.
Using AUX 2 Mode
Press MODE [8] to set the active mode to AUX 2.
Use an RCA stereo patch cable to connect devices with
white and red RCA stereo out connectors (e.g., TVs,
DVD players, camcorders, Hi-Fi stereo and home the-
ater components).
USB SD/MMC
OP TICA L IN
AUX 2
DC 16V
Operate the external device as directed by its manu-
facturer to control playback.

www.naxa.com Page 17
Using OPTI Mode
Press MODE [8] to set the active mode to OPTI.
Use a optical audio patch cable to connect devices with
a optical audio out connector (e.g., TVs, DVRs, Hi-Fi
stereo and home theater components).
Operate the external device as directed by its manu-
facturer to control playback.
⚠L This optical connection only supports the
uncompressed PCM signal format.
Using USB & SD Modes
Install a USB drive or SD memory card and then press
MODE [8] to set the active mode to USB or SD.
Install a compatible USB drive or memory card with
music les on it. Please refer to the Specications sec-
tion to learn more about compatibility.
⚠L Music les must be saved to the root direc-
tory. The sound bar will not play les that
are saved in a folder.
To do this... ...do this
Pause or resume playback. Press .
Skip to the next track. Press .
Skip to the previous track. Press .

Page 18 Naxa Electronics
Warnings and Precautions
The lightning ash with arrowhead symbol within an equilateral
triangle is intended to alert the user to the presence of unin-
sulated “dangerous voltage” within the product’s enclosure that
may be of signicant magnitude to constitute risk of electric
shock
The exclamation point within an equilateral triangle is intended
to alert the userto the presence of important operation and ser-
vicing instructions in the literature accompanying the appliance.
CAUTION
• Do not block the ventilation openings or holes.
• Do not place any naked ames (such as lighted candles) on the ap-
paratus.
• When discarding batteries, follow all local rules and laws governing the
disposal of batteries. Consider the environmental impact of your actions!
• To prevent re or shock hazard, do not expose this appliance to rain
or moisture.
Important Safety Information
1. Read Instructions: All the safety and operating instructions should be
read before the product is operated.
2. Retain Instructions: The safety and operating instruction should be
retained for future reference.
3. Heed Warnings: All warnings on the product and in the operating in-
structions should be adhered to.
4. Follow Instructions: All operating and usage instructions should be
followed.
5. Cleaning: Unplug this product from the wall outlet before cleaning.
Do not use liquid cleaners or aerosol cleaners. Use a damp cloth for
cleaning.
6. Attachments: Use only attachments recommended by the manufac-
turer. Use of other attachments may be hazardous.
7. Water and Moisture: Do not use this product near water (e.g., near a
bathtub, washbowl, kitchen sink, laundry tub, in wet basements, or
near a swimming pool and the like).
8. Accessories: Do not place this product on an unstable cart, stand, tri-
pod, bracket, or table. Use only with carts, stands, tripods, brackets,
or tables recommended by the manufacturer or sold with the product.
Any mounting of the product should follow the manufacturer’s in-
structions and should use a mounting accessory recommended by the
manufacturer. A product and cart combination should be moved with
care. Quick stops, excessive force, and uneven surfaces may cause the
product and cart combination to overturn.
9. Ventilation: Slots and openings in the cabinet are provided for ven-
tilation to ensure reliable operation of the product and to protect it

www.naxa.com Page 19
from overheating. These openings should never be blocked by placing
the product on a bed, sofa, rug, or other similar surface. This product
should not be placed in a built-in installation such as a bookcase or
rack unless proper ventilation is provided or the manufacturer in-
structions have been adhered to.
10. Power Sources: This product should be operated only from the type of
power source indicated on the rating label. If you are not sure of the
type of power supply to your home, consult your product dealer or
local power company. For products intended to operate from battery
power or other sources, refer to the operating instructions.
11. Grounding or Polarization: This product may be equipped with a po-
larized alternating-current line plug that has one blade wider than
the other. This plug will only t into the power outlet in one direction.
This is a safety feature. If you are unable to insert the plug fully into
the outlet, try reversing the direction of the plug. If the plug should
still fail to t, contact an electrician to replace the obsolete outlet. Do
not defeat the safety purpose of the polarized plug.
12. Power-Cord Protection: Power supply cords should be routed so that
they are not likely to be walked on or pinched by items placed upon
or against them, paying particular attention to cords at plugs, con-
venience receptacles, and at the point which they exit
from the product.
13. Protective Attachment Plug: The product may be
equipped with an attachment plug with overload
protection. This is a safety feature. See the operat-
ing instructions for replacement or directions to re-
set the protective device. If replacement of the plug is
required, be sure the service technician has used a replace-
ment plug that has the same overload protection as the original plug as
specied by the manufacturer.
14. Outdoor Antenna Grounding: If an outside antenna is connected to
the product, be sure the antenna system is grounded so as to provide
some protection against voltage surges and built-up static charges.
Article 810 of the National Electrical Code, ANS/NFPA 70 provides in-
formation with regard to proper grounding of the mast and support-
ing structure,grounding of the lead-in wire to an antenna-discharge
unit, size of grounding conductors, location of antenna-discharge
unit, connection to grounding electrodes, and requirements for the
grounding electrode (see gure).
15. Lightning: For added protection for this product, unplug it from the
wall outlet and disconnect the antenna or cable system during a
lightning storm or when it is left unattended and unused for long pe-
riods of time. This will prevent damage to the product due to lightning
or power-line surges.
16. Power Lines: An outside antenna system should not be located in the
vicinity of overhead power lines or other electric light or power cir-
cuits, or where it can fall into such power lines or circuits. When in-

Page 20 Naxa Electronics
stalling an outside antenna system, extreme care should be taken to
keep from touching such power lines or circuits, as contact with them
might be fatal.
17. Overloading: Do not overload wall outlets, extension cords, or inte-
gral convenience receptacles as this can result in a risk of re or elec-
tric shock.
18. Object and Liquid Entry: Never push objects of anykind into this prod-
uct through openings as they may touch dangerous voltage points or
short-out parts that could result in a re or electric shock. Never spill
liquid of any kind on the product.
19. Servicing: Do not attempt to service this product yourself as open-
ing or removing covers may expose you to dangerous voltage or other
hazards. Refer all servicing to qualied service personnel.
20. Damage Requiring Service: Unplug this product from the wall outlet
and refer servicing to qualied service personnel under the follow-
ing conditions: a) when the power-supply or plug is damaged; b) if
liquid has been spilled or if objects have fallen into the product; c) if
the product has been exposed to rain or water; d) if the product does
not operate normally by following the operating instructions. Adjust
only those controls that are covered by the operating instructions as
improper adjustment of other controls may result in damage and will
often require extensive work by a qualied technician to restore the
product to its normal operation; e) if the product has been dropped or
damaged in any way; f) when the product exhibits a distinct change in
performance—this indicates a need for service.
21. Replacement Parts: When replacement parts are required, be sure
that your service technician has used replacement parts specied
by the manufacturer or have the same characteristics as the original
part. Unauthorized substitutions may result in re, electric shock, or
other hazards.
22. Safety Check: Upon completion of any service or repairs to this
product,ask the service technician to perform safety checks to ensure
that the product is in proper operating condition.
23. Wall or Ceiling Mounting: The product should be mounted to a wall or
ceiling only as recommended by the manufacturer.
24. Heat: The product should be situated away from heat sources such as
radiators,heat registers, stoves, or other products (including ampli-
ers) that produce heat.
WARNING:
This product contains lead, a chemical known to the State of California to
cause cancer and birth defects or other reproductive harm. Wash hands
after handling.
FCC NOTICE
This device complies with Part 15 of the FCC Rules. Operation is subject
to the following two conditions: (1) this device may not cause harmful
interference, and (2) this device must accept any interference received,
including interference that may cause undesired operation.
Note: This equipment has been tested and found to comply with the lim-
its for a Class B digital device, pursuant to Part 15 of the FCC Rules. These
limits are designed to provide reasonable protection against harmful in-
terference in a residential installation. This equipment generates, uses
and can radiate radio frequency energy and, if not installed and used in
accordance with the instructions, may cause harmful interference to ra-
dio communications. However, there is no guarantee that interference
will not occur in a particular installation. If this equipment does cause
harmful interference to radio or television reception, which can be de-
termined by turning the equipment off and on, the user is encouraged to
try to correct the interference by one or more of the following measures:
Table of contents
Other Naxa Speakers System manuals