NEC NP01LK User manual

Support Kit Handling Instructions
Model NP01LK
サポートキット取扱説明書
型名 NP01LK
支撑套件操作说明书
型号 NP01LK

2
CONTENTS
Introduction ...................................................................3
CAUTION .........................................................................4
Things to prepare.........................................................4
Included items...............................................................5
Preparation.....................................................................6
How to install the support kit..................................7
Adjusting the focus ...................................................14
Throw distance............................................................17
目次
はじめに..........................................................................3
注意...................................................................................4
用意するもの.................................................................4
同梱品..............................................................................5
準備...................................................................................6
サポートキットの取り付け方...................................7
フォーカス調整...........................................................14
投写距離 .......................................................................17
目录
介绍...................................................................................3
注意...................................................................................4
需要准备的事项 ...........................................................4
内含物品..........................................................................5
准备工作 .......................................................................... 6
如何安装支撑套件.......................................................7
调整焦距........................................................................14
投射距离 .......................................................................17

3
(English)
Introduction
This is the handling instructions of the support kit for the fixed focus lens, NP44ML, describing
how to attach the support kit and how to adjust the focus.
This instructions also includes tables of throw distances of the lens unit mounted on the projector.
About the procedures for mounting the lens unit, please refer to the projector User’s Manual.
Supported projectors
PA803U/PA723U/PA653U/PA853W/PA703W/PA903X/PA803UL/PA703UL/PA653UL
NOTE:
• TheNP44MLlensdoesnotsupporttheLensShiftfunction.WhentheNP44MLlensismount-
ed to the projector, the lens shift function will not work.
• Illustrationsonthisinstructionsmayslightlydierfromtheactualproducts.
(日本語 )
はじめに
本書は、固定焦点レンズ NP44ML 用サポートキットの説明書です。
本書では、サポートキットの取り付け方法とフォーカスの調整方法について説明しています。
また、レンズユニットをプロジェクターに取り付けた時の投写距離表を掲載しています。
レンズユニットの取り付け方法は、プロジェクターの取扱説明書をご覧ください。
対応プロジェクター
NP-PA803UJL/NP-PA723UJL/NP-PA653UJL/NP-PA853WJL/NP-PA703WJL/NP-PA903XJL
NP-PA803ULJL/NP-PA703ULJL/NP-PA653ULJL
注意 :
・NP44ML はレンズシフトには対応していません。プロジェクターに NP44ML を取り付け
た場合、レンズシフトは動作しません。
•本書のイラストは実際の製品と多少異なる場合があります。
(中文 )
介绍
此为定焦镜头 NP44ML 支撑套件的操作说明书,其对如何安装支撑套件以及如何调整焦点进行
了说明。
本说明书还包括安装在投影机上的镜头单元的投射距离表。
有关安装镜头部分的步骤,请参阅投影机用户手册。
支撑的投影机
NP-PA803U+/NP-PA653U+/NP-PA853W+/NP-PA753W+/NP-PA703W+/NP-PA653W+/NP-PA903X+/
NP-PA803X+/NP-PA703X+/NP-PA803UL+/NP-PA703UL+/NP-PA653UL+
注:
•NP44ML 镜头不支持镜头移位功能。 当NP44ML 镜头安装在投影机上时,镜头移位功能将不
起作用。
•本表中的插图可能与实际产品略有不同。

4
CAUTION
• Afterinstallingthelensunit,besuretosecureittotheprojectorusingthesupportkit.Fail-
uretodosocouldcausethelensunittofall,resultingininjury.
• Powerotheprojectorandunplugthepowercordbeforeinstallingthelensunitandthe
support kit.
Things to prepare
• Phillipsheadscrewdriver
• Forceilingmountorportraitposition,amountingbracketwithsucientstrengthtosupport
the combined weight of the projector, the lens unit, and the support kit
注意
•レンズユニットを取り付けた後は、必ずサポートキットを使ってレンズユニットをプロジェク
ター本体に固定してください。固定しないと、レンズユニットが落下して、けがの原因とな
ります。
•レンズユニットとサポートキットの取り付けは、プロジェクターの電源を切り、電源プラグ
をコンセントから抜いた状態で行ってください。
用意するもの
•プラスドライバー
•天吊りまたはポートレートで設置する場合は、プロジェクター本体とレンズユニットおよびサ
ポートキットの重さに十分耐えられる取り付け金具
※天井用取付けユニット NP14CM と組み合わせて使用することはできません。
天吊りで設置する場合は、天井用取付けユニット NP15CM を使用してください。
注意
•安装镜头单元后,务必使用支撑套件将其固定到投影机上。 否则可能导致镜头单元掉落,
从而导致人身伤害。
•在安装镜头单元及支撑套件之前,请关闭投影机电源并拔下电源线。
需要准备的事项
•十字头螺丝刀
•对于天花板安装或纵向位置,需要具有足够强度以支撑投影机、镜头单元和支撑套件总重量
的安装支架

5
Included items
Supportbracket
Screw8pcs
Adapter (A)
ForPA803U/PA723U/PA653U/PA853W/PA703W/PA903X
Adapter (B)
ForPA803UL/PA703UL/PA653UL
同梱品
サポート金具
ネジ 8本
アダプター (A)
NP-PA803UJL/NP-PA723UJL/NP-PA653UJL/NP-PA853WJL/NP-PA703WJL/NP-PA903XJL 用
アダプター (B)
NP-PA803ULJL/NP-PA703ULJL/NP-PA653ULJL 用
内含物品
支撑支架
螺钉 8个
适配器 (A)
适用于 NP-PA803U+/NP-PA653U+/NP-PA853W+/NP-PA753W+/NP-PA703W+/NP-PA653W+/
NP-PA903X+/NP-PA803X+/NP-PA703X+
适配器 (B)
适用于 NP-PA803UL+/NP-PA703UL+/NP-PA653UL+

6
Preparation
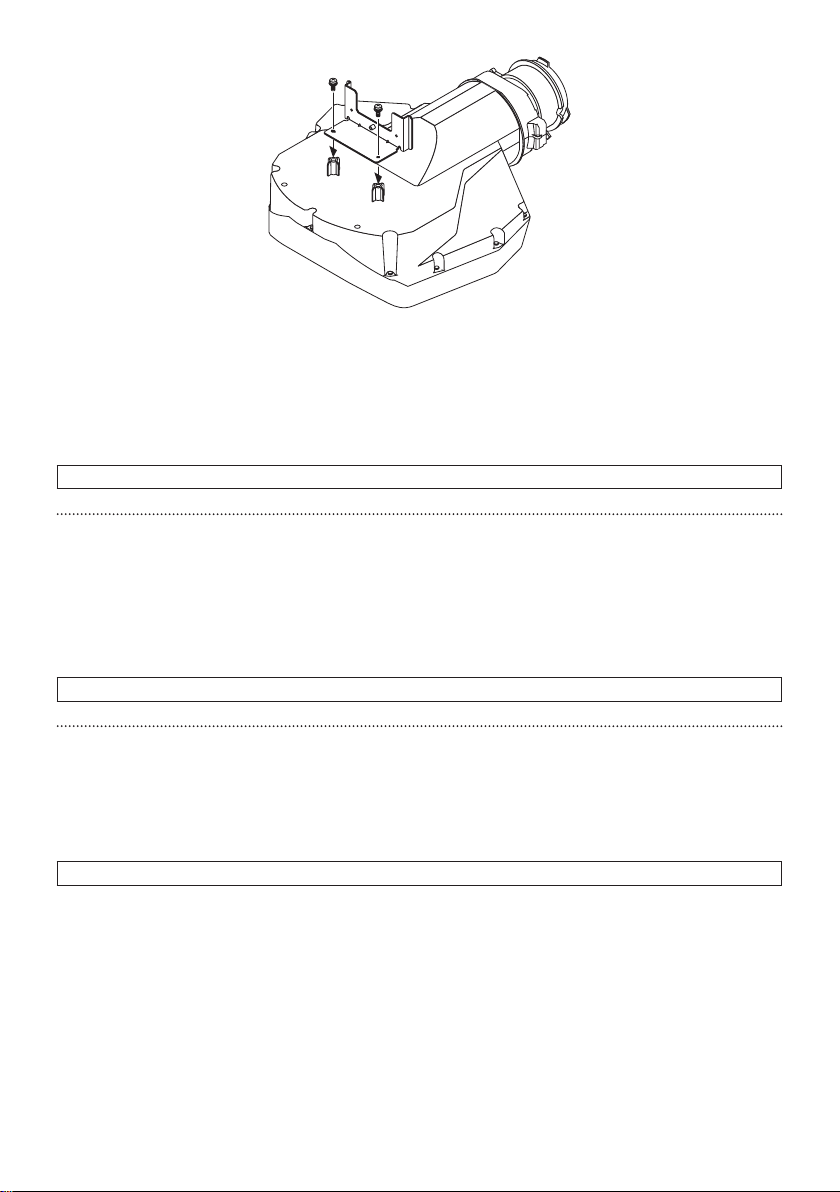
Return the projector lens position to the home position without the lens mounted.
Fordetailsonconnectingthepowercordandturningon/o,refertotheprojectorUser’sManual.
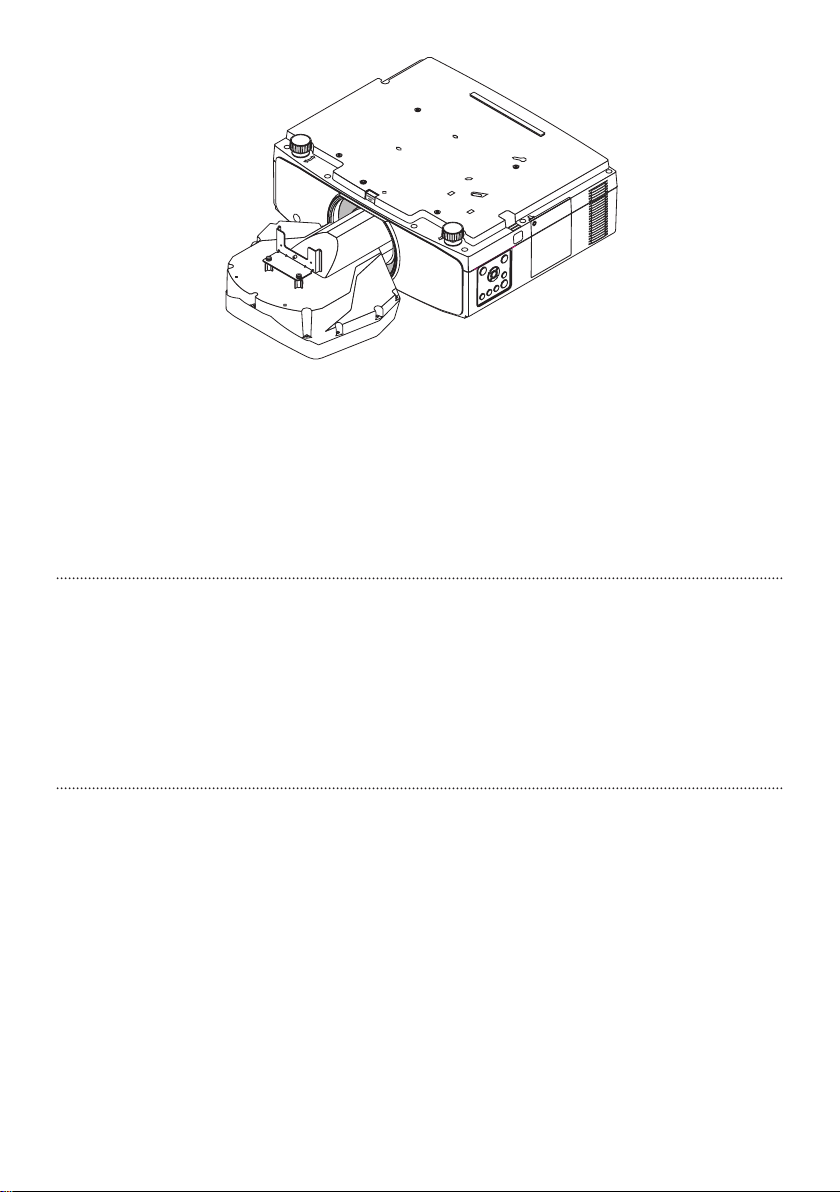
Connect the power cord to the projector.
For PA803U/PA723U/PA653U/PA853W/PA703W/PA903X, press the (POWER) button to turn
on the power to the projector.
ForPA803UL/PA703UL/PA653UL,donotpressthe (POWER) button.
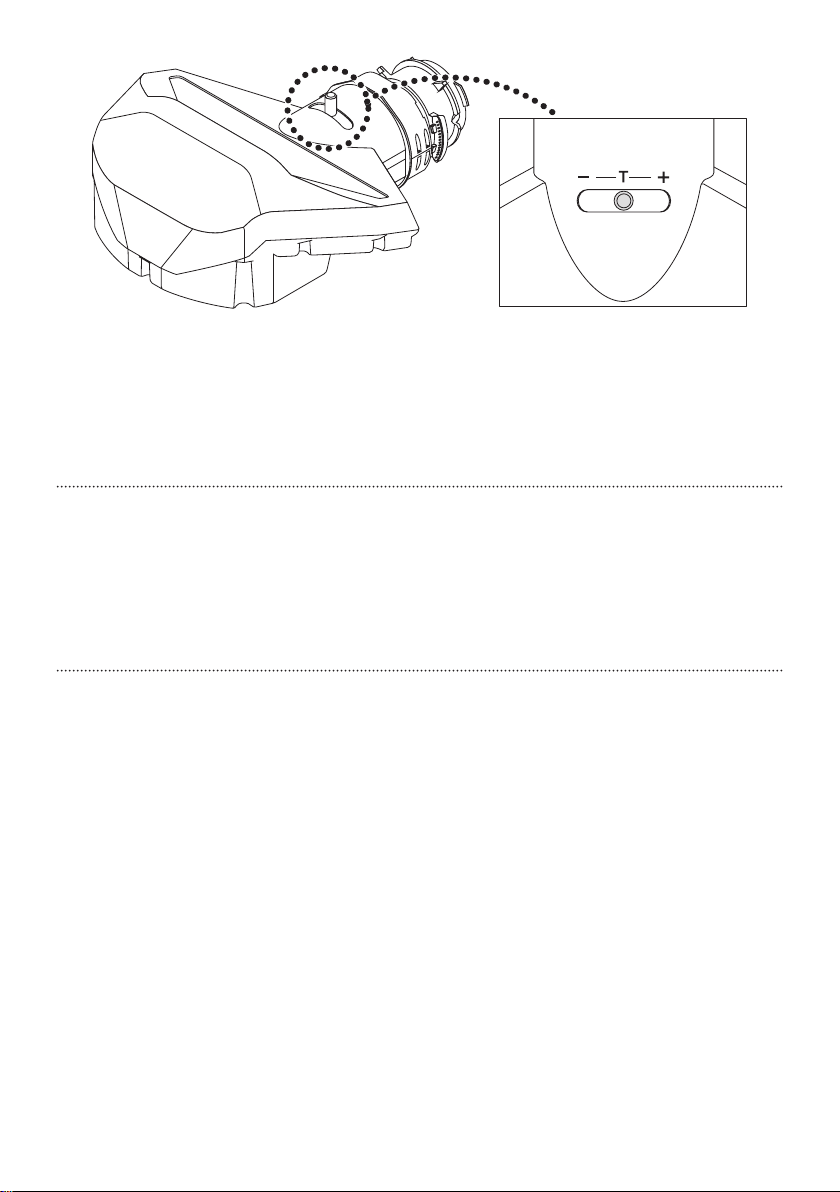
Press and hold the ZOOM/L-CALIB button for 2 seconds or longer.
Afterthelensmovementisnished,pressandholdtheSHIFT/HOMEPOSITIONbuttonfor2
seconds or longer.
Whenthelensmovementisnished,wait10secondsorlonger.
ForPA803U/PA723U/PA653U/PA853W/PA703W/PA903X,pressthe (POWER) button twice to
turnothepowertotheprojector.
Removethepowercordfromtheprojector.
準備
レンズユニットを取り付けていない状態で、プロジェクターのレンズ位置をホームポジ
ションに戻します。
電源コードの接続と電源入 /切について、詳しくはプロジェクターの取扱説明書をご覧く
ださい。
プロジェクターに電源コードを接続する。
NP-PA803UJL/NP-PA723UJL/NP-PA653UJL/NP-PA853WJL/NP-PA703WJL/NP-PA903XJL の場合
は、続いて ボタンを押して、プロジェクターの電源を入れます。
※NP-PA803ULJL/NP-PA703ULJL/NP-PA653ULJL の場合は、 ボタンを押さないでください。
[ZOOM/L-CALIB.] ボタンを 2秒以上押す。
レンズの動作終了後、[SHIFT/HOME POSITION] ボタンを 2 秒以上押す。
レンズの動作終了後、10 秒以上待つ。
NP-PA803UJL/NP-PA723UJL/NP-PA653UJL/NP-PA853WJL/NP-PA703WJL/NP-PA903XJL の場合
は、続いて ボタンを 2回押して、プロジェクターの電源を切ります。
プロジェクターから電源コードを取り外す。
准备工作
在不安装镜头的情况下将投影机镜头返回初始位置。
有关连接电源线和开启 /关闭的详细信息,请参阅投影机用户手册。
将电源线连接至投影机。
对于 NP-PA803U+/NP-PA653U+/NP-PA853W+/NP-PA753W+/NP-PA703W+/NP-PA653W+/
NP-PA903X+/NP-PA803X+/NP-PA703X+,按 (电源)键开启投影机电源。
对于 NP-PA803UL+/NP-PA703UL+/NP-PA653UL+,请勿按 (电源)键。
按住 ZOOM/L-CALIB 键2秒钟或更长时间。
镜头移动完成后,按住 SHIFT/HOME POSITION 键2秒钟或更长时间。
镜头移动完成后,等待 10 秒钟或更长时间。
对于 NP-PA803U+/NP-PA653U+/NP-PA853W+/NP-PA753W+/NP-PA703W+/NP-PA653W+/
NP-PA903X+/NP-PA803X+/NP-PA703X+,按 (电源)键两次关闭投影机电源。
将电源线从投影机上取下。

7
How to install the support kit
The following explanation uses the case of PA803U as an example.
1. Turn over the projector.
Laydowntheprojectorcabinetupsidedownonatablewithsoftclothlaid.Whiledoingthis,
align the front of the projector with the end of the table.
CAUTION
• Formovingtheprojector,makesureyouhaveatleasttwopeople.Attemptingtomovethe
projector alone could result in back pain or other injuries.
サポートキットの取り付け方
ここでは、NP-PA803UJL の場合で説明します。
1. プロジェクターを裏返す。
やわらかい布などを敷いた台の上に、プロジェクターを裏返して静かに置きます。このと
き、プロジェクターの前面を台の端に合わせてください。
注意
•作業は 2人以上で行ってください。プロジェクターを 1人で持ち上げた場合、けがや腰痛
の原因となることがあります。
如何安装支撑套件
以下说明以 NP-PA803U+ 的情况为例。
1. 翻转投影机。
将投影机柜倒置在铺有软布的桌子上。 执行此操作时,将投影机的正面与桌子的末端对齐。
注意
•移动投影机时,请确保至少由两个人进行操作。试图单独移动投影机可能会导致背部疼痛
或其他人身伤害。

8
2. Fix the adapter to the lens unit.
As describing on the illustration, put the adapter (A) on the lens unit whose protrusions meet
withthescrewholesontheadapterandfastenthemby2screws.
• ForPA803UL/PA703UL/PA653UL,usetheadapter(B).Theattachingprocedureisthesameas
theabove.
NOTE: Do not touch the glass on the lens unit.
2. レンズユニットにアダプターを取り付ける。
アダプター (A) を図の向きにして、ネジ穴がレンズユニットの突起に合うように置き、ネ
ジ2本でしめ付けます。
•NP-PA803ULJL/NP-PA703ULJL/NP-PA653ULJL の場合は、アダプター (B) を使用します。取り
付け方は同じです。
注意 : 作業中は、レンズのガラス面に触れないでください。
2. 将适配器固定至镜头单元。
如图所示,将适配器 (A) 放在镜头单元上,其突出部分与适配器上的螺孔相对接,并用两个螺钉
将其固定。
•对于 NP-PA803UL+/NP-PA703UL+/NP-PA653UL+,请使用适配器 (B)。安装程序与上述相同。
注: 请勿触摸镜头部分上的玻璃。

9
3. Adjust the tilt of the lens unit.
Adjustthefocusbalanceattheperipheryoftheprojectedimage.
Fortableuse:Movethetiltlevertothe“+”position.
Forceilinguse:Movethetiltlevertothe“-“position.
Forotheruses:Movethetiltlevertothecenter(around“T”letter).
3. レンズユニットのチルト調整を行う
投写画面の周辺部分のフォーカスバランスを調整します。
テーブルに設置する場合:チルトレバーを+の位置に合わせます。
天吊りで設置する場合:チルトレバーを−の位置に合わせます。
上記以外で設置する場合:チルトレバーを中央(Tの文字付近)に合わせます。
3. 调整镜头单元的倾斜度。
调整投影图像外围的聚焦平衡。
对于在桌上使用 :将倾斜杆移动到“+”位置。
对于在天花板上使用 :将倾斜杆移至“ - ”位置。
对于其他用途 :将倾斜杆移动至中心(“T”字母周围)。

10
4. Mount the lens unit on the projector and adjust the lens position
According to the instructions on the projector User’s Manual, mount the lens unit onto the
projector.
Connect the power cord to the projector and power it on.
PressandholdtheSHIFT/HOMEPOSITIONbuttonfor2secondsorlongertomovethelensto
the home position for NP44ML.
Whenthelensmovementisnished,wait10secondsorlongerbeforeturningothepower
andremovingthepowercord.
4. プロジェクターにレンズユニットを取り付けて、レンズの位置を合わせる。
プロジェクターの取扱説明書に従って、プロジェクターにレンズユニットを取り付ける。
プロジェクターに電源コードを接続して、電源を入れる。
[SHIFT/HOME POSITION] ボタンを 2秒以上押して、レンズの位置を NP44ML のホームポジショ
ンに移動する。
レンズの動作終了後 10 秒以上経過してから電源を切り、電源コードを取り外す。
4. 将镜头单元安装在投影机上,并调整镜头位置
根据投影机 用户手册 上的说明,将镜头单元安装到投影机上。
将电源线连接至投影机并开启电源。
按住 SHIFT/HOME POSITION 键2秒钟或更长时间,以便将镜头移动至 NP44ML 的初始位置。
镜头移动完成后,等待 10 秒钟或更长时间。 在此之后,关闭投影机并拔掉电源线。

11
5. Adjust the support bracket.
Loosen the wing nut on the support bracket and pull out the L-shaped metal fitting.
Rotate the dial to align its hole with its top position.
6. Fix the support bracket to the projector.
As shown on the illustration, place the support bracket and use four screws to tighten them.
Afterthat,rotatetwotiltfeettoextendthembyabout15mm.
5. サポート金具を調整する。
サポート金具に付いている蝶ナットをゆるめ、L字型の金具を引き出す。
ダイヤルを回して、開口を上側に合わせる。
6. プロジェクターにサポート金具を取り付ける。
サポート金具を図のように置き、ネジ 4本でしめ付けます。
その後、2箇所のチルトフットを回して、15mm 程度伸ばします。
5. 调整支撑支架。
松开支撑支架上的蝶形螺母,并拉出 L形金属配件。
旋转拨盘使其孔与顶部位置对齐。
6. 将支撑支架固定到投影机上。
如图所示,放置支撑支架并使用四个螺钉将其拧紧。
然后,旋转两个倾斜支脚使其延伸约 15 毫米。

12
Pin
ピン
插针
7. Connect the support bracket to the adapter.
MovetheL-shapedmetalttingofthesupportbrackettomeetwiththeadapter,andinsertthe
adapter pin into the hole of dial.
Whendoingthis,makesurethattheL-shapedmetalttingandtheadapteraresosecurelyxed
that the adapter pin can be seen through the hole of dial.
7. サポート金具とアダプターを接続する。
サポート金具のL字型の金具を動かしてアダプターに当て、アダプターのピンをダイヤル
の開口に入れます。
このとき、L字型の金具とアダプターが確実に付いて、ダイヤルの開口からピンが見えて
いることを確認してください。
7. 将支撑支架连接至适配器。
移动支撑支架的 L形金属配件,使其与适配器相对接,并将适配器插针插入拨盘的孔中。
在执行此操作时,请确保稳固安装 L形金属配件与适配器,从而可透过拨盘孔看到适配器插针。

13
8. Tighten a screw to fix the support bracket and the adapter.
Tighten two screws to fix the L-shaped metal fitting and the adapter.
Tighten the wing nut.
This completes mounting the support kit.
Afterinstallingtheprojector,connectthepowercordandvideocables,andthenturnonthe
projector.Finally,adjustthefocus.
8. サポート金具とアダプターをネジでしめ付ける。
ネジ2本を使ってL字型の金具とアダプターをしめ付ける。
蝶ナットをしめ付ける。
これで、サポートキットの取り付けが終わりました。
プロジェクターを設置して電源コードや映像ケーブルを接続し、プロジェクターの電源を
入れてフォーカス調整を行ってください。
8. 拧紧螺钉以固定支撑支架和适配器。
拧紧两个螺钉以便固定 L形金属配件和适配器。
拧紧蝶形螺母。
这样就完成了支撑套件的安装。
安装投影机后,连接电源线和视频电缆,然后开启投影机。最后,调整焦点。

14
12
Adjusting the focus
1. Press the FOCUS button on the cabinet.
TheLENSFOCUScontrolscreenwillbedisplayedon.
* Inanotherway,pressandholdtheCTLbuttonandthenpressVOLUME/FOCUS+/-buttonon
the remote control.
2. When the cursor is on the CENTER on on-screen menu, press either ◀or ▶button to
align focus of screen center.
フォーカス調整
1. プロジェクター本体の[FOCUS]ボタンを押す。
レンズフォーカス調整画面が表示されます。
•リモコンで操作する場合は[CTL]ボタンを押したまま[音量/フォーカス+ /−]ボタンを押
します。
2.「中央」にカーソルが合った状態で、◀ /▶ボタンを押して画面中心のフォーカス
を合わせる。
调整焦距
1. 按机身上的 FOCUS(聚焦)键。
将会显示镜头聚焦控制画面。
* 另一方法为,在遥控器上按下并按住控制键,然后按音量 /聚焦 +/- 键。
2. 在光标位于屏幕菜单的中心时,按 ◀或▶键调整屏幕中心的焦点。

15
3 4
3. Press the ZOOM/L-CALIB button on the cabinet.
TheLENSZOOMcontrolscreenwillbedisplayedon.
* Inanotherway,pressandholdtheCTLbuttonandthenpressD-ZOOM/ZOOM+/-buttonon
the remote control.
4. Press either ◀or ▶button to align the focus of screen peripheral area.
3. プロジェクター本体の[ZOOM/L-CALIB]ボタンを押す。
ズーム調整画面が表示されます。
•リモコンで操作する場合は[CTL]ボタンを押したまま[部分拡大/ズーム+ /−]ボタンを
押します。
4. ◀/▶ボタンを押して画面周辺のフォーカスを合わせる。
3. 按机身上的 ZOOM/L-CALIB(变焦)键。
将会显示镜头变焦控制画面。
* 另一方法为,在遥控器上按下并按住控制键,然后按局部放大 /变焦 +/- 键。
4. 按◀或▶键调整屏幕周边区域的焦点。

16
5. Adjust the tilt
Loosenthetwoscrewsthatweretightenedin“7.Connectthesupportbrackettothe
adapter”.
UseyourhandoraPhillipsheadscrewdrivertorotatethedialofthesupportbracket,and
thenadjusttheverticalfocusbalanceoftheprojectedimage.
Tighten the two screws that were loosened in step .
Follow1to4of“Adjustingthefocus”tore-adjustthefocusandcheckifyouhaveobtained
thebestfocusbalanceintheverticaldirection.
This completes adjusting the focus.
5. チルト補正を行う。
サポートキット取り付け手順の7でしめ付けたネジ2本をゆるめる。
手またはプラスドライバーを使って、サポート金具のダイヤルを回し、投写画面上下のフォー
カスのバランスを調整する。
でゆるめたネジ2本をしめ付ける。
フォーカス調整手順の1〜4にしたがって再度フォーカス調整を行い、投写画面上下のフォー
カスのバランスが正常になっていること確認する。
これで、フォーカス調整が終わりました。
5. 调整倾斜度
松开在“7. 将支撑支架连接至适配器“中拧紧的两个螺钉。
用手或十字头螺丝刀旋转支撑支架的转盘,然后调整投影图像的垂直聚焦平衡。
拧紧在步骤 中松开的两个螺钉。
根据“调整焦点”的 1至4步骤重新调整焦点,并检查是否在垂直方向上获得了最佳聚焦平衡。
这样就完成了焦点的调整。

17
Throw distance
• Throwdistanceshowsadistancebetween
the center of the lens unit projection win-
dow and the screen face. (Unit: m)
• Figuresaredesignedvalues.Theycanvary
depending on the lens unit.
H1
H2
L1
L2
①
④
⑥
⑧
⑦
⑤
②
③
投写距離
•投写距離は、レンズユニット投写窓中心か
ら投写画面までの距離です。(単位:m)
•各数値は設計値です。レンズユニットによ
りばらつきがあります。
投射距离
•投射距离表示镜头投射窗中心与屏幕表面
之间的距离。(单位 :米)
•数字为设计值。其可能因镜头单元而异。
Screentopend スクリーン上端 屏幕顶边
Screenface スクリーン面 屏幕正面
Screencenter スクリーン中心 屏幕中心
Screenbottom スクリーン下端 屏幕底边
Center of the lens unit pro-
jection window レンズユニット投写窓中心 镜头投射窗中心
Projector rear face プロジェクター背面 投影机背面
Throw distance 投写距離 投射距离
SupportkitBottom サポートキット下端 支撑套件底部

18
PA803U/PA723U/PA653U
NP-PA803UJL/NP-PA723UJL/NP-PA653UJL
NP-PA803U+/NP-PA723U+/NP-PA653U+
Screensize(inch)
スクリーンサイズ(型)
屏幕尺寸 (英寸 )
L1 L2 H1 H2
97 0.15 0.67 0.59 1.89
100 0.17 0.70 0.60 1.95
120 0.32 0.84 0.70 2.31
150 0.54 1.06 0.84 2.86
180 0.76 1.28 0.98 3.40
200 0.90 1.43 1.07 3.77
240 1.20 1.72 1.26 4.49
270 1.42 1.94 1.40 5.04
300 1.64 2.16 1.54 5.58
350 2.00 2.52 1.78 6.49
400 2.37 2.89 2.01 7.40
PA853W/PA703W
NP-PA853WJL/NP-PA703WJL
NP-PA853W+/NP-PA753W+/NP-PA703W+/NP-PA653W+
Screensize(inch)
スクリーンサイズ(型)
屏幕尺寸 (英寸 )
L1 L2 H1 H2
97 0.16 0.68 0.59 1.90
100 0.18 0.70 0.61 1.95
120 0.32 0.85 0.70 2.32
150 0.54 1.07 0.84 2.86
180 0.76 1.29 0.99 3.41
200 0.91 1.43 1.08 3.78
240 1.20 1.73 1.27 4.50
270 1.42 1.95 1.41 5.05
300 1.64 2.17 1.56 5.60
350 2.01 2.53 1.80 6.51
400 2.38 2.90 2.03 7.42

19
PA903X
NP-PA903XJL
NP-PA903X+/NP-PA803X+/NP-PA703X+
Screensize(inch)
スクリーンサイズ(型)
屏幕尺寸 (英寸 )
L1 L2 H1 H2
101 0.15 0.68 0.47 2.02
104 0.18 0.70 0.49 2.07
120 0.29 0.81 0.54 2.37
150 0.50 1.02 0.64 2.93
180 0.71 1.23 0.74 3.49
200 0.85 1.37 0.81 3.86
240 1.13 1.66 0.95 4.61
270 1.35 1.87 1.05 5.17
300 1.56 2.08 1.15 5.73
350 1.91 2.43 1.32 6.66
400 2.26 2.78 1.49 7. 59
PA803UL/PA703UL/PA653UL
NP-PA803ULJL/NP-PA703ULJL/NP-PA653ULJL
NP-PA803UL+/NP-PA703UL+/NP-PA653UL+
Screensize(inch)
スクリーンサイズ(型)
屏幕尺寸 (英寸 )
L1 L2 H1 H2
100 0.09 0.70 0.64 1.99
110 0.16 0.77 0.68 2.17
120 0.24 0.84 0.73 2.35
150 0.46 1.06 0.87 2.89
180 0.67 1.28 1.01 3.44
200 0.82 1.43 1.11 3.80
240 1.11 1.72 1.30 4.53
270 1.33 1.94 1.44 5.07
300 1.55 2.16 1.58 5.62
350 1.92 2.52 1.82 6.53
400 2.28 2.89 2.05 7. 4 4

©NECDisplaySolutions,Ltd.2018-2019
Printed in Japan 7N8N9514
Table of contents
Other NEC Projector manuals

NEC
NEC NP-PH1201QL User manual

NEC
NEC LT155 - MultiSync UXGA DLP Projector Assembly instructions

NEC
NEC LT75Z - MultiSync SVGA DLP Projector User manual

NEC
NEC LT180 - LT 180 XGA DLP Projector User manual

NEC
NEC M230X User manual

NEC
NEC NP216 Series User manual

NEC
NEC NC2041L User manual

NEC
NEC UM352W User manual

NEC
NEC NP610 Series User manual

NEC
NEC PH1202HL User manual