Nectre Fireplaces MEGA LE User manual

Operating Instructions
Do Not Throw Away
Please keep these Operating Instructions in a safe place for future reference
The model shown here is the Mega LE Pedestal
Pecan Engineering Pty Ltd proudly supports
the activities of Landcare Australia through its
membership of the AHHA
MEGA LE Model

The MEGA LE freestanding wood heater was shown to meet the AS 4013/NZS
7403 Secon 1.2.2(b) - HEAT OUTPUT EXCEEDS 25kW
Firstly check all local building and heang regulaons. Dierent States, Territories and some
Municipals have varying regulaons about the installaon and operaon of wood stoves,
your installer should be aware of these.
Before any use of this appliance please read these instrucons fully.
WARNING: ANY MODIFICATION OF THE APPLIANCE THAT HAS NOT BEEN APPROVED IN WRITING
BY THE TESTING AUTHORITY IS CONSIDERED AS BREACHING AS/NZS 4013.
WARNING: DO NOT USE FLAMMABLE LIQUIDS OR AEROSOLS TO START OR REKINDLE THE FIRE.
WARNING: DO NOT USE FLAMMABLE LIQUIDS OR AEROSOLS IN THE VICINITY OF THIS APPLIANCE
WHEN IT IS OPERATING.
WARNING: DO NOT STORE FUEL WITHIN HEATER INSTALLATION CLEARANCES.
WARNING: WHEN OPERATING THIS APPLIANCE AS AN OPEN FIRE USE A FIRE SCREEN.
WARNING: OPEN AIR CONTROL (AND DAMPER WHEN FITTED) BEFORE OPENING FIRING DOOR.
CAUTION: THIS APPLIANCE SHOULD NOT BE OPERATED WITH A CRACK GLASS
CAUTION: THIS APPLIANCE SHOULD BE MAINTAINED AND OPERATED AT ALL TIMES IN ACCORDANCE
WITH THESE INSTRUCTIONS.
CAUTION: THE USE OF SOME TYPES OF PRESERVATIVE TREATED WOOD AS A FUEL CAN BE
HAZARDOUS.
The appliance or ue system should not be modied in any way without the wrien approval of the
manufacturer. Extractor fans or cooker hoods must not be placed in the sames room or space as this
can cause appliance to emit smoke into the room.
INTRODUCTION
APPLIANCE SERIAL NUMBER
This number can found on the appliance specicaon label on the rear heat shield or on
the compliance plate aached to the rear of the heater. This number maybe required when
ordering spare or replacement parts.

The Nectre MEGA LE has two air controls for
controlling the re.
1 Top Air Slide, is a slide in (closed) and out (open)
manual operaon by the user that allows air to enter
the rebox from above the door, where it is then
drawn down into the base of the re. It also funcons
as a air wash to keep the glass of the door clean. The
knob of the air slide is made from bakelite.
2 Boom Air Slide (Turbo Boost) is a manual slide
le (open) to right (closed) by the user that allows air
to enter directly into the base of the re and is used
as a boost when either starng a re or to excited
the re to generate more heat output quickly. - NOTE
when operang the MEGA LE in the open posion for
extended duraon will reduce the eciency. Should
always be closed when leaving the room.
3 The Nectre MEGA LE door handle is made from
mild steel and has a stay cool spring screwed on.
Warning: The handle may get hot if the appliance has
been operang at High Burn seng for an extended
period of me, in which case it is recommended using
a protecve glove or equivalent to open the door.
2
1
2
3
4
5
3
1
4
5
Top air slide
Boom air slide (Turbo Boost)
Stay cool spring handle
150mm diameter Flue
Cast iron door, ceramic glass
NOTE
Open the Top Air Slide before opening
the door to eliminate the chance of
back-dra and /or smoke entering
the room.
USING YOUR MEGA LE FOR THE FIRST TIME
For the rst few me the appliance is lit it will give o some odorous fumes, which is a curring
of the paint as it heats. It is recommended that you do not touch the paint work while it is
curing, otherwise it can leave a permanent mark on the appliance.
Once the paint is cured the fumes will dissipate. It is suggested that you keep the room well
venlated unl these fumes have cleared.

RECOMMENDED FUELS
LIGHTING THE FIRE
RUNNING THE APPLIANCE
Burn only seasoned hardwood mber with
moisture content of less than 20%. Newly cut
wood should be allowed to dry (season) for
12 to 18 months before burning.
Wood should be stored in an environment
which is protected from the weather to
minimise any potenal moisture content.
For best results, wood should not exceed 270-
290mm in length and 150mm in diameter.
Any larger and the appliance will not operate
at it’s opmum. It is beer to burn several
smaller pieces of wood rather than one large
single piece.
Poor quality mber:
• causes low combuson eciency.
• produces poor emissions (smokey).
• results in addional build-up of creosote
(soot) in the ue which will require
regular cleaning and may result in a ue
re.
Do not burn painted, impregnated/treated
wood, manufactured board products or
pallet wood.
Top air slide regulates the burn me and heat
output depending on the desired warmth.
HIGH HEAT OUTPUT
• Aer establishing the re and loading with
larger pieces of wood, leave it running with
the top air slide fully open.
• Running the appliance with the door open
will not produce maximum heang into the
room as it will draw already warm air out of
the same space.
• Running the appliance with the top and
boom air slides in the fully opened
posion will not produce the hoest re as
too much heat is lost up the ue.
• Running the appliance in this seng is not
the most energy ecient.
LOW HEAT OUTPUT
• The heat output of the appliance can be
reduced by closing the top air slide which
reduces the oxygen intake to the re, which
slows down the burn rate.
• Best eciency is achieved at this seng and
increase burn mes as a result. However,
if not operated correctly this seng may
result in higher parculate emissions (dirty
burn).
• Before closing the top air slide make sure
the re is burning briskly. If not it may
require the top air slide to be le open fully
for 10-15mins before closing the air slide.
• To achieve the opmum from your
appliance between clean burning and high
eciency it is suggested that top air is
opened 4-5mm and the boom air is fully
closed.
1. Place relighters and or paper plus dry
kindling wood at the base of the rebox.
2. Open top and boom air controls.
3. Light the paper and or relighters.
4. Once the re has taken hold, add larger
pieces of wood. For opmal burning
condions, place the logs in a front to
back orientaon (right angles to the door
opening). Too many logs may smoother
the re.
5. Once the re is established, close the
boom air slide.

Reloading with more wood
• Open top air slide before opening the
door.
• Rake or break up any exisng coals on the
base of the rebox.
• Load the wood with the length orientated
front to back.
• Load smaller pieces rather than one large
piece of wood for beer results.
• Close the door with the top air slide fully
opened for a minimum of 10 minutes for
the wood to catch.
• Adjust the top air slide to the desired
warmth.
Depending on the type of wood burnt and
frequency, the ash will need to be removed
every 2-6 weeks. Remove excess ash when
necessary, placed in a non combusble
container with a ghtly ng lid and moved
outdoors immediate to a locaon clear of
combusble materials.
Leave a small amount (1cm) of ash in the
boom of the rebox, helps insulate the base.
Fuel quality
1. Use wood with a moisture content of less
than 20%. Wood should not feel moist
or damp, should not have moss or fungal
growths.
2. Symptoms related to wet wood:
• diculty starng and keeping a re burning
well.
• smoke and only small ames
• dirty glass and or rebricks
• rapid creosote build up in the ue
• low heat output
• short burn mes and blue/grey smoke
from ue outlet.
3. If seasoned wood is not used and some
moisture is present, it suggested that the top
air be used to regulate the required heat output
and burn rate, it is recommended to leave the
boom air slide open 3-4mm.
4. Run the appliance at high heat output for a
short period each day to avoid large build-up of
tars and or creosote within the appliance and
ue.
Flue dra
The ue has 2 main funcons:
1. to remove smoke, gases and fumes
2. to provide a sucient amount of dra
(sucon) in the appliance to ensure the re
keeps burning. Dra is a result of the rising
hot air in the ue when the re has been lit.
The posion, height and size of the ue can
aect the performance of the dra. Refer to
installaon guide for details.
Factors aecng the ue dra include:
• insucient height
• exterior obstrucons cause turbulence
• high and gusty winds
• outside temperature and weather
condions
• blocked ue
RUNNING THE APPLIANCE
ASH REMOVAL
BURNING TIPS

If a ue/chimney re occurs:
close top and boom air slides fully to
smother the re.
do not use the appliance unl an accredited
installer has assessed the cause and damage
that may have occurred.
Glass in door blackening
• Cause - burning unseasoned wood (too
wet) Soluon - burn hardwood not more
than 20% moisture.
• Cause - top air slide closed and a long
burn cycle at low temperature. Soluon -
aer re-stoked operate at high heat.
• Cause - insucient ue dra. (installed
correctly, correct length, poor posion
causing downdra). Soluon - contact
installer.
Trouble starng a re
• Cause - not enough ash in rebox base.
Soluon - always retain at least 1cm of
ash
Glass in the door cracking
• Cause - possible over ghtening of the
screws on the stainless steel strip glass
retainer. Cause - possible expansion of
the cast iron door. Cause - loading the
rebox with oversized logs.
It is recommended that a thorough check of
the ue is done prior to the season for any
build-ups (creosote) or any obstrucons.
To do this:
• remove the bae plate (see Replacement
of Baes)
• using a small mirror and a torch hold
the mirror on a angle below the ue
inside the rebox. A ne black powdery
layer is normal, anything than this needs
removing.
• ret the bae
To clean the ue:
• a ue cleaning brush can be purchased
from the dealer.
• with the baes removed and a rope
aached to the ue brush, it should be
dropped from top of the ue (exterior)
and pulled through the rebox.
• recheck the ue with mirror/torch.
• repeat if necessary.
• remove any buildup from within the
rebox.
• replace the baes.
• check the ue joins are secure for
integrity.
• Alternavely a ue cleaning service can
be sought to undertake the cleaning.
• The appliance, when cool can be cleaned
with a damp cloth.
• Stove Bright metallic black paint can be
used to touch up any faded areas.
• To clean the glass door, it is suggested
that house hold window cleaner or a
general purpose cleaner with a so cloth
is used.
Do not use abrasive cleaners, scourer pads or
wire brush.
FLUE / CHIMNEY FIRE FLUE CLEANING
TROUBLESHOOTING TIPS
CLEANING PAINT WORK & GLASS

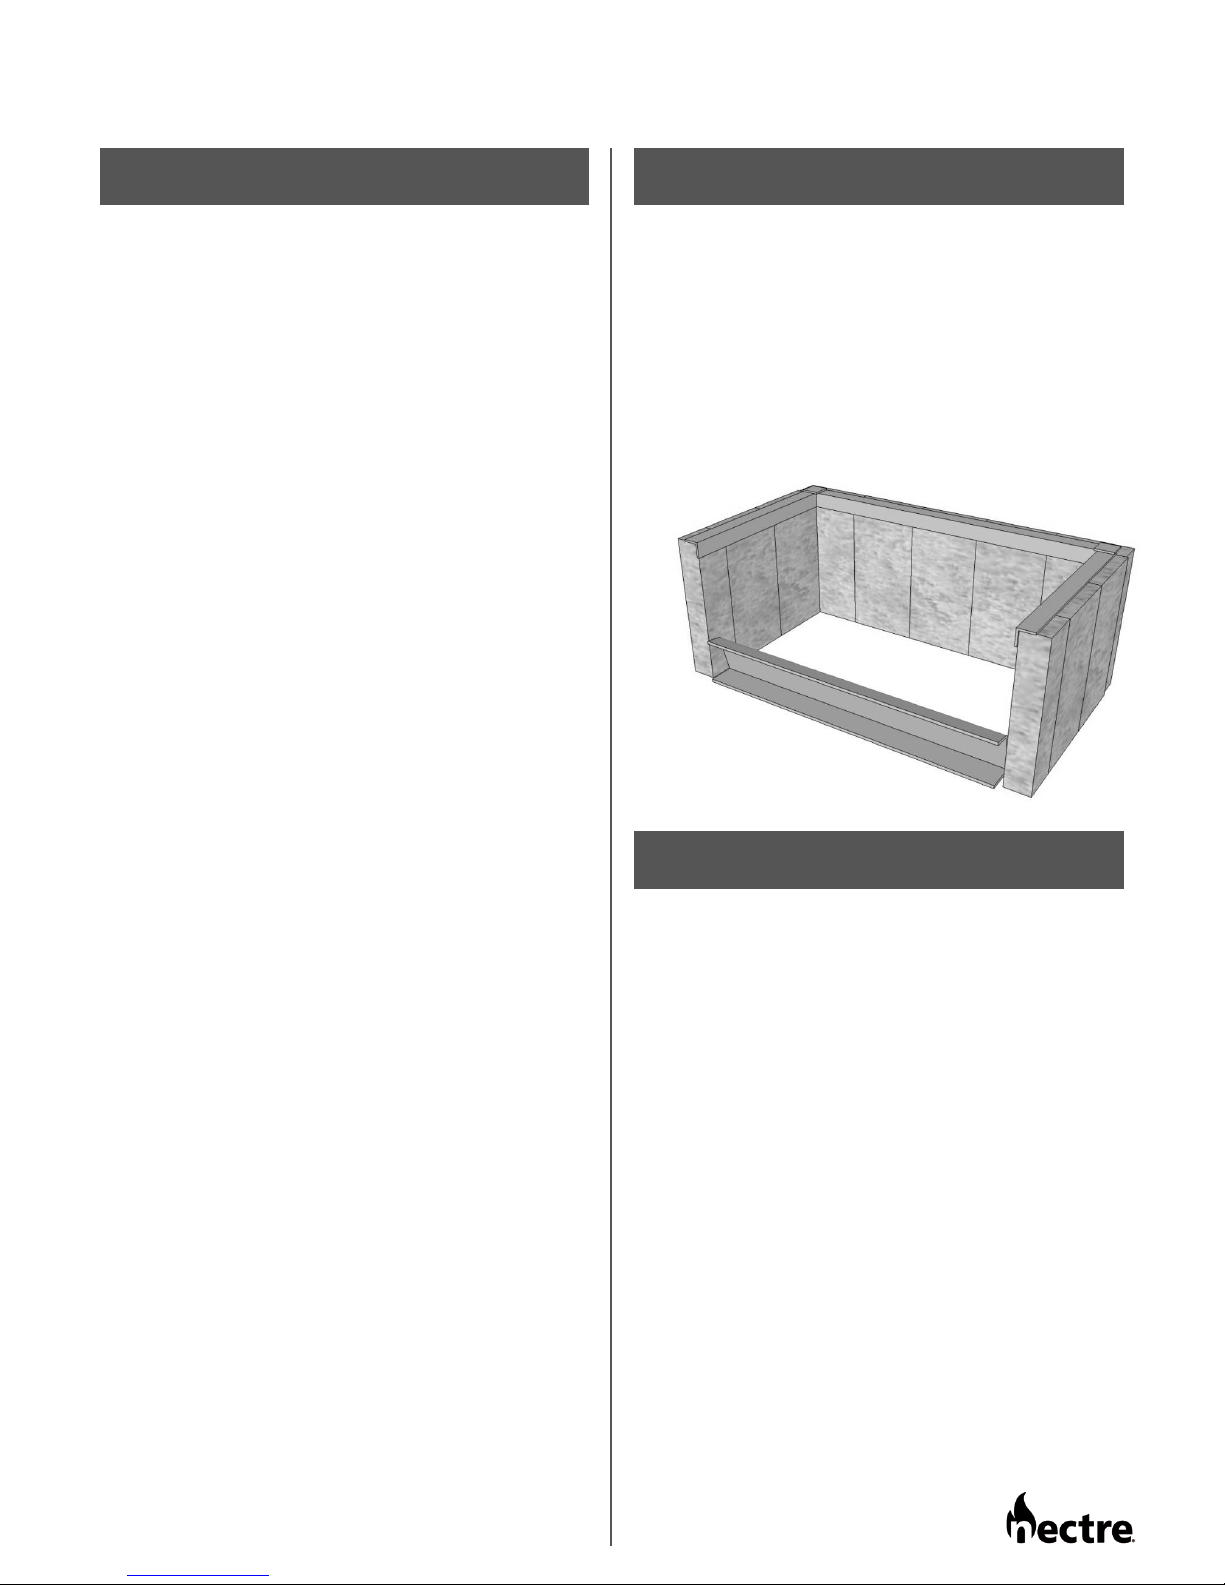
The purpose of the rebricks in the appliance
is to increase thermal mass and to guarantee
the longevity of the steel rebox. Over me
the rebricks may become cracked and
crumble away. If so, then they should be
replaced soon aer.
To replace the rebricks:
• Move any ash away from the base of the
bricks.
• Raise the brick retainer so that the bricks
can be removed.
• Replace with new bricks, and ret brick
retainer.
Firebrick conguraon:
• Base of the rebox has 2 outside rows of
full bricks measuring 234 x 118 x 40mm
and a centre row which are shorter in
width measuring 200 x 115 x 40mm
• Sides of rebox have 8 full bricks standing
on their ends.
• Back of rebox is lined with 5 full bricks
standing on their ends.
• Remove the side and rear re bricks
before ng the brick retainer.
• With the retainer orientated with the
arms poinng up (like a square ‘U’ shape),
push one end into the back corner of the
rebox.
• With the retainer in a diagonal orientaon
relave to the rebox, lt the top slightly
forward allowing the boom corner to
drop into the rebox at the front.
• Push the boom front corner towards
the back of the rebox allowing the top
of the arm to enter the rebox.
• Connue pushing the boom corner
towards rear of rebox so that retainer
sits at in the rebox.
• Raise the retainer and re-install the re
bricks.
REPLACEMENT OF FIREBRICKS REPLACEMENT OF BRICK RETAINER
MAINTENANCE and SERVICING
The MEGA LE is ed with two thick steel
bae plates which help to retain the heat
in the rebox by lengthening the path of the
ame as well as protect the top plate of the
heater.
Over me, the bae may begin to sag a lile
due to the excessive heat. This will not aect
the way the re burns.
Eventually the bae will burn through (5+
years) and if so will need to be replaced.
To remove the bae plates:
• Lower bae plate 500(w) x 300(d) x 12(h)
mm :- raise the rear of the bae plate,
slide forward free from the support lugs,
and out through the door opening.
• Upper bae plate 490(w) x 245(d) x 6(h)
mm :- slide bae plate forward, free
from the support lugs and out through
the door opening.
• Repeat steps i) to iii) in reverse to replace
with the new bae plates.
• The ash plate acts to protect the front of
the rebox below the door opening from
the hot coal bed and re.
• When posioning the ash plate, ensure
that the front top edge is ush against
the inside edge of the rebox beneath
the door opening.
• This task may be easier with the door
removed from the appliance and laid
horizontally on a work-bench.
• Remove any old seal from the door.
• Clean out the groove in the door that the
seal was bedded in using a at-end screw
driver or equivalent.
• Run a thin bead of clear roof and guer
silicone along the groove.
• Starng at one end, press the new door
seal rope into the groove on the door.
• Ret the door if it has been removed and
close.
MAINTENANCE and SERVICING
REPLACEMENT OF BAFFLE PLATES REPLACEMENT OF ASH PLATE
FITTING A NEW DOOR SEAL
FITTING A NEW DOOR GLASS REPLACEMENT SPARE PARTS LIST
ADJUSTING THE DOOR LATCH
This task may be easier with the door removed
from the appliance and laid horizontally. To
replace the door glass:
• Two stainless steel strips hold the glass in
place. Remove the four M4 size Phillips
head screws from the stainless steel
strips.
• Take out the glass, and check if the grey
rope beneath needs replacing. If so
replace this rope as well.
• Posion the new glass on top of the grey
rope and re-t the stainless steel strips
and M4 screws.
• Take extra care not to over-ghten the
screws, otherwise the glass will crack
when the heater gets hot and the door
expands.
• On occasion, the M4 screws will have
deteriorated from the constant heat in
the rebox resulng in them snapping o
when trying to loosen them. In this case,
a new hole can be drilled in the door and
tapped using a 3.4mm drill bit, and M4
tap.
FIREBRICKS
21 x full bricks – 234(h) x 118(w) x 40(d)mm
4 x half bricks – 175(h) x 115(w) x 40(d)mm
BRICK RETAINER
655mm x 445mm
BAFFLE PLATES
Upper Bae Plate:
400(w) x 160(d) in 5mm steel
Lower Bae Plate:
500(w) x 300(d) in 12mm steel
ASH PLATE
500(w) x 75(h) x 50(d)mm in 5mm steel
GLASS SEAL
1360mm 8mm x 3mm
GLASS OF DOOR
476mm x 200mm x 5mm
DOOR ROPE
1580mm x 13mm round braided ceramic rope
• If the door does not close rmly, then the
door latch can be adjusted.
• In the front lower right-hand corner of
the door opening, inside the rebox, is a
welded tab which the door latch secures
against when the door is closed. Using a
large at-end screw driver, place it under
the base of the tab and gently lever it out.
• Close the door with the door handle
to test for any improvement. If no
improvement, repeat process unl door
can be closed rmly.
MAINTENANCE and SERVICING

WARRANTY
MANUFACTURER’S NAME & ADDRESS
Pecan Engineering Pty. Ltd. warrants this stove to be able to operate under normal use
and service and within 10 years from the date of the original purchase on the terms
herein shall repair or replace without cost to the original customer any part thereof which
shall be returned to our factory, transportaon charges prepaid and which our inspecon
shows would prevent operaon.
This warranty does not apply to rebricks, brick retainer, bae, door seal, glass, nor
discolouraon of the surface or tarnishing of chrome ngs all of which require normal
service to maintain them.
Under the terms of this warranty, Pecan Engineering Pty. Ltd. assumes no responsibility for
the labour costs involved in removing or replacing the stove. Nor shall Pecan Engineering
Pty. Ltd. be liable for any injury, loss, or damage (direct, indirect or consequenal) arising
out of the use or inability to use the product, or its removal and replacement. All other
stove warranes, expressed or implied are excluded to the extent possible to law. Any
claims against Pecan Engineering Pty. Ltd. must be brought within Australian Jurisdicon.
The Retailer does not have the authority to alter this warranty.
Pecan Engineering Pty Limited
13 Acorn Road, Dry Creek
South Australia, 5094
Phone +61 8 8349 8332
Email inf[email protected]om.au
Web nectre.com
All dimensions and specicaon were correct at me of print.
Copyright reserved Pecan Engineering Pty Limited
Nectre brand is a registered trade mark of Pecan Engineering Pty Limited.
Table of contents
Other Nectre Fireplaces Heater manuals


Popular Heater manuals by other brands


EUROM
EUROM OUTDOOR HEATPANEL RC manual

Reece
Reece Kado Lussi installation instructions

Pro-Elec
Pro-Elec PEL00939 Important safety information

Rinnai
Rinnai Energysaver RHFE-1004FDT How to use

LHZ
LHZ Crystal 500 Installation and operating instructions

Protemp
Protemp PT-16-TTC User's manual & operating instructions


