nedis WIFIDS10WT User manual

WIFIDS10xx
Wi-Fi smoke and heat detector
Quick Start Guide (EN)
Verkorte handleiding (NL)
Kurzanleitung (DE)
Guía de inicio rápido (ES)
Guide de démarrage rapide (FR)
Guida rapida (IT)
Guia de iniciação rápida (PT)
Hurtigstartsguide (DA)
Hurtigstartsguide (NO)
Snabbstartsguide (SV)
Pikaopas (FI)
Γρήγορος οδηγός (EL)
Krótki przewodnik (PL)
Rychlá příručka (CS)
Gyors útmutató (HU)
Ghid rapid (RO)
Руководство быстрого старта (RU)
Hızlı başlangıç kılavuzu (TR)

2
1 2 3
4
5
50cm 50cm
50cm 50cm
A
B

English
3
WIFIDS10xx
Wi-Fi smoke and heat detector
Description (g. A)
The smoke and heat detector is a device used to detect
smoke and heat. The device does not detect gas. The
device is suitable for indoor use only. If the device
detects smoke or heat, the alarm will sound and the LED
indicator will ash red continuously until it is eliminated.
1. Test button
2. LED indicator
3. Siren
4. Smoke intake
5. Mounting plate
Safety
• Read the manual carefully before use. Keep the
manual for future reference.
• Only use the device for its intended purposes. Do not
use the device for other purposes than described in
the manual.
• Do not use the device if any part is damaged or
defective. If the device is damaged or defective,
replace the device immediately.
• The device has a limited lifetime. Replace the device
10 years after the date of purchase. Write the
purchase date on the manual for future reference.
Battery safety
• Use only the batteries mentioned in the manual.
• Do not use old and new batteries together.
• Do not use batteries of dierent types or brands.
• Do not install batteries in reverse polarity.
• Do not short-circuit or disassemble the batteries.
• Do not expose the batteries to water.
• Do not expose the batteries to re or excessive heat.
• Batteries are prone to leakage when fully discharged.
To avoid damage to the product, remove the
batteries when leaving the product unattended for
longer periods of time.
• If liquid from the batteries comes into contact with
skin or clothing, immediately rinse with fresh water.
Installation (g. B)
Warning!
• Do not use the device outdoors.
• Do not expose the device to water or moisture.
• Install the device out of the reach of children.
• Install at least one device at each oor level.
Preferably install one device in each recommended
area.
• Do not install the device in bathrooms, toilets or
other rooms where the device can be triggered by
steam or condensation. Install the device at least 3
meters away from these rooms.
• Do not install the device in rooms where normal
combustion occurs regularly.
• Do not install the device in rooms with temperatures
below 5 °C or above 37 °C.
• Do not install the device in dusty or dirty
environments.
• Do not install the device near doors and windows.
• Do not install the device near radiators or air vents in
walls or ceilings.
• Do not install the device behind curtains or furniture.
• Do not use rechargeable batteries in order to prevent
malfunctions.
• Do not paint the device.
1 2 3
4
5

English
4
1. Download, install and launch the app“Nedis
SmartLife”from the Apple App Store or Google Play
Store on your mobile device.
2. Create a new account or log in to your existing
account.
3. Tap“+” to add the device.
4. Select the correct product from the list.
5. Place the batteries (2x AA, alkaline) into the battery
compartment.
6. Press the test button 3 times in 2 seconds.
7. When the LED is turned on, conrm in the app.
8. Conrm the Wi-Fi network and password.
9. Enter the device name.
10. Mount the device to the mounting plate. Refer to the
illustrations for the correct positioning of the device.
11. Test the alarm. Refer to the section “Testing the
alarm”.
Recommended installation locations *)
Area Yes No
Living room X
Dining room X
Kitchen X
Bathroom / Toilet X
Bedroom X
Hallway X
Attic X
Basement X
Garage X
Boiler room X
*) The installation requirements may dier per region.
Contact your local authorities for possible additional
requirements.
Use
LED indicator
Do not disconnect battery to quiet an unwanted alarm.
This will remove your protection. Fan the air or open a
window to remove smoke or dust
Normal
operation
The LED indicator will
ash red once every
40 seconds.
---
Smoke/heat
detection
The alarm will
sound and the LED
indicator will ash red
continuously until the
smoke or the heat is
eliminated.
Eliminate the smoke
or the heat.
Low-battery
warning
The alarm will beep
shortly every 40
seconds and the LED
indicator will ash.
Take one of these
actions:
• Replace the battery.
• Press the test button
to pause the alarm
for 8 hours.
Defect
The alarm will beep
shortly every 40
seconds.
Replace the device.
Smoke alarm
does not
sound when
tested
Remove the smoke
alarm from the bracket
and check whether
the battery is properly
connected to the
battery connector.
If the battery is
properly connected
and the smoke alarm
does not sound when
tested, replace the
device.
The alarms
sounds
dierent
The alarm is operating
correctly.
Please clean the
smoke alarm
according to the
Cleaning and
Maintenance section.
Testing the alarm
The alarm must be tested weekly to ensure correct
operation. If the alarm test fails, replace the smoke
detector.
• Press and hold the test button for 5 seconds. The
alarm will sound.
• Release the test button.

5
English
Hush function
If the alarm sounds falsely due to cooking, the alarm can
be paused for 10 minutes by pressing the test button.
The LED indicator will ash every 8 seconds. Locate the
source of the alarm before using the hush function in
order to make sure that it is not a life-threatening
situation.
Cleaning and maintenance
Warning!
• Do not use cleaning solvents or abrasives.
• Do not clean the inside of the device.
• Do not attempt to repair the device. If the device
does not operate correctly, replace it with a new
device.
• Replace the battery immediately when the device
gives a low-battery warning. Only use the batteries
specied in the manual.
• Clean the outside of the device at least once a month.
Use a vacuum cleaner with brush nozzle to clean the
outside of the device.
Technical data
Battery
Battery type 2x AA, alkaline
Rated voltage 1.5 V DC
Recommended batteries
Energize: E91
Gold Peak Group: GP15A LR6
Raymax: LR6
Wi-Fi
Wireless frequency 2.4 GHz
Wireless transmission current < 450 mA
Wireless distance > 30 m
Total maximum transmission
power 17 dBm
Frequency range 2.412 – 2.484 MHz
16
0359
0359-CPR-00622
EN 14604:2005/AC:2008
GS558D
Intended re safety and
installed in buildings
Essential characteristic 1: Pass
Essential characteristic 2: Pass
Essential characteristic 3: Pass
Essential characteristic 4: Pass
Essential characteristic 5: Pass
Essential characteristic 6: Pass
Essential characteristic 7: Pass
Essential characteristic 8: Pass
Support
If you need further help or have comments or
suggestions please visit www.nedis.com/support
Contact
NEDIS BV, De Tweeling 28, 5215 MC‘s-Hertogenbosch,
the Netherlands

Nederlands
6
WIFIDS10xx
WiFi rook- en hittedetector
Beschrijving (g. A)
De rook- en hittedetector is een apparaat dat wordt
gebruikt om rook en hitte te detecteren. Het apparaat
detecteer geen gas. Het apparaat is uitsluitend geschikt
voor gebruik binnenshuis. Als het apparaat rook of hitte
detecteert, gaat het alarm af en knippert de LED-indicator
continu rood tot de alarmsituatie wordt opgeheven.
1. Testknop
2. LED-indicator
3. Sirene
4. Rookinlaat
5. Montageplaat
Veiligheid
• Lees voor gebruik de handleiding zorgvuldig door.
Bewaar de handleiding voor latere raadpleging.
• Gebruik het apparaat uitsluitend voor de beoogde
doeleinden. Gebruik het apparaat niet voor andere
doeleinden dan beschreven in de handleiding.
• Gebruik het apparaat niet als een onderdeel
beschadigd of defect is. Vervang een beschadigd of
defect apparaat onmiddellijk.
• Het apparaat heeft een beperkte levensduur. Vervang
het apparaat 10 jaar na de datum van aankoop.
Noteer de aankoopdatum op de handleiding voor
toekomstig gebruik.
Batterijveiligheid
• Gebruik alleen de in de handleiding vermelde
batterijen.
• Combineer geen oude en nieuwe batterijen.
• Gebruik geen batterijen van verschillende typen of
merken.
• Installeer batterijen niet met omgekeerde polariteit.
• Veroorzaak geen kortsluiting van de batterijen. Haal
de batterijen niet uit elkaar.
• Stel de batterijen niet bloot aan water.
• Stel de batterijen niet bloot aan vuur of extreme hitte.
• Volledig ontladen batterijen kunnen gaan lekken.
Verwijder de batterijen wanneer u het product
gedurende langere tijd onbeheerd achterlaat om
schade aan het product te voorkomen.
• Indien vloeistof uit de batterij in contact komt met de
huid of kleding, onmiddellijk spoelen met vers water.
Installatie (g. B)
Waarschuwing!
• Gebruik het apparaat niet buitenshuis.
• Stel het apparaat niet bloot aan water of vocht.
• Installeer het apparaat buiten bereik van kinderen.
• Installeer minstens één apparaat op iedere
verdieping. Installeer bij voorkeur één apparaat in
iedere aanbevolen ruimte.
• Installeer het apparaat niet in badkamers, toiletten of
andere ruimtes waar het apparaat kan worden
geactiveerd door stoom of condens. Installeer het
apparaat op een afstand van minimaal 3 meter van
deze ruimtes.
• Installeer het apparaat niet in ruimtes waar
regelmatig normale verbranding plaatsvindt.
• Installeer het apparaat niet in ruimten met
temperaturen onder 5 °C of boven 37 °C.
• Installeer het apparaat niet in stoge of vieze
omgevingen.
• Installeer het apparaat niet in de buurt van deuren en
ramen.
• Installeer het apparaat niet in de buurt van
radiatoren of ventilatieroosters in muren of plafonds.
• Installeer het apparaat niet achter gordijnen of
meubels.
• Gebruik geen oplaadbare batterijen om storingen te
voorkomen.
• Schilder het apparaat niet.
1 2 3
4
5

Nederlands
7
1. Download, installeer en activeer de“Nedis SmartLife”
app uit de Apple App Store of Google Play Store op
uw mobiele apparaat.
2. Maak een nieuw account aan of log in op uw
bestaande account.
3. Tip "+" aan om het apparaat toe te voegen.
4. Kies het juiste product uit de lijst.
5. Plaats de batterijen (2x AA, alkaline) in het
batterijcompartiment.
6. Druk binnen 2 seconden 3 maal op de testknop.
7. Bevestig als de LED gaat branden in de app.
8. Bevestig het wi-netwerk en het wachtwoord.
9. Voer de naam van het apparaat in.
10. Monteer het apparaat op de montageplaat. Zie de
afbeeldingen voor de juiste plaatsing van het apparaat.
11. Test het alarm. Zie het gedeelte "Het alarm testen".
Aanbevolen installatielocaties *)
Ruimte Ja Nee
Woonkamer X
Eetkamer X
Keuken X
Badkamer / Toilet X
Slaapkamer X
Gang X
Zolder X
Kelder X
Garage X
Boilerruimte X
*) De installatie-eisen kunnen per regio verschillen.
Neem contact op met uw lokale autoriteiten voor
mogelijke aanvullende eisen.
Gebruik
LED-indicator
Normaal
bedrijf
De LED-indicator
knippert iedere 40
seconden één keer
rood.
---
Rook/
hittedetectie
Het alarm gaat af
en de LED-indicator
knippert continu rood
tot de rook of de hitte
wordt weggenomen.
Neem de rook of de
hitte weg.
Waarschuwing
voor batterij
bijna leeg
Het alarm geeft iedere
40 seconden een korte
pieptoon en de LED-
indicator knippert.
Voer één van de
onderstaande
handelingen uit:
• Vervang de batterij.
• Druk op de
testknop om het
alarm gedurende 8
uur tijdelijk uit te
schakelen.
Defect
Het alarm geeft iedere
40 seconden een korte
pieptoon.
Vervang het
apparaat.
Het alarm
maakt geen
geluid tijdens
het testen
Verwijder het alarm uit
de montageplaat en
kijk of de batterij goed
is aangesloten.
Als de batterij goed
aangesloten is en
het alarm maakt
geen geluid tijdens
het testen, moet het
apparaat vervangen
worden.
Het alarm
klinkt anders
Het alarm werkt naar
behoren
Maak het rookalarm
schoon volgens
de Reiniging en
onderhoud sectie.

8
Nederlands
Het alarm testen
Het alarm moet wekelijks worden getest om de juiste
werking te garanderen. Vervang als de alarmtest geen
goed resultaat oplevert de rookmelder.
• Houd de testknop 5 seconden ingedrukt.
Het alarm zal klinken.
• Laat de testknop los.
Stiltefunctie
Als het alarm door het koken ten onrechte afgaat, kan dit
gedurende 10 minuten worden stilgezet door op de
testknop te drukken. De LED-indicator knippert iedere
8seconden. Zoek voordat u de stiltefunctie inschakelt de
bron van het alarm om zeker te weten dat geen
levensbedreigende situatie aanwezig is.
Reiniging en onderhoud
Waarschuwing!
• Gebruik geen reinigingsmiddelen of schuurmiddelen.
• Reinig niet de binnenzijde van het apparaat.
• Probeer het apparaat niet te repareren. Indien het
apparaat niet juist werkt, vervang het dan door een
nieuw apparaat.
• Vervang de batterij onmiddellijk als het apparaat
aangeeft dat de batterij bijna leeg is. Gebruik
uitsluitend de in de handleiding aangegeven
batterijen.
• Reinig de buitenzijde van het apparaat minstens één
keer per maand. Gebruik een stofzuiger met
borstelmondstuk om de buitenzijde van het apparaat
te reinigen.
Technische gegevens
Batterij
Type batterij 2x AA, alkaline
Nominale spanning 1,5 V DC
Aanbevolen batterijen
Energize: E91
Gold Peak Group: GP15A LR6
Raymax: LR6
WiFi
Draadloze frequentie 2,4 GHz
Draadloze zendstroom < 450 mA
Draadloze afstand > 30 m
Totaal maximum
zendvermogen 17 dBm
Frequentiebereik 2412 – 2484 MHz
16
0359
0359-CPR-00622
EN 14604:2005/AC:2008
GS558D
Bedoeld voor brandveiligheid
en installatie in gebouwen
Essentieel kenmerk 1: Voldaan
Essentieel kenmerk 2: Voldaan
Essentieel kenmerk 3: Voldaan
Essentieel kenmerk 4: Voldaan
Essentieel kenmerk 5: Voldaan
Essentieel kenmerk 6: Voldaan
Essentieel kenmerk 7: Voldaan
Essentieel kenmerk 8: Voldaan
Support
Breng voor hulp of als u een opmerking of suggestie
heeft een bezoek aan www.nedis.com/support
Contact
NEDIS BV, De Tweeling 28, 5215 MC ’s-Hertogenbosch,
Nederland

Deutsch
9
WIFIDS10xx
Wi-Fi Rauch- und Wärmemelder
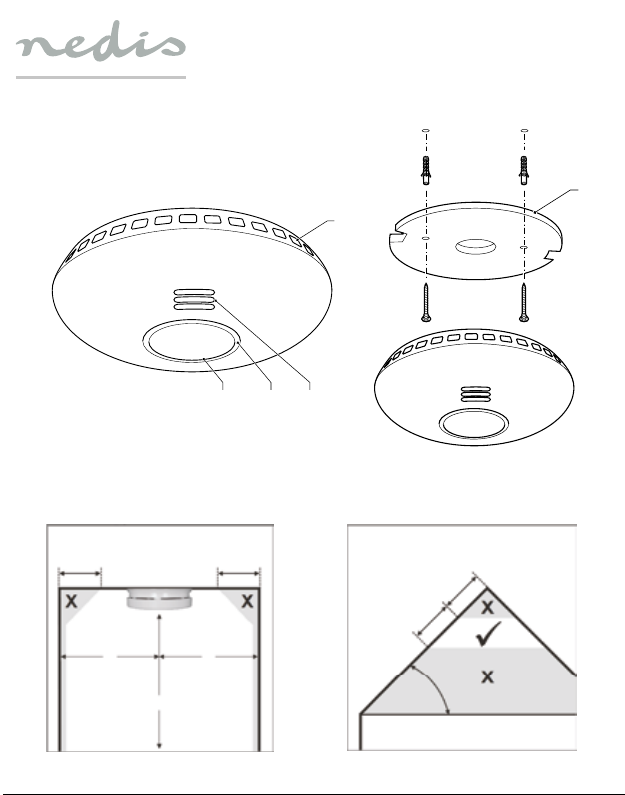
Beschreibung (Abb. A)
Der Rauch- und Wärmemelder ist eine Vorrichtung zur
Erkennung von Rauch und Hitze. Das Gerät erkennt kein
Gas. Das Gerät eignet sich nur zur Verwendung in
Innenräumen. Wenn das Gerät Rauch oder Hitze erkennt,
ertönt der Alarm und die LED-Anzeige blinkt
kontinuierlich rot, bis er abgeschaltet wird.
1. Test-Taste
2. LED-Anzeige
3. Sirene
4. Rauchabzug
5. Montageplatte
Sicherheit
• Lesen Sie die Bedienungsanleitung vor dem
Gebrauch genau durch. Bitte bewahren Sie die
Bedienungsanleitung zur späteren Bezugnahme auf.
• Verwenden Sie das Gerät nur bestimmungsgemäß.
Verwenden Sie das Gerät nur für den in dieser
Bedienungsanleitung beschriebenen Zweck.
• Verwenden Sie das Gerät nicht, falls ein Teil
beschädigt oder defekt ist. Ist das Gerät beschädigt
oder defekt, erneuern Sie es unverzüglich.
• Das Gerät hat eine begrenzte Lebensdauer. Erneuern
Sie das Gerät alle 10 Jahre nach dem Kaufdatum.
Schreiben Sie das Kaufdatum zur künftigen
Bezugnahme auf das Handbuch.
Batteriesicherheit
• Verwenden Sie ausschließlich die in dieser Anleitung
genannten Batterien.
• Verwenden Sie keine alten und neuen Batterien
zusammen.
• Verwenden Sie nicht Batterien unterschiedlicher
Typen oder Marken.
• Setzen Sie die Batterien nicht mit vertauschter
Polarität ein.
• Schließen Sie die Batterien nicht kurz und zerlegen
Sie sie nicht.
• Setzen Sie die Batterien keinem Wasser aus.
• Setzen Sie die Batterien keinem Feuer oder
übermäßiger Hitze aus.
• Batterien neigen dazu, auszulaufen, wenn Sie
vollständig entladen sind. Um eine Beschädigung des
Produkts zu vermeiden, entfernen Sie die Batterien,
wenn das Produkt längere Zeit nicht benutzt wird.
• Falls Batterieüssigkeit mit der Haut oder Kleidung in
Berührung kommt, spülen Sie die Flüssigkeit sofort
mit frischem Wasser fort.
Installation (Abb. B)
Warnung!
• Verwenden Sie das Gerät nicht im Freien.
• Setzen Sie das Gerät keinem Wasser und keiner
Feuchtigkeit aus.
• Installieren Sie das Gerät so, dass es für Kinder
unzugänglich ist.
• Installieren Sie mindestens ein Gerät auf jedem
Stockwerk. Installieren Sie möglichst ein Gerät in
jedem empfohlenen Bereich.
• Installieren Sie das Gerät nicht in Badezimmern,
Toiletten oder anderen Räumen, in denen es durch
Dampf oder Kondensation ausgelöst werden kann.
Installieren Sie das Gerät mindestens 3 Meter von
diesen Räumen entfernt.
• Installieren Sie das Gerät nicht in Räumen, in denen
regelmäßig eine normale Verbrennung stattndet.
• Installieren Sie das Gerät nicht in Räumen mit
Temperaturen unter 5 °C oder über 37 °C.
• Installieren Sie das Gerät nicht in staubigen oder
schmutzigen Umgebungen.
• Installieren Sie das Gerät nicht in der Nähe von Türen
oder Fenstern.
• Installieren Sie das Gerät nicht in der Nähe von
1 2 3
4
5

Deutsch
10
Radiatoren oder Be-/Entlüftungsönungen in
Wänden oder Decken.
• Installieren Sie das Gerät nicht hinter Gardinen oder
Möbeln.
• Verwenden Sie keine wiederauadbaren Batterien,
um Fehlfunktionen zu vermeiden.
• Lackieren Sie das Gerät nicht.
1. Laden Sie die App "Nedis SmartLife" aus dem Apple
App Store oder Google Play Store auf Ihr mobiles
Gerät herunter, installieren und starten Sie sie.
2. Erstellen Sie ein neues Konto oder melden Sie sich
bei Ihrem bestehenden Konto an.
3. Tippen Sie auf "+", um das Gerät hinzuzufügen.
4. Wählen Sie das richtige Produkt aus der Liste aus.
5. Setzen Sie die Batterien (2x AA, alkalisch) in das
Batteriefach ein.
6. Drücken Sie die Testtaste dreimal in 2 Sekunden.
7. Wenn die LED leuchtet, bestätigen Sie dies in der App.
8. Bestätigen Sie das Wi-Fi-Netzwerk und das Passwort.
9. Geben Sie den Gerätenamen ein.
10. Montieren Sie das Gerät auf der Montageplatte.
Entnehmen Sie die korrekte Positionierung des
Gerätes den Abbildungen.
11. Prüfen Sie den Alarm. Siehe Abschnitt "Prüfen des
Alarms".
Empfohlene Installationsorte *)
Bereich Ja Nein
Wohnzimmer X
Esszimmer X
Küche X
Badezimmer/Toilette X
Schlafzimmer X
Flur X
Dachgeschoss X
Keller X
Garage X
Heizungsraum X
*) Die Installationsanforderungen können je nach Region
unterschiedlich sein. Bitte kontaktieren Sie Ihre örtlichen
Behörden, um mögliche zusätzliche Anforderungen in
Erfahrung zu bringen.
Gebrauch
LED-Anzeige
Normalbetrieb
Die LED-Anzeige blinkt
alle 40 Sekunden ein
Mal rot.
---
Rauch-/
Wärmeerkennung
Der Alarm ertönt und
die LED-Anzeige blinkt
kontinuierlich rot,
bis der Rauch oder
die Hitze beseitigt
wurden.
Beseitigen Sie
den Rauch oder
die Hitze.
Warnung bei
schwacher Batterie
Der Alarm ertönt kurz
alle 40 Sekunden
und die LED-Anzeige
blinkt.
Führen Sie eine
der folgenden
Maßnahmen
durch:
• Erneuern Sie
die Batterie.
• Drücken Sie die
Testtaste, um
den Alarm für 8
Stunden zu
unterbrechen.
Fehler Der Alarm ertönt kurz
alle 40 Sekunden.
Erneuern Sie das
Gerät.
Der Alarm ertönt
beim Testen nicht
Entfernen Sie den
Rauchmelder von
der Halterung und
prüfen Sie, ob die
Batterie richtig an
den Batterieanschluss
angeschlossen ist.
Wenn die
Batterie richtig
angeschlossen
ist und der
Rauchmelder
beim Testen nicht
ertönt, erneuern
Sie das Gerät.
Der Alarm ertönt
anders als normal
Der Alarm funktioniert
ordnungsgemäß.
Bitte reinigen Sie
den Rauchmelder
gemäß Abschnitt
Reinigung und
Pege.
Prüfen des Alarms
Der Alarm muss wöchentlich geprüft werden, um die
einwandfreie Funktion des Geräts sicherzustellen. Wenn
der Alarmtest fehlschlägt, ersetzen Sie den Rauchmelder.
• Drücken und halten Sie die Prüftaste 5 Sekunden
lang. Der Alarm ertönt.
• Lassen Sie die Prüftaste los.

11
Deutsch
Ruhe-Funktion
Wenn der Alarm fälschlicherweise durch Kochen
ausgelöst wird, kann der Alarm durch Drücken der
Prüftaste für 10 Minuten angehalten werden. Die
LED-Anzeige blinkt alle 8 Sekunden. Lokalisieren Sie die
Alarmquelle, bevor Sie die Ruhe-Funktion verwenden,
um sicherzustellen, dass es sich nicht um eine
lebensbedrohliche Situation handelt.
Reinigung und Pege
Warnung!
• Verwenden Sie keine Lösungs- oder Scheuermittel.
• Reinigen Sie das Gerät nicht von innen.
• Versuchen Sie nicht, das Gerät zu reparieren. Falls das
Gerät nicht einwandfrei arbeitet, tauschen Sie es
gegen ein neues aus.
• Ersetzen Sie die Batterie sofort, wenn das Gerät eine
Warnung bei niedrigem Akkustand anzeigt.
Verwenden Sie nur die im Handbuch angegebenen
Batterien.
• Reinigen Sie das Äußere des Geräts mindestens ein
Mal im Monat. Verwenden Sie einen Staubsauger mit
einer Bürstendüse, um das Äußere des Geräts zu
reinigen.
Technische Daten
Batterie
Batterietyp 2x AA, alkalisch
Bemessungsspannung 1,5 V DC
Empfohlene Batterien
Energize: E91
Gold Peak Group: GP15A LR6
Raymax: LR6
Wi-Fi
Kabellose Frequenz 2,4 GHz
Strom für die drahtlose
Übertragung < 450 mA
Kabellose Entfernung > 30 m
Maximale
Gesamtübertragungsleistung 17 dBm
Frequenzbereich 2,412 – 2,484 MHz
16
0359
0359-CPR-00622
EN 14604:2005/AC:2008
GS558D
Verwendungszweck:
Brandschutz; Installation in
Gebäuden
Wesentliches Merkmal 1:
Bestanden
Wesentliches Merkmal 2:
Bestanden
Wesentliches Merkmal 3:
Bestanden
Wesentliches Merkmal 4:
Bestanden
Wesentliches Merkmal 5:
Bestanden
Wesentliches Merkmal 6:
Bestanden
Wesentliches Merkmal 7:
Bestanden
Wesentliches Merkmal 8:
Bestanden
Hilfe
Wenn Sie weitere Hilfe benötigen oder Kommentare
oder Vorschläge für uns haben, gehen Sie bitte auf www.
nedis.com/support
Kontakt
NEDIS BV, De Tweeling 28, 5215 MC ’s-Hertogenbosch,
Niederlande

Español
12
WIFIDS10xx
Detector de humo y calor Wi-Fi
Descripción (g. A)
El detector de humo y calor Wi-Fi es un dispositivo que
se utiliza para detectar humo y calor. El dispositivo no
detecta gases. El dispositivo sólo es apto para uso en
interiores. Si el dispositivo detecta humo o calor, la
alarma sonará y el indicador LED parpadeará en rojo de
forma continua hasta que se elimine.
1. Botón de prueba
2. Indicador LED
3. Sirena
4. Admisión de humo
5. Placa de montaje
Seguridad
• Lea el manual detenidamente antes del uso.
Conserve el manual en caso de futura necesidad.
• Utilice el dispositivo únicamente para su uso previsto.
No utilice el dispositivo con una nalidad distinta a la
descrita en el manual.
• No utilice el dispositivo si alguna pieza ha sufrido
daños o tiene un defecto. Si el dispositivo ha sufrido
daños o tiene un defecto, sustitúyalo
inmediatamente.
• El dispositivo tiene una duración limitada. Sustituya
el dispositivo 10 años después de la fecha de compra.
Escriba la fecha de compra en el manual como
referencia futura.
Seguridad de las pilas
• Utilice únicamente las pilas mencionadas en el
manual.
• No use conjuntamente pilas nuevas y usadas.
• No utilice pilas de distintos tipo o marcas.
• No instale las pilas con la polaridad invertida.
• No cortocircuite ni desmonte las pilas.
• No exponga las pilas al agua.
• No exponga las pilas al fuego ni a un calor excesivo.
• Las pilas tienden a tener fugas cuando están
totalmente descargadas. Para evitar daños en el
producto, saque las pilas cuando no vaya a utilizar el
producto durante periodos prolongados de tiempo.
• Si el líquido de las pilas entra en contacto con la piel
o la ropa, lave inmediatamente con agua.
Instalación (g. B)
¡Advertencia!
• No utilice el dispositivo en exteriores.
• No exponga el dispositivo al agua ni a la humedad.
• Instale el dispositivo fuera del alcance de los niños.
• Instale al menos un dispositivo en cada planta.
Preferiblemente, instale un dispositivo en cada zona
recomendada.
• No instale el dispositivo en baños, aseos u otras
habitaciones donde el dispositivo pueda activarse
debido al vapor o a la condensación. Instale el
dispositivo al menos a 3 metros de estas estancias.
• No instale el dispositivo en estancias donde se
produzca periódicamente combustión normal.
• No instale el dispositivo en habitaciones con
temperaturas inferiores a 5 °C o superiores a 37 °C.
• No instale el dispositivo en entornos sucios o con
polvo.
• No instale el dispositivo cerca de puertas y ventanas.
• No instale el dispositivo cerca de radiadores o
ventilaciones de aire en paredes o techos.
• No instale el dispositivo detrás de cortinas o muebles.
• No utilice baterías recargables para evitar fallos.
• No pinte el dispositivo.
1 2 3
4
5

Español
13
1. Descargue, instale e inicie la aplicación "Nedis
SmartLife" de Apple App Store o Google Play Store en
su dispositivo móvil.
2. Cree una cuenta nueva o inicie sesión en su cuenta
existente.
3. Toque“+”para agregar el dispositivo.
4. Seleccione el producto correcto de la lista.
5. Introduzca las pilas (2x AA, alcalinas) en el
compartimento de las pilas.
6. Pulse el botón de prueba 3 veces durante 2
segundos.
7. Cuando el LED se encienda, conrme en la aplicación.
8. Conrme la red Wi-Fi y la contraseña.
9. Introduzca el nombre del dispositivo.
10. Monte el dispositivo en la placa de montaje. Consulte
las ilustraciones para ver el posicionamiento correcto
del dispositivo.
11. Pruebe la alarma. Consulte la sección "Prueba de la
alarma".
Lugares recomendados para la instalación *)
Zona Sí No
Salón X
Comedor X
Cocina X
Baño / aseo X
Dormitorio X
Pasillo X
Ático X
Planta baja X
Garaje X
Cuarto de calderas X
*) Los requisitos de instalación pueden diferir en función
de la región. Rogamos se ponga en contacto con las
autoridades locales para ver posibles requisitos
adicionales.
Uso
Indicador LED
Funcionamiento
normal
El indicador LED
parpadeará en rojo
una vez cada 40
segundos.
---
Detección de
humo/calor
La alarma sonará
y el indicador LED
parpadeará en rojo
de forma continua
hasta que se elimine el
humo o el calor.
Elimine el humo o
el calor.
Advertencia de
pila baja
La alarma pitará
brevemente cada
40 segundos y
el indicador LED
parpadeará.
Realice una de estas
acciones:
• Cambie la pila.
• Pulse el botón de
prueba para poner
en pausa la alarma
durante 8 horas.
Defecto
La alarma pitará
brevemente cada 40
segundos.
Cambie el
dispositivo.
La alarma no
suena cuando
se prueba
Retire la alarma
del soporte y
compruebe si la
batería está conectada
correctamente al
conector de la batería.
Si la batería
está conectada
correctamente y la
alarma de humo no
suena cuando se
prueba, reemplace
el dispositivo.
La alarma suena
diferente a lo
normal
La alarma funciona
correctamente.
Limpie la alarma
de acuerdo con la
sección Limpieza y
mantenimiento.

14
Español
Pruebas de la alarma
La alarma debe probarse una vez a la semana para
garantizar su correcto funcionamiento. Si la prueba de
alarma falla, sustituya el detector de humo.
• Pulse y mantenga pulsado el botón de prueba
durante 5 segundos. La alarma sonará.
• Suelte el botón de prueba.
Función de silencio
Si la alarma suena falsamente mientras cocina, esta
puede ponerse en pausa durante 10 minutos pulsando
el botón de prueba. El indicador LED parpadeará cada 8
segundos. Localice la fuente de la alarma antes de usar la
función de silencio para asegurarse de que no sea una
situación potencialmente mortal.
Limpieza y mantenimiento
¡Advertencia!
• No utilice disolventes de limpieza ni productos
abrasivos.
• No limpie el interior del dispositivo.
• No intente reparar el dispositivo. Si el dispositivo no
funciona correctamente, sustitúyalo por uno nuevo.
• Sustituya la pila inmediatamente cuando el
dispositivo dé una advertencia de pila baja. Utilice
únicamente las pilas mencionadas en el manual.
• Limpie el exterior del dispositivo al menos una vez al
mes. Utilice un aspirador con una boquilla con cepillo
para limpiar el exterior del dispositivo.
Datos técnicos
Pila
Tipo de batería 2x AA alcalina
Tensión nominal 1,5 V CC
Pilas recomendadas
Energize: E91
Gold Peak Group: GP15A LR6
Raymax: LR6
Wi-Fi
Frecuencia inalámbrica 2,4 GHz
Corriente de transmisión
inalámbrica < 450 mA
Distancia inalámbrica > 30 m
Total de potencia de
transmisión máxima 17 dBm
Gama de frecuencia 2.412 – 2.484 MHz
16
0359
0359-CPR-00622
EN 14604:2005/AC:2008
GS558D
Uso previsto para seguridad
contra incendios e instalada en
edicios
Característica esencial 1:
Aprobado
Característica esencial 2:
Aprobado
Característica esencial 3:
Aprobado
Característica esencial 4:
Aprobado
Característica esencial 5:
Aprobado
Característica esencial 6:
Aprobado
Característica esencial 7:
Aprobado
Característica esencial 8:
Aprobado
Apoyo
Si necesita ayuda adicional o si tiene comentarios o
sugerencias, visite www.nedis.com/support
Contacto
NEDIS BV, De Tweeling 28, 5215 MC‘s-Hertogenbosch,
Países Bajos

Français
15
WIFIDS10xx
Détecteur de chaleur et de fumée
Wi-Fi
Description (g. A)
Le détecteur de chaleur et de fumée est un appareil
servant à détecter la fumée et la chaleur. L'appareil ne
détecte pas le gaz. L'appareil est conçu exclusivement
pour une utilisation en intérieur. Si l'appareil détecte de
la fumée ou de la chaleur, l'alarme retentit et l'indicateur
LED clignote en rouge sans arrêt jusqu'à l'élimination.
1. Bouton test
2. Indicateur LED
3. Sirène
4. Admission de fumée
5. Plaque de xation
Sécurité
• Lisez attentivement le manuel avant usage.
Conservez le manuel pour toute référence ultérieure.
• Utilisez l'appareil uniquement pour son usage prévu.
N'utilisez pas l'appareil à d'autres ns que celles
décrites dans le manuel.
• N'utilisez pas l'appareil si une pièce quelconque est
endommagée ou défectueuse. Si l'appareil est
endommagé ou défectueux, remplacez-le
immédiatement.
• L'appareil présente un cycle de vie limité. Remplacez
l'appareil 10 ans après la date d'achat. Notez la date
d'achat sur le manuel pour référence ultérieure.
Sécurité des piles
• Utilisez uniquement les piles mentionnées dans le
manuel.
• N'utilisez jamais des piles usées avec des piles neuves.
• N'utilisez pas des piles de marques ou de types diérents.
• N'installez pas les piles selon une polarité inversée.
• Ne court-circuitez et ne démontez pas les piles.
• N'exposez pas les piles à l'eau.
• N'exposez pas les piles au feu ou à une chaleur excessive.
• Les piles chargées à fond ont tendance à fuir. Pour
éviter d'endommager l'appareil, retirez les piles si
vous laissez l'appareil sans surveillance pendant des
périodes prolongées.
• Si du liquide s'échappant des piles entre en contact
avec la peau ou les vêtements, rincez immédiatement
à l'eau claire.
Installation (g. B)
Avertissement!
• N'utilisez pas l'appareil à l'extérieur.
• N'exposez pas l'appareil à l'eau ou à l'humidité.
• Installez l'appareil hors de la portée des enfants.
• Installez au moins un appareil à chaque étage. De
préférence, installez un appareil dans chaque zone
recommandée.
• N'installez pas l'appareil dans les salles de bains,
toilettes ou autres où il pourrait se déclencher du fait
de la vapeur ou la condensation. Installez l'appareil à
au moins 3 mètres de ces pièces.
• N'installez pas l'appareil dans des pièces où une
combustion normale se produit régulièrement.
• N'installez pas l'appareil dans des pièces présentant
des températures inférieures à 5 °C ou supérieures à
37 °C.
• N'installez pas l'appareil dans un environnement sale
ou poussiéreux.
• N'installez pas l'appareil à proximité des portes et
fenêtres.
• N'installez pas l'appareil à proximité des radiateurs ou
des ventilations aux murs ou au plafond.
• N'installez pas l'appareil derrière des rideaux ou des
meubles.
• N'utilisez pas de piles rechargeables an d'éviter tout
dysfonctionnement.
• Ne peignez pas l'appareil.
1 2 3
4
5

Français
16
1. Téléchargez, installez et lancez l'app“Nedis SmartLife”
sur Apple App Store ou Google Play Store dans votre
dispositif mobile.
2. Créez un nouveau compte ou connectez-vous à votre
compte existant.
3. Touchez“+”pour ajouter l'appareil.
4. Sélectionnez le produit correct dans la liste.
5. Insérez les piles (2x AA, alcalines) dans le
compartiment de pile.
6. Appuyez sur le bouton de test 3 fois en 2 secondes.
7. Lorsque la LED s'allume, conrmez dans l'app.
8. Conrmez le réseau Wi-Fi et le mot de passe.
9. Saisissez le nom d'appareil.
10. Montez l'appareil sur la plaque de montage. Voir les
illustrations pour le positionnement correct de
l'appareil.
11. Testez l'alarme. Consultez la section "Test d'alarme".
Emplacements recommandés d'installation *)
Zone Oui Non
Salon X
Salle à manger X
Cuisine X
Salle de bains /Toilettes X
Chambre à coucher X
Couloir X
Grenier X
Sous-sol X
Garage X
Salle de chaudière X
*) Les exigences d'installation peuvent diérer selon la
région. Veuillez consulter vos autorités locales an de
connaître les obligations supplémentaires possibles.
Usage
Indicateur LED
Fonctionnement
normal
L'indicateur LED
clignote en rouge
une fois toutes les 40
secondes.
---
Détection de
fumée/chaleur
L'alarme retentit
et l'indicateur LED
clignote en rouge
sans arrêt jusqu'à
l'élimination de
la fumée ou de la
chaleur.
Éliminez la fumée
ou la chaleur.
Avertissement de
pile faible
L'alarme émet un
bip bref toutes les
40 secondes et
l'indicateur LED
clignote.
Eectuez l'une de
ces actions :
• Remplacez la
pile.
• Appuyez sur le
bouton de test
pour mettre
l'alarme en
pause pendant 8
heures.
Panne
L'alarme émet un
bip bref toutes les 40
secondes.
Remplacez
l'appareil.
L’alarme ne sonne
pas lors du test
Retirez l’alarme du
support et vériez
si la batterie est
correctement
connectée au
connecteur de
batterie.
Si la batterie est
correctement
connectée et
que l’avertisseur
de fumée ne
sonne pas lors du
test, remplacez
l’appareil.
L’alarme sonne
diéremment de
la normale
L’alarme fonctionne
correctement.
Veuillez nettoyer
l’alarme
conformément
à la section
Nettoyage et
entretien.

17
Français
Test d'alarme
L'alarme doit être testée chaque semaine pour s'assurer
de son fonctionnement correct. En cas d'échec du test
d'alarme, remplacez le détecteur de fumée.
• Appuyez et maintenez le bouton de test pendant 5
secondes. L'alarme retentit.
• Relâchez le bouton de test.
Fonction silence
Si l'alarme retentit par erreur en cuisinant, elle peut être
mise en pause 10 minutes en appuyant sur le bouton de
test. L'indicateur LED clignote une fois toutes les 8
secondes. Localisez la source de l'alarme avant d'utiliser
la fonction de silence an de vous assurer qu'il ne s'agit
pas d'une situation impliquant un danger mortel.
Nettoyage et entretien
Avertissement!
• N'utilisez pas de solvants ni de produits abrasifs.
• Ne nettoyez pas l'intérieur de l'appareil.
• Ne tentez pas de réparer l'appareil. Si l'appareil
fonctionne mal, remplacez-le par un neuf.
• Remplacez la pile immédiatement dès que l'appareil
émet un avertissement de pile faible. Utilisez
uniquement les piles spéciées dans le manuel.
• Nettoyez l'extérieur de l'appareil au moins une fois
par mois. Utilisez un aspirateur avec un embout à
brosse pour nettoyer l'extérieur de l'appareil.
Caractéristiques techniques
Batterie
Type de pile 2x AA, alcalines
Tension nominale 1,5 V CC
Piles recommandées
Energize: E91
Gold Peak Group: GP15A LR6
Raymax: LR6
Wi-Fi
Fréquence sans l 2,4 GHz
Courant de transmission
sans l < 450 mA
Distance sans l > 30 m
Puissance de transmission
maximum totale 17 dBm
Plage de fréquence 2,412 – 2,484 MHz
16
0359
0359-CPR-00622
EN 14604:2005/AC:2008
GS558D
Destiné à la sécurité
anti-incendie et installé en
immeuble
Caractéristique essentielle 1 :
Réussi
Caractéristique essentielle 2 :
Réussi
Caractéristique essentielle 3 :
Réussi
Caractéristique essentielle 4 :
Réussi
Caractéristique essentielle 5 :
Réussi
Caractéristique essentielle 6 :
Réussi
Caractéristique essentielle 7 :
Réussi
Caractéristique essentielle 8 :
Réussi
Support
Si vous avez des commentaires, des suggestions ou
besoin d'aide, veuillez visiter www.nedis.com/support
Contact
NEDIS BV, De Tweeling 28, 5215 MC‘s-Hertogenbosch,
Pays-Bas

Italiano
18
WIFIDS10xx
Rilevatore di fumo e calore Wi-Fi
Descrizione (g. A)
Il rilevatore di fumo e calore è un dispositivo utilizzato
per rilevare la presenza di fumo e calore. Il dispositivo
non rileva la presenza di gas. Questo dispositivo è adatto
solo per uso in ambienti interni. Se il dispositivo rileva la
presenza di fumo o calore, verrà emesso un allarme
acustico e l’indicatore LED lampeggerà in rosso in modo
continuo no all’eliminazione del problema.
1. Pulsante di test
2. Indicatore LED
3. Sirena
4. Bocca d’ingresso del fumo
5. Piastra di montaggio
Sicurezza
• Leggere il manuale con attenzione prima dell'uso.
Conservare il manuale per riferimenti futuri.
• Utilizzare il dispositivo solo per gli scopi previsti. Non
utilizzare il dispositivo per scopi diversi da quelli
descritti nel manuale.
• Non utilizzare il dispositivo se presenta parti
difettose. Se il dispositivo è danneggiato o difettoso,
sostituirlo immediatamente.
• Il dispositivo ha una durata limitata. Sostituire il
dispositivo dopo 10 anni dalla data di acquisto.
Scrivere la data di acquisto sul manuale per un
riferimento futuro.
Sicurezza relativa alla batteria
• Utilizzare esclusivamente le batterie indicate nel
manuale.
• Non mischiare batterie nuove e vecchie.
• Non utilizzare batterie di tipi o marchi diversi.
• Non installare le batterie invertendo la polarità.
• Non mettere in corto circuito o disassemblare le batterie.
• Non esporre le batterie all'acqua.
• Non esporre le batterie a amme o calore eccessivo.
• Le batterie sono soggette a perdite quando sono
completamente scariche. Per evitare di danneggiare
il prodotto, rimuovere le batterie quando viene
lasciato incustodito per periodi prolungati.
• Nel caso di contatto del liquido delle batterie con
pelle o indumenti, sciacquare immediatamente con
acqua fresca.
Installazione (g. B)
Attenzione!
• Non utilizzare il dispositivo all'aperto.
• Non esporre il dispositivo ad acqua o umidità.
• Installare il dispositivo fuori della portata dei
bambini.
• Installare almeno un dispositivo ad ogni piano.
Installare preferibilmente un dispositivo in ogni area
raccomandata.
• Non installare il dispositivo in bagni, toilette o altre
stanze dove potrebbe essere attivato dal vapore o
dalla condensa. Installare i dispositivi ad almeno 3
metri di distanza da tali locali.
• Non installare il dispositivo in locali in cui hanno
luogo regolarmente normali combustioni.
• Non installare il dispositivo in ambienti con
temperature inferiori a 5 °C o superiori 37 °C.
• Non installare il dispositivo in ambienti polverosi o
sporchi.
• Non installare il dispositivo vicino a porte e nestre.
• Non installare il dispositivo vicino a radiatori o prese
d'aria nelle pareti o sui sotti.
• Non installare il dispositivo dietro tende o mobili.
• Per evitare malfunzionamenti, non utilizzare batterie
ricaricabili.
• Non pitturare il dispositivo.
1 2 3
4
5

Italiano
19
1. Scaricare, installare e avviare l'app "Nedis SmartLife"
da Apple App Store o Google Play Store sul proprio
dispositivo mobile.
2. Creare un nuovo account o accedere all'account
esistente.
3. Toccare "+" per aggiungere il dispositivo.
4. Selezionare il prodotto corretto dall’elenco.
5. Inserire le batterie (2x AA, alcaline) nel vano batterie.
6. Premere il pulsante di test per 3 volte in 2 secondi.
7. Quando l’indicatore LED è acceso, confermare
nell’app.
8. Confermare rete e password Wi-Fi.
9. Immettere il nome del dispositivo.
10. Montare il dispositivo sulla piastra di montaggio.
Vedere le illustrazioni per il corretto posizionamento
del dispositivo.
11. Test dell'allarme. Fare riferimento alla sezione
"Testing the alarm".
Posizioni consigliate per l'installazione *)
Area Si No
Soggiorno X
Stanza da pranzo X
Cucina X
Bagno / toilette X
Stanza da letto X
Corridoio X
Attico X
Seminterrato X
Garage X
Sala caldaia X
*) I requisiti di installazione possono dierire in base alla
regione. Contattare le autorità locali per eventuali
requisiti aggiuntivi.
Uso
Indicatore LED
Funzionamento
normale
L'indicatore LED
lampeggerà in
rosso una volta
ogni 40 secondi.
---
Rilevamento di
fumo/calore
Viene emesso
l’allarme acustico
e l'indicatore
LED lampeggia
in rosso
costantemente
nché il fumo o il
calore non sono
stati eliminati.
Eliminare il fumo o il
calore presenti.
Allarme di batteria
scarica
Viene emesso
l’allarme acustico
breve ogni
40 secondi e
l'indicatore LED
lampeggia.
Eseguire una di queste
operazioni:
• Sostituire la batteria.
• Premere il pulsante
di test per mettere in
pausa l’allarme per 8
ore.
Malfunzionamento
L’allarme emette
un bip breve
ogni 40 secondi.
Sostituire il
dispositivo.
L’allarme non
suona durante
il test
Rimuovere
l’allarme
dalla staa e
controllare
se la batteria
è collegata
correttamente al
connettore della
batteria.
Se la batteria
è collegata
correttamente e
l’allarme fumo non
suona durante il test,
sostituire il dispositivo.
L’allarme suona in
modo diverso dal
normale
L’allarme
funziona
correttamente.
Si prega di pulire
l’allarme secondo
la sezione Pulizia e
manutenzione.

20
Italiano
Test dell'allarme
L'allarme deve essere testato ogni settimana per
garantirne il corretto funzionamento. Se il test
dell’allarme fallisce, sostituire il rilevatore di fumo.
• Premere e tenere premuto il pulsante di test per 5
secondi. L'allarme suona.
• Rilasciare il pulsante di test.
Funzione Silenziamento
Se l’allarme suona erroneamente a causa dei cibi in
cottura, è possibile mettere in pausa l’allarme per 10
minuti premendo il pulsante di test. L’indicatore LED
lampeggia ogni 8 secondi. Individuare l’origine
dell’allarme prima di utilizzare la funzione di
silenziamento per vericare di non essere in una
situazione di rischio per la vita.
Pulizia e manutenzione
Attenzione!
• Non utilizzare solventi detergenti o abrasivi.
• Non pulire l'interno del dispositivo.
• Non cercare di riparare il dispositivo. Se il dispositivo
non funziona correttamente, sostituirlo con uno
nuovo.
• Sostituire le batterie immediatamente quando il
dispositivo segnala l’avviso di batteria scarica.
Utilizzare esclusivamente le batterie indicate nel
manuale.
• Pulire l'esterno del dispositivo almeno una volta al
mese. Utilizzare un aspirapolvere con la bocchetta a
spazzola per pulire l'esterno del dispositivo.
Dati tecnici
Batteria
Tipo di batteria 2x AA alcaline
Tensione nominale 1,5 V CC
Batterie raccomandate
Energize: E91
Gold Peak Group: GP15A LR6
Raymax: LR6
Wi-Fi
Frequenza wireless 2,4 GHz
Corrente di trasmissione
wireless < 450 mA
Distanza wireless > 30 m
Potenza di trasmissione
massima complessiva 17 dBm
Gamma di frequenze 2,412 ~ 2,484 MHz
16
0359
0359-CPR-00622
EN 14604:2005/AC:2008
GS558D
Sicurezza antincendio e
installazione negli edici
Caratteristiche essenziali 1: OK
Caratteristiche essenziali 2: OK
Caratteristiche essenziali 3: OK
Caratteristiche essenziali 4: OK
Caratteristiche essenziali 5: OK
Caratteristiche essenziali 6: OK
Caratteristiche essenziali 7: OK
Caratteristiche essenziali 8: OK
Assistenza
Per ulteriore assistenza o per fornire commenti o
suggerimenti visitare il sito www.nedis.com/support
Contatti
NEDIS BV, De Tweeling 28, 5215 MC‘s-Hertogenbosch,
Paesi Bassi
This manual suits for next models
1
Table of contents
Languages:
Other nedis Smoke Alarm manuals

nedis
nedis DTCTH10WT User manual

nedis
nedis DTCTSC20 User manual

nedis
nedis DTCTSL50WT User manual

nedis
nedis SEC-SA10 User manual

nedis
nedis WIFIDS20WT User manual

nedis
nedis WIFIDS10 Series User manual

nedis
nedis DTCTS20WT User manual

nedis
nedis DTCTS10WT User manual

nedis
nedis WIFIDS10 Serries User manual

nedis
nedis DTCTSC10WT User manual